
20 Accent Walls for Nursery Ideas for Playful Charm
A splash of color or a creative pattern on an accent wall can instantly breathe life into a nursery, making it a delightful space for both parents and little ones. These walls are popular because they add personality, charm, and a sense of fun without overwhelming the room’s overall design.
In this article, you’ll find a variety of playful and inspiring ideas to transform an ordinary nursery into a magical haven. From whimsical murals to textured finishes, there’s something to suit every style and theme, helping you craft a space that’s as joyful as your little one’s personality.
1. Whimsical Cloud Mural in Soft Pastels

Ever wish your nursery felt more like a dreamy cloud kingdom? Sometimes, plain walls just don’t inspire the imagination or create that cozy, whimsical vibe you crave. Parents and caretakers want a space that sparks joy and wonder, not just a neutral backdrop. Creating a playful, dreamy atmosphere can turn an ordinary room into a magical retreat for your little one.
Recommended Products to replicate this idea
| # | Preview | Product | |
|---|---|---|---|
| 1 |

|
Wall Mural Rainbow Clouds Blue with Golden Background Stock Pictures Royalty Peel and Stick... | Check Latest Price |
| # | Preview | Product | |
|---|---|---|---|
| 1 |

|
EVOLVE Paint & Primer: Environment-friendly, Low Sheen with One-coat Coverage for Interior &... | Check Latest Price |
Imagine a soft wall painted with fluffy clouds in gentle pastel shades—pinks, blues, and creams—floating across a serene sky. The texture of the clouds feels almost tangible, as if they might drift away at any moment. Soft sunlight filters through a nearby window, casting a warm glow that enhances the dreamy scene. The colors soothe both the eyes and the mind, making the space feel peaceful yet playful.
You can adapt this concept with decals for a quick fix or go all out with hand-painted murals for a personal touch. Changing color schemes for different seasons or themes is easy—bright pastels for spring, muted shades for winter. For smaller rooms, painting a single accent wall with clouds works wonders; larger nurseries can feature a full sky scene. Incorporate cloud-shaped shelving or soft textiles to complement the mural.
Start by choosing your favorite pastel shades and decide whether you want decals or a hand-painted scene. For decals, purchase pre-made cloud stickers or create custom ones with adhesive vinyl. If painting, sketch your clouds lightly with a pencil first, then use soft brushes to fill in with diluted paints for a cloud-like softness. Use stencils to ensure uniformity, or freehand for a more whimsical look. Seal the mural with a matte clear coat to keep it pristine. No special lighting needed—natural light and soft shadows do the magic.
Add playful touches like tiny star decals or a moon in the corner. Incorporate textured textiles such as a plush cloud-shaped pillow or a cozy throw blanket with cloud patterns. Personalize by painting your child’s initials as part of the clouds or integrating their favorite colors. Use glow-in-the-dark paint for stars or accents to make the scene magical at night. This way, the mural becomes a cherished, evolving centerpiece.
A cloud mural in pastels creates a calming, whimsical environment that nurtures creativity and relaxation. It transforms the nursery into a dreamy retreat your child will love growing up in. Plus, it’s a project that’s DIY-friendly, so you can personalize it without breaking the bank. Embrace the magic—your nursery deserves a little cloud nine!
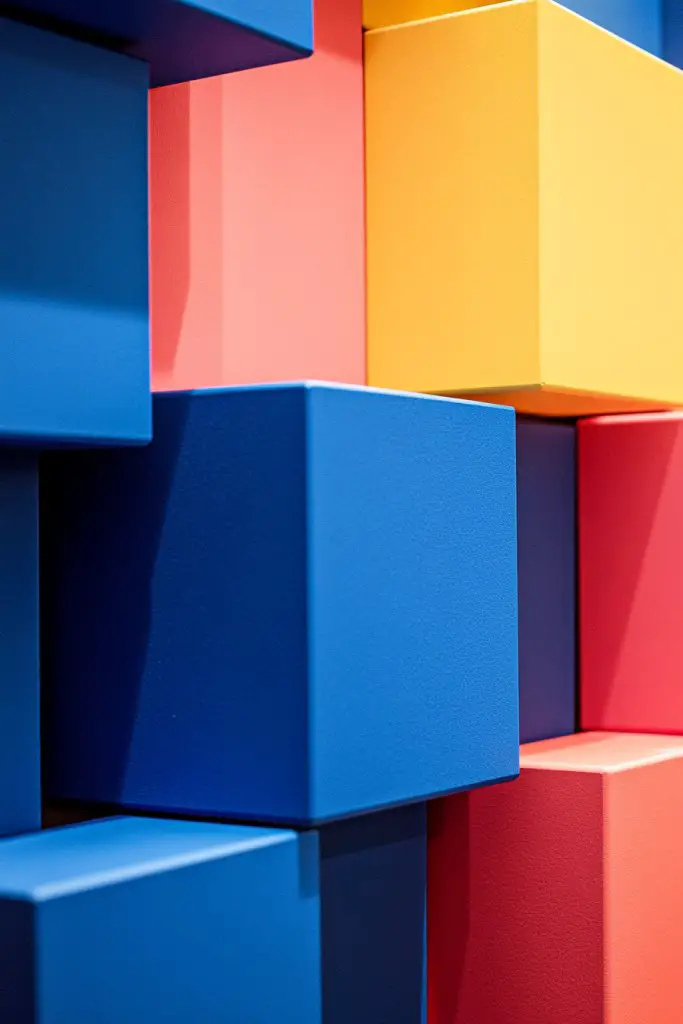
2. Bold Geometric Pattern in Bright Colors

Tired of dull, monotonous walls that don’t excite your child’s imagination? Bright, bold geometric patterns can energize the space and add a modern twist to any nursery. They also serve as a stimulating visual environment that encourages curiosity and cognitive development. If you want a statement wall that’s both playful and contemporary, geometric patterns are the way to go.
Recommended Products to replicate this idea
| # | Preview | Product | |
|---|---|---|---|
| 1 |

|
RoomMates Bluey Family and Friends Peel and Stick Wall Decals, RMK5457SCS | Check Latest Price |
| # | Preview | Product | |
|---|---|---|---|
| 1 |

|
Large Framed Black and White Neutral Abstract Wall Art for Living Room, 3 Piece Boho Canvas Prints... | Check Latest Price |
Picture a wall divided into vibrant triangles, squares, and diamonds in eye-catching colors like fiery reds, sunny yellows, and cool blues. Sharp lines and crisp edges create a dynamic rhythm that pulls your eye across the space. The bold shapes contrast beautifully with neutral furniture, making the colors pop even more. As natural light hits the wall, the vivid hues seem to come alive, creating a lively atmosphere.
You can customize the pattern with different color schemes to match your decor—think pastel shades for a softer look or metallic accents for a luxe feel. Mixing shapes like circles and triangles adds variety, while sticking to a monochrome palette keeps it sleek. For small nurseries, a single accent wall with a geometric mural makes a big impact without overwhelming. Using painter’s tape makes the process precise and straightforward, even for beginners.
Begin by selecting your color palette and sketching your design with a pencil. Use painter’s tape to create sharp lines for each shape—measure carefully to maintain symmetry. Fill in each section with high-quality, quick-drying paint, taking your time to keep edges crisp. For extra durability, seal the finished wall with a clear matte topcoat. To keep things lively, incorporate some metallic or glitter paints in select areas for added sparkle. No fancy tools needed—just patience and a steady hand.
Add a custom touch by painting your child’s initials within a geometric shape or creating a pattern that spells out their name. Mix in textured elements like a soft fabric or a faux 3D effect with layered shapes. Frame parts of the mural with simple wooden trims or use glow-in-the-dark paints for a surprise at night. You can also extend the pattern onto furniture or textiles for a cohesive look that ties the room together.
Bright geometric patterns turn a plain wall into an energetic focal point that sparks creativity. They’re perfect for parents who love bold design and want a nursery that feels fresh and modern. Plus, this DIY project is highly customizable, so you can adapt it to any style or color preference. Your little one will love the vibrant environment where every day feels like an adventure!
3. Striped Wall with Mixed Widths for Dynamic Energy
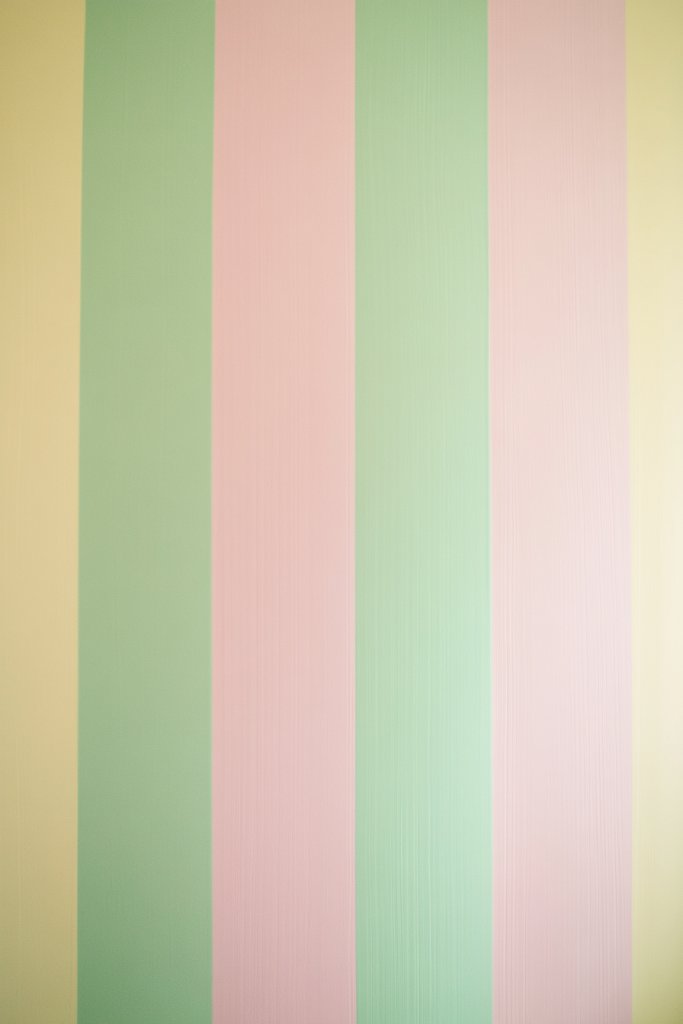
Does your nursery feel a bit flat or uninspired? Stripes in varying widths can inject rhythm and movement into the space, making it feel lively and engaging. This classic design idea is surprisingly versatile, working with both modern and traditional decor styles. Plus, it’s a quick way to add personality without a full overhaul.
Recommended Products to replicate this idea
| # | Preview | Product | |
|---|---|---|---|
| 1 |

|
Qianglive 17.3”x120” Black and White Striped Wallpaper Peel and Stick Wallpaper Self-Adhesive... | Check Latest Price |
| # | Preview | Product | |
|---|---|---|---|
| 1 |
|
Sherwin Williams Colors collection Deck Complete Paint Colors | Check Latest Price |
Imagine a wall striped with bold, wide bands of cheerful colors—perhaps a soft yellow paired with a deep teal or blush pink with charcoal. The stripes run horizontally or vertically, creating a sense of expansion or height, respectively. The contrast in widths adds visual interest and guides your gaze across the room in a playful way. When sunlight hits the stripes, the colors seem to dance, making the room feel vibrant and welcoming.
Choose colors that match your overall theme—neutral tones for a subtle effect or bright hues for maximum impact. For smaller spaces, thinner stripes can make the room appear larger, while bold, wide stripes bring a cozy feel to larger rooms. You can also experiment with metallic or iridescent paints to add a touch of shimmer. For a softer look, use gentle pastel shades in different widths; for a bold statement, go for highly saturated colors.
Start by measuring your wall and sketching your stripe pattern with a level and pencil. Use painter’s tape to mark off each stripe, ensuring the widths are varied but proportionate. Carefully fill in each section with matching paint, removing the tape before it dries to keep edges sharp. For added durability, seal the design with a clear topcoat. Consider using a sponge to blend edges slightly for a softer, more organic look if desired. This project requires patience but yields a striking result.
Personalize by adding your child’s name in bold lettering within a stripe or incorporate themed motifs like stars or hearts in certain bands. You can extend the stripes onto furniture or textiles for a cohesive room design. Incorporate textured paint or raised patterns in some stripes for tactile interest. Change out the color palette seasonally or as your child’s preferences evolve to keep the space fresh and engaging.
Striped walls with mixed widths create a playful yet sophisticated environment perfect for any nursery. They’re easy to customize and can be as subtle or bold as you like. Plus, they add a sense of movement that can energize the entire room. Ready to stripe up your nursery and add some lively rhythm? It’s easier than you think—and totally worth the effort!
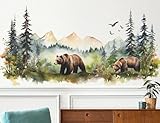
4. Nature-Inspired Forest Scene with Silhouettes
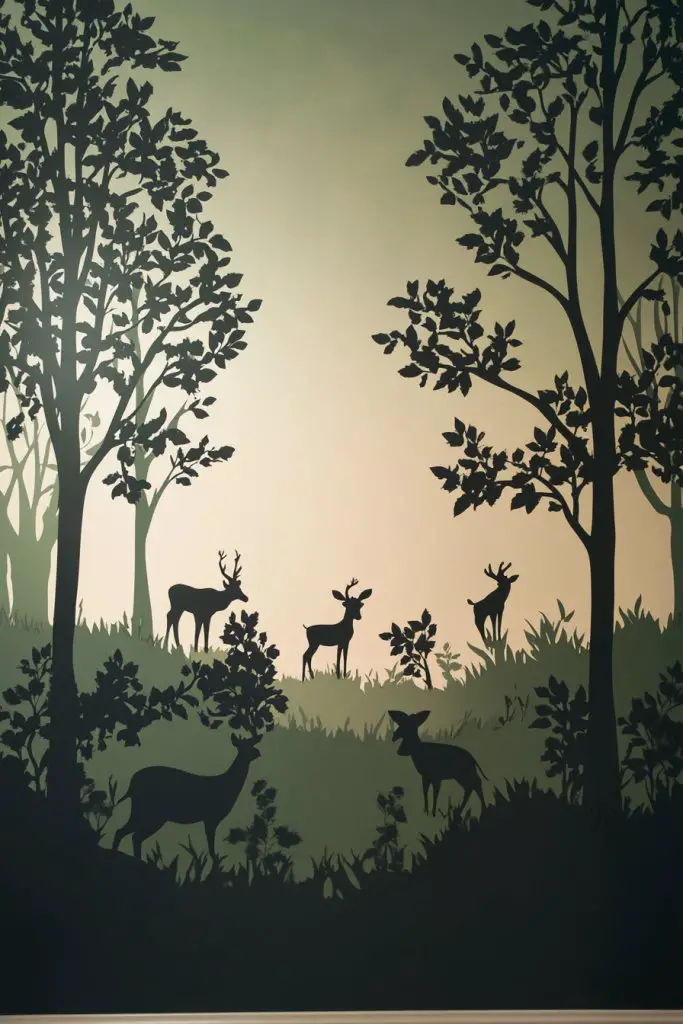
Ever wanted a nursery that feels like an enchanted forest? A nature-inspired scene can bring a calming, whimsical vibe that sparks your child’s imagination. It’s a perfect way to introduce the beauty of the outdoors without leaving the house. Plus, a forest silhouette can be both playful and sophisticated, fitting various decor styles.
Recommended Products to replicate this idea
| # | Preview | Product | |
|---|---|---|---|
| 1 |
|
RAINBOW WSK Large Jungle Animals Wall Decals Forest Tree Wall Decal Peel and Stick Woodland Bear Fox... | Check Latest Price |
| # | Preview | Product | |
|---|---|---|---|
| 1 |

|
ForJoy Colorful Giraffe Decor Wall Art Painting for Children's room Bedroom Living room Decor Ready... | Check Latest Price |
Visualize a wall adorned with dark silhouettes of trees, bushes, and woodland animals against a soft, muted background—think blush, mint, or sky blue. The layered trees and animals create depth and intrigue, inviting your child to explore an entire miniature forest. Subtle gradients in the background mimic dawn or dusk, enhancing the magical feel. Shadows and textures add tactile richness, making the scene immersive and soothing.
Adjust the scene with different animals or plant types to match your child’s interests. Change the background color to reflect seasons—warm tones for autumn, cool for winter. For smaller rooms, focus on a single large tree silhouette; larger spaces can host an expansive forest scene. Incorporate textured elements like faux bark or soft moss for a tactile dimension. Frame the scene with a mural border or extend it onto furniture for a cohesive look.
Begin by designing or sourcing a forest silhouette stencil or decals. Use dark paint or adhesive vinyl for clean, crisp edges. Paint the background in a soft gradient using sponges and blending brushes for a natural transition. Apply the silhouettes carefully with brushes or rollers, layering to add depth. Finish with a matte topcoat to protect the mural. Lighting, such as soft wall sconces or indirect LED strips, can highlight the scene without overpowering it.
Add tiny details like star-shaped glow-in-the-dark stickers or subtle moon and cloud accents. Incorporate textured fabrics like plush cushions or a faux moss rug to complement the forest theme. Personalize with your child’s name carved into a wooden sign or painted onto a tree trunk. You could also add small, movable woodland figurines for interactive play. This scene can evolve as your child grows, maintaining its charm.
A forest scene nurtures curiosity and a love for nature from a young age. It creates a peaceful sanctuary that encourages storytelling and exploration. Plus, it’s a DIY project that can be customized endlessly, making it a rewarding experience. Transform your nursery into a magical woodland—nature’s wonderland right at home!
5. Color Block Wall for Modern Playfulness
Looking for a sleek, modern way to add color and personality to your nursery? Color blocking offers a bold, minimalist approach that’s surprisingly playful. It’s perfect for parents who want a vibrant, contemporary space without overwhelming the senses. Plus, it’s an easy DIY project that can instantly elevate the room’s style.
Recommended Products to replicate this idea
| # | Preview | Product | |
|---|---|---|---|
| 1 |

|
Dxlam Palette Wooden Paint Palette, 2PCS Painting Palette Paint Tray Palettes for Acrylic Watercolor... | Check Latest Price |
| # | Preview | Product | |
|---|---|---|---|
| 1 |

|
4 Rolls Premium Painters Tape, Blue Tape, Masking Tape, Paint Tape for Multi-Purpose, Painting,... | Check Latest Price |
Picture a clean wall divided into large, geometric blocks of contrasting colors—perhaps a soft gray with vibrant coral or mint green with navy. The sharp edges and clear lines create a crisp, modern aesthetic. When the room fills with natural light, the blocks seem to glow, adding depth and dimension. The simplicity of the design allows other elements, like furniture or textiles, to stand out against the colorful backdrop.
You can customize the palette to match your decor—muted tones for a subtle look or bright shades for maximum impact. Vertical blocks can make the room feel taller, while horizontal blocks add width. Use painter’s tape for precise lines, or create a more organic look by blending colors at the edges. You could also incorporate metallic or textured paints for extra flair. This style adapts beautifully to both small and large spaces.
Start by sketching out your block design with a ruler and pencil. Tape off each section carefully, ensuring clean, straight edges. Fill each block with high-quality, quick-drying paint—use small rollers or brushes for precision. Remove the tape before the paint dries completely to avoid smudging. Seal the finished wall with a matte or semi-gloss topcoat to protect the design. Consider adding a personal touch by painting a small motif or your child’s name within one of the blocks.
Incorporate personalized elements like initials or favorite symbols within the color blocks. Use textured paints or metallic finishes for a layered effect. Extend the color scheme onto other decor elements, such as curtains or a rug, for harmony. Change the color blocks seasonally or as tastes evolve to keep the room feeling fresh and lively. This versatile style grows with your child and adapts to any decor theme.
A color block wall transforms a plain space into a vibrant, modern retreat that encourages creativity. It’s an excellent choice for parents who want a stylish yet playful nursery. Plus, it’s easy to customize and update as your child’s preferences change. Dive into this project with confidence—you’ll love the fresh, energetic vibe it creates!
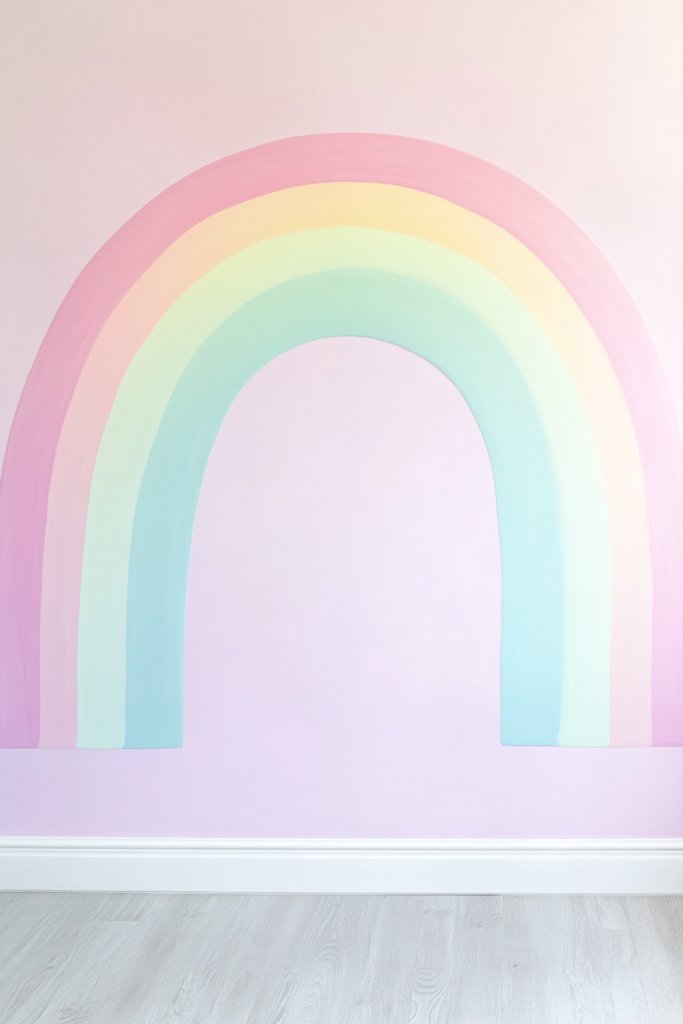
6. Whimsical Rainbow Arch with Soft Hues
Want a nursery accent that’s cheerful, bright, and full of hope? A rainbow arch can bring joy and a splash of color that lifts any space. It’s a timeless symbol of positivity and wonder, perfect for inspiring your little one every day. Plus, it adds a playful focal point that’s both charming and versatile.
Recommended Products to replicate this idea
| # | Preview | Product | |
|---|---|---|---|
| 1 |

|
55"x63" Large Rainbow Wall Stickers, Mural Watercolor Half Rainbow Wall Decals Peel and Stick Vinyl... | Check Latest Price |
| # | Preview | Product | |
|---|---|---|---|
| 1 |
|
Pennclys Clouds Wall Art Decor Over The Bed Sky Canvas Wall Art Abstract Minimalist Clouds Prints... | Check Latest Price |
Imagine a gentle rainbow painted across the wall in soft pastel shades—pinks, yellows, blues, and lavenders—forming a perfect arc. The colors blend seamlessly, creating a soothing yet lively scene. Underneath, you might add clouds, stars, or sun rays for extra whimsy. The soft hues complement neutral furniture, making the entire room feel warm and inviting. When sunlight filters through, the pastel rainbow seems to glow with a gentle magic.
Adjust the rainbow’s size or color palette to suit your style—vibrant or muted, bold or subtle. For a modern look, use geometric shapes and clean lines; for a more organic feel, keep the strokes soft and flowing. Incorporate glitter or metallic paints for a touch of sparkle. For small nurseries, a small rainbow over the crib or changing area is enough; larger rooms can feature a sweeping, mural-style rainbow.
Begin by sketching your rainbow lightly with a pencil, then outline with painter’s tape for crisp edges. Use soft, high-quality brushes or sponges to blend the colors smoothly. Layer the shades gradually, allowing each to dry before adding the next. Add fluffy clouds at each end of the rainbow using white paint or textured appliqués. Seal the mural with a clear matte finish for protection. Optional: add glow-in-the-dark paint to make it magical at night.
Personalize with your child’s name or favorite motifs inscribed within or around the rainbow. Incorporate textured elements like fabric or foam to add tactile dimension. Frame parts of the rainbow with decorative trims or extend the theme onto furniture accessories. Change the color scheme as your child grows or as seasons change to keep the room lively. It’s a versatile design that evolves beautifully.
A pastel rainbow arch creates a cheerful, nurturing environment that promotes happiness and creativity. It’s easy to customize and can be as simple or elaborate as you desire. This project offers a wonderful opportunity to add a personal touch while making a bold style statement. Brighten your nursery with a symbol of hope and joy—your little one will love it!
7. Vintage Wallpaper Accent Wall with Playful Prints
Looking to add a touch of nostalgia and charm to your nursery? Vintage-inspired wallpaper with playful prints offers a perfect blend of retro elegance and whimsy. It can create a warm, inviting atmosphere that feels both timeless and fun. Plus, it’s an easy way to introduce pattern and texture into the room.
Recommended Products to replicate this idea
| # | Preview | Product | |
|---|---|---|---|
| 1 |

|
Laatse Vintage Wallpaper Peel and Stick Black Floral Wallpaper 17.5'' x 393'' Gold Leaf Contact... | Check Latest Price |
| # | Preview | Product | |
|---|---|---|---|
| 1 |
|
Zinsser 122 SureGrip Heavy Duty Wallcovering Adhesive, Quart | Check Latest Price |
Picture a wall covered in vintage wallpaper adorned with tiny stars, polka dots, or adorable animals—think soft pastel backgrounds with cute motifs. The pattern adds depth and interest without overwhelming the space. The wallpaper’s subtle sheen catches the light, giving the room a cozy glow. Pair it with neutral or pastel-colored furniture to let the wallpaper be the star of the show. It instantly sets a playful yet sophisticated tone.
Select wallpapers with patterns that match your theme—classic floral, whimsical animals, or geometric prints. Use bold patterns for an accent wall or go for a more subdued design for full-room coverage. Combine with vintage or shabby chic furniture for a cohesive look. For temporary options, peel-and-stick wallpapers make changes easy and damage-free. Seasonal updates can be achieved with removable wall decals or borders that complement the vintage theme.
Start by preparing your wall—clean and smooth surfaces work best. Carefully measure and mark the placement of your wallpaper to ensure alignment. Apply with a wallpaper brush or roller, smoothing out bubbles as you go. Use a sharp blade to trim excess edges for a clean finish. For added durability, seal with a clear protective coating suitable for wallpaper. Consider lighting that enhances the pattern, such as wall sconces or soft spotlights.
Add personalized touches by framing favorite prints or illustrations on the wallpaper. Incorporate matching textiles, such as curtains or bedding, in the same color palette. Small, vintage-inspired accessories like a soft plush toy or a decorative clock can complement the theme. Change out accessories as your child grows to keep the room feeling fresh and engaging. This approach makes the nursery feel warm, nostalgic, and uniquely yours.
Vintage wallpaper with playful prints offers a charming, timeless aesthetic that ages gracefully. It’s an excellent way for parents to showcase their design style and create a memorable space. Plus, it’s simple to install and replace, making it a practical choice for evolving tastes. Enjoy creating a nursery that’s full of personality and history—your child will love the cozy, nostalgic vibe.
8. Hand-Painted Mural of a Fantasy Castle or Hot Air Balloons
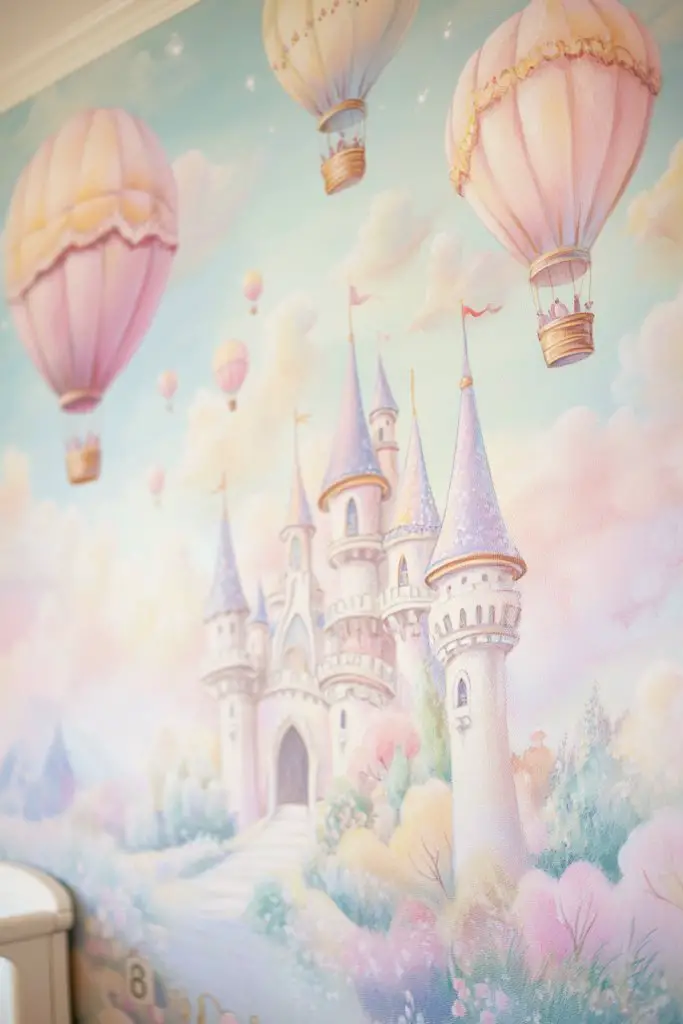
Ever dreamed of transforming your nursery into a fairytale world? Hand-painted murals of castles or hot air balloons can make that dream come true. They evoke wonder and ignite your child’s imagination, turning a plain wall into a storybook scene. Plus, it’s an opportunity to create a truly personalized masterpiece.
Recommended Products to replicate this idea
| # | Preview | Product | |
|---|---|---|---|
| 1 |

|
2 Stickers Mouse Reading Book in Wall 3D Sticker Decal Funny 2 Pack by Lumiere Tech | Check Latest Price |
| # | Preview | Product | |
|---|---|---|---|
| 1 |

|
Crayola Create 'N Carry Travel Art Set for Kids (75pcs), 2-in-1 Lap Desk & Carrying Case, Holiday... | Check Latest Price |
Visualize a vibrant, colorful mural depicting a whimsical castle with towers reaching towards a sky filled with floating hot air balloons. Bright colors and soft shading create a magical atmosphere that feels alive and inviting. The scene extends across the wall, inviting your child to step into a world of adventure. Clouds, birds, and tiny details add layers of storytelling, making the space enchanting.
Choose themes that resonate with your child’s interests—fairy tales, space adventures, or underwater worlds. Use bold or pastel colors depending on your style. For a less detailed approach, create a simple scene with large shapes and minimal shading; for a more detailed look, incorporate fine brushwork and gradients. You can also extend the scene onto furniture or ceiling to unify the space. Seasonal or evolving themes keep the mural fresh over time.
Start by sketching your design with light pencil lines directly onto the wall. Use high-quality acrylic or latex paints suitable for murals. Work from background to foreground, layering colors and shading for depth. Use fine brushes for details like stars or characters. Seal the finished mural with a protective matte or satin topcoat. For added durability, consider professional sealing or varnishing. This project requires patience but results in a magical, one-of-a-kind feature.
Add personalized touches like your child’s name integrated into the scene or specific favorite characters. Incorporate glow-in-the-dark paint for stars or magical elements that shine at night. Use textured paints or mixed media for tactile interest—think glitter, fabric, or metallic accents. Frame the mural with decorative borders or extend motifs onto furniture for a cohesive look. It becomes a treasured art piece celebrating your child’s imagination.
A mural of a fantasy castle or balloons turns the nursery into a magical kingdom that fuels dreams and creativity. It’s a rewarding DIY project that allows for complete customization. Plus, it creates a special environment where stories can come alive. Your child will love waking up to a space full of wonder and adventure—what’s not to love?
9. Textured Wall with 3D Wall Panels or Wainscoting
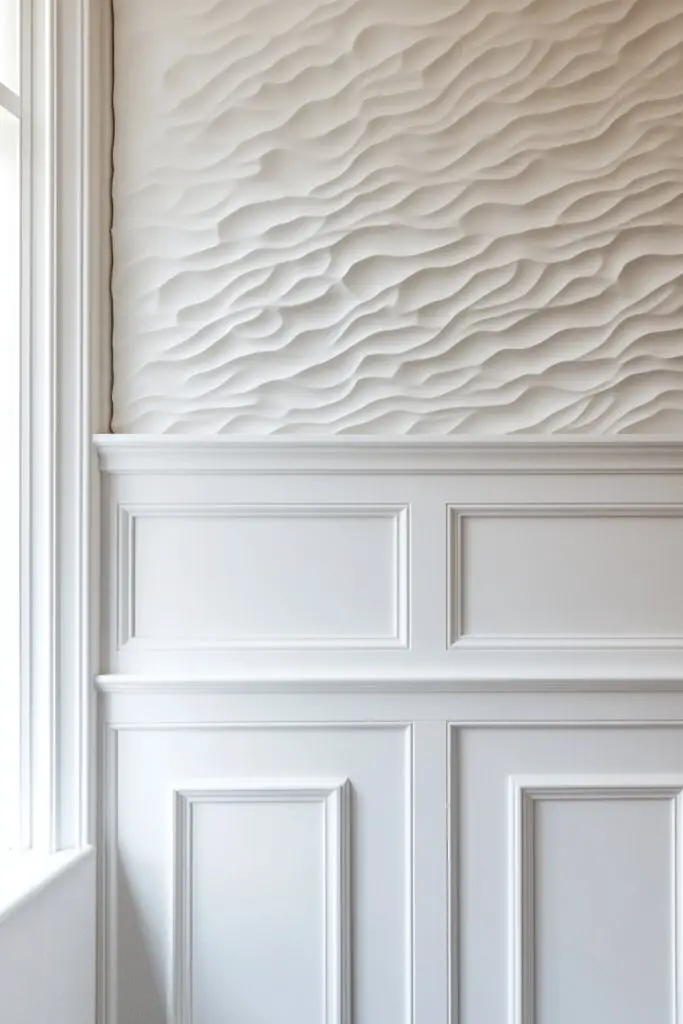
Tired of flat, boring walls that don’t add personality? Textured wall panels or wainscoting can bring depth and dimension to your nursery with minimal effort. They add a tactile element that’s both stylish and fun, making the space feel more inviting. Plus, they hide imperfections and give a polished finish.
Recommended Products to replicate this idea
| # | Preview | Product | |
|---|---|---|---|
| 1 |

|
Art3d Premade Board and Batten Paintable Wainscoting Kit, MDF Accent Wall Panel for Kitchen Bedroom... | Check Latest Price |
| # | Preview | Product | |
|---|---|---|---|
| 1 |

|
Ekena Millwork - WPKP104BBD, Deluxe Beadboard, 8' Length PVC Wainscoting Kit, 56" Height, White | Check Latest Price |
Picture a wall covered with playful, geometric 3D panels or classic beadboard wainscoting painted in cheerful colors. The textured surface creates shadows and highlights, giving the room a lively, dynamic feel. It adds architectural interest without overwhelming the space. Soft light cast across the textures enhances their visual appeal, making the wall a focal point. It’s a subtle way to introduce pattern and depth.
Choose from materials like PVC, MDF, or wood for different budgets and aesthetics. For a modern look, opt for sleek, angular panels; for a cozy, cottage vibe, classic beadboard suits best. Paint the panels in bold hues or keep them neutral with a pop of color on the trim. Extend the texture onto ceiling beams or furniture for a cohesive design. It adapts well to both small and large nurseries.
Start by measuring and marking your chosen panel layout. Attach the panels securely with adhesive or nails, ensuring even spacing and alignment. Paint or finish the panels before installation for a cleaner look. Use a level and spacers for uniformity. Seal the surface with a clear topcoat if necessary, especially for wooden panels. Add decorative molding or trim to accentuate the textured effect. Finish with soft, ambient lighting to highlight the textures.
Customize by painting patterns or illustrations on the panels, or adding decals that complement the texture. Incorporate shelf brackets or small ledges for displaying toys or books, while maintaining the textured backdrop. Use contrasting colors to emphasize the pattern or keep it monochrome for a sleek effect. This textured feature can evolve with your child’s tastes, maintaining its charm.
Textured walls add a sophisticated yet playful element to any nursery. They’re a smart way to introduce depth and personality without clutter. Plus, they’re easy to update with new paint or accents over time. Your nursery will feel more refined and inviting—a space where your child can grow and explore in comfort.
10. Abstract Art-Inspired Splash of Color
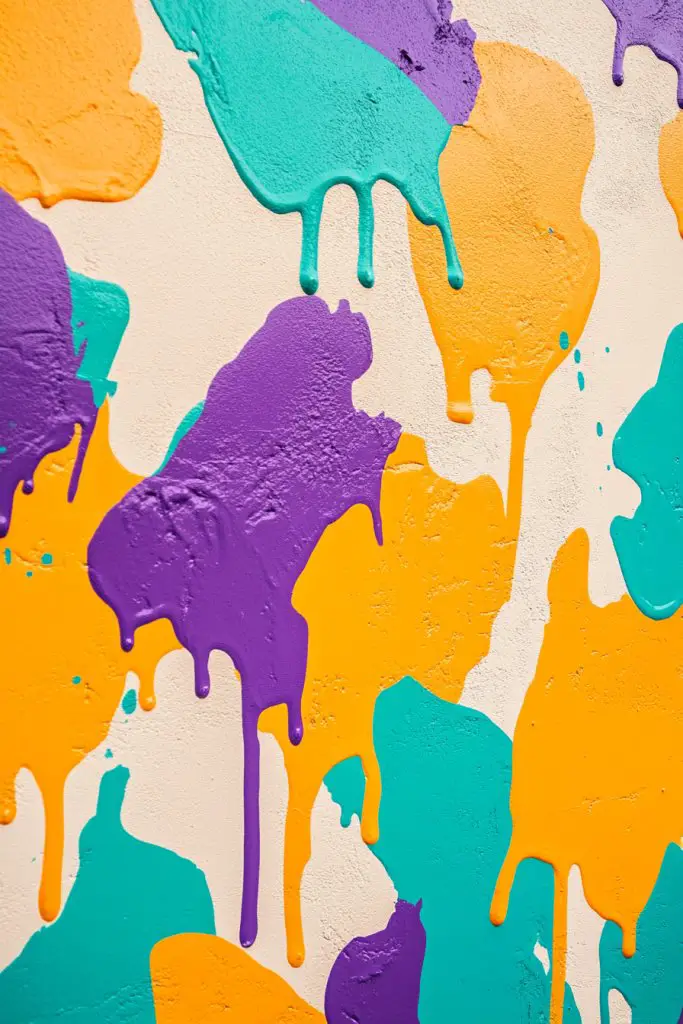
Looking for a modern, energetic way to brighten up your nursery? An abstract splash of color can introduce liveliness and personality without the need for detailed murals or patterns. It’s perfect for parents who want a vibrant, artistic vibe that feels fresh and spontaneous. Plus, it’s a fun DIY project that can be as bold or subtle as you like.
Recommended Products to replicate this idea
| # | Preview | Product | |
|---|---|---|---|
| 1 |
|
2 Stickers Mouse Reading Book in Wall 3D Sticker Decal Funny 2 Pack by Lumiere Tech | Check Latest Price |
| # | Preview | Product | |
|---|---|---|---|
| 1 |

|
Rhibak Paint Roller Kit with Extension Pole, 27 Piece Set, 2 to 4 Ft Pole, 4"9" Paint Rollers, Paint... | Check Latest Price |
Imagine a wall with bold, sweeping brush strokes or watercolor-like blots in lively hues—think oranges, blues, and pinks blending seamlessly. The abstract design creates a sense of movement and energy, making the room feel alive. The irregular shapes and spontaneous application evoke creativity and freedom. When illuminated by natural light, the colors seem to dance across the wall, transforming the space into a dynamic canvas.
Opt for a monochrome palette for a more subdued, sophisticated look or go full spectrum for maximum impact. Use different tools—brushes, sponges, or even your fingers—to create texture and variation. Incorporate metallic or glow-in-the-dark paints for added surprise. This style works well with minimal furniture, allowing the wall to be the centerpiece. It’s also easily adaptable to different room sizes and styles.
Start by choosing your colors and practicing your techniques on paper or small canvases. Apply high-quality, washable paints directly onto a primed wall using broad brushes or sponges. Layer and blend colors while wet to achieve fluid effects. Use painter’s tape for clean edges if desired, or let the paint flow freely for a more chaotic look. Finish with a clear protective sealant to preserve your artwork. Regular touch-ups keep the splash looking fresh and lively.
Add personal touches by incorporating your child’s favorite colors or shapes into the abstract design. Use textured paints or metallic finishes to add depth. Frame or highlight certain areas with contrasting hues or patterns. Change the splash over time—adding new strokes or blending different colors—to keep the artwork fresh and engaging. It’s a creative expression that evolves alongside your child’s interests.
An abstract splash of color brings a vibrant, playful energy that can inspire creativity and joy. It’s a bold statement that’s easy to customize and update. Your nursery transforms into a lively, artistic haven, perfect for dreaming, playing, and growing. Embrace the chaos and let your imagination run wild—this is your blank canvas!
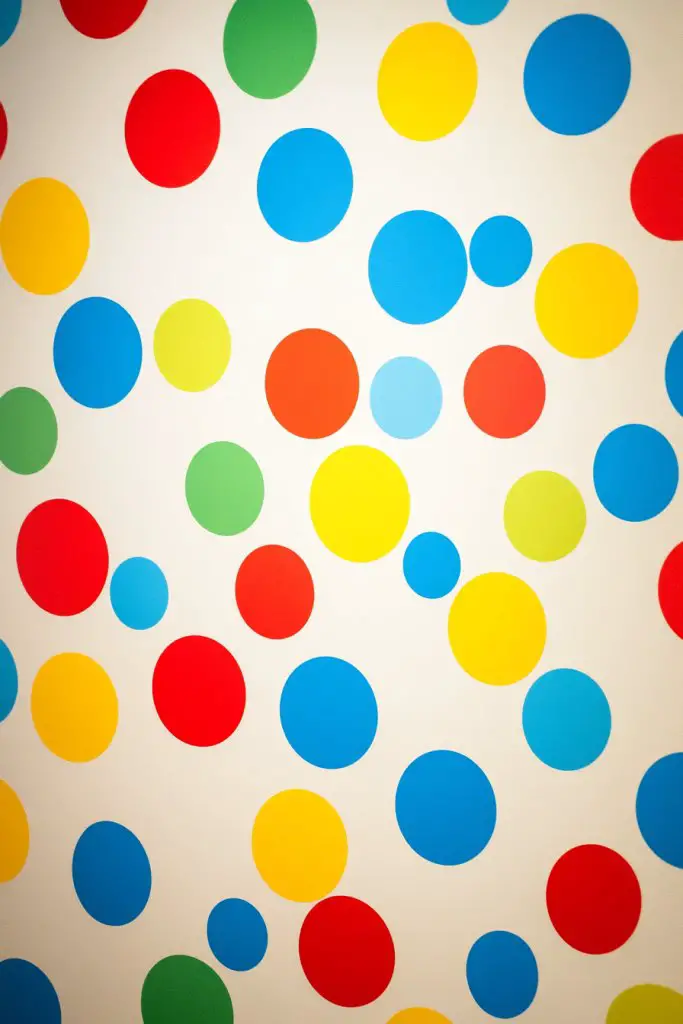
11. Polka Dot Pattern in Multiple Sizes and Colors
Want to add a fun, whimsical touch to your nursery? Polka dots are timeless and adaptable, suitable for both subtle accents and bold statements. Using dots in varying sizes and colors creates a playful, dynamic environment that sparks curiosity. It’s a simple project with big visual impact, perfect for DIY enthusiasts.
Recommended Products to replicate this idea
| # | Preview | Product | |
|---|---|---|---|
| 1 |
|
RoomMates Bluey Family and Friends Peel and Stick Wall Decals, RMK5457SCS | Check Latest Price |
| # | Preview | Product | |
|---|---|---|---|
| 1 |
|
Laatse Vintage Wallpaper Peel and Stick Black Floral Wallpaper 17.5'' x 393'' Gold Leaf Contact... | Check Latest Price |
Visualize a wall decorated with cheerful polka dots in assorted sizes—big, bold circles and tiny specks—scattered across a pastel background. Colors like sunny yellow, soft pink, and mint green make the pattern pop, creating a lively atmosphere. The varied sizes add depth and visual interest, making the space feel energetic yet cozy. When light hits the wall, the dots subtly shimmer, adding a playful, tactile quality.
Mix and match colors to suit your decor—bright primary colors or muted, sophisticated shades. Use removable decals or stencil with painter’s tape for precision. For a more organic look, hand-paint the dots freehand, varying their size and placement randomly. Incorporate the pattern onto textiles like cushions, curtains, or a rug for a cohesive look. Seasonal or thematic color swaps keep the space engaging.
Start by selecting your color palette and planning your dot layout. Use stencils or painter’s tape to create uniform shapes, or freehand for a more spontaneous vibe. For decals, carefully peel and stick, smoothing out bubbles. For painted dots, use a round sponge or small brush for consistency. Seal with a clear topcoat to protect the design. Regular updates or repositioning of decals keep the look fresh and fun.
Create a personalized mural by spelling out your child’s name with dot patterns or highlighting their favorite colors. Add metallic or glow-in-the-dark paints to certain dots for surprise effects. Incorporate the pattern onto accessories like lampshades or storage bins. Change the pattern’s scale or colors over time to match evolving tastes. This playful motif can easily grow with your child’s personality.
Polka dots bring a cheerful, whimsical vibe that’s perfect for a nursery. They’re easy to customize with colors and sizes, making them suitable for any style. Plus, they add a sense of movement and fun to the room. Ready to dot your nursery with happiness? It’s a simple yet effective way to create a joyful space!
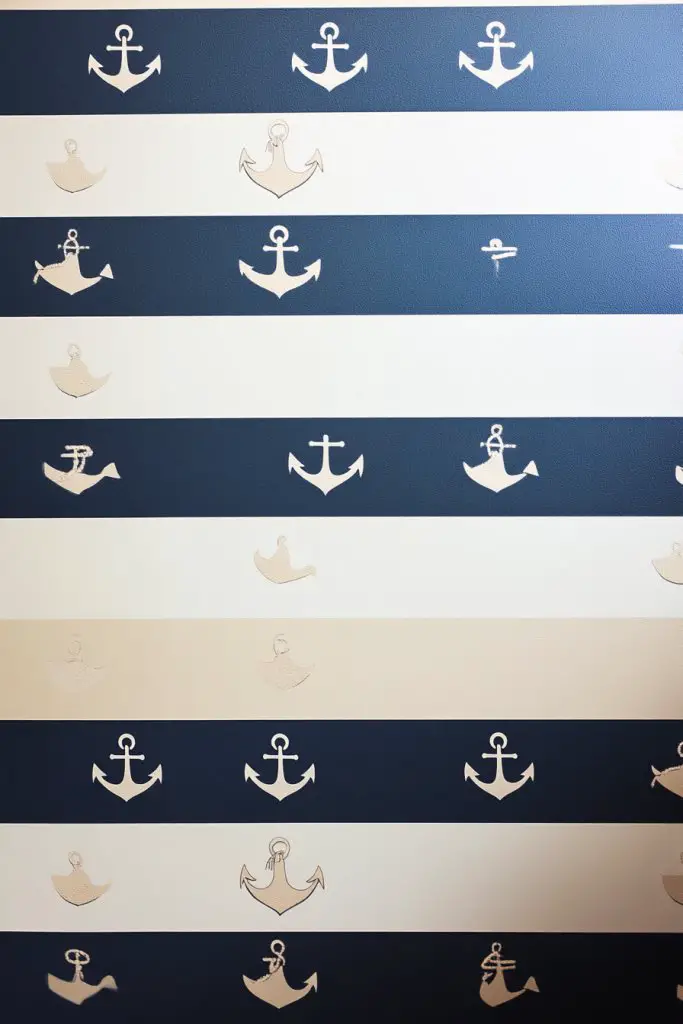
12. Nautical Theme with Stripes and Anchors
Dreaming of a nursery that feels like a seaside escape? Nautical themes with stripes and anchors create a fun, maritime atmosphere that’s both charming and calming. It’s perfect for parents who love the ocean or want a fresh, clean look. Plus, it’s surprisingly easy to incorporate with simple patterns and accents.
Recommended Products to replicate this idea
| # | Preview | Product | |
|---|---|---|---|
| 1 |

|
Erfoni 17.7"x118" Stripe Peel and Stick Wallpaper Blue and White Contact Paper Dark Blue Striped... | Check Latest Price |
| # | Preview | Product | |
|---|---|---|---|
| 1 |

|
DIY 48-Piece Anchor Wall Sticker Set for Boys – Sailing Nautical Vinyl Decals, Removable Mural for... | Check Latest Price |
Imagine a wall painted with navy and white horizontal stripes, reminiscent of classic sailor shirts. Small anchor decals or stenciled motifs add detail without cluttering the space. Soft, muted shades of blue and sandy beige evoke the feeling of the coast, while touches of red add warmth. The stripes create a rhythmic pattern that makes the room feel like a gentle breeze on the sea. It’s a classic look with a playful twist.
Adjust stripe thickness or color schemes to match your style—think pastel blues and creams for a softer vibe or bold navy and white for dramatic contrast. Incorporate seashell or lighthouse motifs for added charm. Use removable decals or stencils for easy updates. For a cozy feel, add plush textiles or nautical-themed accessories like rope trims or porthole mirrors. This theme works well in small or large nurseries.
Start by measuring your wall and sketching your stripe pattern with a level and painter’s tape. Paint the stripes carefully, ensuring even spacing and crisp edges. Use stencils or decals for anchor motifs, applying with adhesive or painter’s tape. Add subtle textures like a faux wood finish or sand-inspired paint for realism. Seal the design with a protective matte or satin topcoat. Lighting with warm bulbs enhances the maritime ambiance.
Personalize with your child’s name spelled out with anchor-shaped letters or nautical-themed embellishments. Incorporate accessories like a soft rope curtain or a seashell-shaped pillow. Use a nautical-themed mobile or wall art to complement the theme. Change accents seasonally—add starfish or beach balls during summer. This theme creates a timeless, adventurous environment your child will love.
A nautical nursery transports your little one to a seaside adventure every day. It’s easy to customize with your favorite maritime motifs and colors, making it uniquely yours. Plus, it’s a classic look that ages well, from baby to toddler years. Set sail on this decorating journey and create a space full of exploration and fun!
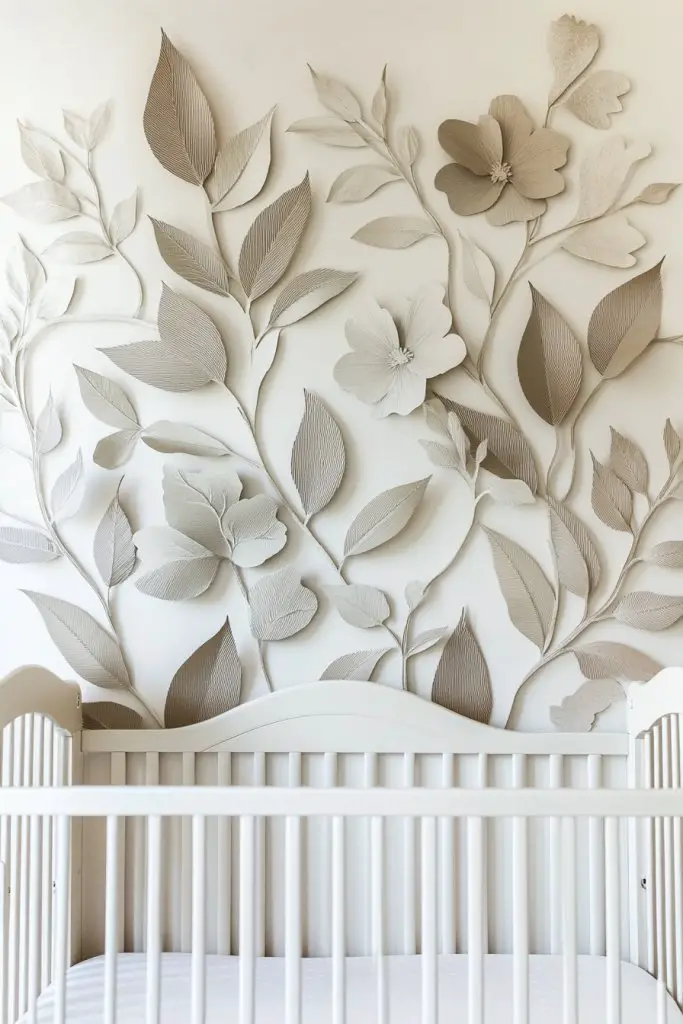
13. Botanical Silhouettes in Soft Neutrals
Craving a nursery that feels calm, natural, and timeless? Botanical silhouettes in soft neutrals can create a serene environment that’s both modern and soothing. They introduce a subtle touch of nature without overwhelming the space. Perfect for parents who want a peaceful retreat for their little one.
Recommended Products to replicate this idea
| # | Preview | Product | |
|---|---|---|---|
| 1 |

|
Vinyl Wall Art Decal - Woman Silhouette - 31" x 17" - Modern Feminine Body Shape Sticker for Women... | Check Latest Price |
| # | Preview | Product | |
|---|---|---|---|
| 1 |

|
Drsoum Botanical Plant Framed Wall Art Boho Wall Decor for Bathroom Sage Green Eucalyptus Leaf... | Check Latest Price |
Envision a wall decorated with delicate, dark plant and leaf silhouettes against a gentle, muted background—think warm beige, soft gray, or blush. The simple shapes evoke a sense of calm and connection to nature, bringing the outdoors inside. The shadows and fine details create a layered, textured effect that invites quiet reflection. Light filtering through nearby windows enhances the tranquil atmosphere.
Choose from a variety of plant shapes—ferns, eucalyptus, or simple leaves—to match your aesthetic. Use stencils, decals, or hand-paint for a DIY approach. For a more layered look, combine silhouettes with textured wall paints or wallpaper borders. Incorporate natural materials like wood or linen textiles to complement the botanical theme. This design adapts effortlessly to different room sizes and decor styles.
Start by selecting your preferred silhouettes and background color. Use stencils or decals to trace or apply the shapes, ensuring symmetry and placement. Paint or apply decals carefully, using a steady hand for fine lines. Seal the mural with a matte or satin protective finish to prevent fading. You can add extra dimension with embossed or textured paints. Keep the design simple for a calming effect or add tiny accent details for visual interest.
Add personalized touches like your child’s initials intertwined with leaves or a custom quote in elegant typography. Use natural fabrics and textured textiles to enhance the botanical feel. Incorporate small, tactile elements like soft moss or faux bark around the room. Change the silhouettes seasonally or as tastes evolve, maintaining a fresh, natural vibe. It’s a design that ages gracefully and remains calming.
Botanical silhouettes foster a peaceful, nature-inspired nursery that encourages relaxation and gentle learning. They’re simple to create and easy to update with new decals or textures. This timeless style connects your child with nature from an early age. Create a space that’s both beautiful and serene—your little one will thank you for it!
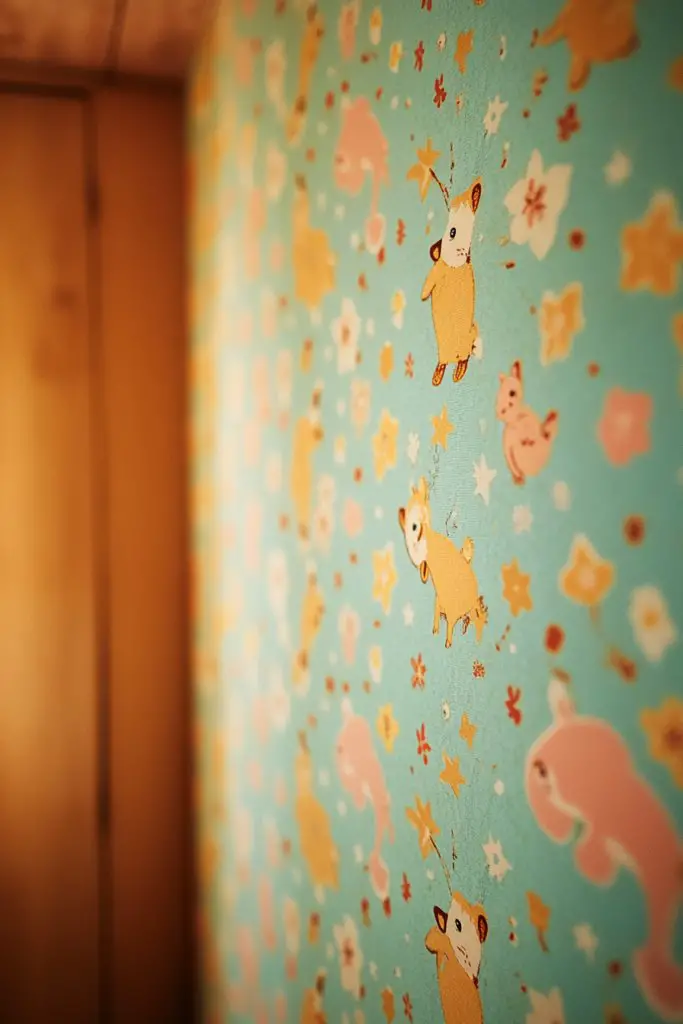
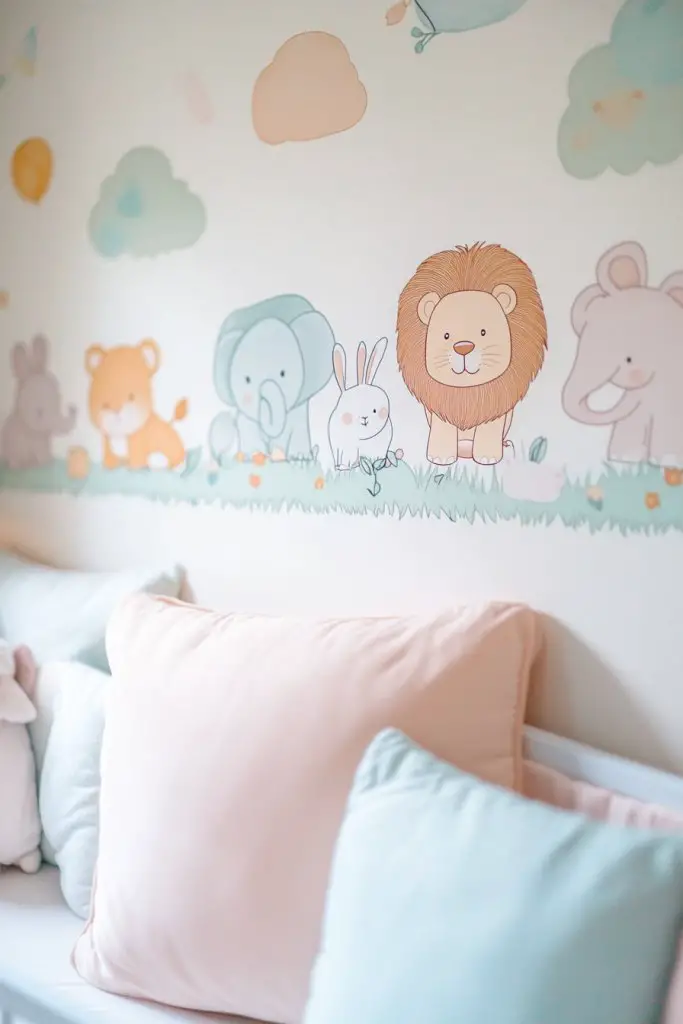
14. Playful Animal Illustrations in a Continuous Border
Want a nursery that feels lively and full of personality? Animal illustrations along a continuous border can make your space playful and engaging. They create a whimsical environment that sparks curiosity and love for nature. Plus, a border is a simple way to add visual interest without overwhelming the room.
Recommended Products to replicate this idea
| # | Preview | Product | |
|---|---|---|---|
| 1 |

|
Mirabuy Big Plant Grass Wall Corner Stickers Flowers with Butterflies Base Board Skirting Line Wall... | Check Latest Price |
| # | Preview | Product | |
|---|---|---|---|
| 1 |

|
Mouse Reading Book, Wall Decor Sticker Decal, Kids Room, Classroom, Home, Bedroom, Bookcase, Book... | Check Latest Price |
Picture a border running along the top or bottom of the wall filled with charming illustrations of animals—elephants, giraffes, bunnies, and birds—each full of character. The animals are lined up in a playful procession, their details softly rendered in gentle colors. The border adds a sense of movement and story, inviting your child to explore each creature. Light-colored backgrounds make the illustrations stand out, creating a cheerful atmosphere.
Choose a theme—safari, woodland, or farm animals—to match your decor. Use decals for easy application or hand-paint for a personalized touch. Combine the border with matching textiles or wall decals for a unified look. Adjust the size and density of the illustrations to suit your wall space—more animals for larger walls, fewer for smaller spaces. Incorporate a matching rug or curtains to complete the scene.
Sketch your animals along the chosen border height with a pencil and level for accuracy. Use decals or stencils to trace and fill in the illustrations with paint or markers. For decals, carefully peel and stick, smoothing out bubbles. For painted designs, use fine brushes for details and shading. Seal with a clear topcoat to protect the artwork. Keep the look playful by varying animal poses and sizes.
Personalize by adding your child’s name, or creating a scene where animals interact with initials or favorite toys. Incorporate tactile elements—like plush animal toys or stuffed figures—to enhance engagement. Frame sections of the border with decorative trims for a finished look. Update the scene over time—adding new animals or seasonal elements for variety. This border becomes a storytelling feature your child will love.
Animal illustrations in a continuous border make the nursery lively and full of wonder. They’re easy to customize with different animals or styles, and grow with your child’s interests. It’s a fun DIY project that adds personality and charm to any space. Your little explorer will love waking up in a room full of friendly creatures—ready for adventures!
15. Ombré Effect with Bright Gradients

Looking for a calming yet visually captivating wall treatment? An ombré gradient in bright, cheerful hues can add depth and softness to the nursery. It’s a subtle way to introduce color variation that feels modern and soothing at the same time. Plus, it’s a great DIY project that can be customized endlessly.
Recommended Products to replicate this idea
| # | Preview | Product | |
|---|---|---|---|
| 1 |

|
Colorful Abstract Aura Posters for Room Aesthetic 3 Piece Aura Gradient Spiritual Affirmation Canvas... | Check Latest Price |
| # | Preview | Product | |
|---|---|---|---|
| 1 |

|
Cmialusie Desk Sticker 39.37x23.62 Inch Pastel Iridescent Wave Soft Purple Aqua Pearl Decorative... | Check Latest Price |
Visualize a wall blending from a soft pink at the top to a vibrant coral at the bottom, or a gentle blue fading into a lively turquoise. The smooth transition creates a sense of movement and tranquility, making the room feel more spacious and dynamic. When sunlight hits the wall, the gradient appears to shimmer and shift, adding a magical glow. The effect is both peaceful and energizing, perfect for a nursery.
Choose your favorite color palette—warm or cool—and experiment with different blending techniques. Use sponges or soft brushes to create seamless gradients; tape off sections for sharp lines if you prefer a more geometric look. Incorporate metallic or pearl paints for a subtle shimmer. Adapt the gradient to suit smaller or larger walls—more gradual for subtlety, more dramatic for impact. It pairs beautifully with minimalist furniture or bold accents.
Start by applying a primer or base coat in your lightest shade. Mix colors in a palette and blend them while wet, using sponges or brushes for smooth transitions. Work from the top down or bottom up, feathering edges for a seamless look. Use painter’s tape for sharp lines if desired. Seal the finished wall with a clear matte or semi-gloss protective coat. Maintain the gradient’s vibrancy with touch-ups as needed.
Add personalized touches like your child’s name in bold, gradient-inspired lettering. Incorporate glitter or metallic paints for shimmer effects. Use coordinating textiles—soft curtains, bedding, or rugs—to amplify the ombré theme. Change color schemes seasonally or as your child’s tastes evolve to keep the room fresh. It’s a sophisticated yet playful backdrop for all nursery activities.
An ombré gradient provides a stunning visual that can be tailored to any color preference. It’s an easy DIY project that results in a luxurious, calming environment. Plus, it’s a versatile design that ages beautifully with your child. Get ready to enjoy a room that feels both peaceful and lively—like a gentle sunrise or sunset, every day.
16. Puzzle or Block Pattern in Primary Colors

Want to create an engaging, interactive wall that stimulates your child’s mind? A puzzle or block pattern in bright primary colors offers a playful way to encourage problem-solving and spatial skills. It’s a vibrant, stimulating design that transforms the nursery into an environment of learning and fun. Plus, it’s a DIY-friendly project with a big visual payoff.
Recommended Products to replicate this idea
| # | Preview | Product | |
|---|---|---|---|
| 1 |

|
Vorshape 15 Pcs Large Cork Board Felt Wall Tiles - 40 x 36 Inches, Decorative Push Pin Board Wall... | Check Latest Price |
| # | Preview | Product | |
|---|---|---|---|
| 1 |
|
Interlocking Floor Mats - 8-Piece Nontoxic Exercise Mat or Play Mat for Toddlers, Babies or Kids -... | Check Latest Price |
Imagine a wall painted with large, interlocking puzzle pieces or blocks, each in bold red, yellow, blue, and green. The pattern mimics a playful construction set, inviting your child to explore and imagine. The shapes fit together perfectly, creating a colorful mosaic that energizes the room. When lit by natural sunlight, the vivid colors seem to pop, making the space feel lively and inspiring.
Use decals or stencils to produce precise puzzle shapes, or paint freehand for a more organic look. Vary the size of the shapes for added interest—large blocks for a bold statement, smaller pieces for detail. Incorporate textured paints or 3D elements like foam shapes to add tactile dimension. Match the color palette with existing decor or go for a contrasting, high-energy look. It’s adaptable for any room size or style.
Begin by sketching your pattern on paper, then transfer it onto the wall with a pencil and ruler. Use painter’s tape to outline each shape, filling in with bright, durable paints. Carefully peel the tape before the paint dries to keep edges sharp. For added fun, include removable puzzle pieces or shapes that your child can manipulate. Seal the entire design with a clear, matte topcoat for longevity. This project requires patience but results in an interactive masterpiece.
Create personalized puzzles by including your child’s initials or favorite symbols within some blocks. Use textured paints or different finishes to distinguish certain shapes. Extend the puzzle theme onto furniture or textiles for a cohesive look. Change colors or shapes as your child’s interests evolve. This playful, stimulating environment will grow with them.
Puzzle or block patterns are a fun way to combine art and learning, making the nursery a hub of activity. They’re easy to customize and can be as simple or complex as you like. Plus, they promote cognitive development while adding a splash of color. Your little builder will love waking up in a room that encourages play and discovery!
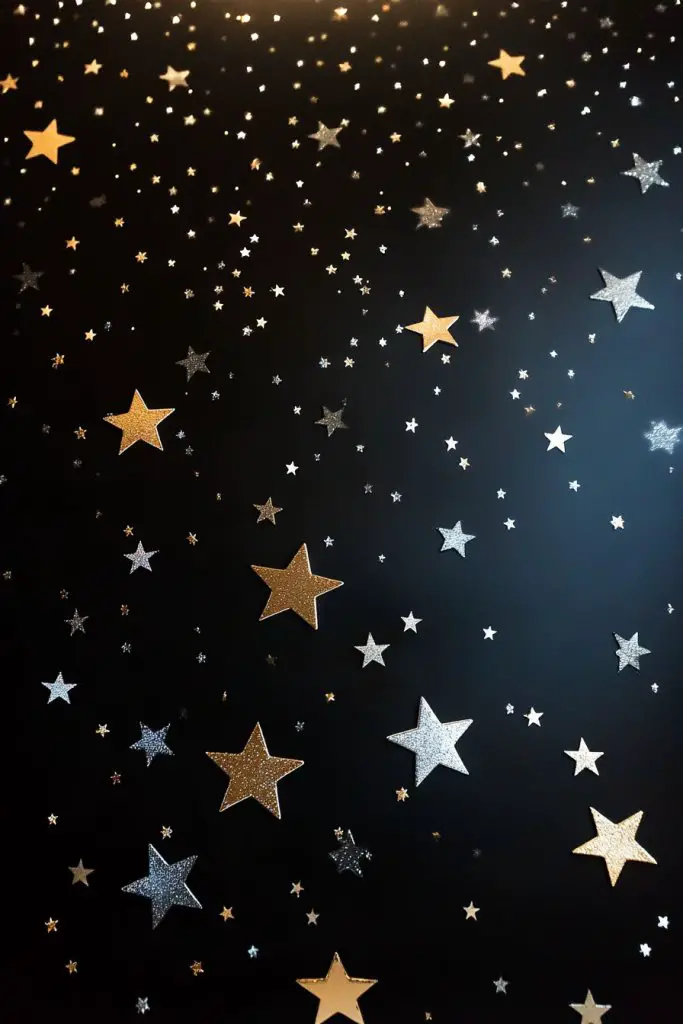
17. Whimsical Starry Night with Metallic Accents
Dreaming of a nursery that feels magical and serene? A starry night scene with metallic accents can transform any space into a dreamy celestial retreat. It’s perfect for sparking wonder and calming your little one before bedtime. Plus, it adds a touch of elegance and whimsy that’s hard to beat.
Imagine a dark, velvety wall dotted with shimmering stars, moons, and tiny planets in metallic gold, silver, or copper. The stars twinkle subtly, reflecting light and creating a sense of depth. Soft, matte background hues like navy, midnight blue, or deep purple set the perfect night sky. Highlights and accents in metallic paints catch the light, making the scene feel alive and magical. It’s a tranquil yet captivating view that invites dreams.
Choose a darker background for a dramatic night sky or a softer tone for a more delicate effect. Use stencils or freehand techniques for stars and celestial bodies. Incorporate glow-in-the-dark paints for stars that shine at night, adding an extra layer of enchantment. Extend the theme with moon-shaped pillows, star-shaped mobiles, or textured fabrics that resemble clouds. It adapts beautifully to both small and large walls.
Begin by painting the background in your chosen dark hue, ensuring an even coat. Use a stencil or freehand to apply metallic paints for stars and celestial shapes. Mix matte and metallic paints for contrast and shimmer. Add glow-in-the-dark elements for an interactive experience. Seal the mural with a clear topcoat to protect the metallic finishes. Consider soft lighting—like dimmable lamps or fairy lights—to enhance the shimmering effect.
Personalize with your child’s name in a starry font or by incorporating their zodiac sign. Add textured moon or cloud shapes for tactile interest. Decorate with metallic or glitter accents on other nursery accessories for a cohesive look. Change out the star motifs with seasonal themes—moon phases, shooting stars, or constellations. It’s an inspiring environment that makes bedtime feel like a magical journey.
A starry night scene with metallic accents creates a tranquil, magical nursery that encourages dreams and imagination. It’s a sophisticated yet playful design that can be easily customized. Plus, it’s a project you can do yourself, adding a personal touch to your child’s space. Let their dreams take flight under a starry sky every night!
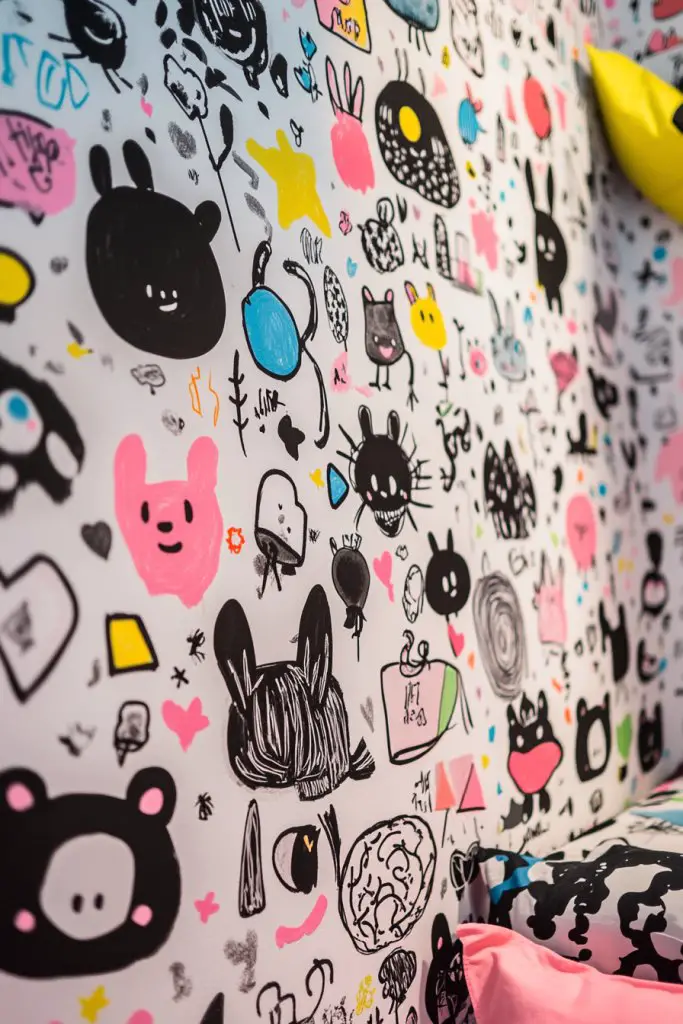
18. Playful Doodle Wall with Hand-Drawn Elements
Want a nursery that feels personal, creative, and full of charm? A doodle wall filled with hand-drawn elements offers a one-of-a-kind touch that’s full of personality. It’s perfect for parents who love art or want a space that encourages imagination. Plus, it’s a budget-friendly way to make the room uniquely yours.
Recommended Products to replicate this idea
| # | Preview | Product | |
|---|---|---|---|
| 1 |

|
64pcs Golden Doodle Stickers, Goldendoodle Dog Sticker Waterproof Decals for Water Bottles Laptop... | Check Latest Price |
| # | Preview | Product | |
|---|---|---|---|
| 1 |

|
Dr.Rapeti Farm Animals Felt Story Board Set 41PCS Preschool Farmhouse Barnyard Theme Busy Board... | Check Latest Price |
Imagine a wall decorated with whimsical drawings—clouds, stars, balloons, animals, and playful patterns—all sketched in black or colorful markers. The hand-drawn style adds an informal, joyful vibe that feels warm and inviting. Variations in line thickness and style bring a sense of movement and spontaneity. The doodles create a lively scene that invites your child to explore and imagine.
Use different colored markers or paints for variety, or stick to a monochrome palette for a sleek look. Incorporate personal touches like your child’s name, favorite animals, or story characters. Frame or highlight certain doodles with decorative borders or colored accents. Use removable or washable markers for easy updates and corrections. It’s an adaptable, evolving design perfect for creative families.
Start by sketching your doodles lightly with a pencil or chalk. Use permanent markers or paint pens to draw over the sketches, adding details and color. For a more cohesive look, create a theme—such as space or jungle—and plan your elements accordingly. Seal the drawings with a clear, protective coat if using paint. Regular touch-ups keep the doodles vibrant and fresh. Consider adding a small ledge or shelf for displaying related toys or books.
Add your child’s favorite characters or symbols into the doodle scene. Incorporate tactile elements like textured stickers or fabric patches for a multi-sensory experience. Personalize with their name integrated into the doodles or as part of the scene. Change or expand the doodles over time to reflect new interests or milestones. This wall becomes a living, creative expression of your child’s personality.
A doodle wall celebrates spontaneity and creativity, making the nursery lively and unique. It’s a fun project that you can customize endlessly, turning everyday moments into art. Encourage your child to add their own drawings over time, fostering confidence and artistic growth. Your nursery will be a joyful, personalized space where imagination rules.
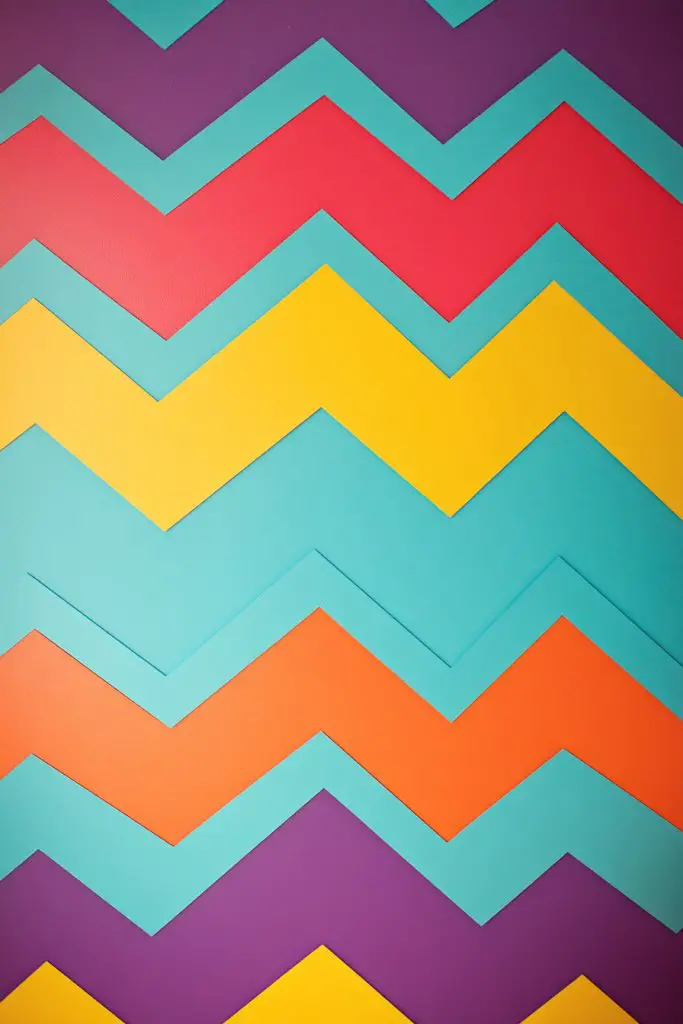
19. Colorful Chevron Pattern in Bright Hues
Craving a bold, energetic look for your nursery? A chevron pattern in vibrant colors can make a striking statement that’s both playful and stylish. It adds visual movement and rhythm, energizing the space. Plus, it’s a fun project for DIY enthusiasts who want a room that truly stands out.
Recommended Products to replicate this idea
| # | Preview | Product | |
|---|---|---|---|
| 1 |

|
A Room with Black Line Vinyl Wall Decals, Peel and Stick Modern Boho Stickers, 300 Stripes with a... | Check Latest Price |
| # | Preview | Product | |
|---|---|---|---|
| 1 |

|
VistaPalette Colorful Fairy Flowers Garden Wildflower Pink/Yellow/Gree/Blue Peel and Stick Wallpaper... | Check Latest Price |
Picture a wall with zigzag stripes in lively hues—think turquoise, coral, yellow, and purple—creating a dynamic, eye-catching pattern. The repeated chevron shapes draw your eye across the room, giving a sense of movement and excitement. When sunlight hits the pattern, the colors seem to shimmer and dance, making the space feel lively. It’s a perfect backdrop for playful decor and furniture.
Adjust the size and frequency of the chevrons to suit your space—larger, bolder zigzags for a dramatic look or smaller, tighter ones for subtle energy. Use painter’s tape for crisp lines, or experiment with blending colors at the edges for a softer effect. Combine with geometric or polka dot accents for a layered, playful aesthetic. It works well with modern, eclectic, or boho styles.
Start by sketching your chevron pattern on paper or directly on the wall with a pencil and ruler. Use painter’s tape to mark out the zigzags, ensuring symmetry and consistency. Fill in with bright, washable paints, carefully removing tape before the paint dries for sharp edges. Seal with a clear finish to protect the pattern. For added fun, incorporate metallic or glitter paints in some chevrons for extra sparkle.
Personalize the pattern with your child’s name incorporated into a zigzag or as part of a border. Use textured or metallic paints for a layered look. Extend the chevron onto furniture or textiles, like pillows or curtains, for a cohesive theme. Change colors or patterns as your child grows, keeping the room fresh and lively. It’s a bold design that ages gracefully.
A chevron pattern in bright hues infuses your nursery with energy and joy. It’s a versatile, customizable design that’s easy to execute and update. Plus, it creates a vibrant environment that encourages playful exploration. Get ready to cheer up your space and your little one—this pattern is pure fun!
20. Fantasy Sky with Hot Air Balloons and Clouds

Dreaming of a nursery that sparks adventure and wonder? A fantasy sky filled with floating hot air balloons and fluffy clouds can turn any room into a magical voyage. It’s ideal for inspiring imagination and creating a calming, dreamy environment. Plus, it’s a whimsical way to personalize your space.
Recommended Products to replicate this idea
| # | Preview | Product | |
|---|---|---|---|
| 1 |

|
TOKMOCO Custom Ceiling Sky Wall Mural Cloud Self-Adhesive Wallpaper Kids Room Bedroom Living Room... | Check Latest Price |
| # | Preview | Product | |
|---|---|---|---|
| 1 |

|
FLAGTOP LED Cloud Light for Bedroom, Floating Cloud Light for Room with Remote and App Control, RGB... | Check Latest Price |
Visualize a sky painted in soft pastel shades—pinks, blues, and lavenders—with colorful balloons drifting lazily across the ceiling or wall. The balloons are detailed with patterns and textures, while fluffy clouds add softness and depth. Tiny stars or birds may complete the scene, creating a sense of endless possibility. When the room is dimly lit, the scene glows gently, inviting dreams of adventure.
Use watercolor techniques for a gentle, blended look or bold outlines for a more graphic style. Vary the size and color of balloons to add visual interest. Incorporate metallic or glow-in-the-dark paints for special effects. Extend the scene onto ceiling or furniture for a cohesive atmosphere. Adapt the scene to suit any decor style—playful, modern, or classic.
Begin by sketching your sky scene with light pencil or chalk. Paint the background with soft, blended hues. Use fine brushes for details on balloons and clouds; layer colors gradually for depth. Apply glow-in-the-dark or metallic accents for magic at night. Seal the mural with a protective topcoat to preserve it. Lighting can be soft and indirect to enhance the dreamy effect. It’s a project that invites patience but rewards with endless charm.
Add your child’s name within a balloon or on a cloud for a personalized touch. Incorporate small, tactile elements like fabric or textured paint to enhance the scene. Use coordinating textiles—like cloud-shaped pillows or a sky-themed rug—to reinforce the theme. Change the scene seasonally—adding stars or moon motifs for variety. It’s a dreamy setting that evolves with your child’s imagination.
A fantasy sky scene transforms the nursery into a world of dreams and exploration. It’s a personalized, engaging environment that inspires wonder. Plus, it’s a creative project you can tailor to your style and your child’s dreams. Prepare for a space where imagination takes flight—every day can be an adventure!
Conclusion
Exploring these diverse nursery accent wall ideas opens up endless possibilities to personalize and energize your child’s space. Whether you opt for bold patterns, soft pastels, or creative textures, these ideas can turn any nursery into a playful retreat. Get inspired, experiment with colors and designs, and create a charming environment where your little one can grow and explore with joy.