
17 Butcher Block Kitchen Countertops for Rustic Functionality
Imagine a kitchen where functionality meets warm, rustic charm—that’s exactly what butcher block countertops bring to the table. Their natural beauty, durability, and inviting appeal have made them a favorite among homeowners seeking a cozy yet practical space.
In this article, you’ll explore a variety of inspiring butcher block countertop ideas that suit different styles and needs. From classic farmhouse looks to modern twists, get ready to discover how these versatile surfaces can transform your kitchen into a welcoming haven filled with rustic character and everyday utility.
1. Reclaimed Wood Finish for Authentic Rustic Charm
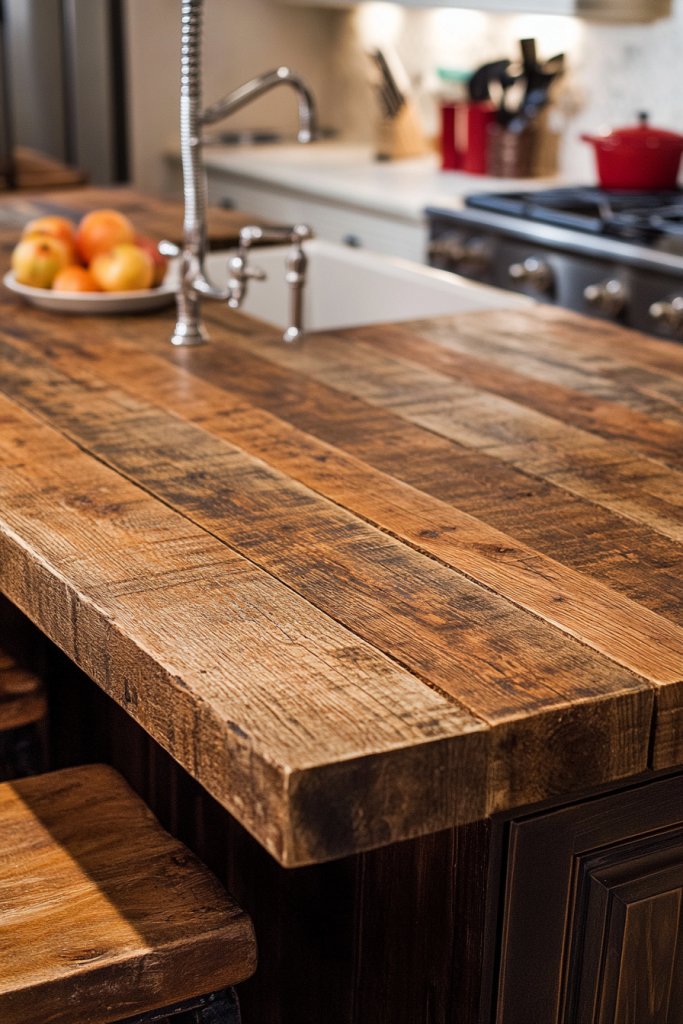
Ever wish your kitchen could feel warmer, more inviting, and full of character? Sometimes, factory-made surfaces just don’t cut it when you’re craving authenticity. Reclaimed wood offers that timeless, rustic charm that makes a space feel lived-in and genuine. If your goal is to create a cozy, eco-friendly vibe, this finish might be just what you need.
Recommended Products to replicate this idea
| # | Preview | Product | |
|---|---|---|---|
| 1 |

|
Qianglive Grey Wood Wallpaper 17.3"×120" Peel and Stick Wallpaper Self Adhesive Distressed Wood... | Check Latest Price |
| # | Preview | Product | |
|---|---|---|---|
| 1 |

|
FLYJOE Floating Shelves, 8 Inch Deep Rustic Solid Reclaimed Wood Wall Shelves for Storage, Wall... | Check Latest Price |
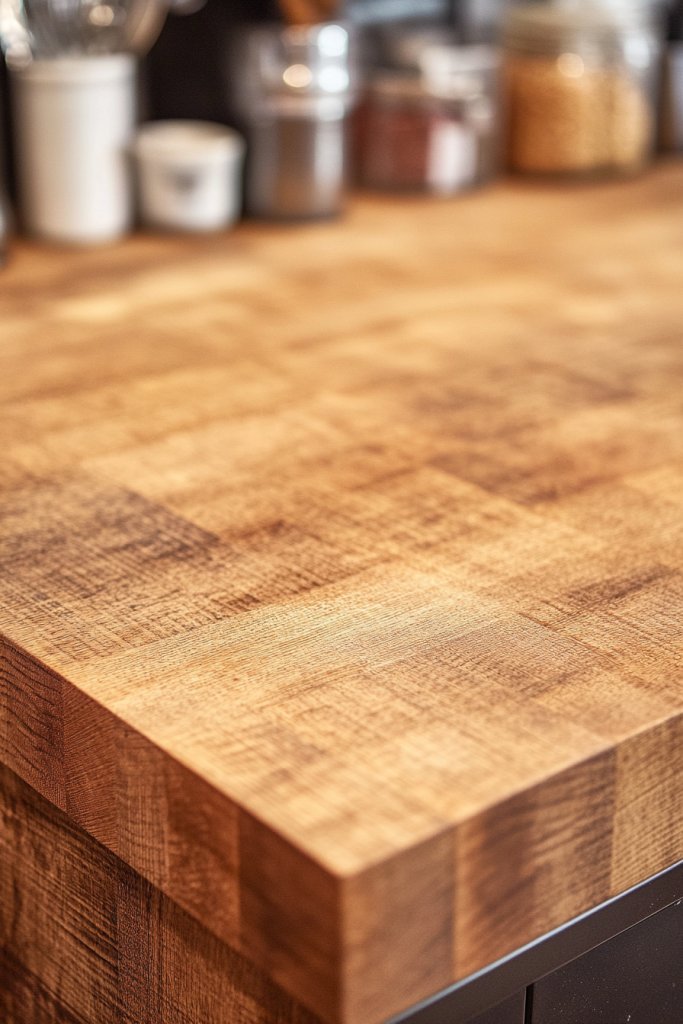
Imagine a countertop with rich, weathered grains and knots that tell a story of old barns and forest adventures. The texture is rugged but refined, with a matte finish that highlights each imperfection as part of its charm. Dappled sunlight dances across the surface, emphasizing the warm, earthy tones that instantly evoke a rustic countryside home. It’s like bringing a piece of nature straight into your kitchen.
Reclaimed wood pairs beautifully with vintage fixtures or modern minimalism, depending on your taste. For a more sustainable look, opt for boards with visible nail holes or distressed edges. Seasonal accents like cozy plaid throws or woven textiles can complement the rustic finish, making the space feel even more inviting. You can also mix reclaimed wood with other natural materials like stone or ceramic for contrast.
Start by sourcing reclaimed wood from reputable suppliers or salvage yards. Look for boards that are flat, stable, and free of rot or pests. Sand the surface lightly to remove splinters, then seal with a food-safe matte oil or wax to preserve the natural look while protecting it from moisture. Be prepared for slight warping or uneven edges, which add to the charm but require some planning during installation. Regular maintenance involves re-oiling or waxing to keep the finish looking aged but cared for.
Add personal touches such as custom engravings or inlays that mimic vintage carvings or symbols. Incorporate decorative metal brackets or leather straps along the edges for added artisanal flair. Choosing a darker stain or tint can deepen the rustic feel, while lighter finishes highlight the wood’s natural grain. You can also layer textiles like linen or burlap to enhance the cozy, authentic vibe.
Using reclaimed wood not only elevates your kitchen’s style but also supports eco-conscious choices. It’s a conversation starter and a testament to your unique taste. With a bit of patience and care, you’ll craft a countertop that ages beautifully and becomes a treasured part of your home’s story. Ready to embrace a rustic, authentic look that’s both stylish and sustainable? Go for it!
2. Incorporate Live-Edge Edges for a Natural Look
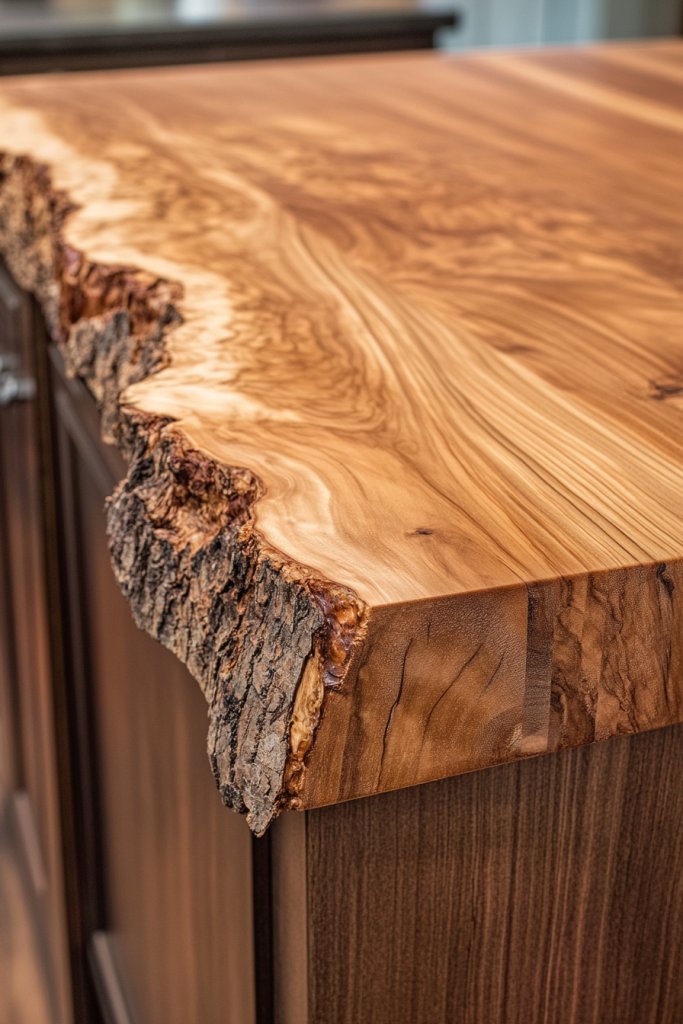
Are you tired of uniform, mass-produced kitchen surfaces that lack personality? Live-edge wood offers a raw, organic aesthetic that turns ordinary countertops into statement pieces. It’s perfect if you crave a natural, unrefined look that celebrates the imperfections and irregularities of real wood. Want to add a touch of wilderness to your culinary space? This idea is for you.
Recommended Products to replicate this idea
| # | Preview | Product | |
|---|---|---|---|
| 1 |

|
Briwooody 6 Pack Hollow Wood Plank Live Edge Woodslab Unfinished Wood Boards for Crafts Rustic... | Check Latest Price |
| # | Preview | Product | |
|---|---|---|---|
| 1 |
|
Shabebe Table Top Epoxy Resin 2 Gallon, Super Gloss & Crystal Clear Epoxy Resin Kit with UV... | Check Latest Price |
Picture a slab of wood with edges that follow the natural contours of the tree, complete with bark remnants and uneven curves. The surface feels smooth yet retains the rugged outline, giving it an authentic, untouched appearance. The contrast between the polished top and the jagged edges creates visual interest and a tactile experience that invites touch. It’s like bringing a slice of the forest into your kitchen.
Live-edge countertops work well in open-plan kitchens or rustic cabins, but can also add charm to modern spaces when paired with sleek cabinetry. You can choose lighter woods like maple or oak for a subtle effect or go bold with darker woods like walnut for drama. To keep the look balanced, pair it with minimalist hardware or open shelving. For seasonal variations, layer with cozy textiles or vintage accessories that echo the natural theme.
Select a high-quality slab from a trusted supplier, ensuring the edges preserve the natural shape. Sand and finish the top with food-safe oil or polyurethane, depending on your preferred sheen level. During installation, leave the edges untouched or lightly sanded to maintain their organic form. Since live edges can be uneven, plan for custom cuts or supports to stabilize the slab. Regular maintenance involves re-oiling to enhance the wood’s natural luster.
Highlight the edges with subtle LED lighting or metal accents to emphasize their organic shape. Consider adding carved motifs or initials on the flat surface for a personalized touch. Pair the countertop with natural fiber rugs or woven baskets to reinforce the earthy feel. You can also finish the edges with a clear resin layer if you want to protect the bark while keeping the natural shape intact.
A live-edge countertop transforms a kitchen from basic to breathtaking, making every meal feel like an outdoor adventure. It’s a bold statement that shows your appreciation for nature’s artistry. Once installed, it ages gracefully, developing a richer patina over time. Don’t hesitate to embrace the imperfect beauty of natural wood—your space will thank you!
3. Pair with Vintage Farmhouse Hardware
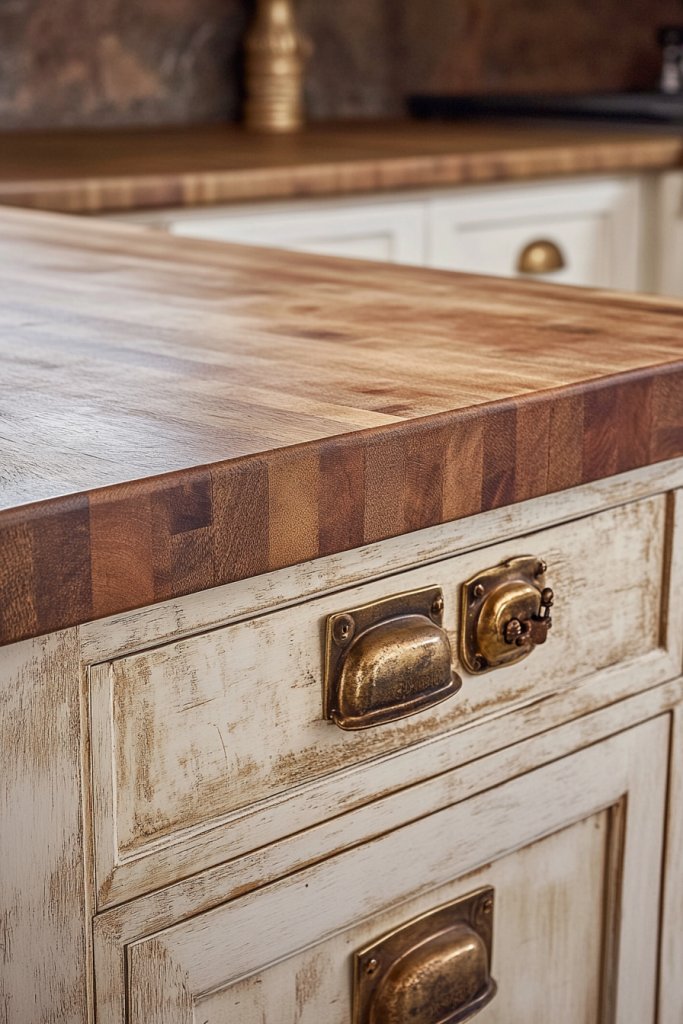
Looking to infuse your kitchen with charm and nostalgia? Vintage farmhouse hardware instantly evokes a cozy, welcoming vibe that complements rustic countertops. It’s a simple upgrade that can dramatically change the overall aesthetic without breaking the bank. Want your space to feel warm and timeless? This is the perfect finishing touch.
Recommended Products to replicate this idea
| # | Preview | Product | |
|---|---|---|---|
| 1 |

|
Yanxia Set of 12 -Sleek Round Antique Brass Cabinet Knobs - Retro and Minimalist Hardware for... | Check Latest Price |
| # | Preview | Product | |
|---|---|---|---|
| 1 |

|
Zernmiarder Antique White Pumpkin Knobs 2 Pack Ceramic Cabinet Knobs Vintage Drawer Pulls - Antique... | Check Latest Price |
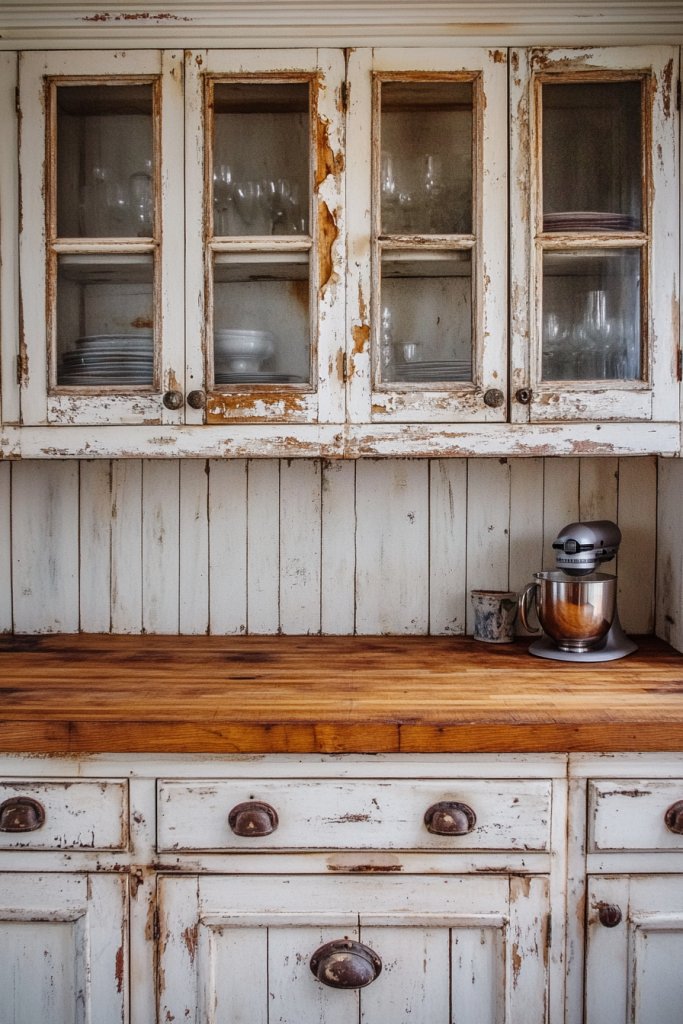
Imagine antique brass or distressed iron handles that look like they’ve been part of the kitchen for generations. They feature intricate details like scrolls, floral motifs, or simple round pulls with a weathered finish. These hardware pieces add character, contrasting beautifully with the warm tones of a butcher block or reclaimed wood. The tactile feel of aged metal invites you to touch and appreciate craftsmanship.
Mix and match different vintage styles—think shiplap cabinets combined with blackened iron pulls or distressed copper knobs. For a more eclectic look, incorporate hardware with colorful enamel or patina finishes. Seasonal swaps, like adding rustic ceramic or glass knobs, can refresh the space without a full remodel. Pairing hardware with open shelving or glass-front cabinets enhances the vintage appeal.
Choose hardware that fits your cabinet holes or plan for drilling new ones. Clean the surface thoroughly before attaching to ensure a secure fit. Use appropriate screws and anchors, especially if installing on thicker wood or reclaimed pieces. For an authentic look, opt for hardware with visible signs of aging, like patina or paint chipping. Regularly tighten and clean the hardware to maintain its vintage charm.
Add custom engravings or monograms to hardware for a personalized touch. Incorporate decorative backplates or escutcheons for an extra layer of detail. Coordinate hardware finishes across the kitchen for a cohesive look, or mix metals for an eclectic vibe. Consider installing decorative hooks underneath for hanging towels or utensils that match your hardware style.
Vintage hardware breathes new life into your kitchen and connects you to a rich history of craftsmanship. It’s a small detail that makes a big impact, elevating even the simplest butcher block countertops. With the right choice, your space will radiate charm and personality. Ready to give your kitchen a nostalgic makeover? Start with vintage hardware—you’ll love the results.
4. Install Open Shelving Above for Practical Storage
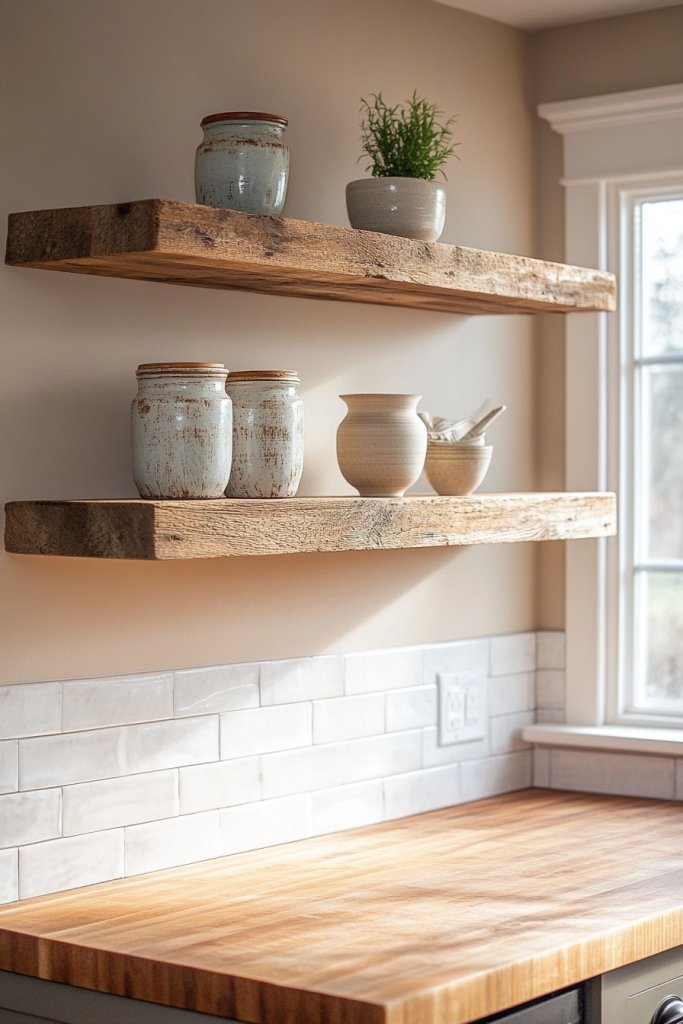
Ever find yourself digging through cluttered cabinets just to grab a spatula? Open shelving offers an easy solution that combines function with style. It keeps your most-used items within arm’s reach while adding a relaxed, airy feel to your kitchen. Want to ditch the clutter and boost your kitchen’s charm? This idea is a game-changer.
Recommended Products to replicate this idea
| # | Preview | Product | |
|---|---|---|---|
| 1 |

|
QEEIG Floating Shelves for Wall Bathroom Shelf Bedroom Kitchen Living Room Hanging Book Shelves... | Check Latest Price |
| # | Preview | Product | |
|---|---|---|---|
| 1 |

|
Janyang Industrial Pipe Shelf Brackets for 8 10 12 14 inches Board, Iron L Pipe Floating Shelves,... | Check Latest Price |
Picture sleek wooden shelves mounted against a painted wall, displaying a curated collection of bowls, jars, and utensils. The natural wood tones tie beautifully with butcher block countertops, creating a seamless rustic look. The open design allows light to flow freely, making the space feel larger and more inviting. It’s like turning your kitchen into a functional gallery.
Use adjustable or floating shelves for flexibility and modern appeal. For a vintage touch, include distressed or reclaimed wood planks. Seasonal displays like woven baskets or ceramic containers can be swapped easily to refresh the vibe. In small kitchens, vertical stacking or corner shelves maximize space without overcrowding. Incorporate hooks or rails underneath for hanging utensils or towels.
Select sturdy brackets and durable wood that can handle everyday weight. Mount the shelves at varying heights to accommodate different items and visual interest. Use a level during installation to ensure a clean look. Seal the wood with matte or satin finish to protect from grease and moisture. Regularly dust and clean the shelves to maintain a tidy, inviting appearance.
Decorate with vintage jars, woven baskets, or decorative tins that reflect your style. Incorporate themed or seasonal items—think a soft cream throw blanket with chunky knit texture or a set of colorful ceramics. Add small potted herbs or faux greenery for a touch of freshness without the restricted content concerns. Personal touches make your open shelves uniquely yours.
Open shelving transforms your kitchen into a practical yet stylish space that’s easy to update. It encourages organization and adds personality with every display. Plus, it’s a great way to showcase your favorite dishes or DIY finds. Ready to create a functional, charming open storage solution? Your kitchen will thank you!
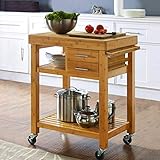
5. Use Butcher Block as a Functional Kitchen Island
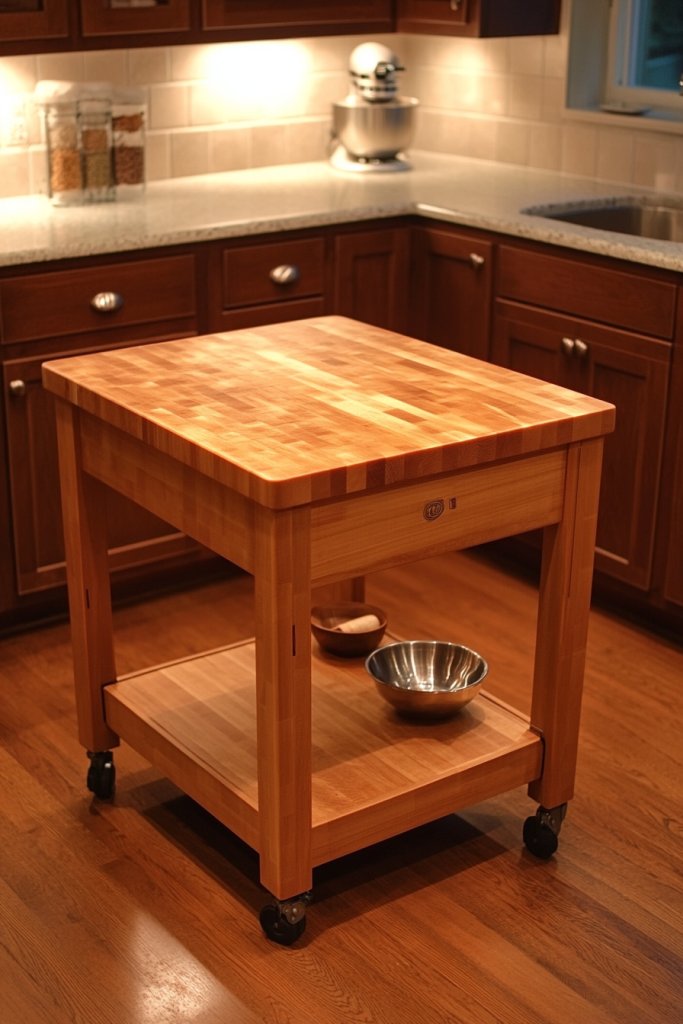
Tired of cramped countertops that limit your cooking space? A butcher block kitchen island offers a portable, versatile solution that doubles as prep area and gathering spot. It can turn a small kitchen into a social hub or provide extra workspace in larger rooms. Want more functionality and style in your cooking zone? This idea delivers.
Recommended Products to replicate this idea
| # | Preview | Product | |
|---|---|---|---|
| 1 |
|
Home Aesthetics Rolling Kitchen Island Cart with Drawers Shelves, Towel Rack, Locking Casters,... | Check Latest Price |
| # | Preview | Product | |
|---|---|---|---|
| 1 |

|
Howard Products Butcher Block Conditioner and Food Grade Mineral Oil for Wood Cutting Boards, 12 Fl... | Check Latest Price |
Visualize a sturdy wooden island with a warm, honey-toned butcher block surface. It’s topped with a few decorative bowls, a cutting board, and some fresh produce, creating a lively, inviting scene. The island’s base can be painted in a contrasting color or left natural for a rustic feel. Its presence anchors the room, making it feel both practical and cozy. It’s like having a custom-made chef’s station right in your kitchen.
Choose a mobile island with casters for flexibility or a fixed one for permanence. You can customize the size and shape based on your space—long and narrow or square and compact. Incorporate shelves or drawers underneath for extra storage. Decorate with textiles like linen aprons or woven mats to enhance the rustic vibe. Seasonal additions like a soft cloth cover or a small basket of herbs can keep things fresh.
Select a durable butcher block top that can withstand daily use. Reinforce the base with sturdy wood or metal for stability. Attach it securely to prevent wobbling, especially if mobile. Seal the surface with food-safe oil or wax to protect from spills and stains. For added convenience, include hooks or towel bars on the sides. Regular maintenance involves re-oiling to preserve the wood’s beauty.
Add a custom sign or painted detail on the base to reflect your personality. Place a soft, textured runner or a set of placemats on top for comfort and style. Incorporate small storage baskets or ceramic jars underneath for utensils or ingredients. You can even install a fold-down leaf extension for extra workspace during busy cooking days. Personal touches make the island uniquely yours.
A butcher block island isn’t just a workspace—it’s a centerpiece that elevates your entire kitchen. It encourages more home-cooked meals and makes entertaining easier. With a bit of effort, you create a functional, charming addition that ages beautifully over time. Ready to bring new life to your kitchen? An island might just be your next favorite feature!
6. Incorporate Matte Black or Copper Accents
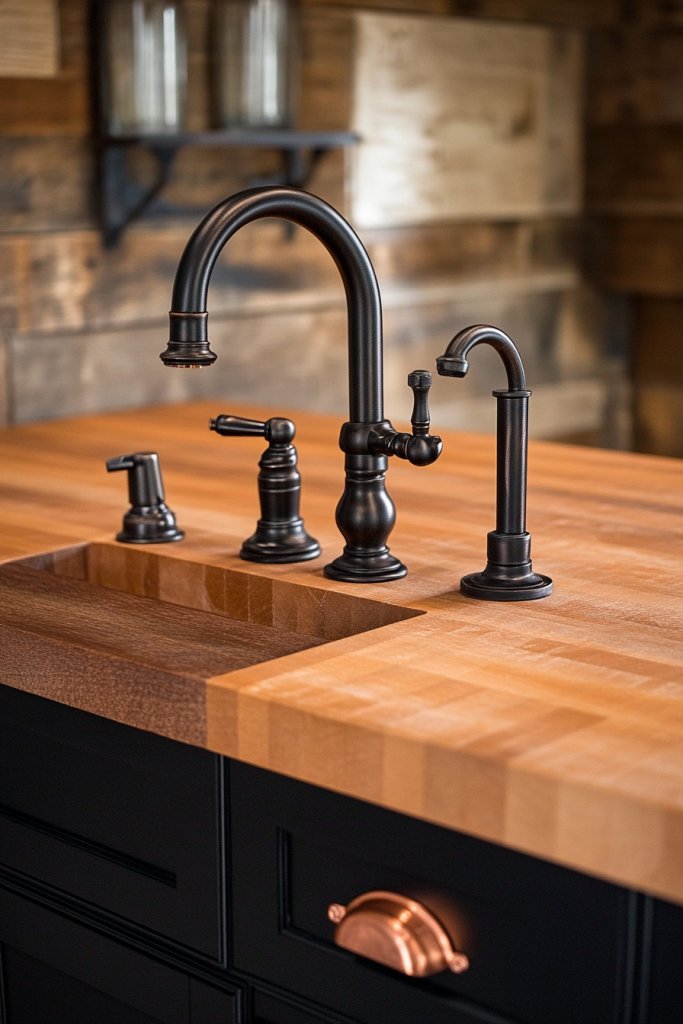
Looking to add a modern edge to your rustic kitchen? Matte black or copper accents balance warm wood tones with industrial or vintage chic. These finishes create visual contrast that elevates your space beyond basic rustic. Want to make your countertops pop without overwhelming the charm? This is the subtle upgrade you need.
Recommended Products to replicate this idea
| # | Preview | Product | |
|---|---|---|---|
| 1 |
|
Ravinte 30 Pack | 5 Inch Cabinet Pulls Matte Black Stainless Steel Kitchen Drawer Pulls Cabinet... | Check Latest Price |
| # | Preview | Product | |
|---|---|---|---|
| 1 |

|
Akicon Antique Copper Pre-Rinse Spring Kitchen Faucet, Single Level Solid Brass Kitchen Sink Faucets... | Check Latest Price |
Imagine matte black cabinet pulls or copper faucet fixtures against a backdrop of warm butcher block. The dark matte surface absorbs light, adding depth, while copper’s warm glow catches the eye and adds a touch of luxe. These accents reflect light differently, creating a layered, textured look that feels both curated and intentional. It’s like jewelry for your kitchen.
Incorporate matte black hardware throughout cabinets and drawers for a cohesive look, or use copper sparingly as statement pieces. Pair with matte black or copper pendant lights (if you’re okay with lighting restrictions) to enhance the industrial vibe. For seasonal updates, swap out hardware or add decorative accents like copper bowls or blackened metal trays. Mixing metals can add an eclectic edge.
Choose hardware and fixtures that match your overall style—matte black for a sleek, modern look or aged copper for vintage charm. Install with appropriate screws and anchors, ensuring a snug fit. For a cohesive feel, coordinate other elements like cabinet hinges or decorative knobs. Regular cleaning with gentle, non-abrasive products keeps finishes looking fresh. Replacing hardware is a quick, impactful upgrade.
Add small decorative touches like black or copper utensil holders, trays, or small sculptures. Use these accents to tie together other design elements, such as textiles or open shelving. For a more personalized look, opt for custom-engraved handles or vintage-inspired fixtures. Keep the finish consistent for a polished, high-end feel.
Matte black and copper accents provide a chic, timeless appeal that enhances rustic wood. They’re versatile enough to adapt to various styles, from industrial to farmhouse. Incorporating these touches makes your kitchen feel curated and sophisticated. Ready to add that perfect finishing touch? These accents are your secret weapon!
7. Apply a Matte Finish for a Weathered Look
Do you love the rustic charm but dislike the glossy, new-looking surfaces? A matte finish can give your butcher block a soft, weathered appearance that ages gracefully. It’s perfect if you want a vintage vibe without actual wear and tear. Want your countertop to look like it’s been part of the family for decades? Matte is the way to go.
Recommended Products to replicate this idea
| # | Preview | Product | |
|---|---|---|---|
| 1 |

|
Minwax 222224444 Polycrylic Protective Wood Finish, Clear Matte, ½ Pint | Check Latest Price |
| # | Preview | Product | |
|---|---|---|---|
| 1 |

|
Romeda 8-Pack Sanding Sponge, Four Grits Per Pack 60/80/120/220, Washable and Reusable Handmade... | Check Latest Price |
Picture a countertop with a smooth, velvety matte surface that absorbs light rather than reflecting it. The subdued sheen enhances the natural grain and imperfections, making each piece unique. It creates a soft, muted backdrop that complements distressed cabinets or woven textiles. The overall look is cozy, warm, and inviting—like a well-loved antique.
Matte finishes work well with both light and dark woods, enhancing their natural beauty. They pair beautifully with textured fabrics or rough-hewn furniture for a cohesive vintage look. During different seasons, add plush throws or textured rugs to reinforce the weathered, cozy feel. This finish is also ideal if you prefer a subtle, understated aesthetic.
Select a matte sealant or oil suitable for food contact surfaces. Sand the wood lightly before applying to ensure an even, smooth surface. Apply multiple thin coats, allowing proper drying time between layers, to avoid streaks or uneven patches. Use a soft cloth or brush to work the finish into the wood, emphasizing the grain. Regular reapplication keeps the look fresh and maintains the weathered appearance.
Combine the matte finish with hand-painted or carved accents to add personality. Incorporate textured textiles, like a soft cream throw blanket with chunky knit texture, nearby. Use decorative storage jars or vintage-inspired containers to add charm without cluttering the surface. This finish lends itself well to layering with other rustic elements for a curated look.
A matte finish not only enhances the rustic character but also makes your kitchen feel calm and collected. It’s a subtle yet impactful upgrade that ages beautifully over time. Plus, it’s low-maintenance and hides fingerprints or scratches better than gloss. Want a timeless, cozy vibe? Matte is a smart choice.
8. Create a Built-In Butcher Block Breakfast Bar

Looking for a cozy spot to start your mornings without sacrificing space? A built-in butcher block breakfast bar can turn your kitchen into a welcoming hub for casual meals. It’s perfect for quick bites or chatting with friends while cooking. Craving a functional yet charming addition? This idea combines practicality with rustic warmth.
Recommended Products to replicate this idea
| # | Preview | Product | |
|---|---|---|---|
| 1 |

|
Solid Wood Butcher Block Countertop - Unfinished Birch Slab Counter Top Wooden Table Top for DIY... | Check Latest Price |
| # | Preview | Product | |
|---|---|---|---|
| 1 |

|
Countertop Support Bracket 16 inch 4 Pack (3/8" Thick),Premium Heavy Duty Granite Countertop... | Check Latest Price |
Visualize a sturdy wooden extension that seamlessly connects to your existing countertop, topped with a warm butcher block surface. It’s accessorized with simple wooden stools and a soft cloth napkin, inviting relaxed mornings. The natural grain and warm tones blend beautifully with open shelving or distressed cabinetry. It’s an inviting space that feels both functional and homey—like a cozy café corner.
Design the breakfast bar to fit your space—long and narrow for small kitchens or wider for more seating. Incorporate a slight overhang for comfortable legroom. Decorate with simple textiles like linen or cotton runners, and add a few decorative jars or bowls nearby. During different seasons, swap out textiles or add small decorative elements for variety.
Construct the bar using sturdy wood, ensuring it matches or complements your existing counters. Secure it firmly to the main cabinetry or floor to prevent wobbling. Seal the surface with food-safe oil or polyurethane for durability. Install supports underneath for extra stability if needed. Finish by sanding smooth and adding protective coats, then anchor securely in place.
Personalize with custom etchings, painted designs, or wood-burning patterns on the edge. Place a soft fabric cover or cushion on the stools for added comfort. Use decorative baskets or pottery nearby to hold breakfast essentials or utensils. Seasonal additions like small floral arrangements or themed textiles make the space inviting year-round.
A built-in breakfast bar makes mornings more relaxed and your kitchen more functional. It’s an approachable project that adds long-term value and charm. Once in place, it encourages informal gatherings and family time. Ready to create a cozy breakfast nook? This could be your favorite new feature!
9. Combine with Whitewashed or Distressed Cabinets
Do your cabinets feel dull or outdated? Pairing butcher block countertops with whitewashed or distressed cabinets instantly transforms your kitchen into a vintage-inspired sanctuary. It’s a look that balances rustic warmth with a hint of shabby chic charm. Want a space that feels cozy yet timeless? This combination is perfect.
Recommended Products to replicate this idea
| # | Preview | Product | |
|---|---|---|---|
| 1 |
|
Solid Wood Butcher Block Countertop - Unfinished Birch Slab Counter Top Wooden Table Top for DIY... | Check Latest Price |
| # | Preview | Product | |
|---|---|---|---|
| 1 |

|
Nuvo Titanium Infusion Cabinet Makeover Kit - Easy DIY 7-Piece Set, Brilliant White, Long-Lasting... | Check Latest Price |
Imagine cabinets painted in soft, muted whites or light pastel shades, with intentional distressing revealing glimpses of wood underneath. The butcher block surface complements this worn, vintage aesthetic perfectly. The contrast between the pale cabinets and warm wood adds depth and character, creating a bright, inviting atmosphere. It’s like stepping into a cozy cottage.
Enhance the vintage vibe with antique brass or wrought iron hardware. Use open shelving or glass-front cabinets to display vintage dishes or rustic pottery. During different seasons, swap out decorative textiles or add seasonal accents like woven baskets or cozy throws. This style works well in small apartments or large farmhouses alike.
Choose cabinets with a distressed or whitewashed finish, or paint and sand existing ones for a custom look. Seal the paint with a matte or satin topcoat to protect against wear. Pair with a warm butcher block surface sealed with oil or polyurethane. During installation, ensure proper leveling and secure attachment. For a cohesive look, match hardware and accents accordingly.
Add decorative touches like vintage knobs, painted motifs, or small etched patterns. Incorporate seasonal textiles such as linen curtains or handwoven rugs. Personalize with a collection of vintage jars or open shelving displaying curated finds. These details enhance the vintage charm and make the space uniquely yours.
Combining rustic and vintage elements creates a welcoming, nostalgic kitchen environment. It’s a style that ages beautifully and feels personal. Your space will radiate charm and history, making every meal feel special. Ready to embrace a charming, vintage-inspired look? This pairing is a delightful choice.
10. Use Rope or Leather Straps for Edge Detailing
Want to add an artisanal, handcrafted touch to your rustic kitchen? Rope or leather straps along the edges of your butcher block counter can create an eye-catching detail. It’s a simple way to introduce texture and a sense of craftsmanship. Looking for a unique design element that also enhances durability? This idea fits the bill.
Recommended Products to replicate this idea
| # | Preview | Product | |
|---|---|---|---|
| 1 |

|
GORGECRAFT 5m Foldover Leather Strips Leather Trimming Tape Black Lychee Grained Imitation... | Check Latest Price |
| # | Preview | Product | |
|---|---|---|---|
| 1 |

|
PerkHomy Natural Jute Twine 600 Feet Long Twine String for Crafts Gift Wrapping Packing Gardening... | Check Latest Price |
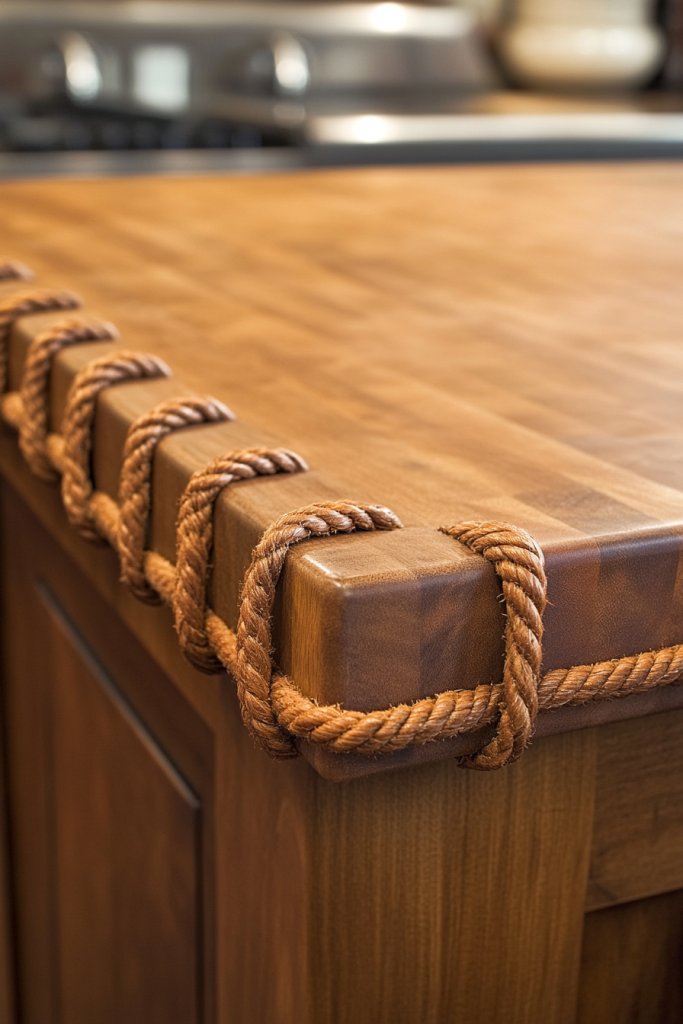
Visualize thick leather straps or braided rope wrapped around the edges of your countertop, secured with visible brass or iron fasteners. The combination of natural materials and aged hardware evokes a sense of old-world craftsmanship. The straps frame the wood beautifully, adding an extra layer of visual interest and tactile appeal. It’s like jewelry for your countertop.
Select straps in natural leather or braided jute for a rustic look, or opt for darker, distressed leather for more contrast. Attach them with decorative rivets or buckles that complement other hardware. During different seasons, swap out straps for colored or patterned options for variety. This detail can also extend along the sides or corners for a more dramatic effect.
Cut the straps to fit the length of your countertop edges, then secure with sturdy rivets or screws. Use a drill or rivet gun for secure attachment, ensuring straps lay flat and tight. Seal the wood surface beforehand to prevent water damage. Regularly check and tighten the straps to maintain their appearance and function. Consider adding decorative accents like metal charms or charms.
Engrave initials or motifs into the leather for a personalized touch. Pair with handcrafted hardware or vintage-style fixtures to reinforce the artisanal theme. Use contrasting stitching or decorative rivets for added detail. These straps also serve a practical purpose, protecting edges from chipping or damage over time.
Adding rope or leather straps elevates your countertop with a handcrafted, durable detail. It’s a small investment that makes a big visual impact while reinforcing rustic authenticity. Once installed, it ages beautifully, developing a rich patina. Ready to craft your own artisanal kitchen? This detail adds personality and resilience.
11. Integrate Open Crate Storage Beneath for Utility
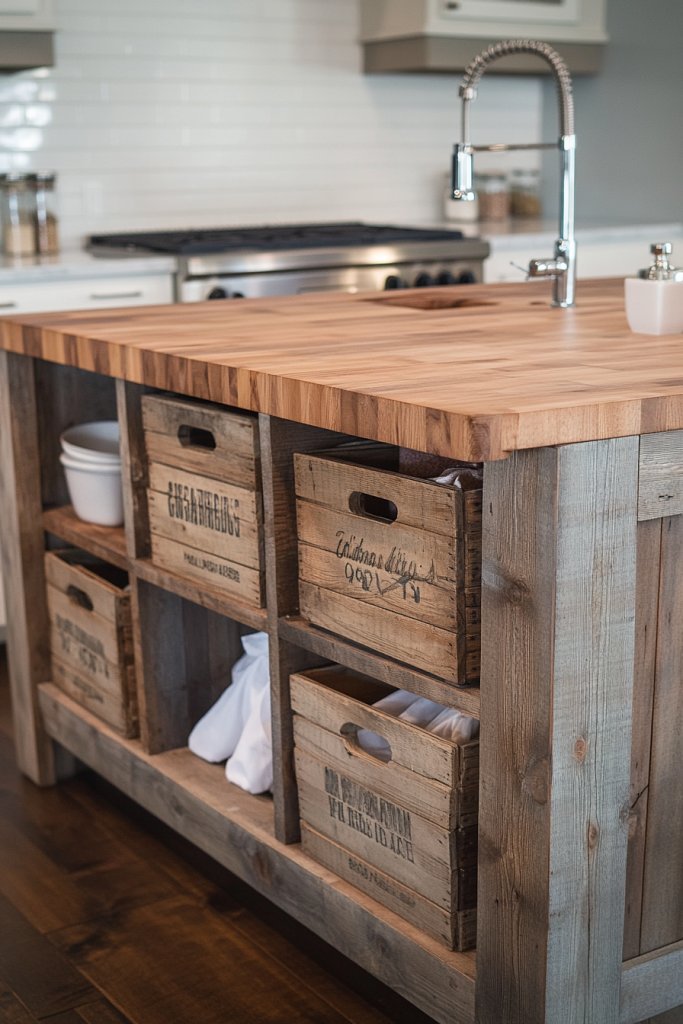
Need extra storage without sacrificing style? Open crates under your butcher block or island offer a practical solution that adds rustic charm. It’s a smart way to organize tools, linens, or pantry items while keeping everything accessible. Want to combine function with a vintage vibe? This idea ticks all the boxes.
Recommended Products to replicate this idea
| # | Preview | Product | |
|---|---|---|---|
| 1 |

|
LYDWOO8D Nested Wooden Storage Crates Set of 3 (L,M,S),Farmhouse Decorative Boxes with Handles for... | Check Latest Price |
| # | Preview | Product | |
|---|---|---|---|
| 1 |
|
Home Aesthetics Rolling Kitchen Island Cart with Drawers Shelves, Towel Rack, Locking Casters,... | Check Latest Price |
Picture sturdy wooden crates stacked or placed neatly beneath your countertop, filled with baskets of fresh produce or kitchen towels. The raw, unfinished look of the crates complements the warm tones of butcher block surfaces. The open design invites you to grab what you need quickly, and the natural textures enhance the rustic aesthetic. It’s like a mini outdoor market inside your kitchen.
Use different sizes and styles—reclaimed, painted, or raw wood—to create visual interest. Incorporate labels or decorative tags for easy identification. Seasonal arrangements like woven or fabric liners can add color and texture. Stack or line up crates along a wall or under an island for maximum utility. Incorporate small wheels or handles for mobility if needed.
Choose durable, well-constructed crates that can withstand daily use. Secure them with brackets or simply slide them into recessed spaces for stability. Seal or paint the crates to match your decor if desired. Arrange them in a way that keeps your workflow efficient, with frequently used items at the front. Regularly tidy and replace contents to keep everything functional.
Label each crate with hand-painted signs or vintage tags for a charming, organized look. Add soft liners, fabric or woven, to hide clutter and add texture. Incorporate small decorative elements like faux greenery or ceramic knobs on the crates for added flair. Personal touches turn utility into a style statement.
Open crate storage under your butcher block boosts practicality while emphasizing rustic appeal. It’s a simple fix that adds both charm and order to your kitchen. Over time, these crates develop a lovely patina that tells a story of everyday life. Want a functional, vintage-inspired pantry? This is your solution.
12. Add Pendant Lighting with Industrial or Mason Jar Shades
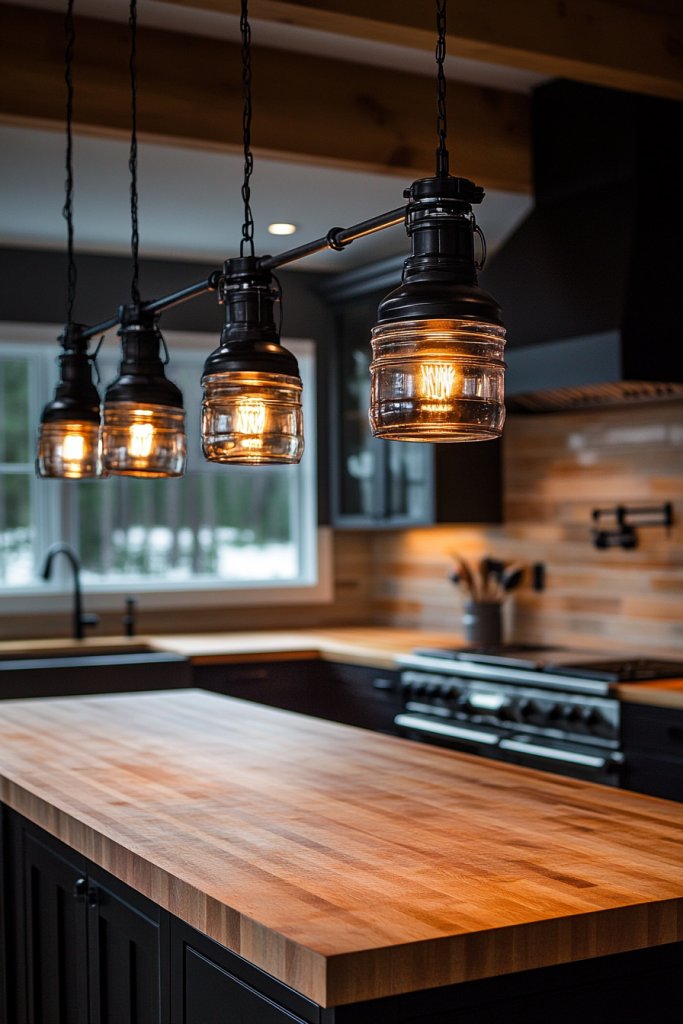
Ever tried cooking or prepping in a dimly lit kitchen and felt like you’re working in a cave? Proper lighting is essential not just for visibility but to set the mood. Pendant lighting adds that perfect touch of style while illuminating your workspace. Yet, many overlook how simple fixtures can totally change the vibe of a rustic kitchen.
Recommended Products to replicate this idea
| # | Preview | Product | |
|---|---|---|---|
| 1 |

|
PINDODO Industrial Pendant Light Fixtures,11.8" Black Dome Pendant Lights,Adjustable Vintage Hanging... | Check Latest Price |
| # | Preview | Product | |
|---|---|---|---|
| 1 |

|
Open Bottom Mason Jar Glass Shade with 1-5/8-Inch Fitter Opening Lighting Lid (RM Quart Ball Jar,... | Check Latest Price |
Imagine warm amber glow spilling from industrial-style pendant fixtures hanging above a rich butcher block island. The shades, whether made from aged metal or frosted glass, cast inviting pools of light that make every meal prep feel cozy. The rustic wood tones are highlighted beautifully, while soft shadows create depth and interest. It’s like turning your kitchen into a welcoming, functional haven.
Choose pendant shades that complement your overall theme—raw metal for an industrial touch, or glass for a more vintage look. You can also vary the height of each pendant for visual interest or cluster several for a dramatic effect. For seasonal variation, swap out shades with different textures or colors, like matte black for winter or brushed nickel for spring. These fixtures work well in small kitchens or large open layouts.
Start by measuring your countertop or island to determine ideal pendant height—usually 24-30 inches above the surface. Select fixtures with sturdy cords or chains that can be adjusted easily. Make sure your electrical wiring is accessible, or hire an electrician for safe installation. Use fixtures with dimmable bulbs for adjustable ambiance. Consider LED bulbs for energy efficiency and longevity. Mounting hardware should be robust enough to hold the weight of the fixtures securely.
Add decorative elements like vintage filament bulbs or colored glass shades to give your lighting a personal touch. Incorporate dimmer switches to control brightness and mood. For a more artisanal look, choose fixtures with distressed finishes or hand-forged details. Pairing different shapes and sizes of shades can create an eclectic, layered effect that feels relaxed and inviting.
Proper lighting can make your entire kitchen feel more inviting and functional. Plus, it’s a simple upgrade that yields big style points. With a bit of creativity, your rustic space can glow with personality and warmth, making every meal prep feel like a special occasion.
13. Incorporate Natural Stone Backsplash for Contrast

Tired of your kitchen feeling flat or bland? A natural stone backsplash can instantly add texture and earthy richness. It’s a perfect way to introduce contrast without overpowering the rustic charm. Plus, stone surfaces are durable and age beautifully, adding character over time.
Recommended Products to replicate this idea
| # | Preview | Product | |
|---|---|---|---|
| 1 |

|
Art3d 10-Pack Peel and Stick Wall Tile for Backsplash, Stick on Stone Tile for Kitchen Bathroom... | Check Latest Price |
| # | Preview | Product | |
|---|---|---|---|
| 1 |

|
Travertine Tumbled Mosaic in Tuscany Classic | Check Latest Price |
Picture a rough-hewn slate or warm travertine extending behind your butcher block counter. The stones, with their irregular shapes and varied hues, create a tactile surface that’s visually captivating. When light hits the textured surface, shadows dance across the uneven edges, heightening the sense of natural beauty. The rustic warmth of the wood is complemented perfectly by the cool, rugged stone.
Choose stone types that match your aesthetic—smooth marble tiles for a refined rustic look or rugged flagstone for a more organic feel. You can opt for a full wall or a partial backsplash, depending on your space. Seasonal updates might include changing grout colors or adding decorative trims. Pair the stone with matte-finish cabinetry or open shelving for extra visual interest.
Begin by selecting your preferred stone material, considering durability and maintenance needs. Prepare the surface by cleaning and leveling it thoroughly. Use a high-quality mortar or adhesive designed for stone installation. Cut tiles to fit your space precisely and lay them out before fixing to avoid surprises. Grout with a color that enhances the natural hues or provides contrast. Seal the stone after installation to prevent staining and make cleaning easier.
Customize the look with unique shapes—hexagonal, irregular, or mosaic patterns—to add visual interest. Incorporate accent tiles with textures or subtle color variations for a handcrafted feel. For added personality, integrate small decorative stone accents or embedded fossils. Seasonal accessories like a soft fabric curtain or textured towels can soften the ruggedness.
A stone backsplash elevates your rustic kitchen into a timeless space rich with texture and warmth. It’s an investment in both style and durability that pays off over years. With the right choice of materials and careful installation, you’ll create a feature wall that’s as functional as it is beautiful, inspiring confidence in your design choices.
14. Use Cast Iron Hooks for Hanging Utensils
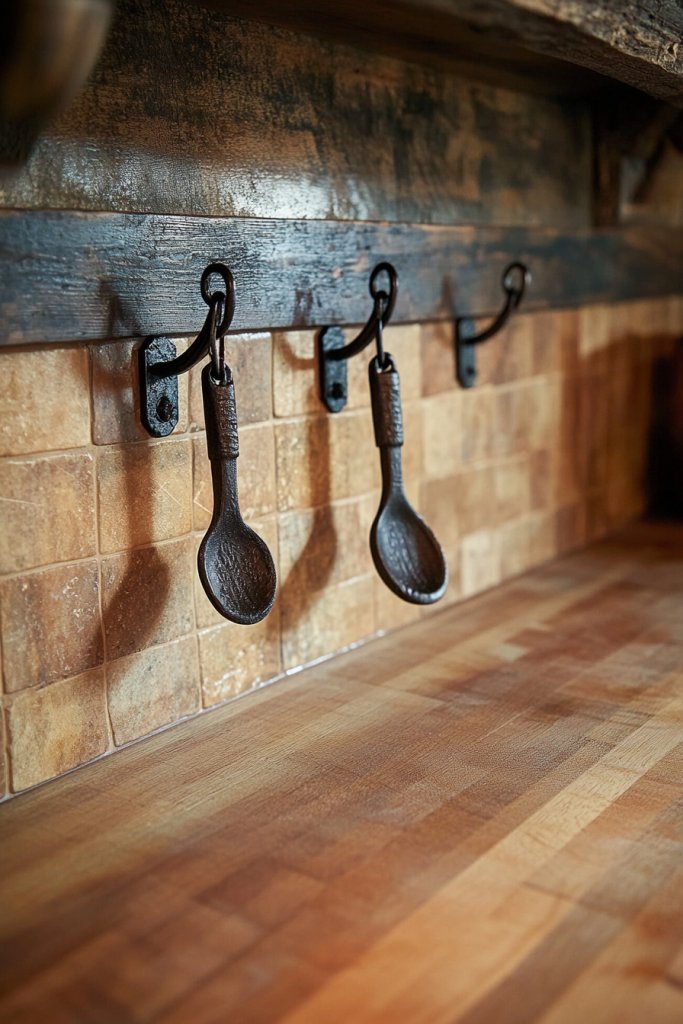
Cluttering your counters with utensils and towels? Cast iron hooks offer a practical solution while adding vintage charm. They keep essentials within reach and clear up surface space. Plus, their rugged look perfectly complements rustic decor, making your kitchen both functional and stylish.
Recommended Products to replicate this idea
| # | Preview | Product | |
|---|---|---|---|
| 1 |

|
Railroad Spike Cast Iron Hooks (10 Pack) Handmade Blacksmith, Wall Mounted Farmhouse Decorative... | Check Latest Price |
| # | Preview | Product | |
|---|---|---|---|
| 1 |

|
CHOEZON Hanging Pot Rack, Vintage Pot Hangers for Kitchen, Ceiling Mounted Pot Rack, Pot and Pan... | Check Latest Price |
Imagine a row of heavy-duty cast iron hooks mounted along the side of your open shelving or beneath a wooden beam. They hold everything from spatulas to oven mitts, all within easy reach. The dark, textured metal contrasts beautifully with warm wood tones, creating a nostalgic, farmhouse vibe. The hooks age gracefully, developing a patina that enhances their character over time.
Opt for vintage-style hooks with ornate details, or go for simple, industrial designs for a more modern rustic look. You can arrange them in a straight line or staggered for visual interest. Incorporate hooks of different sizes for variety, or cluster several to create a focal point. Use them on open shelving, beams, or even on a reclaimed wood panel for added texture.
Start by selecting durable cast iron hooks that can handle daily use. Mark where you want to install them, ensuring even spacing for aesthetic balance. Drill pilot holes and use appropriate anchors if mounting on drywall or softer surfaces. Secure the hooks with sturdy screws—consider using rust-resistant ones for longevity. Arrange your utensils and towels in a way that’s both accessible and visually appealing. Regularly check for loose screws and rust spots to maintain their rustic charm.
Personalize by engraving or painting the hooks with initials or motifs. Group them with decorative leather straps or braided cords for extra artisanal flair. Use color-treated or distressed hooks to match specific themes or seasons. Pair with vintage storage jars or antique kitchen accessories for a curated, eclectic look.
Cast iron hooks marry durability and style, giving your kitchen a warm, lived-in feel. They’re a small detail that makes a big difference in organization and aesthetic. With simple installation and ongoing maintenance, you’ll enjoy a clutter-free, rustic space that’s both practical and charming.
15. Finish with a Clear Food-Safe Oil for a Rich Patina
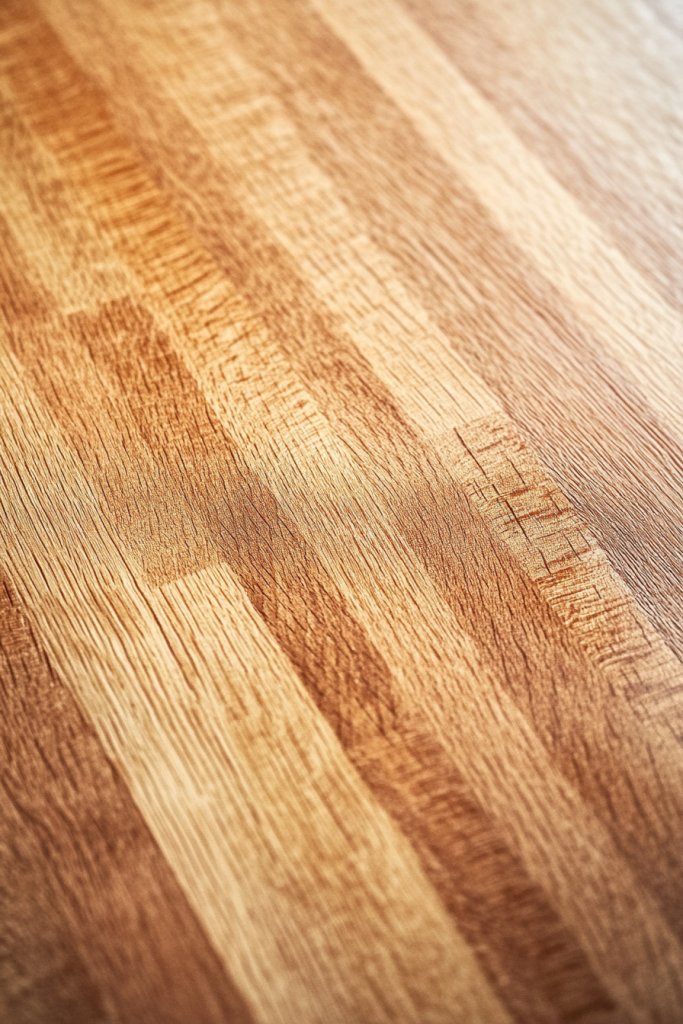
A beautiful butcher block isn’t just for looks—it needs protection to stay functional and inviting. Applying a food-safe oil keeps the wood nourished, prevents cracking, and enhances its natural color. It’s a simple step that preserves the rustic charm and adds a soft, rich glow.
Recommended Products to replicate this idea
| # | Preview | Product | |
|---|---|---|---|
| 1 |

|
Thirteen Chefs Mineral Oil - 8 oz Food Grade Conditioner for Wood Cutting Board, Countertop &... | Check Latest Price |
| # | Preview | Product | |
|---|---|---|---|
| 1 |
|
Howard Products Butcher Block Conditioner and Food Grade Mineral Oil for Wood Cutting Boards, 12 Fl... | Check Latest Price |
Imagine a freshly oiled countertop with a subtle sheen that highlights every grain and knot. The wood looks vibrant, almost alive, inviting you to cook and create. When you run your hand over the surface, it feels smooth and conditioned, a sign of ongoing care. That warm, inviting glow makes the space feel cozy and well-loved, like a treasured heirloom.
Choose from natural oils like tung or mineral oil, or opt for blends with beeswax or carnauba for extra sheen. Regular reapplication is key to maintaining the patina, especially after heavy use or cleaning. Seasonal changes might inspire you to deepen the finish with richer oils or lighter treatments for a fresh look. For a more matte finish, select low-gloss sealants that still nourish the wood.
Start by cleaning the surface thoroughly, removing dust and debris. Apply the oil with a clean cloth, rubbing it into the wood in the direction of the grain. Let it soak for at least 15 minutes, then wipe off any excess to prevent sticky residue. Repeat this process monthly or as needed to keep the wood hydrated. For best results, do this in a well-ventilated area and avoid harsh chemicals that might compromise food safety.
Create a custom blend of oils infused with natural scents like citrus or herbs for a sensory upgrade. Use color-coded oils or waxes to denote different finishes or treatments. Add a decorative label or a small wooden tag with your initials for a personalized touch. Regular maintenance ensures your countertop ages gracefully, developing a desirable, rich patina.
A well-maintained butcher block not only looks stunning but becomes a part of your daily life. Its natural beauty and durability can last for decades with proper care. Embrace the routine of oiling as a ritual that keeps your space inviting and functional, celebrating craftsmanship in every meal.
16. Decorate with Woven Baskets and Mason Jars
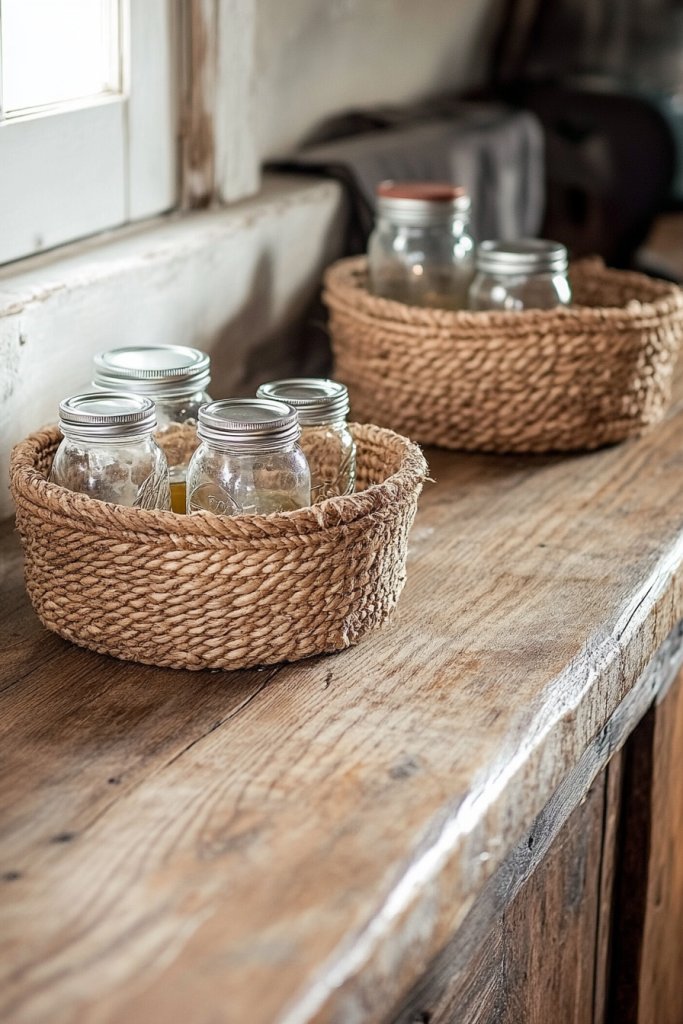
Cluttered countertops can kill the rustic vibe faster than you can say ‘Mess.’ Woven baskets and mason jars offer a charming, practical way to organize essentials while adding texture and warmth. They’re versatile, affordable, and instantly upgrade the look of your kitchen. Plus, who doesn’t love a bit of vintage charm?
Recommended Products to replicate this idea
| # | Preview | Product | |
|---|---|---|---|
| 1 |

|
Posprica Woven Storage Baskets for Organizing 6 Pack, Large&Small Storage Cube Bins Set for... | Check Latest Price |
| # | Preview | Product | |
|---|---|---|---|
| 1 |
|
Dwbligt 2 Pack Cookie Jar, 1 Gallon Glass Jar with Airtight Lids - Large Wide Mouth Mason Jar for... | Check Latest Price |
Imagine open shelves lined with woven baskets filled with neatly stacked dish towels or spices. Mason jars hold utensils, pasta, or dry goods, their glass catching the light beautifully. The textures of woven fibers and clear glass contrast with the smooth, polished butcher block, creating a layered, cozy aesthetic. It feels inviting, like a well-loved country kitchen ready for any culinary adventure.
Vary basket sizes and shapes for visual interest, mixing woven seagrass with rattan or wicker. Use different jar sizes and add decorative lids or labels for a personalized touch. Seasonal swaps include filling jars with holiday spices or dried flowers, while baskets can hold winter mitts or summer napkins. Incorporate these elements into open shelving, island storage, or even on countertops for a relaxed, eclectic feel.
Choose sturdy woven baskets made from natural fibers resistant to moisture. Position them strategically on open shelves or inside cabinetry for hidden storage. Mason jars should have airtight seals for freshness and be easy to clean. Arrange items logically—spices near the stove, utensils close to prep areas. Regularly clean and replace contents to keep everything fresh and appealing. You can even DIY some baskets for a personalized touch.
Label jars with handwritten tags or stylish stickers for easy identification. Fill baskets with seasonal decor like faux berries or fabric accents to match holidays or moods. Mix materials—metal, wood, or ceramic accessories—to enhance the rustic charm. Incorporate small decorative elements like vintage spoons or miniature cutting boards for added flair.
Decorative storage solutions like baskets and jars turn clutter into charm, making your kitchen feel more inviting. They’re a simple way to boost organization without sacrificing style. With a little creativity, your space will look curated and cozy, inspiring you to cook more and entertain with confidence.
17. Incorporate a Chalkboard or Wooden Sign for Personal Touches

A plain kitchen can feel uninspired, especially when it’s just a space for chores. Adding a chalkboard or wooden sign injects personality and warmth, transforming your kitchen into a welcoming hub. It’s the perfect spot to jot down recipes, quotes, or reminders that make the space uniquely yours. Who says functionality can’t be charming?
Recommended Products to replicate this idea
| # | Preview | Product | |
|---|---|---|---|
| 1 |

|
DesignOvation Wyeth Framed Magnetic Chalkboard, 13" x 26", Gray | Check Latest Price |
| # | Preview | Product | |
|---|---|---|---|
| 1 |

|
Rustic Wood Kitchen Sign for Home Decor, Decorative Wooden Cutout Word Decor Freestanding Tabletop... | Check Latest Price |
Picture a rustic wooden sign hanging above your butcher block, engraved with a favorite quote or family motto. Or imagine a chalkboard wall where handwritten menus, grocery lists, or doodles add a playful touch. The natural grains of wood or the matte surface of a chalkboard contrast beautifully with warm wood tones and aged metals. It’s a simple, effective way to personalize your space while adding visual interest.
Choose from hand-painted signs, engraved plaques, or chalkboard panels that can be erased and rewritten. Seasonal messages—like holiday greetings or summer recipes—keep it fresh. Mix and match with other rustic elements like woven textiles or vintage hardware for a layered look. You can also create a gallery wall with multiple small signs for a more eclectic vibe.
Select durable wood or metal signs suited for indoor use. Hang them at eye level using sturdy hooks or brackets, ensuring they are securely mounted. For chalkboards, use quality chalk or chalk markers for clear writing that wipes clean easily. Personalize with your favorite quotes, family initials, or daily specials. Regularly update messages to keep the space lively and engaging.
Add decorative elements like painted borders, stenciled patterns, or faux distressing for extra rustic charm. Incorporate small hooks or clips to hang recipe cards or photos. Personal touches like hand-lettered messages or family recipes make the space feel warm and inviting. It’s a simple yet impactful way to turn everyday routines into a source of inspiration.
A personalized sign or chalkboard elevates your kitchen from ordinary to memorable. It’s an easy project that adds character, making your space feel truly yours. With a little creativity, your rustic kitchen becomes a lively, inspiring place where daily life feels special.
Conclusion
The diverse range of butcher block countertop ideas showcased here demonstrates their ability to enhance any kitchen style with rustic warmth and practicality. Don’t hesitate to incorporate these ideas into your own space—each one offers a unique way to add charm and function. Embrace the beauty of natural wood and let your kitchen become a true reflection of inviting, rustic living.
Last update on 2026-03-07 / Affiliate links / Images from Amazon Product Advertising API