
21 CD Storage Ideas for Organized Collections
Are you tired of cluttered shelves and misplaced CDs? You’re not alone! CD storage ideas have surged in popularity because they combine practicality with creativity, helping collectors and casual listeners alike keep their collections neat and accessible.
In this article, you’ll find a variety of clever and stylish ways to organize your CDs, whether you have a small collection or a vast library. From space-saving solutions to eye-catching display options, these ideas will inspire you to transform your storage space into a functional and attractive part of your home. Get ready to elevate your collection with ideas that are as unique as your music taste!
1. Wall-Mounted CD Shelving with Color-Coded Labels
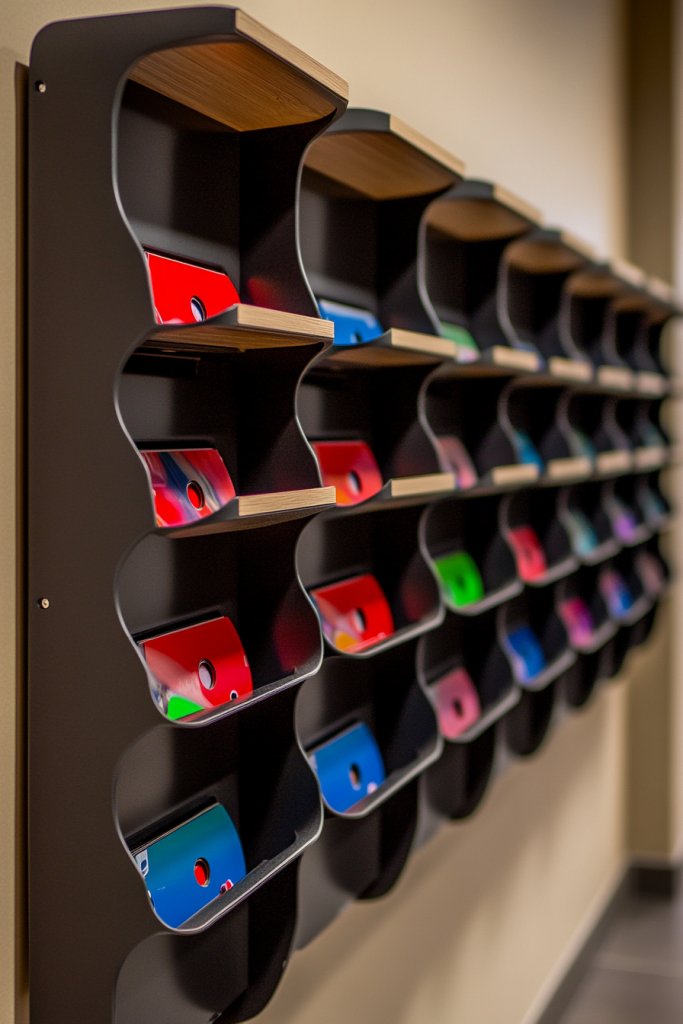
Ever feel overwhelmed by a messy collection of CDs cluttering your space? Sometimes, finding that one album feels like searching for a needle in a haystack. You want a solution that keeps things organized but still looks cool. The struggle is real when your collection turns into chaos.
Imagine sleek, slim shelves mounted on your wall, each labeled with vibrant color codes or genre tags. The CDs rest neatly in rows, easily accessible yet visually appealing. The labels make browsing a breeze, and the colors add a pop of fun to your decor. It’s like a mini record store right in your home, but way more personalized.
You can customize the color labels based on your favorite genres or artists, making it a playful project. For a minimalist look, opt for monochrome labels and simple shelving units. Seasonal decor can be added with themed labels or decorative tape. If space is tight, vertical wall-mounted units work best, maximizing every inch.
Start by measuring your wall space to select appropriately sized shelves. Use sturdy brackets or floating shelf kits to mount them securely. Label each section with durable, colorful tags or stickers—think waterproof vinyl for longevity. Organize your CDs by genre, artist, or mood, and stick to your system for easy browsing. Regularly update labels as your collection grows.
Add decorative elements like patterned washi tape around labels or custom hand-painted tags for a creative touch. Incorporate small framed photos or memorabilia next to some sections for a nostalgic vibe. You can also assign each shelf a theme—like ’90s hits’ or ‘Jazz Classics’—to make browsing even more fun. Personal touches turn a simple shelf into a reflection of your personality.
This organized wall system not only declutters your space but also makes your collection a visual centerpiece. It’s a perfect way to showcase your taste and keep everything accessible. Once set up, you’ll wonder how you ever managed without it. Ready to turn your messy shelves into a stylish display?
2. Repurposed Vintage Suitcases as Portable Storage
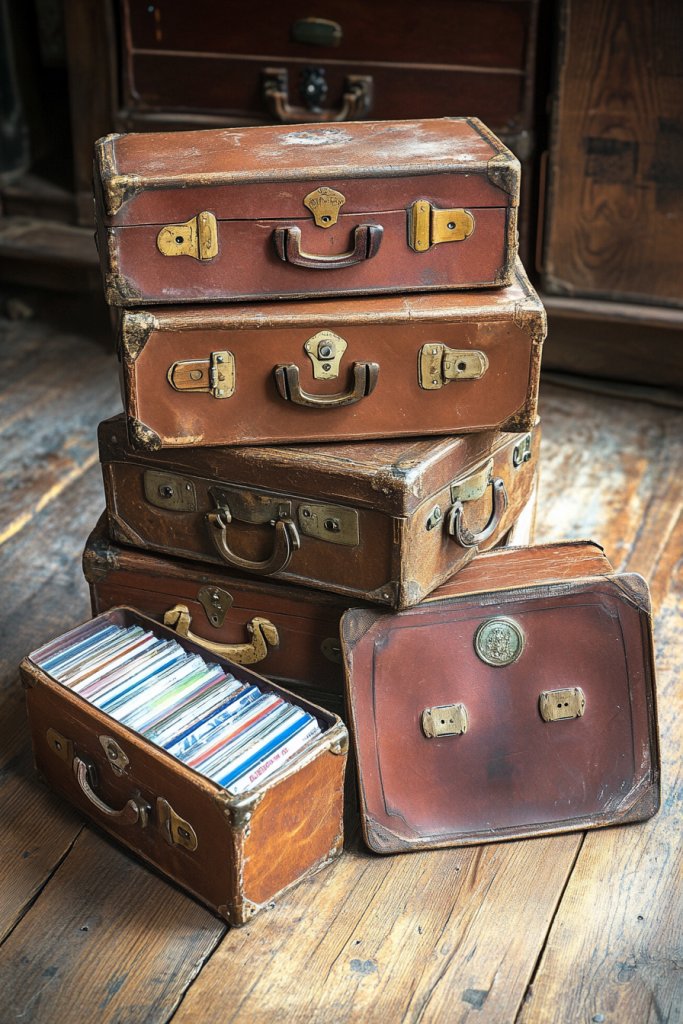
Tired of boring storage boxes that kill your decor vibe? Vintage suitcases are the ultimate style upgrade for storing your CDs. They add character and nostalgia, making storage feel like a design statement rather than an afterthought. Plus, they’re portable, so you can move your collection anywhere.
Picture stacked suitcases with distressed leather or colorful fabric exteriors lining your wall or sitting in a cozy corner. When opened, they reveal neatly organized CDs inside, with dividers or soft fabric lining preventing scratches. Their rustic charm instantly elevates your space, blending storage with retro flair. It’s like having a piece of history that’s functional.
Choose suitcases that match your decor style—vintage leather for classic vibes or bright floral prints for boho chic. Stack them for an eclectic look or hang them on the wall with sturdy hooks for a more modern industrial feel. Seasonal swaps are easy—swap out covers or add decorative patches for a fresh touch. Use smaller suitcases for compact spaces or larger trunks for big collections.
Start by sourcing authentic vintage suitcases from thrift stores or online marketplaces. Clean and condition them if needed; add soft fabric liners or foam inserts to protect the CDs. Use heavy-duty hooks or brackets to mount larger suitcases on walls or stack them safely on the floor. Inside, organize CDs with small dividers or in fabric sleeves. For portability, simply lift and carry the suitcases to different rooms.
Personalize with decorative tags, vintage stickers, or paint accents to match your decor theme. You can also add labels to each suitcase indicating categories like ‘Rock’ or ‘Classical.’ Inside, add small LED puck lights for better visibility. Incorporate vintage keys or charms as decorative pulls for a whimsical touch. It’s a mix of function and style that’s totally unique.
Using vintage suitcases makes your collection a conversation starter and a piece of decor. It’s a creative way to showcase your love for nostalgia while staying organized. Plus, it’s budget-friendly and eco-conscious—reusing old suitcases is a win-win. Ready to pack your collection in style?
3. Custom Drawer Dividers in a Dedicated Media Cabinet
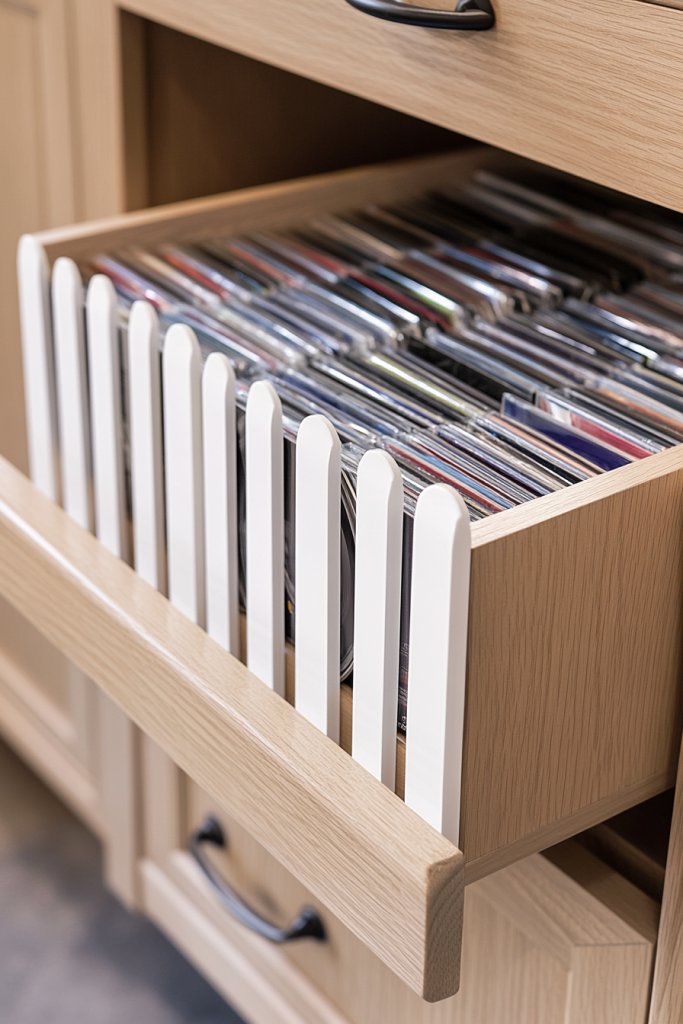
Do your CDs end up in a jumbled mess at the bottom of a drawer? Finding what you want requires digging through chaos. Custom drawer dividers turn that mess into a neatly organized system, making your collection easy to browse and put away. It’s a simple fix for cluttered storage.
Imagine opening a sleek media cabinet with perfectly fitted sections for each category of CDs. The dividers keep everything upright and separated, so nothing gets mixed up or damaged. You see a clean, orderly interior with labels or color codes on each section, ready to be explored at a glance. It’s like having your own mini library in a compact space.
Choose adjustable dividers that can be moved or removed as your collection grows. For a minimalist look, opt for slim, uniform dividers in neutral tones. For a more playful style, use colorful or patterned inserts. Seasonal or themed organizing—like holiday music or summer hits—is easily achieved by swapping out dividers or labels.
Start with a sturdy media cabinet that fits your space and collection size. Measure the interior dimensions, then select or custom-make dividers to fit snugly. Use non-slip pads or foam to prevent shifting. Label each section with small tags or stickers for quick identification. Organize your CDs by genre, artist, or mood, and maintain the system by periodically updating labels or rearranging dividers as needed.
Decorate the dividers with washi tape, decals, or hand-lettered labels for a personalized touch. You could even use themed dividers for different musical genres or eras. Inside, add small stackable trays or bins for accessories like headphones or CD cases. Keep the system flexible so it adapts as your collection evolves.
A dedicated media cabinet with custom dividers transforms a chaotic collection into a showcase of your musical taste. It’s a functional upgrade that makes your daily routine easier and more enjoyable. Once organized, you’ll feel confident in your space and your music collection’s presentation. Time to tidy up?
4. Clear Acrylic Clamshell Cases for Minimalist Display

Tired of bulky, traditional jewel cases cluttering your shelves? Clear acrylic clamshell cases offer a sleek, modern alternative that emphasizes your collection’s visual appeal. They create a minimalist look that keeps the focus on the album art and design. Plus, they’re easy to clean and maintain.
Picture a row of transparent cases aligned on floating shelves or inside glass-front cabinets. The cases reveal the colorful artwork and liner notes, making each album a small piece of art. The clear material adds a contemporary vibe, turning your collection into a visually engaging display. It’s like a mini gallery of music at your fingertips.
Use uniform cases for a clean, streamlined look or mix transparent with colored or textured options for variety. Stack them vertically or lay them flat for different visual effects. Incorporate lighting—such as LED strips—to highlight your collection. For a seasonal twist, swap out cases with themed or decorative covers to match holidays or moods.
Purchase high-quality acrylic cases designed specifically for CDs. Clean and dry the cases thoroughly before inserting your discs, ensuring no fingerprints or smudges. Organize by genre, artist, or release date, then place the cases on your preferred display surface. For wall display, attach sturdy mounting hardware compatible with acrylic cases, ensuring even spacing. Regularly wipe the cases with a soft cloth to keep them pristine.
You can add custom labels or decals on the cases for further organization or decoration. Consider inserting small, decorative backing cards behind the discs for a pop of color or pattern. Stack cases in a clear acrylic storage unit or display them in a glass-front cabinet for a museum-like effect. Personal touches like these make your collection a statement piece.
Minimalist acrylic cases turn your music collection into a sleek, modern art installation. It’s a functional way to protect your discs while showcasing your taste. Once set up, you’ll love how effortlessly stylish and organized your collection looks. Ready to upgrade your display?
5. Under-Bed Slide-Out Storage Drawers

Running out of space for your music collection? Under-bed storage is often overlooked but offers a hidden treasure trove of space. Slide-out drawers beneath your bed can discreetly hold dozens of CDs, freeing up closet or shelf space. It’s an easy way to hide clutter without sacrificing style.
Imagine pulling out a sleek, low-profile drawer from beneath your bed, revealing a neatly organized stash of CDs in labeled storage bins or sleeves. The drawer glides smoothly on rails, making access effortless. It’s tucked away, keeping your collection out of sight but within easy reach. The space feels tidy and uncluttered, with everything hidden in plain sight.
Choose shallow, wide drawers for easy access or deeper ones for larger collections. Use dividers or small bins inside to keep CDs upright and organized. Decorate the drawer fronts with removable labels or decals that match your room’s style. This approach works well in guest rooms, dorms, or small apartments, especially when space is tight.
Measure the space beneath your bed to select suitable slide-out drawers. Opt for sturdy, lightweight materials like plastic or thin plywood for easy sliding. Inside, add fabric or foam liners to prevent scratches. Label each drawer with categories or genres for quick finding. Regularly clean and reorganize to accommodate new additions and avoid clutter buildup.
Personalize the drawers with decorative handles, painted fronts, or themed stickers. Use color-coded bins or dividers inside for better categorization. Integrate small labels or tags for quick identification. You can also add a small LED light strip inside the drawer cavity for better visibility at night.
Utilizing under-bed space maximizes your storage potential without sacrificing aesthetics. It keeps your collection accessible yet out of sight, maintaining a clean look. Once organized, you’ll enjoy a clutter-free room with your music collection always within reach. Ready to slide into better storage?
6. Floating Shelves with Decorative Bins for Easy Access

Cluttered shelves and tangled stacks of CDs can make your space look chaotic. Floating shelves combined with decorative bins offer a smart, stylish solution. They keep your collection organized while adding aesthetic charm. Plus, the bins make it easy to grab a CD without digging through piles.
Visualize a set of sleek, wall-mounted floating shelves with colorful or textured bins placed beneath or alongside. CDs are stored upright in the bins or directly on the shelves, with labels facing outward. The combination creates a layered look, blending display and hidden storage. It’s practical, pretty, and perfect for a modern or eclectic decor style.
Mix and match shelf lengths, colors, and bin styles to match your decor theme. Use woven baskets for a boho feel or metal bins for an industrial vibe. Adjust the height and placement to suit your space, creating a dynamic, personalized display. Seasonal or themed bins can be swapped in for special occasions or moods.
Install floating shelves at a comfortable height using sturdy anchors. Select decorative bins that fit the shelf length and have a clear label area. Organize your CDs in the bins or upright on the shelf, sorted by genre or artist. Label each bin clearly for quick access. Maintain the system by periodically refreshing labels or swapping out bins for variety.
Decorate the bins with fabric liners, painted patterns, or decorative stickers. Use different textures like rattan, metal, or fabric to add visual interest. Incorporate small decorative objects or lighting above the shelves for ambiance. Personal touches like these make your storage both functional and charming.
This setup turns your collection into a curated showcase, boosting your space’s style and usability. It’s adaptable to any room size or decor theme, making organization an enjoyable part of your design. Once in place, you’ll find it’s easy, fun, and satisfying to maintain.
7. Rotating CD Carousel for Efficient Viewing

Ever wish you could browse your entire CD collection without clutter or digging? A rotating carousel makes it simple to flip through albums easily. It’s perfect for displaying your favorites in a compact, accessible way. Plus, it adds a fun, interactive element to your space.
Picture a sleek, spinning stand placed on your table or shelf, filled with neatly organized CDs. As it rotates, each album face is visible, inviting you to browse or pick your next listen. The shiny surface and smooth movement give it a high-tech, playful vibe. It’s like a mini jukebox, but for your home.
Choose a compact, multi-tiered carousel or a larger, stand-alone model for bigger collections. Decorate the base with colorful decals or metallic finishes to match your decor. For a more vintage look, opt for a wooden or brass carousel. You can also incorporate lighting effects to spotlight your favorites.
Select a carousel with a stable base and smooth rotation mechanism. Fill it with your favorite or frequently played CDs, making sure they’re securely placed. Keep the carousel in a central location like a coffee table, countertop, or open shelving. Rotate regularly to enjoy browsing your collection effortlessly. Clean the surface occasionally to keep it looking fresh.
Add small decorative elements like themed stickers or colored rings to your CDs for quick identification. Personalize the base with paint, decals, or LED lights for extra flair. Use a clear acrylic cover or glass dome to protect the carousel from dust while still showing off your collection. It’s a fun, functional piece that’s easy to update.
A CD carousel transforms browsing from a chore into an enjoyable experience. It’s a space-saving, stylish way to showcase your most-loved albums. Once set, you’ll love how it simplifies your listening routine and adds a playful touch to your decor.
8. Modular Cube Storage Units with Custom Labels
Trying to keep your CD collection neat in one big box feels like a losing battle. Modular cube storage units offer a flexible, organized solution that adapts to your needs. They turn chaos into order and turn your collection into a visual delight. Plus, they’re easy to expand as your collection grows.
Visualize a grid of open cubes filled with albums arranged upright or in small containers. Each cube is labeled with custom tags or symbols, making it easy to find genres or artists. The uniform shape and clean lines give a modern, organized look that fits any room. It’s like a mini library or record store at home.
Mix cube sizes or add doors for hidden compartments. Use colorful labels or decorative paper to customize each section. Arrange cubes horizontally or stack vertically for different visual effects. Seasonal or mood-based labeling makes browsing intuitive and fun. The modular nature allows you to reconfigure anytime.
Choose a sturdy cube unit that fits your space and aesthetic. Label each cube with durable tags or paint on custom labels. Organize your CDs by genre, artist, or era—whatever makes sense for you. Inside, use smaller bins or sleeves for protection and easy access. Revisit the setup periodically to add or rearrange categories.
Decorate labels with washi tape, stickers, or hand lettering for a personal touch. Use color-coding for quick identification—red for rock, blue for jazz, etc. Inside, add small dividers or trays to keep CDs upright and prevent scratches. Incorporate some decorative elements like framed photos or small collectibles.
Modular cube units make your collection a showcase rather than clutter. They grow with your collection and can be customized endlessly. Once organized, you’ll find it easier to maintain and more enjoyable to browse. Ready to build your perfect storage grid?
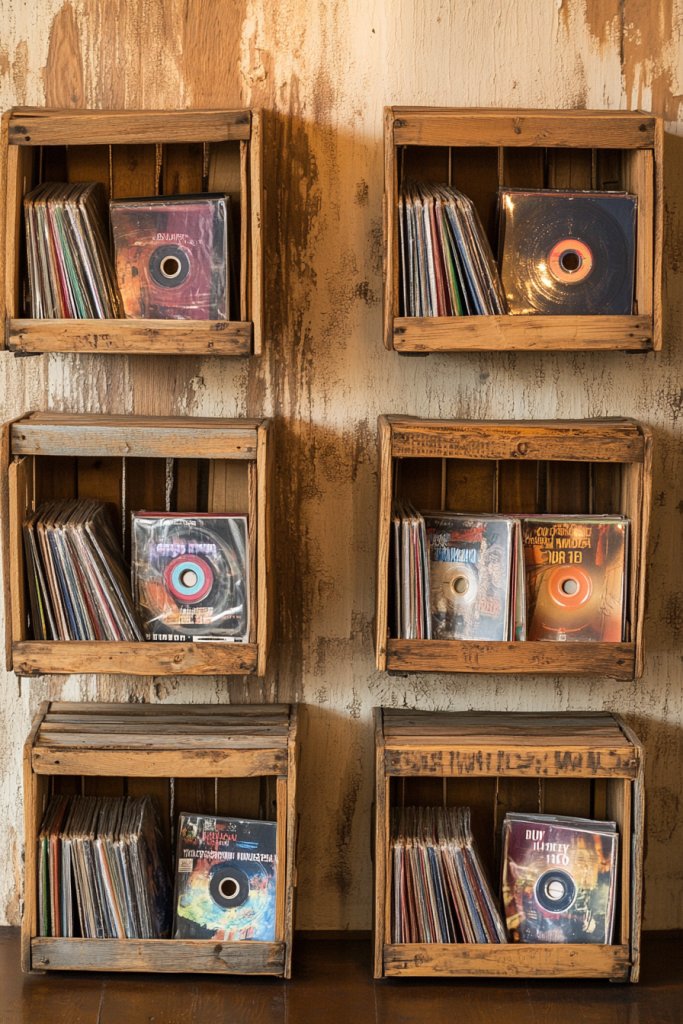
9. Vintage Record Crates with a Modern Twist

Are traditional storage solutions too sterile for your taste? Vintage record crates bring rustic charm and nostalgia to your space while providing ample storage. They’re perfect for those who want a casual, eclectic look that still keeps their collection accessible. Who says storage can’t have personality?
Imagine weathered wooden crates stacked or lined up along a wall, filled with CDs stored upright or in fabric sleeves. The aged finish contrasts beautifully with modern decor, adding warmth and character. You can decorate the crates further with paint or stencils for a personalized touch. It’s a functional piece of decor that tells a story.
Use open crates for easy access or add lids for a cleaner look. Paint or stain the crates to match your color scheme or leave them natural for a rustic vibe. Incorporate modern hardware or decorative labels for a fresh twist. You can also mix vintage crates with contemporary shelving for an eclectic look.
Source authentic vintage crates from thrift stores, flea markets, or online. Clean and lightly sand the surfaces for a smooth finish. Organize your CDs inside with dividers or fabric sleeves, standing upright for easy browsing. Arrange the crates horizontally or vertically, depending on your space. Label each crate with painted or handwritten tags.
Add decorative touches like stenciled patterns or decals. Incorporate small LED string lights around or inside the crates for a cozy glow. Use vintage tags or chalkboard labels for easy updates. Personal touches transform simple crates into statement pieces that reflect your style.
Vintage crates turn your collection into a charming, nostalgic display. They’re easy to customize and maintain, making organization enjoyable. Plus, the aesthetic appeal makes your space feel warm, inviting, and uniquely yours. Ready to crate your collection?
10. Wall-Mounted Pocket Organizers for Compact Storage

Cluttered shelves and messy piles make browsing your CD collection a hassle. Wall-mounted pocket organizers offer a compact, accessible solution that keeps your collection within arm’s reach. They’re perfect for small spaces or for adding a creative storage element. Who says organization has to be boring?
Picture fabric or leather pockets hanging vertically on your wall, each holding a handful of CDs. The textured material adds warmth and interest, while the pockets keep albums upright and visible. It creates a casual, artsy vibe that’s both functional and decorative. Your collection becomes part of your wall art.
Choose from different materials—canvas, leather, or mesh—to match your decor. Vary pocket sizes to accommodate different media or add labels for categorization. Arrange pockets in a grid pattern or staggered for a dynamic look. Seasonal or themed pockets can be swapped in for variety.
Attach sturdy hooks or brackets to your wall, ensuring they can hold the weight of multiple pockets. Sew or buy pre-made pockets with reinforced openings. Organize CDs by genre, artist, or mood, and label each pocket with fabric tags or stickers. Regularly clean and reorganize as your collection grows or changes.
Decorate the pockets with fabric paint, patches, or decorative trims. Add personalized labels or icons to easily identify contents. Incorporate small decorative elements like charms or badges to enhance visual appeal. Keep it fun and reflective of your personality.
Wall-mounted pockets make your collection a visually engaging feature while saving space. They’re flexible, customizable, and easy to update. Once set up, browsing becomes a tactile, aesthetic experience that boosts your love for music and organization.
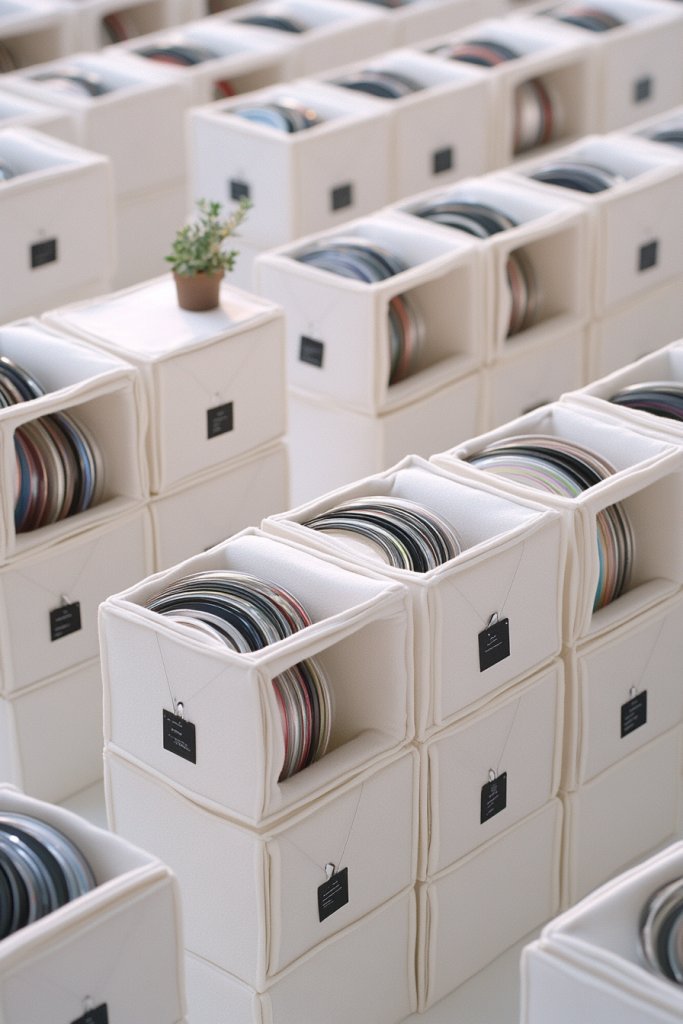
11. Transparent Drawer Bins with Stackable Design

Dealing with a cluttered, hard-to-see collection of CDs is frustrating. Transparent stackable bins solve this by keeping everything visible and organized. They’re perfect for maximizing storage while maintaining easy access. Plus, they look neat and modern on any shelf or closet.
Imagine clear plastic bins stacked neatly in your closet or on a shelf, each filled with CDs arranged upright or in sleeves. The see-through design allows you to identify albums instantly without rummaging. The uniform stacking creates a sleek, organized appearance, turning your collection into a visual display.
Use different sizes for various collection segments—small bins for singles or special editions, larger ones for bulk storage. Label each bin with waterproof stickers or engraved tags for quick identification. Stack them vertically or place side-by-side depending on your space. You can also add decorative labels or color codes for extra flair.
Purchase high-quality, stackable clear bins that fit your available space. Fill them with your CDs, standing upright or layered flat, ensuring labels are visible from the outside. Organize by genre, artist, or release date. Place the bins on sturdy shelving units or inside cabinets, and periodically review for reorganization needs. Keep the bins clean with regular wiping.
Decorate the outer surface with colorful stickers, washi tape, or painted labels. Inside, add small dividers or sleeves for protection. Group similar genres or artists together for quick access. Incorporate decorative elements like small figurines or themed tags to boost aesthetic appeal.
Stackable clear bins turn your collection into a neat, accessible display that’s easy to maintain. They make browsing simple and efficient, giving you a sense of order and control. Once organized, your space feels cleaner, and your music is always at your fingertips.
12. Built-In Cabinet with Sliding Doors for Hidden Storage

Are your CDs scattered across various shelves and drawers? A built-in cabinet with sliding doors offers a sleek, concealed storage solution. It keeps your collection out of sight but easily accessible when needed. Perfect for maintaining a clean, minimalist aesthetic.
Visualize a custom cabinet seamlessly integrated into your wall, with sliding doors that hide a well-organized interior. Inside, CDs are stored in racks or bins, arranged by genre or artist. When closed, the cabinet blends into your wall, creating a streamlined look. It’s like having your own hidden music vault.
Choose materials and finishes that match your decor—matte paint, wood veneer, or lacquer. Opt for full-height cabinets or shorter, modular units. Inside, add adjustable shelves or racks for flexibility. Decorate the sliding doors with minimal hardware or sleek handles for a modern finish.
Work with a carpenter or DIY if you’re handy, to build a custom cabinet that fits your space. Install sturdy sliding hardware, ensuring smooth operation. Inside, organize CDs using racks, dividers, or bins. Seal edges properly to prevent dust and damage. Regularly check the hardware and clean the interior.
Personalize the exterior with decorative paint, decals, or textured finishes. Inside, add labels or color tags for genre separation. Incorporate lighting inside the cabinet for visibility. Use decorative pulls or handles that match your room’s hardware for a cohesive look.
A built-in cabinet transforms your collection into a sleek, integrated feature. It keeps your space tidy and visually appealing, making your collection feel like part of your home’s architecture. Once installed, you’ll love how effortless it is to keep everything organized and out of sight.
13. Repurposed Wooden Crates as Rustic Shelves
Looking for a way to add rustic charm while organizing your CDs? Wooden crates are versatile and stylish, perfect for creating a laid-back, eclectic vibe. They’re affordable, customizable, and easy to install. Who says storage can’t be a statement piece?
Imagine horizontally mounted crates on your wall, each filled with CDs stored upright or in sleeves. The weathered wood brings warmth and texture, contrasting with sleek modern furniture. You can stack or line up the crates to create a gallery wall. It’s an inviting display that sparks conversation.
Paint or stain the crates for a cleaner look or leave them natural for a rugged aesthetic. Combine different sizes and orientations for visual interest. Use brackets or heavy-duty hooks to secure them firmly. You can also add decorative elements like vintage labels or small plants on top of the crates.
Source authentic wooden crates from thrift stores or online marketplaces. Clean and lightly sand surfaces, then apply your choice of finish. Mount the crates at varying heights or aligned for a more structured look. Inside, organize CDs using dividers or sleeves to prevent damage. Regularly check stability and clean dust.
Decorate the crates with stenciled patterns, decals, or personalized labels. You could add small LED string lights around or inside for a cozy glow. Incorporate decorative objects or framed photos on top to further personalize your display. The key is balancing rustic charm with your personal style.
Using vintage crates creates a warm, inviting display that doubles as decor. It’s a DIY-friendly project that’s both affordable and customizable. Once assembled, your collection becomes a charming focal point that reflects your taste and creativity.
14. Hidden Storage in Furniture Pieces (Ottomans, Benches)

Cluttered spaces often mean sacrificing style for storage. Furniture pieces with hidden compartments, like ottomans or benches, offer a clever way to hide your CD collection while adding a functional piece to your room. They keep your space tidy and versatile.
Picture a stylish upholstered ottoman with a lift-up lid revealing a spacious interior filled with neatly organized CDs. The exterior matches your decor, and the hidden storage keeps clutter out of sight. When not in use, it’s just a chic piece of furniture, but when opened, it’s a practical storage solution.
Choose furniture with built-in compartments or modify existing pieces with removable panels. Use fabric bins or sleeves inside for easy organization. Match the upholstery with your room’s theme—think plush velvet, linen, or leather. Consider adding decorative accents on the outside for a personalized touch.
Select a piece with a sturdy hinge mechanism and enough internal space for your collection. Reinforce the interior with dividers or fabric pockets. Label sections if you want to categorize genres or artists. Use a soft cloth to clean and maintain the exterior, and periodically organize the inside for easy access.
Add decorative elements like trim, embroidery, or fabric paint to match your style. Incorporate small labels or tags inside for quick identification. You can also place a tray or small organizer on top for additional items like headphones or accessories. Make it a piece that complements your decor.
Furniture with hidden storage elevates your space’s style and function. It keeps your collection out of sight yet easily accessible, blending practicality with elegance. Once set up, it’s a seamless way to keep your home tidy and showcase your taste.
15. Vertical Wall Panels with Integrated Slots

Tired of cluttered shelves and disorganized piles? Vertical wall panels with integrated slots offer a sleek, space-saving solution. They allow you to display and organize your CDs artistically while freeing up surface space. It’s a modern twist on traditional storage.
Visualize a custom panel mounted on your wall, with angled or straight slots designed to hold CDs upright. The sleek panels can be painted or finished to match your decor, creating a seamless look. As you look at your wall, you see a curated, artistic display of your collection, almost like a sculpture.
Create a grid pattern or asymmetrical design with multiple panels for visual interest. Use materials like MDF, wood veneer, or metal for durability and aesthetic appeal. Incorporate lighting or decorative edge trims for added flair. Adjust slot angles for different visual effects or to accommodate various media sizes.
Design or buy custom panels with precise slot measurements. Mount securely on studs or solid walls, ensuring stability. Organize your CDs by artist, genre, or mood, placing each in its respective slot. Regularly clean the panels and rearrange as your collection updates. For added style, paint or decorate the panels with stencils or decals.
Add labels, icons, or small decorative elements next to each slot for quick identification. Incorporate LED strip lighting along the edges for a gallery effect. Use the slots to also display small collectible items or decorative pieces for a personalized touch. Keep the design minimal or add artistic flourishes based on your taste.
Wall panels with integrated slots turn your collection into a piece of art, blending function and style. They help maintain a clean, modern aesthetic while showcasing your musical taste. Once installed, browsing your collection becomes a visually stimulating experience.
16. Magnetic or Corkboard Wall for Display and Storage

Standard shelves can sometimes feel dull or limiting. A magnetic or corkboard wall offers a dynamic, interactive way to display your CDs and keep them accessible. It’s perfect for creative minds who want a flexible, customizable setup that can evolve with their collection.
Imagine a wall covered with cork or magnetic strips, with CDs held in place by clips, magnets, or hooks. Artistic arrangements or thematic clusters can be easily moved around, creating a living collage. The textured surface adds visual interest and invites you to interact with your collection daily.
Use colorful magnets, decorative clips, or custom labels to add personality. Create zones for different genres, eras, or moods by grouping CDs together. Combine with pinboards or fabric sections for a mixed-media look. Change layouts seasonally or for special themes to keep your display fresh.
Install a sturdy cork or magnetic board on your wall, ensuring it can hold the weight of multiple CDs. Use strong clips or magnets to attach albums or sleeves. Organize your collection by category, and label each zone for easy browsing. Regularly rotate or update your display to keep it engaging. Keep the surface clean with gentle dusting.
Decorate the borders or backgrounds of your board with paint, washi tape, or fabric for extra flair. Add small decorative elements like stickers or icons for categorization. Incorporate string lights or small framed photos around the display for ambiance. Personal touches make your wall both functional and artistic.
A magnetic or corkboard wall turns your collection into a dynamic feature piece. It promotes daily interaction and makes browsing fun and effortless. Once set up, it’s a flexible system that can grow and change with your musical journey.
17. Tiered Ladder Shelving for Decorative Organization
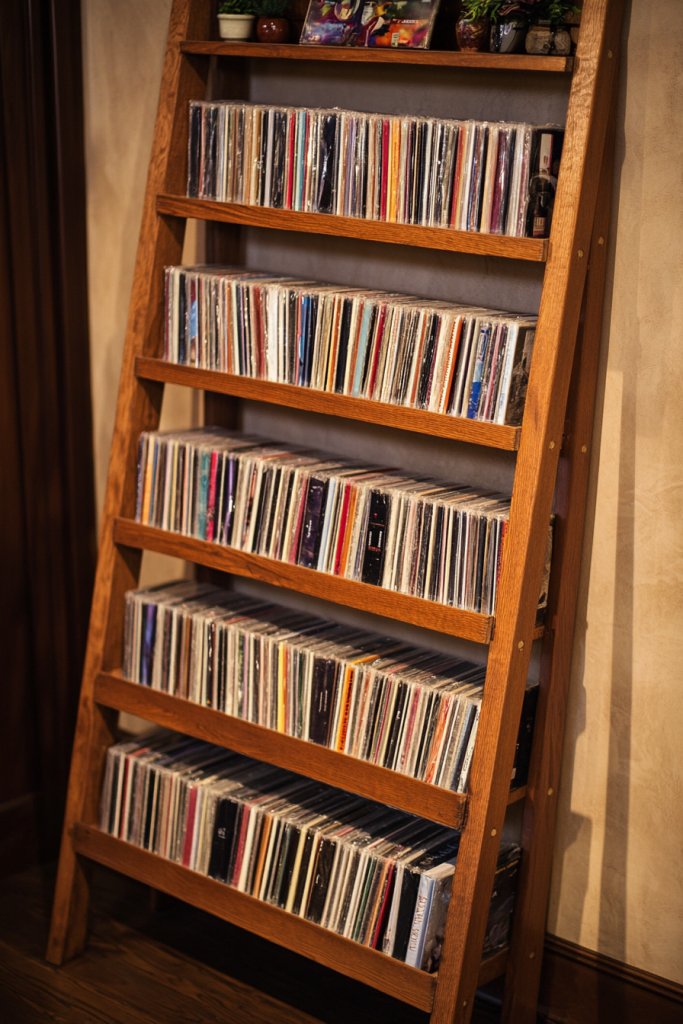
Struggling to find a stylish way to display your CDs without taking up floor space? Tiered ladder shelving offers a chic solution that combines form and function. It’s perfect for showcasing your collection while adding a decorative element to your room.
Imagine leaning a wooden or metal ladder against the wall, with each rung holding CDs in upright or horizontal stacks. The tiered design creates visual layers, with space for decorative objects or plants in between. It’s an eye-catching piece that draws attention to your collection and enhances your decor.
Use different materials—distressed wood for rustic charm or sleek metal for modern minimalism. Adjust the angle or height of the ladder for different visual effects. Incorporate baskets or fabric bins on the rungs for a more organized look. Seasonal decor or themed accessories can be added to keep it fresh.
Choose a sturdy ladder that fits your space and style. Lean it against a wall securely, ensuring stability. Organize your CDs in vertical stacks or upright holders placed on the rungs. Add decorative elements like small plants, picture frames, or lights to enhance the display. Regularly dust and rearrange for a fresh look.
Paint or stain the ladder to match your room’s palette. Attach small hooks or clips for additional storage or display items. Use decorative fabric or paper on the rungs for added texture. Incorporate string lights or fairy lights for a cozy evening glow. Make it a personalized statement piece.
Tiered ladder shelving turns your collection into a dynamic, decorative feature. It’s versatile, easy to update, and adds a touch of personality to your space. Once styled, it becomes a focal point that combines utility with aesthetic appeal.
18. Transparent Wall-Mounted Pockets for a Gallery Feel

Looking for a way to turn your CD collection into an artful display? Transparent wall-mounted pockets create a gallery-like atmosphere that showcases your albums while keeping them organized. It’s a modern, space-efficient solution with a wow factor.
Envision clear plastic or acrylic pockets mounted on your wall, each holding a CD or sleeve. The see-through design emphasizes the artwork and design of each album, creating a colorful mosaic. The arrangement can be grid-like or staggered for an artistic, eclectic look. It’s a visual feast that invites browsing.
Mix pocket sizes or shapes for visual interest, or keep them uniform for a sleek look. Use different finishes—matte, glossy, or frosted—to match your decor. Group by genre or artist for easy navigation. Incorporate small labels or icons for quick identification.
Install sturdy wall anchors suitable for your wall type. Attach the pockets securely, ensuring they can hold the weight of your CDs. Organize the collection by inserting sleeves or albums into each pocket. Arrange the pockets in a pattern that maximizes wall space and visual appeal. Regularly wipe the pockets clean for clarity.
Decorate the edges of pockets with washi tape or paint for added style. Inside, add small decorative tags or stickers. Mix in some framed photos or art pieces around the pockets for a curated gallery vibe. Change the arrangement seasonally to keep it fresh.
Transparent pockets turn your collection into a vibrant wall display that’s both functional and artistic. It makes browsing a visual experience and adds personality to your space. Once installed, it’s a fun way to showcase your musical taste.
19. Hidden Drawers Behind Mirror or Artwork Panels
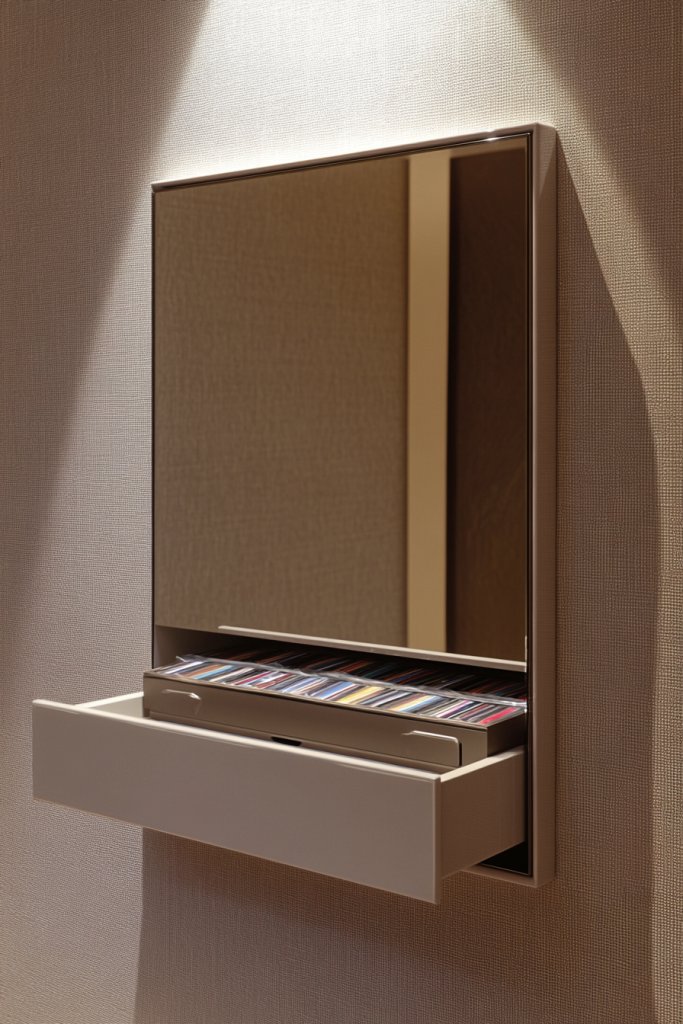
Do you want a sleek, minimalist look but still need storage for your CDs? Hidden drawers behind mirrors or art panels offer a clever solution that combines functionality with style. They keep your collection out of sight but always close at hand.
Imagine a decorative mirror or framed artwork mounted flush against the wall, with a subtle handle or push latch. When opened, it reveals a hidden drawer filled with organized CDs in sleeves or small containers. The outside looks like a piece of art or a mirror, blending seamlessly into your decor. It’s an elegant way to hide clutter.
Select artwork or mirror styles that match your room’s aesthetic—modern, vintage, or eclectic. Use lightweight, sturdy materials for the panels, ensuring easy access. Inside, add dividers or sleeves for organization. Keep the outside design simple or ornate, depending on your style preferences.
Work with a carpenter or DIY to install a concealed drawer behind the panel. Use strong hinges or magnetic catches for smooth operation. Inside, organize your CDs with dividers or sleeves, categorizing by genre or artist. Seal the edges and finish with a protective coat. Regularly clean and check the hardware.
Decorate the outer surface with painted designs, decals, or textured finishes. Label the inside with custom tags for quick access. Incorporate small LED lights or accents to highlight the artwork or mirror. Personal touches make it both functional and beautiful.
Hidden drawers behind art or mirrors add a sophisticated, seamless look to your space. They hide your collection elegantly while maintaining easy access. Once installed, they elevate the overall aesthetic and keep your home clutter-free.
20. Rotating Turntable with Storage Compartments

Want to browse your CD collection without cluttering your space? A rotating turntable with storage compartments offers a fun and functional way to display and access your albums. It combines motion, style, and practicality into one eye-catching piece.
Picture a multi-tiered turntable spinning slowly on your table or shelf, with each layer holding a selection of CDs. The compartments can be open or enclosed, making it easy to view or hide your collection. When spun, it creates a dynamic visual and tactile experience, perfect for music lovers.
Choose a modern acrylic or metal turntable, or go vintage with wood and brass. Use compartments of different sizes to organize by genre or frequency of use. Add decorative elements like LED lights or painted accents to match your decor. Keep it at eye level for quick browsing.
Select a sturdy, smooth-spinning turntable with multiple tiers or compartments. Fill each tier with CDs in sleeves or cases, ensuring they’re secure. Place the turntable on a stable surface, and organize your collection for easy access. Regularly dust and maintain the spinning mechanism to keep it smooth.
Decorate the base or tiers with paint, decals, or LED accents. Use labels, icons, or color codes to categorize your collection. Incorporate small decorative objects or themed elements to enhance the visual appeal. Keep the design simple or elaborate based on your style.
A rotating turntable makes browsing your collection interactive and stylish. It’s a space-saving, conversation-starting piece that showcases your musical taste. Once set up, it encourages regular interaction and adds a fun, artistic touch to your home.
21. Creative Use of Repurposed Items (Tea Boxes, Baskets)

Looking for affordable, eco-friendly ways to organize your CDs? Repurposing everyday items like tea boxes or woven baskets is a creative, charming approach. It adds personality and sustainability to your storage while keeping your collection accessible.
Imagine stacking colorful tea boxes or arranging woven baskets on shelves or under tables. CDs are stored in sleeves or cases, standing upright or lying flat inside these containers. The eclectic mix creates a cozy, vintage vibe that’s both functional and decorative. It’s a collection with character.
Color-code or decorate the boxes and baskets with paint, stamps, or labels for easy identification. Mix different shapes and sizes for visual interest or keep it uniform for a clean look. Incorporate seasonal themes or personal motifs to keep it fresh. Use open baskets for quick access or lidded boxes for a neater appearance.
Gather suitable repurposed containers, ensuring they’re clean and sturdy. Inside, add dividers or sleeves to protect CDs from scratches. Organize by genre, artist, or mood, labeling each container if needed. Stack or arrange the items on shelves, under tables, or inside closets. Regularly clean and rotate to keep the setup lively.
Decorate the containers with paint, fabric, or decorative tape to match your decor. Add personalized labels or tags for categories. Inside, insert small dividers or foam inserts for protection. Incorporate small decorative objects or personal items to make the storage uniquely yours.
Using repurposed items makes your storage eco-conscious, budget-friendly, and full of personality. It transforms everyday objects into functional art, making organization enjoyable. Once arranged, your space will look inviting and thoughtfully curated, reflecting your creativity.
Conclusion
With a diverse array of CD storage ideas, you now have plenty of options to organize your collection beautifully and efficiently. Whether you choose sleek racks, vintage boxes, or customized shelving, these ideas can be tailored to fit any space and style. Don’t hesitate to try out different solutions and make your collection a focal point of your home. Start organizing today and enjoy the satisfaction of a perfectly arranged music library!