
19 Cement Patio Ideas for Updated Outdoor Living
Imagine transforming your outdoor space into a stylish oasis where relaxation and entertainment go hand in hand. Cement patios have surged in popularity thanks to their durability, versatility, and sleek aesthetic, making them an appealing choice for many homeowners looking to upgrade their outdoor living areas.
In this article, you’ll uncover a diverse range of cement patio ideas that can suit any style or budget. From modern geometric patterns to charming rustic finishes, these ideas will inspire you to create a space that’s both functional and visually stunning, elevating your outdoor experience to new heights.
1. Sleek Minimalist Concrete Slab with Embedded Lighting
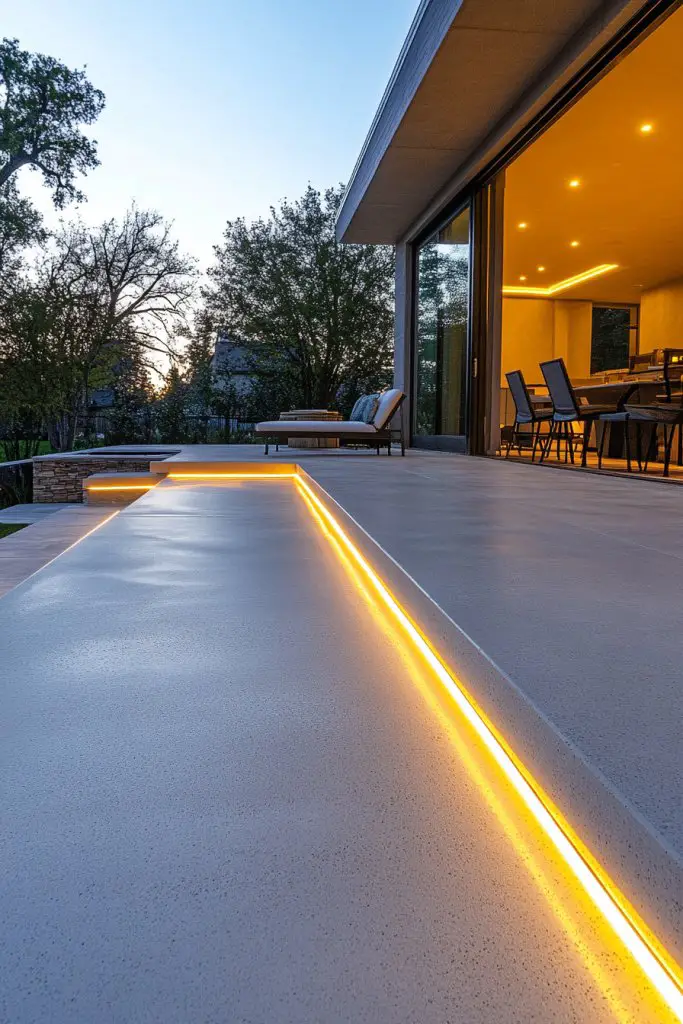
Ever wish your outdoor space looked as clean and modern as those magazine spreads? A cluttered, chaotic patio can kill the vibe faster than bad weather. You want something simple, elegant, and functional that elevates your backyard without overdoing it. Minimalist concrete slabs with embedded lighting offer a sleek, hassle-free solution for a contemporary look.
Recommended Products to replicate this idea
| # | Preview | Product | |
|---|---|---|---|
| 1 |

|
MyGift 11-inch Modern Gray Concrete Round Bathroom Vanity Tray, Cologne and Perfume Tray for Dresser... | Check Latest Price |
| # | Preview | Product | |
|---|---|---|---|
| 1 |

|
KSIPZE 100ft Led Strip Lights RGB Music Sync Color Changing Led Lights with Smart App Control Remote... | Check Latest Price |
Imagine a large, smooth concrete surface stretching out with subtle LED lights embedded along the edges. The light casts a warm glow, highlighting the clean lines and uniform texture of the slab. During dusk, the glow creates a calming ambiance, perfect for evening drinks or quiet reflection. The stark, modern aesthetic contrasts beautifully with lush greenery or minimalist outdoor furniture.
You can tailor the size and layout to fit your space—go for a single expansive slab or a grid of smaller pieces. For a more natural vibe, incorporate textured or stamped finishes. Seasonal adaptations include adding a fire bowl or lanterns to complement the minimalist base. This style works well in urban gardens, rooftop terraces, or even small backyard nooks.
Start by preparing a level foundation, then pour large concrete slabs, ensuring smooth edges for a sleek look. Embed waterproof LED strips into the concrete while it’s still wet or right after curing, following manufacturer instructions. Use a level to ensure even placement, and consider hiring pros for precise installation. Seal the surface with a matte or semi-gloss finish to enhance durability and aesthetics. Incorporate outdoor power sources for the lighting system, and plan for minimal joint lines for a seamless appearance.
Personalize your minimalist slab by adding inset patterns or contrasting borders. Use colored lighting or dimmable LEDs to adjust ambiance. Incorporate textured or painted concrete inlays for an extra design element. For a cozy touch, place a soft throw blanket or textured cushions nearby, balancing sleekness with comfort. Keep the space clutter-free to maintain that modern vibe.
This look proves that less truly is more—simplicity can make a bold statement. With a little planning, you can achieve that high-end, polished style that feels both inviting and sophisticated. Ready to ditch the clutter and embrace clean lines? Your modern outdoor oasis awaits, all thanks to a simple concrete slab and subtle lighting.
2. Textured Stamped Cement with Geometric Patterns
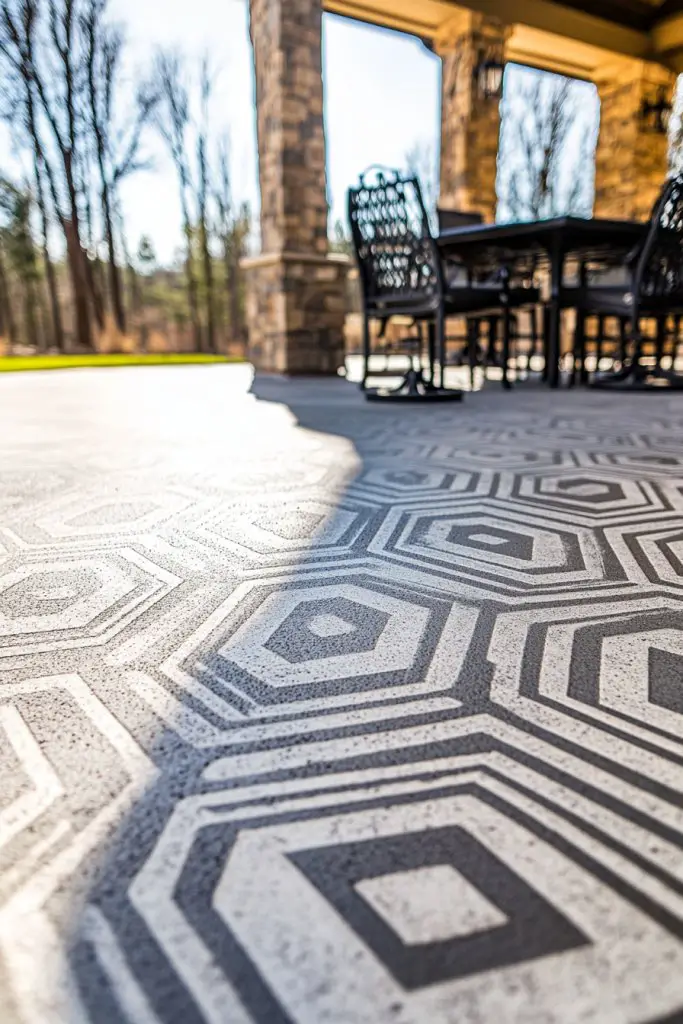
Tired of dull, flat concrete that lacks personality? Standard slabs can feel cold and uninspired, making your outdoor space blend into the background. You crave something that adds visual interest and a touch of artistry. Stamped cement with geometric patterns transforms plain concrete into a statement piece that sparks curiosity.
Recommended Products to replicate this idea
| # | Preview | Product | |
|---|---|---|---|
| 1 |

|
VEVOR Concrete Texturing Skin, 24"x24" Concrete Stamps Mats Set, Polyurethane Concrete Stamping... | Check Latest Price |
| # | Preview | Product | |
|---|---|---|---|
| 1 |

|
MasonryDefender Concrete Sealer for Driveways, Patios, & Sidewalks - Deep Penetrating Water... | Check Latest Price |
Picture a patio surface with bold chevrons, hexagons, or intricate tessellations stamped into freshly poured cement. The textured patterns catch the light, creating shadows that add depth and dimension. The tactile surface invites foot traffic, encouraging guests to linger and explore the design. The variety of patterns can be customized to reflect your personal style—modern, boho, or even art deco.
Choose from a range of patterns—geometric, floral, or abstract—to match your overall theme. Combine stamped sections with plain concrete or contrasting colors for extra flair. Seasonal tweaks include adding outdoor rugs or cushions that complement the pattern’s tones. The pattern can be scaled to suit small courtyards or large patios, making it versatile.
Begin by pouring a base layer of concrete, then use specialized stamps while the surface is still moist. Apply a release agent to prevent sticking, and press the stamps firmly to imprint the patterns. After curing, seal the surface with a durable concrete sealant to protect the design. For added color, incorporate pigments into the mix or stain the surface before stamping. Use textured rollers or stamps to achieve different effects, and consider hiring a professional for complex patterns.
Enhance the pattern with contrasting stains or color washes that highlight the geometric shapes. Add decorative borders or inlays with different textures to frame the design. Incorporate embedded elements like metal accents or glass pieces for a unique touch. Keep the surface clean and sealed to preserve the intricate details over time. Play with lighting angles to accentuate the stamped textures at night.
Stamped cement offers a creative way to elevate your outdoor space with a personalized touch. It’s a cost-effective method to mimic high-end materials like stone or tile. With some patience and attention to detail, you can create a stunning geometric canvas that boosts curb appeal and invites admiration. Ready to stamp your own style into your backyard?
3. Colored Cement with Soft Pastel Tones
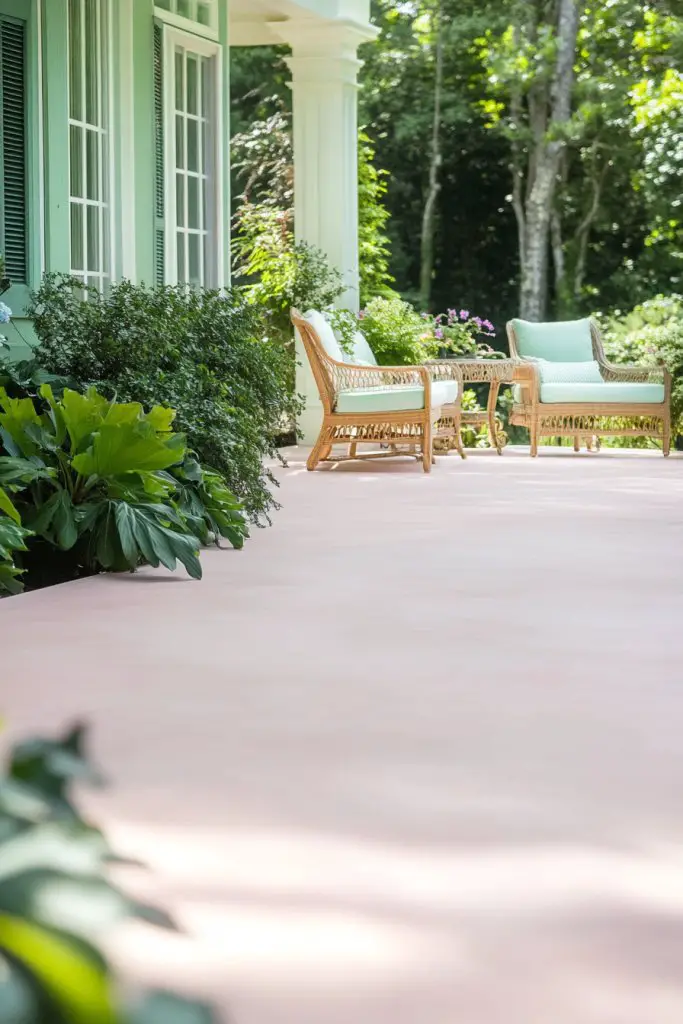
Looking to add a subtle splash of personality to your outdoor space without overwhelming it? Standard gray concrete can feel stark and uninviting, especially when paired with lush greenery. Pastel-colored cement offers a gentle way to introduce warmth and charm, creating a soothing environment perfect for relaxing afternoons.
Recommended Products to replicate this idea
| # | Preview | Product | |
|---|---|---|---|
| 1 |

|
GOODTAKE Concrete Pigment, Blue Iron Oxide Pigment Powder, Concrete Cement Dye Color Coloring Powder... | Check Latest Price |
| # | Preview | Product | |
|---|---|---|---|
| 1 |

|
Walttools | Water-Based Concrete Stain Tru Tint (Bluestone) 1 QUART - Professional Grade,... | Check Latest Price |
Envision a patio with a soft cream or blush hue, the color seamlessly blending with the sky and nearby flowers. The pastel tone softens the overall look, making the space feel cozy yet sophisticated. The surface reflects natural light, giving it an inviting glow during golden hour. The subtle color variation adds depth without dominating the visual narrative of your yard.
Mix pastel shades—like mint green, pale blue, or blush pink—for a playful yet refined palette. Layer with textured textiles, such as outdoor rugs or cushions, in complementary tones. Seasonal adjustments include adding warm throws or candlelight to enhance the cozy feel. This approach works well in cottage gardens, beach-inspired retreats, or contemporary settings seeking softness.
Start with a standard concrete pour, then mix in integral pigments or apply a colored stain after curing for consistent hues. Use a roller or trowel to spread the color evenly, avoiding streaks. Seal the surface with a matte or satin finish to enhance the pastel tones while protecting against weather. Consider adding a slight tint to the sealant for a more vibrant effect. For best results, work in moderate temperatures to prevent uneven drying or color fading.
Layer different pastel shades for a watercolor effect or create subtle patterns using stencils or masking techniques. Incorporate textured finishes to add tactile interest. Pair your colored concrete with natural materials like wood or wicker to amplify the relaxed vibe. Personalize with custom stamped patterns or embedded decorative elements, keeping the focus on the soft color palette.
Pastel cement brings a delicate, charming aura to outdoor spaces, making them feel like a retreat. It’s perfect for those who prefer understated elegance over bold statements. With a little experimentation, you can craft a calming environment that feels both fresh and timeless. Ready to add a whisper of color to your backyard?
4. Indoor-Outdoor Continuity with Large Format Cement Tiles
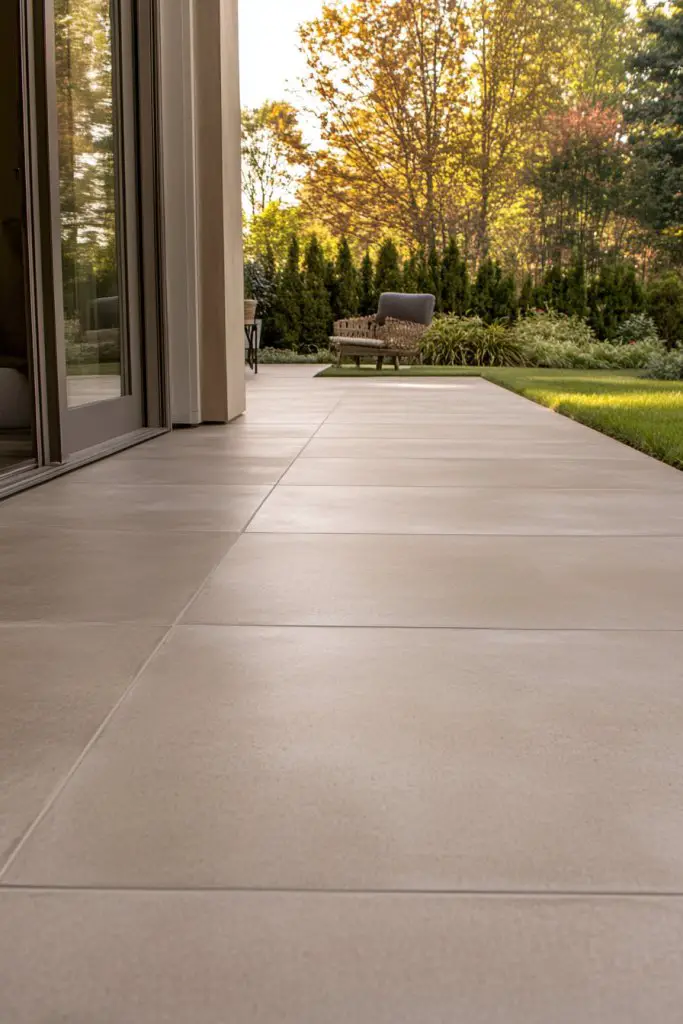
Ever wished your indoor and outdoor spaces felt more connected? A seamless transition can make your home feel larger and more inviting. Large format cement tiles create a unified look, blurring the lines between inside and out, and giving your patio an upscale, cohesive vibe.
Recommended Products to replicate this idea
| # | Preview | Product | |
|---|---|---|---|
| 1 |

|
Ardex TL 1000 Portland Cement-Based Self-Levelling Underlayment for Large and Super-Format Tile... | Check Latest Price |
| # | Preview | Product | |
|---|---|---|---|
| 1 |

|
Gorilla Max Strength Construction Adhesive, Clear Glue, 7 Ounce Squeeze Tube (Pack of 1) - Gap... | Check Latest Price |
Imagine stepping onto oversized tiles that mimic the look of expensive stone or intricate patterns, extending from your living room right outside. The tiles have a matte finish, resisting outdoor wear while maintaining a refined appearance. The large size minimizes grout lines, creating a smooth, uninterrupted surface that visually expands the space. Soft shadows cast by the tiles’ textured surface add depth, making your patio feel like an extension of your home.
Choose from various patterns—grid, herringbone, or staggered layouts—to suit your style. Use neutral tones for a timeless look, or go bold with patterned designs for a statement. Adjust the scale of tiles according to space—larger for expansive yards, smaller for cozy courtyards. Seasonal accessories like outdoor rugs or furniture can complement the tile design, enhancing the overall aesthetic.
Begin by selecting large-format tiles designed for outdoor use, ensuring they are slip-resistant. Prepare a solid, level foundation with proper drainage. Use high-quality thinset mortar and spacers to keep grout lines minimal. Seal the grout thoroughly to prevent staining and moisture infiltration. Professional installation is recommended for precise alignment and to handle heavy tiles, but DIYers can tackle smaller areas with patience and the right tools. Finish with a sealant to protect the surface from weather elements.
Personalize the look with custom grout colors or inlays. Add decorative borders or contrasting grout lines for visual interest. Incorporate built-in seating or planters made from matching cement to create a unified aesthetic. Regular cleaning and sealing keep the tiles looking fresh and vibrant, ensuring your outdoor space remains inviting.
Large format cement tiles elevate your outdoor area with a sleek, modern vibe that’s hard to beat. It’s a smart investment in both style and practicality, helping your backyard feel like an extension of your living space. With the right choices, you’ll enjoy a timeless, cohesive look that impresses everyone who visits.
5. Concrete Fire Pit Area with Built-in Seating
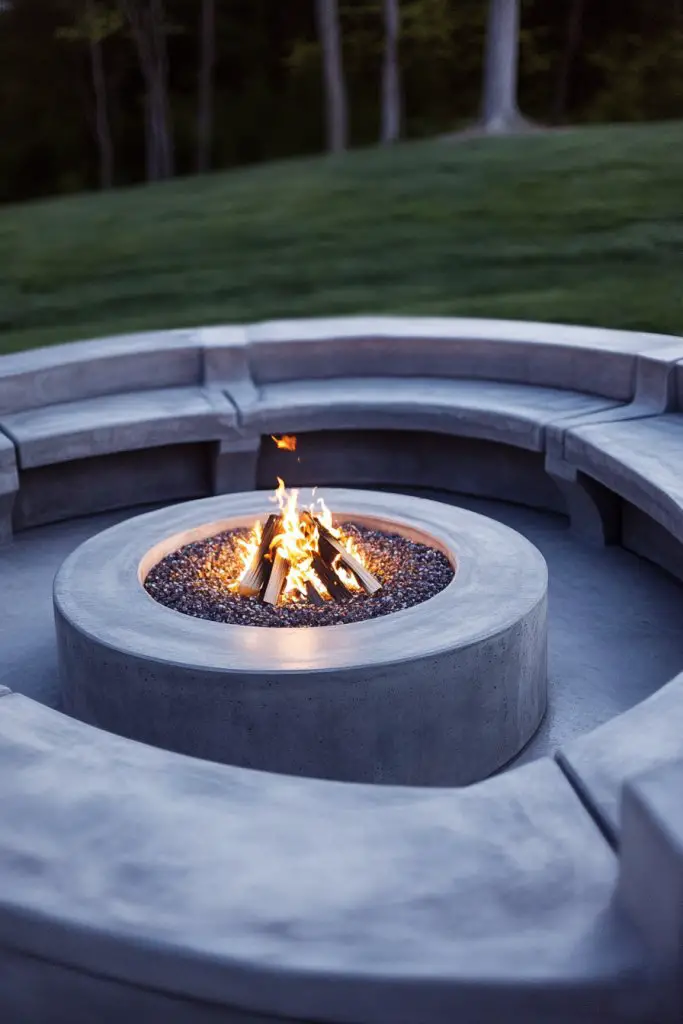
Craving a cozy corner where friends can gather around on cooler nights? A fire pit is the ultimate centerpiece, but a simple one can sometimes look out of place. Combining a concrete fire pit with built-in seating creates a functional focal point that invites warmth and conversation. It transforms your outdoor space into a retreat for relaxation.
Recommended Products to replicate this idea
| # | Preview | Product | |
|---|---|---|---|
| 1 |
|
Christopher Knight Home Crestline Outdoor Fire Pit, Natural Stone | Check Latest Price |
| # | Preview | Product | |
|---|---|---|---|
| 1 |

|
Piano Bench with Storage - Solid Wood Keyboard Bench with Padded Seat and Built-in Bookcase,... | Check Latest Price |
Visualize a circular concrete fire pit, smooth and sleek, surrounded by matching concrete benches that double as armrests and tables. The fire crackles softly, casting flickering shadows across your arrangement. Ambient lighting embedded into the seating adds a subtle glow, enhancing the intimate atmosphere. The neutral concrete complements various decor styles, from rustic to modern, making the area versatile and inviting.
Opt for round, square, or custom-shaped fire pits depending on your space and style. Incorporate cushions or textured finishes into the seating for added comfort and visual interest. Seasonal updates include adding weather-resistant throws or fairy lights. Different materials like stone or brick can be integrated to create contrast, or keep it all concrete for a streamlined look.
Start by excavating and preparing a level base, then pour a sturdy concrete ring for the fire pit. Use fireproof materials or coating for safety. Build the seating from form-fitted concrete, ensuring proper reinforcement for weight and durability. For safety, install a ventilation system or keep clearances from combustible materials. Finish with sealant to resist weathering and stains. Optional: embed a fire bowl or insert for easy maintenance.
Personalize with engraved patterns or textured finishes on the seating for added character. Incorporate built-in side tables or flexible seating options around the pit. Use heat-resistant coatings or accessories to extend usability. Decorate with outdoor rugs or sculptures nearby to complete the scene. This setup encourages casual gatherings and long-lasting memories.
A concrete fire pit with built-in seating creates a warm, welcoming environment that’s both functional and stylish. It’s a project that adds value and charm to any backyard. Once installed, it becomes your favorite spot for unwinding and entertaining, proving that good design can be both simple and impactful.
6. Elevated Cement Deck with Step Accents
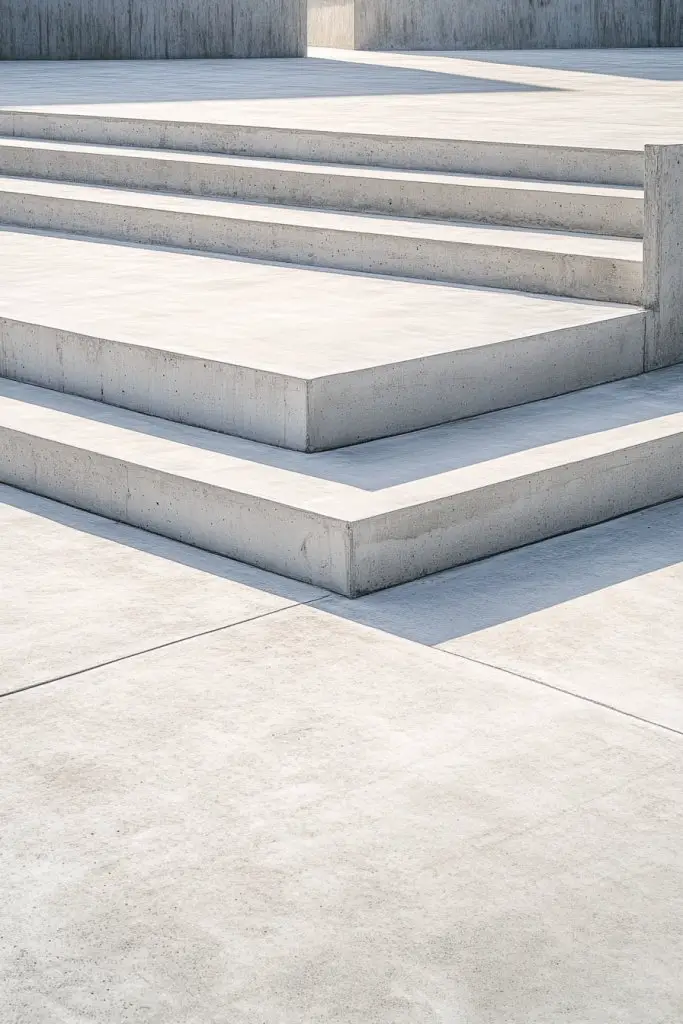
Ever feel like your outdoor space lacks dimension or a sense of hierarchy? An elevated cement deck can add visual interest and functionality, creating a separate zone for lounging or dining. It also helps define different areas without heavy fencing or walls, making your yard feel more dynamic and inviting.
Recommended Products to replicate this idea
| # | Preview | Product | |
|---|---|---|---|
| 1 |

|
Spurtar Rubber Stair Treads 35" x 10", 5 PCS Non-Slip Outdoor Stair Treads for Wooden Steps and... | Check Latest Price |
| # | Preview | Product | |
|---|---|---|---|
| 1 |

|
OutVue 36 Inch Fire Pit with 2 Grills, Wood Burning Fire Pits for Outside with Lid, Poker and Round... | Check Latest Price |
Imagine a smooth, raised platform with clean edges, accessed by a series of gentle cement steps. The elevation provides a perfect stage for outdoor furniture or a fire pit, framed by simple but elegant step accents. The contrasting levels add depth to your landscape, catching light and shadow nicely. The sleek concrete surface reflects a modern aesthetic that pairs well with natural surroundings.
Vary the height of the deck to suit your space—low enough to feel integrated or higher for a more dramatic effect. Incorporate built-in seating or planters along the edges for added functionality. Seasonal options include adding weather-resistant cushions or outdoor rugs. The design adapts easily to small patios or large backyard zones, blending practicality with style.
Begin with a detailed plan, marking the deck footprint and step locations. Excavate and lay a stable foundation, then pour reinforced concrete for the platform. Form and pour each step separately, ensuring secure attachment to the main deck. Finish with a smooth, sealed surface to prevent water infiltration and ensure longevity. Consider integrating drainage solutions to prevent pooling around the elevated area. Skilled labor is recommended for precise measurements and safe construction.
Add textured or stamped finishes to the deck surface for visual interest. Incorporate LED strip lighting along the steps for safety and ambiance. Use contrasting colors or materials for the steps to emphasize their presence. Personal touches like built-in planters or decorative sculptures can make the space uniquely yours. This setup offers a versatile foundation for outdoor living.
An elevated cement deck elevates your outdoor design, literally and figuratively. It provides a stylish platform for entertaining or relaxing, making your backyard feel more curated and intentional. With thoughtful planning, you create a space that’s both functional and stunning—proof that elevation adds value and character.
7. Concrete Planters as Part of the Flooring
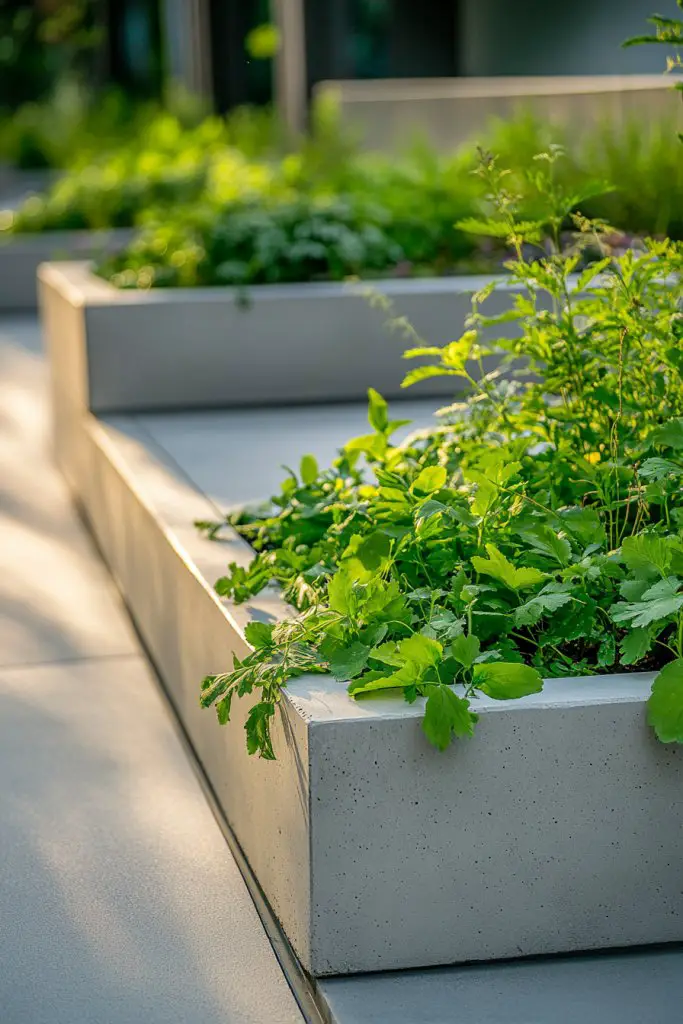
Want a way to incorporate greenery without cluttering your patio? Embedding concrete planters directly into your flooring combines structure with nature in a sleek, modern way. It offers a low-maintenance, integrated solution that keeps your garden or succulents front and center without taking up extra space.
Recommended Products to replicate this idea
| # | Preview | Product | |
|---|---|---|---|
| 1 |

|
Kante 18 Inch Dia Round Concrete Planter, Indoor Outdoor Large Plant Pot with Drainage Hole and... | Check Latest Price |
| # | Preview | Product | |
|---|---|---|---|
| 1 |

|
Keepsmile Smart RGB LED Corner Floor Lamp,172 LEDs Bright Standing Lamps for Living Room with APP... | Check Latest Price |
Visualize a seamless concrete surface with rectangular or rounded planters cast into the floor at regular intervals. Filled with hardy succulents or small shrubs, they add pops of green and texture. The planters’ edges are perfectly flush with the surface, creating a unified look. During the day, they draw your eye with their contrast, while at night, subtle lighting highlights their form.
Select different shapes and sizes for a dynamic layout—linear, cluster, or random arrangements. Use various plant types to suit your climate and aesthetic—cacti, herbs, or flowers. Seasonal changes include swapping out plants or adding decorative stones or mulch inside the planters. This approach works well in modern, minimalist, or even Mediterranean-inspired outdoor spaces.
Start by designing the layout and marking the planter locations. Pour the base cement slab, then form the planter shapes using molds or forms during the pour. Reinforce the form edges for durability, and ensure proper drainage by incorporating small holes or channels. Finish with sealing to prevent water infiltration and staining. Plant immediately after curing, and consider adding a drip irrigation system for low effort maintenance.
Personalize by choosing plants that reflect your style or color scheme. Incorporate decorative stones, pebbles, or LED strip lighting within the planters for extra flair. Use different textures or finishes on the surface around the planters to emphasize their presence. Regular upkeep keeps the design fresh and vibrant, making your outdoor space both functional and beautiful.
Concrete planters embedded into your flooring create a stunning, cohesive look that blends architecture with nature. It’s a clever way to introduce greenery with minimal clutter, perfect for small or busy outdoor areas. Once finished, you’ll enjoy a sleek, garden-like atmosphere that’s easy to maintain and endlessly customizable.
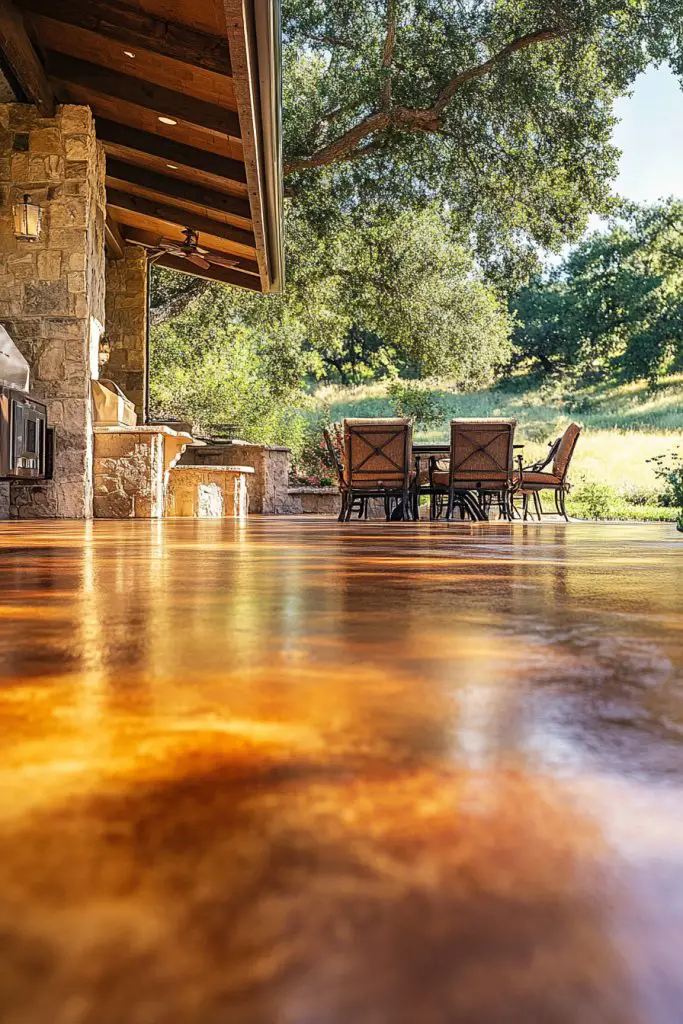
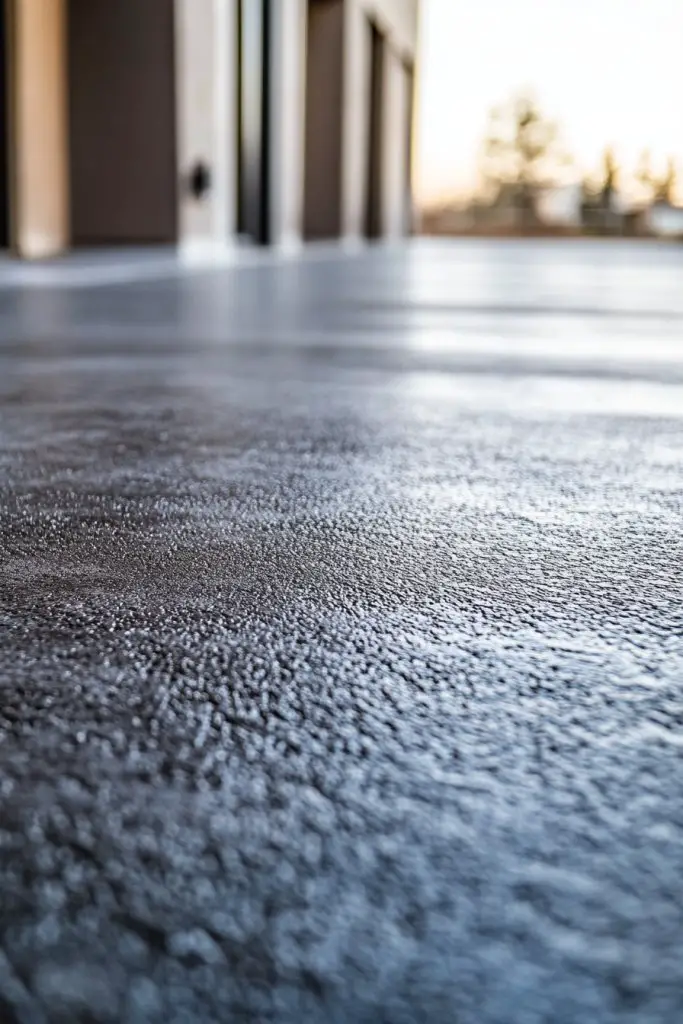
8. Polished Cement Surface for a Lustrous Finish

Are you craving a patio surface that feels luxurious underfoot? Standard concrete often looks dull and rough, lacking the elegance you desire for an upscale outdoor space. Polished cement transforms a basic slab into a sleek, mirror-like surface that elevates your entire yard.
Recommended Products to replicate this idea
| # | Preview | Product | |
|---|---|---|---|
| 1 |
|
Concrete DNA™ Polished Concrete Cleaner (32 Ounce) | Check Latest Price |
| # | Preview | Product | |
|---|---|---|---|
| 1 |

|
ZFE 800W/110V Variable Speed 4'' Wet Polisher / Grinder & Granite Diamond Polishing Pads Concrete... | Check Latest Price |
Imagine walking barefoot on a smooth, glossy surface that reflects the surrounding landscape and sky. The polished finish reveals the fine details in the cement, such as subtle color variations and aggregate accents. Sunlight dances across the surface, creating a vibrant, dynamic visual effect. The high shine gives your outdoor area a sophisticated, high-end vibe.
Opt for a fully polished look or a satin matte finish for a more subdued sheen. Incorporate embedded decorative elements like glass, stones, or metallic accents before polishing for a custom touch. Seasonal accessories like outdoor rugs or furniture can soften the look, while lighting highlights the reflective surface at night. This approach suits contemporary, minimalist, or luxury design schemes.
Start with a well-prepared, level base and pour your concrete slab. After curing, use a series of grinding tools with progressively finer abrasives to smooth the surface. Apply a densifier to harden the surface, then continue polishing with high-speed diamond pads until the desired gloss level is achieved. Seal the finished surface with a high-quality concrete sealer to preserve the shine and protect against stains. Regular maintenance involves cleaning with gentle detergents and occasional re-polishing.
Personalize with embedded patterns, logos, or metallic flakes before polishing to add character. Use contrasting colored stains or dyes to create unique visual effects. Incorporate lighting along the edges to emphasize the glossy finish at night. Pair with sleek outdoor furniture and minimal decor to maintain the luxurious aesthetic.
A polished cement surface proves that concrete can be more than utilitarian—it’s a statement of style and craftsmanship. It instantly upgrades your outdoor space with a modern, elegant touch. With a bit of effort, you can enjoy a stunning, durable surface that’s as beautiful as it is practical.
9. Industrial-Style Cement with Exposed Aggregate
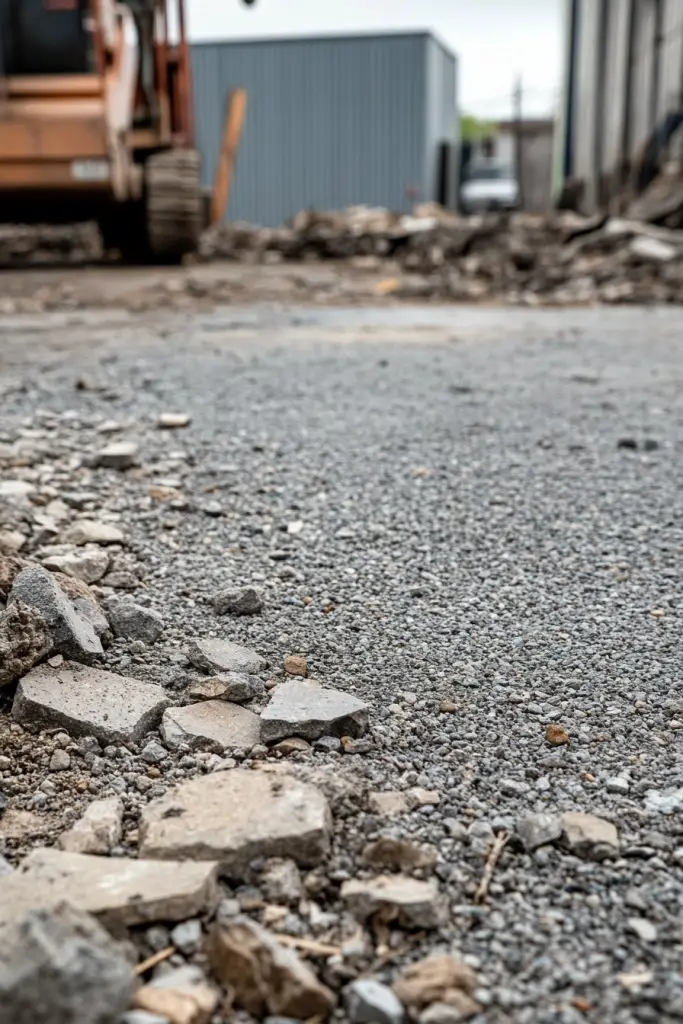
Looking for an outdoor surface that feels raw, edgy, and durable? Exposed aggregate cement offers an industrial vibe that’s perfect for urban gardens or contemporary patios. It combines texture with resilience, giving your space an authentic, rugged appeal.
Recommended Products to replicate this idea
| # | Preview | Product | |
|---|---|---|---|
| 1 |

|
MIOCASA TV Stand Metal TV Table with Storage Steel 3 Door Locker Cabinet for Living Room | Check Latest Price |
Picture a rough-textured surface with stones, pebbles, or crushed glass exposed on the surface. The varied sizes and colors create a natural mosaic that catches light and adds depth. The gritty feel is complemented by the matte finish, making it excellent for high-traffic areas. It pairs well with metal furniture, wooden accents, and minimalist decor, emphasizing its industrial charm.
Adjust the size and type of aggregate for different looks—from fine, sandblasted surfaces to chunky, prominent stones. Incorporate contrasting colors or embed metallic elements for added flair. Seasonal updates include adding weather-resistant furniture or incorporating lighting to highlight the texture. This style adapts to modern, rustic, or eclectic outdoor themes.
Start by pouring a standard concrete base, then broadcast aggregate material onto the surface while it’s still wet. Use a float to embed the aggregate and smooth the surface, ensuring the stones are partially covered. After curing, wash the surface with a high-pressure washer to remove loose particles and expose the aggregate fully. Seal the surface with a penetrating sealer to protect against stains and weathering. Regular cleaning and resealing prolong its rugged look.
Add metallic or colored aggregate for a customized look. Incorporate embedded metal accents or decorative strips for visual interest. Use lighting to emphasize the texture at night, creating a warm glow over the rough surface. Pair with industrial-style furniture and minimalist accessories for an urban, edgy vibe.
Exposed aggregate cement offers a durable, stylish solution that’s perfect for modern and industrial aesthetics. Its textured surface adds character and resilience, making it a practical yet striking choice. With proper maintenance, it remains a standout feature in your outdoor design.
10. Stained Cement with Earthy Tones
Want a natural, warm feel in your outdoor space that mimics earthy landscapes? Standard gray concrete can feel cold and sterile, but stained cement with earthy hues like terracotta or ochre adds warmth and depth. It’s an easy way to bring a rustic or Mediterranean vibe to your backyard.
Recommended Products to replicate this idea
| # | Preview | Product | |
|---|---|---|---|
| 1 |

|
Concrete Stain Concentrate Just Add Water, User & Eco-Friendly Semi-Transparent Professional Grade... | Check Latest Price |
| # | Preview | Product | |
|---|---|---|---|
| 1 |

|
MasonryDefender Low Gloss Patio Paver Sealer - Clear Water-Based Sealant for Patio Pavers & Natural... | Check Latest Price |
Imagine a patio surface infused with rich, warm colors—deep ochre, burnt sienna, or muted terracotta—that enhance natural surroundings. The stain penetrates the concrete, creating a subtle variation in tone that mimics aged stone or clay. The textured surface catches sunlight differently throughout the day, shifting between warm highlights and shadows, adding visual richness. This creates an inviting atmosphere perfect for lounging or outdoor dining.
Combine multiple earth tones for a variegated look or keep it monochrome for a more subdued, elegant effect. Enhance the rustic feel with textured finishes or stamped patterns. Seasonal accessories like woven rugs or wooden furniture complement the earthy palette. This style pairs especially well with natural stone, wood, and metal accents, emphasizing organic harmony.
Pour a standard concrete slab and apply a chemical stain or pigment to the surface before sealing. Use sprayers or brushes for controlled application, allowing for blending and shading. After curing, seal with a penetrating or topical sealer to lock in color and provide weather resistance. For a more aged appearance, use antiquing techniques or multiple stain layers. Regular cleaning with neutral cleaners maintains its warm glow.
Add embedded decorative elements like stamped patterns or textured inlays in contrasting tones. Incorporate natural materials like wood or stone around the edges to reinforce the earthy feel. Use accent lighting to highlight the color variations and textures at night. Personal touches like custom patterns or color blends make your space uniquely yours.
Earth-toned stained cement creates a timeless, grounded outdoor space that feels both cozy and sophisticated. It’s a perfect canvas for organic decor and natural accents. With a bit of planning, you can craft a warm, inviting environment that elevates your outdoor living experience.
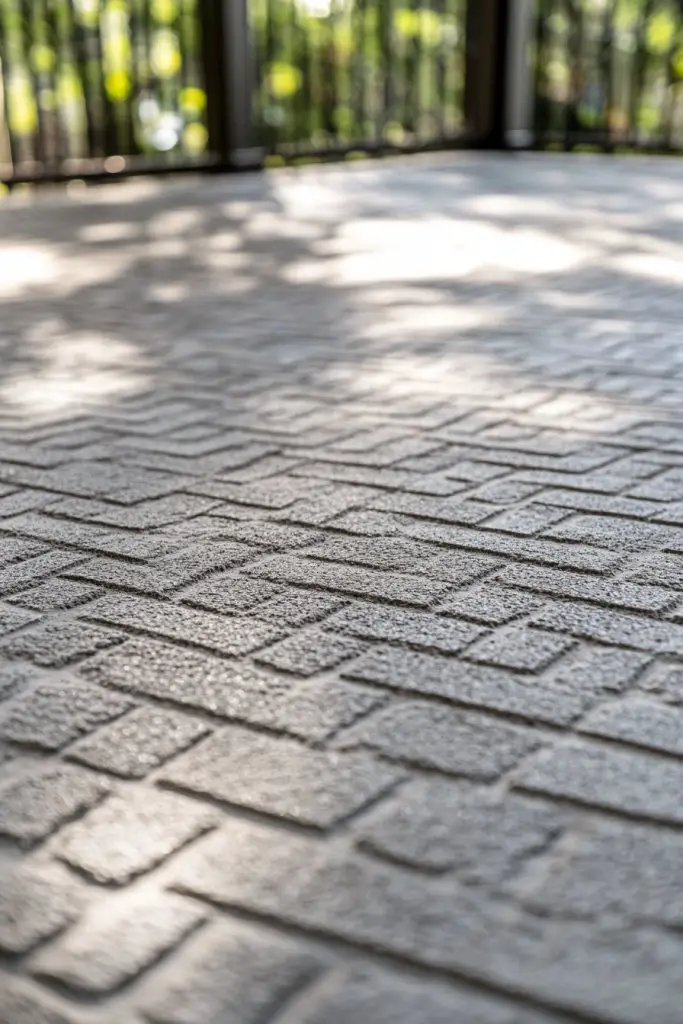
11. Concrete Paver Patterns for Visual Dynamism
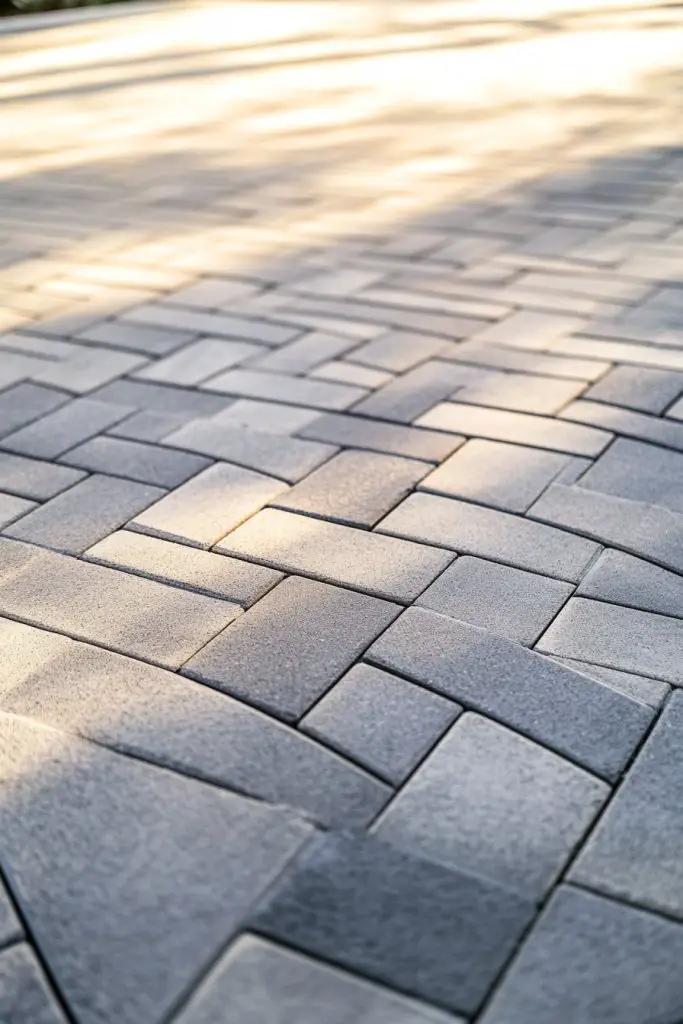
Bored with the same old plain concrete slabs? Want your outdoor space to stand out with a touch of sophistication? Paver patterns are a fantastic way to introduce visual movement and texture, making your patio a true design focal point. They add a layer of complexity that draws the eye and invites exploration.
Recommended Products to replicate this idea
| # | Preview | Product | |
|---|---|---|---|
| 1 |

|
BETONEX Concrete Grass Pavers Breeze Block Paving Bricks Mold ABS 4mm Parking - Plastic Mold for... | Check Latest Price |
| # | Preview | Product | |
|---|---|---|---|
| 1 |

|
Worn Brick Concrete Stamp for Borders by Walttools | Classic Masonry Paver Decorative Pattern,... | Check Latest Price |
Picture a patio laid out in a herringbone or basketweave pattern, with contrasting colors or textures defining each section. The intricate arrangement creates a sense of motion that guides visitors through the space. Light and shadow play across the patterned surface, emphasizing the craftsmanship. Whether in classic gray or vibrant hues, these patterns add depth and elegance.
Experiment with different patterns—cobblestone, running bond, or radial designs—to suit your style. Use contrasting colors or finishes for added impact. Adjust the pattern scale based on your yard size—larger for expansive areas, smaller for intimate courtyards. Seasonal accessories like cushions or planters complement the design, enhancing the visual appeal.
Begin by planning your pattern layout, then excavate and prepare a firm base. Lay out pavers according to your chosen pattern, using spacers for consistency. Secure the pavers with a layer of mortar or sand, and tamp them down firmly. Fill the joints with sand or grout, then sweep to finish. Sealing helps protect the pattern and makes maintenance easier. For complex patterns, professional installation ensures precision.
Highlight the pattern with contrasting grout or stain. Add decorative borders or inlays for extra detail. Incorporate integrated lighting along the pattern’s edges to enhance night-time visual impact. Use furniture and accessories in complementary tones to unify the design. Regular cleaning and resealing preserve the intricate look.
Concrete paver patterns turn a simple outdoor space into a striking visual experience. They add personality and sophistication, elevating your backyard from basic to breathtaking. With a little effort, you can create a timeless pattern that impresses every guest and amplifies your outdoor style.
12. DIY Concrete Slab with Colorful Borders
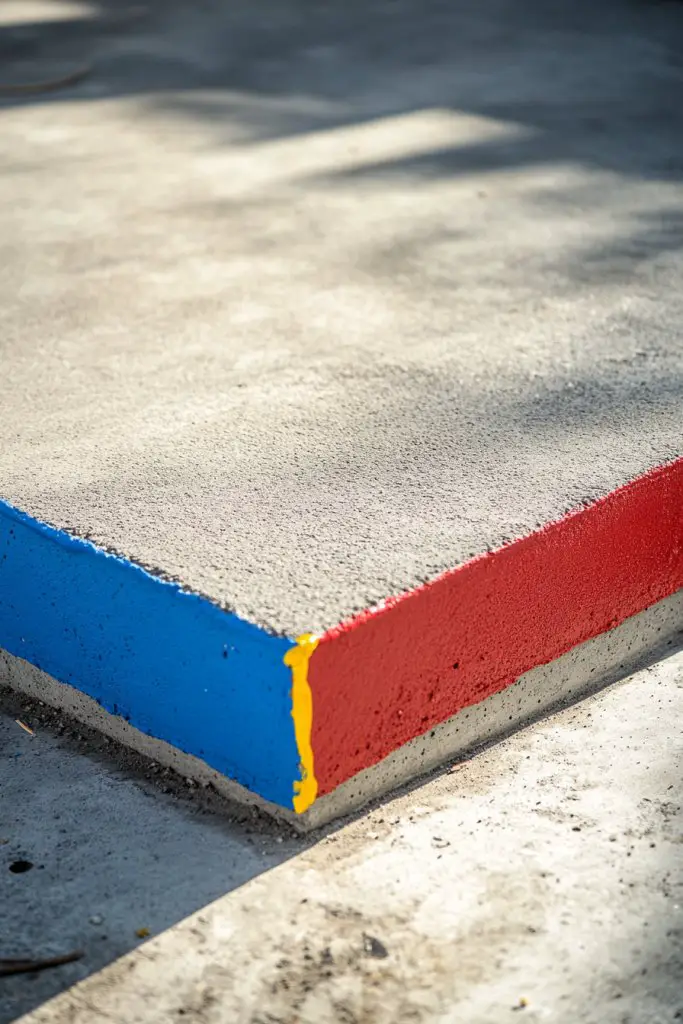
Looking for an affordable way to upgrade your patio without hiring a contractor? A DIY concrete slab with colorful borders offers a budget-friendly, customizable solution. It’s perfect for those who want a personalized touch and a sense of accomplishment. Plus, it’s easier than you might think to create a stylish, finished look.
Recommended Products to replicate this idea
| # | Preview | Product | |
|---|---|---|---|
| 1 |

|
BETONEX 2 pcs 23.34 inch Straight Edge Stone Concrete Mold Plastic ABS 2mm Cement Molds - Concrete... | Check Latest Price |
| # | Preview | Product | |
|---|---|---|---|
| 1 |

|
EVOLVE Paint & Primer: Environment-friendly, Low Sheen with One-coat Coverage for Interior &... | Check Latest Price |
Picture a simple, smooth concrete surface with a vibrant, painted border framing the entire area. You could choose bold colors like turquoise or coral, or keep it subtle with soft pastels. The border adds a pop of personality, making the space feel intentional and lively. The clean, crisp edges contrast with the textured surface, creating a modern yet inviting vibe.
Use painter’s tape or stencils to create geometric patterns or stripes within the border. Change colors seasonally or for special occasions—think bright hues for summer, warm tones for fall. Incorporate textured finishes or stamped accents inside the slab for extra detail. This approach works well in small patios, courtyards, or as an entryway feature.
Mix and pour the concrete into your prepared form, smoothing it out with a trowel. Once set, paint the border with outdoor-grade concrete paint or stain, using painter’s tape for clean lines. Seal the entire surface with a clear outdoor sealer for protection. For added durability, consider applying a textured coating or anti-slip finish. This project requires basic tools like a level, trowel, and brushes, making it accessible for DIY enthusiasts.
Add decorative elements like stenciled patterns or embedded stones within the border. Change border colors over time for fresh looks. Incorporate small built-in features such as a fire bowl or seating niches along the edge. Keep it simple but impactful, emphasizing vibrant borders that make your space uniquely yours.
A DIY concrete slab with colorful borders proves that creative upgrades don’t have to be costly or complicated. It’s a fun project that results in a personalized, stylish outdoor area. With a little effort, you’ll enjoy a space that’s both functional and full of personality.
13. Perforated Cement for Shade and Ventilation
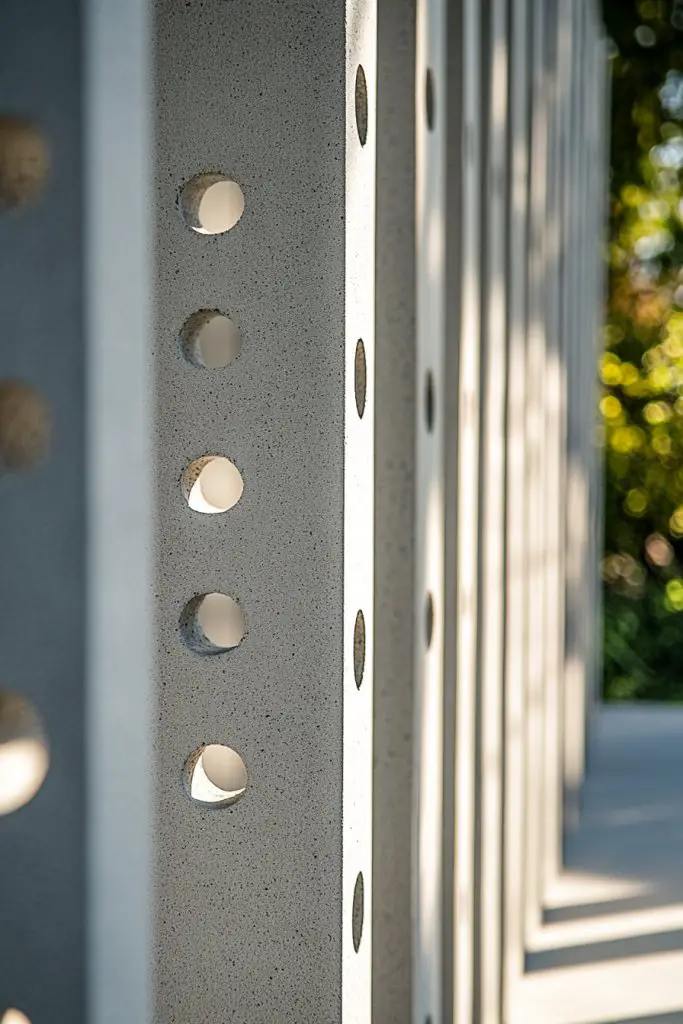
Want to enjoy your outdoor space without the harsh sun or stuffiness? Perforated cement panels or screens provide shade and ventilation while adding a modern architectural element. They create a cool, breezy environment, perfect for relaxing even on hot days.
Recommended Products to replicate this idea
| # | Preview | Product | |
|---|---|---|---|
| 1 |

|
fischer DuoPower 6 x 30 in The BigBox, 950 Universal Dowels, Powerful 2-Component Dowels, Plastic... | Check Latest Price |
| # | Preview | Product | |
|---|---|---|---|
| 1 |

|
20' Front Panel White Canopy Replacement Entrance Front Wall Panel with Zippers (Front Panel) Velcro... | Check Latest Price |
Visualize a series of concrete panels with geometric or organic perforations, arranged to form a semi-private wall or canopy. Light filters through the holes, casting intricate patterns on the ground below. The textured surface of the panels complements other concrete elements, giving your patio a sleek, contemporary feel. The perforations also allow airflow, keeping the space comfortable.
Customize the size, shape, and pattern of the perforations to suit your aesthetic—ranging from minimalist dots to elaborate floral motifs. Use panels as privacy screens, pergola covers, or decorative partitions. Seasonal updates include adding retractable fabrics or removable panels for flexibility. These features work well in urban rooftops, courtyards, or along walkways.
Design the panel layout and cut perforations into form-fitted molds or precast panels. Pour reinforced concrete into molds, ensuring the perforations are accurately placed. Finish with a textured or smooth surface, and seal to prevent staining. For installation, anchor panels securely to existing structures or set on posts, ensuring stability against wind and weather. Regular cleaning prevents clogging of perforations.
Add embedded lighting behind the panels for nighttime ambiance. Incorporate contrasting finishes or colors for visual interest. Use decorative patterns or symbols for a personalized touch. Pair perforated cement with lush greenery in the background—plants will grow through or around the perforations, softening the industrial look.
Perforated cement transforms a simple outdoor area into a functional, artistic space that balances privacy and openness. It’s a perfect solution for modern, minimalist designs seeking both form and function. With thoughtful planning, you create a breathable, stylish oasis that’s both practical and eye-catching.
14. Concrete Slab with Integrated Outdoor Rug Effect
Craving the cozy feel of an indoor rug but worried about weather damage? An integrated outdoor rug effect using stamped or textured cement offers a stylish solution. It mimics the look of woven textiles or intricate patterns without the fuss of actual fabric, perfect for outdoor durability.
Recommended Products to replicate this idea
| # | Preview | Product | |
|---|---|---|---|
| 1 |

|
Magnetic Poetry Press in Letters and Numbers Stone Concrete Stamps - Lowercase Traditional Typeface | Check Latest Price |
| # | Preview | Product | |
|---|---|---|---|
| 1 |

|
Lahome Checkered Easy Jute 5x7 Area Rugs, Washable Outdoor Patio Rug for Living Room Diamond Indoor... | Check Latest Price |
Imagine a large concrete surface stamped with a pattern resembling a traditional rug—think geometric motifs, floral designs, or even Moroccan-inspired tiles. The textured surface creates a tactile experience, inviting barefoot strolls. Subtle color variations or contrasting stains define the pattern, adding visual depth. Under evening lighting, the textured pattern casts gentle shadows, enhancing the cozy, layered look.
Choose from a variety of patterns and textures—braided, woven, or ornate designs—to suit your style. Use color washes or stains to differentiate between the pattern and background. Seasonal updates include adding outdoor cushions or throws nearby for extra comfort. This approach pairs well with outdoor furniture in natural materials like rattan or wood.
Start with a clean, level concrete slab. Use stamping mats or textured rollers to create your desired rug pattern while the cement is still workable. Incorporate contrasting colors or stains into the pattern before sealing. After curing, apply a weatherproof sealant to protect against stains and moisture. Regular cleaning and re-sealing will maintain the textured, rug-like appearance over time.
Add decorative borders or inlays that resemble fringes or tassels for a more authentic rug feel. Use embedded elements like metallic or glass accents within the pattern for extra flair. Incorporate lighting fixtures to accentuate the textured surface at night. Personal touches like monograms or custom symbols can make your outdoor rug truly unique.
This technique proves that you can achieve the comfort and style of an indoor rug outdoors—without the maintenance. It’s a cost-effective way to add personality and warmth to your patio. With a bit of creativity, your outdoor space will feel both inviting and effortlessly stylish.
15. Faux Concrete Finish with Paint Techniques
Want the look of polished concrete but on a budget or without the extensive work? Faux finishes using textured paint or specialized techniques can give you that sleek, industrial vibe at a fraction of the cost. It’s an easy DIY option to refresh tired surfaces with minimal effort.
Recommended Products to replicate this idea
| # | Preview | Product | |
|---|---|---|---|
| 1 |

|
Rust-Oleum 379908 Concrete Interior Wall Paint, Quart, Sidewalk Gray | Check Latest Price |
| # | Preview | Product | |
|---|---|---|---|
| 1 |
|
DAP Concrete Crack Filler, Gray, 1.62 lb (7079860500) | Check Latest Price |
Visualize a patio surface with a layered, mottled appearance resembling raw or polished concrete. The textured paint creates subtle variations in tone and surface, mimicking natural stone or aged concrete. You can add faux seams or cracks for extra realism. The surface reflects light differently across the textured areas, giving depth and interest without actual structural changes.
Choose from different techniques—sponging, dry brushing, or rag rolling—to achieve various textures. Use color washes or multiple layers of paint for complex, nuanced effects. Seasonal updates include adding decorative elements like faux inlays or painted borders. This approach suits small patios, walkways, or decorative accents in larger outdoor areas.
Start by thoroughly cleaning and priming your existing surface. Apply a base coat of primer suited for outdoor use. Use textured paints or special finishes to apply your desired effect, working in layers for depth. Incorporate faux seams or cracks with darker shades for realism. Finish with a clear weatherproof sealer to protect your work. This method requires patience and attention to detail but is highly customizable.
Add metallic or glossy accents to mimic polished concrete’s reflective qualities. Incorporate stenciled patterns or borders to frame the faux surface. Use complementary outdoor furniture and accessories that match your color palette. Regular touch-ups and sealing preserve the effect over time, keeping your space looking fresh and stylish.
Faux concrete finishes demonstrate that you don’t need expensive materials to achieve a high-end look. It’s a versatile, DIY-friendly option that can dramatically change your outdoor aesthetic. With some creativity, you’ll enjoy a modern, polished space that feels both authentic and personalized.
16. Curved Cement Pathways Connecting Different Zones
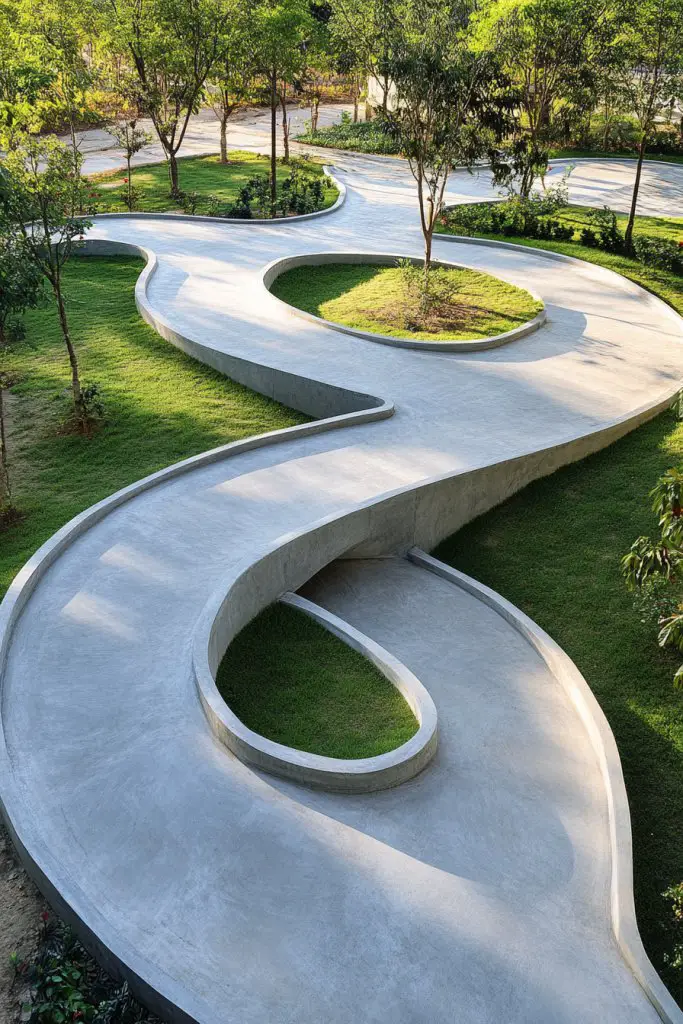
Do your outdoor areas feel disconnected or rigid? Curved cement pathways add a natural, flowing element that guides movement and creates a harmonious landscape. They soften the overall layout, making your yard feel more inviting and organic.
Recommended Products to replicate this idea
| # | Preview | Product | |
|---|---|---|---|
| 1 |

|
NorthRock Edge Loc - Concrete Paver Edger, Alternative to Wood, Plastic, Wire, & Aluminum Edging,... | Check Latest Price |
| # | Preview | Product | |
|---|---|---|---|
| 1 |

|
SIKA Sikaflex Crack Flex Sealant, Gray, High-Performance Textured Polyurethane, Self-Leveling,... | Check Latest Price |
Picture a gently winding pathway that meanders through your garden, connecting seating areas, fire pits, and planting zones. The smooth curves contrast with angular structures, adding visual interest. The textured surface of the pathway catches light, emphasizing its gentle flow and inviting foot traffic. Lush greenery frames the path, enhancing its organic feel.
Vary the width and curvature based on your space—narrower for subtle transitions, wider for main walkways. Incorporate embedded stones, stamped patterns, or contrasting borders for added detail. Seasonal styling includes adding solar-powered pathway lights or bordered flower beds. The curves work well in both formal and casual landscape designs.
Begin by designing your path’s layout with garden hoses or spray paint. Excavate the route and prepare a stable, compacted base. Pour reinforced concrete, shaping it with forms or freehand for softer curves. Smooth and finish the surface, then add textured or stamped elements if desired. Seal the surface to prevent staining and weather damage. Regular maintenance keeps the curves crisp and inviting.
Personalize the path with embedded decorative stones or stamped patterns that match your overall landscape. Use lighting along the edges for safety and ambiance. Incorporate seating nooks or small garden features along the curves for added interest. Keep the surface clean and sealed to maintain its fluid, attractive appearance.
Curved pathways turn simple outdoor routes into captivating design features. They create a sense of journey and discovery, making your yard more engaging. With some planning, you can craft a flowing landscape that’s both functional and beautiful, transforming your outdoor space into a tranquil retreat.
17. Elevated Cement Platform for Lounge Area
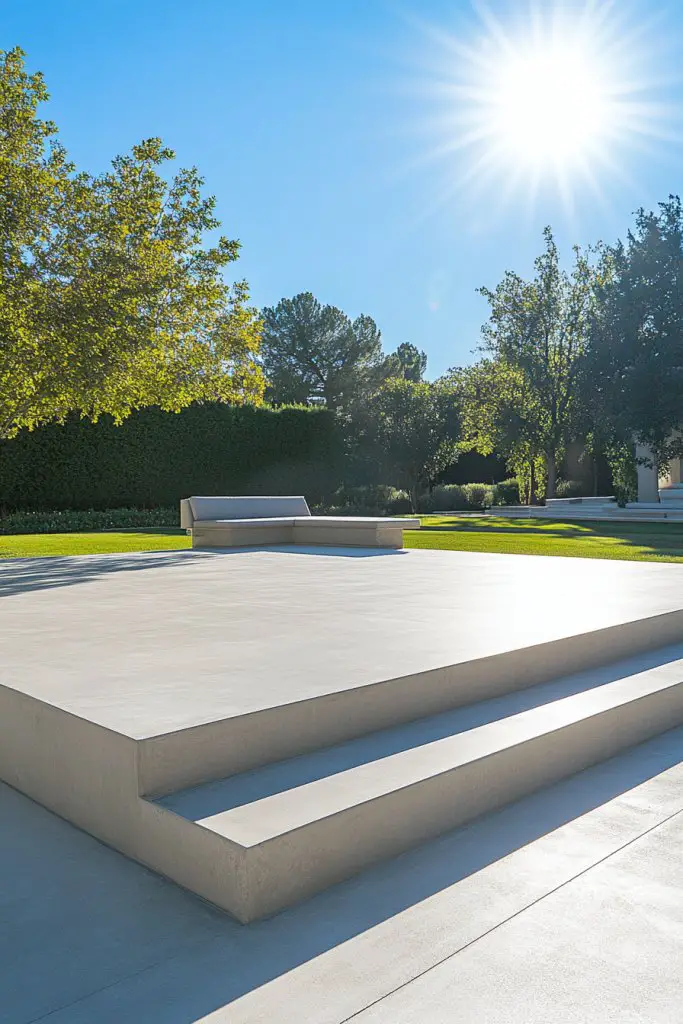
Looking to create a dedicated space for relaxation that stands out from the rest of your yard? An elevated cement platform defines a lounge zone, providing a focal point that’s both functional and stylish. It adds dimension and structure while making your outdoor living feel more intentional.
Recommended Products to replicate this idea
| # | Preview | Product | |
|---|---|---|---|
| 1 |

|
Flat Rock Rain Barrel and AC Unit Paver Patio Pad 24”x24” Natural Gray Tile – Easy... | Check Latest Price |
| # | Preview | Product | |
|---|---|---|---|
| 1 |

|
IRONCK 2 Person Egg Chair Outdoor Indoor, Oversized Double Wicker Lounge Chair, Thickened Padded... | Check Latest Price |
Imagine a sleek, raised concrete surface with clean edges, topped with comfortable outdoor furniture. The elevation provides a natural barrier from dirt and moisture, giving the area a polished, purposeful look. Surrounding it with low walls or planters enhances privacy and visual separation. The platform’s smooth surface reflects light, making the space feel open and inviting.
Adjust the height of the platform to suit your needs—low enough to feel integrated or higher for dramatic impact. Incorporate built-in seating or textured finishes for added interest. Seasonal accessories include outdoor cushions, rugs, or umbrellas. The design adapts to various yard sizes and styles—modern, rustic, or eclectic.
Excavate and prepare a level base, then pour reinforced concrete with formwork to create the platform’s shape. Use smooth or textured finishes depending on your style preference. Consider embedding lighting or incorporating drainage solutions. Finish with sealing to resist weathering and stains. For stability and safety, ensure edges are rounded or beveled.
Add decorative touches like textured or stamped finishes, or embed patterns into the surface. Use weatherproof cushions or throws to enhance comfort. Incorporate low walls or built-in planters for a cohesive look. Personal touches like engraved patterns or custom shapes make it uniquely yours.
An elevated cement lounge area creates a sophisticated, functional outdoor space that’s perfect for entertaining or relaxing. It elevates your backyard’s design and makes your outdoor gatherings feel special. With careful planning, your outdoor oasis will become a favorite retreat.
18. Cement with Integrated Drainage Channels
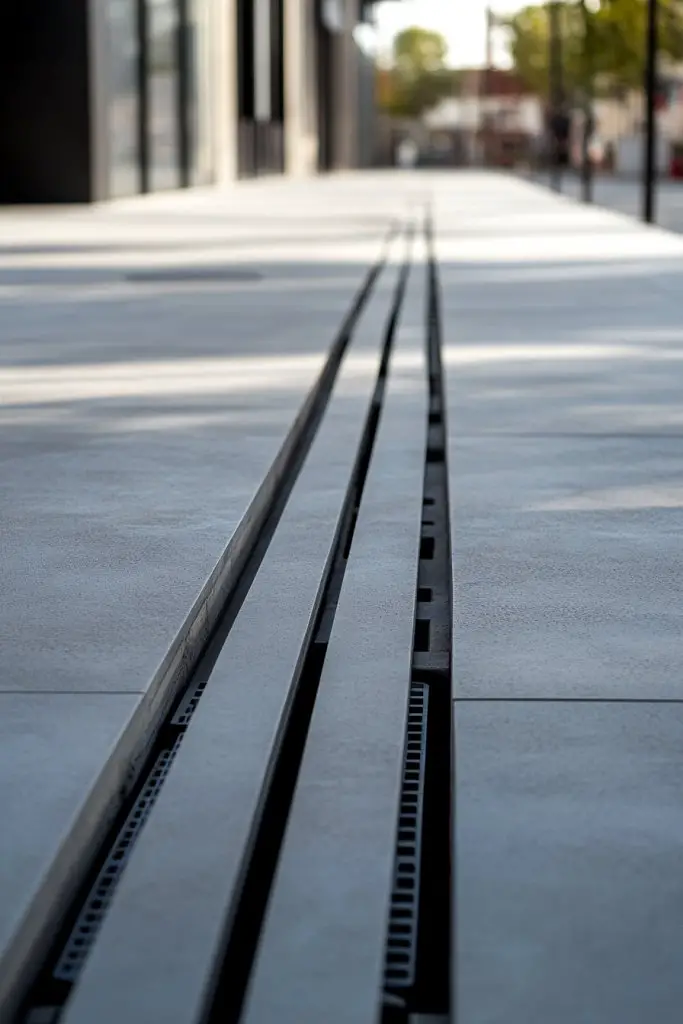
Tired of water pooling and flooding your patio after heavy rains? An outdoor surface with integrated drainage channels cleverly solves this problem while maintaining a sleek appearance. It’s a practical upgrade that prevents damage and keeps your space safe and usable.
Recommended Products to replicate this idea
| # | Preview | Product | |
|---|---|---|---|
| 1 |

|
DAP Concrete and Mortar Filler and Sealant, Gray, 10.1 Oz (7079818096) | Check Latest Price |
| # | Preview | Product | |
|---|---|---|---|
| 1 |

|
VEVOR Trench Drain System with Plastic Grate, 5.9x5.1-Inch HDPE Channel Drainage for Garden,... | Check Latest Price |
Picture a smooth cement surface with narrow, linear channels running across it, subtly integrated into the design. These channels guide water away efficiently, preventing puddles and erosion. The channels can be flush with the surface or slightly recessed, creating a minimal, contemporary look. During rain, water flows seamlessly into these channels, leaving the main surface dry and safe.
Design the channels in geometric patterns or linear runs for a modern aesthetic. Incorporate decorative grates or covers that match your overall style. Seasonal updates include adding gravel or stepping stones within the channels for visual interest. This system adapts well in both small courtyards and large patios, offering a clean, functional solution.
Plan and mark the drainage path before pouring the concrete. Excavate the area and install a slope for water flow. Form and pour the cement surface with channels incorporated into the mold or formed after the slab cures. Seal the channels with a durable, waterproof coating. Regular cleaning prevents debris buildup, maintaining optimal drainage.
Add decorative covers or grates in materials like metal or stone to match your outdoor decor. Use contrasting colors to highlight the drainage feature or keep it subtle. Incorporate LED lighting along the channels for night visibility. Regular maintenance ensures your drainage system continues to work effectively.
Integrated drainage channels elevate your outdoor space’s functionality without sacrificing style. They protect your investment and ensure your patio remains usable year-round. With simple planning, you create a practical, sleek surface that handles weather challenges gracefully.
19. Green-Integrated Cement with Recessed Plant Niches
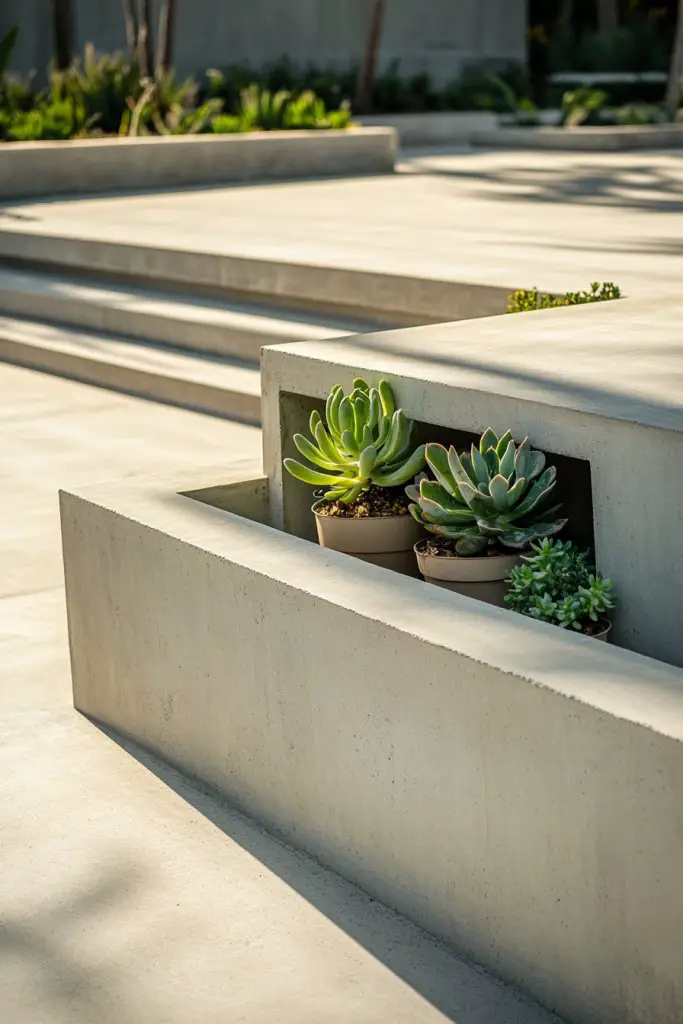
Craving a touch of nature without cluttering your patio? Recessed plant niches built into your cement surface offer a sleek solution for integrating greenery seamlessly. They add visual interest and a fresh vibe, blending architecture with nature in a modern way.
Recommended Products to replicate this idea
| # | Preview | Product | |
|---|---|---|---|
| 1 |

|
Amico 12 Pack 6 Inch 5CCT Ultra-Thin LED Recessed Ceiling Light with Junction Box, 1050LM... | Check Latest Price |
| # | Preview | Product | |
|---|---|---|---|
| 1 |
![HOME GROWN Succulent & Cactus Seed Kit for Planting – [Enthusiasts Favorites] Premium Cactus & Succulent Starter Kit: 4 Planters, Drip Trays, Markers, Seeds Mix, Soil - DIY Gift Kits](https://m.media-amazon.com/images/I/510lchSBzIL._SL160_.jpg)
|
HOME GROWN Succulent & Cactus Seed Kit for Planting – [Enthusiasts Favorites] Premium Cactus &... | Check Latest Price |
Imagine small, rectangular or circular niches recessed into the concrete, each filled with low-maintenance succulents or small flowering plants. The niches are flush with the surface, creating a cohesive, clean look. During the day, the greenery adds a pop of color and life, while at night, subtle lighting can highlight the niches’ contours. The overall effect is a harmonious fusion of organic and architectural elements.
Vary the sizes and depths of the niches for visual rhythm. Use different plant types to suit your climate and style—cacti, herbs, or mosses. Seasonal updates include swapping plants or adding decorative stones or gravel inside the niches. This approach suits modern, minimalist, or Zen-inspired gardens.
Plan the placement and size of the niches before pouring the concrete. Form the niches with molds or build into the formwork during the pour. Reinforce as needed for structural integrity. After curing, plant your chosen greenery and add a layer of soil or gravel inside the niches. Seal around the niches to prevent water infiltration, and install lighting if desired. Regular maintenance includes watering and occasional plant replacement.
Decorate the niches with decorative stones or embedded ornaments. Use lighting to highlight the greenery at night, creating a calming ambiance. Personalize with your favorite plants or themed arrangements. These features make your patio unique and lively, with minimal upkeep.
Recessed plant niches in concrete surfaces bring a fresh, innovative touch to outdoor design. They elevate your space by combining structure with nature, creating a peaceful retreat. With thoughtful placement and plant choices, you’ll craft a stylish, sustainable environment that’s both functional and beautiful.
Conclusion
With such a wide array of cement patio ideas—from minimalist designs to bold decorative touches—there’s truly something for every outdoor space. Don’t be afraid to experiment and personalize these concepts to reflect your unique style. Take the leap and transform your patio into a beautiful, inviting retreat that you’ll love for years to come!