
17 Cheap Bathroom Flooring Ideas with Stylish Solutions
Dreaming of a beautiful bathroom makeover without breaking the bank? Affordable bathroom flooring ideas have gained huge popularity because they allow homeowners to upgrade their spaces stylishly without overspending. Whether you’re renovating on a budget or simply want a fresh look, budget-friendly flooring options make it easy to achieve stunning results.
In this article, you’ll find a variety of creative and cost-effective solutions to transform your bathroom. From DIY projects to smart material choices, each idea is designed to help you combine style and savings. Get ready to explore a range of options that will inspire your next bathroom upgrade and add charm to your home!
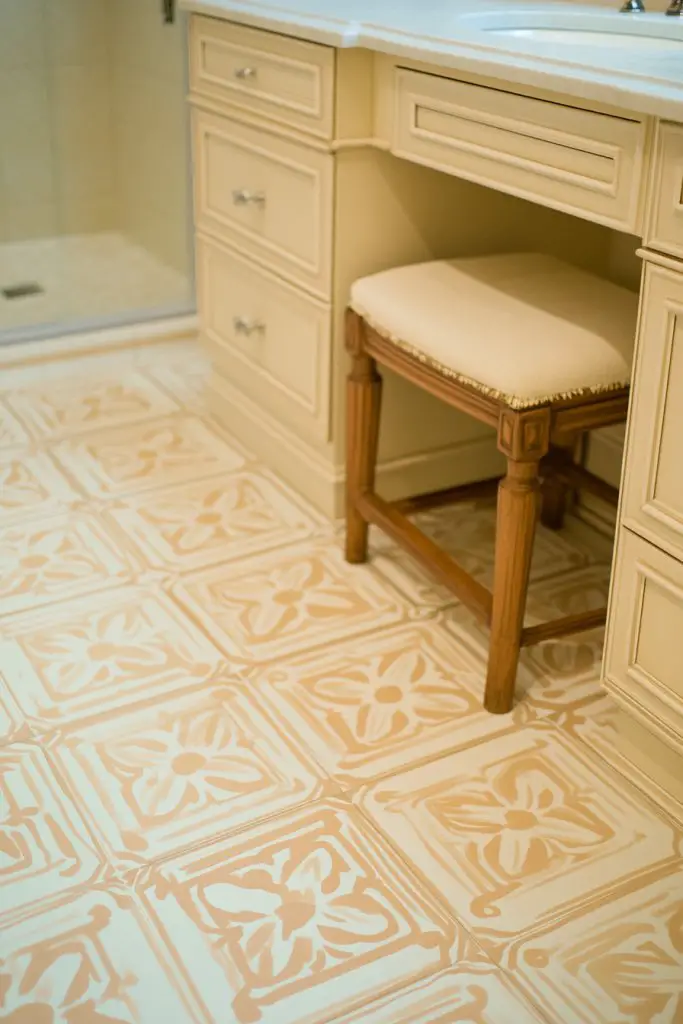
1. Peel-and-Stick Vinyl Tiles for a Modern, Budget-Friendly Look
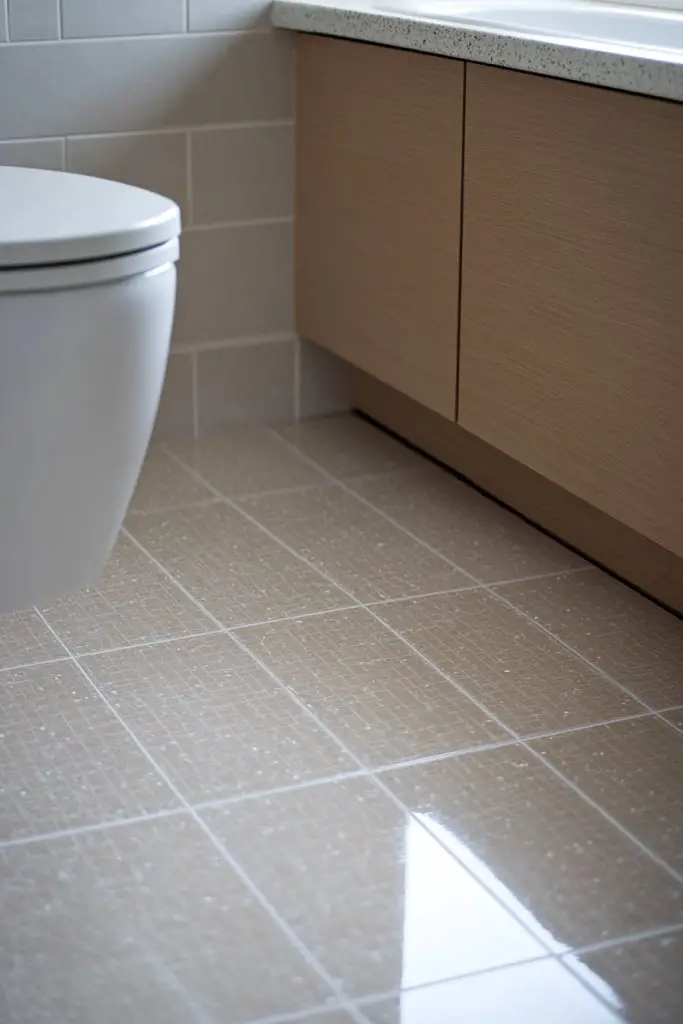
Ever wanted a stylish bathroom floor without the hefty price tag? Peel-and-stick vinyl tiles are perfect for transforming your space on a budget. They make DIY renovations feel less daunting and more fun, especially if you’re tired of outdated or worn flooring. Plus, they’re ideal for renters or anyone who refuses to commit long-term.
Recommended Products to replicate this idea
| # | Preview | Product | |
|---|---|---|---|
| 1 |
|
Nexus Self Adhesive 12-Inch Vinyl Floor Tiles, 20 Tiles - 12" x 12", Light Slate Marble Pattern -... | Check Latest Price |
| # | Preview | Product | |
|---|---|---|---|
| 1 |
|
Nexus Self Adhesive 12-Inch Vinyl Floor Tiles, 20 Tiles - 12" x 12", Light Slate Marble Pattern -... | Check Latest Price |
Imagine stepping onto a sleek, stone-look tile with a matte finish that mimics high-end materials. The tiles come in a variety of textures and colors, allowing you to create a unique pattern or keep it simple. The adhesive backing ensures a seamless look, as if the floor was professionally installed. The surface feels smooth underfoot and adds a modern touch.
These tiles work well in various design styles, from minimalist to rustic. You can opt for bold geometric patterns or subtle monochrome shades, depending on your vibe. Seasonal updates are easy—swap out patterned tiles for lighter shades in summer or darker tones in winter. They also adapt easily to small or large bathrooms.
Start by thoroughly cleaning your existing floor to remove dust and grease. Measure the area and plan your pattern, cutting tiles as needed with a utility knife. Peel off the backing and carefully stick each tile, pressing firmly to avoid air bubbles. Use a straight edge for perfect alignment. No special tools are required—just patience and a steady hand. For uneven surfaces, consider a primer or smoothing compound.
Create visual interest by mixing different colors or textures of tiles for a custom mosaic effect. Frame the edges with trim or decorative borders to elevate the look. Use contrasting grout or sealant to emphasize patterns and protect the surface. Adding a textured or faux-wood vinyl can also add warmth and character.
Peel-and-stick vinyl tiles prove that a stunning bathroom is possible without breaking the bank. They empower you to take on DIY projects confidently, knowing that the results can rival professional work. Your space will look fresh, modern, and uniquely yours—ready to impress friends or just enjoy yourself every day.
2. Painted Cement Floor with Geometric Patterns
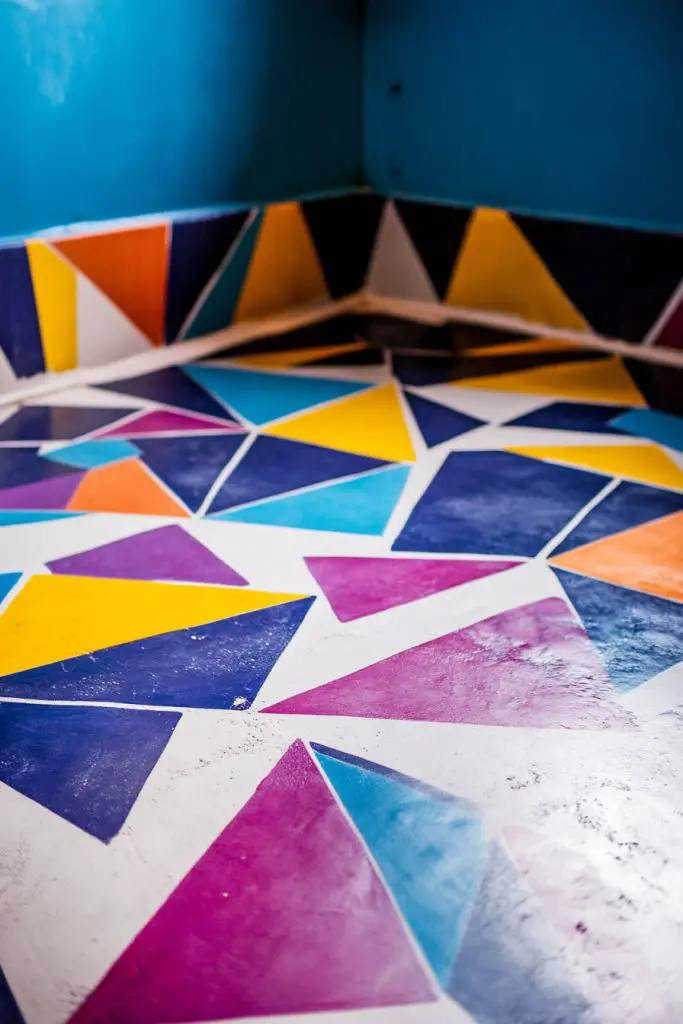
Tired of plain, boring cement floors that lack personality? A fresh coat of paint combined with geometric patterns can totally transform your bathroom into a stylish haven. It’s a low-cost way to add artistic flair without hiring a pro or replacing the entire floor. Plus, it’s perfect for those who love DIY projects.
Recommended Products to replicate this idea
| # | Preview | Product | |
|---|---|---|---|
| 1 |

|
KILZ 1-Part Epoxy Acrylic Concrete & Garage Floor Paint, Slate Gray, Satin, Interior/Exterior... | Check Latest Price |
| # | Preview | Product | |
|---|---|---|---|
| 1 |

|
Arrow Floor Sign Tape 2"4" Marking Sticker 200 PCS Decal Tape Red | Check Latest Price |
Picture a matte grey concrete floor with bold white lines forming a striking hexagon or chevron pattern. The contrast creates visual interest, making the space feel more dynamic and modern. The painted design adds a layer of texture and depth, giving the room an artistic studio vibe. It’s like bringing a piece of contemporary art into your everyday routine.
You can customize the pattern based on your taste—think zigzags, diamonds, or abstract shapes. Colors can be bold or muted, matching your overall decor or creating a statement. For seasonal changes, simply repaint or switch to different color schemes for a quick refresh. This technique works well in small spaces or larger bathrooms seeking visual interest.
Start by cleaning and sealing your cement floor to create a smooth surface. Use painter’s tape to mark your geometric design, ensuring straight lines and symmetry. Choose high-quality, durable floor paint designed for concrete, and apply multiple coats for richness. Let each layer dry thoroughly before removing tape and adding a sealant for longevity. Patience is key to achieving crisp lines.
Add metallic or contrasting colors to highlight specific shapes or borders. Incorporate subtle texturing by sponging or stippling paint for a tactile effect. Use stencils for intricate designs or initials for a personalized touch. You can also add small decorative tiles or decals within the pattern for extra flair.
A painted cement floor is a fun, affordable way to express your creativity and elevate your bathroom’s style. It shows that you don’t need fancy materials to make a big impact. With some patience and a steady hand, you can achieve a professional-looking finish that makes your space uniquely yours.
3. Affordable Laminate Flooring in Warm Wood Tones
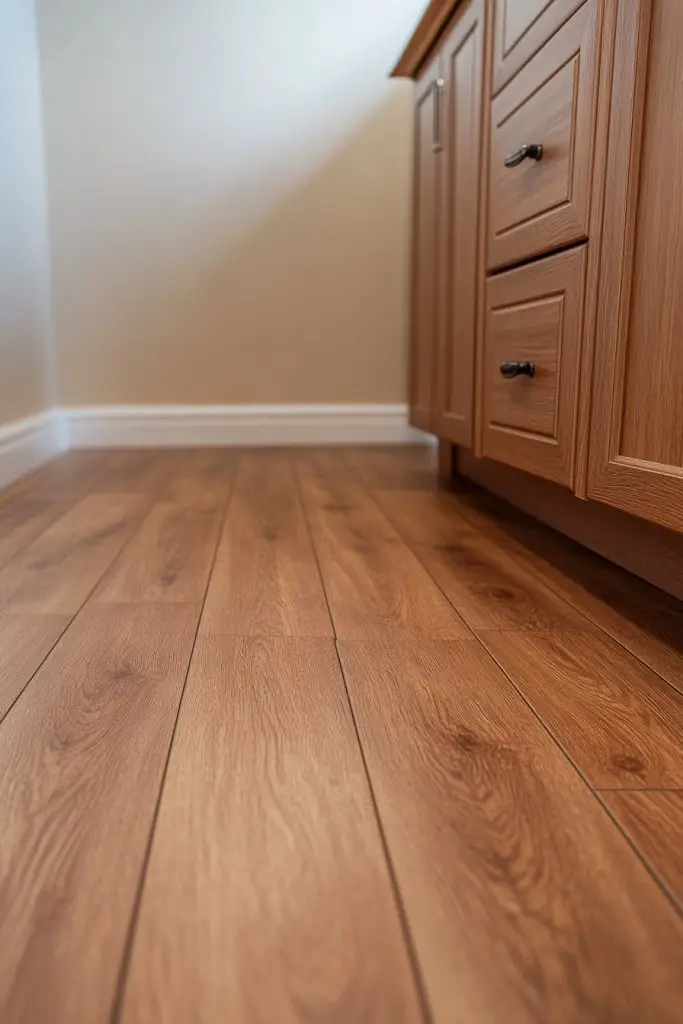
Craving the cozy, timeless look of hardwood but don’t want to spend a fortune? Affordable laminate flooring offers a practical solution, giving your bathroom warmth and style without the high price tag. It’s a great way to upgrade tired floors and boost your home’s appeal.
Recommended Products to replicate this idea
| # | Preview | Product | |
|---|---|---|---|
| 1 |

|
Art3d Peel and Stick Floor Tile Vinyl Wood Plank 36-Pack 54 Sq.Ft, Brown Stone, Rigid Surface Hard... | Check Latest Price |
| # | Preview | Product | |
|---|---|---|---|
| 1 |

|
3in1 Vapor Barrier Flooring Underlayment w/Overlap and pre-Attached Tape Strip - Bestlaminate- 2mm -... | Check Latest Price |
Imagine stepping onto a floor that mimics rich oak or walnut, with realistic grain patterns and a smooth finish. The warm tones instantly make the space feel inviting and comfortable. The planks are wide and long, creating a sense of openness and continuity. The surface feels slightly textured, adding to the authentic wood feel.
Choose from a variety of wood shades, from light maple to dark mahogany, to match your decor. You can install them in a traditional run or create a herringbone pattern for a more elegant look. Seasonal decor can be complemented with soft textiles or bold accessories, changing the ambiance easily. It’s adaptable for both small and large bathrooms.
Begin by removing existing flooring and preparing the subfloor—ensure it’s clean, dry, and level. Lay down a vapor barrier or underlay for insulation and moisture protection. Click or glue the laminate planks together, following manufacturer instructions. Leave a small expansion gap around the perimeter and install baseboards to cover it. The process is straightforward but requires patience to get tight seams.
Layer rugs or mats in contrasting colors for added comfort and style. Incorporate decorative trims or molding to frame the floor and add a finished look. You can also stain or paint sections of the planks for a two-tone effect, creating a custom design. Pair with matching accessories for a cohesive vibe.
Laminate flooring is a smart choice for DIY enthusiasts wanting the look of hardwood without the maintenance. It proves that you can achieve high-end aesthetics on a budget. Your upgraded bathroom will feel warmer and more polished, boosting your confidence in tackling future projects.
4. Classic Black and White Checkerboard Tiles
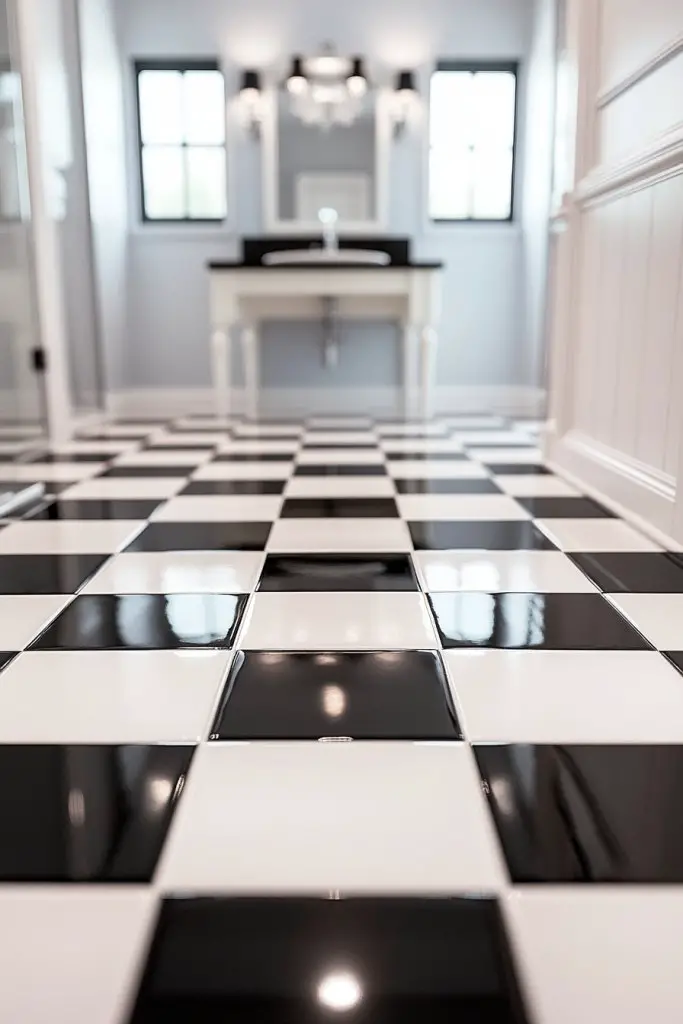
Looking for a timeless, stylish flooring idea that never goes out of fashion? Black and white checkerboard tiles have been a staple for decades and still deliver a chic, retro vibe. They’re affordable, easy to install, and instantly elevate your bathroom’s aesthetic.
Recommended Products to replicate this idea
| # | Preview | Product | |
|---|---|---|---|
| 1 |

|
TileHQ 12” x 12” Porcelain Floor and Wall Tile (15 PC Per Carton) (14.55 SQFT Per Carton) | Check Latest Price |
| # | Preview | Product | |
|---|---|---|---|
| 1 |

|
Red Devil 0425 Pre-Mixed Tile Grout Squeeze Tube, 5.5 oz., White | Check Latest Price |
Visualize a floor with crisp black squares alternating with pure white ones, creating a bold pattern that commands attention. The high contrast makes the space look larger and more vibrant. Glossy ceramic tiles reflect light beautifully, adding brightness and a sense of cleanliness. It’s a classic look that pairs well with almost any color scheme.
You can soften the look with matte finishes or add colored grout for a modern twist. Large tiles create a more seamless appearance, while smaller ones add detail and texture. Incorporate vintage or modern fixtures to complement the style—think brass accents or minimalist hardware. It’s versatile enough for both small powder rooms and spacious bathrooms.
Start by removing existing flooring and preparing the surface. Lay out your tile pattern to ensure symmetry and proper alignment. Use spacers and a level to keep tiles even. Mix and apply the adhesive evenly, pressing tiles firmly and wiping excess grout. Once set, apply grout in the joints, cleaning excess as you go. Seal the tiles to prevent staining and water absorption.
Add decorative borders or inset medallions for an extra touch of elegance. Play with different grout colors—white for a classic look or black for a contemporary edge. Incorporate vintage-inspired fixtures or modern hardware to match your style. Use textured or patterned towels and accessories to complete the aesthetic.
This flooring choice is a statement of confidence and timeless elegance. It’s a DIY-friendly project that yields impressive results, making you proud of your craftsmanship. Your bathroom will radiate style and sophistication, inspiring you to explore more renovation ideas.
5. Reclaimed Wood Look Vinyl Planks for Rustic Charm
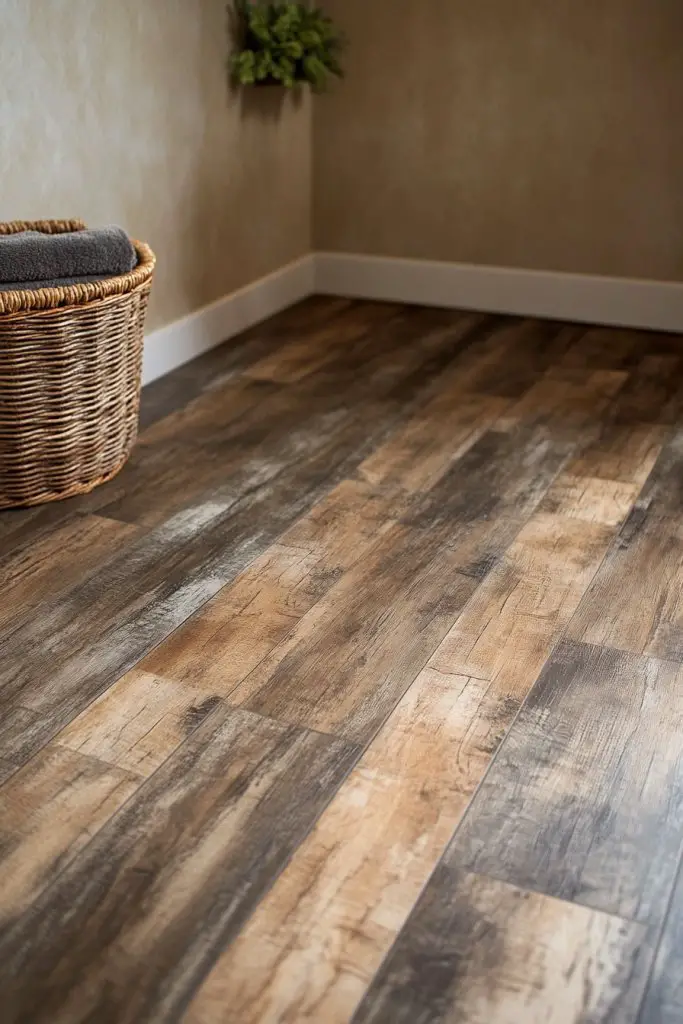
Craving that warm, rustic charm but worried about the high cost and maintenance of real wood? Vinyl planks that mimic reclaimed wood are the answer. They’re budget-friendly, durable, and easy to install, making your bathroom look cozy without the fuss.
Recommended Products to replicate this idea
| # | Preview | Product | |
|---|---|---|---|
| 1 |

|
NAACOO Laminate/Vinyl Flooring Tools, Tapping Block for Vinyl Plank Flooring - Double Sided with... | Check Latest Price |
| # | Preview | Product | |
|---|---|---|---|
| 1 |

|
FLOORLOT BlueStep Underlayment with Moisture Barrier for Laminate and Wood Floors, (200 sq.ft Roll) | Check Latest Price |
Picture a floor with weathered, textured planks in shades of gray and brown, complete with imperfections that add character. The vinyl surface feels slightly rough, mimicking aged wood, and has a matte finish that complements rustic decor. The planks are wide, creating a natural, organic flow that draws the eye across the room.
Choose from different wood tones and grain patterns to suit your style, from farmhouse to shabby chic. Combine with vintage fixtures, woven baskets, or linen textiles to enhance the rustic vibe. Seasonal decor can easily shift from cozy winter layers to breezy summer accents. It’s adaptable to small powder rooms or larger bath spaces.
Prepare the subfloor by cleaning and leveling it. Lay down a moisture barrier or underlay to prevent mold. Click or glue the vinyl planks, starting from a corner and working outward, ensuring tight seams. Use spacers to maintain expansion gaps, and install baseboards or moldings to hide the edges. Regular cleaning with gentle products keeps the surface looking fresh.
Add textured rugs that resemble woven fabrics for extra comfort. Incorporate vintage-inspired hardware and fixtures to tie the look together. Use decorative wall panels or beadboard to complement the rustic flooring. Change accessories seasonally for a fresh look and feel.
Reclaimed wood vinyl planks show that you can get the rustic charm you love without harming the environment or spending a fortune. DIY installation boosts your confidence and makes your bathroom uniquely yours. A cozy, inviting space is just a few smart choices away.
6. Cork Flooring for Soft, Eco-Friendly Comfort
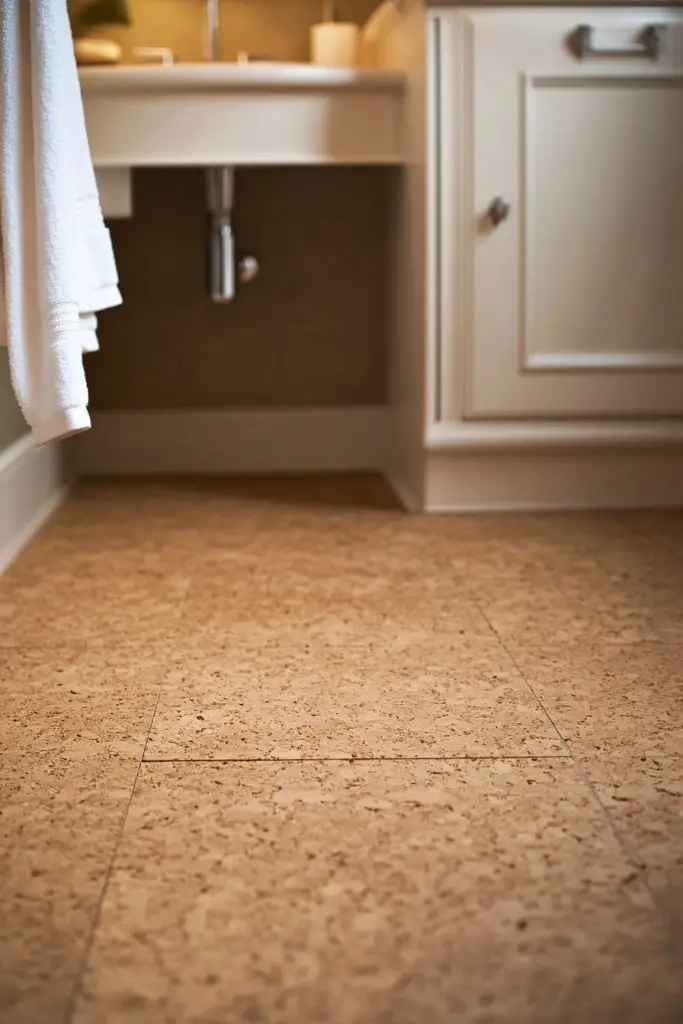
Need a flooring option that’s soft underfoot and eco-friendly? Cork flooring offers natural comfort and sustainability, making it a smart choice for your bathroom. It absorbs sound, insulates heat, and provides a gentle surface that’s easy on your feet and joints.
Recommended Products to replicate this idea
| # | Preview | Product | |
|---|---|---|---|
| 1 |

|
bemaxx Gym Mats Set - 18 pcs EVA Interlocking Foam Floor Tiles (12.6"x12.6"x0.4") 18sqft Protective... | Check Latest Price |
| # | Preview | Product | |
|---|---|---|---|
| 1 |

|
200 Sq. Ft. Cork Roll 48 x 600 Inch Cork Underlayment Roll Sound Insulation Mildew and Moisture... | Check Latest Price |
Imagine stepping onto a warm, textured surface with a natural honey or deep brown hue. The cork tiles have a subtle pattern of tiny cells that add visual interest and a tactile feel. The surface feels cushioned and springy, muffling noise and making every step quiet and comfortable. Light reflects softly off the textured surface, creating a cozy atmosphere.
Cork pairs well with earthy tones, neutral palettes, or bold accents. You can install it in a modular pattern or in a herringbone for a more refined look. Complement with linen or wool textiles and natural wood accents for an eco-inspired theme. It’s perfect for small bathrooms or as an accent floor in larger spaces.
Start with a clean, level surface. Lay a moisture barrier to prevent water damage since cork is porous. Use adhesive or interlocking tiles for easy installation, following manufacturer instructions. Trim tiles to fit corners and edges, and leave expansion gaps. Seal the surface with a water-resistant finish for durability. Regular cleaning with mild soap maintains its appearance.
Add textured rugs or mats with natural fibers to enhance comfort. Use decorative shelving or wall-mounted storage to keep the space functional and stylish. Incorporate eco-friendly paint or finishes to maintain sustainability. Seasonal textiles and accessories can refresh the look effortlessly.
Cork flooring proves that comfort and sustainability can go hand in hand. It’s a DIY-friendly option that invites you to make eco-conscious choices without sacrificing style. Your bathroom becomes a peaceful retreat that reflects your values and design sense.
7. Patterned Vinyl Sheet Flooring for Visual Interest
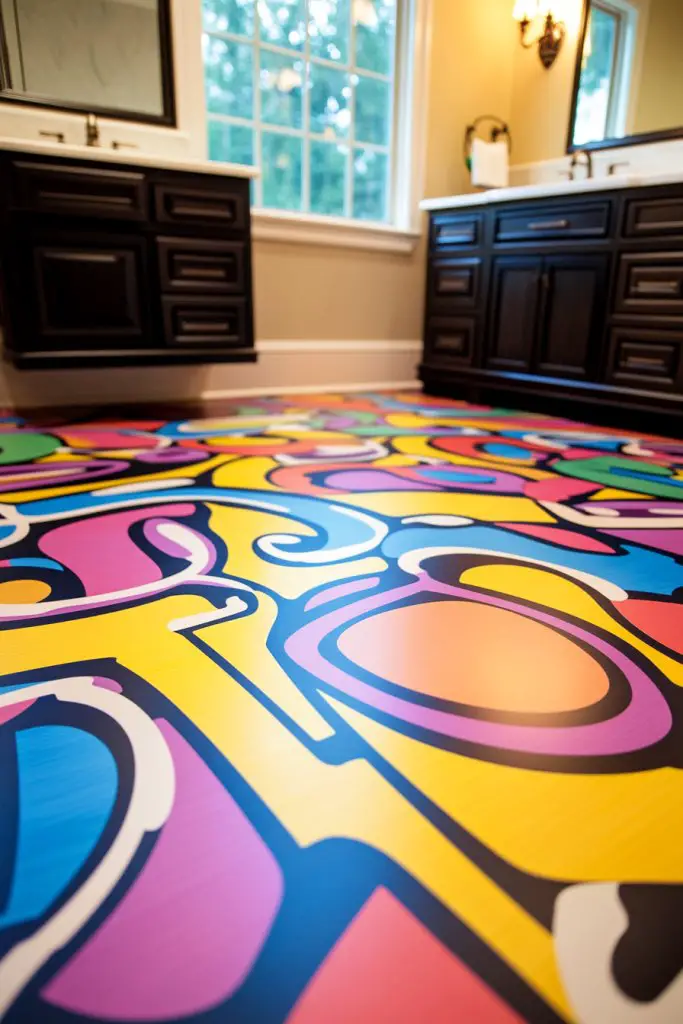
Looking for a bold way to add personality to your bathroom without breaking the bank? Patterned vinyl sheet flooring is a fantastic option. It offers vibrant designs at a fraction of the cost of natural materials and is super easy to install. Say goodbye to dull floors and hello to a statement piece.
Recommended Products to replicate this idea
| # | Preview | Product | |
|---|---|---|---|
| 1 |

|
auxua Wood Grain Peel and Stick Floor Tiles – 11.8” Width, Full Roll Length of 118" –... | Check Latest Price |
| # | Preview | Product | |
|---|---|---|---|
| 1 |

|
Nexus Self Adhesive 12-Inch Vinyl Floor Tiles, 20 Tiles - 12" x 12", Bianco Marble Pattern - Peel &... | Check Latest Price |
Envision a large sheet of vinyl with intricate, colorful patterns—floral motifs, geometric shapes, or abstract art—that instantly draw the eye. The surface is smooth with a slight texture, mimicking fabric or hand-painted murals. It transforms a plain space into a lively, artistic environment, making every step feel like a walk through a gallery.
Choose from a wide array of patterns and colors to suit your style—boho, modern, or eclectic. Pair with minimalist fixtures and simple accessories to let the floor shine or go full maximalist with matching bold textiles. It works well in small powder rooms or large bathrooms needing a visual focal point.
Start by thoroughly cleaning the existing floor. Roll out the vinyl sheet and cut to fit, leaving extra for adjustments. Use adhesive designed for vinyl to secure it in place, working from the center outward to prevent bubbles. Smooth out wrinkles with a roller or squeegee. Trim excess edges with a utility knife. Cover seams with matching or contrasting sealant for a seamless look.
Add decorative borders or corner accents to frame the pattern. Incorporate textured textiles or layered rugs that complement the design. Use coordinating wall colors and accessories for a cohesive look. Seasonal changes can be made by swapping out rugs or adding decorative elements.
Patterned vinyl sheet flooring shows that bold design choices are accessible and affordable. It encourages you to take creative risks and personalize your space. Your bathroom will become a lively and inspiring retreat that reflects your unique style.
8. DIY Painted Tile Effect with Stencils
Ever wish your tiles looked more expensive or unique? DIY painted tile effects with stencils are an affordable way to achieve that look without removing or replacing existing tiles. It’s perfect for renters or anyone wanting a quick style upgrade. Plus, it’s surprisingly easy to do with a bit of patience.
Recommended Products to replicate this idea
| # | Preview | Product | |
|---|---|---|---|
| 1 |

|
6 Pack Tile Stencil Set (8X8 Inch), Tile Stencil Pattern, Use As Floor Stencils Or Wall Stencils,... | Check Latest Price |
| # | Preview | Product | |
|---|---|---|---|
| 1 |

|
Rust-Oleum 384165 Tub And Tile Refinishing 2-Part Kit, 32 oz, Gloss White | Check Latest Price |
Picture a plain ceramic tile floor transformed into a patterned masterpiece with intricate designs. Using stencils and durable paint, you can create repeating motifs like Moroccan tiles, floral patterns, or modern geometric shapes. The painted surface feels smooth but visually rich, adding depth and personality. The colors can be customized to match your decor.
Experiment with different stencil patterns and color combinations for a personalized touch. You can paint an accent section or cover the entire floor for a bold statement. Seasonal color swaps or metallic accents make for easy updates. It’s versatile enough to suit minimalist, boho, or eclectic styles.
Clean and dry your existing tiles thoroughly. Use painter’s tape to mask off areas you want to keep unpainted. Apply a primer suited for ceramic surfaces, then carefully stencil your design with high-quality, water-resistant paint. Use multiple thin coats, allowing each to dry fully. Finish with a clear sealant to protect your work from water and wear. Patience is key but the results are worth it.
Add metallic or contrasting colors for a modern twist. Incorporate hand-drawn accents or borders for extra detail. Use different stencil patterns in corners or along edges to create a layered look. Personalize by adding initials or symbols meaningful to you.
A painted tile effect proves that you can create high-end looks with simple DIY techniques. It’s a fun project that boosts your confidence and allows for endless customization. Your bathroom will have a fresh, artistic vibe that’s all your own.
9. Tiled Mosaic Accents with Cheap Ceramic Pieces

Want to add a touch of artistry and sophistication to your bathroom without a hefty price? Mosaic accents made from inexpensive ceramic pieces can do just that. They’re a creative way to introduce color, texture, and visual interest, especially for small areas.
Recommended Products to replicate this idea
| # | Preview | Product | |
|---|---|---|---|
| 1 |

|
24 Pcs Mosaic Grid Tile Mesh with Adhesive Backing, 12x12 Inch Alkaline Resistant Fiberglass Sheets... | Check Latest Price |
| # | Preview | Product | |
|---|---|---|---|
| 1 |

|
Youway Style Iridescent Glass Mosaic Tiles for Crafts Bulk,200g Broken Mosaic Glass Pieces for... | Check Latest Price |
Imagine a tiny corner or border decorated with colorful ceramic shards arranged in intricate patterns. The mosaic feels tactile and vibrant, catching the light and drawing attention. Each piece adds character and a handmade charm, turning a plain space into a curated gallery of your personality. It’s like a mini masterpiece on your floor or wall.
Play with different color schemes, from bold primaries to soft pastels, to match your decor. Use mosaic borders around the perimeter or create focal points with larger, detailed sections. Incorporate metallic or gloss finishes for a luxe effect. It’s perfect for small accents in both contemporary and traditional styles.
Start with a clean, level surface. Plan your mosaic pattern on paper before applying tiles. Use a strong adhesive suitable for ceramics and press each piece firmly into place, leaving gaps for grout. Once the adhesive sets, fill the gaps with matching grout and wipe away excess. Seal the mosaic to protect it from moisture and stains. Patience and precision are essential.
Mix different shapes and sizes for a dynamic look. Incorporate metallic or iridescent tiles for extra sparkle. Frame the mosaic with decorative trim or paint to highlight the design. Personal touches like initials or symbols can make it even more special.
Creating mosaic accents shows that you don’t need expensive art to make a big impact. It’s a rewarding DIY project that enhances your confidence and adds a personal touch to your bathroom. Expect compliments from guests and a new appreciation for your creative side.
10. Linoleum Flooring in Bright, Trendy Colors
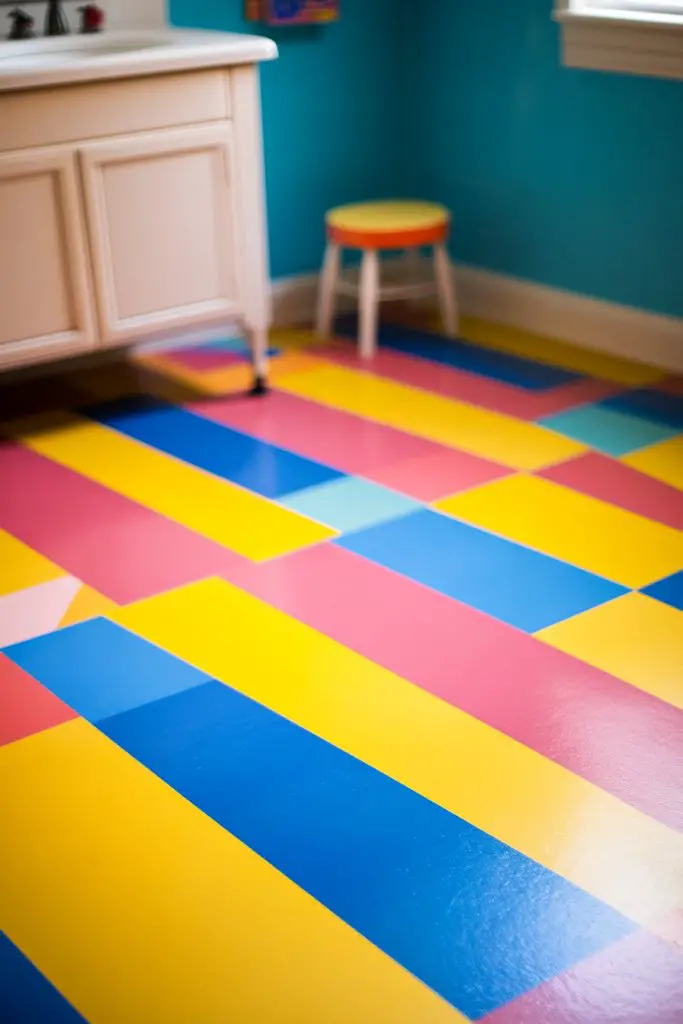
Looking to inject some fun and retro charm into your bathroom? Bright, trendy linoleum flooring is a cost-effective way to do it. It’s durable, easy to install, and comes in a rainbow of colors, making it perfect for those who love bold design choices.
Recommended Products to replicate this idea
| # | Preview | Product | |
|---|---|---|---|
| 1 |
|
Nexus Self Adhesive 12-Inch Vinyl Floor Tiles, 20 Tiles - 12" x 12", Dark Slate Marble Pattern -... | Check Latest Price |
| # | Preview | Product | |
|---|---|---|---|
| 1 |
|
DAP 141 Multi-Purpose Floor Adhesive, 1 Quart, Off-White | Check Latest Price |
Picture a vibrant yellow or turquoise floor that instantly lifts the mood of your bathroom. The smooth surface has a matte finish with subtle patterns or solid colors, giving it a playful yet vintage vibe. It pairs well with minimalist fixtures or eclectic decor, creating a lively, welcoming space. The color pops under soft lighting, making every visit cheerful.
Choose from solid colors, geometric patterns, or even floral motifs for maximum impact. Seasonal updates can include swapping out rugs or accessories to match the color palette. It’s suitable for small powder rooms or larger baths seeking a splash of personality. Layer with textured textiles or colorful towels for added charm.
Start by removing the old flooring and preparing a clean, smooth surface. Roll out the linoleum, trimming to fit the space with a utility knife. Use a cement or adhesive recommended by the manufacturer to secure it, pressing firmly and smoothing out bubbles. Trim excess edges with a straightedge and seal the seams with matching adhesive or sealant. Allow ample drying time before use.
Add decorative borders or painted accents around the edges for a finished look. Incorporate matching or contrasting textiles and accessories for a cohesive style. Use playful rugs or mats that complement the color scheme. Seasonal decor swaps keep the space fresh and lively.
Bright linoleum flooring proves that fun doesn’t have to be expensive or complicated. It encourages bold choices and shows that DIY can be both simple and impactful. Your bathroom will radiate personality and cheer, inspiring you to keep experimenting with your decor.
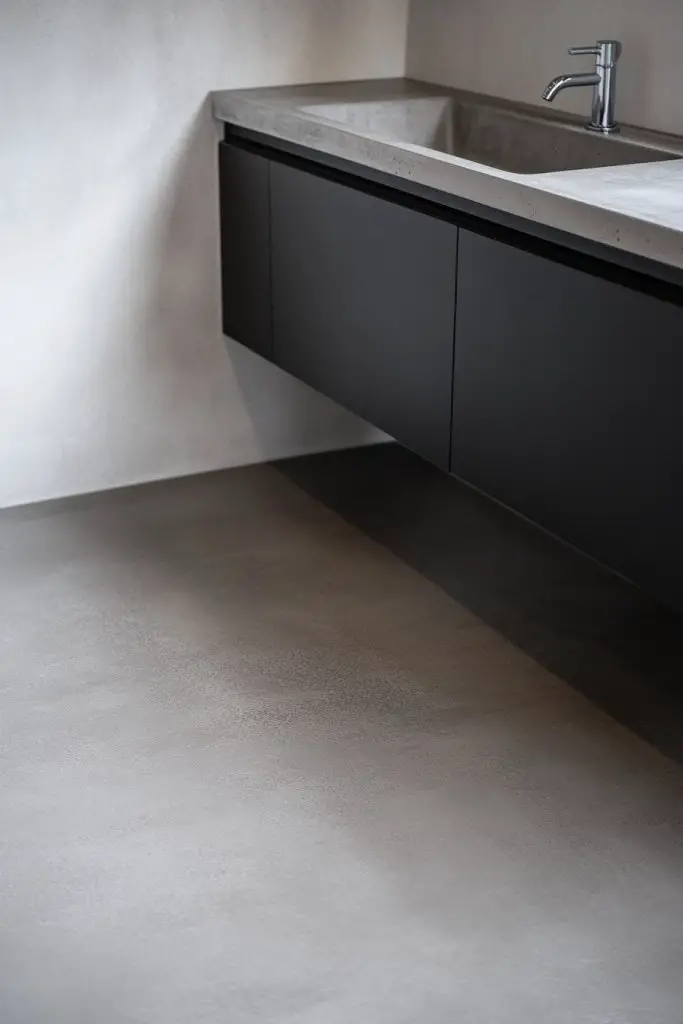
11. Concrete Look Floor Coatings for an Industrial Vibe
Dreaming of an industrial chic bathroom without the hefty renovation costs? Concrete-look floor coatings offer an affordable way to achieve that sleek, modern vibe. They’re easy to apply and transform a dull surface into a stylish statement piece. Plus, they work well with minimalist and contemporary decor.
Recommended Products to replicate this idea
| # | Preview | Product | |
|---|---|---|---|
| 1 |

|
McKinnon Concrete Sealer, Paver Sealer 5 Gallon, Penetrating Semi Gloss Wet Look, Outdoor/Indoor,... | Check Latest Price |
| # | Preview | Product | |
|---|---|---|---|
| 1 |

|
Zhengmy 2 Pieces Metal Tree Leaf Wall Decor Vine Olive Branch Leaf Wall Art Living Room, Hallway... | Check Latest Price |
Visualize a smooth, matte gray floor with subtle variations that mimic real concrete. The surface has a slightly textured feel, adding depth and authenticity. It reflects light softly, creating a clean, uncluttered look. Accentuated with simple fixtures and metallic accents, it embodies urban sophistication.
Choose from different shades of gray or add subtle color pigments for a customized look. Combine with exposed piping, concrete walls, or metal fixtures for a true industrial aesthetic. Use textured rugs or simple mats to add warmth without disrupting the style. It’s adaptable for small or large bathrooms seeking a modern upgrade.
Prepare the existing surface by cleaning, sanding, and repairing any cracks. Apply a primer suitable for concrete or existing surfaces. Use a roller or trowel to apply the coating evenly, working in sections. Add color pigments or textured additives during mixing for variation. Seal with a protective top coat for durability and water resistance. Allow curing time as instructed.
Incorporate metallic or glossy finishes for extra flair. Add industrial-inspired accessories like pipe shelving or vintage fixtures. Use lighting that accentuates the textured surface, like wall-mounted sconces or track lighting. Personal touches such as minimalist art or sculptural elements can enhance the vibe.
A concrete look floor coating shows that you can achieve a high-end industrial style affordably. It’s a DIY project that boosts confidence and offers a sleek, modern upgrade. Your bathroom will look effortlessly chic and ready for Instagram, all thanks to a simple coating.
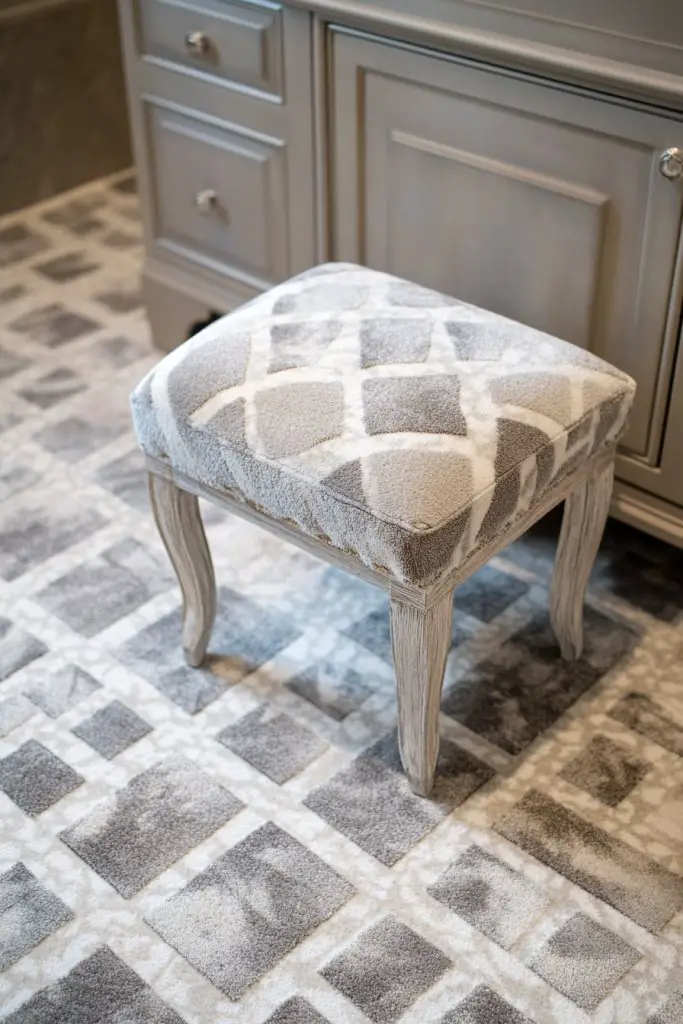
12. Patterned Carpet Tiles for Comfort and Style
Want a bathroom floor that’s soft, warm, and stylish? Patterned carpet tiles are a surprising solution that adds comfort and personality. They’re easy to install, replace, and come in a variety of patterns and colors. Perfect for making your bathroom feel cozy and inviting.
Recommended Products to replicate this idea
| # | Preview | Product | |
|---|---|---|---|
| 1 |

|
Mohawk Home 24" x 24" Indoor/Outdoor 0.25" Pile Height, Peel and Stick Carpet Tile, Grey Polyester,... | Check Latest Price |
| # | Preview | Product | |
|---|---|---|---|
| 1 |

|
12pcs Carpet Squares Puzzle Floor Mat, Plush Interlocking Carpet Tiles, Anti Slip EVA Foam Jigsaw... | Check Latest Price |
Imagine stepping onto plush, patterned tiles with bold geometric or floral motifs. The textured surface feels luxurious underfoot, muffling noise and adding warmth. The patterns can be playful or sophisticated, depending on your taste. They create a layered, textured look that makes the space feel more like a retreat.
Mix and match different patterns and colors to create a bespoke design. Use muted tones for a calming effect or bright hues for energy. Incorporate textured or looped tiles for added depth. It’s suitable for small powder rooms or larger bathrooms seeking a soft foundation.
Start by cleaning and leveling the subfloor. Lay out your tile pattern before installation. Use adhesive backing or interlocking tiles for easy setup, pressing firmly to secure. Trim tiles to fit edges or around fixtures. Regular vacuuming and spot cleaning keep the tiles looking fresh. Replace worn tiles easily without removing the entire floor.
Add rugs or mats to highlight specific areas or add extra comfort. Choose decorative borders or create a central focal point with a different pattern. Use coordinating towels and accessories to tie the room together. Seasonal textiles or colors refresh the look effortlessly.
Patterned carpet tiles turn a functional space into a cozy sanctuary. They show that comfort and style can coexist affordably. Installing them boosts your DIY confidence and makes your bathroom uniquely yours, inviting relaxation every time you step inside.
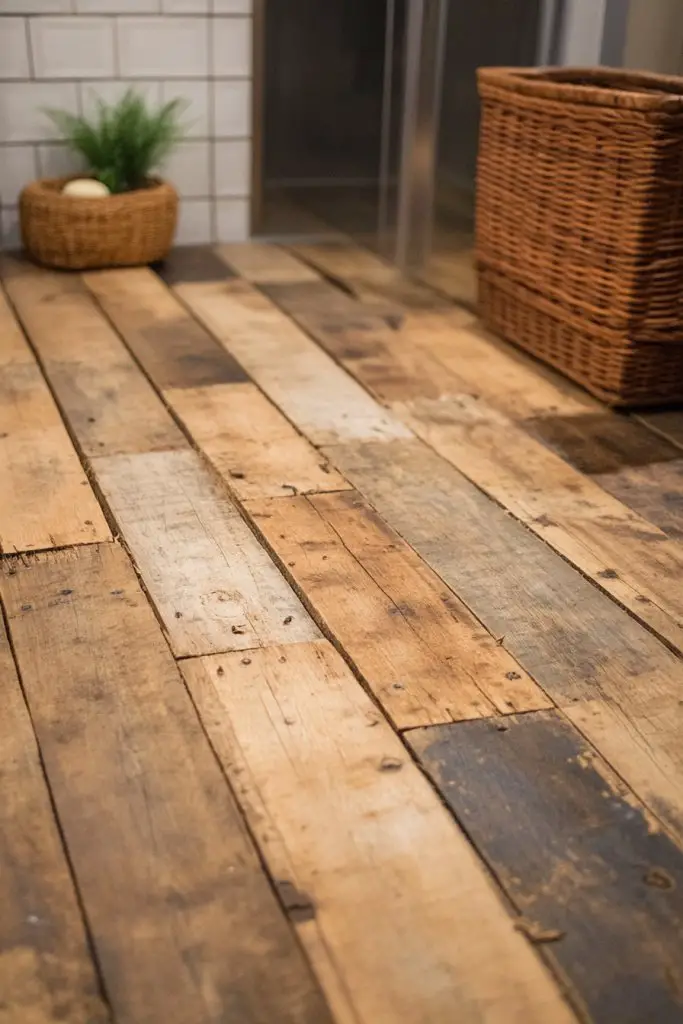
13. Upcycled Pallet Wood for a Unique, Eco-Friendly Floor
Looking for a one-of-a-kind, eco-friendly flooring idea? Upcycled pallet wood is perfect for creating a rustic, sustainable look that’s also budget-conscious. It’s a creative way to reuse materials and add character to your bathroom. Plus, it’s a project that’s surprisingly doable.
Recommended Products to replicate this idea
| # | Preview | Product | |
|---|---|---|---|
| 1 |

|
Bruce Natural Statement 3" Wide x 3/8" Thick Click-Lock Engineered Hardwood Flooring (22sq.ft./case) | Check Latest Price |
| # | Preview | Product | |
|---|---|---|---|
| 1 |

|
Art3d 30-Pack Herringbone Peel and Stick Vinyl Floor Tiles, 12" x 12" Self Adhesive Waterproof Wood... | Check Latest Price |
Picture weathered, textured planks in shades of gray and brown arranged in a herringbone or straight pattern. The imperfect, reclaimed wood adds warmth and authenticity, making the space feel cozy and lived-in. The surface has a tactile, uneven quality that invites touch. Natural knots and grain variations add charm and personality.
Use different types of reclaimed wood for varied color tones and textures. Pair with vintage fixtures, woven baskets, or linen textiles for a rustic aesthetic. Seal the wood with eco-friendly finishes for water resistance and durability. It’s suitable for small powder rooms or as an accent in larger bathrooms.
Begin by cleaning and sanding the pallet wood to remove splinters and rough edges. Arrange the planks in your chosen pattern, then secure them with a strong adhesive or nails. Seal the surface with a water-resistant finish to protect against moisture. Install baseboards or moldings to hide edges. Regular cleaning with gentle products helps maintain the look.
Add textured rugs or mats that complement the rustic style. Incorporate vintage or industrial fixtures to enhance the theme. Use decorative wall panels or shelving to display personal items. Seasonal decorations can refresh the ambiance easily.
Upcycled pallet wood flooring proves that eco-friendly choices can be stylish and affordable. It encourages creative reuse and DIY confidence. Your bathroom becomes a reflection of your sustainable values and unique style—an inviting retreat crafted by your own hands.
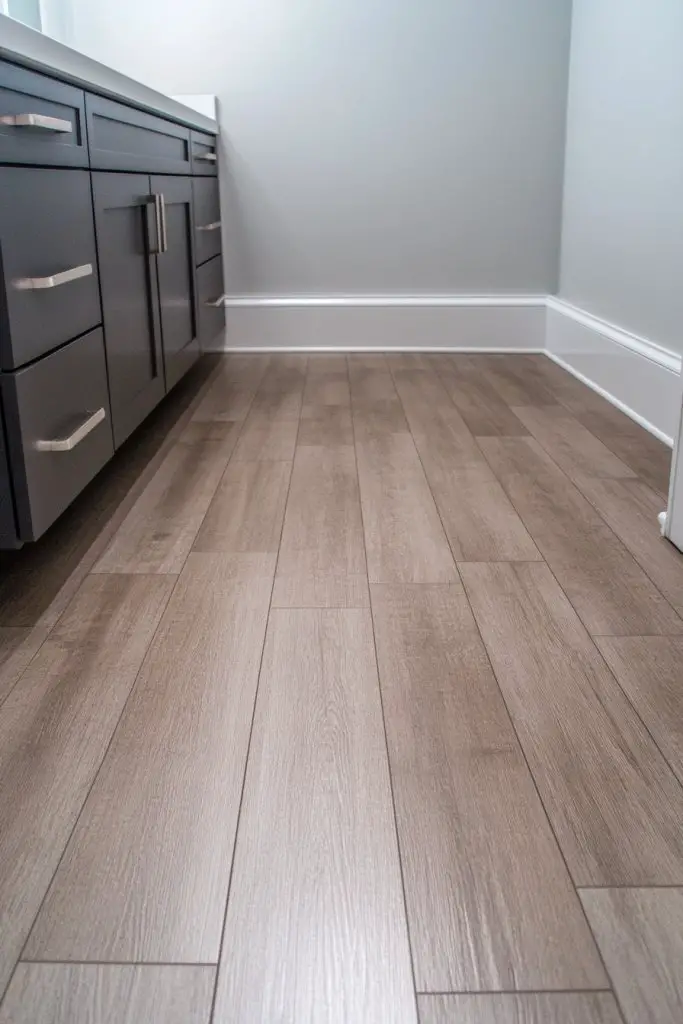
14. Vinyl Plank Flooring with Wide Planks for Spacious Feel
Want to make your small bathroom feel larger and more open? Wide vinyl planks are a smart solution that adds a sense of space and luxury without the expense of real hardwood. They’re durable, waterproof, and simple to install, perfect for DIY enthusiasts.
Recommended Products to replicate this idea
| # | Preview | Product | |
|---|---|---|---|
| 1 |
|
NAACOO Laminate/Vinyl Flooring Tools, Tapping Block for Vinyl Plank Flooring - Double Sided with... | Check Latest Price |
| # | Preview | Product | |
|---|---|---|---|
| 1 |

|
Interlocking Vinyl Flooring Planks 36" X 6", 14 Planks Covers 21 Sq.Ft Per Box, Grey, 5mm Thick DIY... | Check Latest Price |
Visualize large, wide planks in a light oak or natural maple finish stretching across the floor. The broad surface creates a seamless, expansive look that tricks the eye into perceiving more space. The textured surface adds realism, while the subtle grain enhances authenticity. It’s like a mini hardwood upgrade in a fraction of the cost.
Choose from different shades and textures to match your decor—light, medium, or dark finishes. Install the planks in a straight run or a herringbone pattern for added visual interest. Pair with minimal fixtures and open shelving to maximize the spacious feel. Seasonal decor can be layered with textiles and accessories.
Prepare the subfloor by cleaning and leveling it. Lay down an underlayment if needed for moisture and soundproofing. Click or glue the vinyl planks, starting from a corner and working outwards, ensuring tight seams. Leave a small expansion gap to prevent buckling. Cover edges with baseboards or molding for a clean finish. Regular maintenance involves sweeping and damp mopping.
Use rugs or mats in contrasting colors or textures to define zones or add warmth. Incorporate decorative trims or moldings to frame the floor. Match accessories like towels and storage baskets to your color scheme. Seasonal changes in textiles and decor keep the space feeling fresh.
Wide vinyl planks show that smart design can make a small space feel big and inviting. It’s a DIY project that empowers you to upgrade your bathroom with confidence. The result is a stylish, functional space that feels open and welcoming every day.
15. Faux Stone Vinyl Tiles for Natural Texture
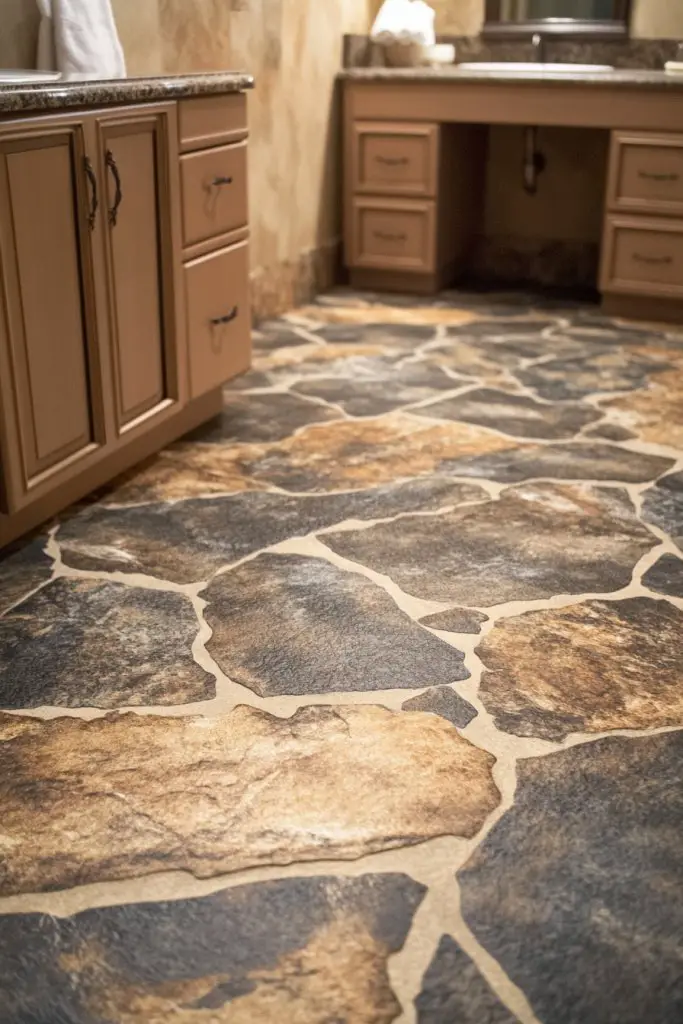
Craving the natural beauty of stone but dreading the cost and maintenance? Faux stone vinyl tiles offer a convincing alternative that’s budget-friendly and easy to care for. They bring texture and visual interest to your bathroom without the hassle of natural stone.
Recommended Products to replicate this idea
| # | Preview | Product | |
|---|---|---|---|
| 1 |
|
Nexus Self Adhesive 12-Inch Vinyl Floor Tiles, 20 Tiles - 12" x 12", Dark Slate Marble Pattern -... | Check Latest Price |
| # | Preview | Product | |
|---|---|---|---|
| 1 |
|
Nexus Self Adhesive 12-Inch Vinyl Floor Tiles, 20 Tiles - 12" x 12", White Slate Pattern - Peel &... | Check Latest Price |
Imagine walking onto a floor that mimics rustic slate or travertine, with textured surfaces that add depth and character. The tiles have a matte or slightly textured finish, enhancing realism. The natural variation in color and pattern creates a soothing, earthy atmosphere. It’s like bringing outdoor charm indoors.
Select from various stone looks—sleek modern slate or warm terracotta. Use large tiles for a seamless, expansive feel or smaller mosaics for intricate patterns. Pair with natural materials like wood or woven textiles for a cohesive design. Seasonal accents like potted plants or natural fiber baskets complement the earthy vibe.
Start by preparing the surface—clean, dry, and level. Lay out your tiles to check the pattern. Use a suitable adhesive, pressing tiles firmly and evenly. Grout the joints with matching or contrasting grout to emphasize the stones. Seal the surface with a protective coating to prevent water damage and stains. Patience during curing ensures longevity.
Add textured rugs or mats that enhance the natural look. Incorporate decorative elements like wicker or ceramic accessories. Use warm lighting to highlight the textured surface. Personal touches such as a small fountain or natural decor can enhance the earthy feel.
Faux stone vinyl tiles demonstrate that natural textures can be affordable and easy to install. They inspire confidence in DIY projects and elevate your bathroom’s style. Your space becomes a tranquil retreat, blending functionality with nature-inspired beauty.
16. Adhesive Cork Tiles for Non-Slip, Insulating Surface
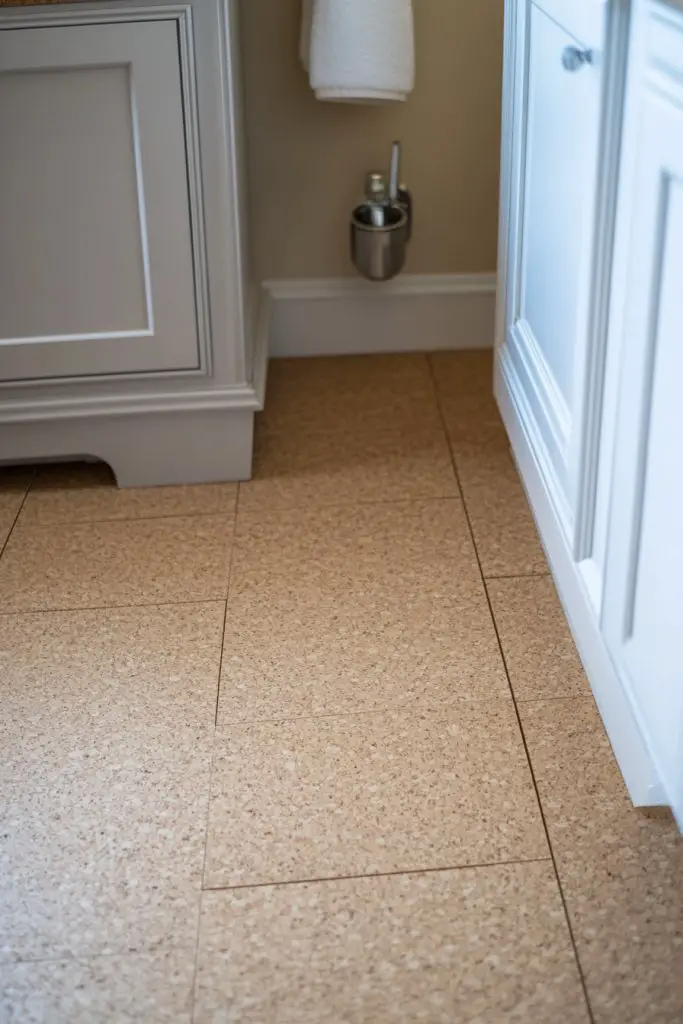
Searching for a bathroom floor that’s safe, insulating, and sustainable? Adhesive cork tiles tick all the boxes. They provide a non-slip surface, excellent thermal insulation, and are eco-friendly, making them ideal for comfort-conscious homeowners. Plus, they’re simple to install without professional help.
Recommended Products to replicate this idea
| # | Preview | Product | |
|---|---|---|---|
| 1 |

|
Quartet Cork Tiles, Bulletin Board Cork Panels 12" x 12" x 3/16", Natural, 8 Pack (108) | Check Latest Price |
| # | Preview | Product | |
|---|---|---|---|
| 1 |

|
16 Pcs Self-Adhesive Cork Round, 3.5" x 3.5" Cork Tiles Backing Sheets,Mini Wall Mat Tiles,for... | Check Latest Price |
Visualize a soft, textured surface in warm beige or deep brown, with a subtly dimpled pattern that invites touch. The cork tiles have a natural matte finish that absorbs light gently, creating a cozy ambiance. The textured surface not only looks inviting but also prevents slips, especially in wet conditions. The organic pattern blends seamlessly with natural decor elements.
Combine cork with natural fibers and neutral tones for a calming retreat. Use in small sections or as a full-floor covering, depending on your preference. Layer with textured rugs or mats that add comfort and style. It’s adaptable to traditional, rustic, or modern aesthetics.
Start by cleaning and leveling the subfloor thoroughly. Peel and stick the cork tiles, aligning them carefully to avoid gaps. Leave a small expansion gap to accommodate moisture and temperature changes. Seal the edges with a compatible adhesive or trim. Regular cleaning with a damp cloth maintains its appearance. Avoid harsh chemicals that can degrade the material.
Add decorative borders or contrasting tiles for a framed effect. Use textured or patterned rugs to enhance comfort and style. Incorporate eco-friendly finishes or coatings for extra protection. Personalize with accessories or wall decor that complement the natural aesthetic.
Adhesive cork tiles show that safety, comfort, and sustainability can be achieved affordably. DIY installation boosts confidence and allows you to create a cozy, eco-conscious bathroom retreat. It’s a smart, stylish upgrade for your home and the planet.
17. Colorful Epoxy Floor Coating for a Bold Statement
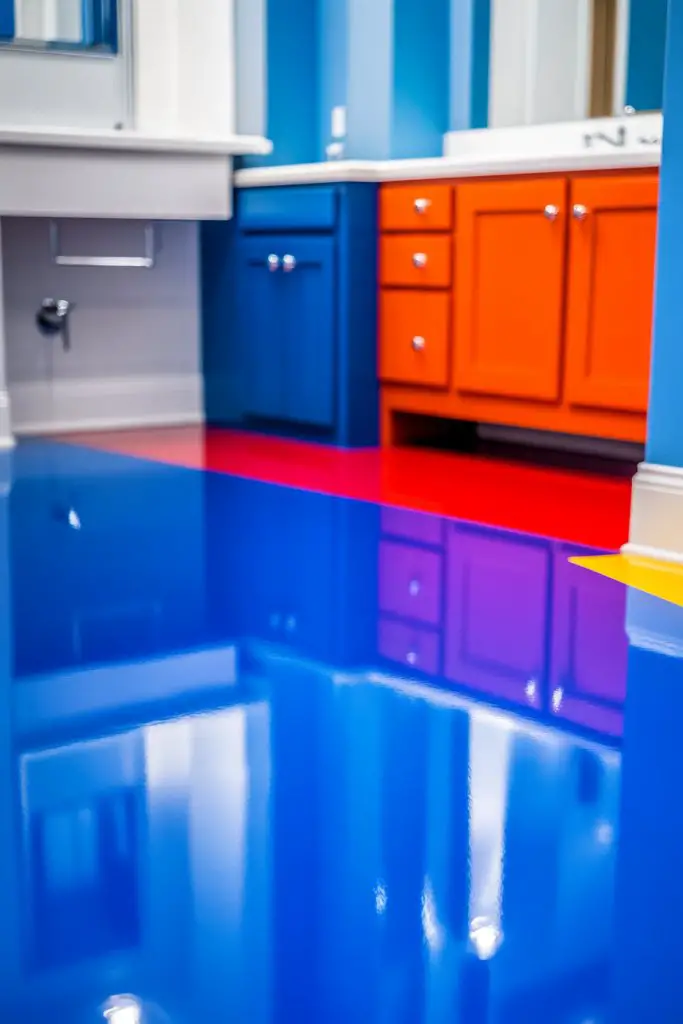
Want to turn your bathroom into a bold, eye-catching space? Colorful epoxy floor coatings deliver a seamless, glossy finish with vibrant hues that scream personality. They’re affordable, durable, and customizable, making them perfect for those who love making statements.
Recommended Products to replicate this idea
| # | Preview | Product | |
|---|---|---|---|
| 1 |

|
Gorilla Epoxy Garage Floor Coating (7 pc) Kit, 1-Car, Concrete Flooring, 100% Solids, Superior... | Check Latest Price |
| # | Preview | Product | |
|---|---|---|---|
| 1 |

|
Custom Shop Metal Flake for Automotive Paint, Chrome Silver, 4oz Medium .008" Metal Flakes for Car... | Check Latest Price |
Imagine a slick, high-gloss surface in a vivid shade like electric blue or fiery red, reflecting light and adding depth. Swirling patterns or metallic flakes can create a dynamic, textured appearance. The smooth, seamless surface feels sleek underfoot and instantly elevates the room’s style. It’s like having a piece of modern art beneath your feet.
Choose from a wide range of colors and effects—metallic, mottled, or layered. Incorporate designs, gradients, or even custom logos for a truly personalized space. Pair with minimalist fixtures and monochrome accessories to let the floor stand out. It’s suited for small or large bathrooms seeking a dramatic update.
Surface preparation is vital—clean, repair, and etch the existing floor for adhesion. Mix the epoxy according to instructions, adding pigments or flakes during the process. Pour and spread evenly with a trowel or roller, working quickly before it sets. Add decorative elements like metallic flakes or glitter for extra flair. Seal with a clear topcoat for durability and shine. Curing time varies but plan accordingly.
Use contrasting borders or inlays to frame the epoxy design. Incorporate decorative hardware or fixtures that complement the vibrant floor. Use mood lighting to enhance the glossy finish and create ambiance. Seasonal decor or accessories can keep the look fresh and exciting.
A colorful epoxy floor shows that you can be bold and creative without spending a fortune. It’s a DIY project that can transform your bathroom into a vibrant retreat full of personality. Your space will radiate confidence and style, inspiring you to continue exploring design possibilities.
Conclusion
With a diverse selection of affordable bathroom flooring ideas, you now have plenty of options to refresh your space without overspending. From peel-and-stick tiles to repurposed materials, these ideas empower you to create a stylish and functional bathroom on a budget. Don’t hesitate to try out these innovative solutions and make your dream bathroom a reality. Start transforming your space today—your stylish, budget-friendly bathroom awaits!