
19 Coffered Ceiling Ideas for 8 Ft Ceilings for Elegant Style
A coffered ceiling can instantly elevate the style of any room, and for homes with 8 ft ceilings, the right design can make your space feel more luxurious and spacious. These ceiling treatments have gained popularity for their ability to add depth, character, and elegance without overwhelming the room, making them a fantastic choice for smaller ceilings.
In this article, you’ll find a variety of inspiring coffered ceiling ideas tailored specifically for 8 ft ceilings. From classic wood-paneled designs to modern geometric patterns, each idea offers a unique way to enhance your home’s aesthetic and create a stunning focal point that complements your décor.
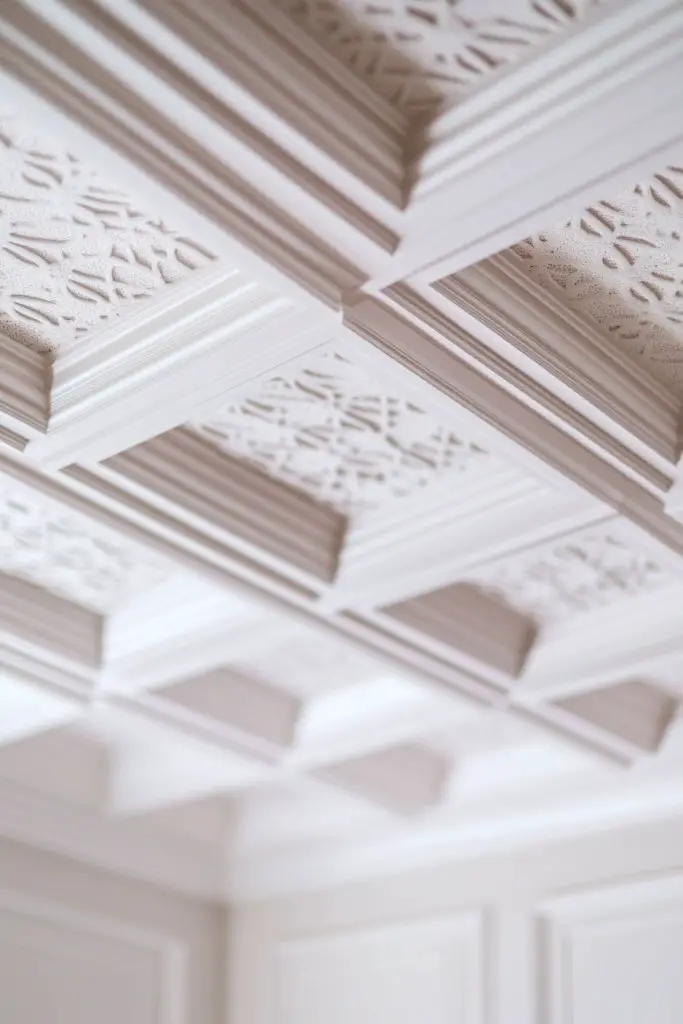
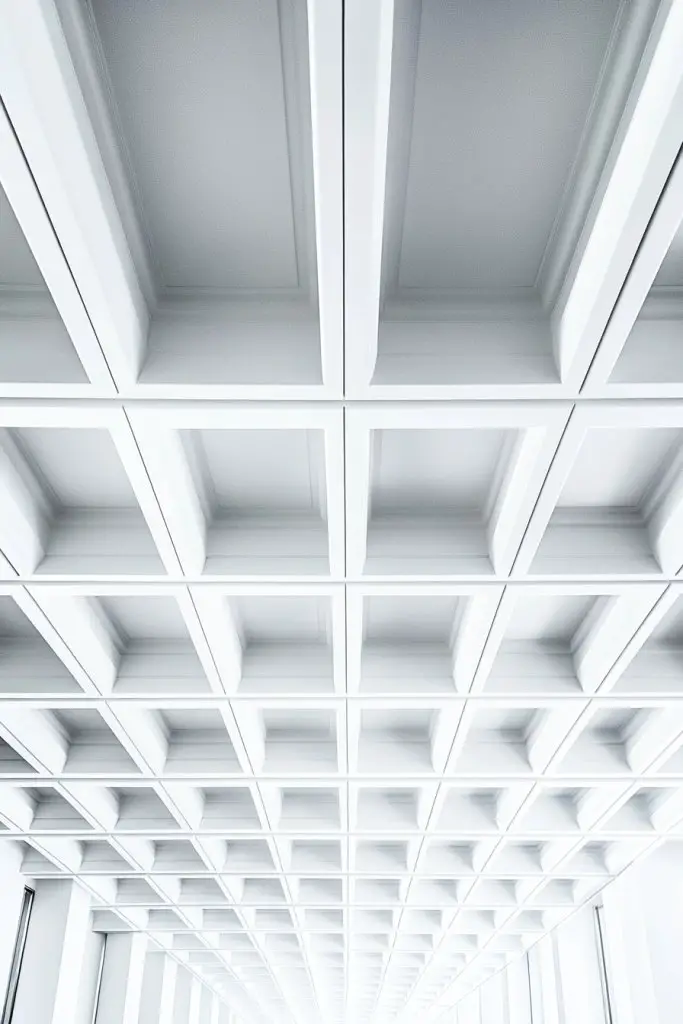
1. Classic White Coffered Ceilings with Crisp Moldings for Timeless Elegance
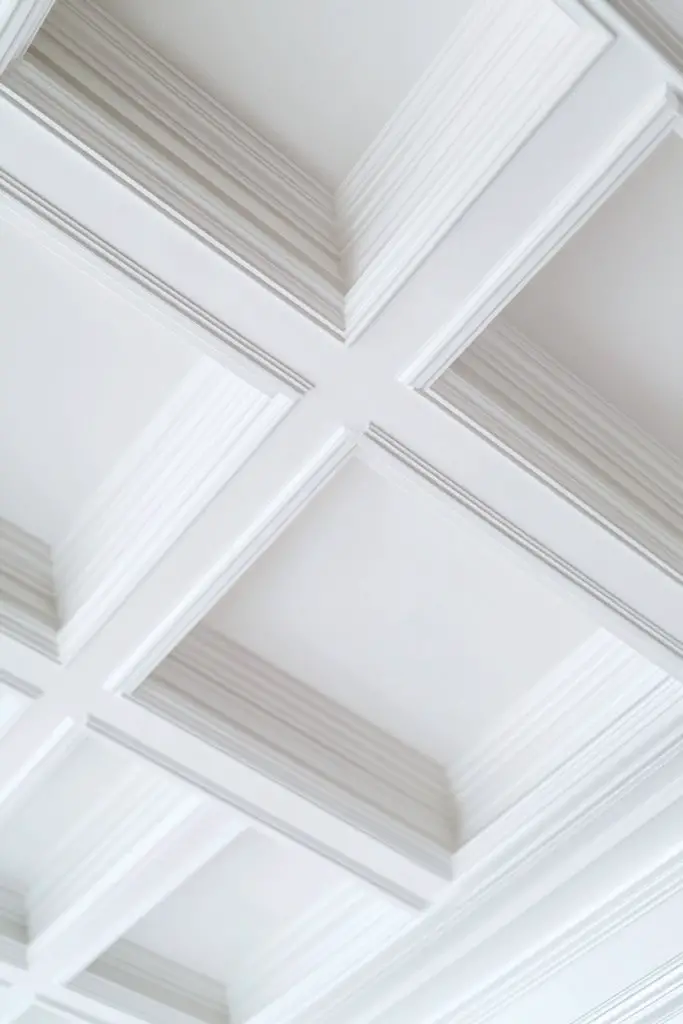
Ever wish your ceilings could make a statement without overwhelming the room? Classic white coffered ceilings with crisp moldings offer that perfect balance of sophistication and simplicity. They give your space an elegant, timeless look that never goes out of style. If you want a ceiling that elevates your entire room, this idea might just be your new best friend.
Recommended Products to replicate this idea
| # | Preview | Product | |
|---|---|---|---|
| 1 |

|
Art3d 10-Pack 47Ft White Ceiling Crown Molding Trim, High Impact Polystyrene Decorative Ceiling... | Check Latest Price |
| # | Preview | Product | |
|---|---|---|---|
| 1 |

|
Art3d 10-Pack Smooth Drop Ceiling Tile 2ft x 4ft - Fire-Rated, Waterproof, Reusable - Premium PVC,... | Check Latest Price |
Imagine a bright, airy room with a pristine white ceiling featuring perfectly aligned, sharp moldings creating a grid pattern. The clean lines add depth and structure without clutter, making the ceiling seem higher and more expansive. The subtle shadows cast by the moldings add a touch of texture, drawing your eye upward gracefully. It’s like giving your ceiling a tailored, crisp suit that never looks outdated.
This classic look works in traditional and modern spaces alike. You can soften the crispness with a matte finish or add a slight sheen for more glamour. For a more dramatic effect, pair it with dark wall colors to enhance contrast. Seasonal accents like faux greenery or subtle lighting can change the vibe without altering the core design. The key is maintaining the sharp, clean lines for that polished appearance.
Start with high-quality crown molding or pre-made coffered ceiling kits available at most home improvement stores. Measure your ceiling carefully, then plan your grid pattern—simple squares or rectangles work best for 8 ft ceilings. Use a level and painter’s tape to mark lines before installing moldings with strong adhesive and small nails. Fill gaps or nail holes with putty, then paint everything in a bright white for a seamless look. Professional help may be beneficial for perfect precision.
Add subtle accents like gold or silver leafing on the moldings to create a luxe effect. Incorporate thin LED strip lights inside the coffers for a soft glow that highlights the design. You can also experiment with textured paints or wallpapers inside the grid for a unique twist. Personal touches like small decorative elements within the coffers can make the ceiling more engaging without detracting from its classic appeal.
A white coffered ceiling with crisp moldings never fails to impress and adds value to your home. It’s a versatile design that complements any decor style, from vintage to contemporary. Once installed, you’ll feel like a pro—just take your time, measure carefully, and enjoy the timeless elegance you’ve created. Your space will feel both sophisticated and welcoming, ready to host gatherings or simply relax in style.
2. Incorporating Soft Gray Paint Inside Coffers for Subtle Sophistication
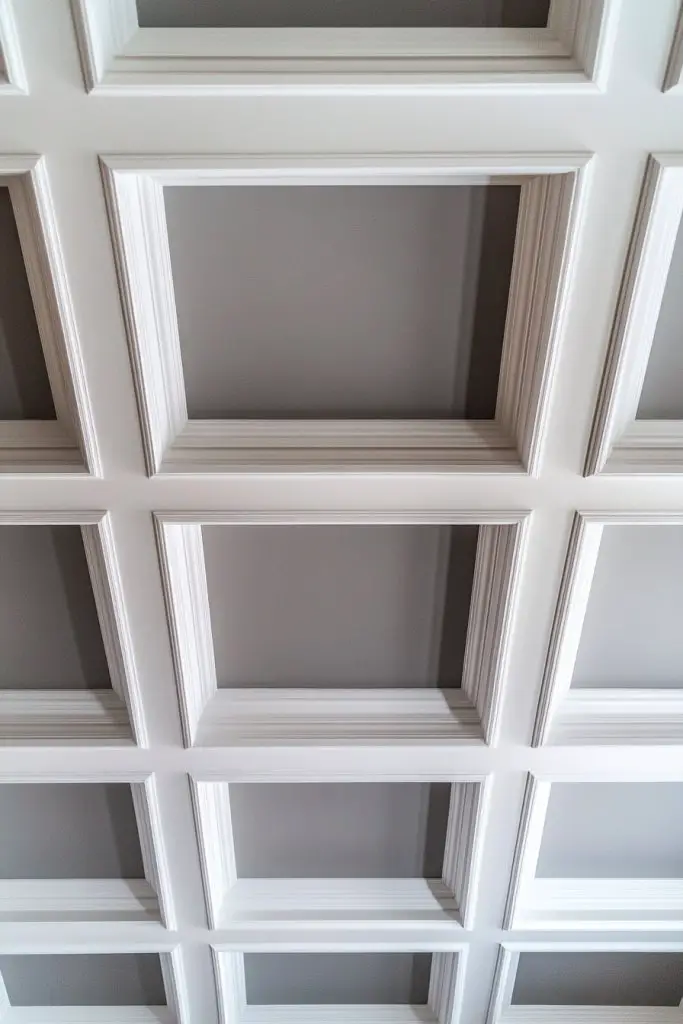
Tired of plain white ceilings but hesitant to go bold? Soft gray painted inside coffers offers a perfect middle ground—adding depth and sophistication without overwhelming the space. It’s an understated way to elevate your ceiling design and create a subtle focal point. If you love a modern, chic vibe, this idea is worth considering.
Recommended Products to replicate this idea
| # | Preview | Product | |
|---|---|---|---|
| 1 |

|
Glidden 1 qt. White Flat Ceiling Interior Paint | Check Latest Price |
| # | Preview | Product | |
|---|---|---|---|
| 1 |

|
Bates - Paint Tray Set, Paint Rollers, Paint Brushes for Wall, Tray, Roller Brush, 11 Piece Home... | Check Latest Price |
Picture a living room with a light gray hue inside the coffered sections, contrasting gently with the bright white moldings. The soft gray adds dimension, making the ceiling appear more layered and interesting. Shadows cast by the moldings become more noticeable, giving a sense of depth that draws your gaze upward. The overall effect is calming, refined, and effortlessly stylish.
You can opt for darker shades of gray for a more dramatic look or stick with lighter tones for a subtle upgrade. Pairing the gray inside coffers with wall colors in blush, navy, or pastel shades enhances the elegant feel. Seasonal changes, like adding warmer tones or metallic accents, can further personalize the look. This approach also works well in both contemporary and transitional decor styles.
Begin by selecting a soothing gray paint that complements your room’s palette. After installing the coffered grid, tape off the moldings to keep the paint confined to the coffers. Use a high-quality brush or roller for smooth application, avoiding streaks or drips. Allow adequate drying time before applying a second coat if needed. For a polished look, lightly sand any imperfections and seal with a clear matte or satin finish. This project requires patience but offers a big visual payoff.
Introduce metallic or pearlized paints inside the coffers for a subtle shimmer. Incorporate textured finishes or a slight gloss on the gray to add richness. Complement the ceiling with throw pillows or rugs in matching or contrasting shades, tying the room together. Adding a few decorative architectural elements like corbels or small columns can amplify the sophisticated vibe.
Using soft gray inside coffers transforms your ceiling into an elegant statement piece that remains versatile over time. It’s a simple change with lasting impact, perfect for those who want a refined look without drastic renovation. Once finished, your space will radiate calm and class—an upgrade that’s both tasteful and timeless. Trust your eye—this subtle touch can elevate your entire decor game.
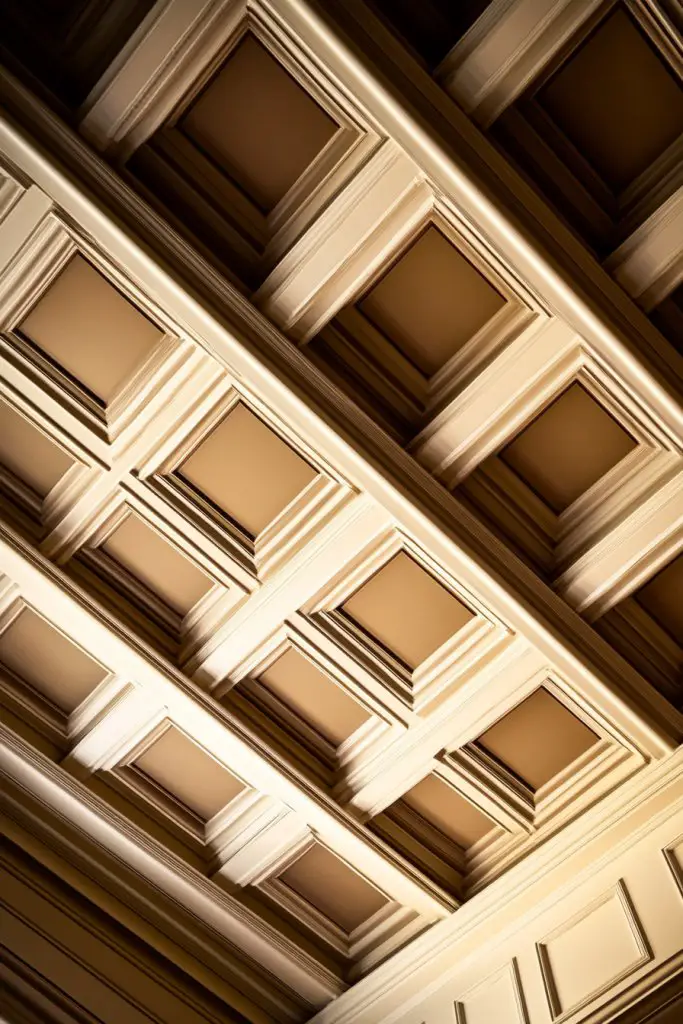
3. Using Faux Wood Beams in Coffers to Add Warmth and Rustic Charm
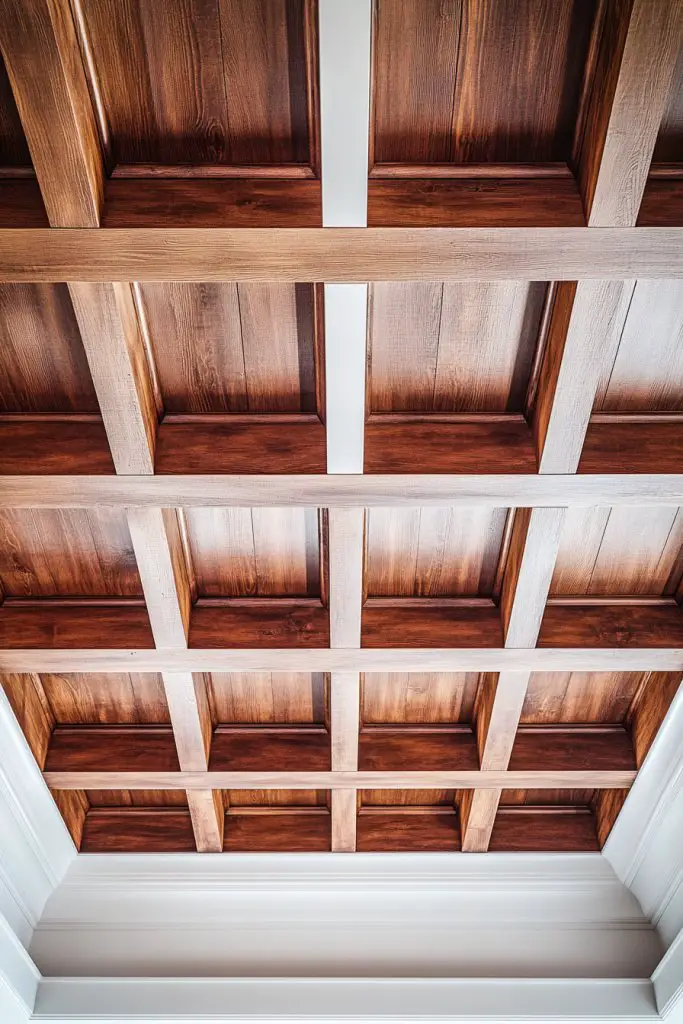
Looking to add warmth and texture to your ceiling without the hefty price tag of real wood? Faux wood beams in coffers offer a rustic charm that instantly transforms a space. It’s perfect for creating cozy, inviting atmospheres in modern or country-style homes. If you crave a bit of farmhouse flair, this idea might be your new favorite.
Recommended Products to replicate this idea
| # | Preview | Product | |
|---|---|---|---|
| 1 |

|
Ekena Millwork 3 1/2"W x 3 1/2"H x 120"L 3-Sided (U-Beam) Salvaged Timber HeritageTimber Faux Wood... | Check Latest Price |
| # | Preview | Product | |
|---|---|---|---|
| 1 |

|
Art3d 12-Pack Square Drop Ceiling Tile 2ft x 2ft in White, PVC Ceiling Panel 24 x 24in. - Compatible... | Check Latest Price |
Imagine a ceiling with dark faux wood beams spanning across a softly painted coffered grid. The textured wood grain adds visual interest and a tactile element that makes the ceiling feel more substantial. Light reflects off the faux wood’s surface, giving warmth and richness to the room. The beams create a sense of structure and depth, making the space feel grounded and welcoming.
Choose lighter or darker faux wood finishes depending on your style—weathered gray for a reclaimed look or deep walnut for richness. For a more contemporary twist, pair with sleek, minimal moldings and neutral walls. Seasonal accessories like cozy textiles or vintage decor can enhance the rustic vibe. This design adapts well to open-plan spaces or more intimate rooms seeking character.
Start by selecting faux wood beams crafted from lightweight materials like polyurethane or high-density foam. Measure your ceiling and decide where to place the beams for optimal visual balance. Attach the beams securely using construction adhesive and optional nails or screws, ensuring they are flush and level. Finish with a stain or paint if desired, and seal for added durability. You can also add small decorative corbels or brackets to enhance the rustic look.
Customize the beams with distressing or staining techniques to match your decor. Incorporate LED strip lighting between beams for soft, indirect illumination. Add vintage-inspired hardware or decorative accents at the beam joints for extra charm. Layering textiles like woven rugs or burlap curtains complements the rustic aesthetic perfectly.
Faux wood beams are a budget-friendly way to bring warmth and character to any ceiling. They’re versatile enough to suit both modern farmhouse and traditional interiors. Once installed, you’ll enjoy a cozy, inviting atmosphere that feels authentic and thoughtfully designed. This simple touch elevates your space, making it feel both stylish and lived-in.
4. Applying Metallic Accents (Gold or Bronze) to Coffered Details for a Luxe Touch
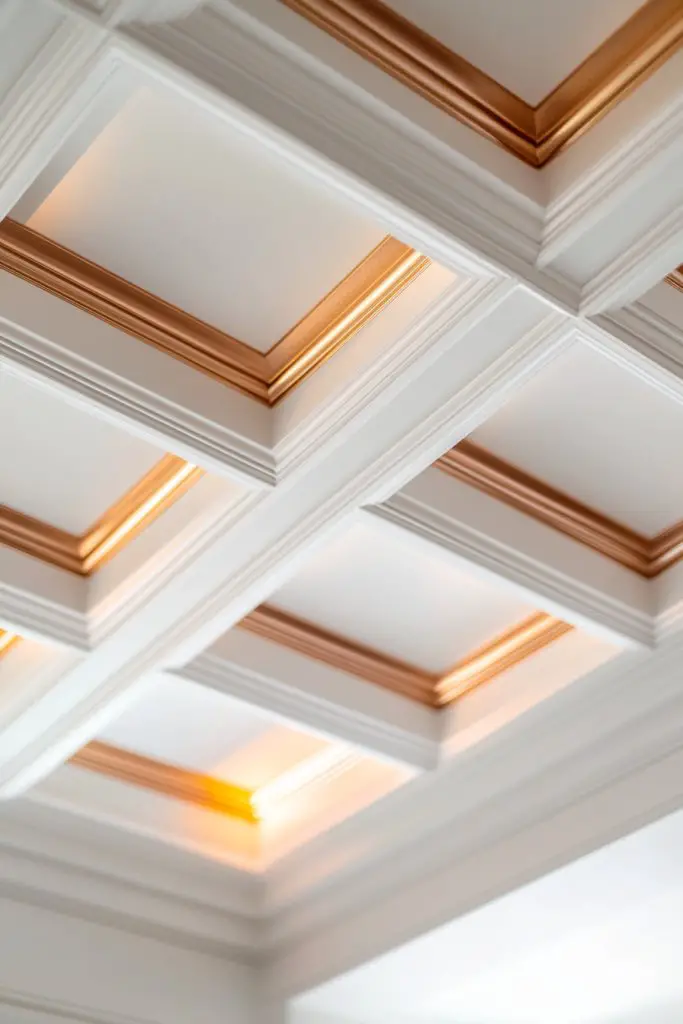
Want to add a touch of glamour to your ceiling without going overboard? Metallic accents in gold or bronze on coffered moldings instantly elevate the look. It’s a subtle luxury that catches the light and adds a sophisticated sparkle. If you’re aiming for a high-end vibe, this idea could make your ceiling the star of the room.
Recommended Products to replicate this idea
| # | Preview | Product | |
|---|---|---|---|
| 1 |

|
Nicpro Metallic Gold Acrylic Paint, 8.45oz/250ml Large Gold Leaf Paint, Non Toxic, Non Fading Craft... | Check Latest Price |
| # | Preview | Product | |
|---|---|---|---|
| 1 |

|
Ekena Millwork 13"OD x 3 1/2"ID x 1 1/4"P Traditional Thermoformed PVC Ceiling Medallion (Fits... | Check Latest Price |
Visualize a coffered ceiling with gold leafing or bronze paint highlighting the moldings. The metallic finish reflects ambient light, creating a warm glow that makes the room feel opulent. Shadows cast by the recessed panels shimmer softly, emphasizing the geometric design. It’s like turning your ceiling into a piece of art that commands attention without overwhelming the space.
Opt for a brushed or matte metallic finish for a more understated look, or go shiny for maximum impact. Pair with rich, dark wall colors like navy or charcoal for a dramatic contrast. For a more contemporary style, combine metallic accents with sleek, clean-lined moldings. Seasonal decor can include velvet throws or satin cushions that complement the luxe ceiling.
Start by choosing high-quality metallic paint or leafing material designed for trim and moldings. Carefully tape off the non-metallic areas before applying the finish for crisp edges. Use a fine brush or foam roller for smooth application, avoiding streaks. Multiple thin coats yield the best results, and sealing with a clear topcoat preserves the shine. Be patient—allow adequate drying time between coats for a flawless look.
Add small decorative elements like metallic corner accents or leaf motifs within the coffers for extra flair. Incorporate lighting fixtures that reflect the metallic sheen—such as sconces or chandeliers with gold or bronze finishes. You can also mix metals for an eclectic, layered effect that feels curated and luxe. Textured fabrics or plush rugs in matching tones further enhance the opulent atmosphere.
Applying metallic accents is an easy way to turn a simple ceiling into a showstopper. It’s a chic, timeless detail that pairs beautifully with various decor styles—from vintage to ultra-modern. With patience and precision, you’ll craft an elegant, luminous space that exudes confidence and style. Your home will radiate sophistication and a little bit of glam, all thanks to your clever use of metallics.
5. Creating Contrasting Coffers with Dark Paint Against Light Surroundings
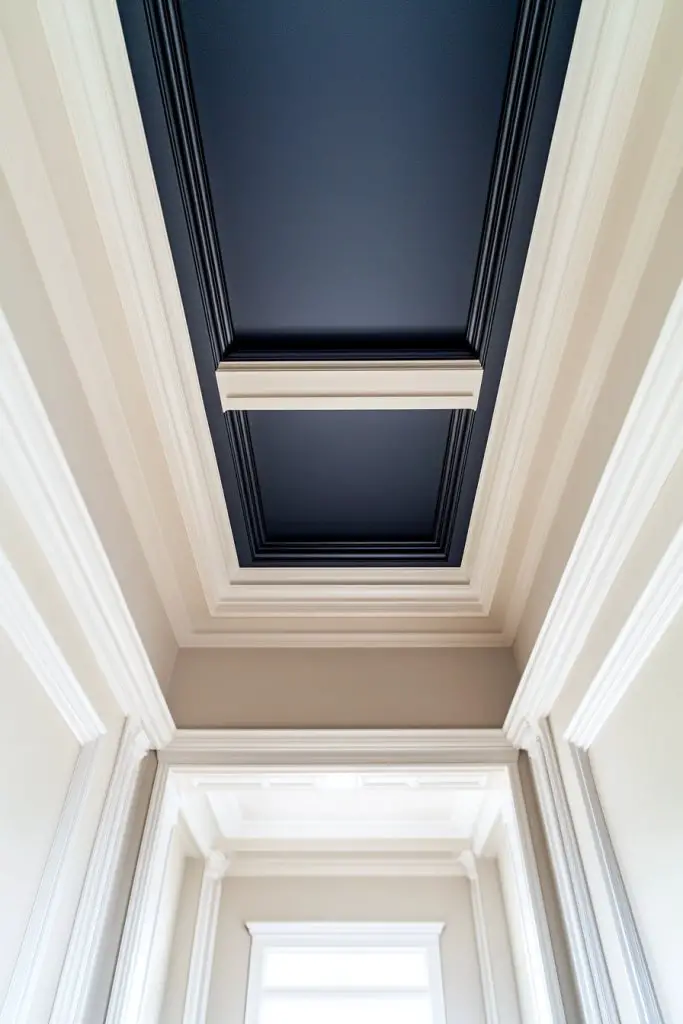
Ever want to create a bold statement that completely transforms your ceiling? Dark paint inside coffers against light walls and moldings offers striking contrast and instant drama. It’s a simple way to add depth and sophistication without heavy renovations. If you’re craving a modern, eye-catching look, this idea might just be your new favorite trick.
Recommended Products to replicate this idea
| # | Preview | Product | |
|---|---|---|---|
| 1 |

|
Zinnser 03688 Covers Up Stain Sealing Ceiling Paint, White | Check Latest Price |
| # | Preview | Product | |
|---|---|---|---|
| 1 |
|
Art3d 10-Pack 47Ft White Ceiling Crown Molding Trim, High Impact Polystyrene Decorative Ceiling... | Check Latest Price |
Envision a ceiling with deep charcoal or navy inside the coffers, set against crisp white moldings and light-colored walls. The contrast makes the grid pattern pop, giving the illusion of higher ceilings and more dimension. Shadows deepen within the panels, creating a layered, textured effect that draws your attention upward. It’s like giving your ceiling a bold frame that commands focus.
Choose darker shades like black, deep gray, or rich navy for a dramatic vibe, or opt for softer darks like espresso or slate for a subtle sophistication. Pair with light-colored or pastel walls to maximize contrast. Incorporate metallic or textured paints inside the coffers for added dimension. Seasonal accents like warm blankets or light wood furniture can soften the overall look if it feels too stark.
Begin by selecting a high-quality, washable dark paint suited for ceilings. Carefully tape off the moldings and walls to avoid smudges. Apply multiple thin coats for even coverage, letting each dry thoroughly. Use a roller with a thick nap for the panels and a brush for corners. For a seamless finish, lightly sand and touch up any uneven spots before sealing with a matte or satin topcoat. Patience is key to achieving crisp edges and a flawless finish.
Add gold or metallic accents to the moldings for a touch of luxury amid the dark contrast. Incorporate textured fabrics or layered textiles in your decor to balance the bold ceiling. Use lighting strategically—such as uplights or sconces—to highlight the contrast and create mood. Personal touches like decorative hardware or subtle patterns inside the coffers can make the design uniquely yours.
Contrasting coffers are a bold, modern way to redefine your space. They work well in rooms with high ceilings or open layouts, providing a focal point that’s both stylish and functional. Once done right, this look radiates confidence and contemporary elegance. Trust your eye—this dramatic scheme can make your ceiling the ultimate design feature.
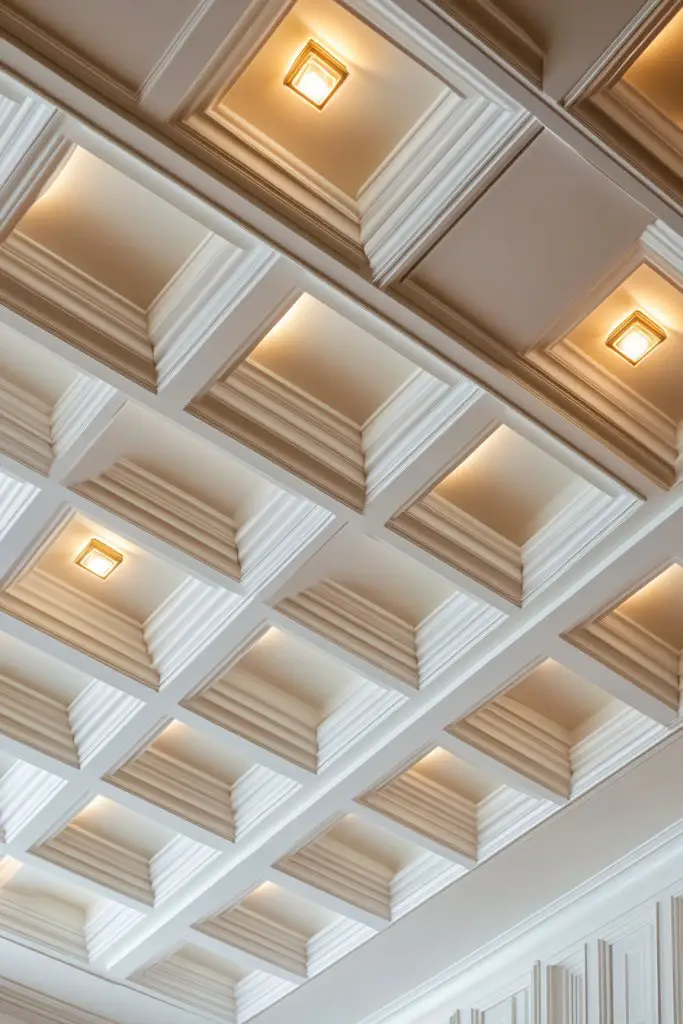
6. Installing Recessed LED Lighting Within Coffers for Ambient Glow
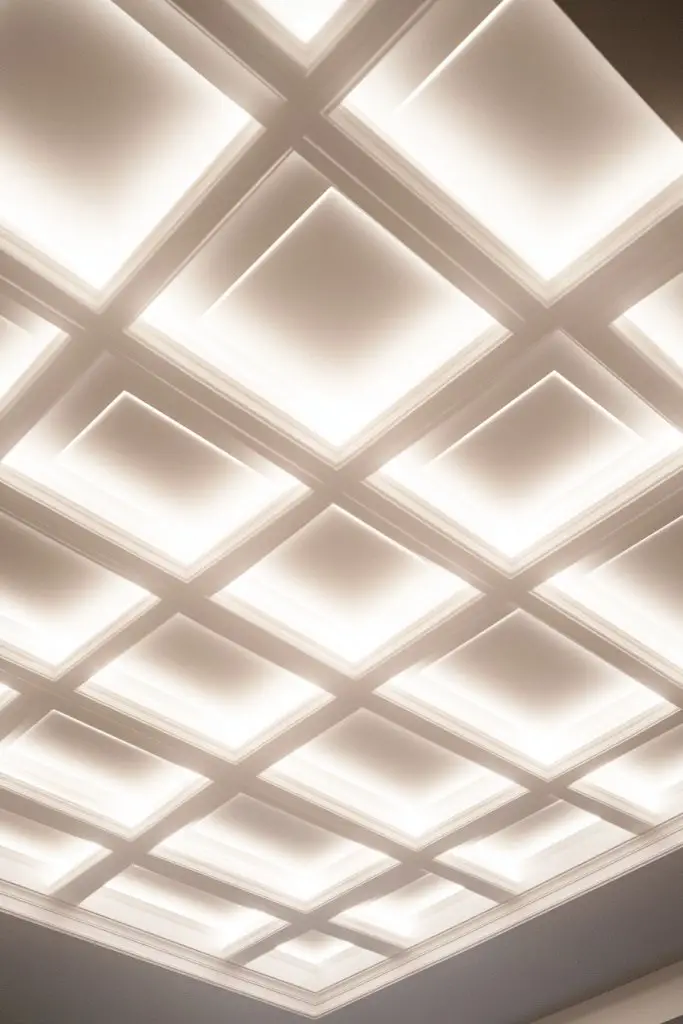
Want to create a cozy, inviting atmosphere without adding clutter? Recessed LED lighting inside coffers offers a sleek, modern way to add soft ambient light. It’s perfect for enhancing mood and highlighting architectural details. If you love subtle elegance and functional lighting, this idea fits the bill.
Recommended Products to replicate this idea
| # | Preview | Product | |
|---|---|---|---|
| 1 |

|
10-Pack 6.6ft/2Meter Silver Recessed LED Aluminum Channel for LED Strip Lights Diffuser Channel with... | Check Latest Price |
| # | Preview | Product | |
|---|---|---|---|
| 1 |

|
Art3d Ceiling Crown Molding Trim 10-Pack 47Ft, High Impact Polystyrene Decorative Ceiling Moulding -... | Check Latest Price |
Imagine a ceiling where hidden LED strips glow gently within the coffers, casting a warm or cool light. The light diffuses evenly, creating a seamless glow that emphasizes the grid pattern. Shadows from the moldings add depth, making the ceiling feel more expansive. The overall effect is calming, sophisticated, and effortlessly chic—a perfect backdrop for relaxing evenings or intimate gatherings.
Choose color temperatures that suit your mood—warm white for cozy nights or cool white for a more energetic vibe. Integrate dimmer switches to control brightness and create different atmospheres. For a more dramatic look, combine lighting with reflective or metallic finishes inside the coffers. This setup works in traditional, modern, or transitional interiors, adapting seamlessly to your style.
Start by selecting high-quality, flexible LED strip lighting designed for coving or architectural lighting. Measure the depths and lengths of your coffers to determine the amount of lighting needed. Attach the strips securely using mounting clips or adhesive, ensuring even placement. Connect the wiring neatly along the moldings and hide the controls for a clean look. Test the lights before sealing everything in place, and install a dimmer if desired for versatile ambiance.
Add color-changing LEDs for dynamic effects during holidays or parties. Incorporate smart controls to adjust lighting remotely. Combine with textured or matte paints inside the coffers to soften or enhance the glow. Personalize the look further with decorative trim or subtle metallic accents that reflect the light beautifully.
Recessed lighting transforms your ceiling into a sophisticated feature that elevates your entire space. It’s a smart, stylish upgrade that adds both form and function. Once installed, you’ll enjoy a versatile ambiance that can be tailored to any mood or occasion. This simple addition makes your home feel thoughtfully curated and endlessly inviting.
7. Adding Decorative Molding Patterns in Coffers for Intricate Visual Interest
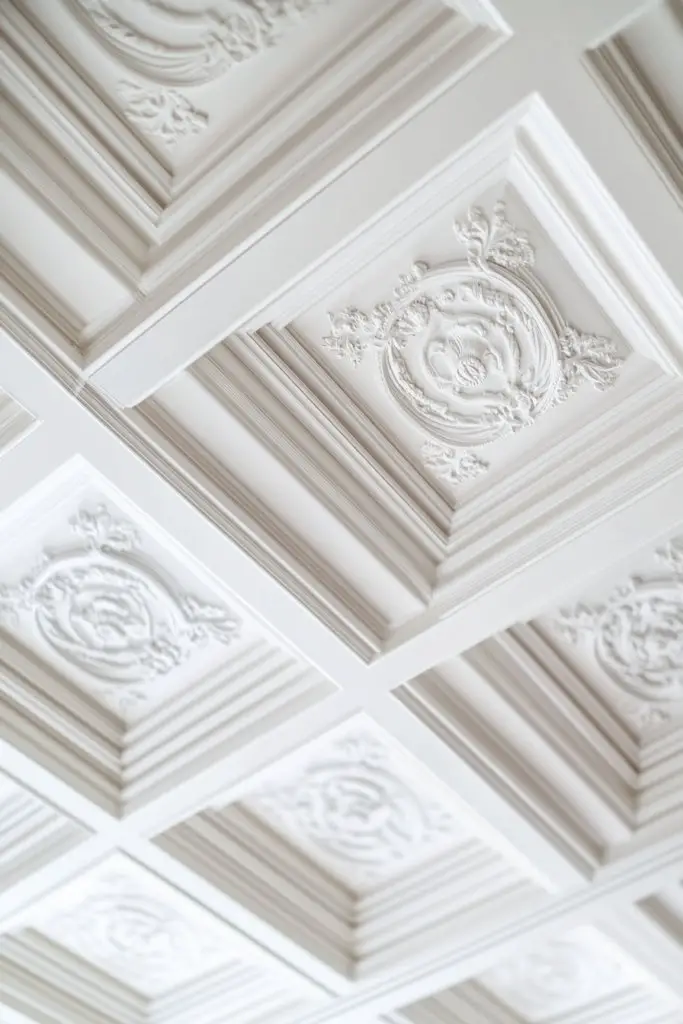
Looking to add a touch of artistry and craftsmanship to your ceiling? Decorative molding patterns in coffers bring intricate detail and visual interest. They elevate a simple grid into a stunning focal point. If you love craftsmanship and unique design, this idea could be your next showstopper.
Recommended Products to replicate this idea
| # | Preview | Product | |
|---|---|---|---|
| 1 |
|
Art3d 10-Pack 47Ft White Ceiling Crown Molding Trim, High Impact Polystyrene Decorative Ceiling... | Check Latest Price |
| # | Preview | Product | |
|---|---|---|---|
| 1 |

|
Sintuff 5 Pcs Wall Molding Kit PU Corners Murals Trim Panel French Style Accent Carved Applique... | Check Latest Price |
Picture a ceiling with ornate, carved patterns or layered moldings inside each coffer. The intricate details catch the light and cast delicate shadows, creating a textured, three-dimensional effect. The patterns add a sense of luxury and uniqueness, making your ceiling stand out in a sophisticated way. It’s like turning your ceiling into a piece of architectural art.
Choose from classic motifs like floral, geometric, or Greek key patterns, or create custom designs for a personalized touch. Pair with rich paints or metallic finishes to further emphasize the details. This approach works beautifully in traditional, vintage, or eclectic interiors. Seasonal accents like small decorative elements within the patterns can add variety.
Begin by selecting or designing your molding patterns—pre-made or custom-carved moldings are available online. Carefully plan your layout, marking where each pattern will go using painter’s tape and levels. Attach the moldings securely with adhesive and nails, ensuring seamless joins between pieces. Fill gaps with caulk, sand smooth, and paint or stain for a refined finish. Patience is key for perfect alignment and detail.
Highlight specific details with metallic or contrasting paints to make them pop. Incorporate small LED accent lights within the patterns for added depth. Personalize by adding small decorative elements like rosettes or medallions at key points. Use textured or gloss paints to give a more tactile, luxurious feel.
Decorative moldings transform your ceiling from simple to spectacular, showcasing your taste and craftsmanship. It’s a timeless technique that adds value and character. With attention to detail, you create a bespoke look that exudes confidence and artistry. Your ceiling becomes a conversation piece everyone will admire.
8. Incorporating Mirror Panels in Coffers to Enhance Light and Space
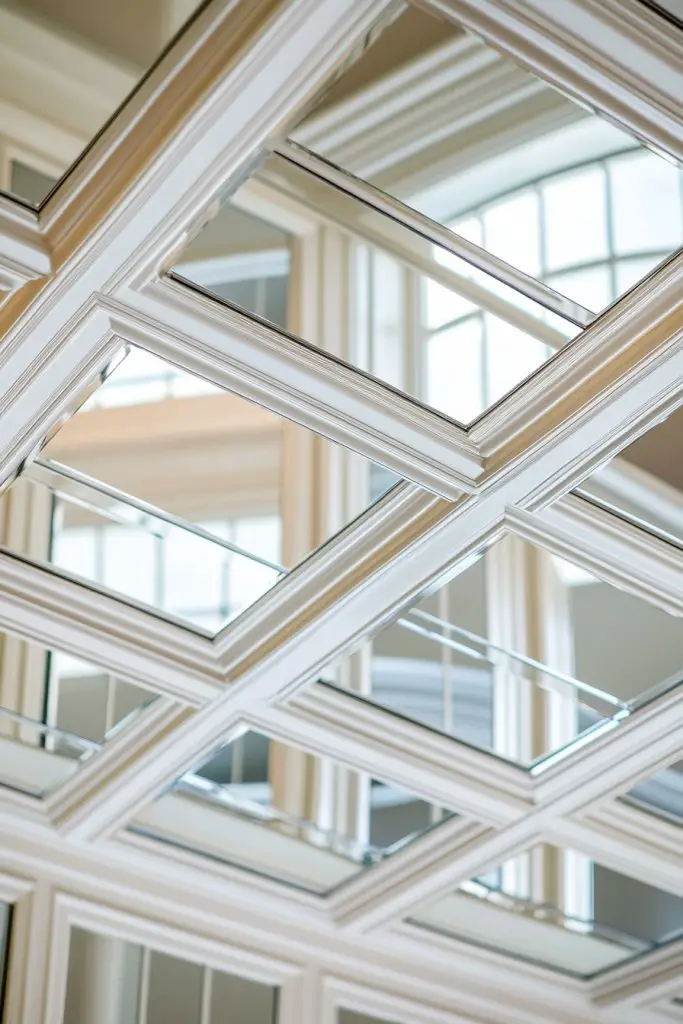
Want to make your room feel brighter and larger without extensive renovations? Mirror panels fitted into coffers reflect light and create an illusion of expanded space. It’s an elegant, functional twist that can dramatically change the feel of any room. If you crave openness and brightness, this idea is a game-changer.
Recommended Products to replicate this idea
| # | Preview | Product | |
|---|---|---|---|
| 1 |

|
Ruomeng Home Gym Mirrors 12 Inch x 12Pcs Wall Mounted Mirror Glass Frameless Full Length Mirror... | Check Latest Price |
| # | Preview | Product | |
|---|---|---|---|
| 1 |

|
13 inch Flush Mount LED Ceiling Light Fixture, 2700K/3000K/3500K/4000K/5000K Adjustable Ceiling... | Check Latest Price |
Visualize a ceiling with large, framed mirror panels inside each coffer, bouncing natural and artificial light around the room. The reflections multiply the sense of space, making even small rooms feel airy and open. The mirrors add a glossy texture that contrasts beautifully with matte walls, creating a contemporary, polished look. It’s like installing a piece of art that also brightens your home.
Choose frameless mirror panels for a sleek look or ornate frames for a vintage feel. Frosted or tinted mirrors can soften reflections and add a unique aesthetic. Pair with minimalist furniture and neutral walls to maximize the reflective effect. Seasonal decor like soft textiles or subtle lighting can enhance the overall ambiance.
Measure your coffers carefully and select mirror panels that fit snugly within the grid. Use heavy-duty mirror adhesive or clips designed for wall mounting—make sure they’re rated for ceiling use if necessary. Install the panels securely, ensuring no gaps or wobbling. Finish with a protective sealant to minimize scratches and smudges. Regular cleaning will keep the mirrors sparkling and effective.
Frame the mirrors with decorative moldings or metallic trims for added style. Incorporate LED backlighting behind the panels for a luminous glow. Mix mirror styles or add etched designs for a bespoke look. Keep the surrounding decor simple to let the mirrors truly stand out.
Mirror panels in coffers are a clever way to amplify light and space, making your home feel more open and inviting. It’s a sophisticated upgrade that combines function with style. Once installed, you’ll enjoy a brighter, more expansive environment that boosts your mood and impresses guests. This simple update can redefine your entire room.
9. Using Textured Ceiling Paint Inside Coffers for a Subtle Patterned Effect
Craving a ceiling that offers visual interest without overwhelming the space? Textured paint inside coffers adds a subtle pattern and depth, giving your ceiling a crafted, artistic touch. It’s a clever way to elevate your decor with minimal effort. If you love understated sophistication, this idea is perfect.
Recommended Products to replicate this idea
| # | Preview | Product | |
|---|---|---|---|
| 1 |
|
Glidden 1 qt. White Flat Ceiling Interior Paint | Check Latest Price |
| # | Preview | Product | |
|---|---|---|---|
| 1 |

|
Hokkieam Clay Texture Rollers | 10-Pack Polymer Clay Texture Roller Set for Pottery & Crafting | Check Latest Price |
Imagine a ceiling with a soft, tactile finish inside each coffer—perhaps a subtle swirl, stipple, or linen texture. The textured surface catches light differently throughout the day, creating gentle shadows and a sense of movement. It adds richness and complexity without the need for elaborate moldings or patterns. The overall effect is calm, elegant, and inviting.
Select from various textures—smooth stipple, rough plaster, or fabric-inspired finishes—to match your decor style. Pair with neutral or monochrome color schemes to emphasize the texture. Seasonal accents like soft textiles or layered lighting can complement the textured ceiling beautifully. It’s adaptable to both modern and traditional interiors.
Begin by preparing the ceiling surface, ensuring it’s smooth and dust-free. Choose a textured ceiling paint suitable for your desired pattern and finish. Use a roller or sprayer for even application, following the manufacturer’s instructions. Apply multiple coats if necessary, allowing each to dry thoroughly. For a more intricate effect, consider stencil techniques or sponging for added variation. Seal with a clear matte topcoat for durability.
Experiment with different textures inside different coffers for a custom mosaic effect. Incorporate subtle color variations or metallic sheens for extra depth. Use lighting to cast shadows that enhance the tactile patterns. Personal touches like painted borders or decorative edging can make the textured ceiling a signature feature.
Textured ceiling paint offers a sophisticated, low-maintenance upgrade that’s easy to customize. It adds a nuanced layer of visual interest that makes your ceiling stand out quietly. Once finished, your space will feel more refined and thoughtfully designed—proof of your creative eye and attention to detail. It’s an understated upgrade with a big impact.
10. Highlighting Coffers with Accent Colors Complementing Room Decor
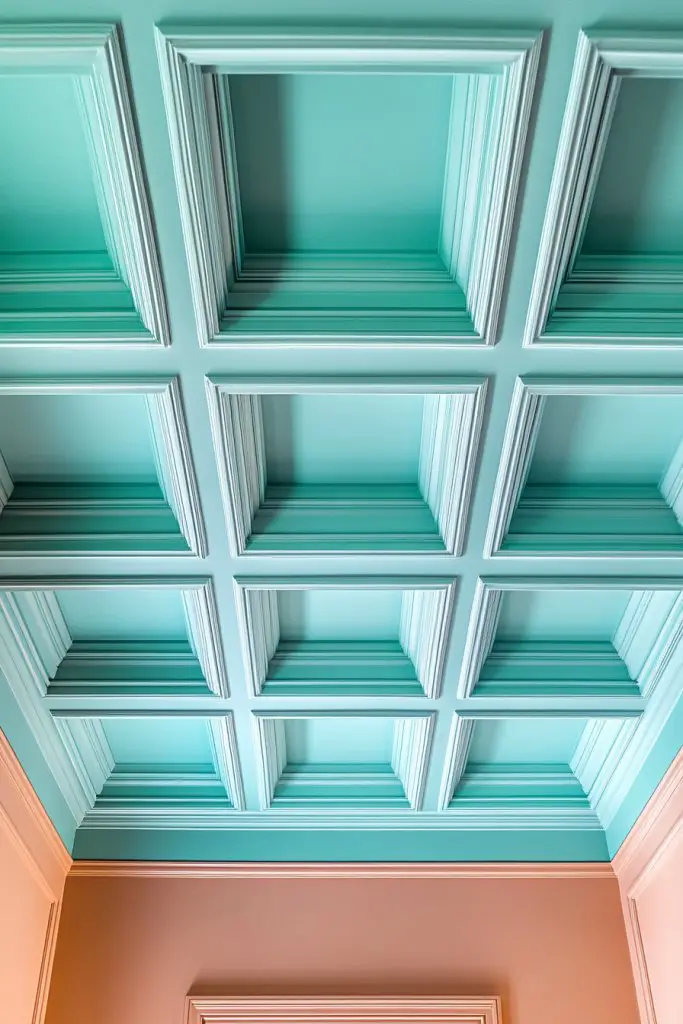
Looking for a way to make your ceiling truly pop? Using accent colors inside coffers that coordinate with your room’s palette creates a cohesive, eye-catching effect. It’s a bold move that draws attention upward and adds personality. If you love vibrant, personalized spaces, this idea could be your new decor secret.
Recommended Products to replicate this idea
| # | Preview | Product | |
|---|---|---|---|
| 1 |
|
Zinsser Ceiling Acrylic Paint & Primer in One, 13 oz, Flat White | Check Latest Price |
| # | Preview | Product | |
|---|---|---|---|
| 1 |
|
Art3d 10-Pack 47Ft White Ceiling Crown Molding Trim, High Impact Polystyrene Decorative Ceiling... | Check Latest Price |
Visualize a ceiling with deep blue or emerald green inside the coffers, contrasting with crisp white moldings. The vibrant interior color enhances the architectural detail, making the ceiling a focal point. Shadows and light play off the painted surfaces, creating a layered, dynamic look. It’s like adding a splash of color without painting all the walls.
Choose colors that complement or contrast with your walls—think warm tones with cool backgrounds or vice versa. Incorporate patterns or metallic accents within the coffers for added interest. Seasonal changes can include swapping pillow covers, throws, or decorative accessories that match your accent colors. This approach is versatile and highly customizable.
Select a high-quality, durable paint in your chosen accent color. Tape off the moldings and walls carefully to prevent bleed-through. Use a brush for edges and a roller for larger panels, applying multiple thin coats for even color. After drying, inspect for touch-ups and seal with a clear matte or satin finish. Precise tape lines help maintain a clean, professional look.
Add metallic or glitter accents inside the coffers for an extra sparkle. Incorporate decorative trim or molding overlays in contrasting colors. Use lighting to highlight the accent colors—think uplights or directional spotlights. Personal touches like decorative hardware or patterns can make the design uniquely yours.
Accent colors inside coffers turn a mundane ceiling into a vibrant statement piece. It’s a playful, bold choice that reflects your personality and style. When done carefully, this detail can transform your entire room into a lively, cohesive space. It’s a simple yet impactful way to express your creative flair.
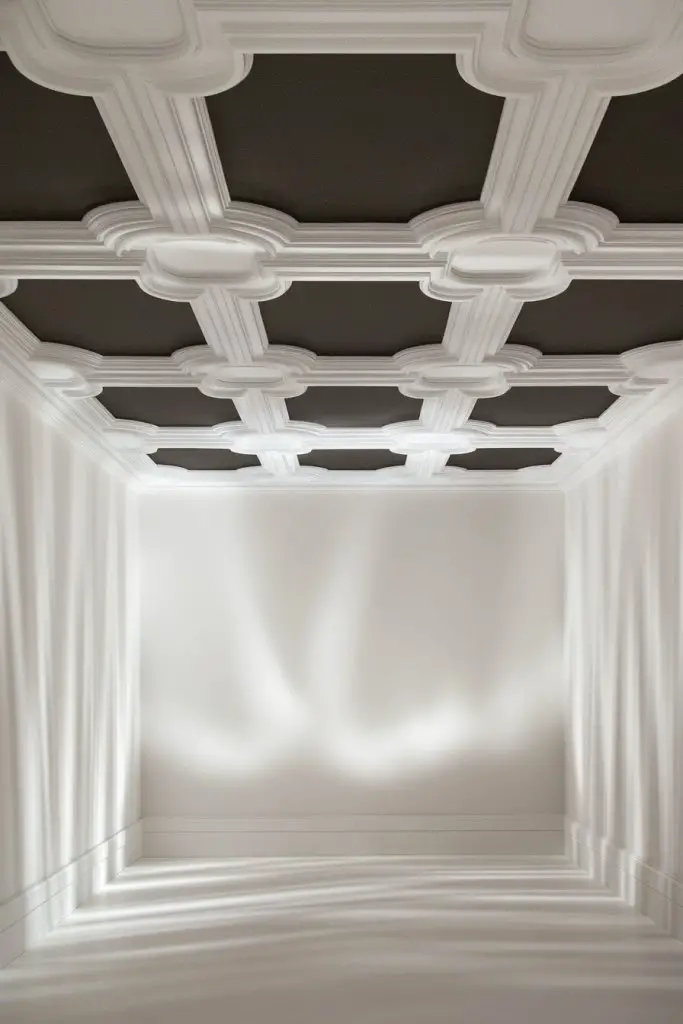
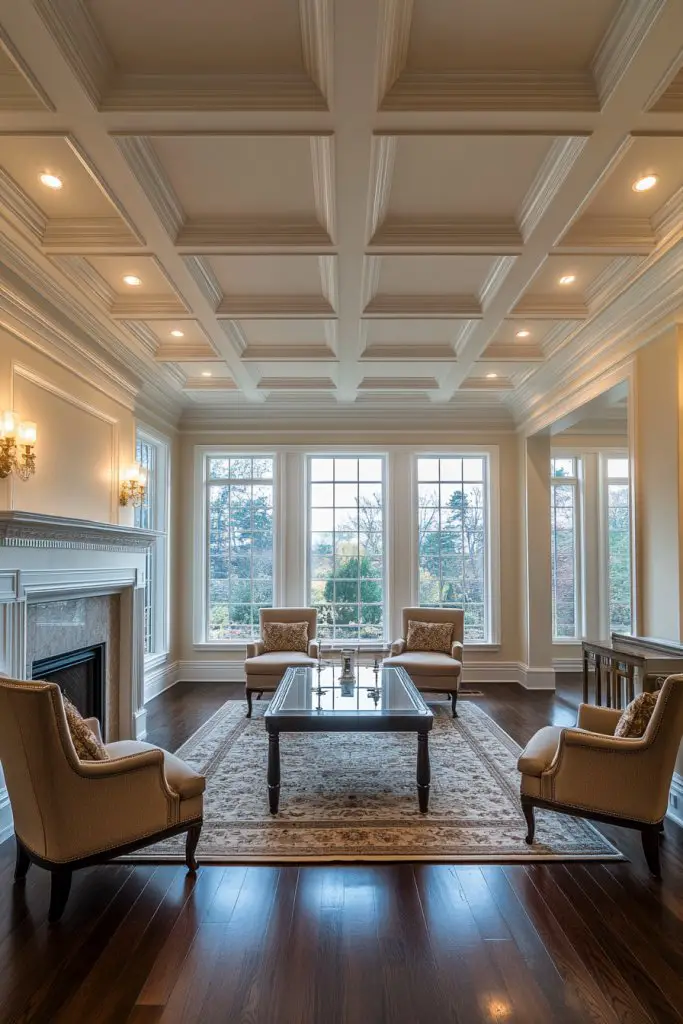
11. Combining Coffered Ceilings with Crown Molding for a Grand Look
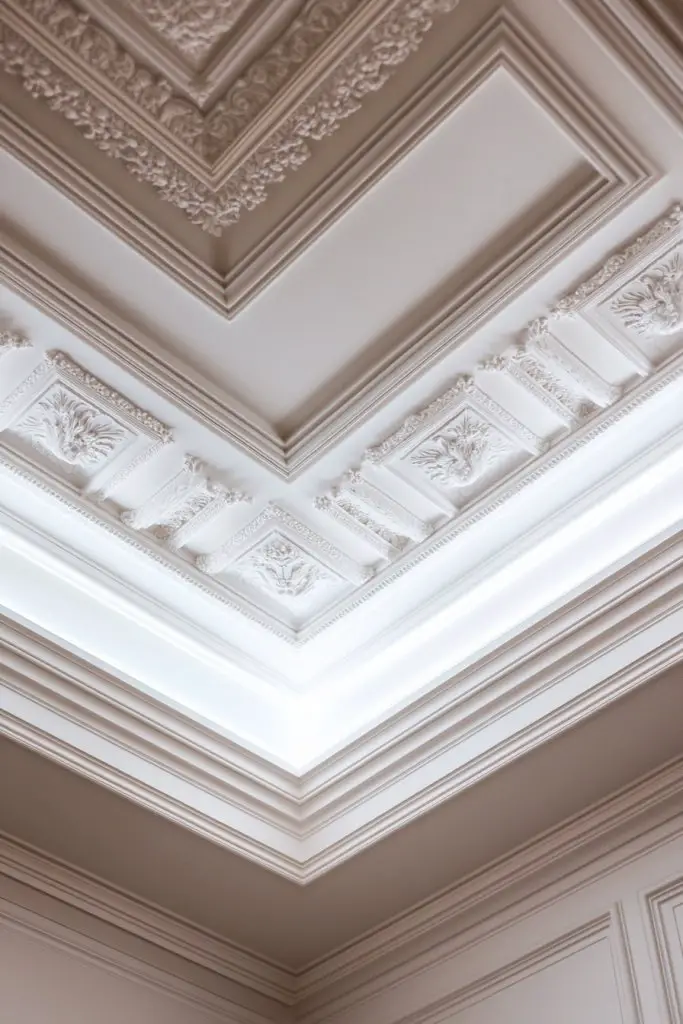
Dreaming of a regal, elegant room? Combining coffered ceilings with crown molding creates a luxurious, layered effect that elevates any space. It’s a classic approach that adds architectural depth and sophistication. If you want a dramatic, high-end feel, this idea is a perfect fit.
Recommended Products to replicate this idea
| # | Preview | Product | |
|---|---|---|---|
| 1 |
|
Art3d 10-Pack 47Ft White Ceiling Crown Molding Trim, High Impact Polystyrene Decorative Ceiling... | Check Latest Price |
| # | Preview | Product | |
|---|---|---|---|
| 1 |
|
Art3d 12-Pack Square Drop Ceiling Tile 2ft x 2ft in White, PVC Ceiling Panel 24 x 24in. - Compatible... | Check Latest Price |
Picture a room with a coffered ceiling framed by ornate crown molding that flows seamlessly into the walls. The detailed moldings draw your eye upward, emphasizing the height and grandeur. The grid pattern of the coffers adds structure, while the moldings soften the transition to the walls for a cohesive look. The overall effect is majestic and polished.
Opt for elaborate, carved crown moldings for a vintage or traditional vibe, or sleek, simple profiles for contemporary elegance. Paint the moldings in a contrasting color or finish to make them stand out. Decorate the room with rich fabrics, chandeliers, or antique furniture to complement the regal aesthetic. Seasonal accents like floral or ribbon details can add festive charm.
Start by selecting high-quality crown molding and coffered ceiling materials—either pre-made or custom-cut. Install the crown moldings first, ensuring precise miter cuts and secure attachment. Next, construct the coffers using the same careful measurements, attaching the panels with adhesive and nails. Finish with paint or stain, and add decorative trim or accents as desired. Precision tools like a miter saw and level are essential for a flawless finish.
Add gold or metallic accents to the crown molding for extra opulence. Incorporate layered lighting—such as chandeliers and wall sconces—to highlight the architectural features. Personalize with decorative medallions or motifs within the crown moldings. Use plush textiles and antique accessories to complete the luxurious ambiance.
Combining coffers with crown molding instantly boosts your room’s elegance and perceived value. It’s a timeless look that complements many decor styles—from Victorian to modern luxury. With careful planning and execution, you’ll create a space that exudes confidence, tradition, and style. Your home will reflect a level of craftsmanship that’s truly impressive.
12. Creating a Modern Geometric Coffered Pattern with Clean Lines
Want a ceiling design that feels fresh, sleek, and contemporary? Modern geometric coffers with clean lines give your space a minimalist, sophisticated edge. It’s perfect for urban, industrial, or modern interiors aiming for a crisp, uncluttered look. If you love symmetry and simple elegance, this idea is your new go-to.
Recommended Products to replicate this idea
| # | Preview | Product | |
|---|---|---|---|
| 1 |
|
Art3d PVC Ceiling Tiles, 2'x2' Plastic Sheet in White (12-Pack) | Check Latest Price |
| # | Preview | Product | |
|---|---|---|---|
| 1 |

|
Strippable Coatings Booth Coat 5140 - Water-Based Clear Peelable Booth Coating for Protecting Walls,... | Check Latest Price |
Visualize a ceiling with a precise grid of rectangular or square coffers, painted in neutral tones. Sharp, straight lines define the pattern, creating a sense of order and structure. The light plays evenly across the surface, emphasizing the geometric shapes. The minimalist design makes the space feel larger and more organized—like a piece of modern art overhead.
Use monochrome shades or subtle color contrasts to keep the look sleek, or incorporate metallic or matte finishes for texture. This style pairs well with minimalist furniture, glass accents, and open floor plans. Seasonal updates like adding bold rugs or artwork can refresh the overall aesthetic without changing the ceiling.
Begin by sketching your pattern and measuring your ceiling accurately. Use painter’s tape and a level to mark out the grid lines precisely. Construct the coffers using flat moldings or panels that fit within the grid. Attach securely with adhesive and nails, ensuring clean, straight joints. Paint in your chosen color, keeping lines crisp and edges sharp. Seal with a protective topcoat for durability.
Introduce subtle textures or metallic paints inside the coffers for added depth. Use lighting strategically—recessed or directional lights can highlight the geometric pattern. Keep surrounding decor minimal to let the ceiling stand out, or add a few personal art pieces that complement the sleek design. The goal is harmony and modern elegance.
A geometric ceiling pattern is a bold, contemporary statement that elevates your entire decor. It’s a clean, simple approach that exudes confidence and style. Once complete, you’ll feel proud of your modern, sophisticated space—proof that less is often more when done right.
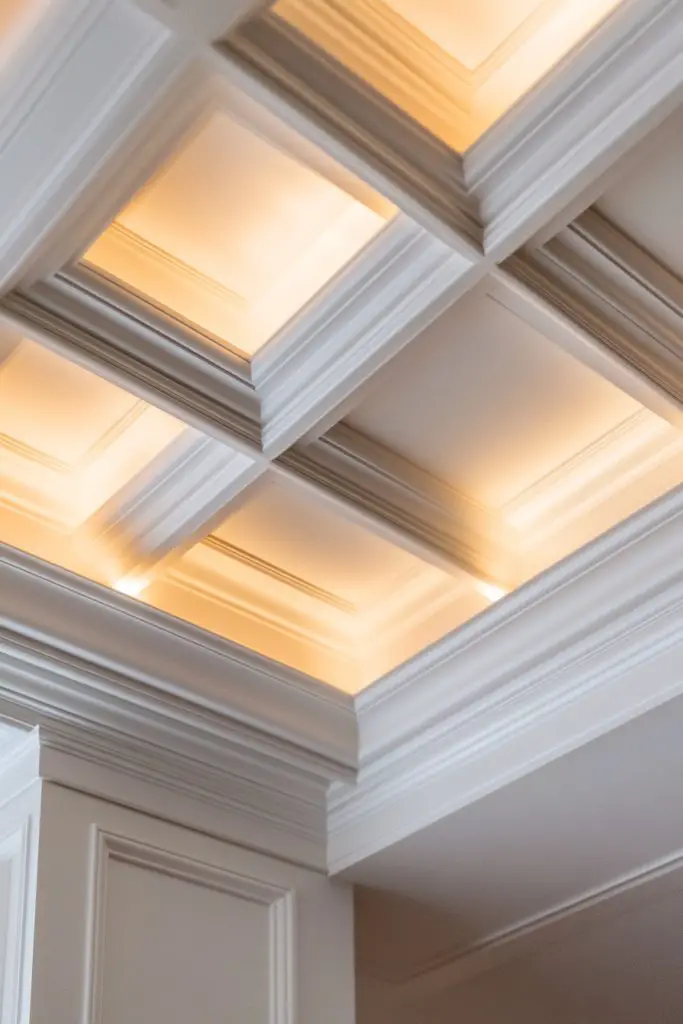
13. Integrating Architectural Paneling Between Coffers for Depth and Dimension
Looking to add architectural interest and a sense of craftsmanship? Incorporating paneling between coffers creates a layered, textured ceiling that feels bespoke. It’s a perfect way to add depth and complexity without overwhelming the space. If you value detailed design, this idea will inspire you.
Recommended Products to replicate this idea
| # | Preview | Product | |
|---|---|---|---|
| 1 |

|
VocgoUU 6 Pack 2x4 Surface Mount Kit for 2x4 LED Flat Panel Light - Aluminum 2'x4' ft Ceiling Frame... | Check Latest Price |
| # | Preview | Product | |
|---|---|---|---|
| 1 |
|
Art3d 12-Pack Square Drop Ceiling Tile 2ft x 2ft in White, PVC Ceiling Panel 24 x 24in. - Compatible... | Check Latest Price |
Imagine a ceiling with rectangular panels framed by moldings inside each coffer, creating a grid of inset panels. The paneling adds dimension, making the ceiling appear higher and more intricate. Light and shadow play across the panels, emphasizing their depth and craftsmanship. It’s like giving your ceiling a custom, high-end architectural feature.
Choose from flat, raised, or textured panels depending on your style—smooth for modern, ornate for traditional. Paint or stain the panels to match or contrast with the moldings for visual interest. Incorporate decorative moldings or rosettes at panel intersections for extra detail. Seasonal accents like fabric inserts or metallic finishes can further personalize the design.
Start by measuring your ceiling and designing your panel layout. Use high-quality MDF or wood panels cut to size. Attach moldings with adhesive and nails, creating a crisp frame for each panel. Install the panels within the frames, ensuring they are level and secure. Finish with paint, stain, or decorative finishes. Attention to detail in joints and finishes makes all the difference.
Highlight the panels with contrasting colors or metallic accents. Add LED lighting behind panels or along moldings to create ambient effects. Customize the panels with textured finishes or decorative motifs. This approach offers endless possibilities for personal expression and craftsmanship.
Integrating paneling elevates your ceiling to an artful centerpiece, showcasing your attention to detail. It’s a timeless technique that adds value and character. With patience and precision, you craft a space that’s both sophisticated and personalized. Your home will reflect your taste and dedication to fine design.
14. Using Painted Faux Coffers with Shadow Effects for a 3D Illusion
Want a ceiling that feels three-dimensional without complex construction? Painted faux coffers with shadow effects create an optical illusion that adds depth and intrigue. It’s a clever trick that transforms flat ceilings into dynamic, layered surfaces. If you love visual illusions and creative design, this idea is for you.
Recommended Products to replicate this idea
| # | Preview | Product | |
|---|---|---|---|
| 1 |

|
Art3d Drop Ceiling Tiles 24x24 in White (12-Pack, 48 Sq.ft), Wainscoting Panels Glue Up 2x2 | Check Latest Price |
| # | Preview | Product | |
|---|---|---|---|
| 1 |
|
Zinnser 03688 Covers Up Stain Sealing Ceiling Paint, White | Check Latest Price |
Envision a ceiling painted with darker shades inside the coffers and lighter shades on the moldings, creating the illusion of recessed panels. Shadow effects can be enhanced with strategic shading and highlighting, making the panels pop or recede as desired. This technique gives a sense of architectural grandeur with minimal structural work. The room feels more spacious and sophisticated.
Use contrasting colors for maximum impact or monochrome shades for subtle depth. Incorporate metallic or gloss finishes inside the coffers to catch light and add realism. Seasonal decor can include textured fabrics or layered lighting to enhance the illusion. This technique suits modern, transitional, or even vintage styles.
Start by sketching your faux coffer pattern and selecting appropriate paints. Tape off the moldings and panels carefully to create sharp edges. Use a combination of darker and lighter shades, applying with brushes and sponges for controlled shading. Blend edges smoothly to mimic shadows naturally. Finish with a clear protective coat to preserve the effect. Practice shading techniques beforehand for best results.
Incorporate metallic or iridescent paints inside the recesses for extra sparkle. Use directional lighting to cast shadows and emphasize the 3D effect. Add decorative moldings or frames to define each panel. Personal touches like stenciled patterns or painted borders can make the illusion even more convincing.
A painted faux coffer ceiling is an affordable way to achieve a luxurious, architecturally interesting look. It’s a creative solution that showcases your artistic flair. Once completed, you’ll enjoy a ceiling that appears much more elaborate and crafted than it actually is—proof of your inventive spirit and design confidence.
15. Installing Decorative Metal Grilles in Coffers for an Art Deco Flair
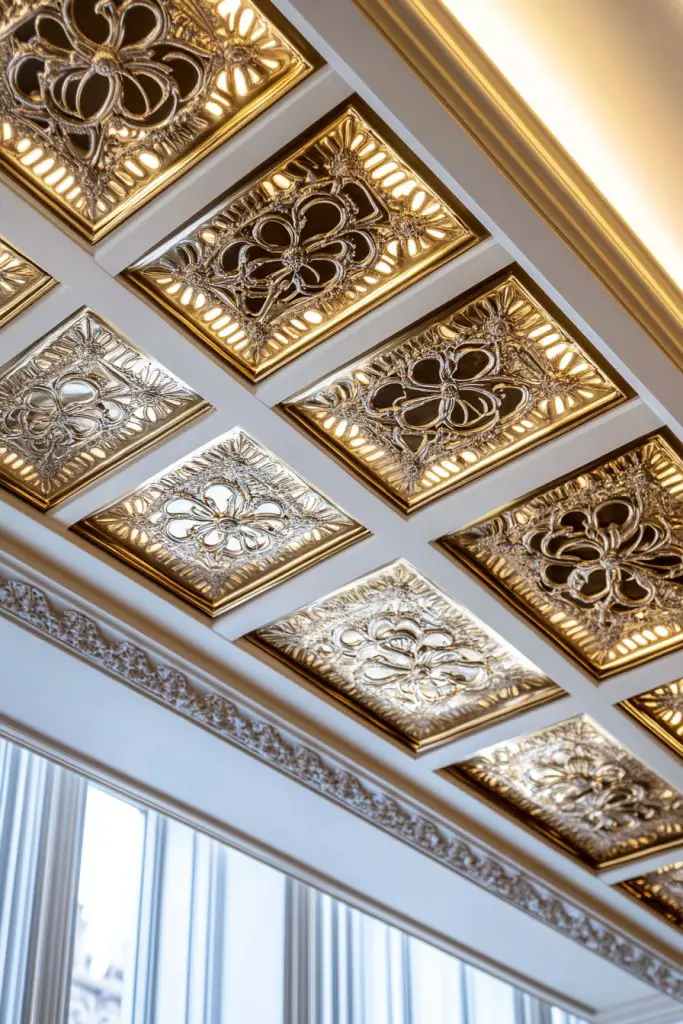
Looking to add a touch of vintage glamour and texture? Decorative metal grilles in coffers evoke the opulence of Art Deco design. They introduce intricate patterns and metallic shine, instantly elevating your ceiling’s style. If you love statement pieces and unique details, this idea might be just what you need.
Recommended Products to replicate this idea
| # | Preview | Product | |
|---|---|---|---|
| 1 |
![Howeall 10'W x 4'H [Duct Opening Size] Steel Return Air Grille, Air Return Vent Cover for Ceiling and Sidewall - HVAC Air Vent Covers - [Outer Dimensions: 11.75'W x 5.75'H]](https://m.media-amazon.com/images/I/31o789bATyL._SL160_.jpg)
|
Howeall 10"W x 4"H [Duct Opening Size] Steel Return Air Grille, Air Return Vent Cover for Ceiling... | Check Latest Price |
| # | Preview | Product | |
|---|---|---|---|
| 1 |

|
12 Inch Flush Mount Ceiling Lights, 36W 3200LM Black Dimmable Light Fixtures Ceiling Mount,... | Check Latest Price |
Imagine a ceiling with ornate metal grilles fitted into each coffer, featuring geometric or floral patterns. The metallic finish reflects light and adds a tactile element that catches the eye. The grilles create a layered effect, combining architectural structure with decorative elegance. It’s like turning your ceiling into a piece of high-end, vintage-inspired art.
Choose from brass, bronze, or nickel finishes, depending on your style preference. Pair with rich, jewel-toned walls or sleek, matte paints for contrast. Incorporate LED lighting behind or around the grilles for a luminous glow. This look works well in vintage, eclectic, or modern interiors seeking a touch of luxe.
Measure your coffers precisely and purchase decorative metal grilles designed for ceiling use. Secure the grilles with appropriate fasteners, ensuring they sit flush and are stable. For added durability, seal or coat the metal with protective finishes to prevent tarnishing. Integrate lighting fixtures to enhance the metallic shine and create ambient effects. Finish with clean lines and minimal clutter for maximum impact.
Add small LED spots or backlighting to make the patterns glow. Mix metals or add painted accents for a customized look. Incorporate decorative hardware or small embellishments that complement the grille motifs. Personal touches like textured paints or contrasting colors around the grilles can enhance visual interest.
Metal grilles in coffers combine artistry with architectural detail, creating a striking focal point. They evoke vintage glamour while fitting into contemporary spaces with the right finishes. With a bit of effort, you craft a ceiling that’s both functional and fabulously stylish, showcasing your taste and love for unique design.
16. Incorporating Inset Lighting and Hidden Niches for Functional Elegance
Want your ceiling to do more than just look good? Inset lighting combined with hidden niches offers both beauty and function. It creates a seamless, elegant atmosphere while providing discreet storage or display spaces. If you love clever design and practicality, this idea is a winner.
Recommended Products to replicate this idea
| # | Preview | Product | |
|---|---|---|---|
| 1 |

|
Amico Recessed Lighting 5/6 Inch, 12 Pack 5CCT Flat LED Can Lights, 2700K/3000K/4000K/5000K/6000K... | Check Latest Price |
| # | Preview | Product | |
|---|---|---|---|
| 1 |

|
CHOEZON Recessed Wall Niche, 2-Tier Recessed Medicine Cabinet, Bathroom Cabinet Wall Mount, Bamboo... | Check Latest Price |
Picture a ceiling with soft LED lights embedded within the coffers, illuminating the space without visible fixtures. Hidden niches between the coffers serve as storage or display areas, blending effortlessly into the design. The lighting casts gentle shadows and highlights architectural details, creating a layered, sophisticated look. It’s like giving your ceiling a secret, stylish upgrade.
Choose adjustable or color-changing LED lights for versatility. Incorporate small niches or shelves for decorative objects, framed photos, or books—avoiding wall clutter. Use sleek, minimal finishes for a modern look or ornate trims for a classic vibe. Seasonal accents like candles or textiles can further soften the ambiance.
Plan your layout carefully, marking where lights and niches will go. Use LED strips or spotlights rated for ceiling installation, attaching them securely with clips or adhesive. Build niches using drywall or pre-made units, finishing with paint or veneer. Connect wiring discreetly and install dimmers or controllers for mood lighting. Seal all edges for a clean, professional appearance.
Add dimmable or color-changing LEDs for mood control. Decorate niches with textured or painted backs to add visual depth. Incorporate small decorative elements like sculptural pieces or layered textiles in the niches. Personalize with lighting effects that change with seasons or occasions.
Inset lighting and hidden niches make your ceiling both beautiful and functional, blending design with practicality. They reflect a thoughtful, modern approach to home decor. Once finished, you’ll enjoy a space that feels sophisticated, well-designed, and uniquely yours—proof of your creative vision.
17. Designing a Symmetrical Coffered Pattern for Formal Living or Dining Rooms
Want to create a room that exudes formality and grace? Symmetrical coffered patterns bring order and elegance to living and dining spaces. They set a refined tone and showcase your attention to architectural detail. If you love balanced, classic design, this idea is a perfect choice.
Recommended Products to replicate this idea
| # | Preview | Product | |
|---|---|---|---|
| 1 |

|
Genesis Icon Coffer White Ceiling Tiles - Easy Drop-In Installation – Waterproof, Washable and... | Check Latest Price |
| # | Preview | Product | |
|---|---|---|---|
| 1 |
|
13 inch Flush Mount LED Ceiling Light Fixture, 2700K/3000K/3500K/4000K/5000K Adjustable Ceiling... | Check Latest Price |
Imagine a ceiling with evenly spaced rectangular or square coffers arranged in a precise grid. The symmetry creates a harmonious visual rhythm that guides the eye across the room. Light and shadow accentuate the uniformity, adding depth and sophistication. It’s like a tailored suit for your ceiling—polished and dignified.
Opt for classic, ornate moldings or sleek, modern profiles depending on your style. Use monochrome or contrasting colors within the coffers to enhance symmetry. Incorporate decorative medallions or central motifs for focal points. Seasonal accessories like fine tableware or luxurious textiles can further elevate the room’s formality.
Measure your ceiling carefully and plan the grid pattern precisely. Use a level, measuring tape, and painter’s tape to mark out the pattern. Install moldings or panels following your layout, ensuring perfect alignment. Finish with paint or stain, paying close attention to maintaining consistent color and finish. Adding a statement chandelier or pendant at the center can amplify the formal effect.
Highlight the symmetry with metallic or glossy finishes inside the coffers. Incorporate elegant lighting fixtures that emphasize the grid pattern, such as chandeliers or wall sconces. Use luxurious fabrics or fine decorative accents to complement the overall style. Personal touches like monograms or intricate detailing can make the design uniquely refined.
A symmetrical coffered ceiling elevates your space into a formal, timeless setting. It reflects craftsmanship and taste, making your home feel upscale and well-designed. With careful execution, you create an environment that combines tradition with your personal style—confidently showcasing your decor skills and eye for detail.
18. Using Silk or Satin Finish Paints in Coffers for a Luxurious Sheen
Craving a ceiling that radiates elegance and subtle glamour? Silk or satin finish paints inside coffers add a soft, luminous sheen that elevates the entire room. It’s a simple upgrade with a big visual impact, perfect for those who love a touch of luxury. If you want your ceilings to feel special, this idea is worth trying.
Recommended Products to replicate this idea
| # | Preview | Product | |
|---|---|---|---|
| 1 |

|
Rust-Oleum 267335 Painter's Touch Latex Acrylic Paint, Satin Stone Gray 32 Fl Oz (Pack of 1) | Check Latest Price |
| # | Preview | Product | |
|---|---|---|---|
| 1 |
|
Paint Brushes Set of 24 Pieces Wooden Handles Brushes with Canvas Brush Case, Professional for Oil,... | Check Latest Price |
Imagine the light softly bouncing off the smooth, satin-finished interior of the coffers, creating a gentle glow. The sheen adds depth and richness, making the architectural details stand out more vividly. Shadows and highlights play across the textured surface, giving a dynamic, elegant appearance. It’s like your ceiling is dressed in fine silk—sophisticated and inviting.
Choose a color palette that complements the sheen—soft neutrals, pastels, or deep jewel tones work beautifully. Pair with matte or semi-gloss walls for contrast, emphasizing the ceiling’s luxurious finish. Incorporate lighting that enhances the sheen—such as uplights or wall washers—to maximize the effect. Seasonal decor can be muted or opulent, depending on your mood.
Prepare your ceiling surface thoroughly, then select a high-quality silk or satin paint. Use brushes or rollers suitable for smooth finishes, applying thin, even coats. Multiple coats may be necessary to achieve the desired sheen and color depth. Allow adequate drying time between coats, and finish with a clear protective topcoat if desired. Precision in application ensures a flawless, sophisticated result.
Add metallic or pearlescent pigments to the paint for extra shimmer. Incorporate subtle decorative moldings or trim painted in matching or contrasting finishes. Use lighting to highlight the smooth surface and sheen—think soft uplights or cove lighting. Personal touches like small decorative accents or textured fabrics can complement the luxurious ceiling.
Using silk or satin paints turns your ceiling into a subtle, elegant feature that elevates your decor. It’s a refined choice that adds depth and sophistication, making your space feel more luxurious. Once finished, you’ll enjoy a home environment that’s both beautiful and inviting—proof that simple upgrades can redefine your interior style.
19. Combining Coffered Ceilings with Statement Chandeliers for a Focal Point
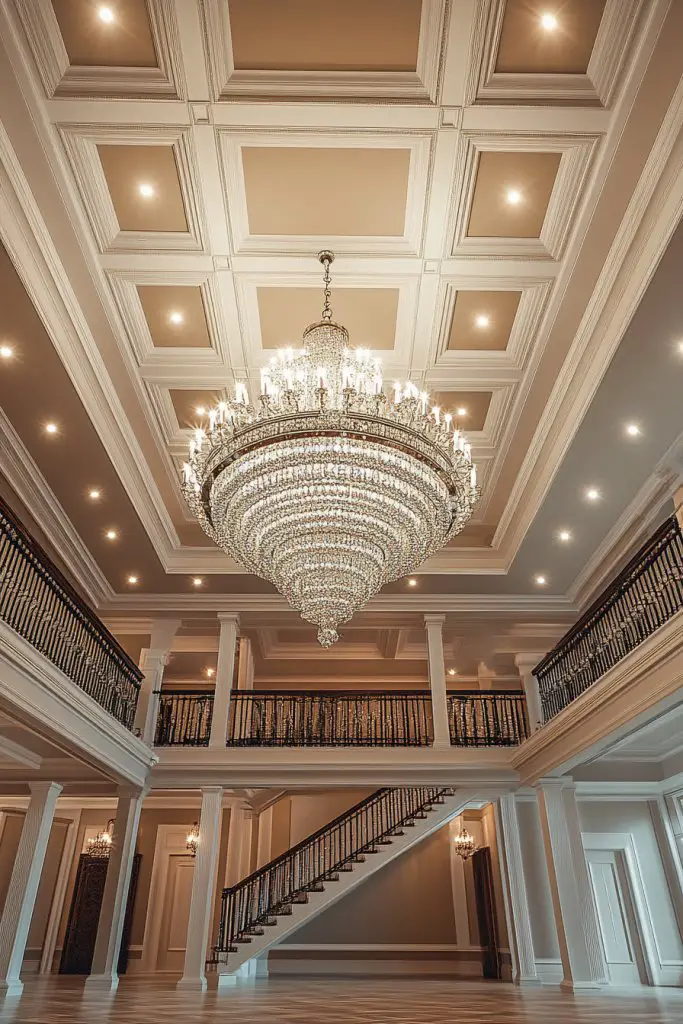
Want your ceiling to be the ultimate showstopper? Pairing coffered ceilings with a striking chandelier creates a dramatic focal point that ties the entire room together. It’s a timeless look that oozes elegance and grandeur. If you love statement lighting and architectural detail, this idea is a must-try.
Recommended Products to replicate this idea
| # | Preview | Product | |
|---|---|---|---|
| 1 |

|
Black Chandelier, 6-Light Farmhouse Chandelier for Dining Room Lighting Fixtures Hanging, Dining... | Check Latest Price |
| # | Preview | Product | |
|---|---|---|---|
| 1 |

|
Art3d 12-Pack 24×24 Inch PVC Waterproof Drop Ceiling Tiles for Home Décor - 2x2 ft 3D Modern... | Check Latest Price |
Imagine a grand chandelier hanging from the center of a beautifully coffered ceiling, drawing the eye upward. The grid pattern frames the fixture perfectly, emphasizing its size and design. Light from the chandelier casts intricate shadows and highlights, amplifying the room’s luxury. It’s a harmonious blend of architecture and lighting artistry that makes your space feel special.
Choose a chandelier that matches your decor—crystal for classic glam, matte black for modern minimalism, or mixed metals for eclectic charm. Keep the coffered ceiling simple if the fixture is elaborate, or add decorative moldings around the chandelier for extra flair. Seasonal decor can include fabric shades, candles, or floral arrangements that complement the fixture.
Determine the ideal height for your chandelier based on ceiling height and room function. Install the coffered ceiling first, ensuring it’s level and secure. Mount the chandelier with appropriate hardware, checking weight limits and clearance. Connect wiring discreetly and test the fixture before finalizing the installation. Adjust the height to optimize visual impact and functionality. This combination creates a luxurious, balanced look.
Add dimmable or colored bulbs to customize the mood. Incorporate decorative chains or cords that match your decor style. Use complementary wall fixtures or accent lighting to enhance the chandelier’s effect. Personal touches like beaded or fabric shades can soften or glamorize the overall look, making your ceiling a true focal point.
A coffered ceiling with a statement chandelier elevates your interior style, making a bold yet elegant statement. It’s a classic design choice that works across many decor themes, from traditional to contemporary. With a bit of planning and patience, you craft a space that feels both luxurious and inviting—showing off your eye for spectacular design. Your home becomes a reflection of confidence and refined taste.
Conclusion
Exploring these diverse coffered ceiling ideas demonstrates how versatile and transformative this architectural feature can be for 8 ft ceilings. Whether you prefer traditional elegance or contemporary flair, there’s a design here to inspire your next upgrade. Don’t hesitate to bring these ideas to life in your own home—your perfect, stylish ceiling awaits!