
18 College Apartment Bedroom Ideas for Student Living
Looking to transform your college apartment bedroom into a stylish and cozy retreat? You’re not alone! As students seek to make their small spaces feel like home, creative bedroom ideas have become incredibly popular. From clever storage hacks to personalized decor, these ideas help maximize limited space while showcasing your unique personality and style.
In this article, you’ll discover a variety of inspiring bedroom ideas tailored for student living—whether you’re into minimalist chic, vibrant boho vibes, or functional organization. Get ready to find new ways to refresh your space, make it more comfortable, and reflect your personal flair. With these ideas, you’ll be empowered to create a bedroom that feels truly yours, no matter the size or budget. Let’s turn your college space into a haven you’ll love coming home to!
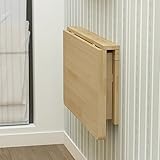
1. Multi-Functional Fold-Out Desk Area
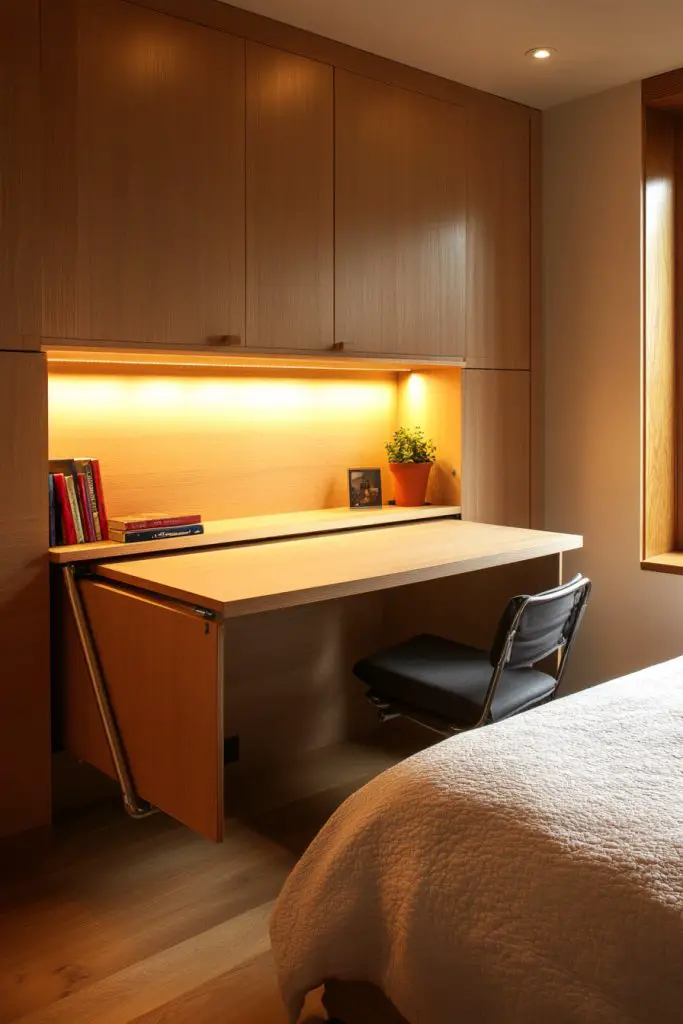
Do you struggle to find space for both studying and self-care in your tiny dorm or apartment? A dedicated desk often feels like just another piece of furniture to squeeze into an already tight room. The constant need to switch between work and relaxation can be frustrating and inefficient. What if your workspace could transform to meet your changing needs?
Recommended Products to replicate this idea
| # | Preview | Product | |
|---|---|---|---|
| 1 |
|
MM MELISEN Wall Mounted Folding Table for Laundry Room, Wall Mounted Fold Down Desk for Small Saving... | Check Latest Price |
| # | Preview | Product | |
|---|---|---|---|
| 1 |
|
Amazon Basics Wall Mount Round Vanity Magnifying Bathroom Mirror, 1X/5X Magnification, 12.8"L x... | Check Latest Price |
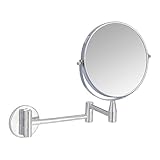
Picture a sleek wall-mounted panel that folds down into a compact desk, complete with a small mirror for quick makeup checks. When not in use, it folds back against the wall, hiding away clutter. The surface is smooth, with a subtle edge to prevent items from slipping off. A few hooks or small shelves above hold supplies or accessories, making it a mini sanctuary for both work and self-care.
Choose a fold-out desk with different finishes—light wood for a Scandinavian vibe, painted MDF in bold colors for a pop of personality, or a sleek laminate for a modern look. For small spaces, go for a fold-down unit that extends only a few inches when open; larger rooms can accommodate bigger surfaces with additional storage. You can also add a fold-down mirror to create a multi-use vanity or makeup station. Seasonal decor can include colorful organizers or removable wall decals.
Start by selecting a sturdy wall and a fold-out desk mechanism rated for your intended use. Use a stud finder to locate framing and mark the mounting points. Drill pilot holes, then attach the hinges or brackets securely with appropriate screws. Test the fold-out action thoroughly before adding the surface top. Add a small, lightweight tabletop made of plywood or laminate, attaching it with hinges or clips. Finish with a quick paint or sealant for durability. Keep tools simple—just a drill, level, and screwdriver.
Personalize your fold-out desk with colorful storage bins, adhesive hooks for tools, or a decorative chalkboard paint section for notes. Use a soft, removable fabric cover to protect the surface when not in use. You could also add a small fold-up stool that tucks underneath, saving space. For a touch of elegance, incorporate a decorative edge trim or corner protectors that match your room’s style. The goal is to make it uniquely yours.
A fold-out desk turns a tiny space into a multifunctional zone that adapts as your needs change. It’s a smart solution that proves you can have style and function without sacrificing space. Once set up, you’ll love how effortlessly it transforms your room. Ready to make your space work harder for you?
2. DIY Canvas Wall Art for Personalized Decor
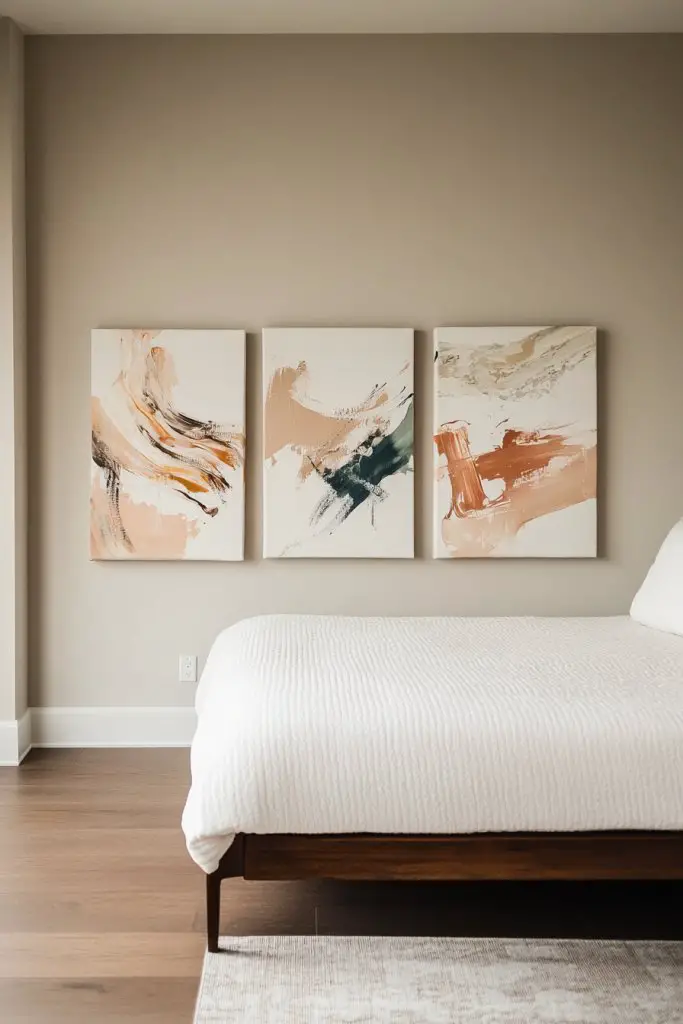
Tired of blank walls that make your space feel dull and uninspired? Buying expensive artwork or prints can quickly blow your budget and still leave your room feeling generic. Personalizing your space with DIY projects is a fun alternative that adds character and makes your room truly yours. Plus, it’s easier than you think.
Recommended Products to replicate this idea
| # | Preview | Product | |
|---|---|---|---|
| 1 |

|
30 PCS Push Pins Picture Hangers Wall Hooks, Double Headed Thumb Tacks for Wall Hangings, Renter... | Check Latest Price |
| # | Preview | Product | |
|---|---|---|---|
| 1 |

|
Command 5 lb Large Utility Hooks, 7 Wall Hooks and 12 Command Strips, Damage-Free Hanging with... | Check Latest Price |
Imagine a large canvas painted with bold, abstract strokes in your favorite colors, or a series of smaller canvases with hand-drawn designs. The textures of thick acrylic paint or layered prints create depth and visual interest. You might add personal touches like a quote or a meaningful symbol, all on a blank canvas that you’ve customized yourself. The finished piece hangs prominently above your bed or desk, giving your room personality.
Use different mediums—acrylics, watercolors, or mixed media—to match your aesthetic. For a minimalist look, stick with monochrome or geometric patterns; for boho vibes, incorporate natural textures like jute or fabric accents. Seasonal themes can be achieved by swapping out art pieces or adding removable wall decals that complement your canvases. You can also create a gallery wall with a mix of paintings, prints, and photos, all customized by you.
Gather affordable canvases from craft stores or online, along with your preferred paints or printouts. Sketch your design lightly with pencil, then fill in with bold strokes or layered colors. For digital prints, print your custom designs on high-quality paper or fabric and stretch them over canvases or attach with adhesive. Use painter’s tape or stencils for clean lines and shapes. Hang your finished artwork using removable hooks or strips for easy updates, ensuring your wall stays damage-free.
Frame your canvases with inexpensive DIY frames made from painted cardboard or reclaimed wood for a rustic look. Incorporate textured elements like fabric patches or metallic accents to add dimension. Personalize further by adding small handwritten notes or quotes directly on the canvas with paint markers. Change your art seasonally or for different moods, keeping your space fresh and inspiring.
Creating your own wall art is a rewarding way to express your personality and style. It shows that you don’t need to spend a fortune to make your space beautiful. With a little creativity, your room becomes a gallery that reflects your unique taste. Ready to turn blank walls into a masterpiece?
3. Under-Bed Storage Solutions for Clutter Control
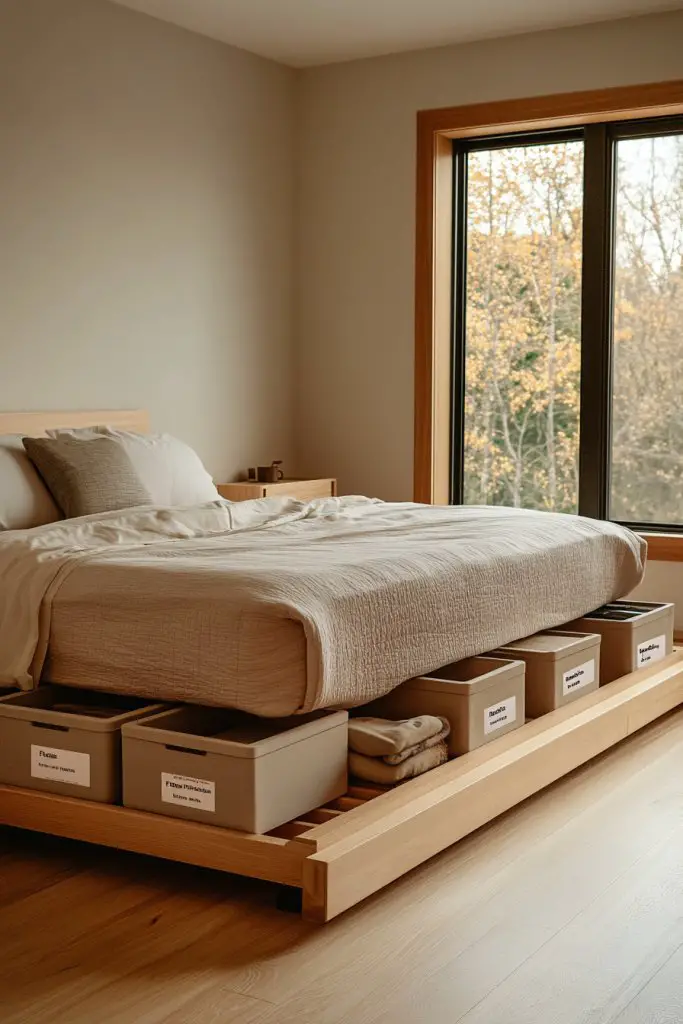
Clutter under the bed can take over your entire room and make cleaning feel like a chore. If your small space lacks closet or drawer storage, everything tends to pile up in plain sight. But what if you could turn that wasted space into an organized haven? Under-bed storage solutions are the answer to decluttering without sacrificing style.
Recommended Products to replicate this idea
| # | Preview | Product | |
|---|---|---|---|
| 1 |

|
Budding Joy 90L Under Bed Storage Containers, Closet Organizers and Storage Bins, Foldable Underbed... | Check Latest Price |
| # | Preview | Product | |
|---|---|---|---|
| 1 |

|
FOUCSSOMEI Under Bed Storage with Wheels, Wooden Under Bed Drawers On Wheels, Rolling Under Bed Shoe... | Check Latest Price |
Visualize a set of sleek, matching bins or drawers neatly tucked beneath your bed frame. They’re made of durable fabric, plastic, or wood, with labels or clear fronts for easy access. The beds are elevated just enough for you to slide items in and out effortlessly. When organized, the space looks tidy and intentional, with everything from seasonal clothing to extra shoes stored out of sight but within reach.
Choose soft fabric bins for a cozy, textured look, or opt for rigid plastic drawers for a more industrial vibe. For small rooms, slim-profile containers maximize space, while larger beds can accommodate wider or deeper storage units. Consider stacking units vertically for added capacity. You can also customize the look with covers or labels matching your room’s color palette or theme.
Start by measuring the clearance under your bed to select appropriately sized storage. Look for containers with handles for easy pulling, and consider stackable options for versatility. Place heavier items at the bottom of each bin for stability. Label each container clearly to avoid digging through everything every time you need something. To keep everything fresh, add moisture absorbers or small dehumidifiers inside the bins if needed. Regularly review and purge outdated items to keep your system efficient.
Decorate storage bins with fabric covers, stickers, or custom labels to match your room’s vibe. Use color-coding to differentiate categories—like blue for study supplies and red for seasonal clothes. Incorporate decorative baskets or woven boxes for a boho touch. For extra convenience, add a small wheel or sliders to make pulling out bulky bins easier. This setup turns chaos into calm.
Smart under-bed storage transforms a hidden space into your best organizational secret. It’s a simple, affordable way to reclaim your room’s visual peace. Once you get used to this tidy system, you’ll wonder how you ever lived without it. Ready to turn that underused space into your personal storage haven?
4. Vertical Pegboard Organizer for Supplies and Accessories
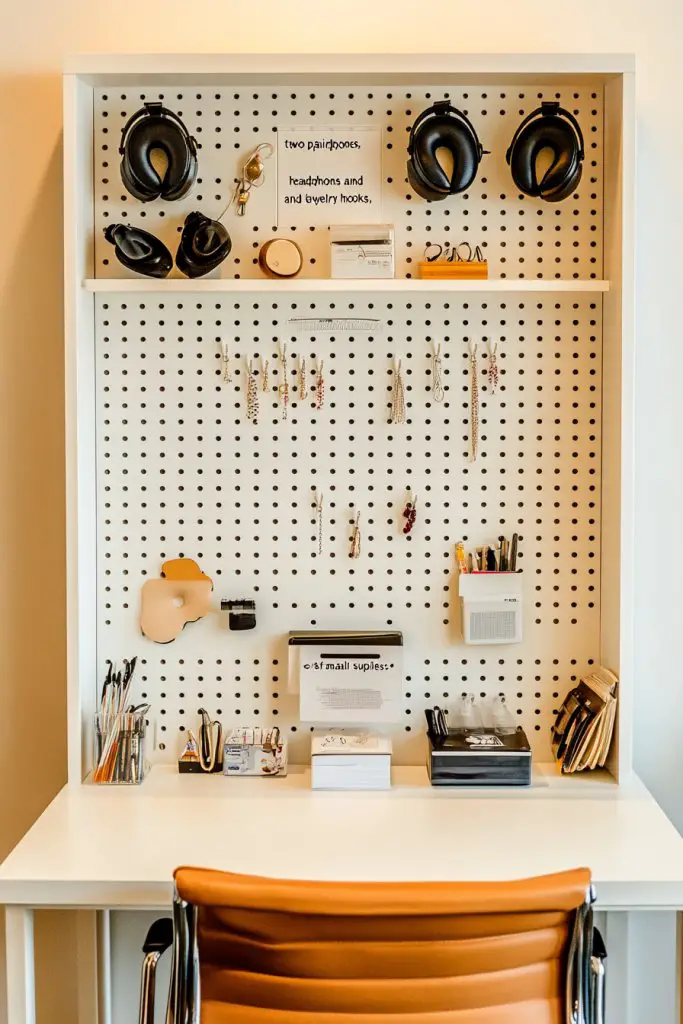
Ever feel overwhelmed by scattered stationery, headphones, or jewelry cluttering your desk or dresser? Counter space is precious, and a jumble of accessories only adds to the chaos. A vertical pegboard can help you organize everything in one stylish, accessible spot. It’s a simple way to keep your essentials within arm’s reach while looking cool.
Recommended Products to replicate this idea
| # | Preview | Product | |
|---|---|---|---|
| 1 |

|
300-Piece Pegboard Hook Set, Pegboard Organizer Accessories for Hanging, Durable Metal Hooks for... | Check Latest Price |
| # | Preview | Product | |
|---|---|---|---|
| 1 |

|
WOPITUES Wood Floating Shelves Set of 6, Shelves for Wall Decor, Farmhouse Shelf for Bedroom,... | Check Latest Price |
Envision a sleek black or natural wood pegboard mounted on your wall, dotted with hooks, baskets, and small shelves. Hang headphones, keys, or jewelry neatly, with cords and chains hanging freely. Small containers hold pens, paper clips, or other tiny supplies. The entire setup is both functional and decorative, adding a modern industrial touch to your room. It’s like having a mini command center for your everyday essentials.
Choose a pegboard in a color or material that complements your room’s decor—metal, painted MDF, or reclaimed wood all work well. Customize with different hooks, baskets, and shelf brackets to suit your needs or style. For a more subtle look, paint or stencil designs onto the pegboard itself. You could also add a clip to display photos or inspirational quotes for motivation. The versatility makes it suitable for dorms, apartments, or even craft rooms.
Start by choosing a sturdy wall that can handle the weight of your accessories. Use a level to mark where the pegboard will hang, then drill pilot holes into wall studs or use heavy-duty anchors. Attach the pegboard securely and organize your items with the hooks and shelves provided or purchased separately. Adjust the arrangement until it feels intuitive and clutter-free. Keep cleaning supplies or extra hooks handy for future reorganization.
Add decorative touches like paint, stencils, or washi tape to match your room’s theme. Personalize with labeled containers for specific items, or incorporate a small chalkboard section for notes. You can also add small LED puck lights for task lighting during late-night study or craft sessions. The goal is to make it not just functional but a part of your room’s aesthetic.
A pegboard turns chaos into order while showcasing your personal style. It’s an affordable, customizable solution that keeps your essentials visible and within easy reach. Once installed, you’ll love how much cleaner and more organized your space feels. Ready to take control of your clutter?
5. Layered Rugs for Comfort and Style
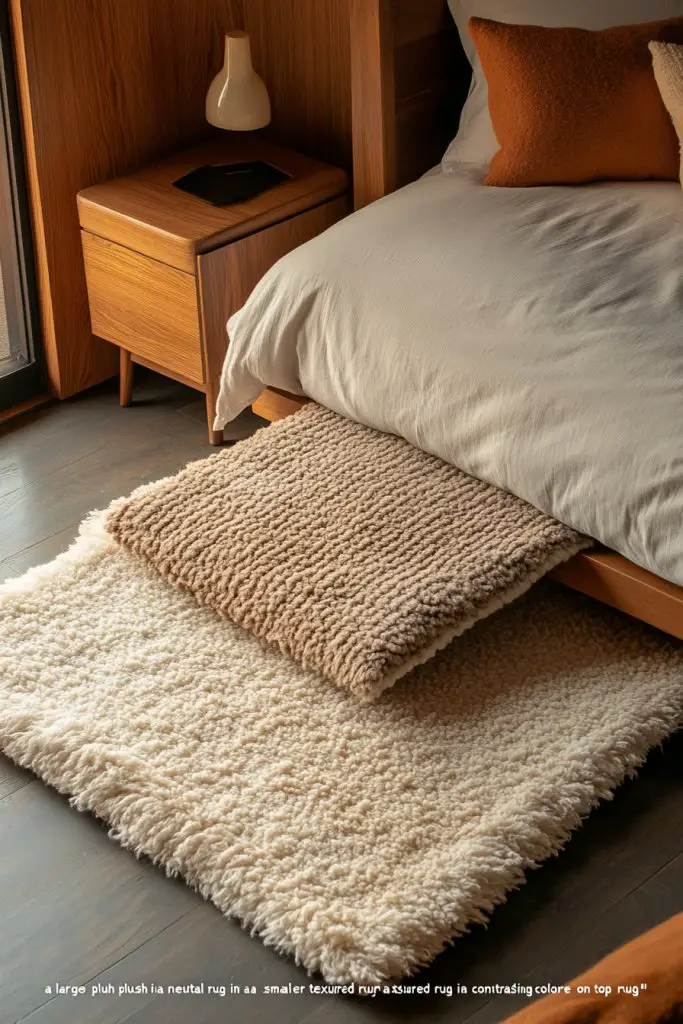
Does your room feel flat or cold, lacking that cozy vibe you crave? A single rug can sometimes look too plain or get lost in the space. Layering rugs is a trendy way to add depth, warmth, and personality to your bedroom floor. It’s an easy, budget-friendly trick to make your space feel more inviting.
Recommended Products to replicate this idea
| # | Preview | Product | |
|---|---|---|---|
| 1 |

|
Zentavio Area Rugs for Living Room Grey Rugs for Bedroom 4x6 Carpet Fluffy Furry Soft Shag Aesthetic... | Check Latest Price |
| # | Preview | Product | |
|---|---|---|---|
| 1 |
|
GORILLA GRIP Strong Rug Pad Gripper, US Designed, Grips Keep Area Rugs Safe and in Place, Thick,... | Check Latest Price |
Picture a soft cream or neutral base rug laid out under your bed, with a smaller, patterned rug layered on top. The textures and patterns create visual interest, while the combination of materials adds warmth underfoot. Think plush shag, woven jutes, or textured flatweaves—mix and match for a curated, layered look. The different heights and textures make the space feel plush and designed.
Choose rugs that complement your overall color scheme—monochrome layers for minimalism, or bold patterns for a boho vibe. For small spaces, focus on layering a small rug over a larger one, while in bigger rooms, multiple rugs can define different zones. Seasonal styles might include warmer textures in winter or lighter, breathable fabrics in summer. Experiment with colors and textures to reflect your mood or decor themes.
Start with a larger, neutral base rug that fits your room’s dimensions. Layer smaller rugs on top, arranging them with a bit of overlap and asymmetry for a relaxed look. Use non-slip rug pads underneath to prevent slipping and shifting. Position your bed or furniture over the layered rugs to anchor the space. For easy cleaning, choose machine-washable or easy-to-vacuum fabrics. Refresh your layers periodically for new visual effects.
Add decorative fringes, tassels, or embroidered details to your layered rugs for extra flair. Incorporate textiles like throws or cushions in similar tones to unify the look. You can also swap out layered rugs seasonally—think cozy sheepskin in winter or jute in summer—to keep your bedroom feeling fresh. Layering isn’t just about looks—it’s about comfort and creating a warm, layered ambiance.
Layered rugs are a simple way to elevate your decor while making your space feel warm and personalized. They reflect a relaxed, curated style that’s easy to achieve and adapt. Once you see how much cozier your room becomes, you’ll wonder why you didn’t do it sooner. Time to layer up and transform your space into a cozy retreat!
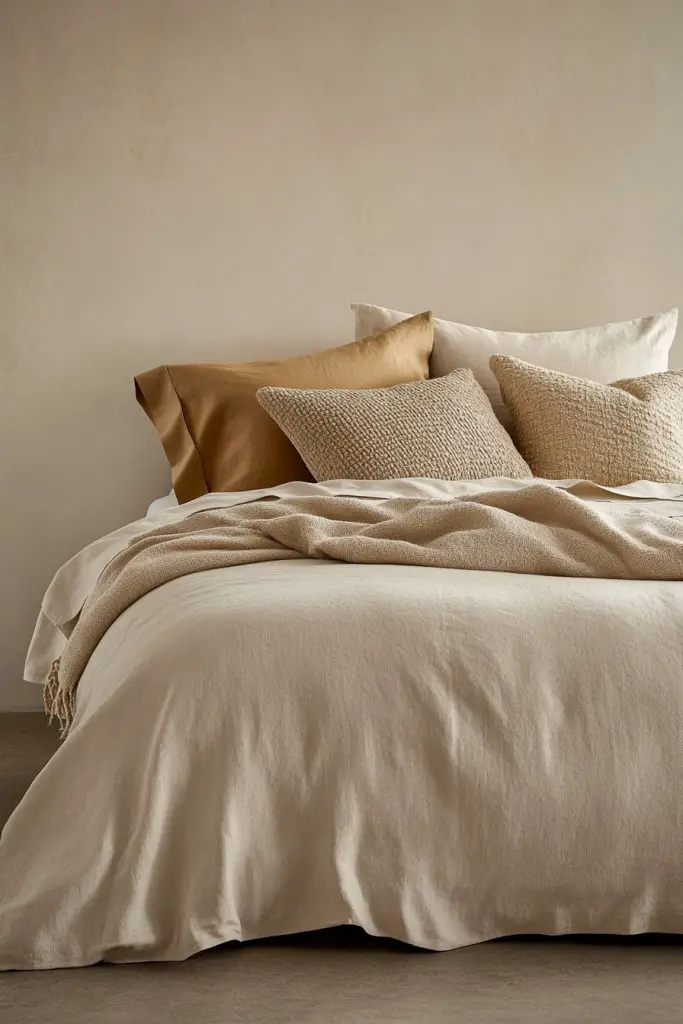
6. Modular Bedding Sets for Easy Style Updates
Bored of your current bedding and want a quick way to refresh your room’s vibe? Changing your entire duvet and pillow set can be costly and time-consuming. Modular bedding offers a flexible, budget-friendly way to update your look without buying new sets every season. It’s perfect for students who love variety and easy style changes.
Recommended Products to replicate this idea
| # | Preview | Product | |
|---|---|---|---|
| 1 |

|
Bedsure Duvet Cover Queen Size - Gingham Reversible Buffalo Plaid Duvet Cover Set with Zipper... | Check Latest Price |
| # | Preview | Product | |
|---|---|---|---|
| 1 |

|
Bedsure GentleSoft White Throw Blanket for Couch - Cozy Blanket for Women, Cute Fleece Throw for... | Check Latest Price |
Visualize a reversible duvet cover with two contrasting patterns, paired with pillowcases in coordinating colors. Mix-and-match pillow shams and throws allow you to customize your look effortlessly. For a fresh feel, switch out pillow covers or add a textured throw blanket—no need for a full bedding overhaul. The result is a space that feels new with minimal effort.
Choose bedding in versatile colors—neutrals, pastels, or bold hues—that can be easily combined or swapped. For seasonal updates, add a faux fur throw or a lightweight quilt. If your room has a specific theme, incorporate patterned pillowcases or accent textiles to reinforce it. Mix textures like silky, matte, or embroidered fabrics for visual interest. The key is flexibility and personal expression.
Start with a neutral or solid-colored fitted sheet as your base. Select reversible or patterned duvet covers that match your style. Mix and match pillowcases, shams, and throws to create different looks. Keep extra sets stored in a small bin or drawer for quick swaps. Wash everything regularly to maintain freshness. Layering different textiles can add depth and comfort, making your bed the focal point of your room.
Add embellishments like decorative trims or embroidered initials to your pillowcases for a personal touch. Use seasonal colors—bright for spring, deep tones for fall—to match your mood. Incorporate textured textiles like velvet or linen for variety. Remember, the key is to keep it simple but versatile enough to change whenever you feel like a refresh.
Modular bedding empowers you to change your space effortlessly and economically. It’s a smart way to keep your room feeling fresh and aligned with your evolving style. Once you see how simple swaps can transform your room, you’ll be hooked. Ready to update your bedding game without breaking the bank?
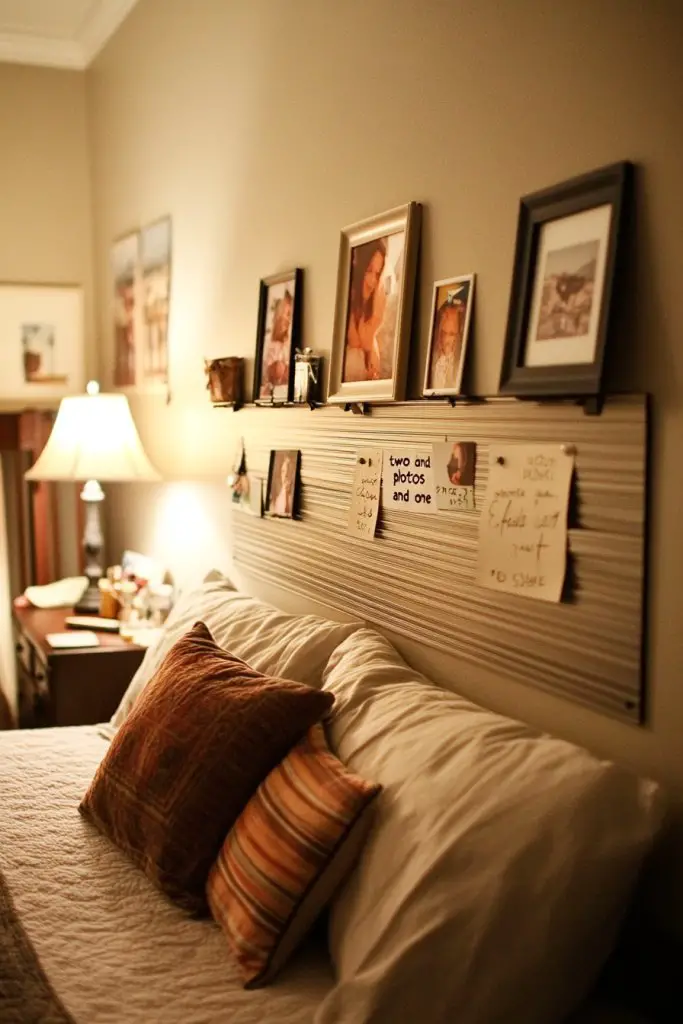
7. DIY Headboard from Reclaimed Materials
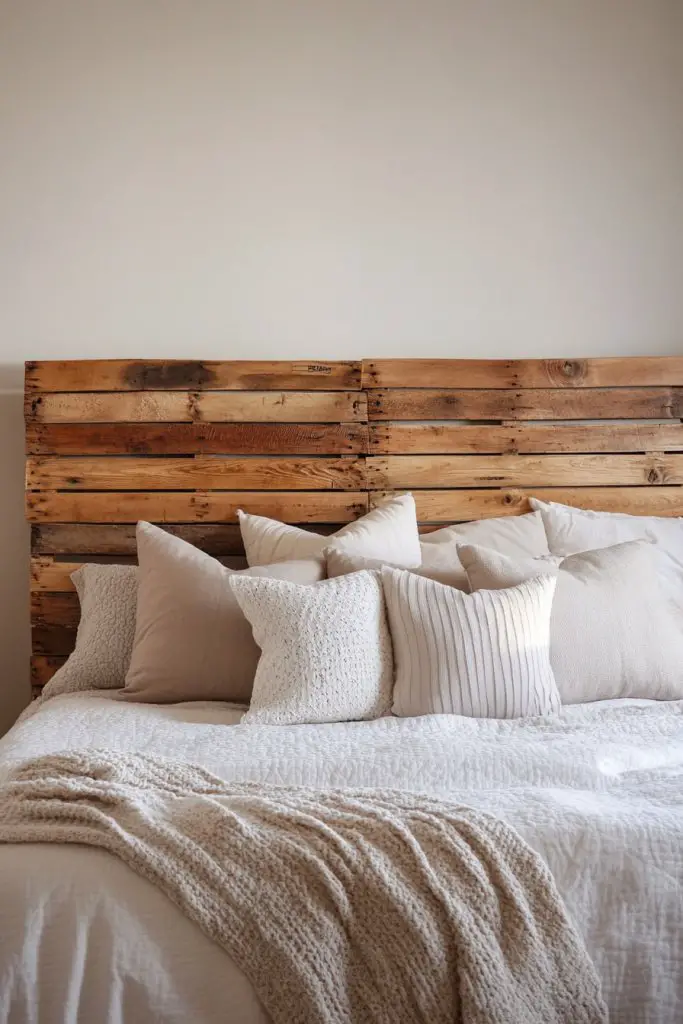
Tired of your bed looking plain or mismatched? A headboard instantly elevates your bedroom’s style, but custom ones can be pricey. DIY headboards from reclaimed materials are budget-friendly, eco-conscious, and totally customizable. Plus, they add a rustic, personal touch that no store-bought piece can match.
Recommended Products to replicate this idea
| # | Preview | Product | |
|---|---|---|---|
| 1 |

|
Prepac Stylish Flat Wood Panel Headboard for Queen Size Beds, Simplistic Wooden Queen Headboard... | Check Latest Price |
| # | Preview | Product | |
|---|---|---|---|
| 1 |

|
IFNOW Upholstered Wall Mounted Headboard, 3D Soundproof Wall Panels Peel and Stick Headboard for... | Check Latest Price |
Picture a headboard made from weathered pallet wood, painted or left natural, mounted behind your bed. It adds texture and character, giving your space a cozy, farmhouse feel. Or imagine a fabric-covered panel made from reclaimed wooden crates or old doors, with decorative nails or fabric trim. The result is a unique focal point that reflects your style and creativity.
Choose materials like old wooden shutters, pallets, or vintage doors for a rustic look. For a more polished vibe, paint or stain the materials in your preferred colors. You can also add decorative elements like string lights, fabric, or metal accents—just keep the main structure simple. Adapt the size to fit your bed and room dimensions, making it as high or low as you like. Seasonal or thematic accents can also be added for variety.
Start by sourcing reclaimed wood or materials from thrift stores, flea markets, or your own garage. Clean and sand rough surfaces, then cut to size if needed. Assemble using nails, screws, or brackets, ensuring a sturdy structure. Paint, stain, or decorate as desired before mounting behind your bed with wall anchors or brackets. For a softer look, add fabric panels or upholstered sections. You can also attach small shelves or hooks for added function.
Decorate the headboard with stenciled patterns, fabric accents, or metallic details. Incorporate your favorite colors or themes to match your decor. For a layered look, add a soft throw or small cushions in front of the headboard. If you want to change styles later, simply paint or cover the materials again. It’s a versatile project that grows with your evolving taste.
A DIY headboard from reclaimed materials proves that you can create stylish decor on a budget while being eco-friendly. It’s a statement piece that shows off your personality and resourcefulness. Once finished, you’ll have a unique focal point that makes your bedroom feel truly yours. Ready to craft your own headboard adventure?
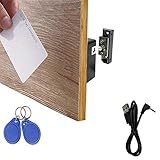
8. Multi-Level Nightstand with Hidden Storage
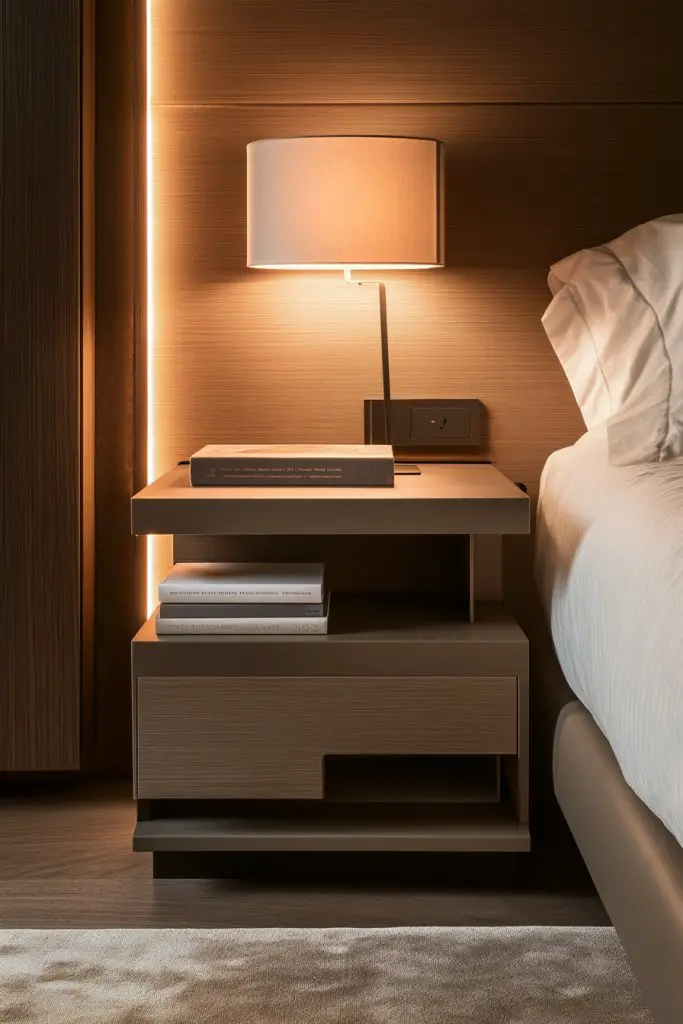
Nightstands are essential but often cluttered or too small to hold everything you need. Finding a balance between storage and style can be tricky, especially in a small room. A multi-level nightstand with hidden compartments solves this by offering extra space without taking up more floor area. It’s a clever way to keep your essentials organized and close at hand.
Recommended Products to replicate this idea
| # | Preview | Product | |
|---|---|---|---|
| 1 |
|
Vtopmart 25 PCS Clear Plastic Drawer Organizers Set, 4-Size Versatile Bathroom and Vanity Drawer... | Check Latest Price |
| # | Preview | Product | |
|---|---|---|---|
| 1 |
|
WOOCH RFID Lock Electronic Cabinet Lock, Hidden DIY Lock with USB Cable for Wooden Cabinet Drawer... | Check Latest Price |
Imagine a sleek, modern side table with a top shelf for your alarm and a lower drawer or compartment for books, chargers, or personal items. The drawer blends seamlessly into the design, with a push-to-open mechanism or a hidden latch. The multi-level design adds visual interest and allows you to organize items by priority. The overall look is clean, functional, and unobtrusive, fitting perfectly into any bedroom style.
Opt for materials like wood, laminate, or metal to match your decor. For a rustic look, choose distressed wood with metal handles; for contemporary spaces, go for sleek, glossy finishes. You can customize the number of levels and storage options—add a small open shelf for your favorite book or decorative item. The design can be adapted to fit tight spaces or larger rooms with multiple functions.
Start by measuring your space and sketching your ideal layout. For a DIY approach, assemble a multi-tiered box using plywood or reclaimed wood, attaching each level with brackets or screws. Incorporate hidden compartments with sliding panels or lift-up lids, secured with magnets or latches. Finish with paint or stain, then attach legs or feet for stability. Place it beside your bed and organize your essentials in the designated spaces. Keep tools simple—saw, drill, screws, and a level.
Add decorative touches like painted patterns, stenciled labels, or metallic accents to make it stand out. Use fabric-lined drawers or small baskets inside for a refined look. Personalize with a favorite color palette or theme that matches your room. You can also add a small lamp or a charging station on the top shelf for convenience. It’s a functional piece with personality.
A multi-level nightstand with hidden storage shows that smart design can maximize small spaces beautifully. It’s a practical project that elevates your room’s style and organization. Once you see how much more accessible your essentials become, you’ll wonder why you didn’t do it sooner. Ready to build your new favorite spot in the room?
9. Magnetic Wall for Notes and Photos
Do your walls feel cluttered with sticky notes, reminders, or scattered photos? Keeping track of schedules and memories can be chaotic without a dedicated space. A magnetic wall offers a simple, stylish solution that keeps everything in one place and adds a modern touch to your room. It’s perfect for students who need organization without sacrificing aesthetics.
Imagine a section of wall painted with magnetic primer or covered with a magnetic paint strip. You can attach notes, photos, or small accessories with magnets, creating a dynamic display. Use colorful magnetic clips or decorative magnets to add personality. This magnetic zone becomes a visual hub that’s both functional and attractive, holding your reminders, favorite memories, or motivational quotes.
Choose from magnetic paint in a bold color or a subtle neutral for versatility. Combine with decorative washi tapes or borders to frame your magnetic area. You can also attach magnetic strips to existing bulletin boards or repurpose a painted section. For a more playful look, choose magnets in fun shapes or patterns. It’s adaptable to small or large walls and can be integrated into any decor style.
Start by selecting a wall section and cleaning it thoroughly. Apply a magnetic primer or paint according to the manufacturer’s instructions—usually multiple coats for a strong magnetic hold. Once dry, paint over with your preferred color or leave it as-is for a sleek look. Use magnetic clips, small containers, or hooks to organize notes and photos. Keep your magnets organized and update your display regularly to keep it fresh.
Decorate the edges with washi tape, stickers, or painted designs that match your personality. Use themed magnets—such as motivational quotes or favorite characters—to add fun. Incorporate small magnetic containers for pens, keys, or other small items. Make it a weekly ritual to update your display for fresh inspiration and organization.
A magnetic wall turns a simple space into an interactive, personal gallery that keeps you organized. It’s a creative, clutter-free way to display what matters most. Once you start using it, you’ll wonder how you ever managed without this versatile tool. Ready to magnetize your space?
10. Space-Saving Over-Door Hooks and Racks
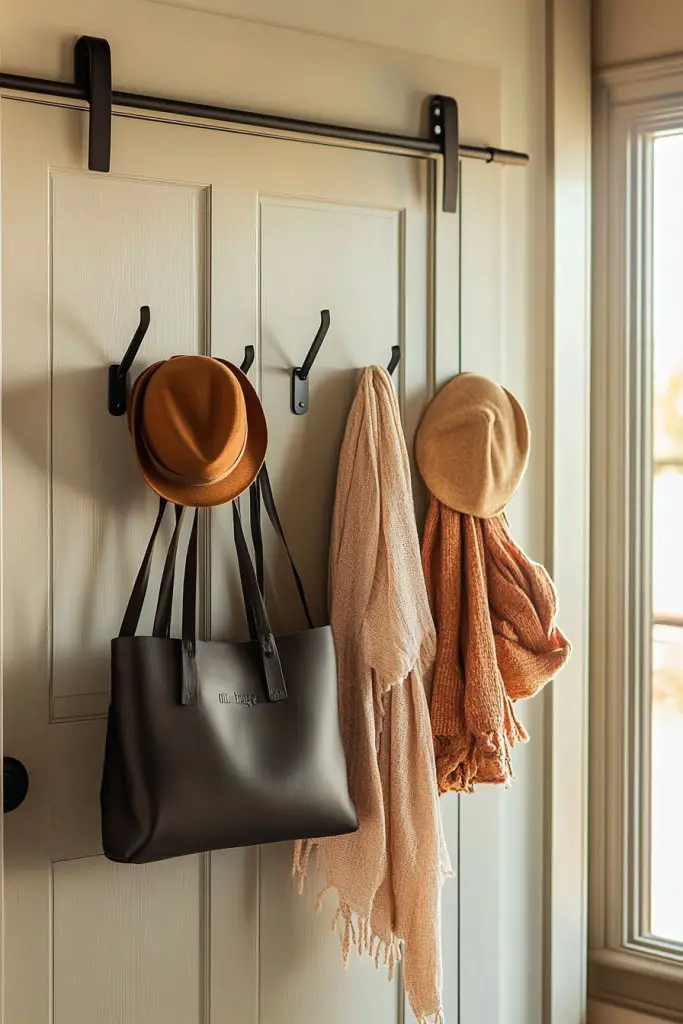
Overcrowded closets and limited wall space make organizing accessories and everyday items a challenge. Traditional hooks take up wall or floor space, which you might not have. Over-door hooks and racks are a simple solution to maximize vertical space and keep essentials within reach without cluttering your room. They’re especially great in dorms or small apartments.
Recommended Products to replicate this idea
| # | Preview | Product | |
|---|---|---|---|
| 1 |

|
Optish Over The Door Hooks, Door Hanger Hooks for Hanging, Over The Doors Towel Racks for Bathroom... | Check Latest Price |
| # | Preview | Product | |
|---|---|---|---|
| 1 |

|
Pantry Door Organizers and Storage, 8-Tier Large Metal Heavy-Duty Frame Over the Door Spice Rack, 2... | Check Latest Price |
Picture a sturdy over-the-door rack with multiple hooks hanging behind your door. It holds backpacks, jackets, or accessories, freeing up closet space. The hooks are made of metal or plastic, and some designs include small shelves for shoes or storage bins. The door remains fully functional, but now it’s a smart storage zone that keeps your room looking tidy and accessible.
Choose from different styles—slim metal hooks for a minimalist look, or decorative hooks with unique shapes for personality. Some racks come with additional features like hooks for scarves or small pockets for valuables. They work well in bedrooms, bathrooms, or entryways. You can also add labels or color-coding to organize different categories or seasons.
Measure your door width and select a rack with enough hooks to meet your needs. Install the hooks over the top edge or use tension-mounted versions if you prefer not to drill. Ensure the hooks are sturdy enough to hold your heavier items. Organize your belongings, then hang the rack on the door, adjusting the placement for balance. Keep it light to prevent door damage—avoid overloading.
Decorate the hooks with paint or decals for a personalized touch. Use different colored hooks for categories—like red for coats, blue for accessories. Add small storage bins or fabric pockets to hold smaller items. Regularly review and adjust your setup to keep it functional and clutter-free.
Over-door hooks are a simple, effective way to reclaim space and stay organized. They’re inexpensive, easy to install, and adaptable to any room. Once you see how much easier it is to access your essentials, you’ll wonder why you didn’t do it sooner. Ready to upgrade your room’s storage game?
11. DIY Corkboard or Bulletin Board for Organization
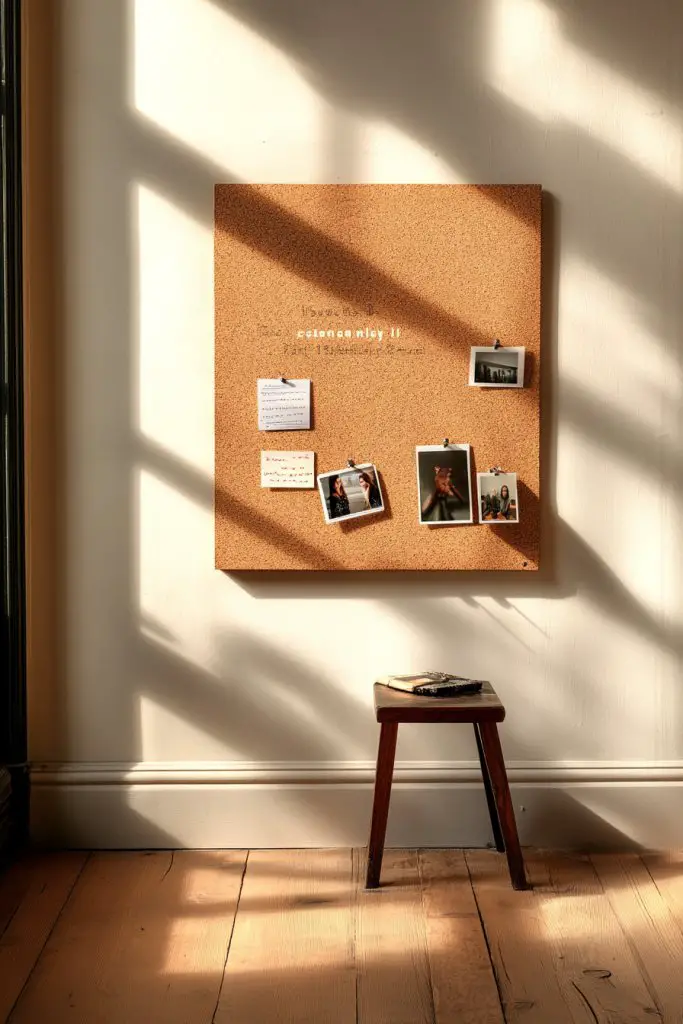
Do you forget important deadlines, class schedules, or motivational quotes because everything’s scattered? A cluttered desk or wall makes organization tough and stress levels rise. A DIY corkboard or bulletin board offers an easy, customizable solution to keep your notes, reminders, and inspiration in one place. It’s a practical way to stay on top of your busy student life.
Imagine a framed corkboard painted in your favorite color or covered with decorative fabric. Pin your class schedule, to-do lists, and motivational quotes with colorful pushpins or clips. The board becomes a focal point in your room, helping you stay organized and inspired. Add photos, stickers, or small decorations to make it uniquely yours. It’s both functional and a fun design element.
Choose from plain cork, fabric-covered boards, or magnetic versions depending on your style. For a sleek look, frame the corkboard with painted or stained wood; for a more eclectic vibe, use washi tape or decorative borders. You can create sections for different categories—study, goals, personal notes—using string or washi tape. Change the layout seasonally or as your needs evolve.
Measure your wall space and cut cork or foam boards to size if DIY. Mount using command strips, nails, or hooks—depending on weight and wall type. Arrange your notes with pushpins or clips, and organize by priority or category. For a clean look, keep your notes color-coded or neatly arranged. Regularly update your board to keep it relevant and motivating. Optional: add small containers or pockets for pens and small supplies.
Decorate the frame with paint, washi tape, or fabric to match your room’s theme. Use themed pushpins or clips for added fun. Incorporate inspirational quotes or artwork around the board edges. You could also add a small calendar or pocket for receipts or small papers. Keep it visually appealing and functional for daily use.
A DIY corkboard keeps your essentials in sight and your mind organized. It’s a simple project that adds a personal touch and boosts productivity. Once in place, you’ll feel more in control of your busy schedule. Ready to create your own organization hub?
12. Clip-On Bedside Reading Light for Flexibility
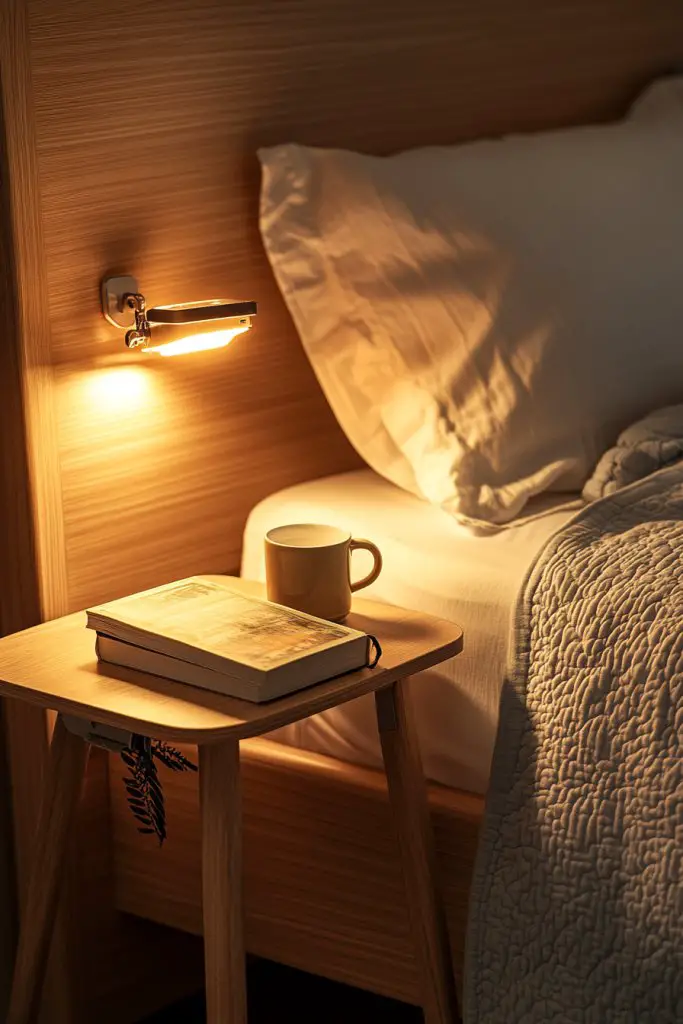
Do you find it annoying to get up and turn off your main light after a late-night read? Cluttering your nightstand with bulky lamps isn’t ideal, especially in small rooms. A clip-on reading light offers a flexible, space-saving solution that you can attach directly to your bed frame or shelves. It’s perfect for reading, studying, or creating a cozy atmosphere.
Recommended Products to replicate this idea
| # | Preview | Product | |
|---|---|---|---|
| 1 |

|
Gritin 19 LED Rechargeable Book Light for Reading in Bed with Memory Function- Eye Caring 3 Color... | Check Latest Price |
| # | Preview | Product | |
|---|---|---|---|
| 1 |

|
Airlonv LED Desk Lamp for Office Home, Eye-Caring Desk Light with Stepless Dimming Adjustable... | Check Latest Price |
Imagine a slim, lightweight clip-on light attached to the headboard or shelf just above your pillow. It emits a focused beam of warm or cool light, adjustable to your needs. The clip is sturdy yet gentle on surfaces, and the design is sleek enough to blend into any decor. It’s like having your own personal spotlight that moves where you need it most.
Choose from different finishes—metal, plastic, or fabric-covered clips—to match your style. For a minimalist look, go for a slim, unobtrusive design; for a fun vibe, select colorful or patterned clips. Some models come with flexible arms or touch controls, adding convenience. Seasonal or mood-based updates can include changing the bulb color or adding a decorative cover.
Attach the clip to your bed frame, headboard, or shelf at a comfortable height. Ensure the surface can handle the weight without slipping. Position the light to shine directly on your reading material, then adjust the angle as needed. Use energy-efficient bulbs or LEDs to minimize heat and power consumption. Keep cords tidy with clips or cable ties, and replace batteries or recharge if wireless. It’s a quick, easy setup with immediate benefits.
Decorate the clip with fun or elegant covers, or customize the color temperature for different moods. Add decorative elements like small charms or fabric wraps for personality. Pair with a matching bedspread or pillows for a cohesive look. Use different light intensities to switch from reading to relaxing ambiance seamlessly.
A clip-on reading light adds practicality and style without taking up space on your nightstand. It’s a simple fix that transforms your late-night routine. Once you try it, you’ll wonder how you ever slept without one. Ready to upgrade your bedtime experience?
13. Compact Laundry Hamper with Style
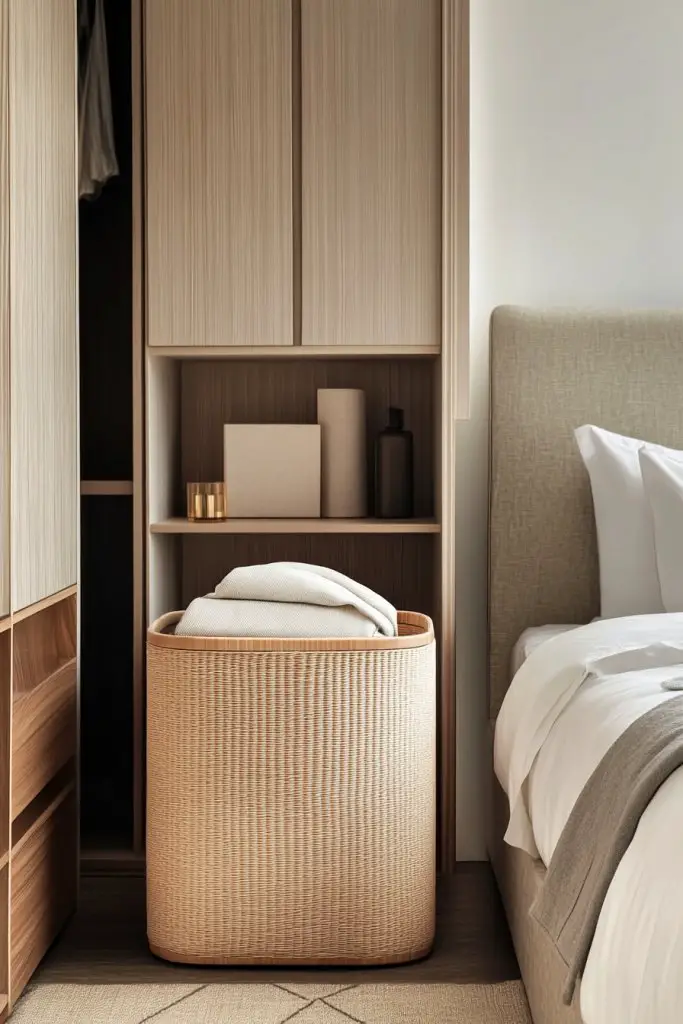
Laundry day can turn into a messy, chaotic chore, especially when your hamper is bulky or ugly. Finding a stylish, space-efficient way to store dirty clothes can make the process less of a hassle. A compact laundry hamper that looks good and fits in tight spaces is exactly what you need to keep your room tidy and elevate your decor.
Picture a sleek, collapsible fabric basket with a modern pattern or solid color that blends seamlessly with your room. It sits discreetly in a corner or under the desk, ready to catch clothes without cluttering your space. When full, it’s easy to carry or fold away, keeping your room looking fresh and organized. Its simple design adds a touch of sophistication to your laundry routine.
Choose from woven, canvas, or collapsible fabric styles in neutral tones or vibrant hues depending on your decor. For small spaces, go for stackable or slim-profile designs; larger rooms can handle wider, decorative baskets. Personalize with labels, fabric paint, or removable decals. Seasonal options include waterproof materials for outdoor use or decorative trims for special occasions.
Select a compact hamper that fits your available space—under the sink, beside your closet, or in a corner. Fold or assemble it if needed, then place it where laundry naturally accumulates. Use a liner or removable bag for easy washing and transport. Keep it accessible but out of the way. Regularly empty and clean the hamper to prevent odors or mold. For added style, coordinate it with your room’s colors or themes.
Decorate with fabric covers, painted patterns, or fabric patches for a personalized look. Add small labels to categorize laundry—whites, colors, or delicates. Use decorative trims or tassels to elevate the design. Keep a small laundry list or reminder nearby to stay on top of chores. It’s about making laundry less of a chore and more of a stylish routine.
A stylish, compact hamper makes laundry day less stressful and more integrated into your decor. It’s an easy upgrade that keeps your space neat and reflects your taste. Once you see how much cleaner your room feels, you’ll wonder why you didn’t do it sooner. Ready to make laundry less of a mess?
14. Tension Rods for Hanging Clothes or Accessories
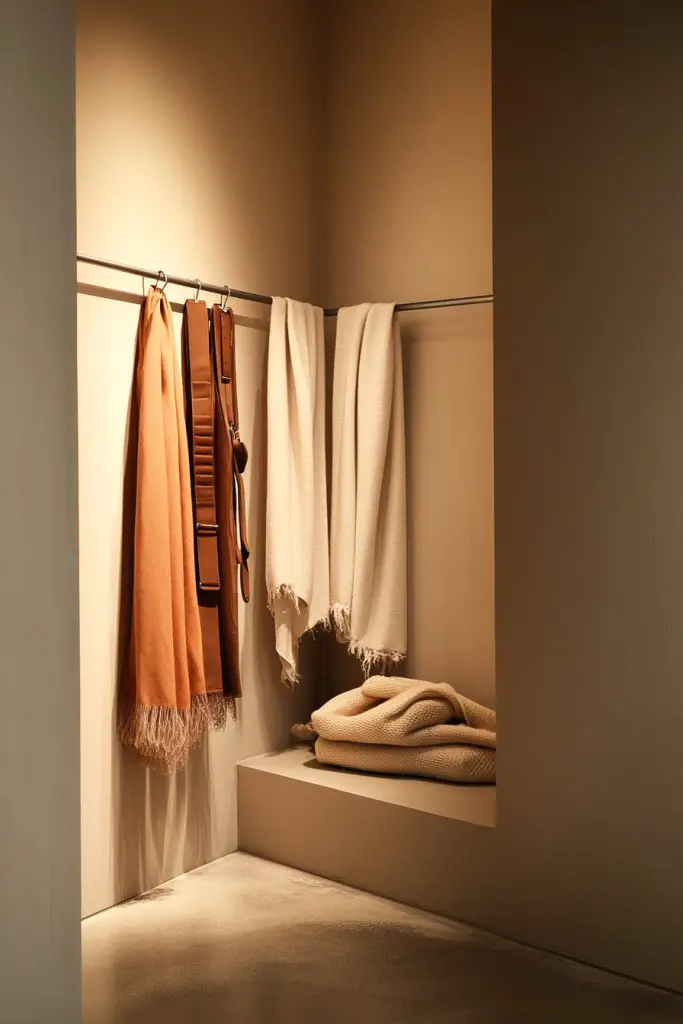
Limited closet space and messy piles of scarves, belts, or clothes can turn your room into a whirlwind. Installing permanent racks or shelves isn’t always feasible, especially in rentals. Tension rods are a quick, inexpensive way to add hanging space anywhere—inside closets, across corners, or in tight spots. They’re perfect for organizing accessories and extra clothes with minimal effort.
Imagine a sleek, silver tension rod stretched across a small corner or inside a closet door. It holds an array of hanging scarves, belts, or lightweight clothing. The rods can be easily adjusted to fit different widths, and their minimal design blends into any decor. It’s an invisible extension of your closet that keeps everything accessible and tidy. Plus, no tools or drilling required, so no damage!
Opt for simple metal rods for a clean look, or colorful plastic ones for a playful touch. Use multiple rods for different categories—one for scarves, one for jewelry, another for lightweight clothing. Place them in unused corners, inside cabinet doors, or across open wall sections. Seasonal updates include swapping out lighter fabrics or adding decorative hooks for extra flair. They are versatile and adaptable to your storage needs.
Measure the space where you want the rod and adjust the tension accordingly. Extend the rod until it fits snugly between surfaces, ensuring it’s secure. Hang your accessories or clothes, making sure the weight doesn’t exceed the tension rod’s capacity. For added stability, consider using two rods in parallel or stacking them vertically. Clean the rod periodically to prevent rust or residue buildup. It’s a simple, damage-free upgrade.
Decorate the rods with colorful tapes or add small decorative hooks for keys or ornaments. Label different rods for easy categorization—like seasonal or daily wear. Use fabric covers or decorative trims to match room themes. Combine with other storage solutions like small baskets or hooks for a custom organization system. Keep accessories visible and accessible, saving time and frustration.
Tension rods are a clever, adaptable way to maximize space and organize effortlessly. They prove that small changes can make a big difference in your room’s functionality. Once you experience how tidy and accessible your accessories become, you’ll love the simplicity. Ready to hang your way to a more organized space?
15. DIY Curtain Rods from Recycled Materials
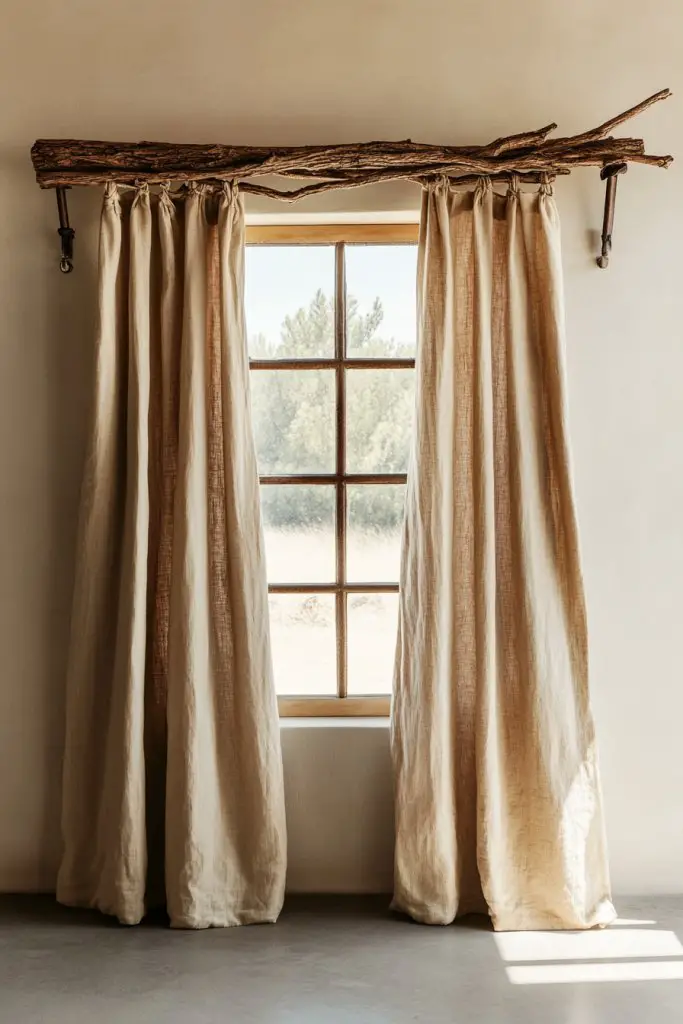
Looking for a unique, eco-friendly way to hang curtains or create visual separation? Store-bought curtain rods can be expensive or lack personality. DIY curtain rods from recycled materials are a fun, sustainable alternative that adds character to your space. Plus, customizing them means they fit your style perfectly.
Recommended Products to replicate this idea
| # | Preview | Product | |
|---|---|---|---|
| 1 |

|
Premium Curtain Rod Brackets - 2 Pack Adjustable Wall Mounts, Curtain Rod Holders for 1 Inch Rod... | Check Latest Price |
| # | Preview | Product | |
|---|---|---|---|
| 1 |

|
Mikikit 10pcs Decorative Wood Finials Craft Spindles: Unfinished Wooden Roman Column Baluster... | Check Latest Price |
Imagine a curtain rod made from reclaimed bamboo, old metal pipes, or sturdy branches, mounted with simple brackets or hooks. The natural textures and imperfections add charm and authenticity. Draped with your favorite fabrics, these rods create a cozy, rustic vibe. They’re not just functional—they’re conversation starters that showcase your creativity.
Use materials like reclaimed wood, vintage pipes, or even thick twine wrapped around metal hooks. Finish with paint, stain, or leave natural for a raw look. Decorate with fabric ties, tassels, or decorative knots for extra flair. Adapt the length by trimming or joining different pieces, and choose brackets that complement your decor style. Seasonal updates include changing fabric or adding decorative end caps.
Source your recycled materials—think thrift stores, scrap yards, or your own garage. Clean and prepare the surfaces, then cut or assemble to your desired length. Attach the rods to walls using brackets, hooks, or mounting clips, ensuring they’re level and secure. Hang your curtains and adjust the fabric for a perfect fall. For extra stability, reinforce joints with glue or brackets. It’s a DIY project that’s environmentally friendly and customizable.
Decorate the rods with paint, metallic finishes, or decorative wraps. Add end caps or finials made from reclaimed wood or metal for a finished look. Personalize with fabric tassels or beads. Coordinate with your room’s theme—rustic, industrial, or boho. Change curtains seasonally or for special occasions to keep your decor fresh and interesting.
DIY recycled material curtain rods show that you can create stylish, eco-conscious decor on a budget. They add warmth and personality, making your space uniquely yours. Once you see how easy and rewarding it is, you’ll be inspired to tackle more creative projects. Ready to craft your own sustainable curtain solution?
16. Floating Shelf for Books and Decor
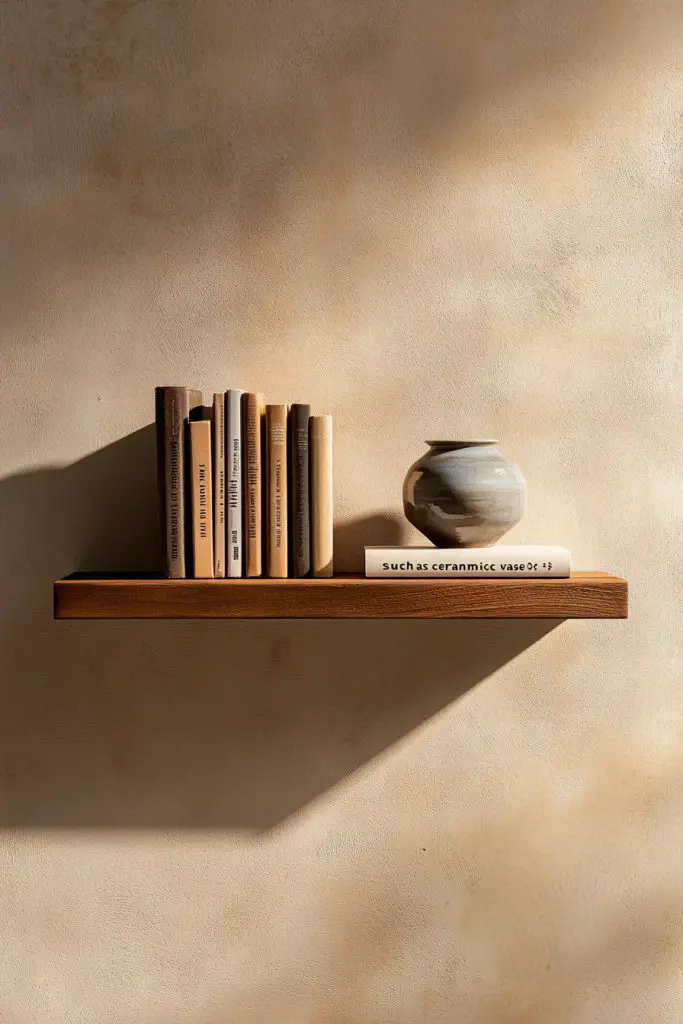
Does your room lack enough space to display your favorite books or decorative items? Cluttering surfaces can make your space look chaotic and small. Floating shelves offer a minimalist, stylish way to organize and showcase your essentials without taking up precious floor or wall space. They’re perfect for adding personality and function to any room.
Recommended Products to replicate this idea
| # | Preview | Product | |
|---|---|---|---|
| 1 |

|
Starunder 6 Pack Floating Shelf Brackets, 6 Inch Heavy Duty Industrial Shelf Bracket, Black Metal L... | Check Latest Price |
| # | Preview | Product | |
|---|---|---|---|
| 1 |

|
QEEIG Bathroom Floating Shelves for Wall - 15.7" Wall Mounted Shelf Over Toilet Farmhouse Home Decor... | Check Latest Price |
Visualize a set of sleek, narrow floating shelves mounted along a blank wall, holding a few colorful books, small vases, or personal mementos. The shelves appear to ‘float’ thanks to hidden brackets, creating a clean, modern look. The space beneath remains open, making the room feel larger. Textured or painted wall backgrounds enhance the display, turning your collection into a curated gallery.
Choose materials like wood, MDF, or metal for a different aesthetic—natural, industrial, or contemporary. For a layered look, install multiple shelves at varying heights. Use decorative objects, small plants (if appropriate), or framed photos to personalize. In small rooms, keep shelves narrow and sparse; larger spaces can handle wider, more elaborate displays. Seasonal decorations or themed setups keep the display fresh.
Start by measuring wall space and selecting suitable shelf lengths and thicknesses. Use a level and wall anchors or find studs for secure mounting. Install the brackets first, then slide the shelves into place, securing with screws if necessary. Arrange your books and decor thoughtfully, balancing colors and sizes for visual appeal. Regularly dust and rotate items for a fresh display. Keep tools simple—drill, level, and screwdriver.
Paint or stain the shelves to match your decor, or add decorative edge trims. Incorporate small LED strip lights underneath for subtle illumination. Mix decorative objects with books—stack some horizontally or add small sculptures or candles. Use themed or seasonal objects to keep the display dynamic. Personal touches turn a simple shelf into a statement piece.
Floating shelves are a versatile, stylish solution that adds personality without cluttering your space. They show that simple design choices can have a big visual impact. Once installed, you’ll love how your room feels more curated and open. Ready to float your way to a more organized, stylish room?
17. Clear Acrylic Storage Bins for Visibility
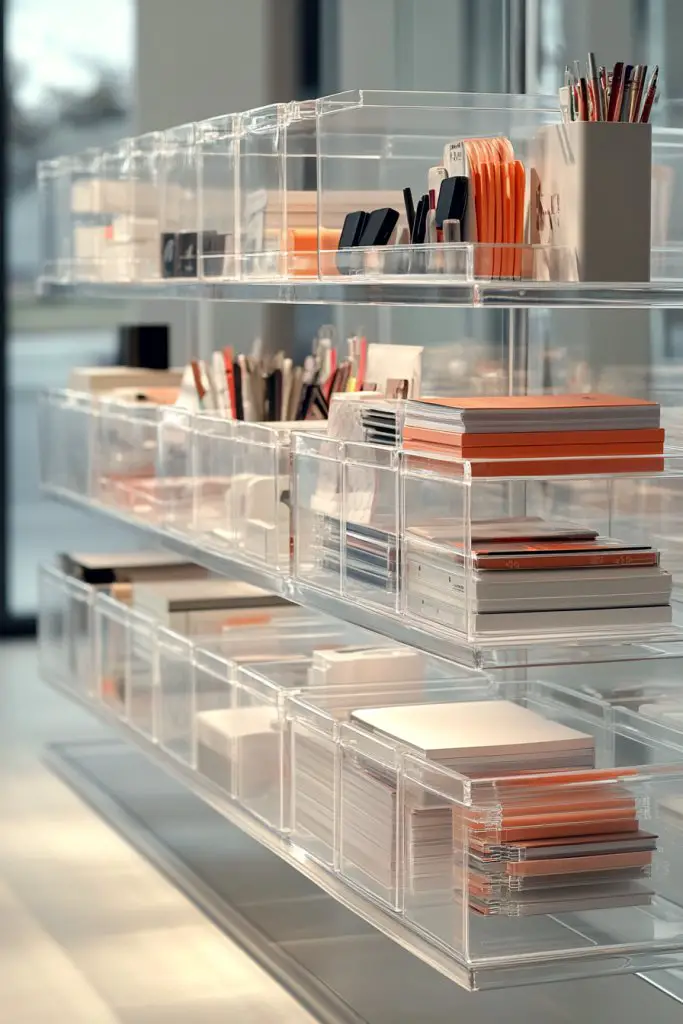
Cluttered drawers and messy shelves make it hard to find what you need and can be a visual headache. When everything is hidden, you lose track of supplies, increasing frustration. Clear acrylic storage bins solve this by providing visible organization, so you can see exactly what’s inside without digging around. They’re a simple upgrade for a more functional and tidy space.
Recommended Products to replicate this idea
| # | Preview | Product | |
|---|---|---|---|
| 1 |

|
BINO | Plastic Storage Bins, Large - 2 Pack, Clear | THE SOHO COLLECTION | Pantry Organizers and... | Check Latest Price |
| # | Preview | Product | |
|---|---|---|---|
| 1 |
|
QYH Premium Printable Vinyl Sticker Paper - 50 Matte White Waterproof Decal Paper Sheets for Inkjet... | Check Latest Price |
Imagine a set of transparent bins stacked neatly on a shelf or inside a closet, each holding pens, chargers, snacks, or small accessories. The see-through design allows instant identification of contents, reducing clutter and saving time. You might label some bins with small stickers, but the transparency keeps the overall look clean. The sleek acrylic finish adds a modern, minimalist vibe to your room.
Choose different sizes—small for tiny items, larger for bulkier supplies—and stack or organize them horizontally or vertically. Use them in drawers, closets, or on open shelves for versatile storage. For added style, coordinate the color of labels or add decorative tape or stickers to personalize each bin. Seasonal or thematic organization can be achieved by switching out contents or colors.
Select sturdy, high-quality acrylic bins with reinforced edges for durability. Arrange your items logically—group similar items together, and stack or line up the bins for maximum efficiency. Label the bins with clear, waterproof labels or write directly on the surface with a permanent marker. Clean regularly with a damp cloth to keep the transparency crystal-clear. These bins are lightweight, easy to rearrange, and perfect for those who value visibility.
Decorate the edges with washi tape, paint, or stickers to add a personal touch. Use color-coding for different categories—like blue for tech, pink for accessories, etc. Incorporate decorative tags or small charms for a fun, personalized look. These bins make organization feel more intentional and stylish, encouraging regular tidying.
Clear acrylic storage bins turn chaos into clarity, making your space more functional and visually appealing. They demonstrate that organization can be simple, stylish, and easily adjustable. Once you see how much easier it is to find and access your items, you’ll be hooked. Ready to see your space in a whole new light?
18. Removable Wall Stickers or Decals for Personal Touches
Looking to add personality to your room without damaging walls? Permanent paint or wallpaper can be intimidating or costly to change. Removable wall stickers and decals offer an easy, mess-free way to customize your space instantly. They’re perfect for students who want to express their style without the commitment.
Recommended Products to replicate this idea
| # | Preview | Product | |
|---|---|---|---|
| 1 |

|
RoomMates Bluey Family and Friends Peel and Stick Wall Decals, RMK5457SCS | Check Latest Price |
| # | Preview | Product | |
|---|---|---|---|
| 1 |

|
HAMIGAR Whiteboard Sticker for Wall 18" x 79" Dry Erase Board Wallpaper Peel and Stick, White Board... | Check Latest Price |
Picture a wall decorated with colorful motivational quotes, geometric shapes, or playful patterns that can be peeled off and repositioned at will. They add visual interest and a layer of personality without the permanence of paint. The stickers are available in various designs, sizes, and textures—some matte, some glossy—allowing you to create a dynamic, personalized backdrop. It’s like decorating with giant, stylish decals tailored to your taste.
Choose themes that match your personality—minimalist, boho, playful, or artistic. Use a combination of large decals and smaller stickers for a balanced look. Seasonal or mood-based updates are simple: just peel off old stickers and replace with new designs. Incorporate patterns like stripes, stars, or floral motifs for added visual appeal. You can also layer decals over painted walls or existing wallpaper for a unique effect.
Clean your wall thoroughly before applying stickers to ensure good adhesion. Plan your design layout by positioning the decals on the floor or a table first. Peel and stick carefully, smoothing out air bubbles with a credit card or squeegee. Reposition if needed—most decals are forgiving until pressed down firmly. For removal, gently peel from one corner, and clean any residue with mild soap. Keep your wall damage-free and versatile.
Customize decals with your own artwork or quotes printed on special sticker paper. Mix different designs and sizes for a layered, gallery-like effect. Use stickers to mark special dates, goals, or favorite sayings. Change your decor theme seasonally or as your style evolves without repainting or damaging walls. It’s a fun, flexible way to keep your space fresh.
Removable wall stickers empower you to personalize your space effortlessly and affordably. They turn plain walls into a reflection of your personality and mood. Once you see how easy and impactful decorating can be, you’ll want to experiment more. Ready to stick your way to a more vibrant, expressive room?
Conclusion
With a diverse array of college apartment bedroom ideas, you’ll find countless ways to elevate your space—whether through clever organization, eye-catching decor, or cozy comfort. These ideas are designed to suit every style and budget, inspiring you to personalize your room and make it truly your own. Don’t be afraid to experiment and put your unique touch on each concept; your perfect bedroom awaits. Take action today and create a space that energizes, relaxes, and reflects your vibrant college life!