
17 Cool Garden Ideas for Creative Landscaping
Imagine stepping into a garden that sparks your creativity and makes you smile every time you visit—that’s the magic of cool garden ideas! These innovative concepts are gaining popularity because they transform ordinary outdoor spaces into personalized retreats filled with charm and character.
In this article, you’ll uncover a variety of inspiring ideas that range from quirky DIY projects to elegant landscaping tricks. Whether you love vibrant colors, unique plant arrangements, or clever space utilization, there’s something here to ignite your gardening passion and help you craft a truly one-of-a-kind outdoor oasis.
1. Vertical Garden Walls with Reclaimed Wooden Pallets
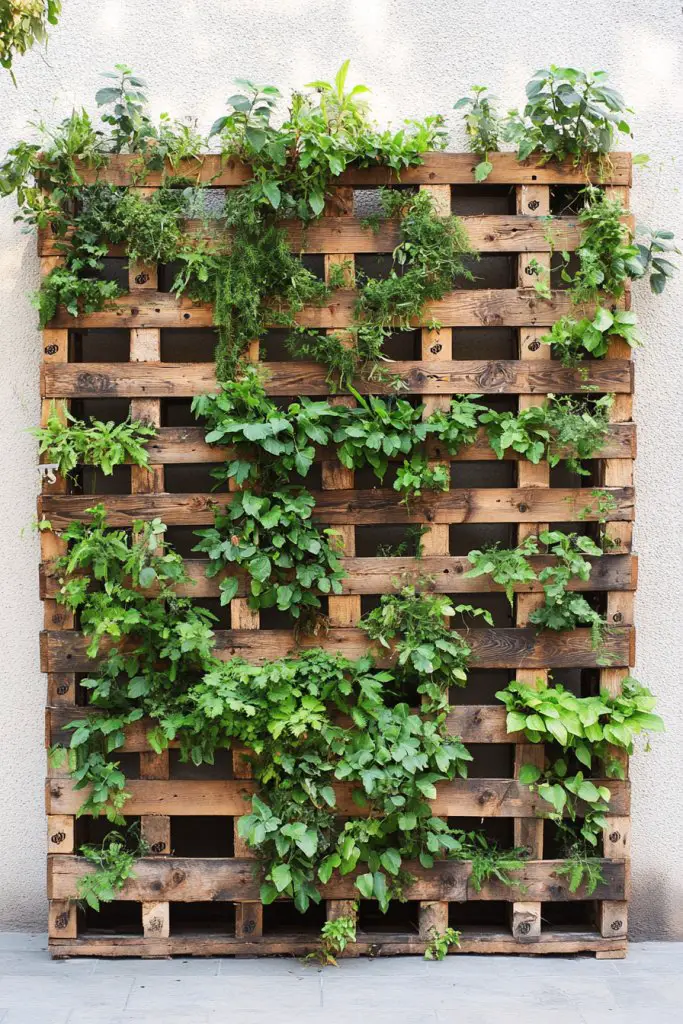
Ever wish your plain exterior or dull wall could burst into life? Maybe you dream of transforming stark surfaces into lush green tapestries, but think it’s too complicated or expensive. Well, vertical gardens are the perfect fix—creating a vibrant focal point without taking up precious ground space. They let you enjoy nature’s beauty right at eye level, adding freshness and personality.
Recommended Products to replicate this idea
| # | Preview | Product | |
|---|---|---|---|
| 1 |

|
Make Good PlantPod Luxe - Self-Watering Wall Planters (Set of 6) - Easy to Water and Install -... | Check Latest Price |
| # | Preview | Product | |
|---|---|---|---|
| 1 |

|
Wood Pallet DIY Garden: 30 Unique Projects to Transform Your Outdoor Space | Check Latest Price |
Imagine a weathered wooden pallet turned vertical masterpiece, filled with cascading greenery and colorful blooms. The texture of reclaimed wood contrasts beautifully with the lushness of plants, giving a rustic yet modern vibe. Picture small hanging planters dangling from the pallet, swaying gently in the breeze. The mix of textures and shades creates a lively mosaic that turns a plain wall into a living artwork.
You can choose to go full-on veggie garden, or keep it purely ornamental with succulents and trailing vines. For small balconies, vertical gardens can be narrow and compact, while larger walls can accommodate elaborate setups with multiple pallets. Seasonal changes let you swap out flowers or foliage, keeping the display fresh year-round. Even in shaded spots, you can select shade-loving plants for a lush look.
Start by sourcing sturdy reclaimed pallets, making sure they’re treated and safe for planting. Attach vertical planters or pockets made of fabric or plastic to the pallet, ensuring they’re secure. Use waterproofing paint or sealant to protect the wood from weather. Fill the pockets or containers with soil suited for your chosen plants, then carefully plant your selections. Mount the pallet securely against a wall using heavy-duty brackets or hooks, and water regularly to keep everything thriving.
Add personal touches by incorporating decorative elements like painted accents or themed planters. Use different plant heights and textures to create depth, or embed small decorative stones for visual interest. Consider incorporating lighting—solar-powered spotlights or fairy lights—to highlight your green wall at night. You could also add small signs or labels for a whimsical or organized look.
Vertical gardens prove that you don’t need a huge yard to enjoy lush greenery. They boost your mood, improve air quality, and turn dull walls into conversation starters. With a bit of effort, you can craft a stunning green sanctuary that reflects your style. Ready to turn an empty wall into your own botanical masterpiece?
2. Fairy Tale Pathways with Stepping Stones and Solar Lanterns
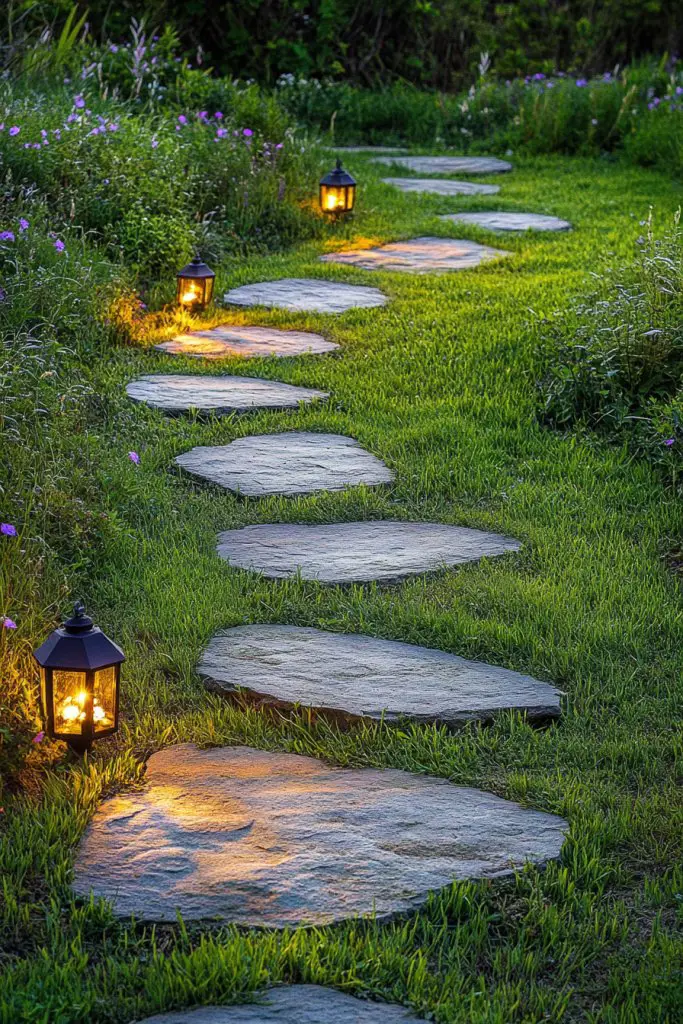
Ever dreamed of wandering through a magical garden where every step feels like stepping into a fairy tale? Maybe your current paths are dull and uninspiring, lacking that whimsical charm. Creating an enchanting walkway transforms your outdoor space into a storybook setting that invites exploration and wonder. Who says fairy tales are just for kids?
Recommended Products to replicate this idea
| # | Preview | Product | |
|---|---|---|---|
| 1 |

|
Midwest Products StoneCraft (90111232) 8 Inch Mosaic Stepping Stone Kit | Check Latest Price |
| # | Preview | Product | |
|---|---|---|---|
| 1 |

|
JOIEDOMI 2 Pack Outdoor Solar Hanging Lantern Lights, Waterproof Tabletop with Handle, LED Moroccan... | Check Latest Price |
Picture a winding stone path made of irregular, natural-looking stepping stones, each one uniquely textured. Alongside, small solar lanterns cast a soft, golden glow, flickering gently as evening falls. The path meanders through lush greenery, flower beds, or even decorative mulch, leading you to a cozy sitting nook or secret garden corner. It’s like living in your own fantasy world.
You can choose smooth, flat stones for modern looks or rougher, organic shapes for rustic charm. Incorporate colorful mosaic tiles for a more artistic vibe. Seasonal adjustments include adding autumn leaves or snow accents, or replacing lantern styles to match holiday themes. Small stepping stones can be grouped to create playful patterns, while larger ones provide a more formal look. The lighting options vary from string lights to lantern-style solar lamps for a vintage feel.
Lay out your pathway design on paper first, then select stones that fit your style and yard size. Excavate the path area to a consistent depth, about 4-6 inches, and add a layer of compacted gravel or sand as a base. Place the stones carefully, ensuring stability and a natural flow. Install solar lanterns along the route, positioning them to illuminate the path evenly. Test the lighting at dusk and adjust placement as needed. Regularly clean the stones and check solar batteries for optimal performance.
Personalize your fairy tale pathway with decorative elements like tiny figurines, whimsical garden signs, or themed lantern covers. Use different textures—smooth pebbles, textured tiles, or moss-covered stones—to add visual interest. Incorporate aromatic plants or herbs nearby for sensory delights. For special occasions, add lanterns with color filters or string fairy lights overhead to enhance the magic.
Transforming your garden with a fairy tale pathway creates a space that sparks imagination and joy. It’s a simple project that yields big enchantment, making your outdoor area a favorite retreat. Who wouldn’t want to stroll through their own storybook? Time to bring some magic into your landscape.
3. String Light Canopy Over Patio Seating Areas

Ever find your outdoor gatherings lacking that cozy, inviting vibe? Maybe the harsh glare of overhead lights or complete darkness makes your patio less appealing after sunset. Creating a string light canopy instantly transforms any outdoor space into a warm, enchanting sanctuary. Who doesn’t love a little fairy-tale glow?
Recommended Products to replicate this idea
| # | Preview | Product | |
|---|---|---|---|
| 1 |

|
Outdoor String LED Patio Lights - 100Ft 30M Outside Waterproof Light with Remote Dimmable ST38... | Check Latest Price |
| # | Preview | Product | |
|---|---|---|---|
| 1 |

|
Summsun Outdoor Chair Cushions Set of 4, Waterproof Backrest and Deep Seat Cushion Set for Patio... | Check Latest Price |
Imagine a network of delicate string lights draped overhead, crisscrossing to form a soft, starry sky effect. The warm bulbs cast a gentle glow, illuminating your seating area with a romantic, ambient light. The glow reflects off textured cushions, rustic furniture, or decorative rugs, enhancing the cozy atmosphere. It’s like dining under a constellation, right in your backyard.
Choose between clear, warm-toned bulbs for a classic look or colored bulbs for festive occasions. Create a more structured canopy using tension cables or rustic wooden beams, or keep it relaxed with loose, flowing strings. Seasonal adjustments include swapping out bulbs for festive colors or adding lanterns and candles for extra charm. For small patios, cluster strings in a tight grid, while larger spaces benefit from expansive, crisscrossing arrangements. The style can be modern, boho, or vintage—tailor it to your taste.
Start by selecting suitable hardware—hooks, clips, or tension cables—to secure the strings safely. Measure your space and plan the layout to maximize coverage and even light distribution. Hang the lights at a height that ensures safety and visual appeal, avoiding sagging or sagging wires. Connect to outdoor-rated power sources, using weatherproof cords. Test the setup at night to confirm the perfect glow and make adjustments. Regularly check for loose fixtures or damaged bulbs to keep the magic alive.
Add decorative elements like fabric drapes, hanging lanterns, or even paper lanterns for added texture. Incorporate outdoor cushions, poufs, or a cozy rug underneath to enhance comfort. Seasonal decor such as faux snow, colorful ribbons, or floral accents can refresh the look year-round. Stringing fairy lights in different patterns or layering with additional light sources creates a layered, magical effect.
A string light canopy turns any outdoor space into an inviting retreat that’s perfect for entertaining or relaxing solo. It’s a simple upgrade that instantly boosts ambiance and mood. Light up your nights and make every outdoor moment memorable. Ready to bathe your patio in warm, fairy-tale glow?
4. Elevated Plant Stands with Mixed Container Gardens
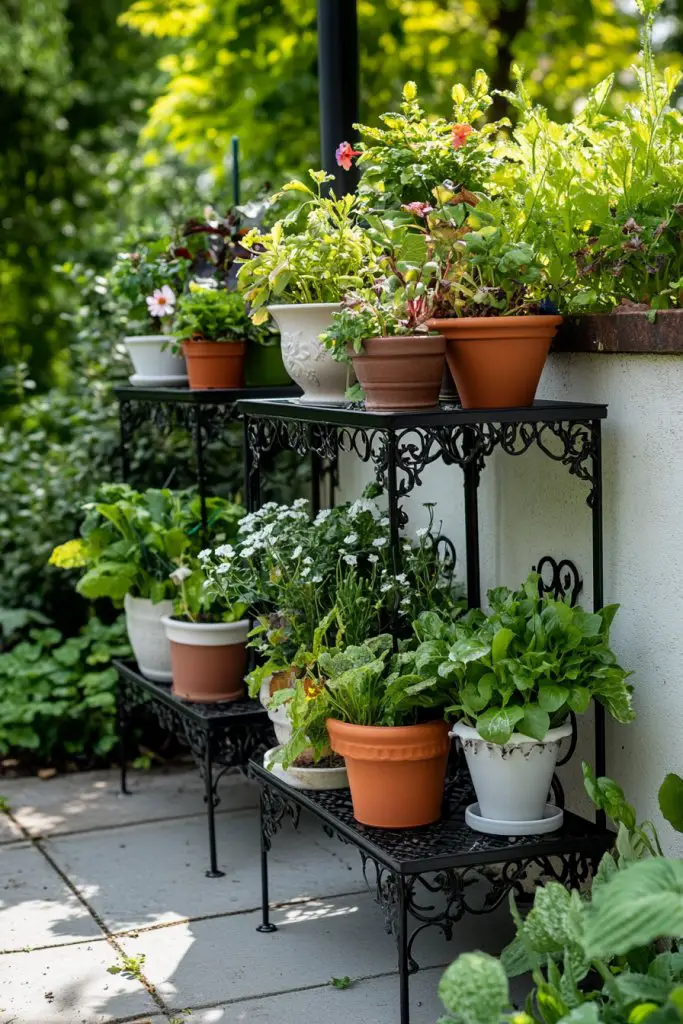
Feeling like your garden looks flat or boring? Want to create visual interest without expanding your yard or patio? Using elevated plant stands and mixed containers lifts your greenery to new heights—literally—and adds layers of depth to your landscape. It’s a simple trick to make your garden look more curated and vibrant.
Recommended Products to replicate this idea
| # | Preview | Product | |
|---|---|---|---|
| 1 |
|
Gepege 6 Inch Beaded Ceramic Planter Set of 2 with Drainage Hole and Saucer for Plants,... | Check Latest Price |
| # | Preview | Product | |
|---|---|---|---|
| 1 |

|
Linpla 5-Pack Decent Metal Plant Stands, Heavy Duty Flower Pot Stands for Multiple Plant, Anti-Rust... | Check Latest Price |
Imagine a series of colorful ceramic pots, vintage metal stands, and sleek modern planters arranged at varying heights. The plants spill over the edges, with trailing vines cascading down, while upright containers showcase bold foliage or blooms. The varied heights draw your eye around the space, creating a dynamic, multi-dimensional scene. This layered effect makes even a small garden feel larger and more sophisticated.
Mix different styles—rustic wooden stands, minimalist metal racks, or ornate ceramic pedestals—to match your aesthetic. Use seasonally appropriate plants—spring bulbs, summer annuals, or fall foliage—to keep things fresh. For small spaces, stack containers vertically or place stands against walls. In larger gardens, create focal points with tall stands and grouping containers for a more dramatic look. Swap out plants as seasons change or to reflect your mood.
Select sturdy, weather-resistant stands and containers appropriate for your plant choices. Position taller stands at entry points or focal areas, and cluster smaller containers together for visual balance. Use lightweight, breathable soil mixes to ensure healthy roots. Water consistently and ensure proper drainage to avoid root rot. Play with heights and arrangements until your eye feels satisfied, then add decorative stones or mulch for polish.
Incorporate decorative stones, sculptures, or lanterns between your stands to add personality. Use containers in different colors, textures, and shapes to create contrast. You can also add functional elements like small shelves or hooks for tools or accessories. Personal touches make the display uniquely yours and keep it engaging over time.
Elevated stands turn a flat garden into a lively, textured landscape that’s inviting and easy to admire. They’re perfect for showcasing your favorite plants and adding a layer of professionalism to your garden design. With a little creativity, your outdoor space will look like it belongs in a magazine. Ready to elevate your garden game?
5. Miniature Garden with Fairy Houses and Pebble Trails
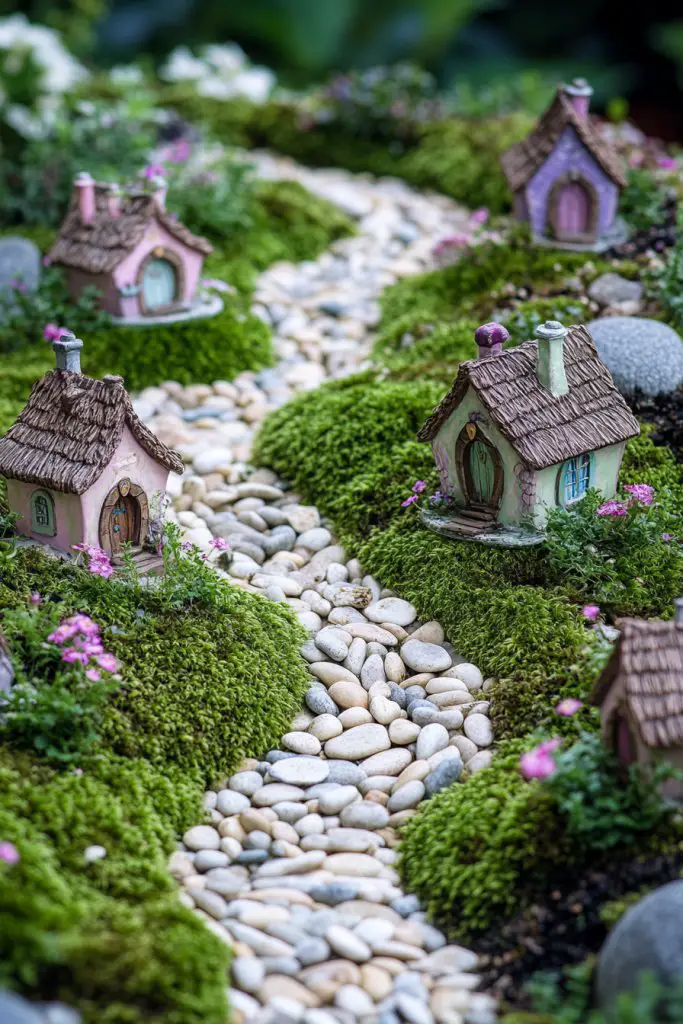
Ever wanted to create a tiny world that sparks imagination and wonder? Miniature gardens are perfect for adding a whimsical touch to your yard or balcony. They’re charming, easy to customize, and turn any corner into a storybook setting. Plus, they make great conversation starters for guests.
Picture a tiny moss lawn dotted with miniature fairy houses, each with tiny doors and windows. Winding pebble trails meander through the scene, inviting you to imagine tiny inhabitants going about their day. Tiny benches, decorative mushrooms, and miniature trees complete the scene, making it feel like a living fairy land. The lush moss adds softness, contrasting with the textured pebbles.
Use different-sized pebbles or gravel for the paths; colored stones can add a magical touch. Incorporate small plantings like succulents or tiny flowers to mimic real gardens scaled down. For seasons, add miniature pumpkins or holiday-themed decorations. This garden can sit on a tabletop, windowsill, or in a dedicated corner of your yard, adapting easily to available space. Play with themes—enchanted forest, seaside village, or fairy tale castle—to match your style.
Start by preparing a shallow container or bed, layering with soil, moss, and gravel. Place tiny fairy houses and decorate with small natural elements like twigs or shells. Create the pebble trails by laying out small stones or gravel in winding patterns. Secure your decorations with small amounts of adhesive if needed, especially for outdoor durability. Regularly water the plants and refresh decorations to keep the scene lively.
Add miniature figurines, tiny lanterns, or personalized signs for extra charm. Use different moss or miniature plants for variety and texture. Incorporate small fairy lights or glow-in-the-dark stones for nighttime magic. Personal touches like tiny furniture or themed accessories help make your miniature garden truly unique.
Miniature gardens offer a delightful escape and a chance to express your creativity. They’re low-maintenance, highly customizable, and bring a sense of enchantment to any space. Perfect for kids and adults alike, they remind us that magic can be found in the smallest details. Ready to build your own tiny fairy world?
6. Rustic Tree Bench with Built-in Flower Beds
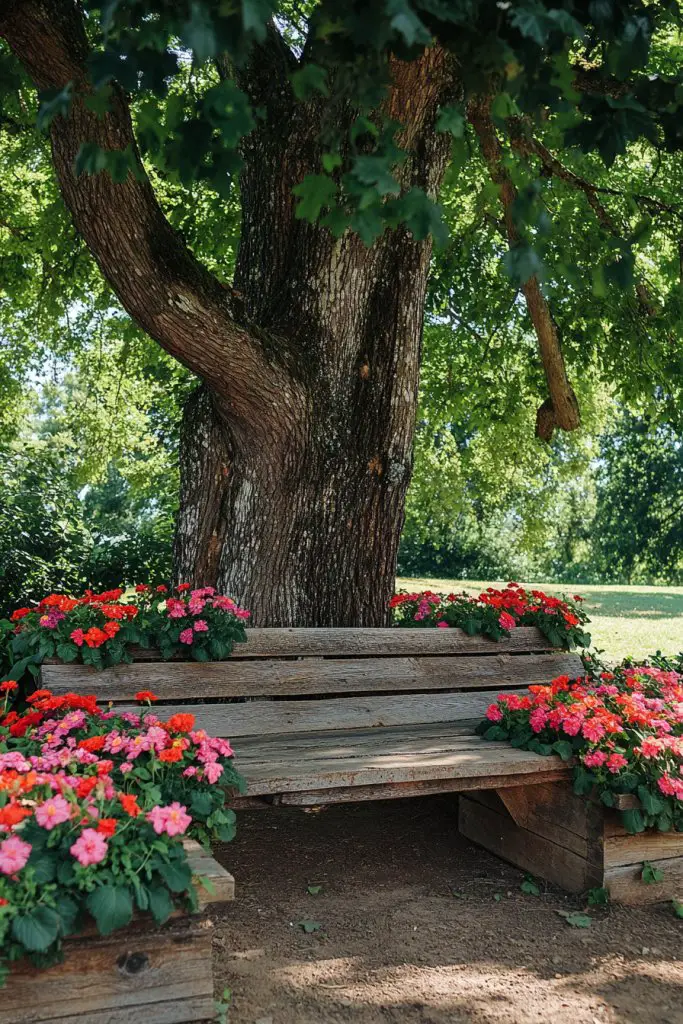
Looking for a natural centerpiece that combines function and charm? A rustic tree bench with integrated flower beds offers a cozy spot to relax while adding vibrant color directly into your landscape. It turns a simple tree into a focal point, blending seamlessly with nature. Who knew you could have seating and blooms in one elegant package?
Recommended Products to replicate this idea
| # | Preview | Product | |
|---|---|---|---|
| 1 |

|
Giantex Outdoor Wooden Garden Bench - 2-Person Acacia Wood Loveseat with Armrests, Backrest, 800lbs... | Check Latest Price |
| # | Preview | Product | |
|---|---|---|---|
| 1 |

|
Meberam 2 Pack 6x3x1FT Galvanized Raised Garden Beds Kit Outdoor Metal Gardening Planter Box for... | Check Latest Price |
Envision a sturdy wooden bench wrapping around a mature tree trunk, with a built-in flower bed filled with cheerful blooms and lush foliage. The rough-hewn wood, weathered by time, adds rustic appeal, while the flowers burst with color—reds, yellows, purples—drawing your eye. The natural setting invites you to sit and soak in the surroundings, feeling connected to the outdoors. This setup creates a harmonious blend of seating and garden.
Use reclaimed or salvaged wood for an authentic rustic look, or opt for painted or stained finishes for a more polished appearance. The flower beds can be filled with annuals, perennials, or a mix, depending on your climate and maintenance preferences. For smaller spaces, opt for a simple bench with a narrow flower bed, while larger yards can accommodate elaborate designs. Seasonal planting allows for color changes and ongoing interest.
Start by selecting a healthy, mature tree with a sturdy trunk. Build a circular or semi-circular bench frame using weather-resistant wood, ensuring it’s high enough for comfortable seating. Incorporate a raised flower bed by framing it with wood or stone, and fill with quality soil suitable for your chosen plants. Secure the bench with anchors or support posts, and fill the flower beds with your preferred seasonal flowers. Water regularly and prune as needed.
Decorate with carved or painted details on the wood for a personal touch. Use decorative stones or mulch in the flower beds to define space and retain moisture. Add small sculptures or garden ornaments within the beds for extra personality. Incorporate a small footrest or side table for convenience, making the space even more inviting.
A rustic tree bench with built-in flower beds transforms an ordinary tree into a stunning outdoor feature. It encourages outdoor lounging and garden enjoyment, making your space feel cozy and complete. With some craftsmanship and love, you can craft a natural retreat that’s both functional and beautiful. Ready to give your garden a rustic upgrade?
7. Recycled Tire Planters for Vibrant, Budget-Friendly Blooms

Want to add color and life to your yard without breaking the bank? Using recycled tires as planters is a fun, eco-friendly way to create vibrant displays while giving old tires a second life. It’s a budget-friendly solution that’s surprisingly versatile and customizable. Plus, it’s a small act that helps the environment.
Recommended Products to replicate this idea
| # | Preview | Product | |
|---|---|---|---|
| 1 |
|
Veradek Demi Series Round Planter w/Stand for Porch/Patio | Durable Plastic-Stone Composite & Wooden... | Check Latest Price |
| # | Preview | Product | |
|---|---|---|---|
| 1 |

|
HOME GROWN 𝗨𝗦𝗔 𝗣𝗥𝗘𝗠𝗜𝗨𝗠 Zinnia Dahlia Seeds Pack for 2026 – 524... | Check Latest Price |
Picture stacks of painted tires arranged in clusters, bursting with a variety of seasonal flowers—bright petunias, cheerful marigolds, or lush impatiens. The colors pop against the black rubber, making your garden lively and inviting. Some tires are stacked vertically, creating tiered planters, while others are laid flat, serving as wide flower beds. The whole setup looks playful, quirky, and full of character.
Paint tires in bold colors or patterns to match your decor or theme. You can cut the sidewalls to create unique shapes or add handles for easy movement. Use them to border pathways or create focal points in your yard. Seasonal planting allows you to swap out flowers and keep the display fresh. For a more natural look, leave some tires unpainted and let the weather add character.
Start by collecting old tires, cleaning and drying them thoroughly. Paint or decorate to your liking, then fill with high-quality soil suited for your chosen plants. Drill drainage holes if necessary, especially for taller stacks. Arrange the tires in your preferred layout, securing them with stakes or support structures if stacking. Plant your flowers, water well, and watch the magic unfold. Regular watering and fertilizing keep everything thriving.
Add decorative stones, small sculptures, or themed paint designs for extra flair. Use contrasting colors in the tires to create eye-catching patterns. Incorporate herbs or edible plants for a functional twist. You can also attach small watering cans or sprinklers to make maintenance easier. Personal touches like name tags or painted designs turn this simple idea into a statement.
Recycled tire planters prove that creativity and sustainability can go hand in hand. They offer a lively, colorful way to brighten up any yard or patio while helping reduce waste. With minimal investment and effort, you can craft a playful garden scene that’s full of personality. Ready to give your old tires a new purpose?
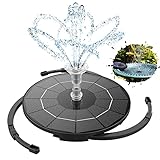
8. Water Feature with Recirculating Bird Bath and Stones
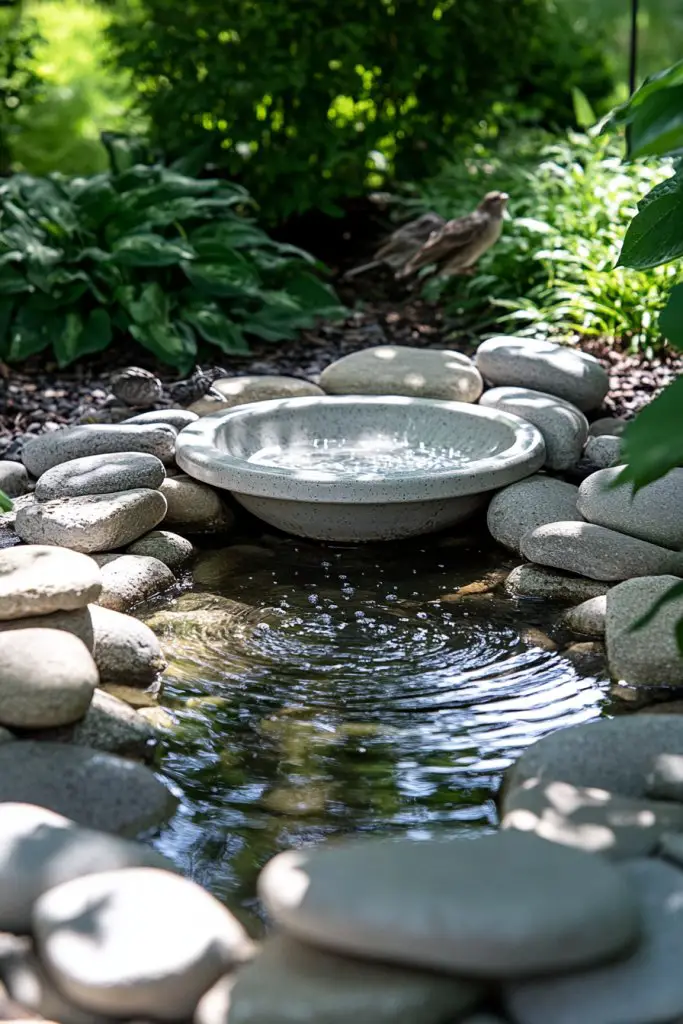
Looking to add a calming focal point to your garden? A water feature brings tranquility, attracts wildlife, and creates a soothing ambiance. But big, fancy fountains can be costly and complicated to install. A recirculating bird bath with natural stones is an easy, budget-friendly way to get that peaceful, aquatic vibe.
Recommended Products to replicate this idea
| # | Preview | Product | |
|---|---|---|---|
| 1 |
|
AISITIN 3.5W Solar Fountain Pump for Water Feature Outdoor DIY Solar Bird Bath Fountain with... | Check Latest Price |
| # | Preview | Product | |
|---|---|---|---|
| 1 |

|
Virekm River Rocks, Decorative Ornamental Pebbles,Garden Landscaping Stones,Gravel Filler for Home... | Check Latest Price |
Imagine a shallow stone basin filled with clear water, gently swirling with a small pump that recirculates the flow. Surrounding the bath are smooth river stones and pebbles, creating a natural, organic look. Water gently ripples as birds splash and perch nearby, while your garden’s foliage provides a lush backdrop. The sound of cascading water adds serenity, making your outdoor space feel like a retreat.
Choose from various basin shapes—round, square, or irregular—to match your style. Incorporate different size stones or add aquatic plants for visual interest. For a more rustic look, use natural stone or reclaimed materials. Seasonal changes include adding floating candles or small ornaments for special occasions. Small fountain kits are widely available for DIY setups, allowing customization and easy maintenance.
Select a waterproof basin or shallow bowl that fits your space. Position it on a stable, level surface, and connect a small recirculating pump designed for ponds or fountains. Surround the basin with rocks for stability and aesthetics, ensuring the pump’s outlet is submerged. Fill with water, plug in the pump, and adjust the flow rate. Regularly clean the stones and refill water to prevent algae buildup. Cover or shield the pump to protect it from dirt and debris.
Add decorative stones or sculptures for a personalized touch. Incorporate floating candles or LED lights for evening ambiance. You might also include a small, hidden fountain feature or install a bird-friendly overhang. Using different colored stones or layered textures enhances visual appeal. Keep maintenance simple with regular cleaning and water top-ups.
A small, recirculating water feature is a peaceful addition that invites birds and soothes your mind. It’s an achievable project that offers big benefits—serenity, wildlife, and beauty—without a hefty price tag. Your garden will become a tranquil oasis everyone will admire. Ready to turn your yard into a calming retreat?
9. Herb Spiral for Compact, Multi-Temperature Growing Space
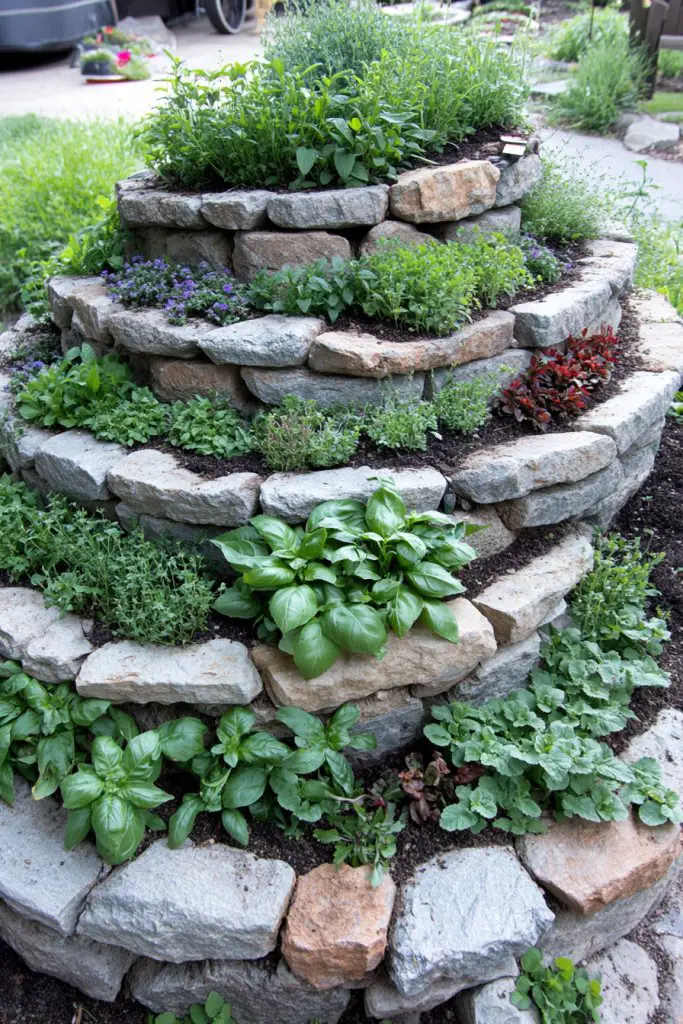
Ever wish you could grow a variety of herbs in a tiny space? A herb spiral is a clever, space-saving solution that offers microclimates for different herbs. It’s perfect for small gardens, balconies, or even urban patios where space is limited. Plus, it looks pretty cool—like a mini architectural feature.
Recommended Products to replicate this idea
| # | Preview | Product | |
|---|---|---|---|
| 1 |

|
Indoor Herb Garden Kit – 10 Non-GMO Herb Seeds with Soil, Pots & Moisture Meter – Easy... | Check Latest Price |
| # | Preview | Product | |
|---|---|---|---|
| 1 |

|
Land Guard Galvanized Raised Garden Bed Kit, Galvanized Planter Garden Boxes Outdoor, Oval Large... | Check Latest Price |
Visualize a spiraled mound of soil built in a tight spiral, with herbs planted along its curves. The top of the spiral enjoys full sun, perfect for heat-loving herbs like basil and thyme, while the shaded side supports more delicate plants like cilantro or mint. The spiral’s layers create a visually interesting, tiered effect, making the garden appear lush and multi-dimensional. The textured soil, combined with aromatic herbs, makes the space fragrant and inviting.
Use different materials—stone, brick, or reclaimed wood—to construct your spiral. The size can be customized to fit your available space, from small tabletop versions to larger ground setups. Incorporate decorative stones or tiles to add flair. Seasonal planting allows you to rotate herbs, and you can even add small stepping stones for access. This design suits a variety of garden styles, from modern to rustic.
Build your spiral by creating a sturdy base with stones or bricks in a circular shape. Fill with a mix of compost, soil, and organic matter. Plant herbs at different levels according to their sun and water needs. Ensure good drainage and water regularly, especially during dry spells. Mulching helps retain moisture and suppress weeds. Adjust watering based on the microclimate of each section.
Personalize your spiral by adding decorative stones, small sculptures, or engraved tiles. Use colorful pots or labels for easy identification. Incorporate a rainwater collection system or drip irrigation for ease. Add aromatic plants or edible flowers to increase utility and beauty. The spiral is both functional and a lovely focal point.
A herb spiral maximizes your planting area while creating a visually appealing feature. It’s a practical, space-efficient way to enjoy fresh herbs year-round. With a bit of DIY effort, you’ll have a lush, fragrant corner that boosts your cooking and garden pride. Ready to grow smarter, not bigger?
10. Artistic Garden Edging Using Reclaimed Materials
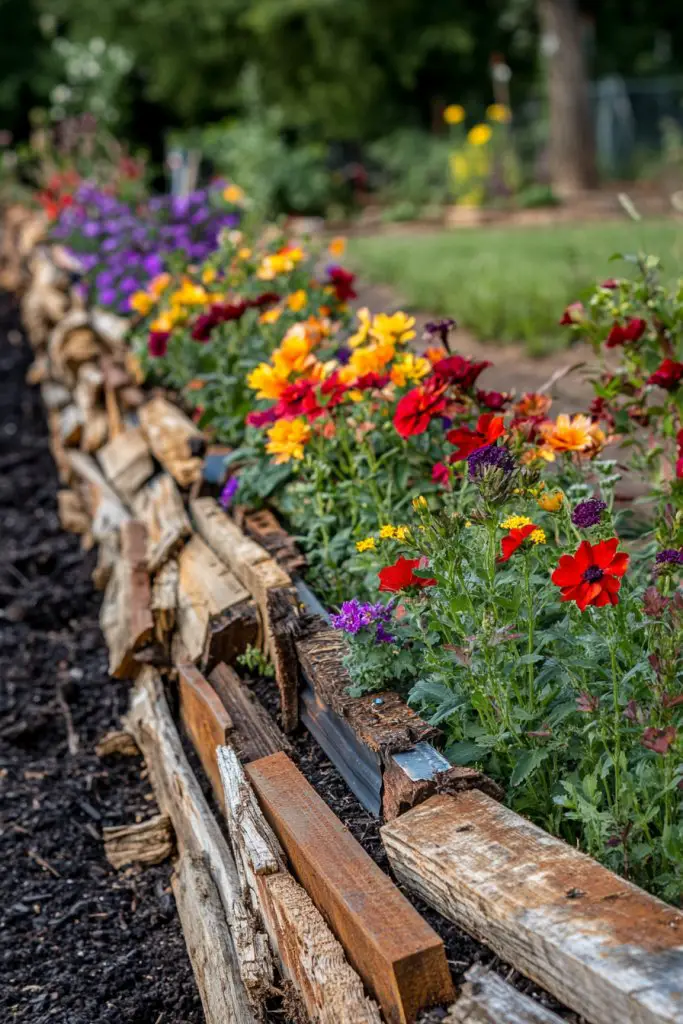
Tired of boring, mismatched garden borders? An artistic edging made from reclaimed materials can upgrade your garden’s look instantly. It adds personality, defines spaces, and reduces weed intrusion—all while being eco-friendly. Who knew that old, discarded items could be transformed into stunning landscape features?
Recommended Products to replicate this idea
| # | Preview | Product | |
|---|---|---|---|
| 1 |

|
Beuta Landscape Edging | Garden Edging Border | Faux Stone Bricks for Lawn edging, Flower beds,... | Check Latest Price |
| # | Preview | Product | |
|---|---|---|---|
| 1 |

|
Rockin' Wood Real Wood Nail Up Application Rustic Reclaimed Naturally Weathered Barn Wood Accent... | Check Latest Price |
Imagine a border composed of weathered bricks, old wood planks, and twisted metal scraps arranged in a creative, uneven pattern. The textures and colors create a rustic, eclectic vibe that complements your garden’s natural beauty. The edging curves organically around flower beds or vegetable patches, blending seamlessly into the landscape. The rough, recycled look gives your yard a storybook charm.
Combine different materials—think corrugated metal, broken tiles, or vintage bottles—for a layered effect. You can paint or seal some items for a polished look or leave them weathered for authenticity. The height can be varied for visual interest or kept uniform for a clean, modern line. Seasonal accents, like small lanterns or plantings, can be added to enhance the border’s appeal.
Gather reclaimed items that suit your style and landscape. Lay out your design on paper, then start positioning the materials along your garden edge. Use a sturdy adhesive, stakes, or buried supports to secure the materials in place. Fill gaps with soil or gravel to stabilize and prevent shifting. Regularly check for stability and replace or repair as needed. This DIY project can be completed in an afternoon with basic tools.
Add decorative features like embedded glass shards, painted accents, or small sculptures. Incorporate lighting—solar stakes or embedded LED strips—for nighttime effect. Use plantings like low-growing ground covers or edging plants to soften the border. Personal touches make your garden unique and inviting.
Creative, reclaimed-edged borders elevate your garden’s style while being eco-conscious. They showcase your personality and craftsmanship. With some imagination and effort, you turn discarded items into a stunning landscape feature. Ready to craft your own artistic border?
11. Hanging Gardens with Macramé Plant Holders
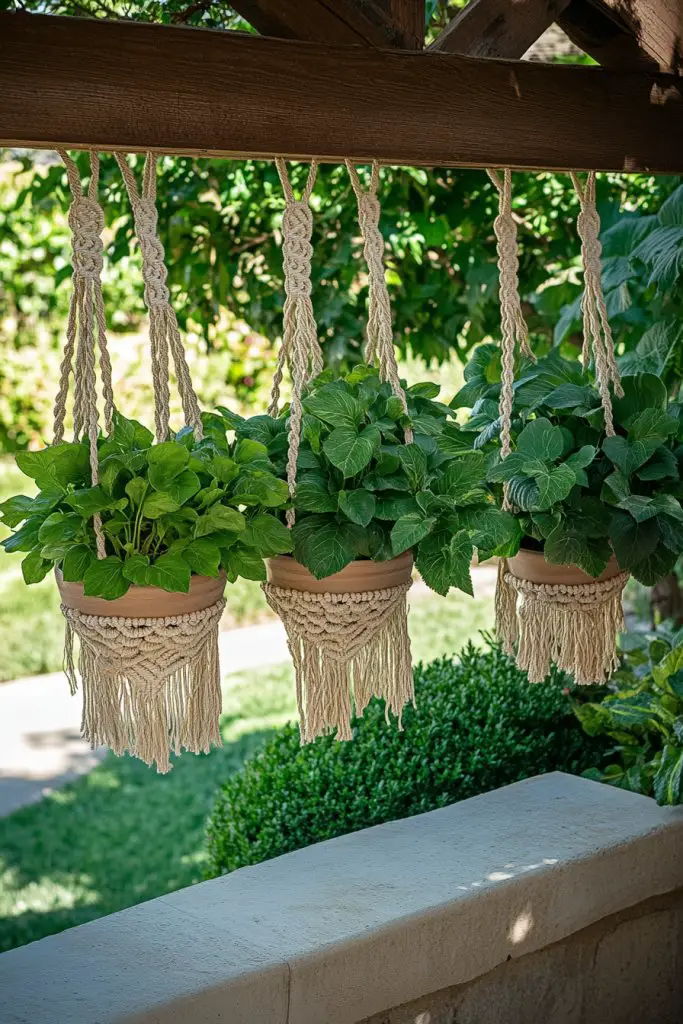
Dreaming of lush greenery but lacking ground space? Hanging gardens are the answer—adding visual volume without sacrificing floor area. Macramé plant holders turn your plants into decorative art pieces, perfect for small apartments or patios. They bring a boho-chic vibe that’s both trendy and functional.
Recommended Products to replicate this idea
| # | Preview | Product | |
|---|---|---|---|
| 1 |

|
SFENNGPET Macrame Plant Hangers, 6Pack Hanging Planters for Indoor Plants w/ 6 Set Hangers Kit... | Check Latest Price |
| # | Preview | Product | |
|---|---|---|---|
| 1 |

|
Utopia Home Plant Pots Indoor with Drainage Holes – Set of 5 White Plastic Flower Pots... | Check Latest Price |
Picture a series of intricate macramé hangers suspended from a pergola or porch beam, each holding a vibrant plant in a decorative pot. The textured knots and patterns add a tactile element, contrasting beautifully with the greenery. The plants cascade down gracefully, creating a layered, lush effect that transforms your space into a tropical paradise. The soft sway in the breeze adds movement and life.
Mix different macramé styles—from tight knots to loose weaves—and vary the lengths for a playful look. Use colorful cords or natural fibers to match your decor. Incorporate different sized pots, from small succulents to trailing vines, for variety. Seasonal swaps include adding fairy lights or decorative charms. Hangers can be placed at different heights to create depth and interest.
Choose sturdy hooks or ceiling anchors rated for weight, then hang your macramé holders securely. Select lightweight, durable pots with good drainage, and fill them with your favorite plants—preferably low-maintenance varieties. Position the hangers where they catch sunlight or shade, depending on the plants’ needs. Regular watering and occasional pruning keep the display fresh. Mix and match different patterns for a cohesive yet eclectic look.
Personalize with colorful cords, beads, or charms woven into the macramé. Incorporate decorative elements like tiny bells or feathers for extra charm. Use a variety of plant types—herbs, flowers, or foliage—to create visual interest. You can even add small LED lights within the hangers for a magical nighttime glow.
Hanging gardens with macramé are a stylish way to bring life to limited spaces. They’re easy to set up, customize, and move around as needed. This trend combines craftsmanship with nature, making your outdoor or indoor area uniquely yours. Ready to craft your own boho oasis?
12. Multi-Level Deck with Built-in Planters and Seating

Want a versatile outdoor space that combines lounging, dining, and gardening? A multi-level deck with built-in planters and seating transforms your yard into a functional oasis. It maximizes space and creates distinct zones for relaxing and entertaining. Who says you can’t have it all in one beautiful package?
Recommended Products to replicate this idea
| # | Preview | Product | |
|---|---|---|---|
| 1 |

|
IPYNBAP Outdoor Chair Cushions Set of 4 -Waterproof Outdoor Seat Cushions for Patio Furniture, Patio... | Check Latest Price |
| # | Preview | Product | |
|---|---|---|---|
| 1 |

|
Yaheetech 8×2ft Wooden Horticulture Raised Garden Bed Divisible Elevated Planting Planter Box for... | Check Latest Price |
Imagine a wooden deck tiered into different levels, each with its own purpose. The upper level hosts a cozy seating area with cushions, while the lower level features a lush, built-in planter box filled with seasonal flowers or herbs. The different heights add architectural interest, and the integrated planters soften the structure with greenery. String lights or lanterns hang overhead, completing the inviting scene.
Use weather-resistant materials like composite decking or treated wood. Incorporate various planter styles—wooden boxes, ceramic pots, or metal containers—to match your aesthetic. The levels can be designed for different functions: eating, relaxing, or gardening. Seasonal changes include swapping out plants or adding outdoor rugs and cushions for comfort and color. Small tiers work well on limited space, while larger yards can accommodate expansive multi-level setups.
Plan your deck layout based on your yard’s dimensions and your needs. Build sturdy support structures for each level, using treated wood or composite materials. Install built-in planters during construction or retrofit existing decks with embedded boxes. Incorporate drainage and irrigation systems for the planters. Finish with sealant or stain to protect the wood. Add furniture and accessories to personalize each zone. Regular maintenance ensures longevity and safety.
Decorate with cushions, outdoor rugs, or decorative lighting to enhance the ambiance. Fill planters with your favorite plants—edible herbs, flowering perennials, or foliage plants. Incorporate small sculptures or decorative stones for added interest. Use removable or movable furniture for flexibility. Personal touches like family photos or themed decor make the space uniquely yours.
A multi-level deck with integrated planters elevates your outdoor living experience. It combines practicality with aesthetic appeal, making your yard a perfect spot for gatherings and relaxation. With some planning and DIY effort, you’ll create a stunning, functional landscape feature. Ready to elevate your outdoor space?
13. Succulent Rock Garden with Colorful Stones
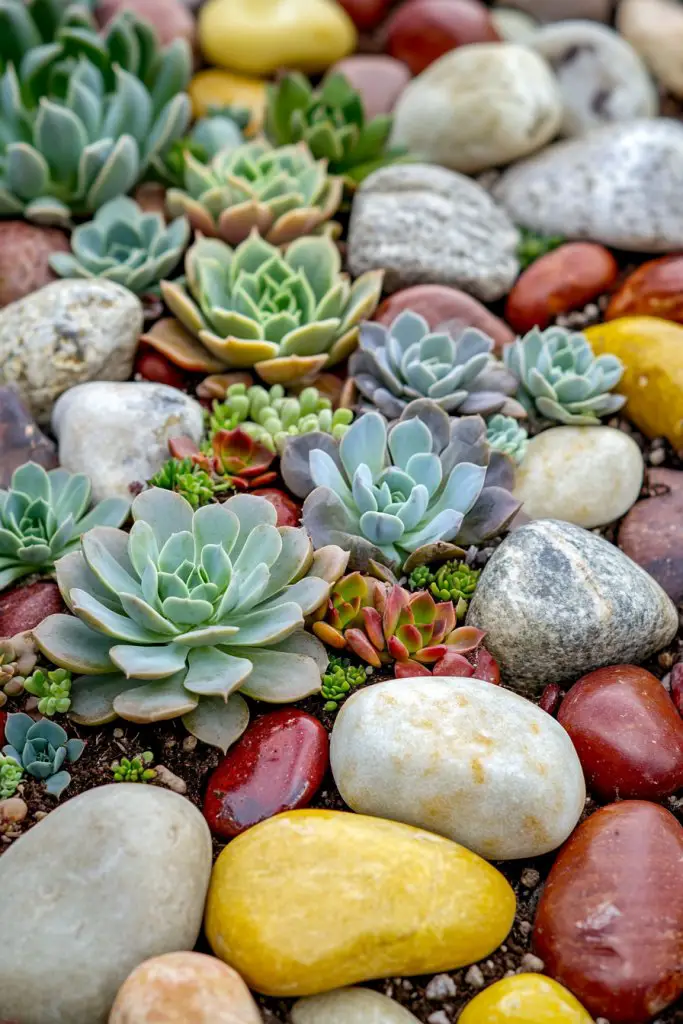
Looking for a low-maintenance yet eye-catching garden idea? A succulent rock garden offers stunning visual appeal with minimal effort. It’s perfect for busy folks or those who prefer beauty without constant fuss. Plus, it adds a modern, sculptural element to your landscape.
Visualize a bed covered in a variety of succulents, each with different shapes, textures, and colors—from rosettes to spiky echeverias. Surrounding them are smooth, brightly colored stones and gravel, creating a striking contrast. The garden looks like a tiny desert landscape, with a curated, artistic vibe. Dappled sunlight highlights the textures, making the whole scene pop.
Use layered stones, pebbles, or crushed gravel to create textures and define shapes. Incorporate larger rocks or boulders for focal points or naturalistic appeal. Seasonal adjustments include adding decorative elements like mini figurines or colored sand accents. The design can be minimalist or lush, depending on your taste and space. It works well in small corners or as a border.
Select a well-draining soil mix suitable for succulents and cacti. Create a raised bed or flat surface, then lay a layer of stones or gravel to improve drainage. Plant succulents in groups, spacing them for growth, and add decorative stones around them. Water sparingly—succulents thrive on infrequent watering. Regularly remove dead leaves and replace or add stones to refresh the look. Fertilize during active growing seasons.
Personalize with colorful stones, small sculptures, or decorative gravel patterns. Incorporate miniature garden ornaments or themed accents for variety. Use contrasting colors to create visual interest and depth. You can also add a small, decorative pathway or border to frame your succulent oasis. The key is balancing simplicity with artistic touches.
A succulent rock garden is a chic, sustainable way to enjoy greenery with little upkeep. It proves that beauty can come from simplicity and smart design. With minimal watering and care, you create a modern landscape feature that’s both functional and artistic. Time to get your hands sandy and your creativity flowing?
14. Reclaimed Wooden Crate Gardens for Easy Planting
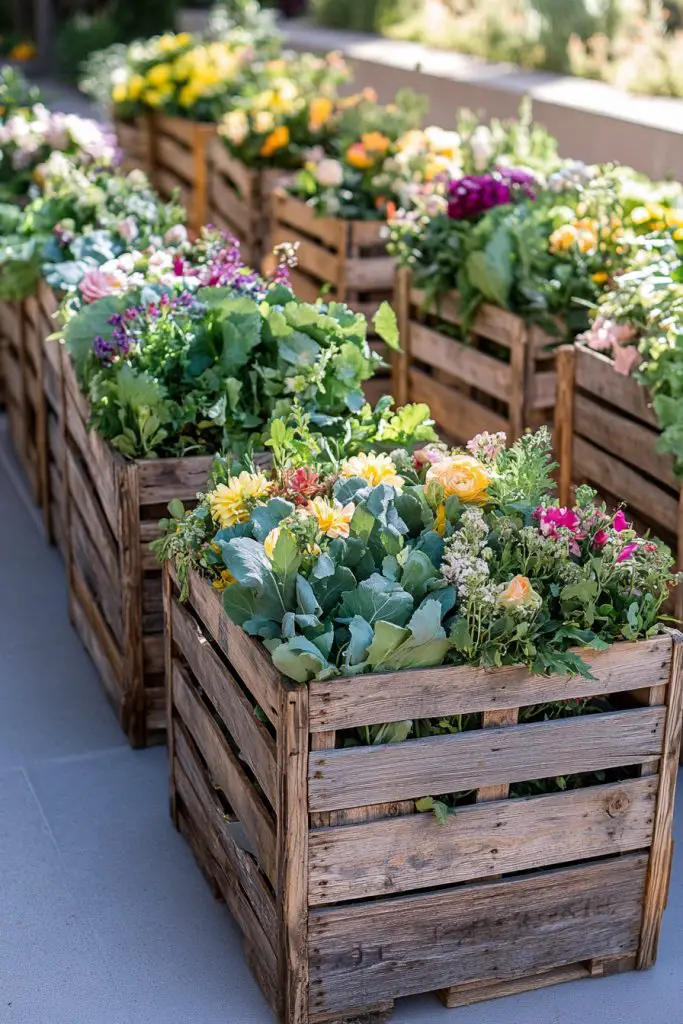
Want a charming, rustic way to grow vegetables or flowers? Reclaimed wooden crates are an affordable, versatile solution. They’re perfect for small spaces, patios, or even indoors. Plus, they give vintage charm to your garden while making planting simple and accessible.
Recommended Products to replicate this idea
| # | Preview | Product | |
|---|---|---|---|
| 1 |

|
Backyard Expressions Wooden Raised Garden Bed | 48" x 24" x 30" Elevated Planter Box with Included... | Check Latest Price |
| # | Preview | Product | |
|---|---|---|---|
| 1 |

|
Back to the Roots 100% Organic Potting Mix (Value 12 Quart) | Premium Blend | Made in The USA | Check Latest Price |
Picture a stack of weathered crates arranged in tiers or side-by-side, overflowing with herbs, flowers, or small vegetables. The natural wood grain adds warmth and texture, contrasting with the vibrant plants. You can see roots and soil through the slats, giving an authentic, farmyard feel. Whether on a porch or in a garden bed, these crates look cozy and inviting.
Stack crates vertically for limited space or line them up horizontally for a border. Paint or stain the crates for a more polished look, or leave them natural for rustic appeal. Incorporate wheels for mobility or add decorative hooks for tools. Seasonal changes include planting different crops or flowers, and swapping out plants as needed. You can also line crates with landscape fabric for better drainage.
Start by sourcing sturdy, untreated crates or cleaning up old ones. Drill drainage holes if absent, and line with landscape fabric or grow bags. Fill with soil suitable for your plants, then plant seeds or seedlings. Arrange crates in your desired layout—stacked, staggered, or flat—and secure as needed. Water thoroughly and regularly, and fertilize periodically. Keep an eye on soil moisture and adjust watering accordingly.
Decorate with painted designs, plant labels, or small decorative objects. Use colorful pots within the crates for added visual interest. Incorporate small trellises or support sticks for climbing plants. Personal touches like garden signs or fairy lights can make your crate garden truly unique. It’s a DIY project with lots of room for creative expression.
Reclaimed crate gardens combine sustainability with charm and practicality. They’re a fun way to grow your own food or flowers, even in tight spaces. With some effort, you turn old wood into a lively, productive garden feature. Ready to craft your vintage-inspired planting paradise?
15. Butterfly and Pollinator-Friendly Flower Beds
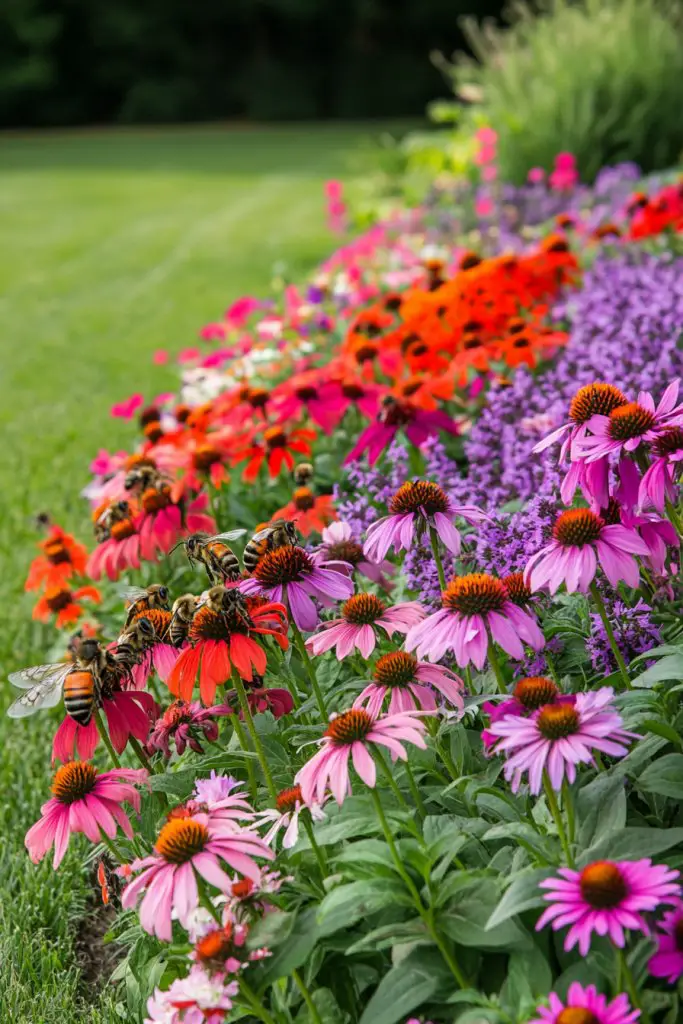
Want to attract more wildlife to your garden while adding vibrant color? Designing flower beds that support butterflies, bees, and hummingbirds boosts local ecosystems and creates a lively, dynamic landscape. It’s a win-win for nature and your aesthetic. Plus, pollinator-friendly plants are often easy to grow and maintain.
Recommended Products to replicate this idea
| # | Preview | Product | |
|---|---|---|---|
| 1 |

|
Wildflower Seeds Hummingbird and Butterfly Mix 1 Ounce, No Filler, 24 Varieties Flowers Seeds to... | Check Latest Price |
| # | Preview | Product | |
|---|---|---|---|
| 1 |

|
Burpee Wildflower 25,000 Bulk, 1 Bag, 18 Varieties of Non-GMO Flower Seeds Pollinator Garden,... | Check Latest Price |
Picture a bed bursting with nectar-rich flowers like coneflowers, bee balm, and milkweed, arranged in natural, flowing shapes. Bright yellows, purples, and reds dominate, drawing pollinators from afar. Butterflies flutter among the blooms, while bees busily collect pollen. The scene is lively, colorful, and full of movement, turning your garden into a pollinator paradise.
Arrange native plants for best attractants suited to your region, mixing tall and low-growing varieties. Incorporate layered planting for continuous bloom periods and visual depth. Seasonal plantings keep the bed lively year-round, with early spring bulbs and late-season perennials. Use organic mulches and avoid pesticides to protect pollinators and promote healthy growth. Create small habitats nearby, like bee hotels or shallow water sources, to further support local wildlife.
Select a sunny, well-drained site for your flower bed. Prepare the soil by enriching it with compost and organic matter. Plant a mix of native nectar plants, perennials, and flowering shrubs that bloom at different times. Space plants appropriately, considering their mature size, and water regularly until established. Avoid chemical pesticides; instead, use natural pest control methods. Continuously deadhead spent flowers to encourage more blooms and pollinator visits.
Add decorative elements like small stone pathways or colorful garden stakes. Incorporate native plants that hold special meaning or personal significance. Consider adding a small water feature or birdbath nearby to attract even more wildlife. Use plant markers or personalized signs to educate visitors and add charm. Keep the bed thriving with seasonal plant swaps and ongoing maintenance.
Creating pollinator-friendly beds not only supports vital insect populations but also beautifies your garden. It’s a simple way to contribute to environmental health while enjoying natural beauty. With a little planning, you can turn your yard into a lively hub of activity and color. Ready to make your garden a buzzing, blooming haven?
16. Edible Garden with Vertical Planting Towers
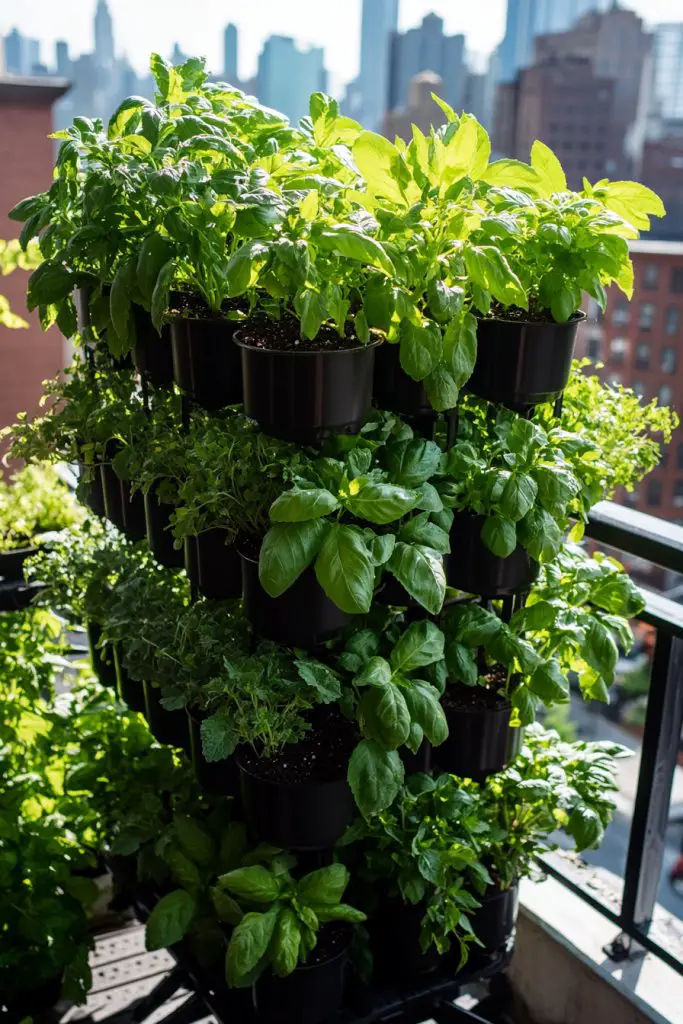
Craving fresh herbs and veggies but short on space? Vertical planting towers are an innovative solution, enabling you to grow a variety of edible plants in a compact footprint. They’re perfect for urban gardens, balconies, or small yards. Plus, harvesting your own food feels pretty awesome.
Recommended Products to replicate this idea
| # | Preview | Product | |
|---|---|---|---|
| 1 |
|
Mr. Stacky 5 Tier Stackable Strawberry, Herb, Flower, and Vegetable Planter - Vertical Garden... | Check Latest Price |
| # | Preview | Product | |
|---|---|---|---|
| 1 |

|
9 Herb Indoor Garden Kit - Unique Kitchen Gift for Women, Men, Mom, Friends - Complete Starter Set... | Check Latest Price |
Imagine a tall, multi-tiered tower filled with lush greens, cherry tomatoes, or fragrant herbs. Each level features a different crop, with vibrant leaves and ripe fruits peeking out. The vertical design maximizes space, while the open structure allows sunlight to reach all plants evenly. It’s like a mini farm, standing proudly in your yard or patio.
Use stackable containers, pocket systems, or modular towers made from recycled materials. Customize height and number of tiers based on your available space. Incorporate composting units at the base for sustainability. Seasonal crops include lettuce, peppers, or strawberries, which can be swapped out or rotated. For aesthetic flair, paint or decorate the towers to match your style.
Choose a sturdy, weather-resistant tower design suited for your plants. Fill each tier with high-quality, organic soil and plant your seedlings or seeds. Position the towers where they receive ample sunlight—ideally 6 hours or more daily. Water regularly, keeping soil moist but not waterlogged. Use organic fertilizers to boost growth. Consider integrating a drip irrigation system for convenience.
Add decorative elements like colorful pots, painted patterns, or personalized labels. Incorporate small trellises or support structures for climbing plants. Use companion planting strategies to improve yields and pest resistance. Seasonal decorations, like fairy lights or flags, add personality. Maintain the plants with regular pruning and harvesting to keep productivity high.
A vertical edible garden maximizes your harvest in small spaces and enhances your kitchen’s freshness. It’s a sustainable, fun project that pays off with delicious, homegrown produce. With some planning, you’ll turn a tiny corner into a thriving food oasis. Ready to grow your own farm in the sky?
17. Artistic Garden Sculptures with Recycled Metal Art
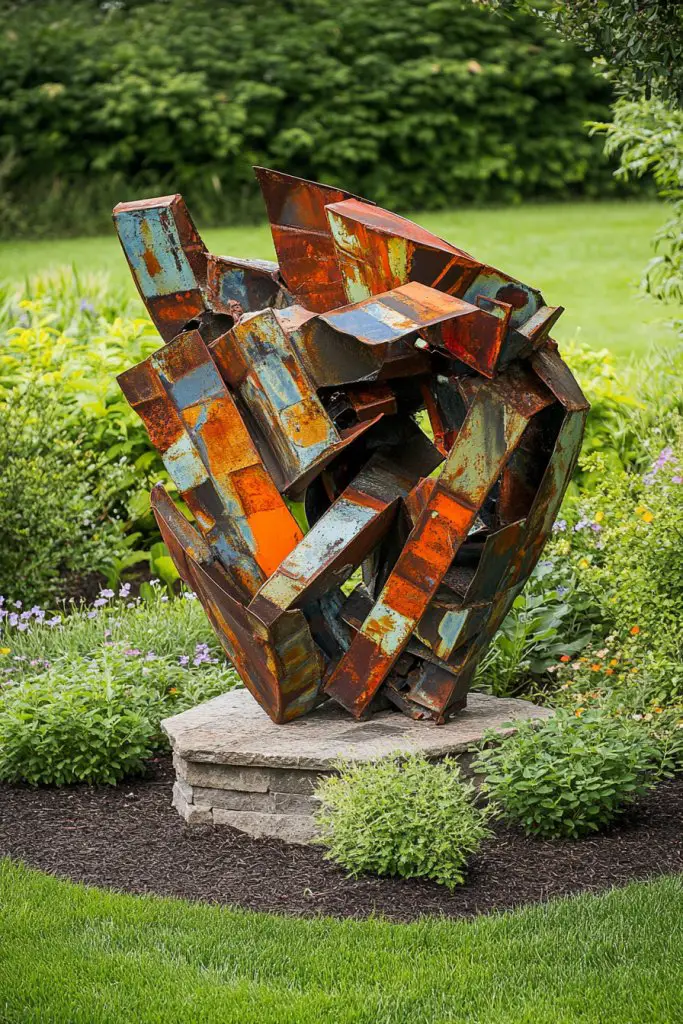
Looking to add a bold, creative statement to your garden? Artistic sculptures made from recycled metal transform ordinary outdoor spaces into striking art installations. They reflect your personality, support sustainability, and create focal points that draw the eye. Who says garden decor has to be boring?
Recommended Products to replicate this idea
| # | Preview | Product | |
|---|---|---|---|
| 1 |

|
Big Sky Antiques Rustic Medium 13" Repurposed Scrap Metal Moose Statue Home Farm Garden Lodge | Check Latest Price |
| # | Preview | Product | |
|---|---|---|---|
| 1 |

|
Rooster Statue Creative Chicken Animal Sculpture Garden Decoration Metal Yard Art for Patio Lawn... | Check Latest Price |
Picture whimsical metal animals, abstract shapes, or modern sculptures standing proudly amidst your plants. The weathered rust and shiny metal surfaces catch the light differently throughout the day, adding depth and interest. The sculptures’ textures contrast with soft foliage or smooth stones, creating a captivating visual dialogue. These art pieces give your garden a unique personality and an edgy, contemporary vibe.
Choose sculptures that complement your garden style—be it rustic, modern, or eclectic. Place them near pathways, seating areas, or as standalone features. Incorporate movement by selecting kinetic sculptures or wind chimes. Seasonal accents like fairy lights or floral garlands can further enhance their presence. Mix different sizes and themes for a curated, gallery-like effect.
Source or create your own recycled metal sculptures—think old tools, scrap metal, or car parts. Secure sculptures firmly into the ground or into raised beds using anchors or supports. Treat metal with rust-resistant paint if desired, or leave the natural patina for an industrial look. Position your art strategically to balance the landscape composition. Clean and maintain periodically to prevent deterioration.
Add plaques, personalized engravings, or paint details to make sculptures meaningful. Incorporate complementary elements like metal planters or decorative stones. Use lighting—spotlights or solar-powered lamps—to highlight your sculptures at night. Create themed displays, such as wildlife or abstract art, that reflect your passions. Personal touches turn your garden into an outdoor art gallery.
Recycled metal sculptures bring a creative, eco-conscious edge to your landscape. They showcase your artistic side and commitment to sustainability. With a little effort, you can craft or curate a collection of striking art pieces that transform your yard into a personal outdoor museum. Ready to make your garden a masterpiece?
Conclusion
From vibrant plant displays to inventive DIY features, the garden ideas shared here cover a wide spectrum of creativity and style. Embrace these concepts and adapt them to your own outdoor space—your garden can become a beautiful, personalized sanctuary. Start experimenting today and watch your outdoor area transform into a stunning reflection of your personality and imagination!