
18 Custom Headboard Ideas for Personalized Style
A beautifully crafted headboard can instantly transform the vibe of your bedroom, making it a focal point that reflects your personal style. Custom headboard ideas have surged in popularity because they offer a unique way to add character, texture, and personality to your space without a full remodel.
In this article, you’ll discover a variety of creative and inspiring custom headboard ideas that cater to different tastes and budgets. Whether you love boho chic, modern minimalism, or vintage charm, there’s a perfect idea waiting for you to try and make your own. Get ready to elevate your bedroom decor with these personalized touches!
1. Upholstered Velvet Headboard with Button Tufting
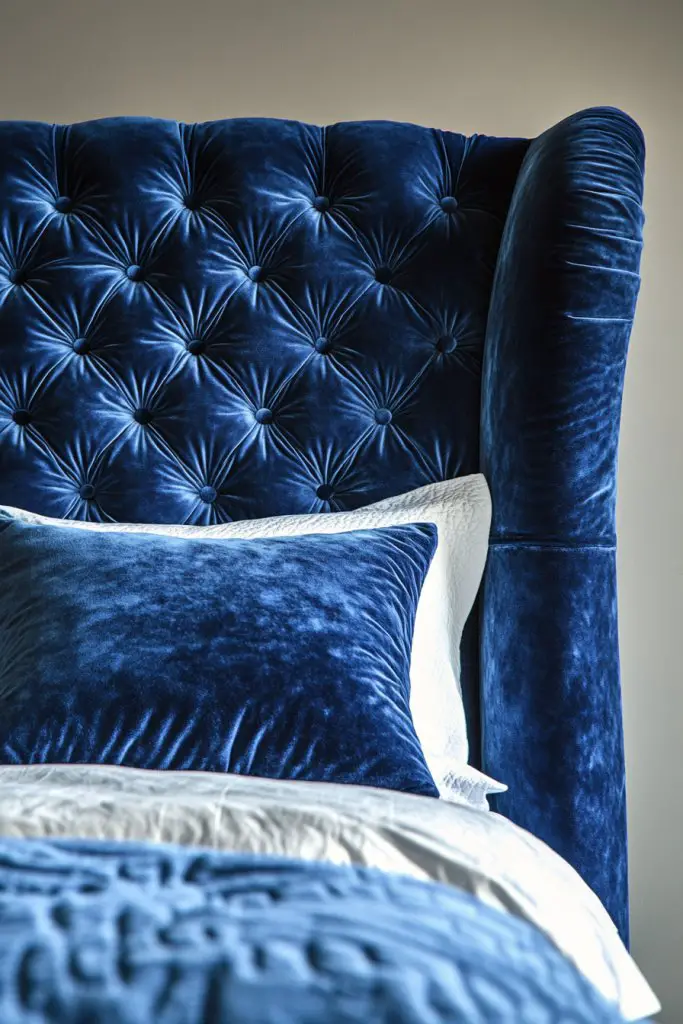
Ever feel like your bedroom’s missing that touch of luxury and comfort? A velvet headboard with button tufting offers an instant upgrade, turning a simple bed into a statement piece. It’s perfect for those who crave a cozy yet elegant vibe without sacrificing style. Plus, it makes your bedroom feel more inviting and plush, almost like a boutique hotel.
Recommended Products to replicate this idea
| # | Preview | Product | |
|---|---|---|---|
| 1 |

|
Huatean Home Tufted Upholstered Headboard Queen Size, Solid Wood Head Board with Durable Metal Legs,... | Check Latest Price |
| # | Preview | Product | |
|---|---|---|---|
| 1 |

|
Unique Craft Upholstery Repair Tufting Needle and Thread Kit. 4 Heavy Duty Long Button Tufting... | Check Latest Price |
Imagine sinking into a bed with a soft velvet headboard in deep emerald or navy, the fabric catching the light just right. The buttons create a subtle pattern, adding texture and depth. The rich, smooth surface contrasts beautifully with crisp white sheets or layered textiles. You can almost feel the plushness just by visualizing the tufted surface, giving your space that luxurious hotel look.
Choose bold jewel tones for a dramatic effect or soft neutrals for a calming retreat. For a more contemporary style, pair with sleek metal accents or minimalist bedding. If space allows, add decorative pillows or throws that complement the fabric’s richness. You can even switch up the button styles—large, oversized buttons for a playful look or small, subtle ones for refined elegance.
Start by selecting high-quality velvet fabric and a sturdy backing material. Use a foam core or plywood as the base for added comfort and durability. Attach the fabric tightly to the backing, then mark and sew the buttons in your desired pattern, ensuring they’re evenly spaced. Secure the buttons through the fabric and backing with a heavy-duty needle and thread. Mount the headboard onto a frame or directly onto the wall for a clean finish. Optional nailhead trim or piping can further elevate the look.
Customize by choosing colors that match your overall decor or mood. Add metallic or contrasting fabric piping around the edges for a tailored finish. Incorporate personalized embroidery or monograms for a special touch. For seasonal updates, swap out accent pillows or throws that align with holidays or seasons, keeping your space fresh and inviting.
A velvet tufted headboard instantly elevates your bedroom’s style and comfort. It’s a timeless design that works across various decor styles, from vintage to modern. Once you see your own DIY masterpiece, you’ll feel confident trying other upholstery projects. Your bedroom will feel more sophisticated and cozy—no fancy designer required.
2. Reclaimed Wood Plank Headboard with Rustic Charm
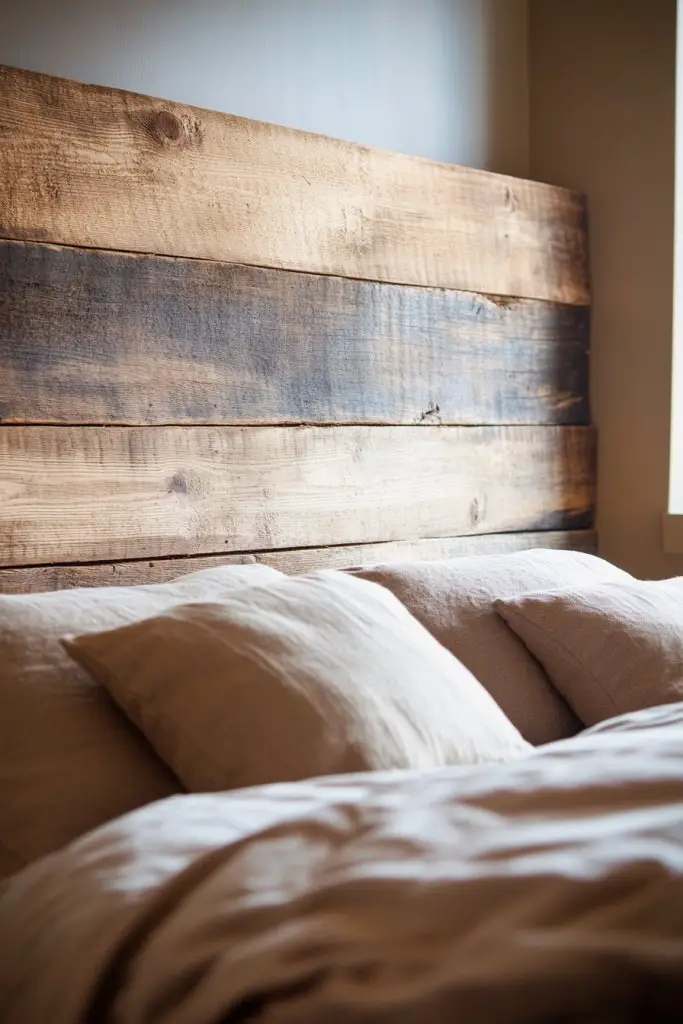
Dreaming of a bedroom that feels warm, authentic, and full of character? A reclaimed wood plank headboard delivers that rustic charm you’ve been craving. It’s a perfect way to add personality and a touch of nature to your space. Plus, it’s eco-friendly and budget-friendly—a win-win for stylish sustainability.
Visualize a headboard made from weathered, uneven planks with knots and grain that tell a story. The natural imperfections create a textured, layered look that adds depth to your bedroom. The wood’s warm tones—honey, chestnut, or gray—pair beautifully with soft bedding in neutral or earthy palettes. The rustic aesthetic invites a cozy, cabin-like atmosphere, making your space feel more grounded and inviting.
Use horizontally for a wider, more grounded feel or vertically for a taller, more dramatic statement. Combine different reclaimed woods for a patchwork look or keep it simple with uniform planks. Decorate with vintage accessories, woven rugs, or linen bedding to enhance the rustic vibe. For a modern twist, paint some planks in bold colors or add metal accents for contrast.
Source reclaimed wood from salvage yards, thrift stores, or sustainable suppliers. Cut planks to your desired size, then sand them lightly to remove splinters while preserving the aged character. Attach the planks with sturdy brackets or directly screw them into a frame or wall studs. Seal the wood with a matte or semi-gloss finish to protect it and highlight the grain. Mount the headboard at the height you prefer, ensuring it’s securely anchored for safety.
Add personal touches by incorporating metal hooks or vintage knobs for hanging accessories. Paint some planks in colors that match seasonal decor or your mood. Incorporate LED strip lighting behind the headboard for a soft glow. You can also integrate shelves or small ledges for displaying treasured items without cluttering the space.
Reclaimed wood headboards are not only gorgeous but also sustainable, making them a responsible choice. They work well in farmhouse, boho, or industrial styles, proving their versatility. Building your own gives you a sense of achievement and a uniquely personal piece. Your bedroom will radiate warmth and authenticity—no fancy store-bought look needed.
3. Geometric Patterned Wall Panels for a Modern Touch
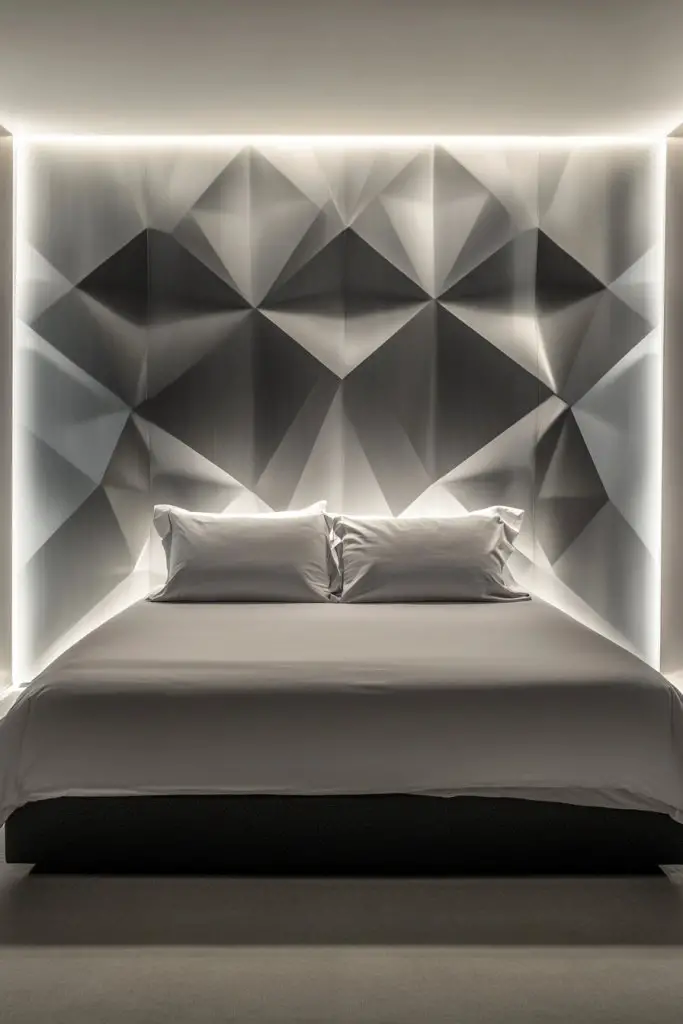
Looking to add a wow factor to your bedroom without going overboard? Geometric wall panels bring in a sleek, modern aesthetic that instantly elevates any space. They’re perfect if you want to create visual interest and depth on an otherwise flat wall. Plus, they can serve as a focal point that anchors your entire decor.
Recommended Products to replicate this idea
| # | Preview | Product | |
|---|---|---|---|
| 1 |
|
Art3dwallpanels 33 Pack 3D Wall Panel Diamond for Interior Wall Décor, PVC Flower Textured Wall... | Check Latest Price |
| # | Preview | Product | |
|---|---|---|---|
| 1 |

|
SHYJSHYJ Black Geometric Line Vinyl Wall Decals, Peel and Stick Memphis Group Geometrical Lines,... | Check Latest Price |
Imagine bold 3D panels in shapes like triangles, hexagons, or diamonds, arranged in a repeating pattern. The panels could be matte, glossy, or metallic, reflecting light and adding dimension. Play with contrasting colors—black and white, metallics, or vibrant hues—to make the patterns pop. The textured surface catches shadows and light differently throughout the day, creating a dynamic backdrop behind your bed.
Opt for monochrome designs for a minimalist look or go for colorful combinations to energize the room. Install panels in a grid, chevron, or random arrangement based on your taste. These panels work well in small spaces to add depth or in large rooms to define zones. Combine with simple bedding and subtle accessories to keep the focus on the pattern.
Choose lightweight, durable materials like MDF, PVC, or high-density foam for easy installation. Measure your wall carefully and plan your pattern layout before attaching. Use strong adhesive or screws to fix the panels securely, making sure they’re level and aligned. Some panels come with interlocking edges for seamless installation. Finish with a protective coat if needed, then paint or treat the surface to match your decor.
Customize by painting sections in your favorite colors or metallic finishes. Add LED strip lights behind the panels to create a backlit effect at night. Mix different patterns or textures within the panels for a more eclectic look. Keep accessories minimal to let the geometric design shine and avoid visual clutter.
Modern geometric panels are a quick way to upgrade your bedroom’s style and add personality. They appeal to fans of contemporary, minimalist, or art-inspired decor. Installing them yourself can be a fun project that boosts your confidence in DIY home upgrades. Your space will feel fresh, stylish, and totally on trend.
4. Floating Wooden Shelf Headboard for Functional Decor
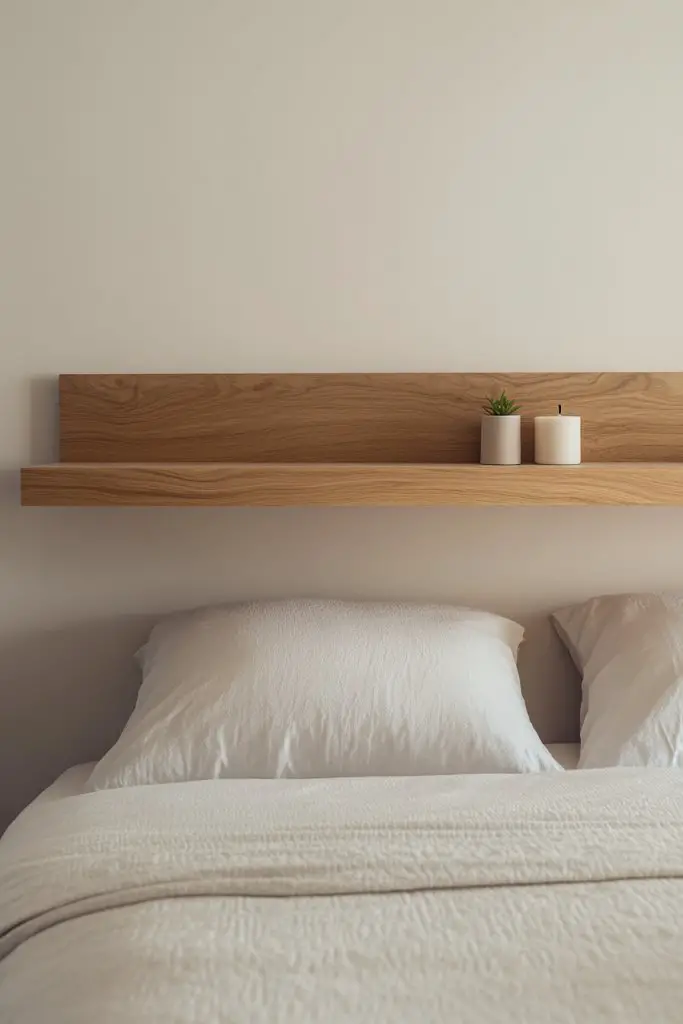
Ever wish your headboard could do more than just look good? A floating wooden shelf headboard combines style with functionality, transforming your bedroom into an organized oasis. It’s perfect for those who want a minimalist aesthetic without sacrificing practical storage. Plus, it keeps essentials within arm’s reach without cluttering your space.
Recommended Products to replicate this idea
| # | Preview | Product | |
|---|---|---|---|
| 1 |

|
BAYKA Floating Shelves for Wall, Wall Mounted Rustic Wood Shelves for Bathroom, Bedroom, Living... | Check Latest Price |
| # | Preview | Product | |
|---|---|---|---|
| 1 |

|
SunnyPoint Bedside Shelf, Office Divider - Clamp on Shelf for Bunk, Lofts & Bed Frame (Standard -... | Check Latest Price |
Picture a sleek, wide wooden shelf mounted just behind your bed, with a smooth finish and clean lines. It can hold books, a small plant, or decorative objects—no bulky nightstands needed. The floating design gives a sense of openness, making the room feel airier and more spacious. Warm wood tones contrast nicely with soft bedding and add a natural touch that grounds the room.
Choose different wood finishes—light, dark, or stained—to match your decor style. For a cozy vibe, add soft textiles like a throw blanket or fabric bins for storage. If you prefer a more modern look, keep the shelf clear of clutter and incorporate sleek accessories. You can also add small LED puck lights underneath for ambient lighting, enhancing both function and style.
Select a durable, lightweight wood such as pine or plywood, then cut it to your desired width. Sand the edges and surface smoothly to prevent splinters and give it a polished look. Mount heavy-duty brackets or anchors into wall studs to support weight. Use a level to ensure perfect alignment, then screw the shelf into place. Seal or finish the wood to protect against moisture and wear.
Personalize by staining or painting the shelf in colors that complement your bedding and walls. Add decorative items like framed photos, candles, or small sculptures—just avoid overcrowding. You could also attach small hooks underneath for hanging jewelry, hats, or keys. This transforms your headboard into a multi-use feature that adapts to your needs.
A floating shelf headboard is a simple yet impactful upgrade, perfect for DIYers of all skill levels. It’s a versatile solution that combines form and function effortlessly. Once installed, it’ll make you feel more organized and stylish—plus, it’s a great conversation starter. Your bedroom will look modern, clean, and thoughtfully curated.
5. DIY Macramé Headboard for Boho Vibes
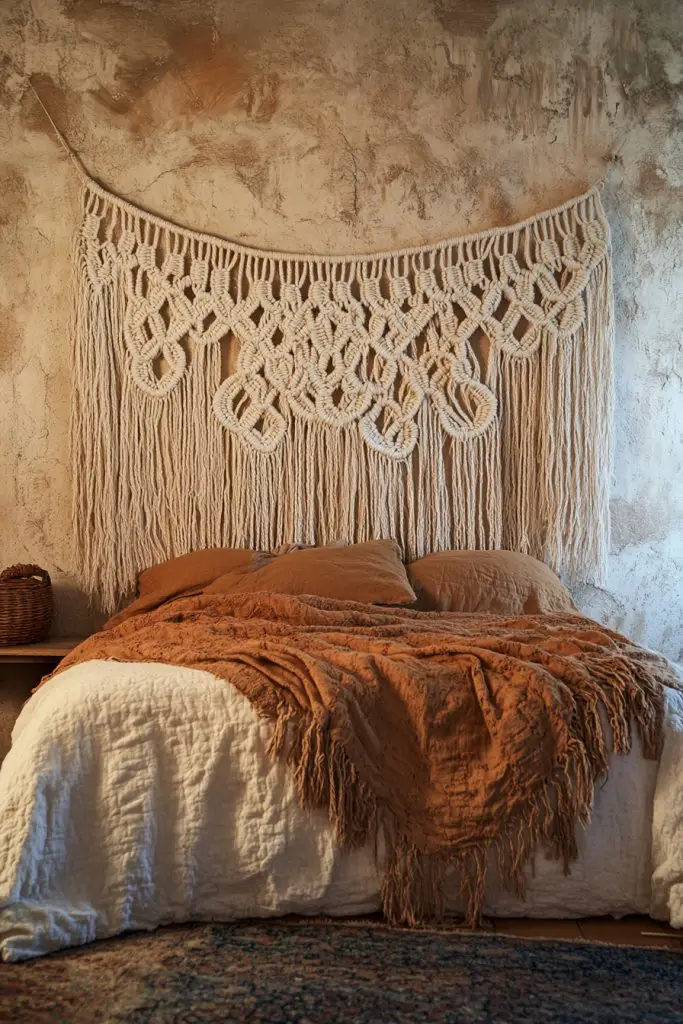
Craving a laid-back, artsy vibe in your bedroom? A DIY macramé headboard offers a relaxed, bohemian charm that’s easy to create and customize. It’s perfect for adding texture and personality without breaking the bank. Plus, it’s a fun craft project that lets you showcase your creative side.
Recommended Products to replicate this idea
| # | Preview | Product | |
|---|---|---|---|
| 1 |

|
Achart Macrame Wall Hanging Large- Boho Wall Decor- large wall art- Wall Decor Living Room- Macrame... | Check Latest Price |
| # | Preview | Product | |
|---|---|---|---|
| 1 |

|
SAFAVIEH Area Rug 8x10 - Natural Fiber Collection - Large - Natural Brown, Handmade Jute, Farmhouse... | Check Latest Price |
Picture a large, intricate macramé wall hanging in natural fibers, cascading down behind your bed. The knotted patterns form geometric shapes, fringes, or organic designs that add softness and movement. The neutral tones of cotton or jute create a cozy, tactile feel that pairs beautifully with woven textiles and earthy decor. It’s like bringing a piece of nature into your sanctuary.
Experiment with different knot styles, fringe lengths, or dyeing techniques to match your aesthetic. Use natural fibers for a rustic look or opt for colorful cords to add vibrancy. Incorporate small LED fairy lights or attach decorative beads for extra flair. You can also combine macramé with wooden dowels or metal rods for structural support.
Start by choosing a sturdy wooden dowel or metal rod as your base. Cut your cord lengths, then practice your knots—square knots, spiral knots, or feather knots—before starting the actual piece. Attach the cords to the rod using lark’s head knots, then work your pattern, gradually building up the design. Once finished, hang the piece securely on the wall behind your bed using hooks or brackets. Ensure the cords are evenly spaced and taut for a polished look.
Add colored accents, beads, or shells to personalize your macramé. Incorporate elements like small plants or decorative charms on the fringes (avoiding actual plants as per restrictions). Frame your macramé headboard with additional textiles or string lights for a cozy glow. You can also create smaller, matching pieces for bedside or wall decor.
A DIY macramé headboard is a perfect project to infuse your space with personality and craftsmanship. It’s a testament to your creative spirit and adds a tactile, warm element to your room. Once finished, you’ll feel proud and inspired to explore more textile art projects. Your bedroom will radiate boho charm and handmade warmth—totally Instagram-worthy!
6. Upholstered Headboard with Nailhead Trim for Classic Sophistication
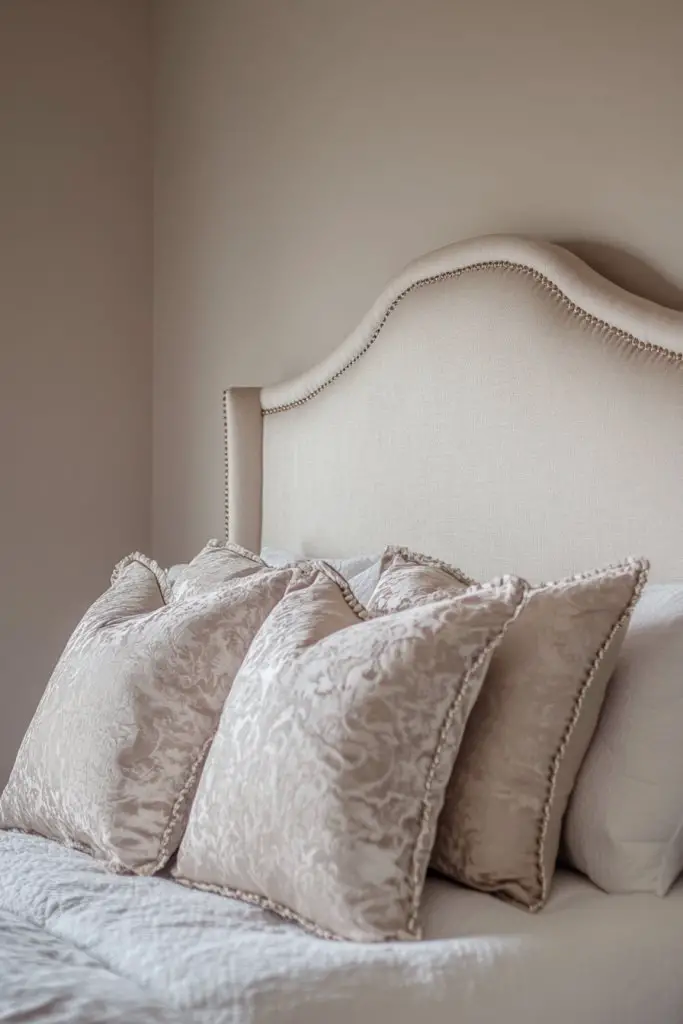
Want to add timeless elegance and a polished look to your bedroom? An upholstered headboard with nailhead trim offers classic sophistication that fits both traditional and modern decor. It elevates the entire space and makes your bed the centerpiece. Plus, it’s a simple way to bring texture and depth without overwhelming the room.
Recommended Products to replicate this idea
| # | Preview | Product | |
|---|---|---|---|
| 1 |
|
Huatean Home Tufted Upholstered Headboard Queen Size, Solid Wood Head Board with Durable Metal Legs,... | Check Latest Price |
| # | Preview | Product | |
|---|---|---|---|
| 1 |

|
Let's Decorate 10 Meters D9.5mm Brass Upholstery Tacks Strips/Nailhead Trims,Decorative Nail Strips... | Check Latest Price |
Visualize a plush fabric in velvet, linen, or suede stretched tightly over a sturdy frame. The nailhead trim runs along the edges, creating a crisp border that accentuates the shape—be it rectangular, curved, or wingback. The combination of soft upholstery and metallic accents catches the light, adding subtle shine and detail. It’s a refined look that invites you to sit up and relax in style.
Choose fabrics in neutral tones for a versatile, understated look or bold colors for a statement piece. Incorporate contrasting nailhead finishes—antique brass, chrome, or black—for different effects. The headboard can be tall or low-profile depending on your space and taste. Pair with elegant bedding, decorative pillows, or textured throws to complete the look.
Start by selecting a durable frame and appropriate fabric—foam padding for comfort, and a fabric that’s easy to clean. Attach the fabric to the frame using a staple gun, pulling tightly to avoid wrinkles. Mark and attach the nailhead trim along the edges with a nail gun or upholstery tacks, maintaining even spacing. Mount the headboard onto your bed frame or wall for stability. Finish with optional decorative trim or piping for extra detail.
Personalize further by choosing fabric patterns or textures that reflect your personality. Add embroidery, piping, or contrasting stitching for a bespoke touch. For seasonal updates, swap pillow arrangements or add a decorative bed skirt. Keep the fabric clean and in good condition with regular vacuuming or spot cleaning to maintain its refined appearance.
A nailhead-trim upholstered headboard exudes elegance and craftsmanship. It’s a versatile choice that complements many decor styles, giving your bedroom a luxurious upgrade. Building or installing one yourself boosts your confidence in upholstery projects. Your space will look sophisticated and inviting, proving that DIY can be both stylish and achievable.
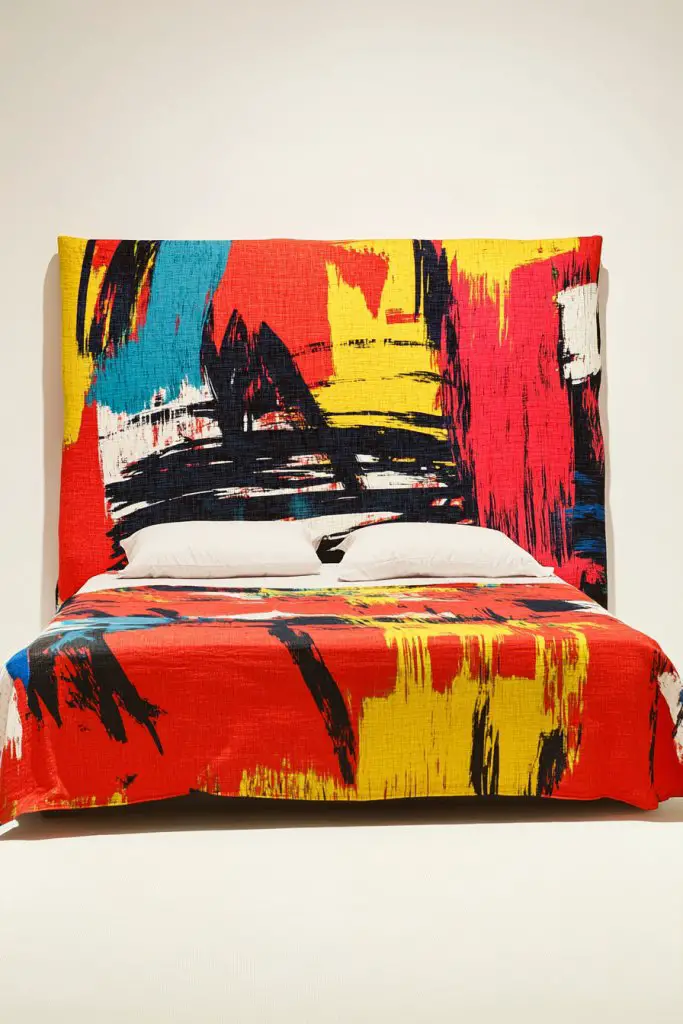
7. Abstract Painted Headboard Using Chalk Paint or Stencils
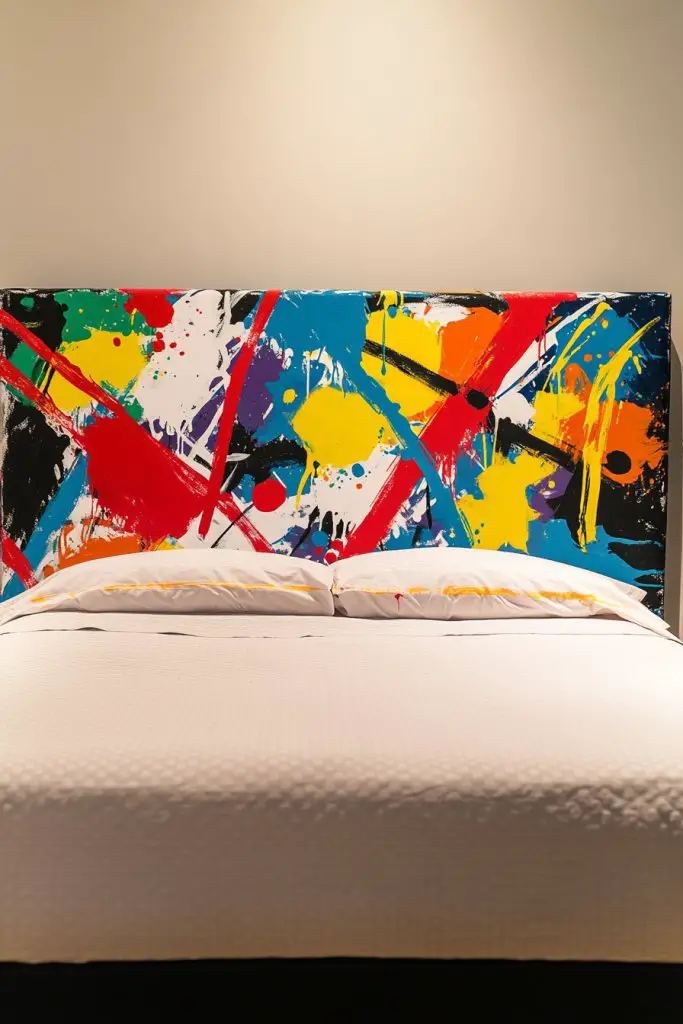
Looking to turn your headboard into a piece of art? An abstract painted headboard allows you to express your personality while adding a pop of color or pattern. It’s an affordable way to customize your space without buying expensive art or wallpaper. Plus, it’s a fun project that results in a truly unique focal point.
Recommended Products to replicate this idea
| # | Preview | Product | |
|---|---|---|---|
| 1 |

|
Rust-Oleum Linen White Chalked All-in-One Ultra Matte Paint | One Coat Coverage | No Primer,... | Check Latest Price |
| # | Preview | Product | |
|---|---|---|---|
| 1 |

|
YEAJON 2 Inch Letter Stencils Symbol Numbers Craft Stencils, 42 Pcs Reusable Alphabet Templates... | Check Latest Price |
Imagine a wooden or MDF panel painted with bold, sweeping strokes, splatters, or geometric shapes in vibrant hues. Chalk paint or stencils make it easy to create layered, textured effects that look spontaneous yet intentional. The abstract design can be harmonious or chaotic, depending on your mood, adding energy and personality to your bedroom. The surface becomes a canvas that reflects your creative spirit.
Use a monochrome palette for a sophisticated look or a rainbow of colors for vibrancy. Incorporate metallic or glitter accents for extra flair. Combine the painted headboard with minimalist bedding to let the artwork stand out or match it with patterned textiles for a maximalist vibe. You could also add a protective sealant to make it more durable.
Start by selecting a wooden panel or MDF board cut to your desired size. Prime the surface if needed, then sketch your design lightly with pencil. Use chalk paint or acrylics to fill in the shapes and strokes, layering colors for depth. Utilize stencils for precise shapes or freehand for more organic designs. Finish with a clear sealer to protect the artwork. Mount the panel behind your bed securely, ensuring it’s sturdy and level.
Add metallic or neon accents with metallic pens or tape for extra dimension. Incorporate textured elements like fabric patches or foil for tactile interest. Change the design seasonally or for special occasions with new painted motifs. Frame or border the artwork with trim or molding for a polished appearance.
Transforming a headboard into art unlocks your creative potential and makes your room distinctly yours. It’s a playful project that can evolve over time, adding new designs or colors whenever you feel inspired. Your bedroom becomes a gallery of your personality and style—proof that DIY art can be both impactful and affordable.
8. Layered Fabric and Pillow Headboard for Cozy Comfort
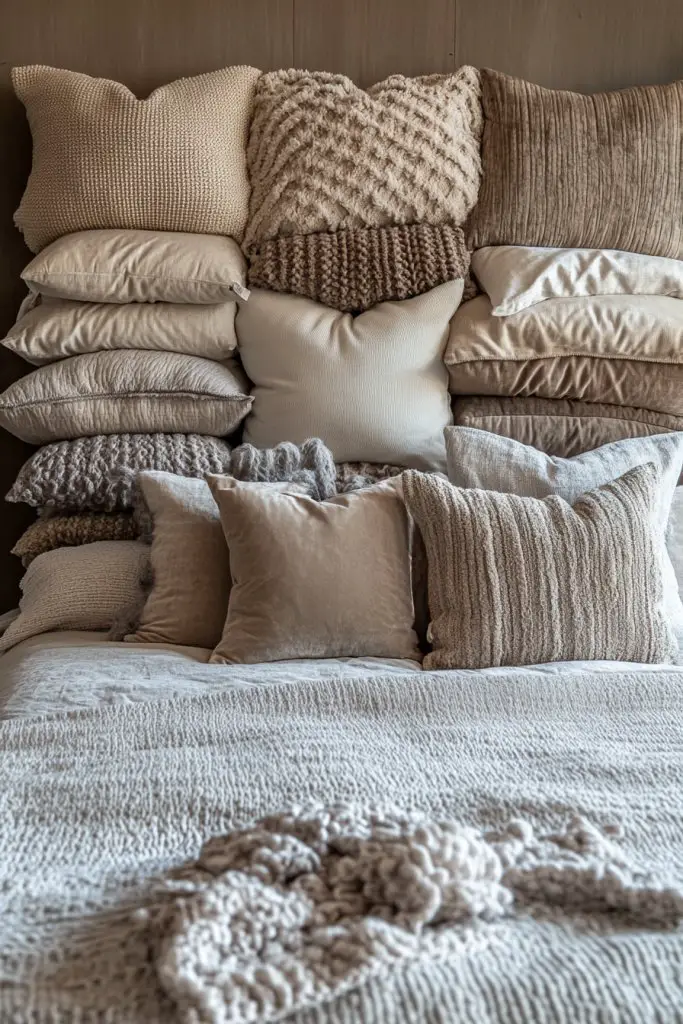
Ever wish your bed looked inviting and plush without spending a fortune? A layered fabric and pillow headboard creates a soft, cozy barrier that makes your space feel warm and welcoming. It’s a simple way to add texture and personality that’s both functional and decorative. Plus, it’s perfect for curling up with a good book.
Recommended Products to replicate this idea
| # | Preview | Product | |
|---|---|---|---|
| 1 |
|
Huatean Home Tufted Upholstered Headboard Queen Size, Solid Wood Head Board with Durable Metal Legs,... | Check Latest Price |
| # | Preview | Product | |
|---|---|---|---|
| 1 |

|
Utopia Bedding Throw Pillows (Set of 4, White), 18 x 18 Inches Pillows for Sofa, Bed and Couch... | Check Latest Price |
Picture a bed surrounded by an arrangement of assorted pillows—some in velvet, linen, or woven fabrics—stacked against a padded fabric panel. The layered look offers visual depth, with different textures, patterns, and sizes creating a relaxed, eclectic vibe. The headboard itself could be a soft upholstered panel or a fabric-covered frame, topped with a variety of cushions that invite touch and comfort.
Mix and match pillow shapes, sizes, and fabrics to suit your style—think boho, shabby chic, or modern minimalism. Use seasonal colors or patterns to refresh the look throughout the year. Incorporate textured throws or blankets for added warmth. Keep the arrangement balanced and inviting, avoiding clutter for a clean, curated appearance.
Start with a padded or foam-backed panel as your base, covered in a durable fabric of your choice. Arrange pillows in a layered fashion, securing them with fabric ties or inserting them into decorative cases. Use a combination of large, statement pillows and smaller accent cushions for variety. Attach the layered fabric panel to the wall or bed frame with brackets or hooks for stability. Adjust the pillow arrangement regularly to keep it looking fresh.
Personalize with embroidered initials, decorative trims, or contrasting piping on pillows. Incorporate seasonal motifs or colors to keep the look fresh. Add textured throws or faux fur accents for extra coziness. Keep the fabric clean and fluff pillows regularly to maintain the inviting, layered aesthetic.
A layered fabric and pillow headboard transforms your bed into a cozy retreat and showcases your style sensibility. It’s a flexible design that can evolve with your preferences and seasonal updates. Achieving a balanced, inviting look boosts your confidence in styling and decorating your space. Your bedroom will feel like a lush sanctuary, crafted by your own hand.
9. Mirrored Headboard for Glamorous, Reflective Style
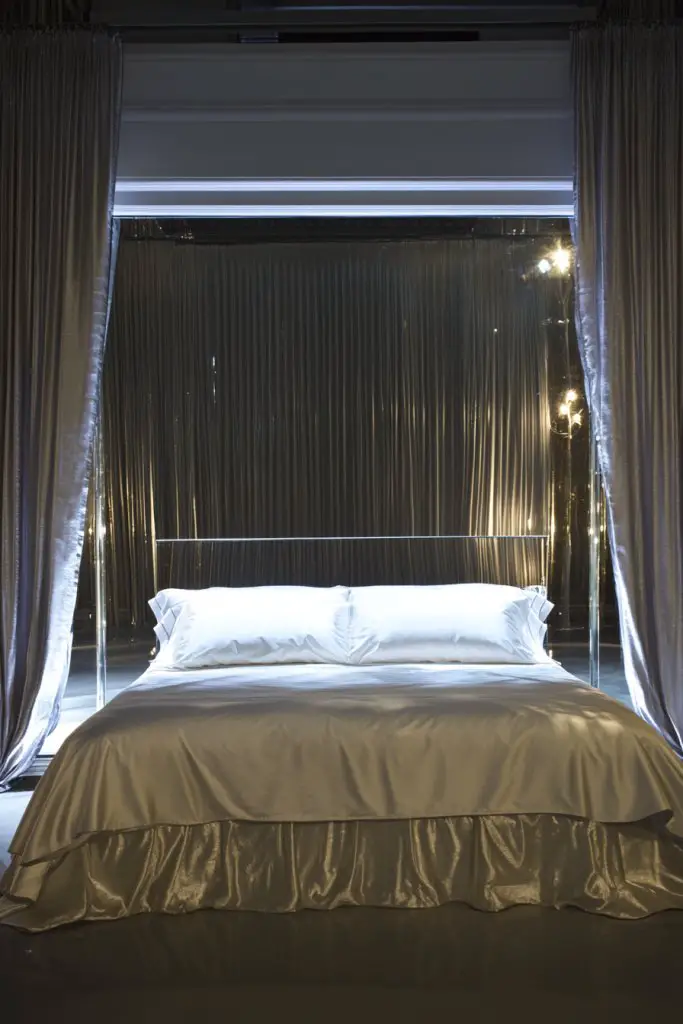
Want to add a touch of glamour and brightness to your bedroom? A mirrored headboard is the perfect solution. It creates the illusion of more space, reflects light beautifully, and adds a chic, sophisticated vibe. No wonder it’s a favorite among those who love a luxe aesthetic without the hefty price tag.
Recommended Products to replicate this idea
| # | Preview | Product | |
|---|---|---|---|
| 1 |

|
DUMOS Full Length Mirror 59"x17" Full Body Floor Mirror for Bedroom or Cloakroom, Can Stand Alone,... | Check Latest Price |
| # | Preview | Product | |
|---|---|---|---|
| 1 |

|
DESOMINOR 32FT Black Border Peel &Stick Black Wood Grain Wallpaper Border Removable Waterproof... | Check Latest Price |
Visualize a large, sleek mirror framed in ornate or minimalist styles, mounted behind your bed. The reflective surface captures the room’s light, bouncing it around and making the space feel larger. The frame can be metallic, upholstered, or even beveled glass, depending on your style. The mirror’s reflection creates a dynamic, ever-changing visual that can brighten even the gloomiest rooms.
Opt for frameless, full-glass designs for ultra-modern spaces or ornate, vintage-inspired frames for classic glamour. Incorporate lighting around the mirror edges, such as LED strips or sconces, to enhance its reflective qualities. Use it in small bedrooms to open up the space or in larger rooms as a statement piece. Pair with luxurious bedding and metallic accents for a cohesive, upscale look.
Choose a high-quality mirror with safety backing and appropriate dimensions. Frame it with materials that match your decor—metal, wood, or upholstered trim. Mount securely onto the wall, ensuring it’s level and anchored into studs for safety. For a seamless look, hide mounting hardware behind the frame or mirror edges. Consider adding a protective coating or anti-fog treatment if needed.
Customize by framing with decorative moldings or painting the frame in metallic finishes. Use LED backlighting or side sconces for ambient glow. Incorporate decorative elements like etched patterns or frosted sections for flair. Keep the mirror clean and streak-free to maximize its reflective magic.
A mirrored headboard instantly elevates your bedroom’s style quotient and makes your space feel more open. It’s a versatile choice that pairs with both modern and traditional decor. Installing one yourself can be rewarding and boost your confidence in home upgrades. Your bedroom will radiate glamour and brightness, all thanks to your DIY touch.
10. Upholstered Headboard with Quilted Pattern for Textural Interest
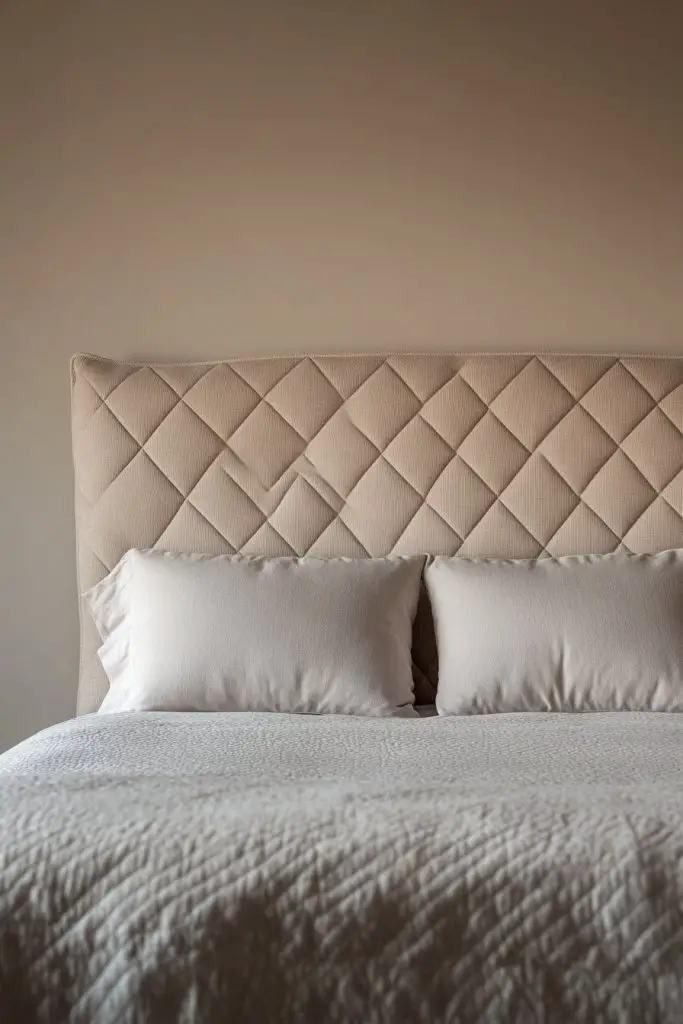
Looking to add subtle texture and sophistication to your bedroom? An upholstered headboard with a quilted pattern offers just that. It’s the perfect way to bring depth and visual interest without overwhelming your decor. Plus, it adds a layer of softness that invites you to relax and unwind.
Recommended Products to replicate this idea
| # | Preview | Product | |
|---|---|---|---|
| 1 |
|
Huatean Home Tufted Upholstered Headboard Queen Size, Solid Wood Head Board with Durable Metal Legs,... | Check Latest Price |
| # | Preview | Product | |
|---|---|---|---|
| 1 |

|
Utopia Bedding Quilted Fitted Mattress Pad, Queen Size, Elastic Fitted Mattress Topper Protector and... | Check Latest Price |
Imagine a padded headboard covered in plush fabric, featuring diamond, chevron, or other geometric quilting patterns. The stitching creates a tactile surface that plays with light and shadow, making the headboard more than just a flat surface. Choose fabrics like velvet, linen, or boucle for a rich, cozy feel. The geometric pattern adds a modern edge to classic softness.
Opt for a large, statement quilted headboard or a smaller, more subtle pattern for a minimalist look. Combine with textured bedding, embroidered pillows, or metallic accents for added depth. Use contrasting fabrics or piping to highlight the quilting design further. Match the quilting style to your overall decor—sleek diamonds for modern, more organic patterns for boho.
Start with a sturdy wooden or foam core base, then upholster with your chosen fabric. Attach the fabric tightly using a staple gun or upholstery tacks, making sure the pattern remains aligned and smooth. Sew or glue decorative quilting stitches, or opt for pre-quilted fabric if available. Mount the finished headboard onto your bed frame or wall, ensuring stability and safety. Consider adding a dust cover or sealant for longevity.
Add piping or contrasting thread to emphasize the quilting pattern. Incorporate personalized embroidery or monograms in the center or corners. Use seasonal fabrics or colors for variety, or add decorative trims for extra detail. Keep fabric clean with regular vacuuming and spot cleaning to maintain its plush, inviting appearance.
A quilted upholstered headboard combines comfort and elegance effortlessly. It’s adaptable to many decor styles and DIY-friendly with some basic upholstery skills. Seeing your own craftsmanship in a luxurious piece boosts confidence and inspires further home projects. Your bedroom will look polished, cozy, and uniquely yours.
11. Vintage Window Frame Headboard for Eclectic Charm
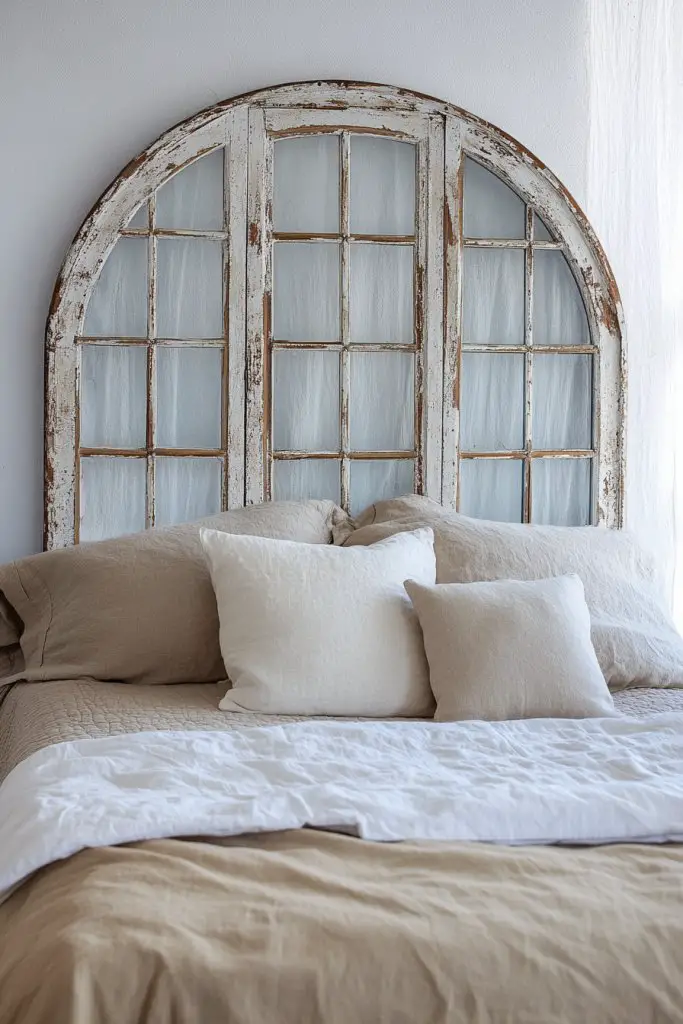
Craving a headboard that tells a story and adds instant character? A vintage window frame headboard offers eclectic charm and a whimsical touch. It’s perfect for creating a focal point that feels both nostalgic and artsy. Plus, it’s an easy way to incorporate repurposed, one-of-a-kind decor.
Recommended Products to replicate this idea
| # | Preview | Product | |
|---|---|---|---|
| 1 |
|
ComfIQ Serene Solid Wood Window-Pane Panel Headboard – Easy Assembly, Casual Coastal Style –... | Check Latest Price |
| # | Preview | Product | |
|---|---|---|---|
| 1 |

|
1/8" (0.118") Frosted Matte Acrylic Sheet 24"x12" Cast Plexiglass 3mm Thick Nominal Size AZM | Check Latest Price |
Picture an aged, distressed window frame mounted behind your bed, complete with panes, mullions, and weathered paint. You can leave the glass intact, add curtains or fabric behind it, or replace the glass with frosted or textured material. The frame’s imperfections and history add layers of visual interest and personality. It looks like a piece straight out of an antique shop or a shabby chic vignette.
Use multiple frames layered together for a gallery effect or a single large piece for impact. Paint or distress the frame further to match your decor style—whitewashed, darkened, or brightly colored. Decorate with vintage accessories, or keep it simple for a more understated look. It pairs well with soft bedding, floral prints, or rustic accents.
Find suitable vintage window frames from salvage yards, thrift stores, or online marketplaces. Clean and repair any broken glass or wood, then sand lightly for a smoother finish if desired. Mount the frame securely into wall studs using heavy-duty hooks or brackets. To add a personal touch, you can paint or distress the frame, or decorate it with decals or decals. Make sure it’s stable and safely secured before use.
Decorate with small ledges or hooks on the frame for hanging lightweight accessories or decorative items. Add seasonal fabric curtains or drapes for softness and privacy. Incorporate fairy lights or mini lanterns for a magical glow. Personalize with stickers, decals, or painted details to reflect your personality.
A vintage window frame headboard is a creative, budget-friendly way to bring history and charm into your space. It’s a conversation starter and a reflection of your eclectic taste. Installing it yourself can be a rewarding experience, boosting your confidence in repurposing and DIY projects. Your bedroom will radiate personality and artful history—an inspiring addition.
12. Fabric-Covered Pegboard Headboard for Practicality
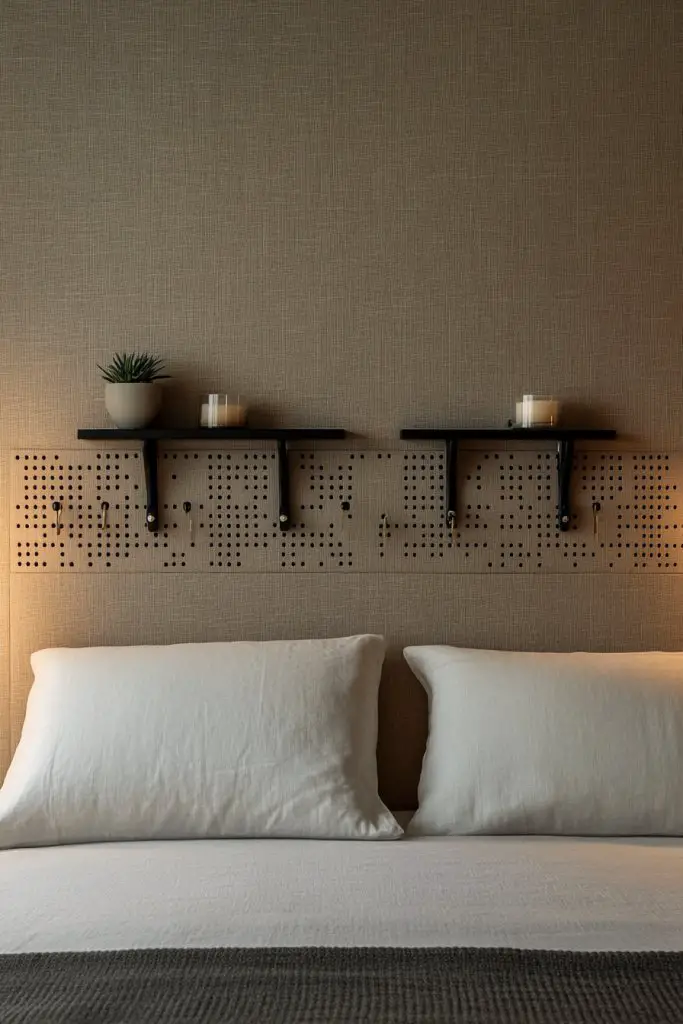
Ever wish your headboard could double as a functional organizer? A fabric-covered pegboard headboard makes that dream come true. It adds a modern, customizable element to your space while keeping your essentials within reach. It’s perfect for small bedrooms where storage is at a premium.
Recommended Products to replicate this idea
| # | Preview | Product | |
|---|---|---|---|
| 1 |

|
INCLY 278PCS Pegboard Accessories Organizer Kit, Peg Board Hooks Assortment with Bins for Organizing... | Check Latest Price |
| # | Preview | Product | |
|---|---|---|---|
| 1 |

|
Gorkett Peel and Stick Upholstered Wall Mounted Headboard Queen Size, 9 Panels Tufted Fabric... | Check Latest Price |
Picture a sleek pegboard mounted behind your bed, uniformly covered in soft fabric that matches your decor. The grid of hooks and pegs allows you to hang jewelry, accessories, or small decorative items—no clutter on your nightstand. The fabric softens the industrial look, making it blend seamlessly into cozy or contemporary styles. It’s a practical piece that looks stylish and organized.
Choose fabrics in patterns or textures that complement your bedding—think linen, velvet, or printed textiles. Customize with different hooks, baskets, or small shelves to suit your needs. Use it seasonally to display new accessories or keep it minimalist for a clean look. You can also add decorative fabric borders or piping for a polished finish.
Start with a sturdy pegboard cut to your desired size. Cover it in your chosen fabric, attaching it securely with a staple gun or adhesive. Reinforce the edges with trim or piping, if desired. Mount the fabric-covered pegboard onto the wall using heavy-duty anchors, ensuring it’s level and firmly attached. Add hooks, baskets, or shelves to organize your essentials effectively. Regularly update the contents to keep it fresh.
Personalize with custom labels, fabric patches, or decorative pins. Use seasonal themes or color schemes to change the look. Incorporate small decorative elements like fabric flowers or appliqués for extra flair. Keep the fabric clean and the hooks organized for both function and aesthetics.
A fabric-covered pegboard headboard is a clever, space-saving solution that combines style and practicality. It shows off your organizational skills and sense of design. Installing it yourself boosts your confidence in functional DIY projects. Your bedroom will be both beautiful and highly functional—proof that home organization can be stylish.
13. Wooden Pallet Headboard with a Natural Finish
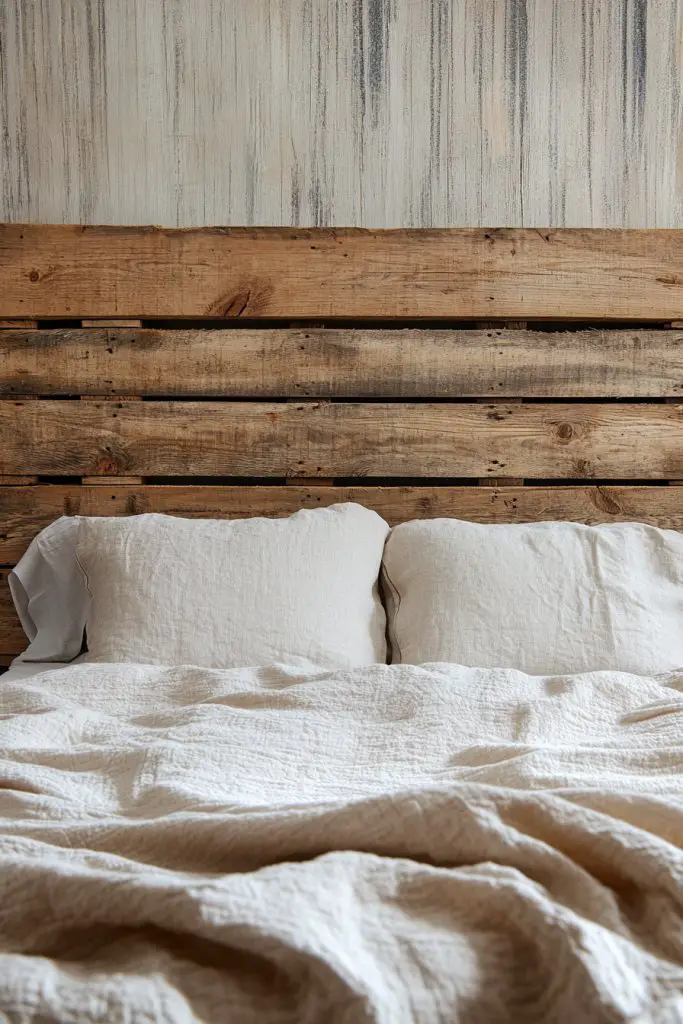
Want a rustic, budget-friendly headboard that adds charm without sacrificing simplicity? A wooden pallet headboard ticks both boxes. It’s a straightforward project that brings natural texture and warmth to your bedroom. Plus, it’s a great way to repurpose old pallets and create a unique focal point.
Recommended Products to replicate this idea
| # | Preview | Product | |
|---|---|---|---|
| 1 |

|
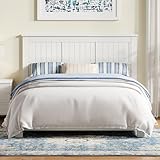
Prepac Stylish Flat Wood Panel Headboard for Queen Size Beds, Simplistic Wooden Queen Headboard... | Check Latest Price |
| # | Preview | Product | |
|---|---|---|---|
| 1 |

|
NEW JETO Metal Bed Frame,Queen Size Bed Frame with Storage Space,Heavy Duty Sturdy Mattress... | Check Latest Price |
Imagine a row of weathered, rough-hewn pallets stacked horizontally behind your bed, their grain and imperfections on full display. The natural finish highlights knots, cracks, and the aged patina, adding character and authenticity. The raw wood pairs beautifully with soft bedding and metal accents, creating a cozy, farm-inspired vibe. The imperfect beauty of the pallets makes your bedroom feel warm and inviting.
Arrange pallets horizontally, vertically, or in a layered design for different visual effects. Paint some planks in subtle shades or leave them all natural for a true rustic look. Mix with other reclaimed wood pieces or metal accents for an eclectic feel. Decorate with string lights, woven textiles, or vintage accessories to enhance the rustic atmosphere.
Source pallets from local stores, warehouses, or online. Clean and sand the surfaces to remove splinters and rough edges. Cut to size if necessary, then arrange and secure with nails or screws into wall studs or a simple frame. Seal or treat the wood with a clear, matte finish to protect against wear and enhance the natural look. Mount securely behind your bed, ensuring stability and safety. Add decorative touches like hooks or small shelves if desired.
Customize with painted patterns, stenciled designs, or distressing techniques for a more personalized look. Incorporate small hooks or brackets for hanging accessories or lightweight decor. Change the look seasonally with added textiles or decorative accents. Keep the wood clean and protected for long-lasting rustic charm.
A wooden pallet headboard proves that stylish, eco-friendly decor can be simple and affordable. It’s a DIY project that leaves a lot of room for creativity and adaptation. Seeing your own handcrafted piece in your bedroom boosts confidence in your home decor skills. Your space will radiate warmth, personality, and a touch of nature—crafted by your own hands.
14. DIY Painted Mason Jar or Bottled Light Headboard
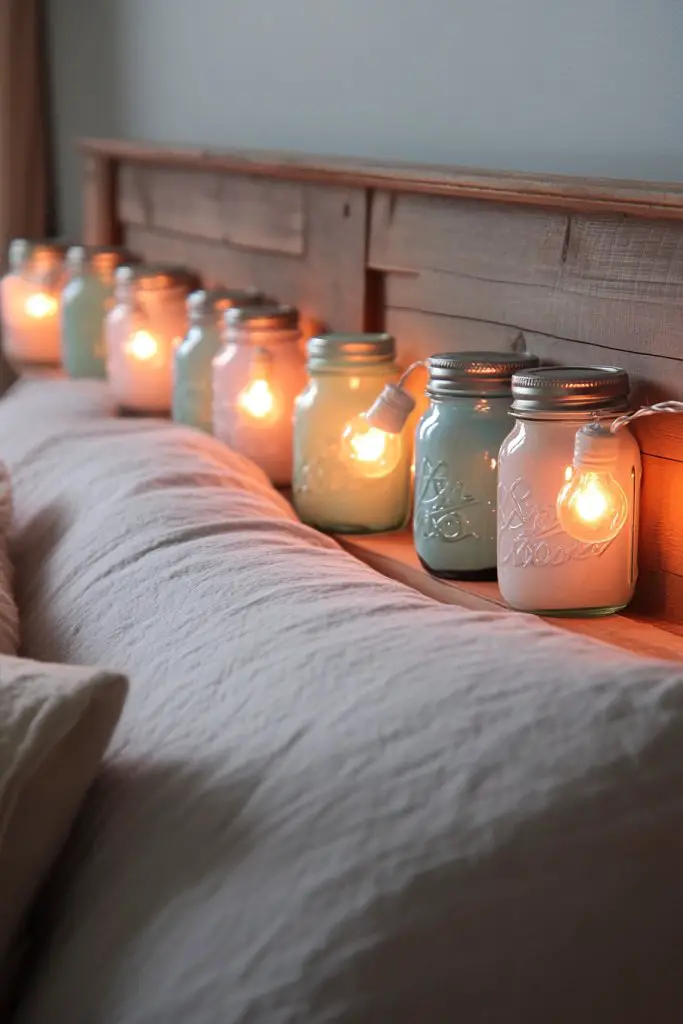
Craving a cozy, personalized glow in your bedroom? A DIY painted mason jar or bottled light headboard combines soft lighting with a charming, handcrafted look. It’s an affordable way to add ambiance and a touch of whimsy. Plus, it’s a project that sparks creativity and makes your space truly yours.
Recommended Products to replicate this idea
| # | Preview | Product | |
|---|---|---|---|
| 1 |

|
Kurt Adler UL 10-Light Clear Mason Jar Light Set | Check Latest Price |
| # | Preview | Product | |
|---|---|---|---|
| 1 |

|
JarThenaAMCS 3Pcs Vintage Floral Glass Storage Jars with Airtight Lid Wildflower Decorative... | Check Latest Price |
Picture a series of painted or distressed glass jars or bottles mounted on a wooden or metal backing behind your bed. The jars are filled with fairy lights or LED string lights, casting a warm, inviting glow. The painted designs—floral, geometric, or abstract—add a decorative element that blends rustic charm with modern aesthetics. The soft light reflects through the glass, creating a dreamy atmosphere.
Use different colored paints, frosted finishes, or patterns to match your decor. Arrange bottles in symmetrical rows or a random, artsy cluster for visual interest. Incorporate decorative elements like twine, lace, or ribbons for extra texture. Change out the lighting seasonally or for special occasions to keep the ambiance fresh.
Clean and paint your jars or bottles with weather-resistant, non-toxic paint. Drill small holes in the lids if they don’t already have openings. Securely mount the jars onto a wooden board, metal frame, or directly onto the wall using hooks or brackets. Thread fairy lights or LED string lights inside each jar, then plug in or battery-power the setup. Arrange for even spacing and ensure the wiring is hidden for a clean look.
Personalize with painted patterns, quotes, or initials on the jars. Use different light colors or dimming options for mood control. Incorporate decorative elements like faux flowers, feathers, or charms inside or around the jars. Keep the wiring tidy and replace batteries or bulbs as needed to maintain the cozy glow.
This project proves that a little creativity can turn simple glass jars into a magical headboard focal point. It’s a charming DIY that adds warmth and personality to your bedroom. Successfully creating your own lighting setup boosts confidence in your crafting skills. Your space will feel cozy, inviting, and uniquely personalized—thanks to your handiwork.
15. Upholstered Headboard with Embedded Storage Compartments
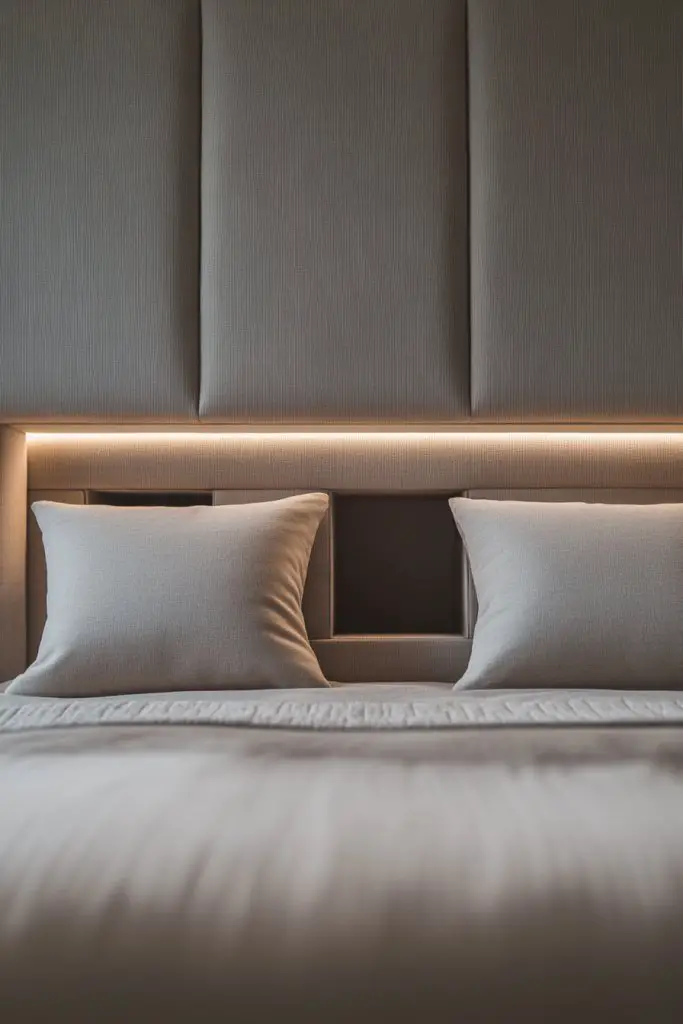
Want a headboard that does more than just look good? An upholstered headboard with built-in storage compartments combines comfort with practicality, making your bedroom both stylish and functional. It’s perfect for small spaces where every inch counts. Plus, it keeps your essentials close at hand without cluttering your nightstand.
Recommended Products to replicate this idea
| # | Preview | Product | |
|---|---|---|---|
| 1 |
|
Huatean Home Tufted Upholstered Headboard Queen Size, Solid Wood Head Board with Durable Metal Legs,... | Check Latest Price |
| # | Preview | Product | |
|---|---|---|---|
| 1 |
|
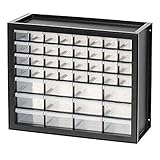
IRIS USA Screw Tool Organizer Small Parts Cabinet, 44-Drawer, Electronics Hardware Nuts and Bolts... | Check Latest Price |
Imagine a plush fabric headboard with discreet compartments or shelves hidden behind padded panels. The compartments can hold books, gadgets, or personal items, while the soft upholstery invites you to lean back comfortably. The design seamlessly integrates storage into the headboard, maintaining a sleek, cozy appearance. It’s like having a secret storage hideaway right behind your head.
Choose fabrics that match your decor—velvet, linen, or faux leather—for a tailored look. Design the compartments with different sizes or add doors and handles for a cleaner finish. Incorporate LED lighting inside the compartments for visibility at night. Keep the overall look balanced with decorative pillows or throws that complement the fabric.
Construct or purchase a padded panel with built-in compartments or cutouts. Attach the fabric tightly over the padding and frame, securing with staples or upholstery tacks. Install shelves or small drawers within the compartments, ensuring they are sturdy and accessible. Mount the headboard securely onto your bed frame or wall, ensuring stability. Add interior lighting if desired, with battery-powered or wired options.
Personalize with embroidered initials, decorative trims, or contrasting fabrics for different sections. Use seasonal colors or themes to keep it fresh. Incorporate small hooks or holders for chargers or accessories. Regularly tidy and reorganize the contents to keep the headboard functional and inviting.
A storage headboard maximizes utility without sacrificing style, proving that practicality and design can go hand in hand. Creating one yourself shows off your organizational and DIY skills. It transforms your bedroom into a neat, personalized retreat—crafted by your own hands, with flair and function.
16. Fabric-Covered Canvas Art Headboard for Artistic Flair
Looking for a bold, artistic statement that also functions as a headboard? A fabric-covered canvas art headboard combines creativity with practicality, turning a blank wall into a personalized masterpiece. It’s a perfect way to showcase your style and artistic side. Plus, it’s a customizable project that can evolve over time.
Recommended Products to replicate this idea
| # | Preview | Product | |
|---|---|---|---|
| 1 |

|
MHARTK66 3 Piece Framed Canvas Art Prints Wall Art for Living Room Modern Wall Decor for Bedroom... | Check Latest Price |
| # | Preview | Product | |
|---|---|---|---|
| 1 |
|
Huatean Home Tufted Upholstered Headboard Queen Size, Solid Wood Head Board with Durable Metal Legs,... | Check Latest Price |
Imagine a large canvas stretched over a sturdy frame, covered with your favorite fabric or printed design. The artwork could feature abstract patterns, geometric shapes, or even your own photography—whatever speaks to you. The textured fabric adds depth and tactile interest, making it a visual centerpiece. The headboard becomes a piece of art you can change or update whenever inspiration strikes.
Use bold, contrasting fabrics for a dramatic effect or subtle tones for understated elegance. Incorporate patterns or textures that complement your bedding and room decor. Frame the canvas with decorative molding or keep it simple for a modern look. Change the fabric seasonally or based on your mood for a fresh vibe.
Select a large, lightweight canvas or wooden panel, and stretch your chosen fabric over it, securing with a staple gun or upholstery tacks. Add extra padding or batting for a cushioned effect, if desired. Mount the finished piece onto the wall using brackets or picture hooks, ensuring it’s level and secure. For added flair, paint or embellish the edges with decorative trim or molding.
Personalize further by adding embroidered initials, painted accents, or textured elements like beads or sequins. Change out fabrics seasonally or for special occasions. Pair with matching wall art or decorative pillows to create a cohesive look. Keep the fabric clean and free of dust for long-lasting beauty.
Creating a fabric-covered canvas headboard allows you to blend art and decor seamlessly. It’s a rewarding project that results in a striking focal point. Seeing your own artistic creation in your bedroom boosts your confidence and sparks further creative endeavors. Your space will be uniquely yours, full of personality and style.
17. Leather or Faux Leather Headboard for Sleek Sophistication

Craving a headboard that exudes modern luxury and durability? A leather or faux leather headboard offers a sleek, sophisticated look that elevates your bedroom’s style. It’s a chic choice for contemporary spaces and easy to clean, making it both practical and stylish. Perfect for those who want a high-end feel without the high-end price.
Recommended Products to replicate this idea
| # | Preview | Product | |
|---|---|---|---|
| 1 |

|
Nathan James Harlow Modern Wall Mount Hanging Headboard, Queen, Brown Faux Leather | Check Latest Price |
| # | Preview | Product | |
|---|---|---|---|
| 1 |

|
Allewie Queen Size Platform Bed Frame with Fabric Upholstered Headboard and Wooden Slats Support,... | Check Latest Price |
Picture a smooth, matte or glossy leather surface stretched over a sturdy frame, with clean lines or subtle tufting. The reflective quality of leather adds a subtle sheen that catches the light, accentuating its sleekness. Choose classic shades like black, white, or deep brown for timeless elegance, or bold colors for a modern twist. The smooth surface creates a minimalist, high-end vibe that instantly updates your room.
Opt for a tall, wingback style for a dramatic look or a low-profile panel for a minimalist aesthetic. Pair with polished metal or acrylic bedside tables for a modern vibe. Complement with textured bedding, metallic accents, or monochrome color schemes. For a softer touch, add plush pillows and throws in contrasting fabrics.
Start with a sturdy frame, then cut or purchase a foam core backing to fit your design. Wrap the foam with high-quality faux or real leather, pulling tightly and securing with a staple gun or upholstery tacks. For tufted styles, sew or attach buttons in a grid pattern before mounting. Mount the finished headboard securely to your bed frame or wall using anchors. Clean and condition the leather regularly to maintain its appearance.
Add decorative stitching or contrast piping to enhance the design. Incorporate metallic or textured accents around the edges for extra detail. Change pillow covers frequently to refresh the look. Keep the leather conditioned and free of scratches for a polished, luxurious finish.
Leather and faux leather headboards bring a sleek, upscale vibe that elevates any decor. Crafting your own can be surprisingly straightforward and rewarding. Once installed, it adds a touch of sophistication and confidence to your decorating skills. Your bedroom will feel more luxe and styled—proof that DIY can reach high-end standards.
18. DIY Wooden Frame with Woven Rattan or Cane Insert
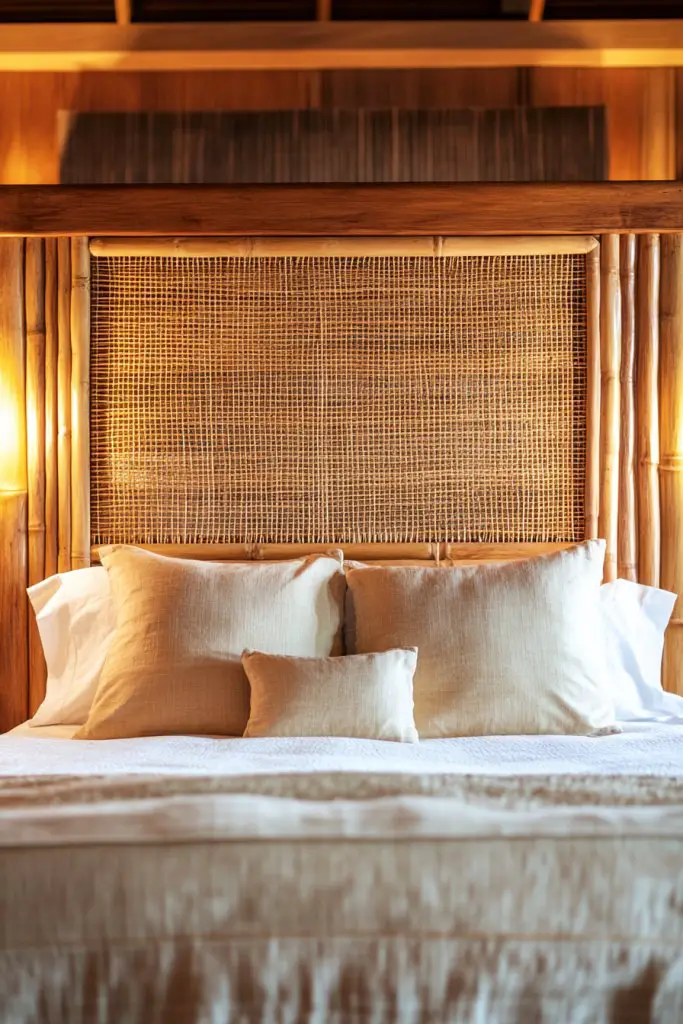
Looking to add a tropical, textured element to your bedroom? A wooden frame with woven rattan or cane insert offers a handcrafted, natural vibe that’s both stylish and relaxing. It’s an eye-catching focal point that also brings warmth and an artisanal feel. Plus, it’s a fun DIY project that’s surprisingly accessible.
Recommended Products to replicate this idea
| # | Preview | Product | |
|---|---|---|---|
| 1 |

|
Wesiti 14"x 59" Natural Cane Webbing V Shape Rattan Webbing Roll for Caning Projects Woven Mesh Cane... | Check Latest Price |
| # | Preview | Product | |
|---|---|---|---|
| 1 |

|
Califortree 5x7 Picture Frame - Can Display Photo 4x6 with Mat, Wood Frame with Shatterproof... | Check Latest Price |
Imagine a simple wooden frame, with a woven rattan or cane panel filling the center. The intricate weaving pattern adds texture and visual interest, creating a contrast with smooth bedding or sleek furniture. The natural fibers and warm wood tones evoke a tropical or coastal vibe, transforming your space into a relaxing retreat. The weave’s pattern adds a tactile depth that invites touch and admiration.
Opt for lighter woods like bamboo or teak for a more authentic look. Use darker stains or paints to match your decor style. Combine with other natural materials—sea shells, driftwood, or linen textiles—for a cohesive, beach-inspired aesthetic. You can also experiment with different weave patterns for unique visual effects.
Cut a sturdy wooden frame to size, then sand and finish it with a protective coat. Stretch and secure your woven rattan or cane panel tightly within the frame, using glue or staples at the edges for a seamless look. Mount the finished piece onto your wall or bed frame with brackets or hooks, ensuring stability. Adjust tension and weave pattern as needed for a smooth, uniform appearance.
Add decorative accents like painted stripes or metallic thread within the weave. Incorporate shells or beads into the pattern for a personalized touch. Change the stain or finish seasonally to match your decor updates. Keep the weave clean and dust-free to maintain its natural beauty.
A woven rattan or cane headboard is a beautiful, artisanal project that adds texture and warmth. It’s a versatile design that suits coastal, boho, or tropical decor themes. Successfully building this piece boosts your confidence in woodworking and weaving crafts. Your bedroom will radiate handcrafted charm and relaxed luxury—crafted with your own hands.
Conclusion
With a wide range of creative options—from upholstered chic to rustic wooden designs—these custom headboard ideas provide endless opportunities to express your style. Don’t hesitate to try out new materials, colors, or patterns to make your bedroom uniquely yours. Embrace these ideas and transform your space into a cozy, stylish retreat that truly reflects your personality and taste!