
17 Dining Room Paneling Ideas with Classic Elegance
Imagine walking into a dining room that instantly exudes timeless sophistication—that’s the magic of well-chosen paneling. Dining room paneling ideas have surged in popularity because they add warmth, character, and a touch of classic elegance that transforms any space into a refined retreat.
In this article, you’ll uncover a variety of paneling styles that cater to different tastes and interiors. From traditional wainscoting to intricate wood designs, these ideas will inspire you to elevate your dining area with timeless charm and personalized flair.
1. Wainscoting with Traditional Beadboard for Timeless Charm
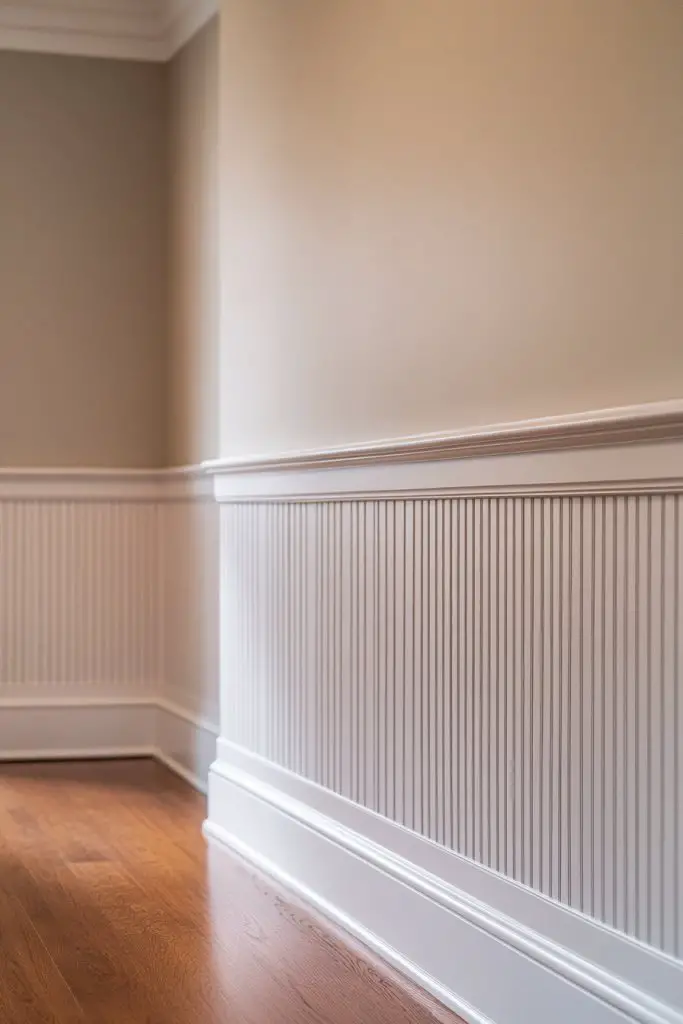
Ever wish your dining room felt more refined but don’t want to overhaul the entire space? Wainscoting with beadboard offers a simple way to add that classic charm without too much fuss. It’s perfect for homeowners craving a timeless look that elevates their decor. Plus, it’s surprisingly affordable and easy to install, making it a popular choice.
Recommended Products to replicate this idea
| # | Preview | Product | |
|---|---|---|---|
| 1 |
|
Graham & Brown Paintable Pre-Pasted Beadboard Wallpaper | Check Latest Price |
| # | Preview | Product | |
|---|---|---|---|
| 1 |
|
Rust-Oleum 1990502 Painter's Touch Latex Paint, Quart, Flat White 32 Fl Oz (1 Quarts Pack of 1) | Check Latest Price |
Imagine soft, vertical beadboard panels painted in warm neutrals wrapping your walls, adding texture and depth. The gentle grooves catch the light, creating subtle shadows that enhance the room’s character. Pair it with a smooth, matte finish for a cozy yet sophisticated vibe. The design invites your eyes to wander, giving the space a welcoming, vintage-inspired feel.
You can keep it classic with white or go bold with dark hues like navy or charcoal. For a more eclectic look, mix beadboard with decorative molding or wallpaper accents. In smaller rooms, scale down the panel height to avoid overwhelming the space. Seasonal tweaks, like adding a warm-colored accent or a textured fabric curtain, can refresh the look effortlessly.
Start by measuring your wall height and choosing beadboard panels that suit your aesthetic. You’ll need primer, paint, a saw, and nails or adhesive for installation. For a DIY project, carefully cut panels to size, then attach them with nails or a strong adhesive. Finish with caulk or trim for clean edges, and paint in your preferred shade. For a polished look, consider adding a chair rail or decorative cap molding.
Customize your beadboard by staining it a rich wood tone or distressing the paint for a vintage feel. Add decorative corner blocks or rosettes at panel intersections for extra detail. Incorporate contrasting trim or wallpaper behind the beadboard for visual interest. Personal touches like a handwritten menu board or vintage hooks can make it uniquely yours.
Wainscoting with beadboard has stood the test of time for a reason—its charm is undeniable. Whether you’re aiming for farmhouse coziness or a more refined look, this classic feature adapts easily. DIY or hire a pro, and you’ll have a stunning transformation that makes your dining space feel warm and stylish.
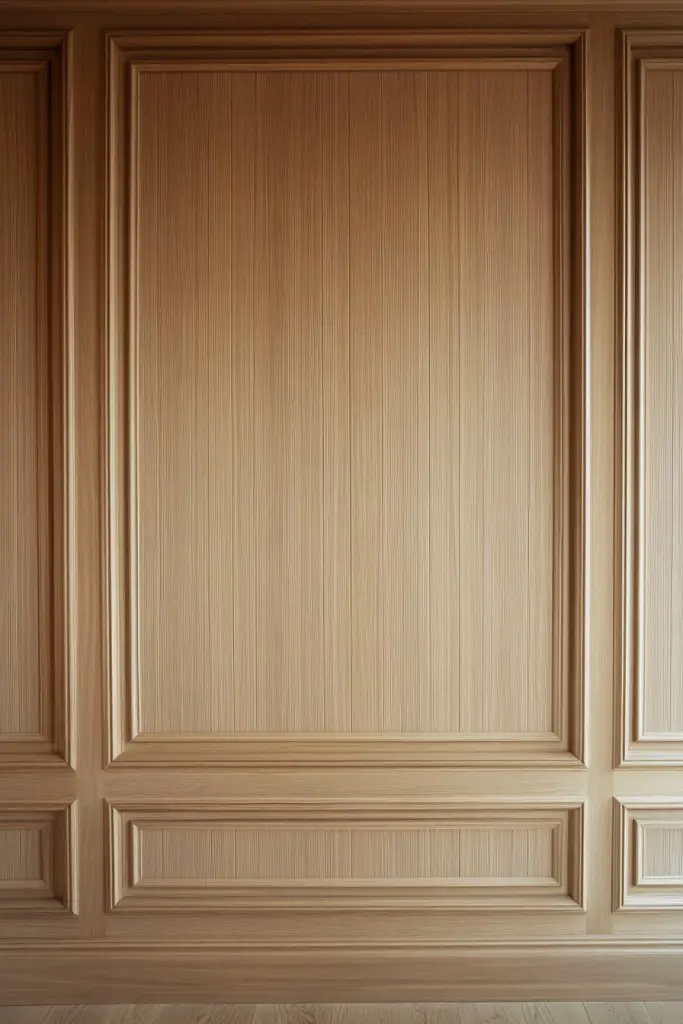
2. Raised Panel Molding for Architectural Grandeur
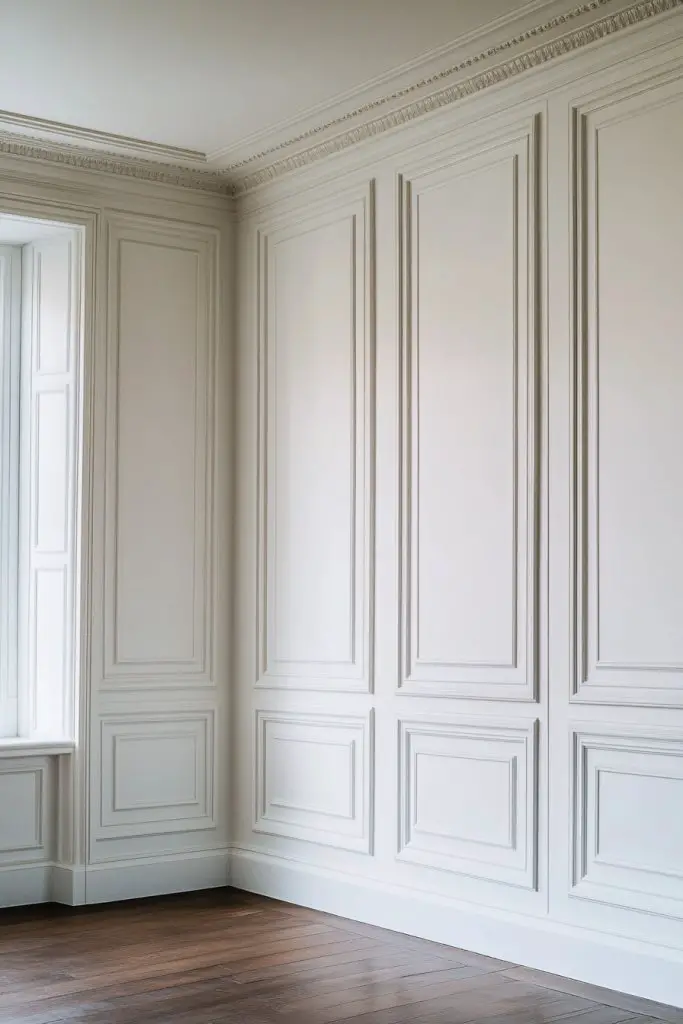
Looking to give your dining room a sense of grandeur without building an entirely new wall? Raised panel molding creates a stately, museum-quality vibe that elevates any space. It’s perfect for those who want to add a touch of luxury and craftsmanship. Plus, it can make even modest rooms feel more substantial and elegant.
Recommended Products to replicate this idea
| # | Preview | Product | |
|---|---|---|---|
| 1 |
|
Ekena Millwork 24"W x 12"H x 5/8"P Legacy Raised Panel Decorative Wall Panel | Check Latest Price |
| # | Preview | Product | |
|---|---|---|---|
| 1 |

|
Musanpou Unique Hand Carved Wooden Wall Panels with Hanging Floral Decorations - Rustic Farmhouse... | Check Latest Price |
Picture deep, intricately carved wooden panels framed by wide, decorative moldings. The rich, dark stain highlights the craftsmanship, while the raised surfaces cast shadows that add depth. When illuminated by soft lighting, the panels seem to come alive, transforming your wall into a piece of art. It’s like stepping into a historic estate every time you dine.
Choose traditional motifs like acanthus leaves or geometric patterns for a classic look, or go modern with clean, simple lines. You can paint the panels in bold colors for a contemporary twist or stain them to showcase natural wood grain. For small spaces, keep the panels narrower to avoid overpowering the room. Seasonal accents like metallic or glossy finishes can add flair.
Start by selecting high-quality molding or custom panels, then sketch your design on the wall. Use a level and template for precise placement. Attach the panels with construction adhesive and finishing nails, ensuring they’re flush and secure. Fill nail holes with wood filler, sand smooth, and apply your chosen stain or paint. Finish with a clear coat for durability. For a seamless look, consider crown molding at the top.
Add decorative elements like corner blocks or rosettes at panel intersections for extra detail. Incorporate metallic accents or gilded edges for a regal touch. You can also inset wallpaper or textured finishes within the panels for visual contrast. Personalize your design with monograms or family crests for a bespoke feel.
Raised panel molding not only adds architectural interest but also elevates your entire dining experience. It’s a timeless technique that adapts to both historic and modern aesthetics. With patience and a bit of craftsmanship, you can create a statement wall that impresses every guest and boosts your home’s value.
3. Shiplap Paneling for Coastal Elegance
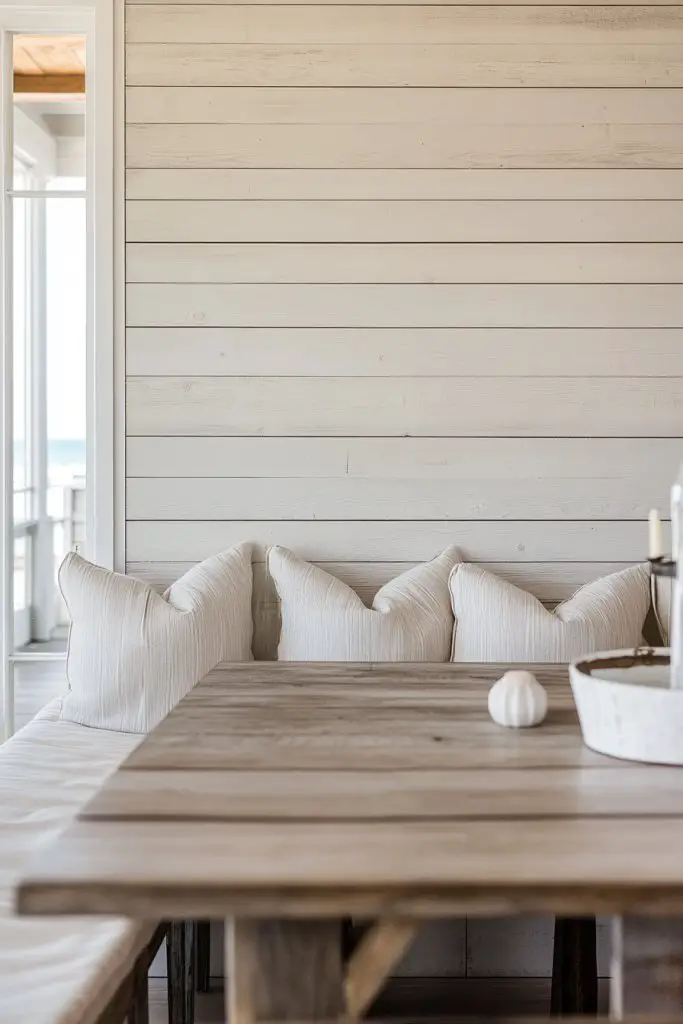
Craving that relaxed, beachy vibe without sacrificing style? Shiplap paneling delivers coastal elegance and casual charm in one package. It’s a favorite for homeowners wanting to evoke seaside serenity or add texture to a plain wall. Plus, it’s surprisingly versatile and easy to install.
Recommended Products to replicate this idea
| # | Preview | Product | |
|---|---|---|---|
| 1 |

|
Luxdecor Real Wood Wall Planks - White Shiplap Boards 5" Peel and Stick - 10 Pieces, 12.5 Sq Ft | Check Latest Price |
| # | Preview | Product | |
|---|---|---|---|
| 1 |

|
Zinsser 02774 PERMA-WHITE Mold & Mildew Proof Interior Paint, Quart, Eggshell White | Check Latest Price |
Imagine horizontal planks painted in crisp white or muted blues, running seamlessly across your wall. The narrow gaps between boards add subtle shadow lines, giving depth and dimension. The rough-hewn texture of shiplap creates a rustic yet refined look, reminiscent of seaside cottages. When paired with natural light, it feels fresh and airy, inviting relaxation.
You can keep it simple with classic white or embrace weathered finishes for a vintage look. For a more modern twist, paint shiplap in bold or contrasting colors, like charcoal or navy. Combining shiplap with other materials, such as stone or wood accents, can add layers of visual interest. Seasonal decor like nautical accents or cozy textiles can refresh the space.
Start by measuring your wall and purchasing pre-cut shiplap boards or strips. Sand and prime if you plan to paint, or lightly distress for aged effects. Attach the planks horizontally using nails or a pneumatic nailer, ensuring tight, even spacing. Seal the surface with a clear protective coat if desired. Keep the installation straight with a level, and consider adding decorative trim at the top and bottom for a finished look.
Use contrasting paint colors on the shiplap or add a weathered, whitewashed finish for authenticity. Incorporate decorative hooks or shelves for functional decor, avoiding wall art or vases to stay true to the coastal theme. Layer textiles like linen curtains or woven rugs to complement the breezy aesthetic. Personal touches like driftwood or vintage lanterns add character.
Shiplap paneling instantly transforms a room into a seaside retreat, even if you live miles from the coast. Its blend of rustic charm and modern simplicity makes it a go-to choice. Whether you DIY or hire a pro, you’ll end up with a feature wall that feels both fresh and timeless, perfect for entertaining or everyday dining.
4. Picture Frame Molding for a Sophisticated Panel Effect
Want to add a touch of elegance and artful sophistication to your dining room? Picture frame molding creates a refined, tailored look that mimics gallery walls without the clutter. It’s perfect for homeowners who love clean lines but crave visual interest. The best part? It’s surprisingly simple to achieve.
Recommended Products to replicate this idea
| # | Preview | Product | |
|---|---|---|---|
| 1 |

|
Art3d 30Ft Flexible Peel and Stick Crown Molding Trim, Self-Adhesive Panel Moulding Décor Lines for... | Check Latest Price |
| # | Preview | Product | |
|---|---|---|---|
| 1 |

|
KURUI 303Pcs Picture Hanging Kit, Picture Hangers Assorted Kit with Heavy Duty Picture Hanging... | Check Latest Price |
Visualize large, rectangular or square frames carved into the wall, painted in a contrasting color or finished with ornate molding. The framed sections create a sense of depth and structure, almost like miniature artworks. Soft lighting highlights the borders, emphasizing the geometric pattern. The overall effect elevates your space, making it feel curated and luxurious.
Use ornate or minimalist moldings depending on your style—think clean, sharp edges for modern decor or elaborate curves for vintage charm. Paint the frames in bold colors or metallic finishes for extra impact. For a more subdued look, stick with monochromatic tones and subtle textures. This technique adapts well to both small and large walls.
Start by marking the desired frame sizes with a pencil and level. Cut molding pieces with a miter saw to ensure clean corners. Attach the moldings with finishing nails, then fill nail holes with wood filler. Paint or stain the frames in your preferred finish, choosing high-quality paints for a sleek look. For extra durability, add a clear coat. Consistent spacing between frames helps maintain symmetry.
Add decorative corner blocks or rosettes at the intersections for a handcrafted look. Experiment with metallic or matte finishes to match your decor. Incorporate inset panels of wallpaper, fabric, or textured paint inside the frames for variety. Personalize further with monograms or custom motifs for a truly bespoke wall.
Picture frame molding offers a sophisticated upgrade that’s versatile and timeless. It suits both traditional and contemporary styles, ensuring your dining room feels polished and intentional. Once installed, it provides a perfect backdrop for your table and a conversation piece for guests, boosting your confidence as a decorator.
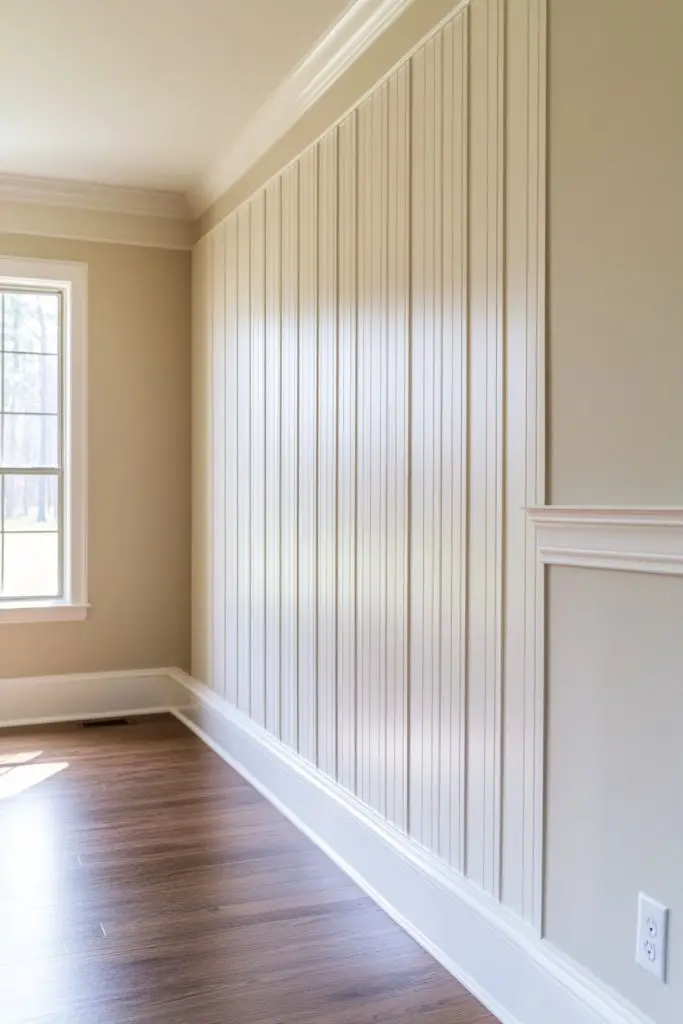
5. Tongue and Groove Paneling for Seamless Classic Style
Looking for a sleek, unified wall that looks effortlessly timeless? Tongue and groove paneling creates a smooth, continuous surface that exudes classic elegance. It’s ideal for those who want a polished, minimalist aesthetic with a touch of craftsmanship. Plus, it’s a straightforward project for DIY enthusiasts.
Recommended Products to replicate this idea
| # | Preview | Product | |
|---|---|---|---|
| 1 |
|
Cedar Tongue and Groove Wall Panels 3 ft Long – Natural Cedar Wood Panels for Walls, Saunas, and... | Check Latest Price |
| # | Preview | Product | |
|---|---|---|---|
| 1 |
|
Loctite Power Grab Express Heavy Duty Construction Adhesive, 9 fl oz Cartridge, 1 Pack - Versatile... | Check Latest Price |
Envision long, horizontal planks fitted tightly together, painted in shades like soft cream or cool gray. The interlocking edges ensure a seamless appearance, with no visible gaps or joints. The subtle texture adds warmth, while the clean lines make the room feel more expansive. When lit softly, the panels reflect light evenly, creating a calm, inviting atmosphere.
Opt for painted or stained finishes depending on your decor style—light colors for airy, modern spaces, or darker stains for a cozy, traditional vibe. For a more rustic look, distress the panels lightly or leave some natural wood grain visible. You can also combine with other panel styles, like beadboard or shiplap, for layered visual interest.
Begin by measuring your wall and selecting tongue and groove boards that fit your design. Use a level and pencil to mark your lines. Attach the panels with nails or a pneumatic nailer, ensuring tight fit and alignment. Fill any nail holes with wood filler, then sand smooth. Paint or stain the panels, applying multiple coats for full coverage. Seal with a clear topcoat for durability. Consider adding baseboards or crown molding for a finished look.
Customize by choosing contrasting paint or stain colors for a two-tone effect. Incorporate decorative hardware or carved accents to add personality. For a vintage vibe, add distressed paint or antiqued finishes. You can also install LED strip lighting behind the panels for subtle backlighting, creating a dramatic effect.
Tongue and groove paneling offers a refined, seamless aesthetic that suits many decor styles. It’s a classic choice that adds warmth and structure to your dining space. With patience and attention to detail, you’ll achieve a polished look that enhances your home’s character and your confidence as a decorator.
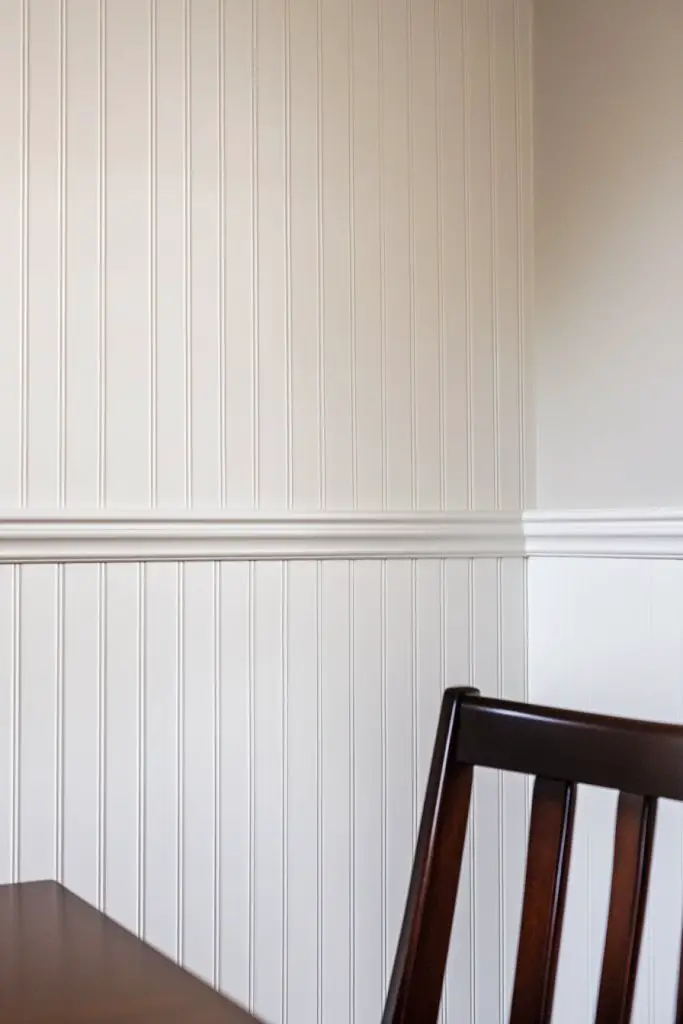
6. Beadboard with Chair Rail for a Traditional Look
Craving a traditional, cozy dining room that feels inviting and timeless? Combining beadboard with a chair rail instantly adds architectural interest and a classic charm. It’s a versatile look that works well in both formal and casual settings. Plus, it’s a straightforward way to add texture without overwhelming the space.
Recommended Products to replicate this idea
| # | Preview | Product | |
|---|---|---|---|
| 1 |
|
Graham & Brown Paintable Pre-Pasted Beadboard Wallpaper | Check Latest Price |
| # | Preview | Product | |
|---|---|---|---|
| 1 |

|
moonoom 20 Ft x 1.6''Wall Decoration Molding Trim,Self-Adhesive 3D Chair Rail Panel Molding,... | Check Latest Price |
Visualize crisp beadboard panels painted in soft whites or pastel shades, topped with a decorative chair rail in a contrasting or matching color. The horizontal line of the rail draws the eye upward, making the ceiling feel higher. The textured panels create a subtle pattern that softly catches the light, adding warmth and charm. This combination offers a balanced, harmonious look that’s both old-world and fresh.
Choose a simple, smooth beadboard for a minimalist aesthetic or add ornate moldings for a more elaborate look. Play with color—dark beadboard with light trim for contrast, or tone-on-tone for subtle elegance. For seasonal updates, swap out the chair rail for a different color or finish, like metallic or distressed paint. The style can be adapted to small or large rooms with proportional panel heights.
Start by outlining your design with a level and pencil. Attach beadboard panels with nails or adhesive, ensuring they’re straight and flush. Install the chair rail at the desired height, then fill nail holes and seams with caulk or wood filler. Paint or stain the beadboard and trim for a polished finish. Consider adding crown molding or baseboards for extra detail. Regular maintenance involves gentle cleaning and touch-up paint.
Add decorative accents like ornate corner blocks or carved medallions. Experiment with different paint finishes—matte, semi-gloss, or distressed—to match your style. Incorporate wall-mounted hooks or small shelves on the beadboard for functional decor. Personal touches like vintage hardware or fabric-covered panels can give your space a unique character.
This classic pairing instantly upgrades your dining room with timeless appeal. It’s a flexible solution that can be tailored to suit your personal taste and your room’s proportions. With a little effort, you’ll enjoy a charming, handcrafted aesthetic that makes every meal feel special.
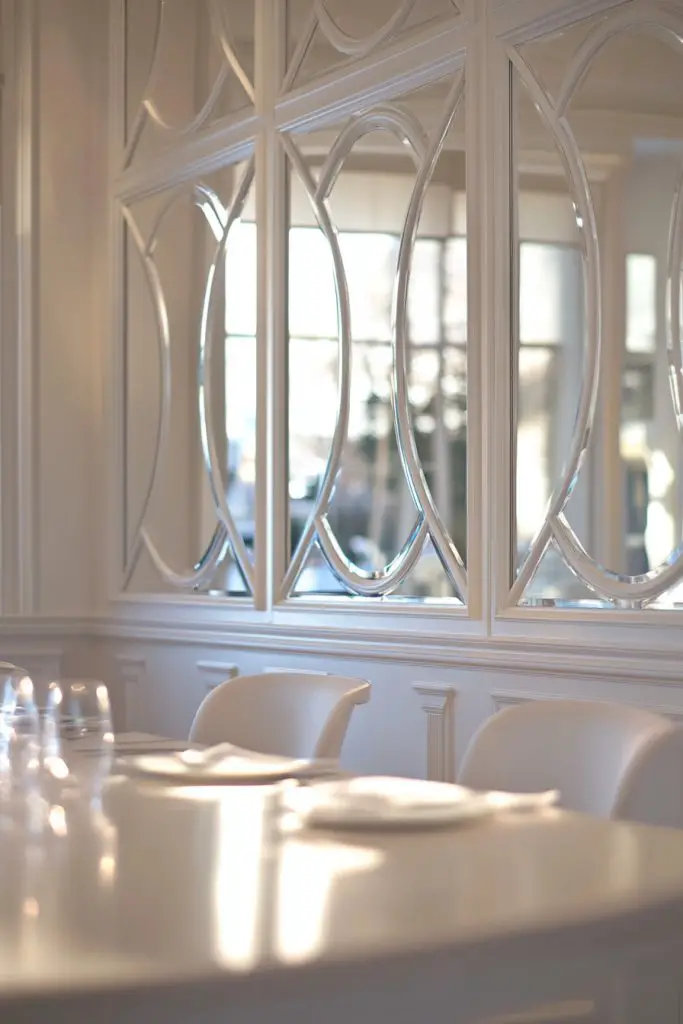
7. Mirror-Embedded Panel Walls for Light and Depth
Want to make your dining room feel brighter and more spacious without knocking down walls? Mirror-embedded panel walls reflect light, creating an illusion of depth and openness. It’s an elegant solution that adds personality while boosting your room’s visual appeal. Plus, it’s an easy way to incorporate a touch of glamour.
Recommended Products to replicate this idea
| # | Preview | Product | |
|---|---|---|---|
| 1 |

|
Ruomeng Home Gym Mirrors 12 Inch x 12Pcs Wall Mounted Mirror Glass Frameless Full Length Mirror... | Check Latest Price |
| # | Preview | Product | |
|---|---|---|---|
| 1 |

|
Vittanly 10 Pack Picture Frames Collage Wall Decor, Gallery Wall Frame Set for Wall or Tabletop... | Check Latest Price |
Imagine sleek, decorative panels with inset mirrors arranged in geometric patterns or framed with ornate moldings. The reflective surfaces bounce natural and artificial light around the room, making it appear larger. The combination of textures—smooth glass contrasted with textured or painted panels—adds sophistication. When illuminated by soft lighting, the mirrors create a shimmering, inviting ambiance.
Choose frameless or framed mirrors depending on your aesthetic—sleek and modern or vintage and ornate. For a subtle look, opt for small, inset mirrors within textured panels; for drama, cover entire walls with large mirrored panels. Incorporate decorative trims or contrasting paints around the mirrors for added depth. Seasonal adjustments include adding decorative tapestries or fabric accents around the mirrors.
Begin by marking your panel layout and selecting mirror sizes. Attach panels with a strong adhesive or mounting hardware suitable for mirrors. Carefully install the mirrors within the frames or cutouts, ensuring they are flush and secure. Seal edges with appropriate caulk or trim to prevent dust buildup. Finish with paint or decorative molding around the panels for a cohesive look. Regular cleaning with glass cleaner keeps the mirrors shining.
Frame the mirrors with decorative moldings or metallic finishes for extra flair. Incorporate LED backlighting behind the panels for a luminous glow. Mix in textured wall coverings or fabric panels to complement the mirrors without cluttering the space. Personal touches like etched designs or custom shapes can turn your wall into a statement piece.
Mirror-embedded panels are a smart, stylish way to amplify your room’s light and size. They seamlessly blend function with high-end design, making your dining area feel luxurious. With creative choices, you’ll create a space that feels both expansive and elegant, inspiring confidence in your decorating skills.
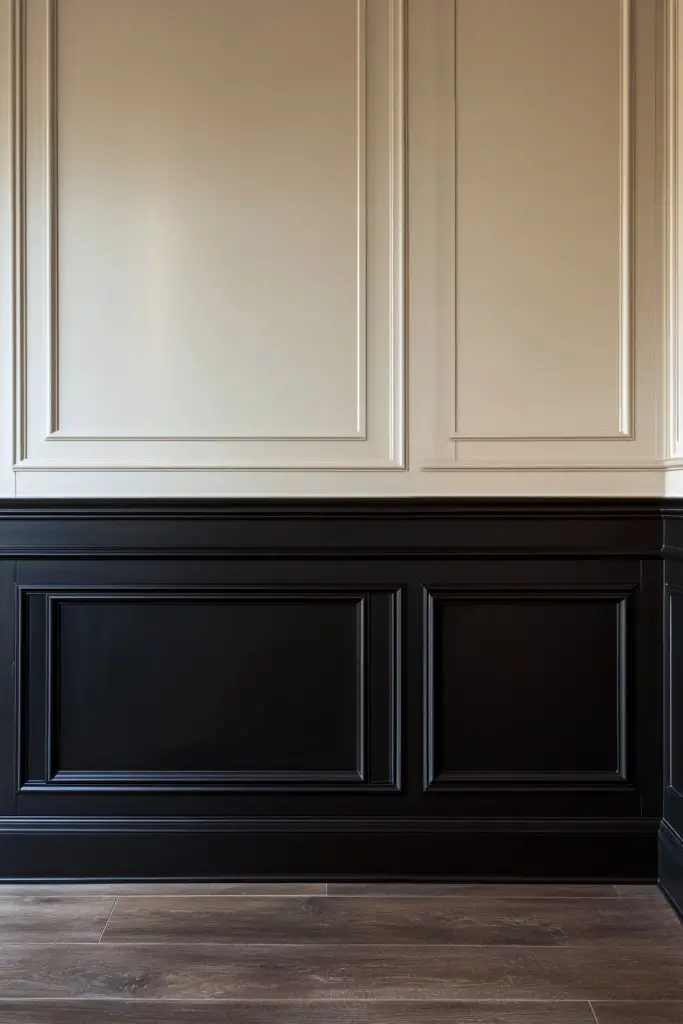
8. Elegant Wainscoting with Dark Paint Contrast
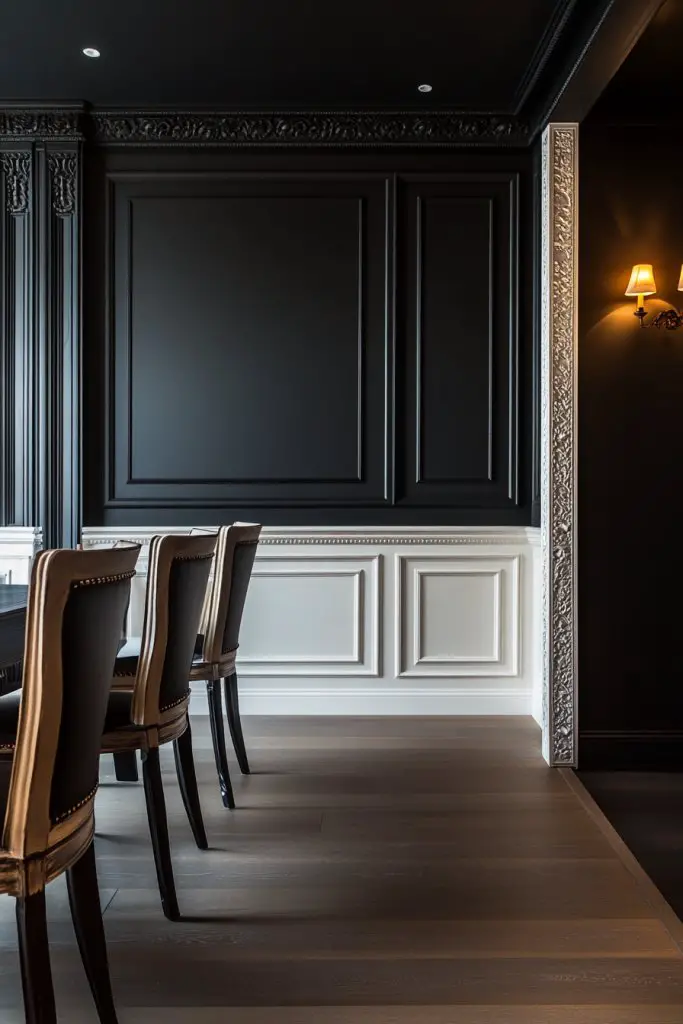
Looking to add drama and sophistication to your dining room? Dark paint contrasted with elegant wainscoting creates a striking visual impact. It’s a perfect choice for those who want a bold, luxurious ambiance that still feels timeless. This combo instantly elevates your space from ordinary to extraordinary.
Recommended Products to replicate this idea
| # | Preview | Product | |
|---|---|---|---|
| 1 |

|
Art3d Pre-Cut Wall Molding Set of 6 pcs, Ready-to-Assemble Wainscoting Panels for Interior Wall... | Check Latest Price |
| # | Preview | Product | |
|---|---|---|---|
| 1 |
|
Zinsser 02774 PERMA-WHITE Mold & Mildew Proof Interior Paint, Quart, Eggshell White | Check Latest Price |
Picture white or light-colored wainscoting panels painted in crisp, matte white or soft neutrals, topped with a deep, rich hue like navy or charcoal. The contrast draws the eye downward, making the wainscoting a focal point. The textured panels add depth, while the dark paint creates a cozy, intimate atmosphere. The interplay of light and shadow enhances the room’s architectural features.
Use high-gloss or matte finishes depending on your style—gloss adds modern sophistication, matte offers a softer, muted elegance. Incorporate a decorative chair rail in a metallic or contrasting color for a layered look. For a more eclectic feel, mix panel sizes or add in textured wallpaper behind the wainscoting. Seasonal accents like natural textiles or metallic decor can complement the bold color scheme.
Start by painting the upper walls in your chosen light color. Carefully measure and install the wainscoting panels, ensuring they’re level and evenly spaced. Use painter’s tape to create clean lines for the dark paint. Seal the panels with a primer before applying the dark hue, then finish with a clear protective coat. Add trim or molding at the top and bottom for a polished appearance. Regular touch-ups keep the contrast crisp.
Add decorative molding or ornate trim to heighten the sense of luxury. Incorporate metallic or textured paints for accents or borders. Personalize your space with monograms or family emblems painted or embossed on the panels. Use complementary textiles, like velvet or silk curtains, to match the rich, dramatic palette.
Dark contrast wainscoting offers a bold statement that’s also versatile enough to suit many decor styles. It’s a timeless look that, once mastered, can be adapted for different seasons or moods. Your dining room will exude confidence and sophistication, making every meal feel like a special occasion.
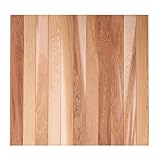
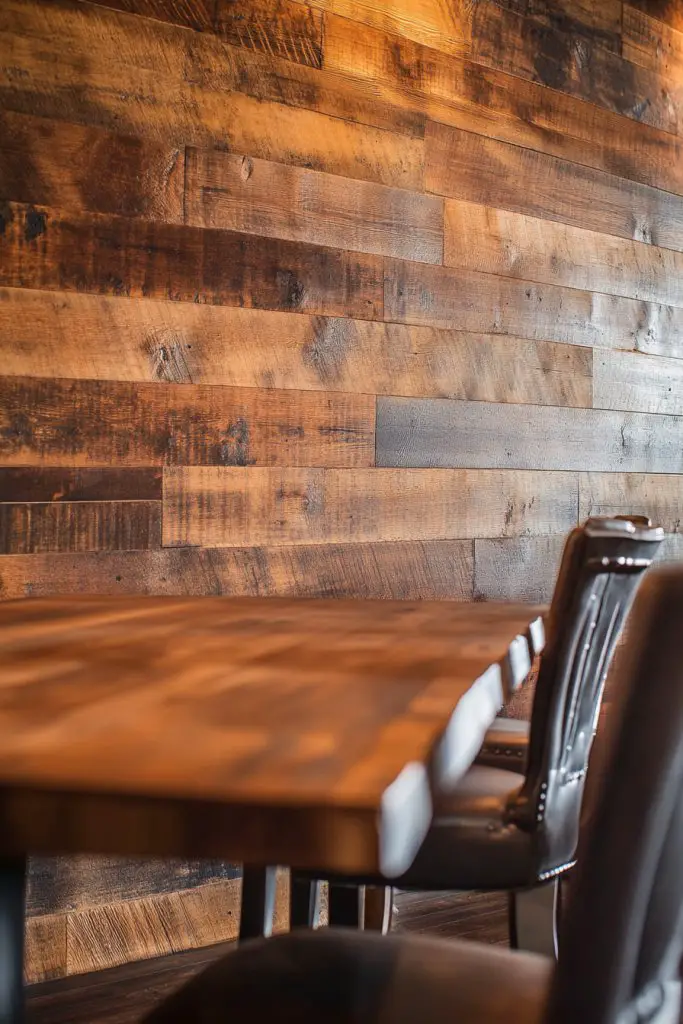
9. Faux Wood Paneling for Rustic-Refined Elegance
Craving that warm, cozy feel of rustic wood but not ready for the real deal? Faux wood paneling gives you all the charm of traditional timber with none of the maintenance. It’s perfect for adding texture and character to your dining space while maintaining a clean, refined look. Who says you can’t have the best of both worlds?
Recommended Products to replicate this idea
| # | Preview | Product | |
|---|---|---|---|
| 1 |
|
WENMER 17.71" x 118" Brown Wood Wallpaper Peel and Stick Shiplap Self Adhesive Contact Paper for... | Check Latest Price |
| # | Preview | Product | |
|---|---|---|---|
| 1 |

|
LUTQ Wood Grain Tool - Natural Woodgrain Maker for Decorative Painting Premium Wood Graining Tool... | Check Latest Price |
Imagine panels designed to mimic aged, distressed wood with knots and grain, painted or stained in warm tones like honey or deep brown. The textured surface adds visual depth, catching light and shadows in all the right places. It creates a layered, inviting environment that feels both rustic and elegant. When paired with soft textiles and vintage accessories, the effect is cozy yet sophisticated.
Choose lighter colors or weathered finishes for a beach cottage vibe, or go dark and rich for a more dramatic, rustic look. Combine faux wood with stone or brick accents for added texture. For seasonal updates, add fabric drapes or textured rugs to soften the space. It’s adaptable to both small and large rooms, with panel width and finish playing key roles.
Select high-quality faux wood panels with realistic grain details. Prepare your wall surface by cleaning and smoothing it out. Attach panels using adhesive or nails, ensuring they’re aligned and snug. Seal the seams with caulk or molding for a seamless appearance. Finish with stain or paint if desired, then protect with a matte or semi-gloss topcoat. Regular cleaning preserves the textured look without damage.
Add decorative elements like vintage hooks or shelves to create functional accents. Use contrasting colors on adjacent walls to highlight the paneling. Incorporate textiles like plaid or burlap for a full rustic feel. Personalize with painted signs or distressed finishes that reflect your style and personality.
Faux wood paneling brings warmth and personality without the cost or upkeep of real timber. It’s a versatile choice that can fit traditional, farmhouse, or industrial styles. Once installed, it transforms your dining room into a cozy retreat that feels authentic and inviting, inspiring pride in your decorating skills.
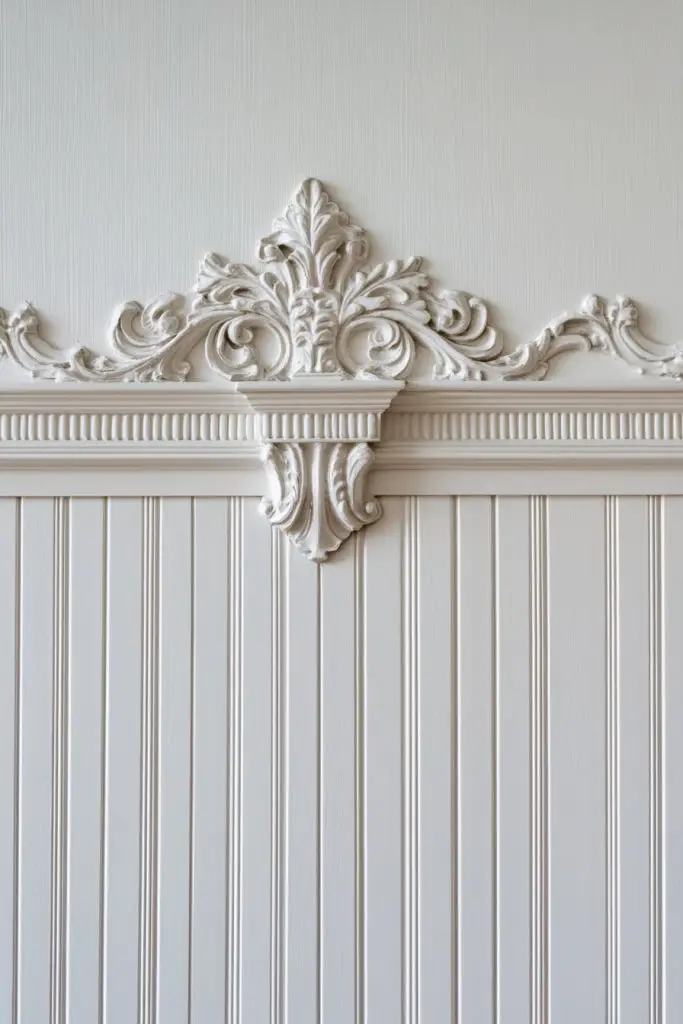
10. Beadboard with Intricate Moldings for Vintage Appeal
Want to evoke vintage charm and craftsmanship in your dining room? Beadboard combined with intricate moldings creates a classic, ornate look that feels timeless. It’s perfect for homeowners who love detailed architecture but prefer a DIY-friendly approach. This style adds a layer of elegance and personality to any space.
Recommended Products to replicate this idea
| # | Preview | Product | |
|---|---|---|---|
| 1 |
|
Graham & Brown Paintable Pre-Pasted Beadboard Wallpaper | Check Latest Price |
| # | Preview | Product | |
|---|---|---|---|
| 1 |

|
Art3d 10-Pack 47Ft White Ceiling Crown Molding Trim, High Impact Polystyrene Decorative Ceiling... | Check Latest Price |
Visualize beadboard panels painted in crisp whites or soft pastels, topped with ornate crown moldings or corner accents. The detailed moldings frame the panels, adding depth and a handcrafted vibe. The textured beadboard provides a subtle pattern that catches the light, while the moldings elevate the overall feel. It’s like decorating a vintage dollhouse scaled up.
Choose highly detailed moldings for a baroque or Victorian look, or opt for simple, clean lines for a more subdued vintage charm. Use a monochrome palette or contrasting colors to highlight the moldings. Incorporate decorative elements such as medallions or corner brackets for a more elaborate effect. This style adapts well to both small and large walls.
Begin by marking your layout carefully, then install beadboard panels with nails or adhesive. Attach crown moldings and corner accents with a miter saw for clean cuts. Fill nail holes and seams with wood filler, then sand smooth. Paint or stain the panels and moldings, choosing finishes that complement your decor. Add additional decorative trim or medallions for extra detail. Regular upkeep involves gentle cleaning and touch-ups.
Enhance with gilded or metallic accents on the moldings for a luxurious touch. Customize by adding painted motifs or vintage hardware. Incorporate fabric or wallpaper behind the beadboard for layered visual interest. Personal touches like family initials or hand-painted designs can make the space uniquely yours.
This vintage-inspired beadboard with moldings offers a timeless elegance that elevates your decor. It’s a crafted look that feels both nostalgic and high-end. Once completed, your dining room will radiate charm and personality, making every meal a special occasion and boosting your confidence as a decorator.
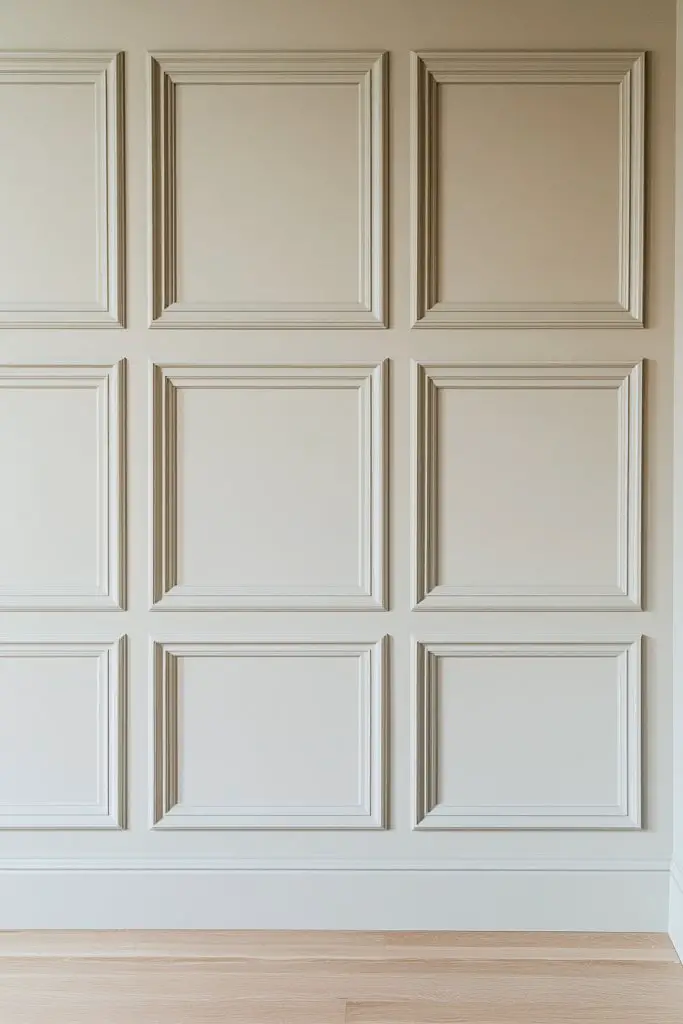
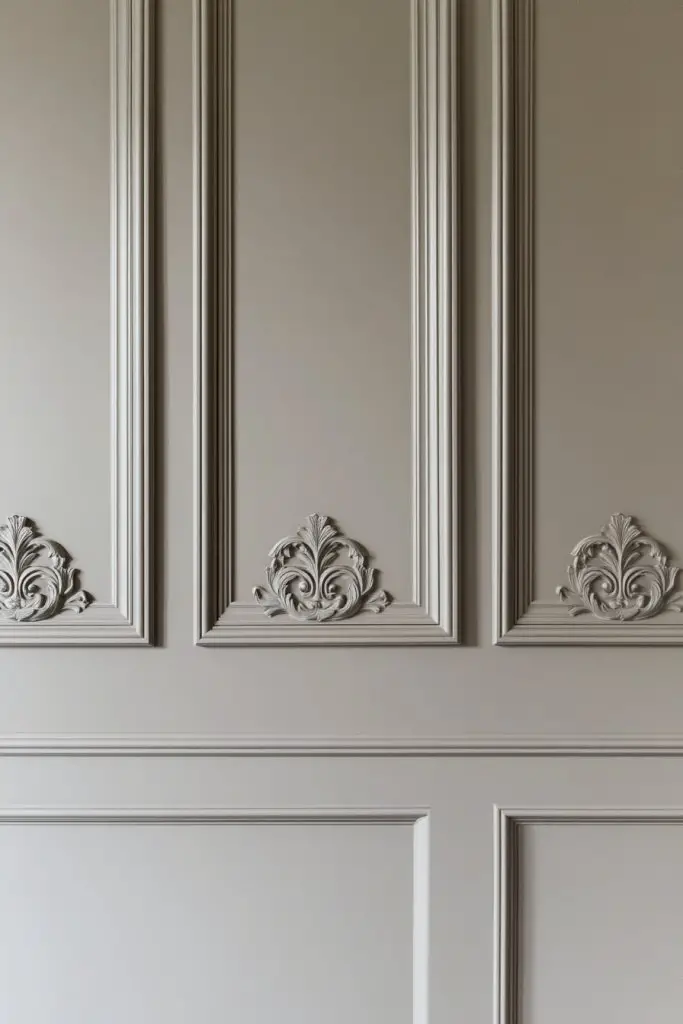
11. Paneled Wall with Decorative Corner Blocks
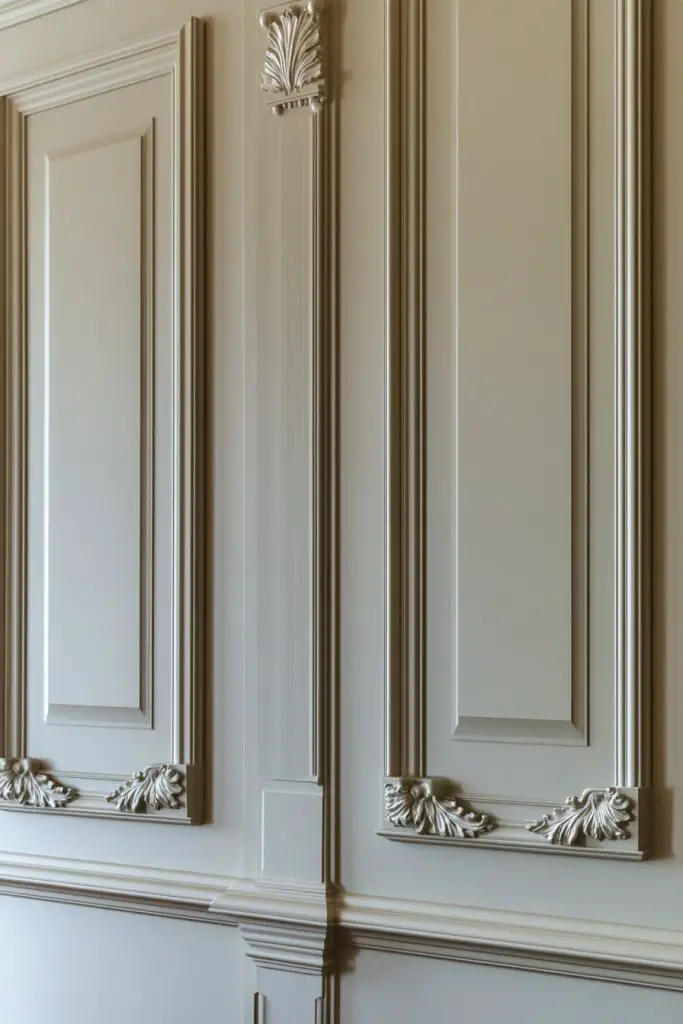
Craving a classic, structured look that adds architectural interest? Paneled walls with decorative corner blocks introduce a sophisticated, handcrafted element to your dining space. It’s an easy way to create a sense of order and elegance without a full renovation. Perfect for lovers of detailed craftsmanship.
Recommended Products to replicate this idea
| # | Preview | Product | |
|---|---|---|---|
| 1 |
|
Art3d Pre-Cut Wall Molding Set of 6 pcs, Ready-to-Assemble Wainscoting Panels for Interior Wall... | Check Latest Price |
| # | Preview | Product | |
|---|---|---|---|
| 1 |

|
Birch Square Acanthus Corner Onlay Ornament Moulding (4 Pack) 7/32 in. x 2 in. x 2 in. | Check Latest Price |
Picture panels divided into rectangular sections, framed by moldings, with ornamental corner blocks at each intersection. The blocks add a three-dimensional aspect, catching light and shadows in a way that emphasizes craftsmanship. Painted in contrasting shades or metallic finishes, they create a striking geometric pattern. The overall effect is both structured and artistic, reminiscent of historic estates.
Select ornate corner blocks for a Victorian or classical vibe, or keep it simple with geometric shapes for a modern take. Paint the panels and blocks in monochrome, metallic, or contrasting colors for visual punch. You can also incorporate inset panels of textured wallpaper or fabric within the sections. This style works well in both small and large rooms, with the block size adjusted accordingly.
Start by marking your pattern on the wall with a level and ruler. Install the panels with nails or adhesive, then add corner blocks at each intersection, securing with nails and filling any gaps. Sand smooth and paint or stain your preferred finish. For added detail, consider gilding or metallic paints on the corner blocks. Seal with a clear protective layer if needed. Regular cleaning and touch-ups maintain the crisp lines.
Personalize by choosing decorative corner blocks that match your decor—ornate, simple, or metallic. Incorporate small decorative elements like medallions or emblem accents for a regal touch. Use different finishes—glossy, matte, or distressed—to suit your style. Layer in complementary textiles or accessories to enhance the layered, crafted ambiance.
Adding decorative corner blocks turns a simple paneled wall into a statement of craftsmanship and style. It’s a timeless technique that suits many decor themes, from traditional to contemporary. Achieving a polished look boosts your confidence, making your dining room feel refined and thoughtfully designed.
12. Vertical Paneling for a Height-Enhancing Effect
Feeling like your room needs to feel taller and more spacious? Vertical paneling tricks the eye into perceiving greater height, making your dining space feel grander. It’s a simple, impactful update that transforms the atmosphere without major construction. Ideal for rooms with low ceilings or awkward proportions.
Recommended Products to replicate this idea
| # | Preview | Product | |
|---|---|---|---|
| 1 |

|
Art3d Premade Board and Batten Paintable Wainscoting Kit, MDF Accent Wall Panel for Kitchen Bedroom... | Check Latest Price |
| # | Preview | Product | |
|---|---|---|---|
| 1 |

|
2-Pack Acoustic Wood Slat Panels - Soundproof Wall Paneling for Interior Decor | Check Latest Price |
Imagine tall, narrow panels running from floor to ceiling painted in light, airy tones. The vertical lines draw your gaze upward, creating an illusion of height and openness. The textured surface adds subtle detail, catching light along the grooves. When paired with minimal decor, the walls seem to stretch endlessly, giving your room a sophisticated, airy feel.
Use glossy or matte finishes depending on your decor—gloss for a sleek, modern look or matte for softness. Combine with other vertical elements like tall shelves or curtains to reinforce the effect. For a more dramatic look, alternate panel widths or incorporate inset decorative strips. Seasonal updates can include changing paint colors or adding metallic accents.
Start by marking your vertical lines with a level and painter’s tape. Attach panels using nails or adhesive, ensuring they’re aligned and secure. Fill and sand any gaps or nail holes, then paint in your chosen color. Consider adding crown molding or a decorative cap at the top to enhance the verticality. Regular cleaning and touch-ups keep the panels looking sharp. For extra height, install tall, narrow trim or decorative strips between the panels.
Enhance with contrasting colors or metallic paints to add visual interest. Incorporate decorative molding or sculptural elements along the panels for added texture. Use textiles like drapes or tall, narrow art pieces to complement the vertical lines. Personalize with monograms or painted motifs at eye level for a customized touch.
Vertical paneling is a game-changer for rooms that need a visual boost. It’s a straightforward upgrade that dramatically impacts the overall feel. When done right, it makes your dining space feel taller, more elegant, and inviting—perfect for hosting or cozy family dinners alike.
13. Two-Tone Paneling with Elegant Accents
Tired of monotonous walls that lack personality? Two-tone paneling introduces visual interest and sophistication by contrasting shades or finishes. It’s a stylish way to add depth and dimension, especially if you want your dining room to stand out. Plus, it’s easy to customize to match your color palette.
Recommended Products to replicate this idea
| # | Preview | Product | |
|---|---|---|---|
| 1 |

|
Weysat MDF Board and Batten Wall Panel Kit 94.5in x 47.2 in Premade Wainscoting Panels Kit... | Check Latest Price |
| # | Preview | Product | |
|---|---|---|---|
| 1 |

|
Taaizau Peel and Stick Upgrade Chair Rail Molding Trim, Flexible Self-Adhesive Paintable White TPE... | Check Latest Price |
Visualize the lower half of your wall in a rich, dark hue like emerald or deep brown, topped with a lighter, complementary shade such as ivory or soft gray. The contrast creates a striking visual break, emphasizing architectural details. Decorative trims or moldings separate the two tones, framing panels that catch the eye. When illuminated, the contrast enhances shadows and highlights, making the space feel layered and dynamic.
Use bold, contrasting colors for maximum impact or subtle variations for a more understated elegance. Incorporate metallic or textured finishes for added richness. The dividing line can be a simple painted stripe, a decorative molding, or even wallpaper strips for extra flair. Seasonal updates include changing the lighter or darker shades to freshen the look.
Begin by painting or staining the bottom panels first, then tape off the boundary line carefully. Apply a second color or finish on the upper section, ensuring crisp, clean edges. Use painter’s tape or decorative molding to define the line. Seal the paint with a clear topcoat for durability. Add decorative trims or corner accents to enhance the transition. Regular touch-ups keep the contrast sharp.
Personalize with painted motifs, patterns, or textured finishes within each section. Incorporate metallic or gloss accents for a luxe feel. Add small decorative elements like painted medallions or faux inlays for extra detail. Use textiles or accessories that complement the two-tone scheme for a cohesive look.
Two-tone paneling offers a bold, personalized touch that elevates your decor instantly. It’s a versatile technique that suits many styles, from traditional to modern. With thoughtful color choices, you’ll create a dining space that feels both vibrant and refined, boosting your decorating confidence.
14. Classic Shaker-Style Paneling for Minimalist Elegance
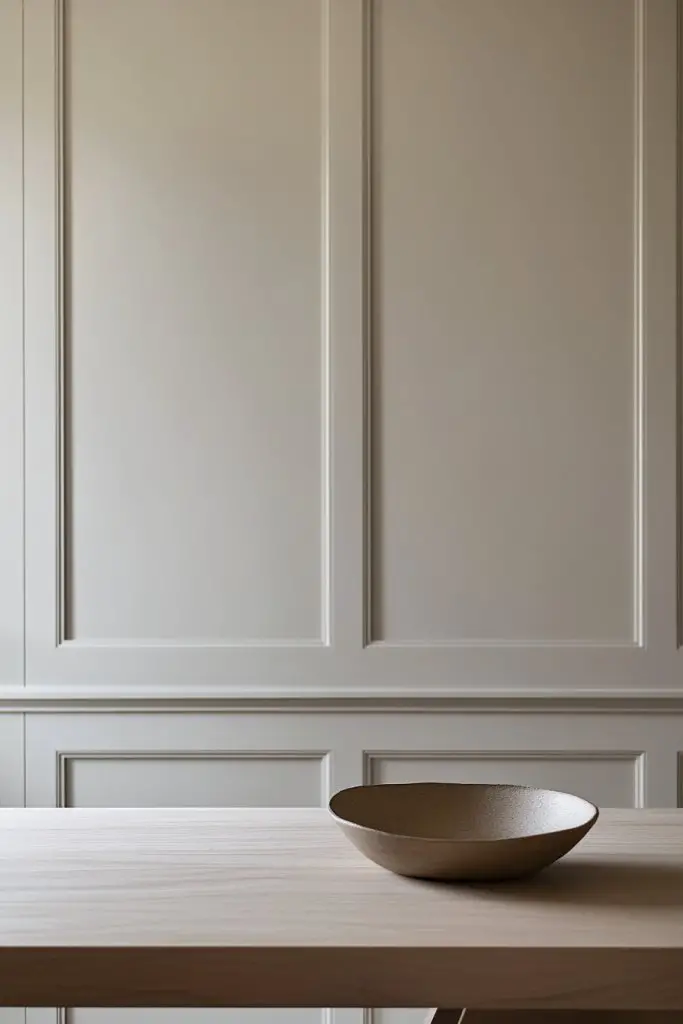
Searching for a timeless, understated look that pairs well with any decor? Shaker-style paneling emphasizes simplicity and clean lines, creating a calm and elegant atmosphere. It’s perfect for those who prefer minimalist design but still want warmth and texture. The style is flexible enough to fit classic or contemporary settings.
Recommended Products to replicate this idea
| # | Preview | Product | |
|---|---|---|---|
| 1 |
|
Art3d Premade Board and Batten Paintable Wainscoting Kit, MDF Accent Wall Panel for Kitchen Bedroom... | Check Latest Price |
| # | Preview | Product | |
|---|---|---|---|
| 1 |

|
Art3dwallpanels 10 Pack Acoustic Panels, 48" X 12" X 0.35" Soundproof Wall Panels, Self Adhesive... | Check Latest Price |
Imagine uniform, square panels with beveled edges painted in neutral shades like white, beige, or soft gray. The balanced grid pattern creates order and harmony, while the subtle shadow lines add depth. The overall effect is crisp, polished, and unobtrusive—letting your furniture and accessories shine. When paired with simple lighting, it feels soothing and refined.
Keep it monochromatic or add slight variations in finish for subtle interest. Use natural wood stains or painted finishes depending on your decor theme. Incorporate horizontal or vertical orientations for visual variety. Enhance the minimalist look with sleek hardware or integrated shelving, avoiding overly ornate details. Seasonal updates can include changing wall colors or adding textiles.
Measure your wall and mark grid lines for your panels. Cut the panels to size with a saw, then attach using nails or adhesive. Fill seams and nail holes, then sand smooth. Paint or stain in your preferred color, ensuring even coverage. Finish with a clear protective coat if needed. For a seamless look, add minimal trim or no trim at all. Regular cleaning maintains the crisp appearance.
Add subtle decorative touches like small, hidden shelves or minimalist hardware. Incorporate textured or matte finishes to add depth without distraction. Personalize with monograms or subtle painted motifs. Complement with textiles or accessories that maintain the minimalist aesthetic for a cohesive look.
Shaker-style paneling is a classic choice that offers serenity and sophistication. It’s a versatile backdrop that complements any decor style, from rustic to urban modern. Mastering this simple, elegant technique boosts your confidence in creating a timeless, polished space you’ll love for years.
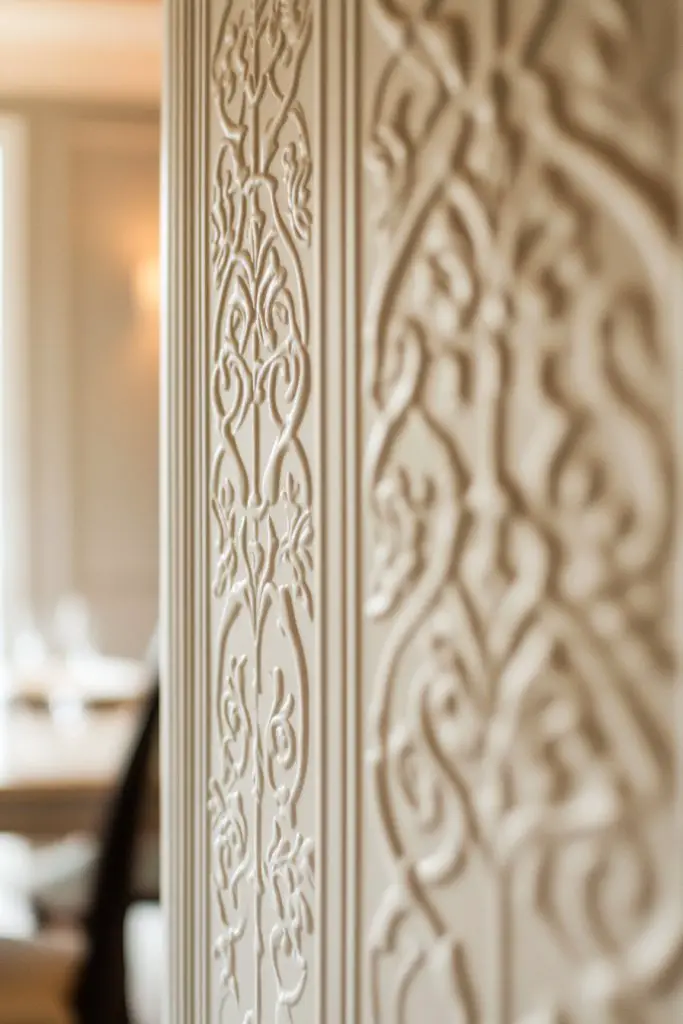
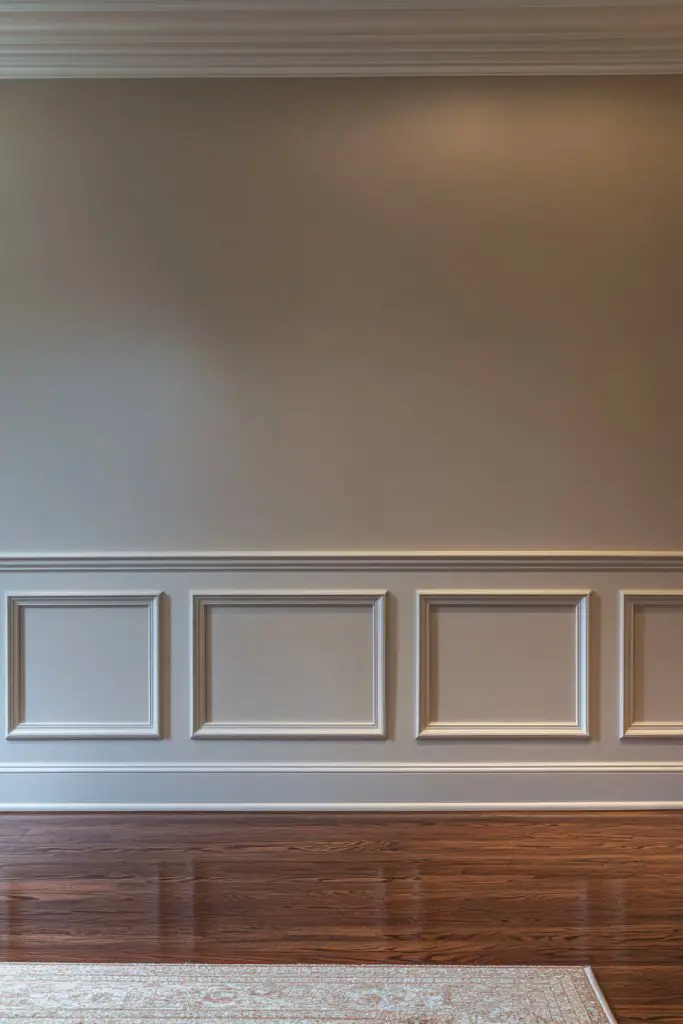
15. Framed Panel Inserts with Decorative Molding
Want to add depth and bespoke detail to your walls? Framed panel inserts with decorative molding create a custom, crafted look that elevates your decor. It’s an ideal solution for homeowners seeking a high-end, personalized aesthetic without extensive renovation. This technique offers a perfect balance of form and function.
Recommended Products to replicate this idea
| # | Preview | Product | |
|---|---|---|---|
| 1 |
|
Art3d Pre-Cut Wall Molding Set of 6 pcs, Ready-to-Assemble Wainscoting Panels for Interior Wall... | Check Latest Price |
| # | Preview | Product | |
|---|---|---|---|
| 1 |

|
Access Panel for Drywall - 8x8 inch - Wall Hole Cover - Access Door - Plumbing Access Panel for... | Check Latest Price |
Picture inset panels framed by ornate or simple moldings, painted in contrasting or harmonious shades. The framed sections add a layered, three-dimensional effect, creating visual intrigue. Textured or patterned inserts within the frames, such as wallpaper or fabric, enhance the richness. When illuminated, the layered panels cast subtle shadows, emphasizing craftsmanship.
Choose decorative moldings in ornate styles for a vintage or regal look, or opt for clean, straight lines for contemporary elegance. Use contrasting colors or finishes to make the frames pop. Incorporate textured wallpaper, fabric, or textured paint inside the inset panels for added interest. This style adapts well to both small and large walls, with custom sizes for a tailored fit.
Start by measuring and marking your panel layout. Cut molding pieces with a miter saw, then attach securely with nails. Install the inset panels, ensuring they are flush and centered. Fill nail holes and seams with wood filler, then sand smooth. Paint or decorate the inset panels as desired. Seal with a clear coat for protection. Regular maintenance involves cleaning and touch-ups.
Personalize your panels with metallic or gilded finishes on the moldings. Add decorative motifs, monograms, or family crests inside the inset panels. Use textured or patterned materials to reflect your style. Incorporate LED backlighting or accent lighting behind the panels for a dramatic effect.
Framed panel inserts are a versatile, high-impact way to craft a bespoke wall feature. They blend traditional craftsmanship with modern flair, allowing you to customize every detail. When finished, your dining room will radiate elegance, and your confidence in tackling custom carpentry will soar.
16. Paneling with Subtle Textured Finishes for Depth
Looking to add subtle sophistication and depth without overwhelming your space? Textured paneling offers a refined touch that elevates your walls with delicate patterns and finishes. It’s perfect for creating a layered, tactile environment that feels rich yet understated. Ideal for homeowners who appreciate nuanced design.
Recommended Products to replicate this idea
| # | Preview | Product | |
|---|---|---|---|
| 1 |
|
Art3dwallpanels 33 Pack 3D Wall Panel Diamond for Interior Wall Décor, PVC Flower Textured Wall... | Check Latest Price |
| # | Preview | Product | |
|---|---|---|---|
| 1 |

|
DESOMINOR 32FT Black Border Peel &Stick Black Wood Grain Wallpaper Border Removable Waterproof... | Check Latest Price |
Imagine panels finished with soft, textured paints or wallpapers that mimic linen, plaster, or fabric. The tactile surface catches light differently throughout the day, creating gentle shadows and highlights. The textures add dimension and warmth, making the walls feel inviting and sophisticated. When paired with simple decor, it provides a subtle but impactful backdrop.
Choose from a variety of textures—matte, raised patterns, embossed designs, or fabric-inspired finishes. Use neutral colors for a calm, elegant look, or add metallic accents for a touch of glamour. Combine with smooth panels or paint for contrast. Seasonal updates include switching textures or colors to reflect changing styles or moods.
Select textured wallpaper or textured paint, then prepare your wall surface by cleaning and priming. Apply the wallpaper carefully, smoothing out bubbles and aligning patterns. For textured paint, use a roller or brush to create your desired finish, following manufacturer instructions. Seal the surface with a protective topcoat if necessary. Regular cleaning with a soft cloth preserves the textured surface.
Add decorative trims or borders to frame textured panels. Incorporate metallic or pearlized paints for a subtle shimmer. Use textured finishes behind shelves or within inset panels to add layers of depth. Personal touches include monogrammed accents or custom patterns that reflect your personality.
Subtle textured finishes bring a quiet luxury to your walls, elevating your decor with minimal effort. They work beautifully in both traditional and modern spaces, offering endless customization. Mastering this technique allows you to craft walls that feel rich and layered, inspiring confidence in your creative instincts.
17. Incorporating Elegant Chair Rail and Paneling Combo
Want to achieve a classic, balanced look that defines your dining room? Combining chair rails with paneling creates a harmonious, traditional aesthetic that adds architectural interest. It’s a timeless technique that instantly upgrades your space, making it feel more structured and elegant. Perfect for those who love a polished, cohesive style.
Recommended Products to replicate this idea
| # | Preview | Product | |
|---|---|---|---|
| 1 |
|
moonoom 20 Ft x 1.6''Wall Decoration Molding Trim,Self-Adhesive 3D Chair Rail Panel Molding,... | Check Latest Price |
| # | Preview | Product | |
|---|---|---|---|
| 1 |
|
Weysat MDF Board and Batten Wall Panel Kit 94.5in x 47.2 in Premade Wainscoting Panels Kit... | Check Latest Price |
Visualize a room where the lower half of the wall features paneled or textured surfaces, topped with a decorative chair rail in a contrasting finish. The rail acts as a visual separator, emphasizing the wall’s structure and height. The panels below can be painted or finished to match your decor, while the upper wall remains simple or adorned with light wallpaper or paint. The result is a balanced, refined environment that feels both warm and stately.
Choose ornate or simple chair rails depending on your style—gold leaf or gilded for regal, or painted in a matching tone for subtle elegance. Use different panel patterns or textures below the rail, such as beadboard or flat panels. Seasonal updates can include changing the paint or adding decorative accents like rosettes or medallions. It adapts well to both small and large rooms.
Begin by marking the placement of the chair rail at your desired height, then attach with nails or adhesive. Install the paneling or textured wall treatment below, ensuring alignment and levelness. Fill and sand nail holes and seams, then paint or stain the panels and rail. For a seamless look, use matching colors or contrasting finishes. Add crown molding at the top for an extra touch of elegance. Regular maintenance involves gentle cleaning and occasional touch-ups.
Personalize with decorative moldings, painted motifs, or metallic accents on the chair rail. Incorporate small shelves or hooks for functional decor, maintaining a balanced look. Use contrasting or matching colors on the upper wall to complement the panel below. Add textured wallpaper or fabric panels above for a layered, sophisticated finish.
This classic combo of chair rail and paneling offers a timeless elegance that can be tailored to any decor style. It’s a versatile approach that instantly elevates your room’s architecture. Once installed, you’ll feel confident creating a space that’s both beautiful and functional, perfect for family dinners and entertaining guests alike.
Conclusion
Exploring these diverse paneling options showcases how versatile and impactful classic elegance can be in your dining room. Whether you prefer subtle textures or bold statements, these ideas are perfect for inspiring your next design project. Don’t hesitate—bring these timeless touches into your home and create a space that invites admiration and comfort for years to come.