
18 Earring Storage Ideas for Organized Displays
Imagine opening your jewelry box to find your earrings perfectly displayed and easily accessible — sounds dreamy, right? Earring storage ideas have gained popularity because they combine practicality with creative flair, helping you keep your collection tidy while showcasing your favorite pieces.
In this article, you’ll explore a variety of innovative and stylish ways to organize your earrings, from chic wall-mounted displays to clever DIY solutions. Whether you prefer minimalistic setups or eye-catching displays, these ideas will inspire you to transform your space into an organized jewelry haven and make choosing your accessories a delightful experience.
1. Vintage Tea Cup Earring Holders for a Charming Display
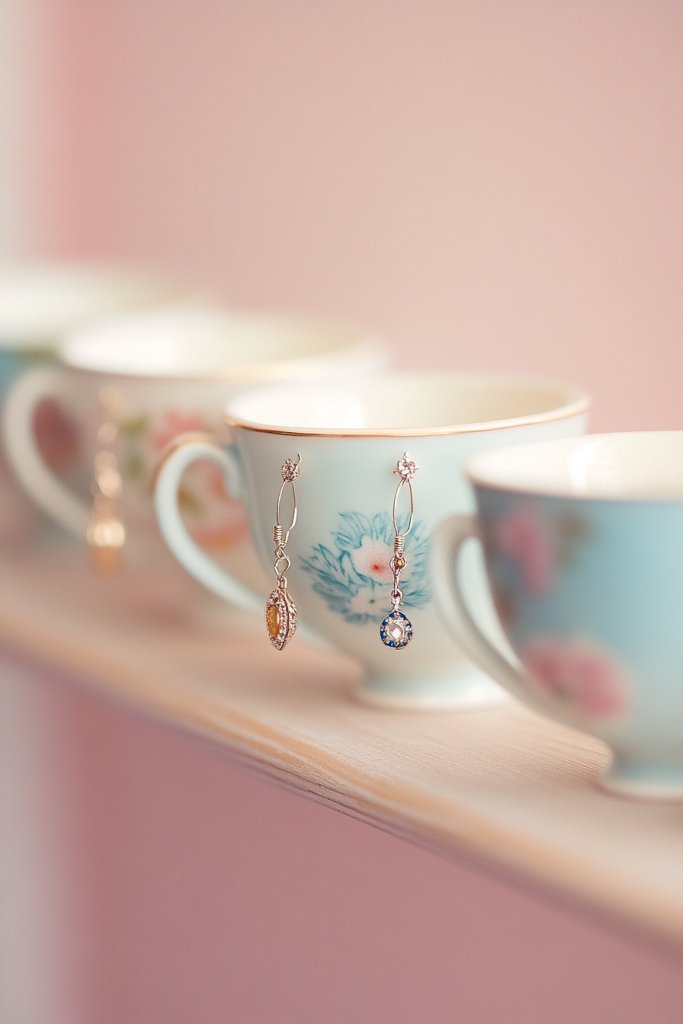
Ever struggle to keep your earrings organized without sacrificing style? It’s easy for jewelry to become a tangled mess or hidden in drawers. Many of us want a display that’s both functional and adds charm to our space. The solution lies in turning everyday items into decorative storage.
Imagine delicate vintage teacups perched on wall hooks, each filled with bright, shiny earrings. The cups, with their intricate patterns and soft pastels, evoke nostalgia and elegance. Light filters softly through nearby windows, highlighting the sparkle of your jewelry. It’s a whimsical setup that feels like a treasure chest waiting to be explored.
You can paint or decoupage the teacups in bold or pastel shades to match your decor. For a more eclectic look, mix different styles and sizes. Use vintage teacups for a shabby-chic vibe or sleek modern ones for a contemporary twist. This setup works well on open shelves, vanity tops, or even as a wall-mounted display in a cozy nook.
Start by collecting vintage teacups from thrift stores or your grandmother’s cupboard. Mount sturdy wall hooks or small brackets at a comfortable height. Carefully attach the cups to the hooks using strong adhesive or by inserting a hook through the handle. Arrange them in a pattern or randomly for visual interest. Fill each with earrings, making sure the hooks are secure enough to hold the weight.
Add small decorative elements like faux pearls, tiny charms, or tags to personalize each cup. Incorporate seasonal touches—like mini ornaments during holidays—to keep the display fresh. Use different cup shapes and patterns to create a playful, layered look. Labeling each cup can also help keep pairs separated and easy to find.
This vintage teacup display turns simple storage into an artful statement. It’s perfect for adding a touch of nostalgia and elegance to any space. Plus, it’s incredibly customizable—your jewelry becomes part of your decor. Ready to bring a little charm into your everyday routine?
2. Mason Jar Lids as DIY Earring Pegboards
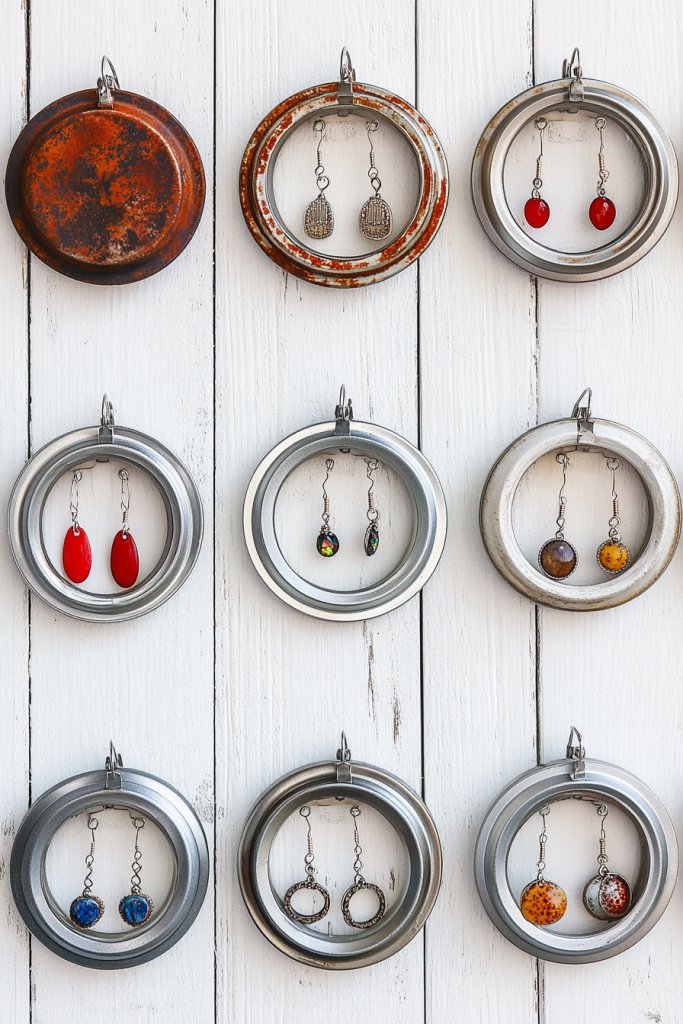
Tired of digging through drawers to find matching earrings? Clutter can make even the most organized person lose their cool. A simple, DIY solution can turn everyday items into a practical jewelry display. Mason jar lids are often overlooked but surprisingly versatile.
Visualize a painted wooden board mounted on your wall, with dozens of metal mason jar lids attached in a grid pattern. Each lid acts like a mini pegboard, with earrings hanging from the rim. Brightly painted lids add pops of color and texture, creating a playful, rustic aesthetic. It’s a functional art piece that keeps your jewelry within easy reach.
Choose lids in different colors or finishes—matte, gloss, or distressed—to match your decor. For a sleek modern look, opt for monochrome palettes or metallic finishes. You can install the lids in a symmetrical grid for a formal vibe or scatter them randomly for casual charm. Adjust the size of the board to fit your space and collection.
Start by painting or decorating the jar lids as desired. Use strong adhesive or small screws to attach each lid to a painted or stained wooden board or directly onto a wall panel. Space them evenly, leaving enough room for earrings to hang freely. Use hooks or small nails to hang each lid securely. Organize earrings by style, color, or length for quick selection.
Add labels or color-coded tags to help identify different earring sets quickly. Incorporate decorative elements like washi tape or metallic accents on the lids for extra flair. You could also attach small hooks or clips inside the lids to hold studs or delicate pieces. Personal touches turn this functional display into a conversation starter.
This DIY pegboard is a budget-friendly, customizable way to stay organized. It combines rustic charm with practicality, perfect for small spaces or creative personalities. Plus, it’s a fun weekend project that leaves you with a unique jewelry display you can be proud of.
3. Magnetic Spice Jars on Framed Boards for Easy Access

Finding a quick way to grab your earrings without rummaging through clutter is a common challenge. Traditional jewelry trays can be bulky and inaccessible. Magnetic spice jars offer a neat, space-efficient solution that keeps your accessories visible and within arm’s reach.
Picture a sleek, framed board hanging on your wall, with small magnetic jars attached securely to the surface. Inside each jar, earrings are organized by type or color, creating a colorful mosaic. The shiny metal lids contrast beautifully against a painted or cork-backed frame, giving a modern, minimalist vibe. It’s like having a jewelry boutique right in your home.
Opt for matte, metallic, or patterned jar lids to match your decor theme. Use a frame painted in bold or neutral tones, depending on your style. Arrange the jars in a grid, staggered, or in a pattern that fits your space. You can also incorporate small labels or color strips for extra organization.
Choose small magnetic spice jars with tight-fitting lids. Secure a sturdy frame or backing—like corkboard or painted wood—on which to attach the jars. Use strong magnets or adhesive strips to keep the jars in place. Hang the frame on the wall at a comfortable height, then fill each jar with pairs of earrings. Keep similar styles grouped together for quick access.
Decorate the frame with washi tape, stickers, or paint for a personalized touch. You can install additional small hooks or clips within the jars for studs or delicate earrings. Label each jar with a decorative tag or paint to categorize your collection. This setup can evolve with your style, adding new jars or changing colors as needed.
This magnetic jars system combines practicality with style, making jewelry management effortless. It elevates your space by turning storage into a sleek decorative feature. Plus, it’s adaptable for any space—small or large—and easy to update as your collection grows.
4. String and Clothespin Garland for Casual, Colorful Storage
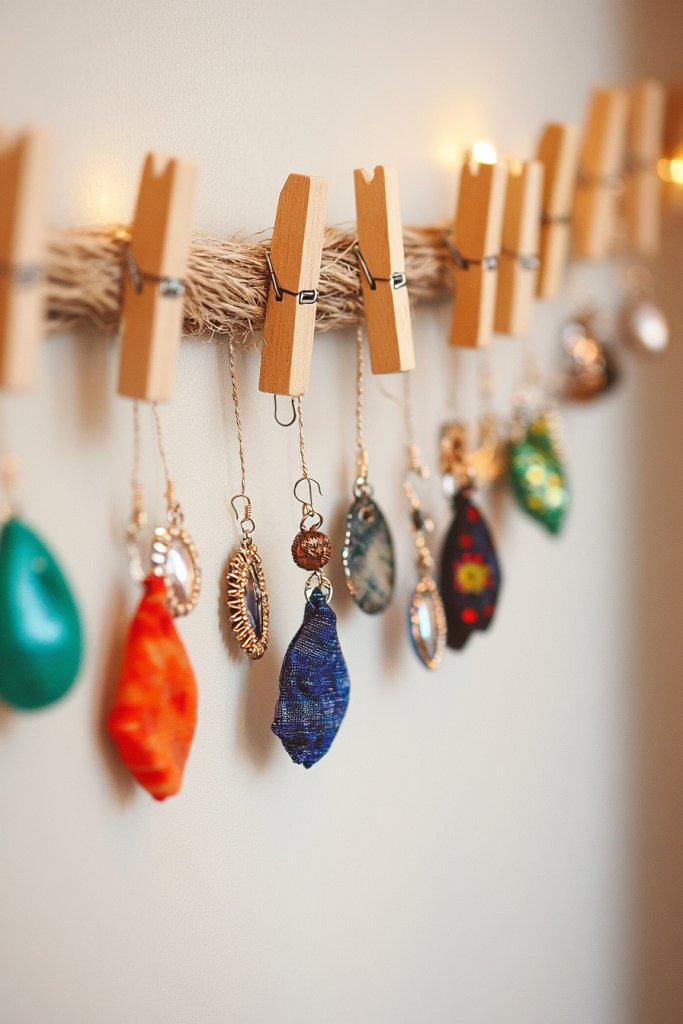
Ever find yourself frustrated by cluttered jewelry drawers or piles on your vanity? You’re not alone. Sometimes, the best way to keep jewelry accessible and add color to your space is with a simple, DIY solution. A string and clothespin garland is fun, flexible, and totally customizable.
Imagine a length of twine or wire stretched across a mirror or wall, with colorful clothespins clipped along its length. Earrings dangle freely from each clip, creating a lively, playful display. Brightly colored clothespins add a pop of fun, while the overall setup feels relaxed and approachable. Ambient light reflects off the earrings, making the display sparkle.
Use different colored clothespins, or opt for metallic or wooden styles for a more refined look. Change the string’s length or add multiple rows for larger collections. Incorporate decorative elements like beads or charms on the string for added visual interest. This method works well in bedrooms, walk-in closets, or even on the side of a cabinet.
Choose a sturdy string or wire, and install hooks or nails at each end of your chosen display area. Securely attach the string tautly between the hooks. Clip earrings onto the clothespins, organizing by type or color if preferred. Adjust spacing to prevent tangling, and replace clothespins or string as needed. For more stability, use heavy-duty clips or add small weights at the ends.
Mix and match clothespin colors to suit your mood or decor. You can also decorate the clips with washi tape or paint. Incorporate small charms or tags to label sections. To keep it fresh, swap out earrings seasonally or when you add new pieces to your collection.
This casual display is perfect for everyday wear, making accessories easy to find and put on. It adds a cheerful, personalized touch to your space while keeping your jewelry organized. Plus, it’s a simple project that can be as elaborate or minimal as you like—fun for all skill levels.
5. Picture Frame with Mesh or Wire Backing for a Chic Organizer
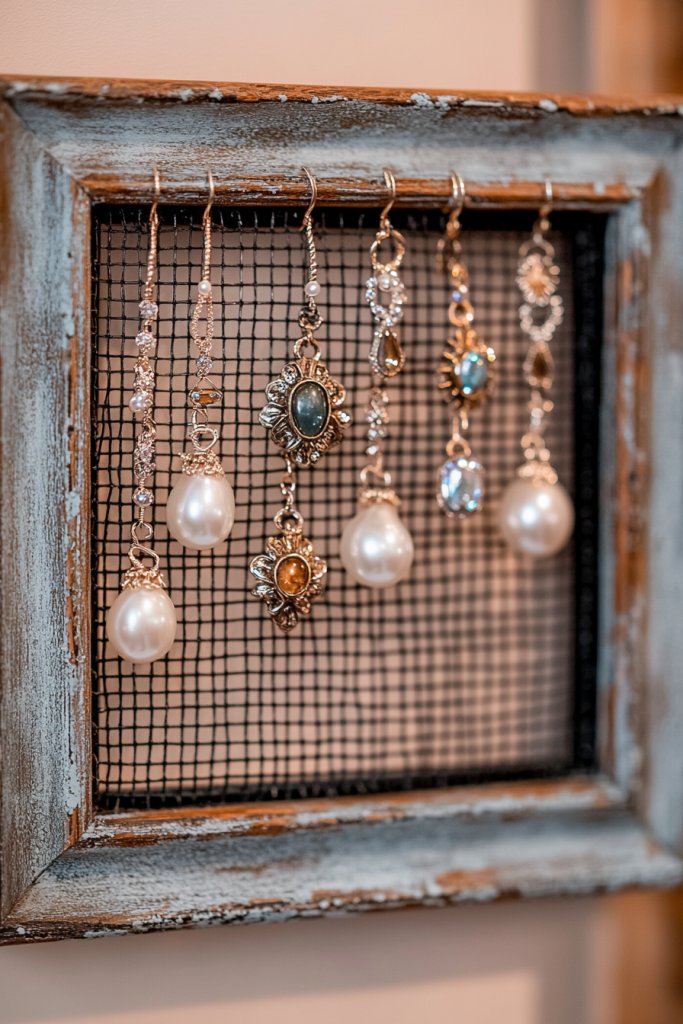
Tired of tangled chains and lost earrings? A cluttered jewelry box can make even the most organized person feel overwhelmed. Turning a picture frame into a jewelry display combines style and practicality. It’s a chic way to showcase your accessories while keeping them easy to access.
Envision an elegant vintage or modern picture frame hung on your wall, with the glass replaced by a wire grid or fine mesh. Earrings hang freely from the grid’s hooks or clips, creating a gallery-like effect. The frame’s border adds a decorative element, and the open design keeps the space feeling airy and bright. It’s a simple yet sophisticated addition to any room.
Choose frames in different finishes—white, black, gold—for various decor styles. You can also decorate the frame with paint, fabric, or washi tape to match your aesthetic. Use larger or smaller frames depending on your jewelry collection size. Incorporate additional hooks or small baskets inside the frame for necklaces or bracelets.
Remove the glass from the picture frame and replace it with a wire mesh or screen secured with staples or glue. Mount the frame securely on the wall at a comfortable eye level. Attach small hooks, clips, or S-shaped pins to the mesh to hang earrings. Organize your jewelry by style or color for quick selection. Reinforce the frame’s back if needed to support heavier pieces.
Decorate the frame with paint, stencils, or embellishments for extra personality. Add labels or tags to categorize your jewelry. You could incorporate small decorative elements like beads or charms to personalize the display further. Regularly update or rearrange your jewelry to keep the display fresh and inspiring.
This DIY picture frame turns your jewelry into wall art, making it both functional and beautiful. It’s a stylish solution that elevates your space while simplifying your routine. Perfect for those who love a mix of vintage charm and modern minimalism—get creative and make it your own.
6. Tiered Jewelry Stand for a Stylish, Space-Saving Solution
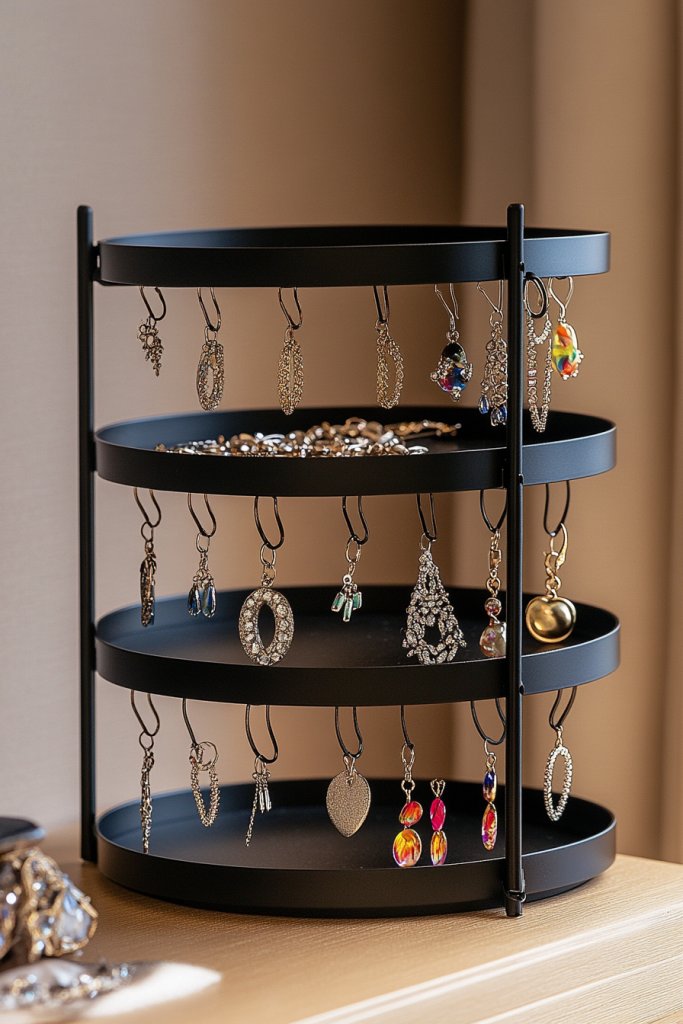
Cluttered surfaces and overflowing drawers make jewelry organization a nightmare. You want a display that’s both eye-catching and practical. A tiered jewelry stand offers a compact solution that keeps your pieces visible and accessible at a glance. Plus, it adds a touch of elegance to your decor.
Imagine a multi-level stand with small trays or hooks stacked vertically. Earrings dangle gracefully from each tier, with some pieces cascading down. The stand’s design can be vintage, modern, or rustic—crafted from wood, metal, or acrylic. It stands proudly on your dresser or vanity, turning jewelry into a decorative element.
Choose a stand that matches your aesthetic—ornate metalwork for vintage charm, sleek acrylic for modern minimalism. Vary the height and number of tiers based on your collection size. Use different tray shapes, like circular or rectangular, or incorporate drawers for extra storage. Position it near your mirror or window for natural light to highlight your jewelry.
Select a tiered jewelry stand from a craft store or make one yourself with wood or metal supplies. Arrange earrings on hooks or lay them on trays, organizing by type or color. Secure each tier firmly to prevent wobbling. Place the stand where it’s easy to see and reach, and regularly update the arrangement to keep it fresh.
Decorate the stand with paint, decals, or fabric liners to match your decor. Add name tags or labels for different jewelry types. Incorporate decorative elements like small figurines or faux gemstones to enhance visual appeal. Use the stand not just for storage but also as a display piece during special occasions.
A tiered jewelry stand makes organizing stylish and effortless. It transforms your collection into a curated display, inspiring you to wear more accessories. With its space-saving design, it’s ideal for small rooms or crowded dressers—practical and beautiful!
7. DIY Cork Board with Push Pins for Customizable Layouts
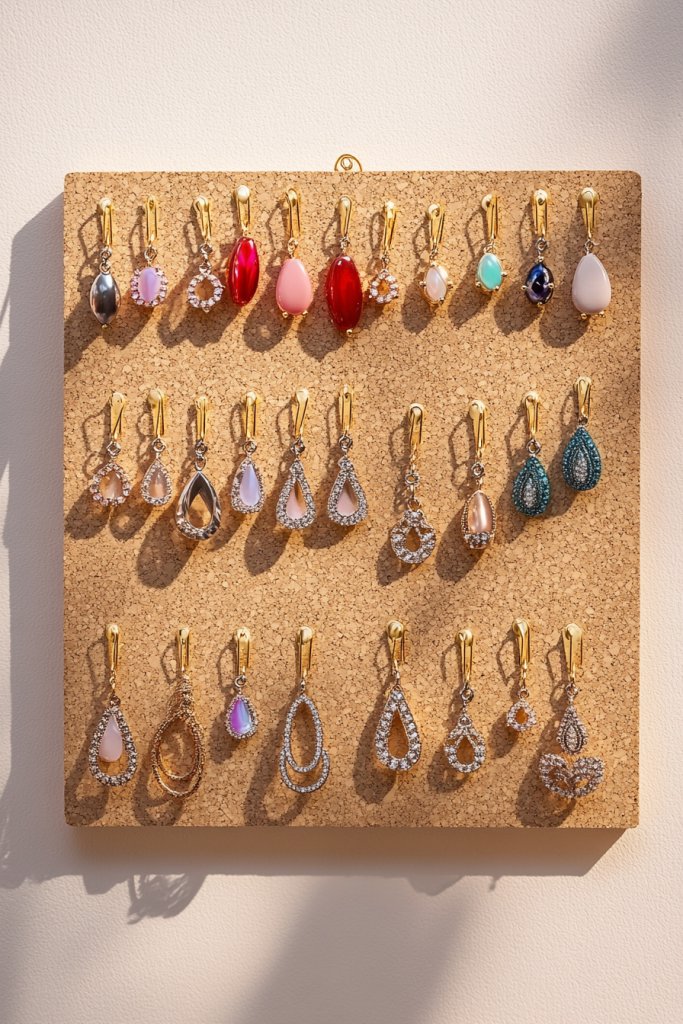
Ever wish you could see all your earrings at once without digging through a drawer? A corkboard is an easy, customizable solution that turns chaos into order. It’s perfect for those who love changing up their display or want a visual overview of their jewelry. Plus, it’s budget-friendly and simple to set up.
Picture a large corkboard hung on your wall, dotted with colorful push pins. Earrings are clipped onto the pins, arranged by style, color, or occasion. The natural texture of cork adds a warm, inviting feel, while the pins create a flexible grid for your collection. It’s a functional piece of wall art that evolves with your taste.
Use a plain corkboard or decorate it with paint, washi tape, or fabric borders. Organize earrings in sections or scatter them randomly for a more eclectic look. Incorporate small baskets or clips for necklaces or bracelets. Adjust the size of the corkboard to fit your space and collection.
Mount the corkboard at a comfortable height using nails or screws. Gather colorful push pins or decorative tacks. Pin earrings directly onto the board, grouping similar styles or colors together. Use additional hooks or clips for larger or more delicate pieces. Keep a few spare pins handy for quick updates or rearrangements.
Decorate the edges of the corkboard with washi tape or painted designs for a personal touch. Label sections with small tags or stickers to categorize your jewelry. Mix in decorative elements like small pictures or notes to motivate your styling choices. Regularly swap or update earrings to keep the display fresh.
This DIY corkboard makes your jewelry a visual centerpiece, inspiring you to accessorize more. It keeps everything in sight and easy to grab, reducing morning chaos. Plus, it’s a creative project that makes your space uniquely yours—fun and functional.
8. Repurposed Silverware Racks for a Unique Industrial Touch
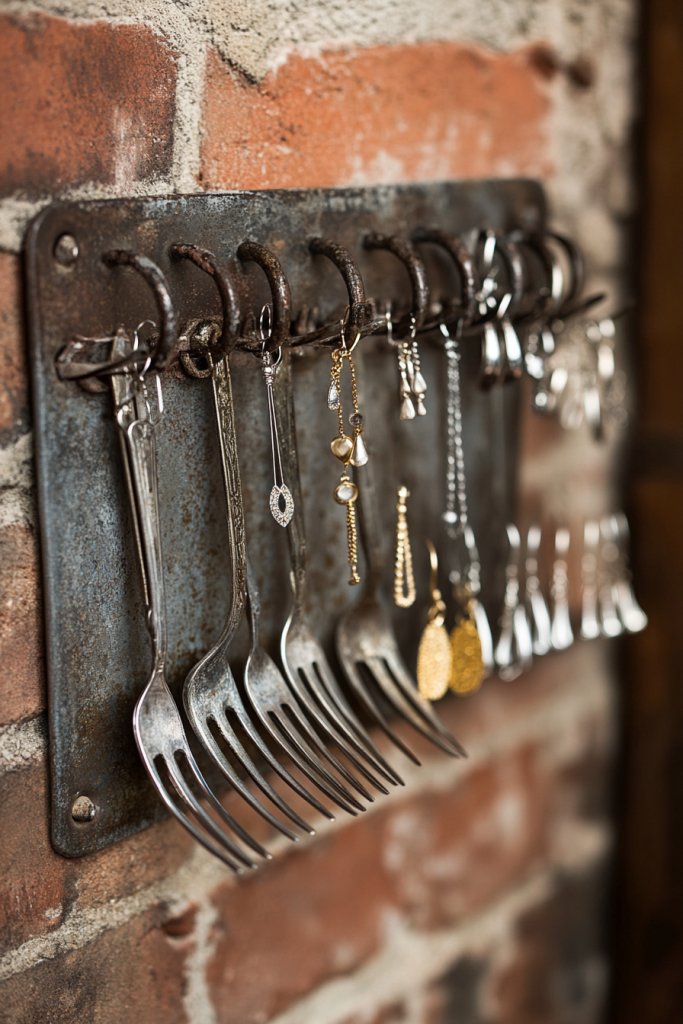
Looking for a storage idea that’s both practical and adds a bit of edge? Silverware racks, often cast aside, can be transformed into striking jewelry holders. They bring an industrial vibe that’s perfect for modern or eclectic decor. Plus, they’re surprisingly simple to repurpose.
Imagine vintage metal racks mounted on a wall, with earrings hanging from the slots and hooks. The dark, weathered finish contrasts with bright jewelry, creating an eye-catching display. This setup resembles a chic atelier or workshop, adding character and a sense of craftsmanship to your space. It’s a bold statement that doubles as functional decor.
Choose racks with different finishes—brushed metal, painted, or rusted—to match your aesthetic. Install multiple racks in a grid or staggered pattern for visual interest. Use hooks or small clips to hang earrings, and incorporate small containers or trays for other jewelry items. Keep the arrangement asymmetrical for a more casual, artistic look.
Find vintage silverware racks at thrift stores or repurpose flatware organizers. Securely mount them on your wall using appropriate hardware. Attach hooks or clips to hold earrings, spacing them out to prevent tangling. You can paint or seal the racks to prevent rust or match your color scheme. Organize your jewelry by style or frequency of use.
Add decorative touches like stencils or metallic paint for a custom look. Use small baskets or trays beneath the racks for additional storage. Incorporate labels or tags to categorize jewelry. Mix in other industrial elements like pipe shelving or vintage signs for a cohesive look.
This industrial-inspired setup turns functional storage into a statement piece. It’s perfect for adding personality and a touch of vintage charm to your home. With a little creativity, you can craft a display that’s as unique as your jewelry collection.
9. Hanging Jewelry Organizer with Clear Pockets for Visibility
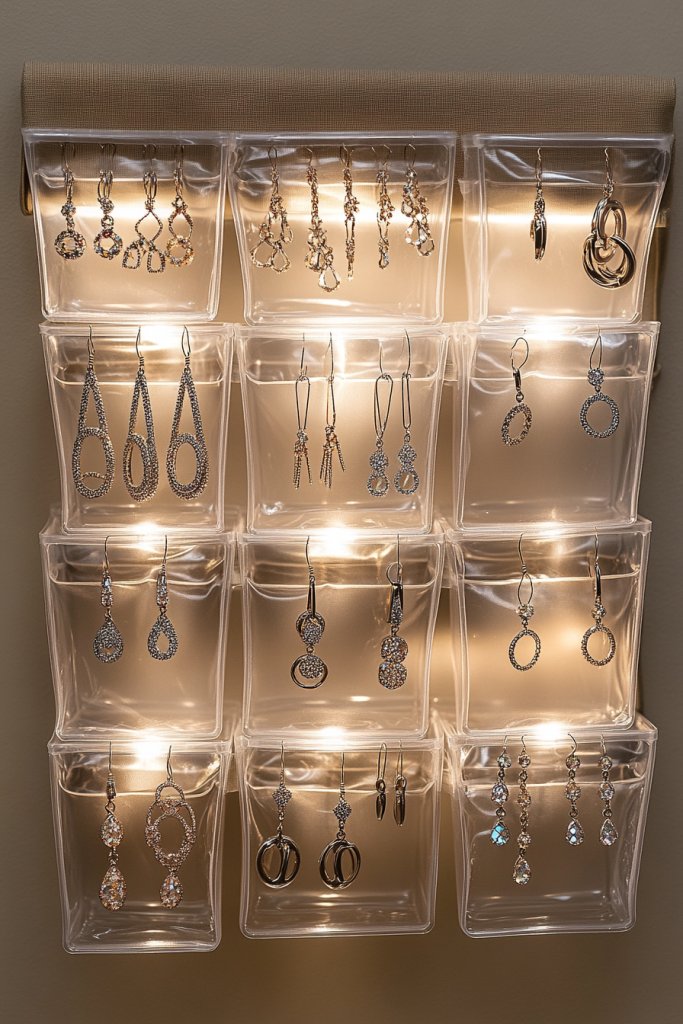
Tired of losing earrings in cluttered drawers or boxes? Visibility is key to quick styling, and a hanging organizer with clear pockets makes that easy. It’s a simple way to keep your jewelry organized, accessible, and visually appealing. Plus, it saves space and keeps everything in plain sight.
Visualize a durable fabric or plastic organizer hanging on your closet door or wall, with transparent pockets filled with earrings. The pockets are arranged in neat rows, allowing you to see each pair at a glance. Light filters through the clear material, highlighting your jewelry’s shine and colors. It’s like a mini boutique right in your home.
Choose organizers with different pocket sizes to accommodate various earring styles. Use neutral tones or bold colors to match your decor. Organize by type—studs, hoops, dangles—or by color for quick inspiration. You can also layer multiple organizers for larger collections.
Hang the organizer on a hook, door, or wall at a comfortable height. Fill each pocket with earrings, making sure to keep pairs together. Group similar styles or colors for easy retrieval. Regularly tidy and reorganize to keep the display fresh and functional. Ensure the pockets are securely attached and durable enough for daily use.
Add decorative touches like embroidered borders or personalized labels. Use color-coding to categorize your collection or designate sections for special occasions. Incorporate small hooks or clips inside pockets for delicate or layered pieces. Rotate earrings seasonally to keep your display exciting.
This hanging organizer makes accessorizing hassle-free and stylish. It’s perfect for small spaces, giving you a clear overview of your collection. It encourages you to wear more of your jewelry, boosting confidence and creativity every day.
10. Wooden Wall Mount Pegboard for a Minimalist, Modern Display
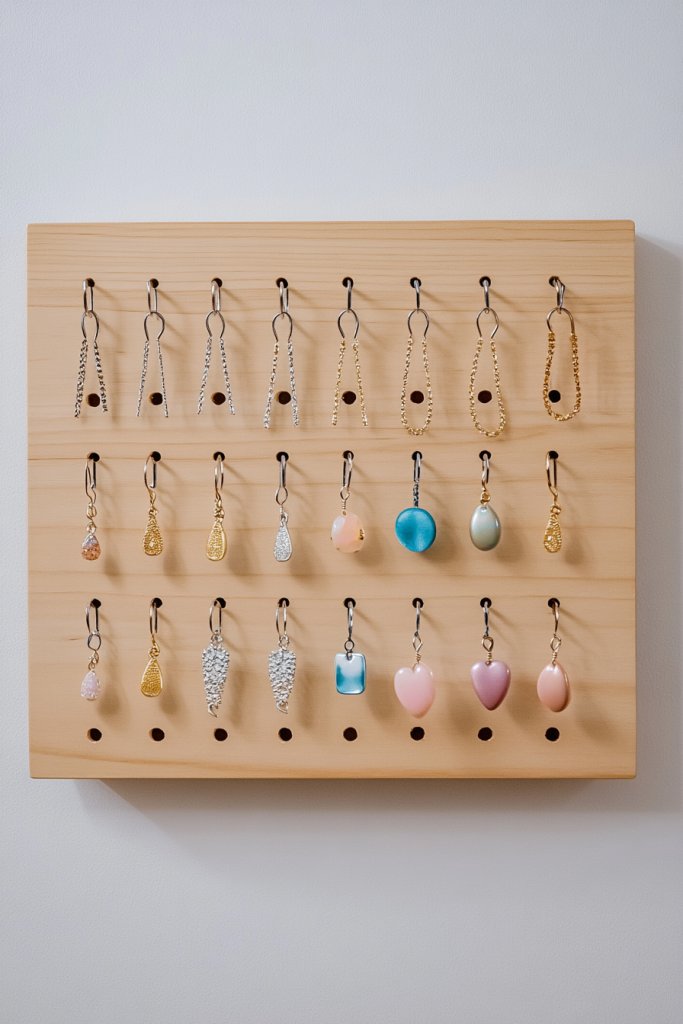
Are cluttered surfaces and tangled chains making you dread jewelry mornings? A pegboard offers a clean, modern way to keep your earrings visible and organized. It’s versatile, customizable, and adds a sleek touch to any room. Plus, it’s easy to install and adapt as your collection grows.
Picture a painted wooden pegboard mounted on your wall, with hooks and pegs arranged in a geometric pattern. Earrings hang freely, some dangle from hooks, others rest on pegs. The minimalist design emphasizes simplicity and function, with a pop of color from your painted wall or the jewelry itself. It’s a contemporary display that doubles as wall art.
Paint the pegboard in bold or neutral colors to match your decor. Arrange hooks and pegs in symmetrical or asymmetrical patterns. Use different sizes and shapes of pegs for visual interest. Incorporate additional shelves or small baskets for other jewelry items for a comprehensive display.
Securely mount the pegboard at eye level using appropriate hardware. Insert hooks and pegs in a pattern that suits your jewelry collection. Hang earrings directly on hooks or clip onto the pegs. Keep some space between pieces to avoid tangling. Regularly update the layout to keep it fresh and inspiring.
Decorate the pegboard with paint, stencils, or decals to match your style. Add labels or tags to categorize sections. Incorporate small decorative elements like LED strips or fabric accents for extra flair. Use different hook styles—s-shaped, straight, or clip hooks—to maximize versatility.
A pegboard combines form and function, making jewelry management effortless. It transforms a simple wall into an artful space that inspires daily accessorizing. Perfect for modern interiors, it’s a practical way to showcase your collection with style.
11. Reclaimed Window Frame as a Boho Earring Gallery
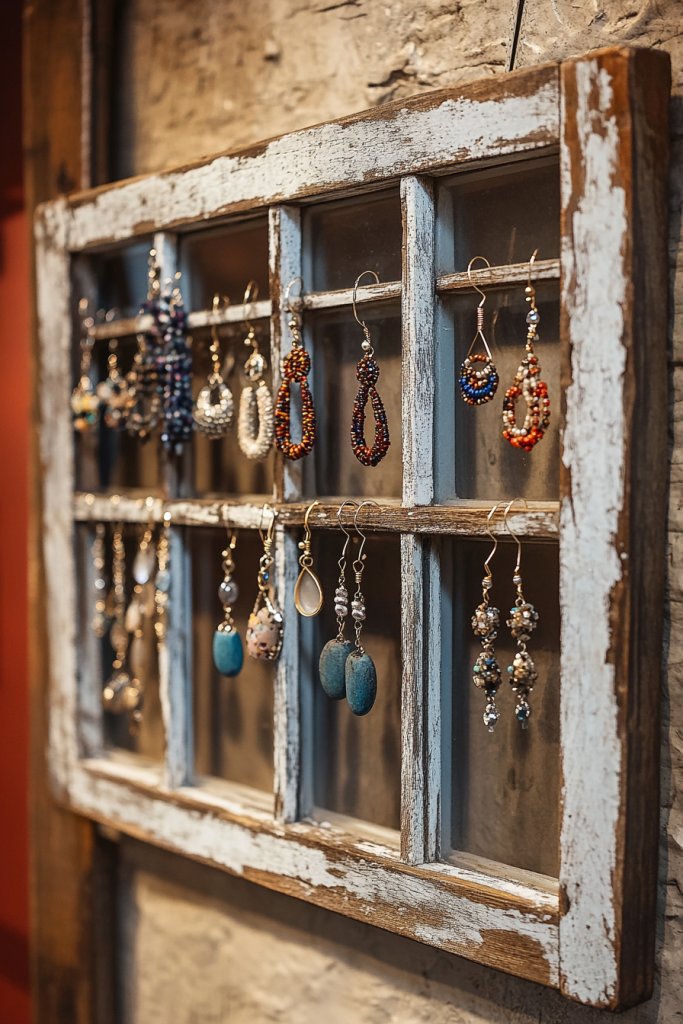
Looking for a unique way to display your jewelry that also adds character to your space? Reclaimed window frames are perfect for creating a boho-inspired earring gallery. They bring a rustic charm and a sense of history, making your collection feel special.
Imagine an old, weathered window frame hung on your wall, with multiple panes and a distressed finish. Each pane can hold hooks or clips, with earrings hanging freely. The frame’s imperfections add authenticity and visual interest, turning your jewelry into a piece of art. Light filters through the open or glass panes, creating a cozy, inviting atmosphere.
Choose frames with different styles—shabby chic, industrial, or vintage—to match your decor. Decorate the frame with paint, stencils, or fabric for a personalized touch. Use small hooks or clips inside each pane for earrings, and add small shelves or baskets for additional jewelry pieces. Large frames work well as statement pieces, while smaller ones suit cozy corners.
Securely hang the reclaimed frame on a wall, ensuring it’s level. Attach hooks or clips to each pane, spacing them evenly. Organize earrings by style or color, or create a random, eclectic mix. Consider reinforcing the frame’s back for stability. Use nails or screws suited for wall type and weight. Regularly update the display to reflect your evolving collection.
Paint or stain the frame in complementary colors, or leave it distressed for authenticity. Add decorative elements like small charms or tags. Incorporate fairy lights or small accents to highlight your jewelry. Personal touches turn this display into a conversation starter and a reflection of your personality.
This boho-inspired display turns everyday reclaimed materials into art. It’s a heartfelt way to celebrate your jewelry and your space. With its rustic charm, it invites you to accessorize creatively and confidently every day.
12. Glass Cloche or Dome for a Elegant, Show-Stopper Display
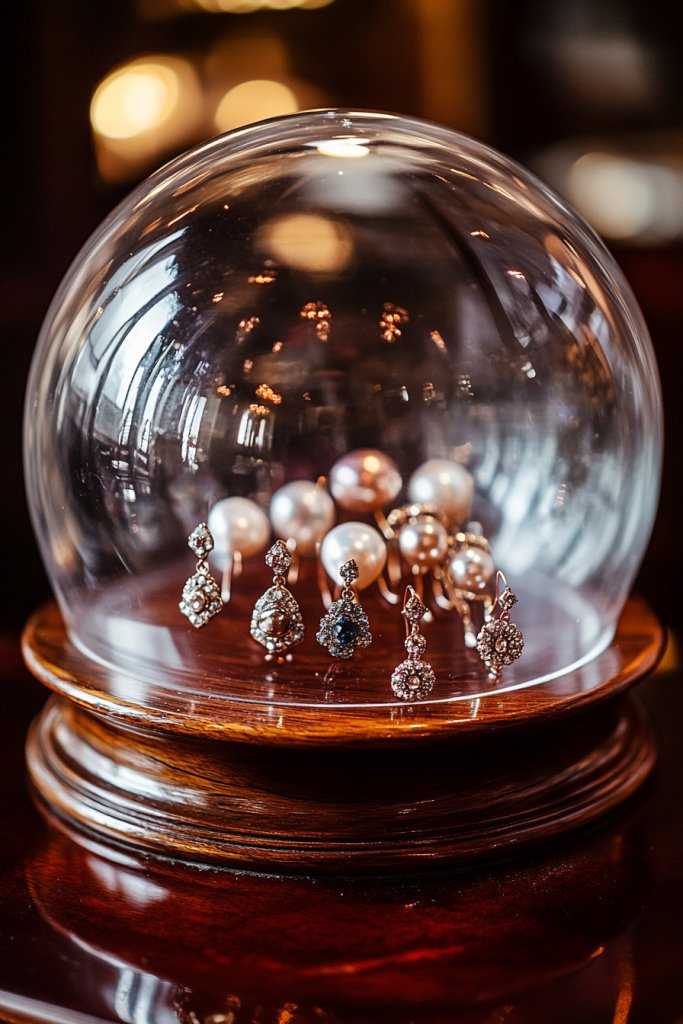
Want to elevate your jewelry display from ordinary to extraordinary? A glass cloche or dome adds a layer of sophistication and drama. It’s perfect for special pieces or for creating a focal point in your decor. Plus, it protects your jewelry while making it look like a museum exhibit.
Picture a sleek glass dome placed on a decorative tray or shelf, with earrings carefully arranged inside. The transparent cover magnifies the sparkle and color of your jewelry, while the rounded shape adds elegance. Light reflects off the glass, creating a captivating glow. It’s a refined way to showcase your favorite pieces and turn them into art.
Use different sizes and shapes of domes to suit your collection. Pair with metallic or ceramic bases for a luxurious look. Incorporate decorative elements like velvet pads, fabric liners, or small stands inside the dome for added visual interest. Change the arrangement seasonally or for special occasions to keep your display fresh.
Select a clear glass or acrylic dome that fits your space and jewelry size. Place a decorative or padded base underneath for stability. Arrange earrings carefully inside, ensuring the display remains open and accessible. Position the dome on a shelf, table, or vanity for maximum impact. Regularly clean the glass to keep it looking pristine. Consider stacking multiple domes for a layered, gallery-like effect.
Decorate the base with candles, flowers, or decorative stones, avoiding restricted wall decor. Use velvet or silk pads inside for delicate pieces, or add small tags for labeling. Switch out jewelry seasonally to keep your display engaging. Incorporate small LED lights inside or around the dome for extra sparkle.
A glass dome makes your jewelry feel special and treasured. It’s a statement piece that enhances your decor and inspires you to wear your most beautiful pieces more often. Show off your collection confidently with this elegant, eye-catching display.
13. Drawer Dividers Inside a Jewelry Box for Organized Storage
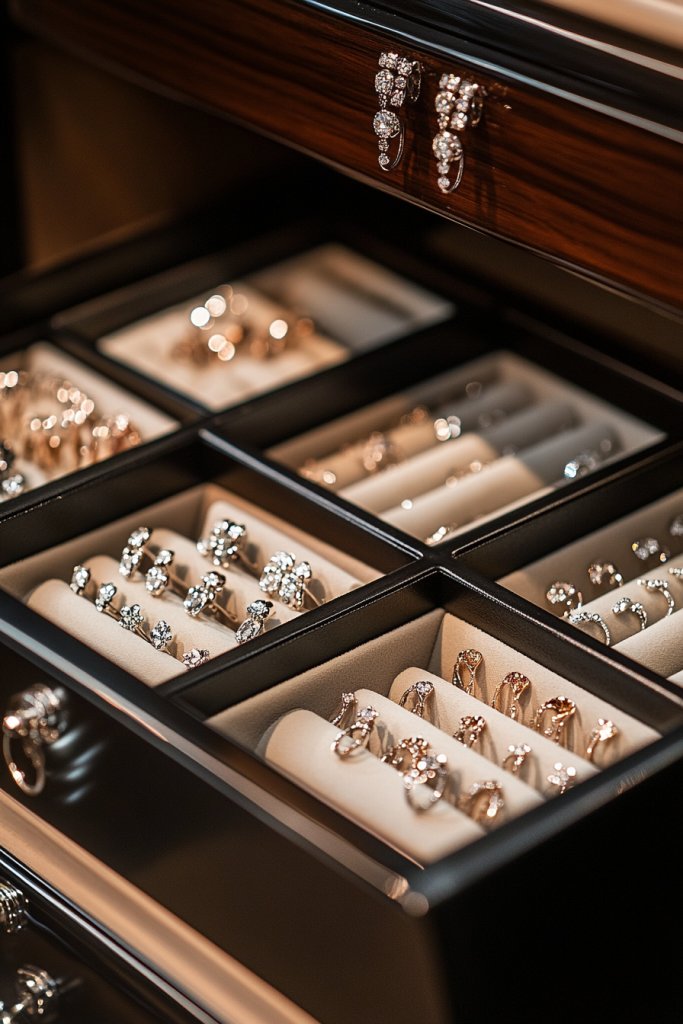
Do tangled earrings and cluttered drawers frustrate your morning routine? Drawer dividers help you organize your jewelry neatly and efficiently. They turn chaos into order and make finding the perfect pair quick and easy. Plus, they keep your collection protected and tangle-free.
Imagine opening a jewelry drawer divided into sections, each dedicated to different styles or colors. Earrings sit neatly in their own compartments, no longer tangled or knocked over. The dividers create a clean, structured look, making your collection feel curated and accessible. The organized space invites you to experiment with different combinations.
Use adjustable or customizable dividers to fit your drawer size perfectly. Incorporate velvet-lined compartments for delicate pieces or stackable trays for larger collections. Switch between open trays or covered boxes for different aesthetics. Personalize by labeling sections or using decorative liners to match your decor.
Select drawer dividers made of wood, plastic, or fabric to suit your needs. Arrange them inside your jewelry box or drawer, creating separate sections for earrings, rings, and necklaces. Place earrings in individual slots or small containers within each section. Organize by style, color, or frequency of use for quick access. Regularly update the layout as your collection evolves.
Add decorative liners, fabric covers, or washi tape to the dividers for a personalized touch. Use labels or tags to identify sections clearly. Incorporate small trays or compartments for extra organization. Rotate or reorganize your collection periodically to keep it fresh and inspiring.
This method turns your jewelry storage into a visual delight, making accessorizing effortless. It encourages you to wear more of your collection and keeps your space looking tidy. With everything neatly separated, you’ll feel more confident and inspired every day.
14. Over-the-Door Hooks for Space-Saving Convenience
Limited space and cluttered surfaces can make jewelry management a hassle. Over-the-door hooks provide an easy, space-saving solution that keeps your earrings within reach. They’re perfect for small apartments or rooms where wall space is precious. Plus, installation is quick and non-invasive.
Picture a sturdy hook or rack hanging over your bedroom or closet door. Earrings hang from the hooks, organized by style or color. The setup is unobtrusive yet highly functional, turning an otherwise unused space into an organized jewelry station. The hooks blend seamlessly with your door, adding minimal visual clutter.
Choose hooks in different finishes—metal, wood, or plastic—to match your decor. Install multiple hooks or racks for larger collections. Use S-hooks or clips for added versatility. Pair with small baskets or pouches for accessories like bracelets or necklaces. Adjust height and spacing for easy access.
Select over-the-door hooks or racks designed for jewelry or accessories. Hang them securely over the door, ensuring they don’t interfere with door opening. Organize earrings on hooks or clips, grouping similar styles. Use additional hooks inside the door for necklaces or rings. Regularly review and update to keep your collection fresh.
Decorate the hooks with paint or washi tape to match your style. Add small labels or tags to categorize sections. Incorporate decorative pouches or fabric sleeves for delicate pieces. Use different hook styles to maximize organization and aesthetic appeal.
Over-the-door hooks maximize vertical space and keep your jewelry visible. They make accessorizing quick and simple, boosting your confidence to try new looks. Perfect for small spaces, they turn neglected areas into functional, stylish solutions.
15. Succulent or Small Plant Wall with Earring Hooks for a Nature-Inspired Look
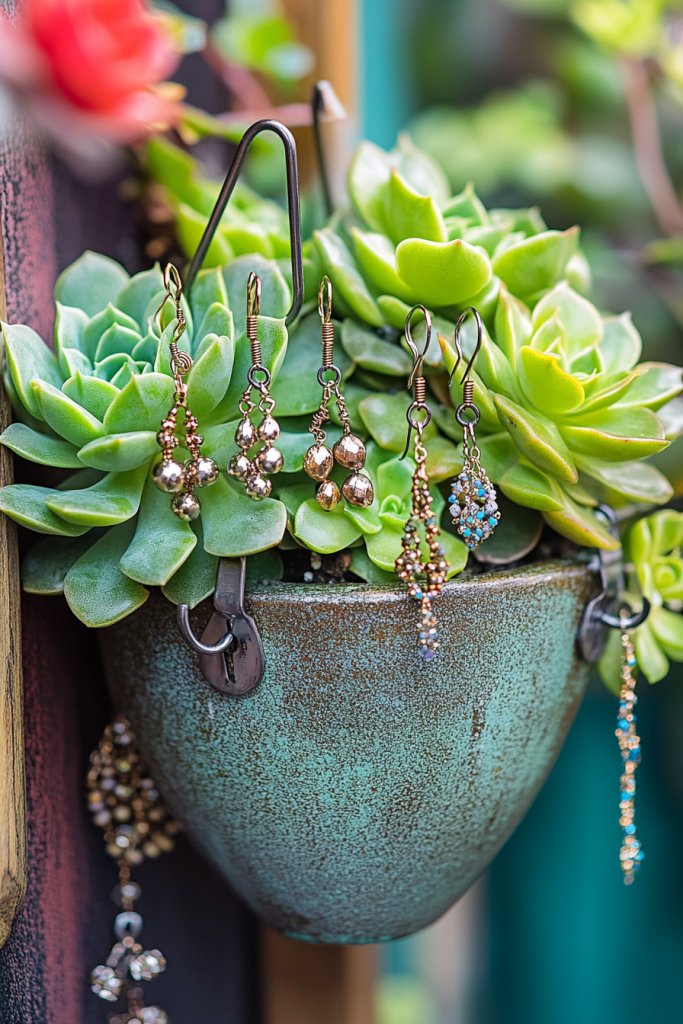
Want your jewelry display to feel fresh and lively? Combining plants with jewelry creates a vibrant, nature-inspired aesthetic. Earring hooks mounted on a small wall planter or succulent arrangement not only organize your pieces but also add a burst of greenery. It’s a unique blend of decor and function.
Imagine a small wall with tiny planters or succulents, each with hooks or clips hanging from the containers. Earrings dangle from the hooks, contrasting beautifully with lush green leaves or textured succulents. The natural elements soften the space, creating a refreshing, organic vibe that energizes your room.
Use small wall-mounted planters made of ceramic, wood, or metal, with hooks embedded or attached. Choose plants that require minimal maintenance, like succulents or cacti. Decorate the containers with paint, fabric, or decorative stones for personalization. Arrange the planters in a grid or staggered pattern for visual interest.
Install small brackets or wall-mounted containers at a comfortable height. Use hooks or clips inside the containers or on their edges to hang earrings. Ensure the containers are securely mounted and water-resistant if needed. Place the display near natural light sources and keep the plants healthy with minimal watering. Organize earrings by style or color for quick access.
Decorate containers with personalized labels, paint, or small charms. Incorporate decorative stones or sand for a layered look. Mix in small decorative items like fairy lights or figurines to enhance the natural theme. Change out earrings seasonally or for special occasions for variety.
This combination of greenery and jewelry creates a lively, inspiring space. It’s a reminder of nature’s beauty and your own creativity. Perfect for a fresh, modern aesthetic that makes every day feel a little more vibrant.
16. Decorative Wall Hooks in Artistic Shapes for a Bold Statement
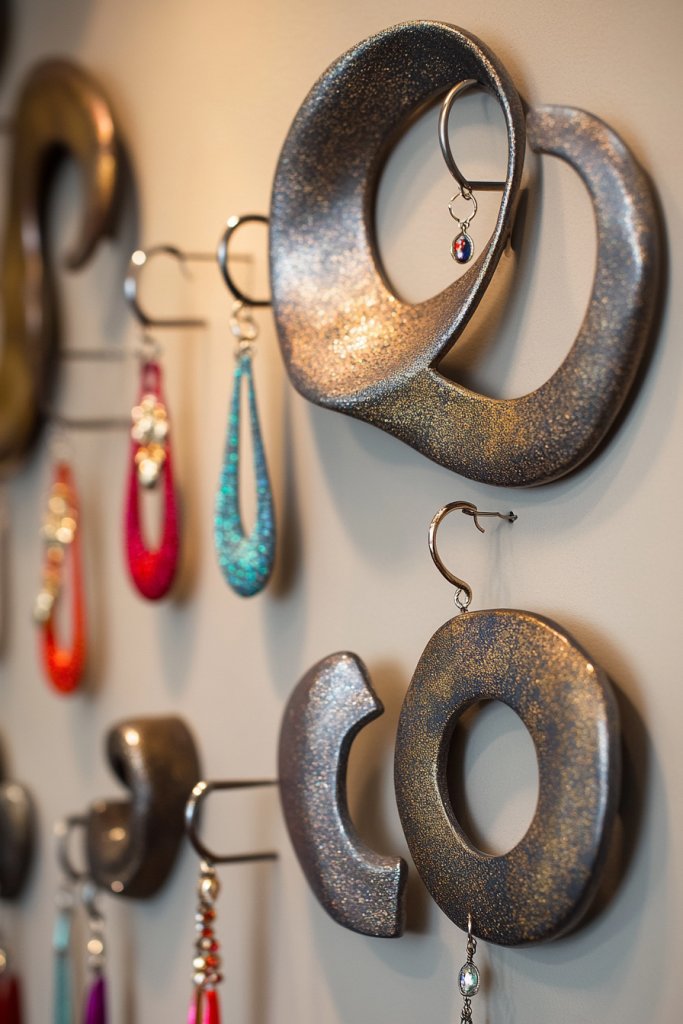
Looking to make a statement with your jewelry display? Artistic wall hooks in bold shapes add personality and creativity to your space. They serve as functional art, turning your collection into a focal point. Plus, they’re a fun way to express your personal style.
Visualize wall hooks shaped like leaves, branches, or geometric forms, mounted on a blank wall. Earrings hang from the hooks, creating a dynamic, sculptural display. The shapes add an artistic flair, transforming simple jewelry organization into a bold decor statement. The contrast of shapes and jewelry spark curiosity and admiration.
Select hooks in various shapes and sizes to suit your decor. Arrange them in patterns—linear, radial, or abstract—to create visual interest. Use different materials—metal, wood, or acrylic—for texture. Incorporate complementary elements like small shelves or decorative accents around the hooks.
Mount the hooks securely on a wall, spacing them evenly or in a creative arrangement. Hang earrings directly from the hooks, mixing styles for an eclectic look. Reinforce hooks if needed, especially for heavier pieces. Keep the display balanced and accessible, and consider adding lighting to highlight the shapes.
Paint or decorate the hooks to match your color scheme. Add small decorative elements like beads or charms on the hooks. Create a themed display—nature-inspired, abstract, or geometric—to reflect your personality. Regularly rotate earrings to showcase different pieces.
This artistic approach elevates your jewelry display into a piece of wall art. It celebrates your individuality and creativity, encouraging you to experiment with your accessories. It’s a bold, inspiring way to turn everyday jewelry into a design feature.
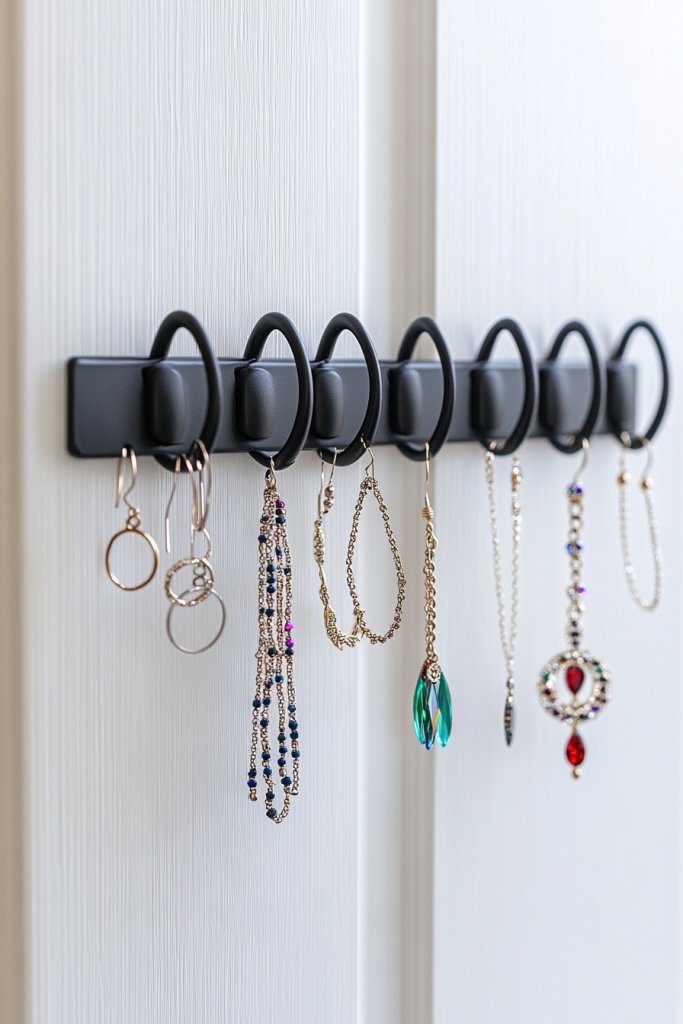
17. Magnetic Strip on Vanity or Wall for Quick Swap-Outs
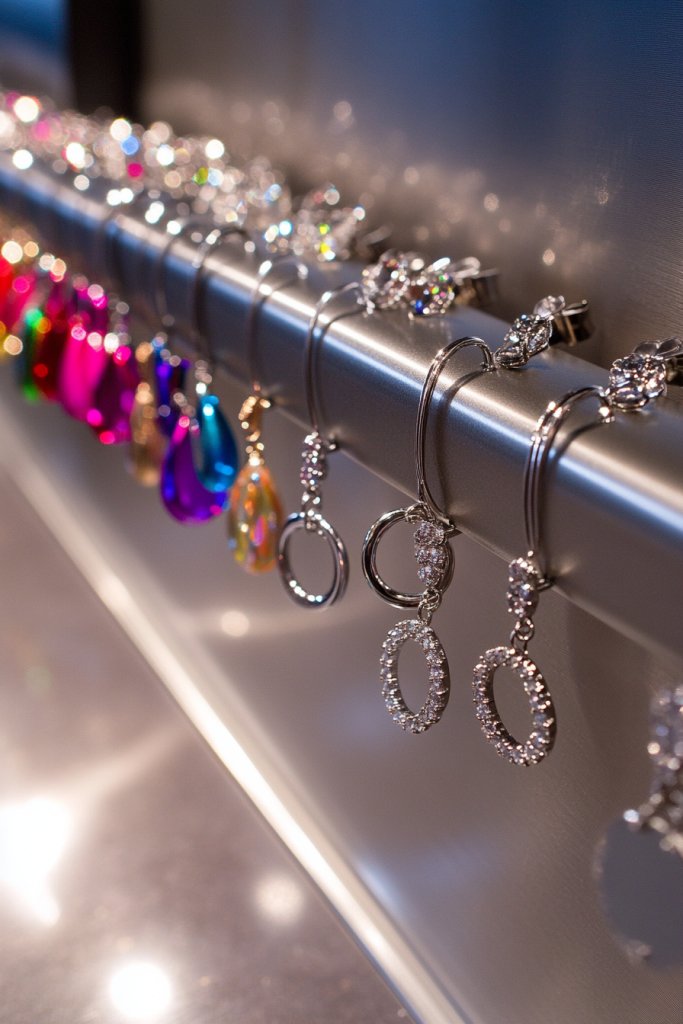
Hate wasting time searching for matching earrings? A magnetic strip offers a quick, efficient way to display and swap jewelry daily. It keeps pieces visible and easily accessible, making your morning routine smoother. Plus, it’s a sleek, modern solution that fits any space.
Picture a thin magnetic strip mounted on your vanity or wall, with earrings attached magnetically. The strip’s clean lines and metallic finish blend into contemporary decor. Earrings hang in a line or cluster, ready to grab. It’s a minimal yet effective display that keeps your jewelry front and center.
Choose magnetic strips in various lengths and finishes—brushed metal, matte, or colored—to match your style. Use multiple strips for different jewelry categories or to expand your display. Combine with small containers or stands for additional pieces like rings or bracelets. Place near your mirror for quick access.
Securely attach the magnetic strip to a clean, dry surface using screws or adhesive strips. Ensure it’s level and at a height that’s comfortable for reaching. Arrange earrings along the strip, grouping similar styles or colors. Consider adding small labels or tags for organization. Regularly update the display as your collection grows or changes.
Decorate the strip with paint, decals, or washi tape for a personalized touch. Use color-coding or tags to categorize jewelry. Incorporate small magnetic containers or clips for extra storage. Rotate earrings seasonally or for special events to keep the display fresh.
This simple yet chic setup streamlines your daily styling routine. It encourages you to wear more of your jewelry and experiment with new looks. Sleek and practical, it’s a modern solution that keeps your collection organized and inspiring.
18. Upcycled Candle Holders or Vases as Elegant Stands
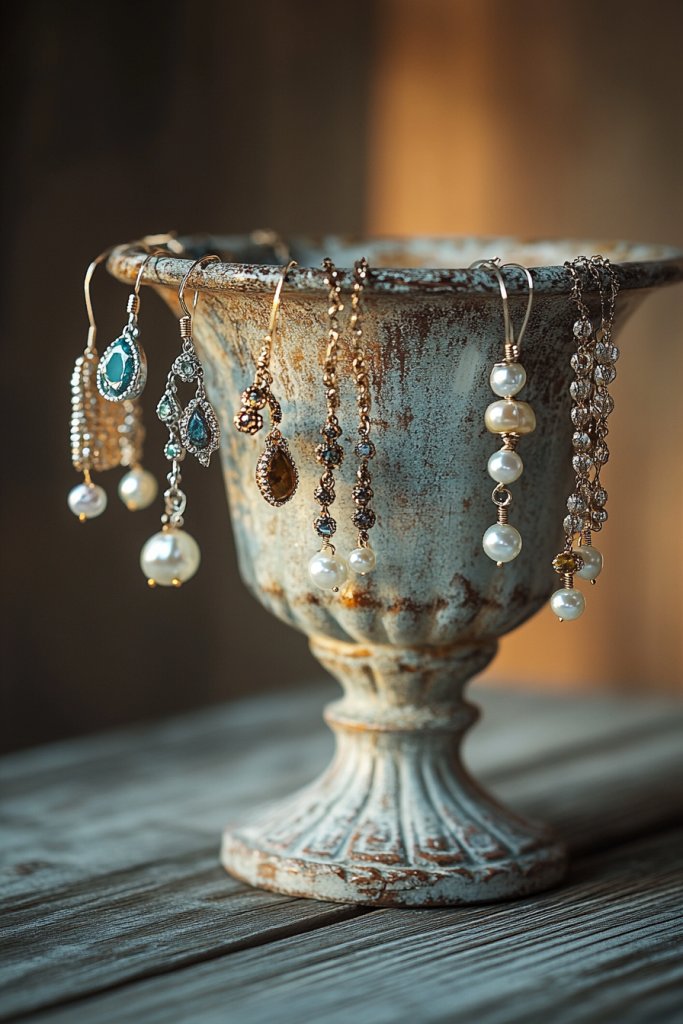
Looking for a stylish way to display your earrings without investing in new decor? Upcycled candle holders or small vases are perfect for creating elegant, elevated stands. They add a touch of vintage charm and personality, turning everyday objects into jewelry showcases. It’s a fun, eco-friendly project for creative souls.
Imagine vintage glass candle holders or small ceramic vases placed on your dresser or shelf, with earrings draped or hung from the rim or base. The reflective surfaces and delicate shapes bring a refined aesthetic. Light plays off the glass or ceramics, highlighting your jewelry’s sparkle and colors. The stands add height and visual interest, making your collection stand out.
Select holders in different shapes, heights, and finishes—clear glass, colored, textured—to suit your decor. Use them alone or in groups for a layered effect. Decorate with ribbons, beads, or fabric wraps for a personalized touch. Arrange earrings artistically, mixing styles and lengths for a dynamic display.
Clean and prepare your upcycled pieces thoroughly. Use small hooks, clips, or simply drape earrings over the rim or base. Secure pieces with adhesive if necessary, especially for heavier items. Place the stands on your vanity, shelf, or in a display cabinet. Rotate and update the collection regularly for freshness.
Decorate the bases with paint, fabric, or decorative elements. Add tags or labels to categorize or highlight special pieces. Incorporate seasonal or themed accents for variety. You can also combine different stand heights for visual diversity.
This creative reuse adds charm and elegance to your jewelry display. It’s a conversation starter and a reflection of your style and eco-consciousness. Elevate your collection with simple, beautiful stands that inspire you to accessorize confidently every day.
Conclusion
With this diverse range of earring storage ideas, you now have the tools to create a personalized and organized display that suits your style. Don’t hesitate to try out different solutions and adapt them to your space — the perfect storage is just a creative step away. Embrace these ideas and turn your jewelry organization into a fun, inspiring project that elevates your daily routine!