
20 Funky Painting Ideas for Creative Expression
Are you ready to unleash your inner artist and add a pop of funk to your walls? Funky painting ideas have surged in popularity because they allow for bold self-expression, playful experimentation, and a break from traditional decor. These vibrant and unconventional designs bring personality and fun into any space, making your home truly one-of-a-kind.
In this article, you’ll find a diverse array of funky painting ideas that will inspire your creative side. From abstract splashes of color to quirky patterns and unexpected themes, there’s something to ignite everyone’s artistic spirit. Get ready to transform your walls into lively canvases that reflect your unique style and zest for life!
1. Geometric Abstract Wall Art with Metallic Accents
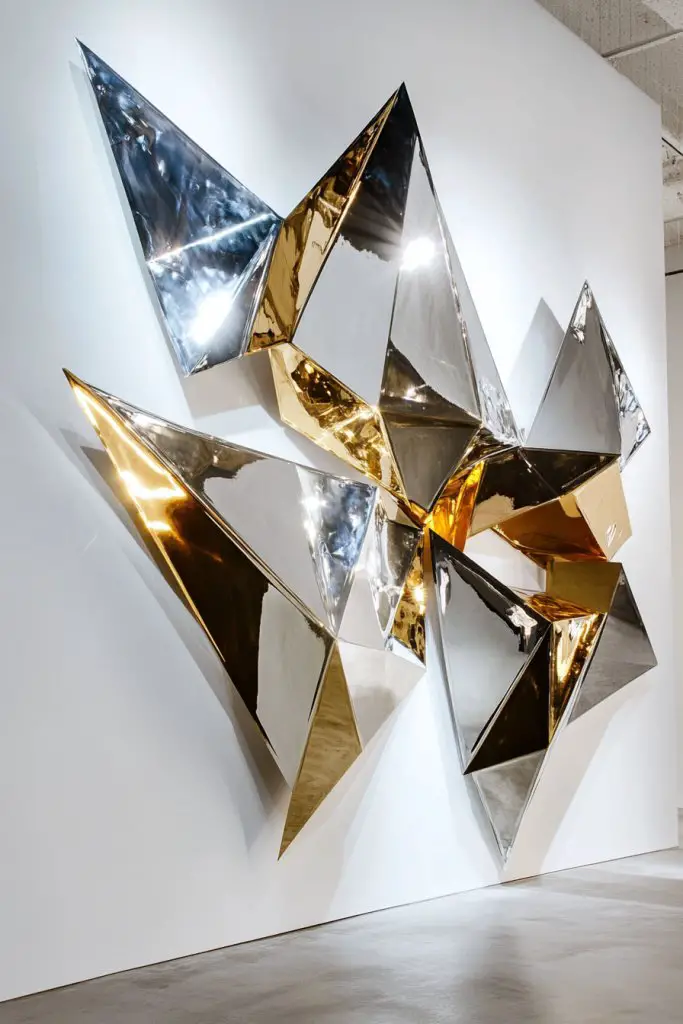
Ever feel like your walls are just screaming for a makeover that’s bold and stylish? Sometimes, a simple coat of paint isn’t enough to satisfy that craving for something edgy and modern. You want your space to stand out, to tell a story without words, and to showcase your personality through art. Geometric abstracts with metallic accents tick all those boxes, giving your walls an instant upgrade.
Recommended Products to replicate this idea
| # | Preview | Product | |
|---|---|---|---|
| 1 |

|
Wall Photo Grid Shelf, Wall Hanging Ins Art Display Grid Panel for Decor & Storage, Metal Wire... | Check Latest Price |
| # | Preview | Product | |
|---|---|---|---|
| 1 |

|
COLOR CARE Metallic Paint – Satin Champagne, 1 Quart (Pack of 1) | Water-Based Low-Odor Paint for... | Check Latest Price |
Imagine large, sharp shapes intersecting in vibrant or metallic hues, catching the light at different angles. Think of crisp lines forming triangles, squares, and polygons that create an eye-catching mosaic effect. When paired with metallic paints—gold, silver, or copper—it adds a luxe, futuristic vibe. The textures shimmer and reflect, making your walls the center of attention in any room. It’s like turning your wall into a piece of modern sculpture.
You can go for a monochrome palette for a sleek look or mix bright colors for a playful vibe. Metallic accents work well in contemporary, industrial, or even eclectic styles. For smaller spaces, opt for smaller geometric patterns; larger walls can handle bold, expansive designs. Seasonal tweaks, like adding more gold in winter or silvers in summer, can refresh the look. Play around with matte backgrounds to make metallic pops truly stand out.
Start with painter’s tape to outline your geometric shapes precisely. Pick your favorite vibrant or metallic paints—acrylics work great—and fill in the shapes carefully. Use straightedges and stencils for sharp, clean lines. Allow each color to dry before moving on to prevent smudging. For added texture, consider layering metallic foil or specialty paints for a more tactile finish. Finish with a clear sealing coat to preserve the vibrancy and shine.
Add your initials or meaningful symbols within the geometric shapes to give it a personal touch. Incorporate textured materials like metallic foil or reflective vinyl for a mixed-media effect. Experiment with asymmetrical designs for a more dynamic look or mirror the patterns for symmetry. You can also extend the design onto furniture or frames for a cohesive artistic vibe. Customization is key to making this truly yours.
This style turns your walls into a statement piece that feels fresh and modern. It’s a trend that’s easy to adapt and always in style. Plus, creating your own geometric art boosts your confidence in DIY projects. Ready to add a touch of metallic magic and geometric flair to your space? Your walls are waiting for their transformation!
2. Ombre Rainbow Canvas Art
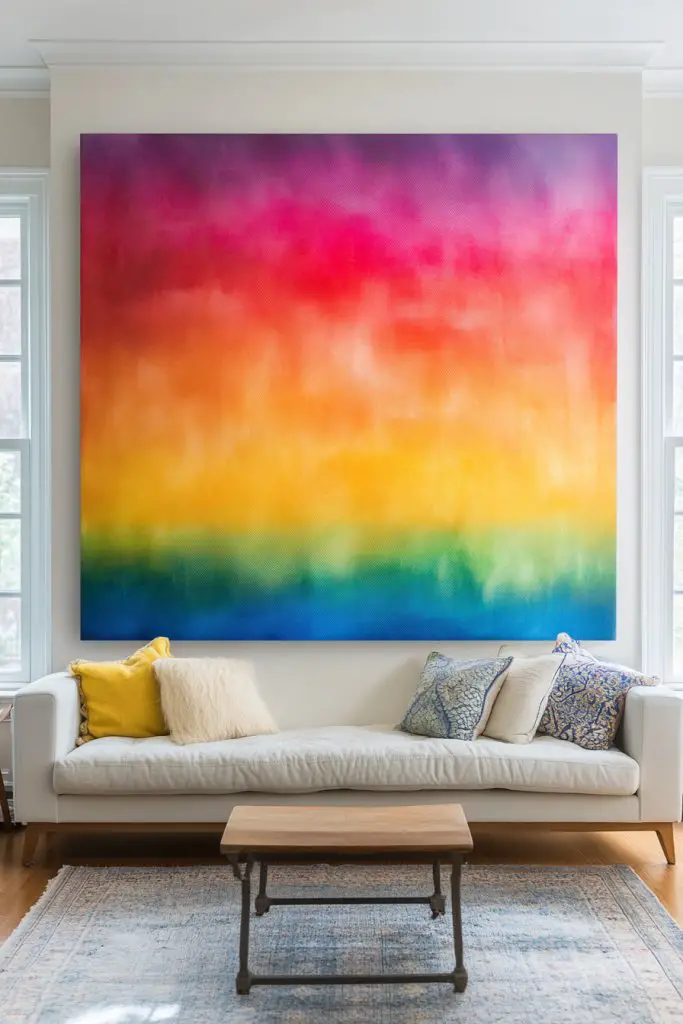
Are you tired of dull, lifeless walls that don’t inspire your mood? Sometimes, all it takes is a splash of color to turn a space from boring to breathtaking. But plain colors can feel flat and uninspired, right? Enter ombre rainbow canvas art—a vibrant, soothing solution that adds energy and calm all at once.
Recommended Products to replicate this idea
| # | Preview | Product | |
|---|---|---|---|
| 1 |

|
Large Framed Black and White Neutral Abstract Wall Art for Living Room, 3 Piece Boho Canvas Prints... | Check Latest Price |
| # | Preview | Product | |
|---|---|---|---|
| 1 |

|
SUNLU Silk Rainbow PLA Filament 1.75mm, Multicolor Gradient 3D Filament, Neatly Wound Shiny Silk 3D... | Check Latest Price |
Picture a large canvas where shades blend seamlessly from deep violet to bright yellow, then back again, creating a gentle gradient. The colors flow into each other smoothly, like a sunset or a rainbow after a rainstorm. The softness of the gradient adds a calming effect, while the vibrant hues energize the room. It’s a visual feast that draws the eye without overwhelming.
You can customize the color palette based on your room’s theme—pastels for a soft, airy feel or bold primaries for a lively statement. For a more subdued look, choose muted tones; for a playful vibe, go for brighter shades. Large walls benefit from big, sweeping gradients, while smaller canvases work great as accent pieces. Seasonal adjustments, like cooler tones for winter or warmer hues for summer, keep the artwork feeling fresh.
Start with a high-quality canvas and acrylic paints in your chosen rainbow shades. Use a large, flat brush or sponge to blend the colors horizontally, starting from one side and working across. Keep blending as you go to ensure a smooth transition. For extra precision, use a grid to outline your gradient zones. Finish with a clear acrylic sealer to protect the colors and give a subtle sheen. Hang in a spot where natural light enhances the gradient’s vibrancy.
Add metallic or pearl accents to certain bands for a touch of shimmer. Incorporate glitter or iridescent paints for a sparkling effect, especially in areas with lots of light. Personalize by adding subtle symbols or initials within the gradient. Use custom framing or mount the canvas on a textured backing for added dimension. You can even create multiple canvases with different sections of the rainbow for a gallery wall.
This artwork creates a lively, positive atmosphere and can be a great conversation starter. It’s a simple project that anyone can do, even beginners, and it results in a stunning visual. Plus, it reminds you daily of the beauty in diversity and color. Ready to brighten your space with a rainbow of happiness? Your wall just got a whole lot more inspiring!
3. Drip Painting with Bright Colors
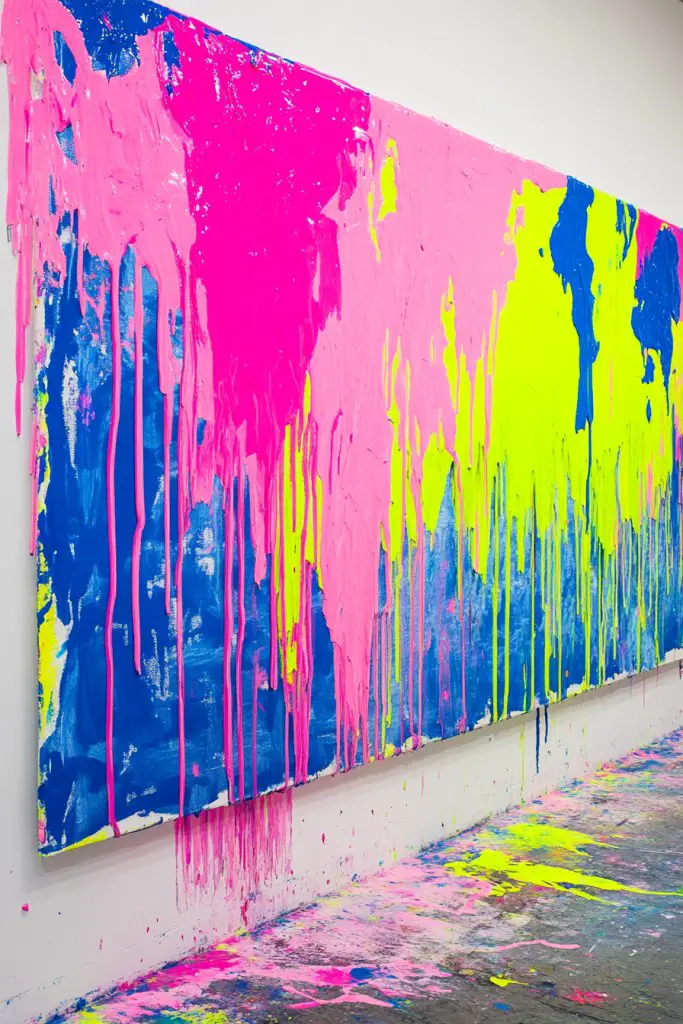
Feeling stuck in a creative rut? Or maybe you just want to add some wild energy to your walls? Drip painting is the answer—messy, bold, and totally fun. It’s perfect for those who crave a piece that screams personality without needing perfection. Plus, it’s surprisingly easy to pull off, even if you’re not a seasoned artist.
Recommended Products to replicate this idea
| # | Preview | Product | |
|---|---|---|---|
| 1 |

|
55PCS Acrylic Paint Set of 36 Colors 2fl oz 60ml Bottles 12 Brushes,Non Toxic 36 Colors Acrylic... | Check Latest Price |
| # | Preview | Product | |
|---|---|---|---|
| 1 |

|
Apple Barrel, Vibrant Spectrum Collection Acrylic Craft Paint, PROMOABIII, 2 fl oz each, 16 assorted... | Check Latest Price |
Imagine vibrant colors like hot pink, electric blue, and lime green pouring and dripping down a canvas in chaotic yet controlled patterns. The thick layers of paint create a textured, layered look that feels alive and dynamic. The drips form abstract shapes and streaks, giving off an energetic vibe. When backlit or in natural light, the layered paint glimmers, adding depth and movement.
Use a monochrome palette with varying shades for a more subtle drip effect or go all out with multiple bright colors for maximum impact. The technique works well on large canvases for a statement piece or smaller ones for accents. For seasonal variations, incorporate metallic or neon paints for extra flair. Experiment with different dripping tools—brushes, syringes, or even squeeze bottles—to vary the flow.
Lay your canvas flat or prop it upright, then choose your bold colors. Load your brushes or squeeze bottles and start pouring or dripping from the top, allowing the paint to flow freely. Tilt the canvas to guide the drips or let gravity do its thing for natural streaks. Work quickly to layer colors before they dry, creating overlapping effects. Once finished, let it dry completely before hanging. Consider sealing with a glossy spray for added vibrancy.
Incorporate metallic or glow-in-the-dark paints for surprising effects under different lighting. Add splashes of glitter or iridescent finishes for extra dimension. Personalize with a few intentional drips of your favorite color or pattern to make it uniquely yours. Frame it with a simple border or leave it raw for an industrial look. You can also combine drip art with other mixed media for a collage feel.
This style proves that art doesn’t need to be neat to be stunning. It encourages embracing imperfection and celebrating spontaneity. Plus, it’s a perfect project to get your kids or friends involved—no rules, just pure chaos. Ready to make a splash on your wall? Drip painting is your new best friend for instant energy and color!
4. Faux Textured Murals Using Sponges and Palette Knives

Tired of flat, boring walls that lack depth? Want to add a tactile, artistic vibe without a lot of fuss? Faux textured murals are a fantastic way to create the illusion of stone, fabric, or even wood grain—without the hefty price tag or mess. Plus, you get a unique, handcrafted look that’s all your own.
Recommended Products to replicate this idea
| # | Preview | Product | |
|---|---|---|---|
| 1 |

|
Homax 4092 Aerosol Texture, Water-Based Orange Peel Wall Texture, 20 oz | Check Latest Price |
| # | Preview | Product | |
|---|---|---|---|
| 1 |
|
Patelai Knockdown Texture Sponge Drywall Wall Patch Ceiling Texture Sponge Home Decor for Repair DIY... | Check Latest Price |
Picture a wall with the appearance of rough sandstone or soft linen, achieved through clever sponge and palette knife techniques. The textured surface invites touch and adds visual interest, making the space feel more layered and inviting. The varied textures cast subtle shadows, especially in angled lighting, enhancing the illusion of depth. This technique can transform a plain wall into a feature that resembles high-end materials.
Choose different textures based on your style—rougher textures for rustic or industrial looks, smoother finishes for modern minimalism. You can mimic natural surfaces like stone, brick, or fabric by adjusting your tools and techniques. Seasonal tweaks include lightening or darkening the color palette or adding metallic accents for a luxe touch. Use color washes or dry brushing to add aged or weathered effects.
Start with a primer to ensure good adhesion for your textured paint. Mix your paints with texturizing mediums or use thicker paints directly. Use a sponge to dab on the base layer, then enhance with palette knives to carve or stipple patterns. Layer the textures gradually, allowing each layer to dry. Finish with a sealing coat to lock in the textured effect and protect against wear. Practice on a small section first to perfect your technique.
Add metallic or pearl finishes to certain areas for a sophisticated look. Incorporate contrasting colors for more dynamic textures. Use stencils or masks to create patterns within the textured surface. Personalize by embedding small decorative elements like metallic flakes or textured fabric patches. This approach allows you to craft a one-of-a-kind mural that reflects your taste.
Faux textured murals offer a high-end look with a DIY twist. They’re perfect for transforming a feature wall without heavy renovations. Plus, experimenting with textures boosts your confidence in mixing techniques and colors. Ready to turn plain walls into tactile masterpieces? This method is a game-changer for creative expression at home.
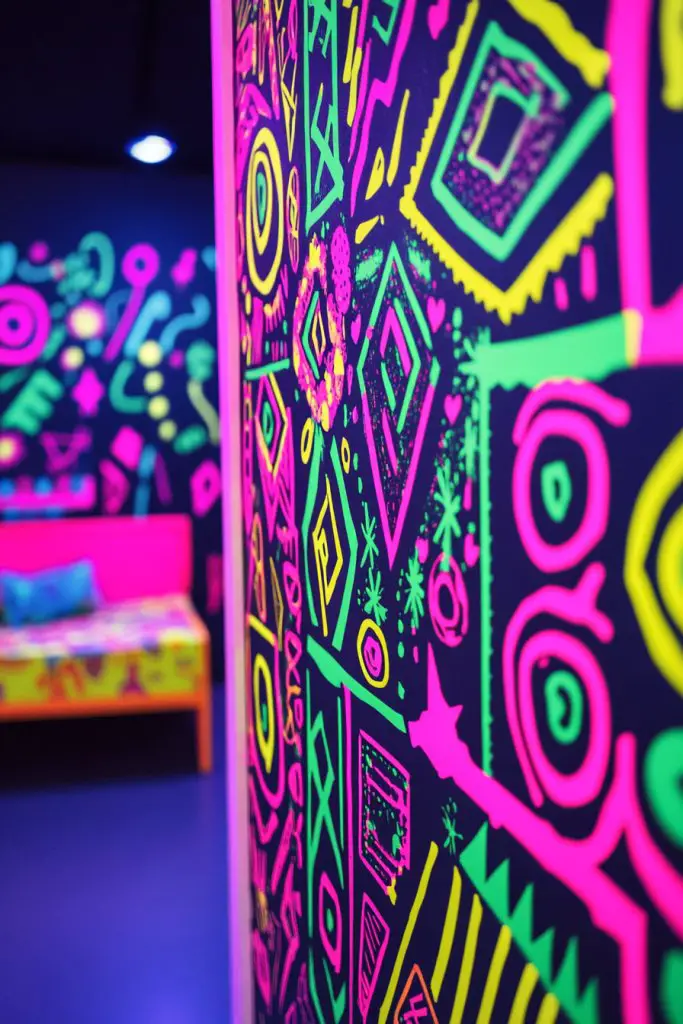
5. Stenciled Funky Patterns in Neon Tones
Ever wanted to add a pop of vibrant energy to your space without committing to a full mural? Stenciled funky patterns in neon tones are perfect for injecting fun and personality into any room. They’re easy to customize and update, making your walls a playground of bold designs. Plus, neon colors are trending big time, so your decor will look fresh and lively.
Imagine repeating geometric, floral, or abstract patterns in electric pink, lime green, or vivid orange. The sharp contrast of neon against neutral backgrounds makes the patterns glow, creating a dynamic visual impact. When lit with blacklights or in low lighting, the neon colors pop even more, adding a funky, nightclub vibe. The symmetrical or asymmetric patterns can stretch across an entire wall or serve as eye-catching accents.
Mix and match patterns—think chevrons, circles, or tribal motifs—for a boho or eclectic style. Use stencils with different sizes and shapes to create layered effects. For a more subdued look, combine neon with metallic or pastel shades. Seasonal updates might include swapping out neon colors for softer hues during winter or festivals. Incorporate glow-in-the-dark paints for extra fun in the dark.
Start by choosing high-quality stencils and neon or UV-reactive paints. Tape your stencil securely to prevent slipping, then apply the paint with a sponge or brush, avoiding excess to prevent bleeding. Use a light dabbing motion for sharp edges. Repeat the pattern across your wall, adjusting spacing for visual rhythm. Once dry, you can add a clear coat to protect the design. For maximum glow, consider installing blacklights nearby.
Add metallic or iridescent accents within your pattern for extra dimension. Personalize by incorporating symbols or initials into the design. Create a layered effect by overlapping patterns or combining different stencil designs. You could also frame sections of the pattern with LED strip lighting for a dramatic effect. Customization makes each piece uniquely yours.
Neon stenciled patterns are perfect for those who want a bold, playful statement. They’re simple to update or change out, so your decor stays fresh. Plus, mastering stenciling boosts your confidence in DIY wall art. Ready to turn your walls into a vibrant, energetic canvas? Neon patterns are your new secret weapon for fun and funky interiors!
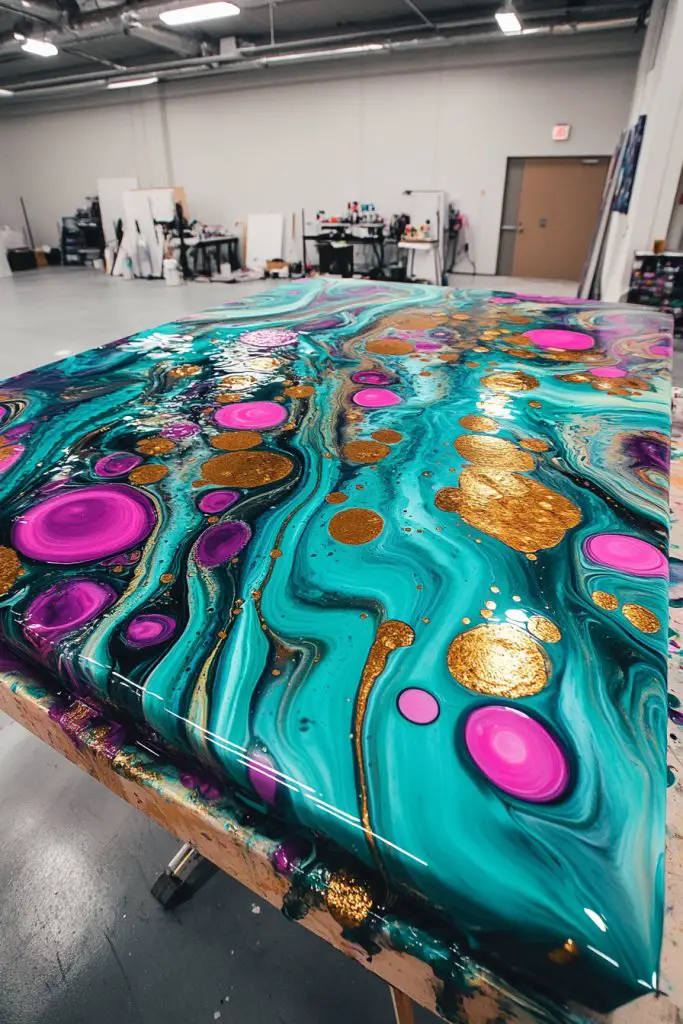
6. Abstract Fluid Art with Acrylic Pouring
Looking for a way to create truly unique artwork that feels spontaneous and alive? Abstract fluid art with acrylic pouring is your answer. It’s perfect for those who want vibrant, one-of-a-kind pieces without having to master traditional painting techniques. Plus, it’s oddly satisfying to watch colors swirl and blend into mesmerizing patterns.
Recommended Products to replicate this idea
| # | Preview | Product | |
|---|---|---|---|
| 1 |

|
Nicpro Acrylic Pouring Kit, Artist Starter Supplies Including 19 Colors Acrylic Paints,Pouring... | Check Latest Price |
| # | Preview | Product | |
|---|---|---|---|
| 1 |
|
55PCS Acrylic Paint Set of 36 Colors 2fl oz 60ml Bottles 12 Brushes,Non Toxic 36 Colors Acrylic... | Check Latest Price |
Visualize a canvas filled with swirling, layered colors—blues melting into greens, reds blending with yellows—forming hypnotic, organic shapes. The flowing paint creates a sense of movement, like a river or cloudscape frozen in time. When finished, each piece has a distinct pattern, almost like a fingerprint, making every artwork uniquely yours. The glossy finish enhances the depth and richness of the colors.
Use different color combinations to match your mood or decor—cool blues and greens for calm, fiery reds and oranges for energy. For a more subtle look, stick to pastel shades; for a pop of drama, incorporate metallic or iridescent paints. Large canvases serve as statement pieces, while smaller ones can be grouped for a gallery effect. Seasonal tweaks include shifting toward warmer or cooler palettes.
Prepare your workspace with plastic or drop cloths, then pour a base layer of paint onto your canvas. Mix your acrylics with pouring mediums for a smooth, fluid consistency. Pour different colors onto the canvas and tilt or swirl to let the paints interact naturally. Use sticks or toothpicks to create additional details or cells. Once the paint settles and dries, apply a gloss varnish for extra vibrancy. This process is all about letting go and embracing spontaneity.
Add metallic accents or glitter within the pour for a sparkling effect. Incorporate personal symbols or initials by painting over specific areas after the pour dries. Mount multiple pieces together for a dynamic wall display. You can also experiment with different pouring techniques—flip cups, dirty pours, or rainbows—to achieve varied textures and effects. Personal touches make each piece truly yours.
Abstract fluid art is a celebration of chaos turned beautiful. It encourages experimentation and embracing imperfections as part of the charm. Creating your own pieces boosts confidence in your artistic instincts. Ready to pour your way to a stunning, unique wall? Acrylic pouring is a fun, rewarding way to express yourself creatively!
7. Color Blocked Art with Sharp Lines

Ever wish your walls could look more modern and organized? Color blocking with sharp lines is a simple yet powerful way to add structure and vibrancy to any space. It’s perfect for creating a bold statement without overwhelming the room. Plus, it’s incredibly easy to customize to suit your style.
Recommended Products to replicate this idea
| # | Preview | Product | |
|---|---|---|---|
| 1 |

|
KBKBART Claude Monet Eclectic Wall Art, Monet Prints for Wall Decor, Eclectic Home Decor Canvas... | Check Latest Price |
| # | Preview | Product | |
|---|---|---|---|
| 1 |

|
upsimples Floating Shelves for Wall, Wall Shelves for Decor Storage Set of 6, Wall Mounted Wood... | Check Latest Price |
Imagine large blocks of vivid colors—bright yellows, deep blues, or fiery reds—dividing your wall into geometric sections. The crisp, clean lines create a sense of order and sophistication, while the contrasting colors add energy. Visualize the interplay of colors, like a modern painting come to life, energizing your environment and making a room instantly more dynamic. It’s a bold move that pays off.
Use a monochrome palette with varying shades for a subtle, chic look or go full rainbow for maximum impact. For smaller spaces, opt for thinner blocks or vertical stripes; larger walls can handle wide, dramatic sections. Seasonal changes might include switching to softer pastel blocks or metallic accents for a luxe touch. Play with different shapes—triangles, rectangles, or trapezoids—to add variety.
Start by sketching your design on paper or directly on the wall with painter’s tape. Use painter’s tape to create sharp, straight edges for your blocks. Paint each section carefully, ensuring clean lines by pressing down the tape firmly. Remove the tape while the paint is still slightly wet for crisp edges. Use a level for accuracy and touch up any uneven lines with a small brush. Finish with a clear sealant if needed.
Incorporate metallic or neon paints within your blocks for extra punch. Personalize by adding small geometric patterns or symbols within certain sections. Use textured or matte finishes to add depth. Arrange the color blocks asymmetrically for a more playful look, or align them for a minimalist vibe. This technique is highly adaptable to your personal taste.
Color blocking transforms a plain wall into a piece of modern art, boosting your confidence in bold design choices. It’s a straightforward project that yields high-impact results. Plus, it’s fun to experiment with color combinations and shapes. Ready to make a statement with sharp lines and vibrant hues? Your walls are about to get a serious upgrade!
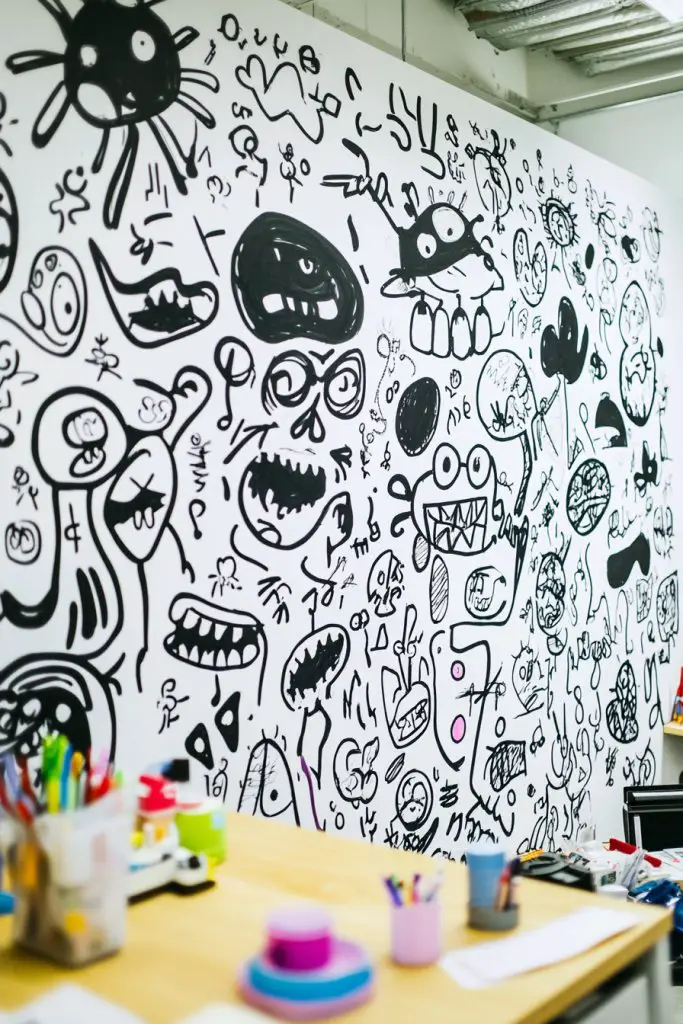
8. Whimsical Doodle Art on Large Murals
Feeling creative but unsure how to showcase your quirky personality? Whimsical doodle art is the perfect outlet—fun, spontaneous, and totally customizable. It turns blank walls into playful, personalized masterpieces that make any space feel welcoming. Plus, you don’t need to be an artist to get started; doodling is all about fun.
Recommended Products to replicate this idea
| # | Preview | Product | |
|---|---|---|---|
| 1 |

|
72 Pcs Botanical Stencils Set, Reusable Butterfly & Flower Painting Templates - Leaf, Dragonfly,... | Check Latest Price |
| # | Preview | Product | |
|---|---|---|---|
| 1 |

|
upsimples 11x14 Picture Frame, Display Pictures 8x10 with Mat or 11x14 Without Mat, Wall Hanging... | Check Latest Price |
Visualize a large wall covered with tiny, intricate sketches—quirky animals, abstract shapes, whimsical patterns, and funny characters all intertwined. The black lines pop against colorful backgrounds, creating a lively, chaotic feel. The art invites viewers to explore every nook and cranny, discovering hidden details and playful surprises. It’s like having a living sketchbook come to life on your wall.
Choose a theme—nature, fantasy, or abstract—and let your imagination run wild. Use bright, bold colors or stick to monochrome for a more minimalist look. Add text elements like funny quotes or motivational words for extra personality. Seasonal tweaks might include snowflakes or flowers, depending on the vibe you want. Incorporate different line weights and patterns to add depth.
Start with a large blank wall and sketch your doodles lightly with a pencil or chalk. Use fine-tipped markers or black paint pens to outline your designs. Fill in with colors or shading as desired. Keep your doodles playful—don’t worry about perfection, embrace irregular lines and quirky shapes. Seal your work with a clear spray to protect against smudges. Regular touch-ups keep it fresh.
Add pops of color with metallic or fluorescent paints for extra zing. Personalize by including your favorite characters or symbols. Create a cohesive look by repeating patterns or motifs throughout the mural. Frame sections with decorative borders or incorporate 3D elements like small sculptures or textured paint for added interest. Your doodles become a true reflection of your personality.
Whimsical doodle art encourages you to relax and have fun with your decor. It’s a low-pressure way to experiment and develop your artistic style. Your walls will become a conversation starter and a source of daily joy. Who knew that doodling could turn into a stunning piece of art? Get ready to showcase your quirky, creative side!
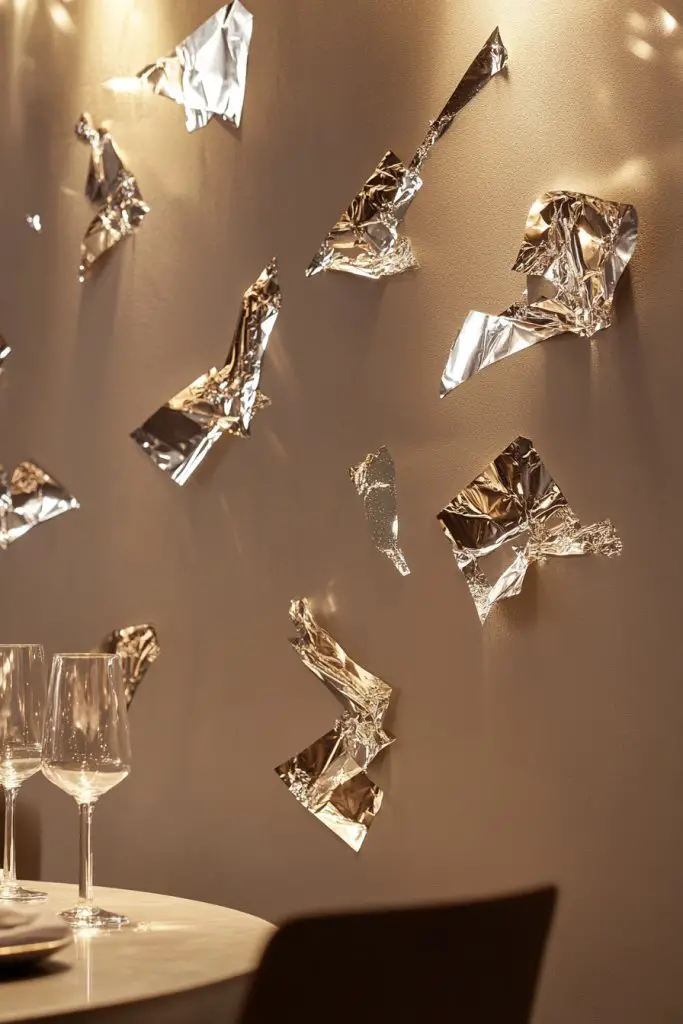
9. Metallic Foil Accents on Painted Backgrounds
Want to add a touch of luxury and sparkle to your space without going full-blown glam? Metallic foil accents are the answer—glittering details that elevate any painted background. They’re perfect for creating focal points or subtle highlights that catch the eye and add depth. Plus, it’s a surprisingly simple way to make your walls look chic and sophisticated.
Recommended Products to replicate this idea
| # | Preview | Product | |
|---|---|---|---|
| 1 |

|
Silver Party Streamers 2Pack Metallic Tinsel Foil Fringe Curtains 3.3X 8.3ft Party Decors for Photo... | Check Latest Price |
| # | Preview | Product | |
|---|---|---|---|
| 1 |

|
Cunhill 100 Pcs Gold Leaf Sheets for Art Foil Paper Leaf Art Foil Sheets Gilding Brush Thin Paper... | Check Latest Price |
Visualize a matte painted wall with shimmering gold or silver foil accents embedded within geometric shapes or freeform patterns. The foil catches the light and creates a dynamic play of shine and matte textures. It’s like having a piece of jewelry embedded into your wall, adding a layer of richness. The reflective surfaces make the space feel more expansive and lively.
Use foil accents sparingly for subtle elegance or cover entire sections for a more dramatic look. Combine with muted, neutral backgrounds for a high-end feel or pair with bold, colorful paints for maximum contrast. Seasonal variations include switching to warmer golds in fall or icy silvers in winter. Incorporate different foil textures—matte, glossy, or textured—for variety.
Paint your wall with a base color and wait until it’s fully dry. Cut or tear metallic foil sheets into desired shapes or patterns. Use a specialized adhesive or decoupage medium to affix the foil, pressing down firmly to avoid wrinkles or air bubbles. Use a soft brush to smooth out the foil and trim excess edges. Seal with a clear varnish to lock in the shine and protect the surface.
Add personal symbols or initials with foil for a bespoke touch. Mix different metallic shades within a single design for a layered effect. Incorporate textured or embossed foil for tactile appeal. Frame the accent areas with painted borders or LED backlighting to enhance the glow. Customizing foil accents allows for a luxurious, personalized wall.
Metallic foil accents add instant elegance and glamour, proving that simple touches can have a big impact. They’re perfect for DIY projects that look professionally finished. Incorporating these accents into your decor boosts confidence in your ability to create high-end effects at home. Ready to shimmer and shine? Your walls will thank you!
10. Psychedelic Swirl Patterns with Bright Hues
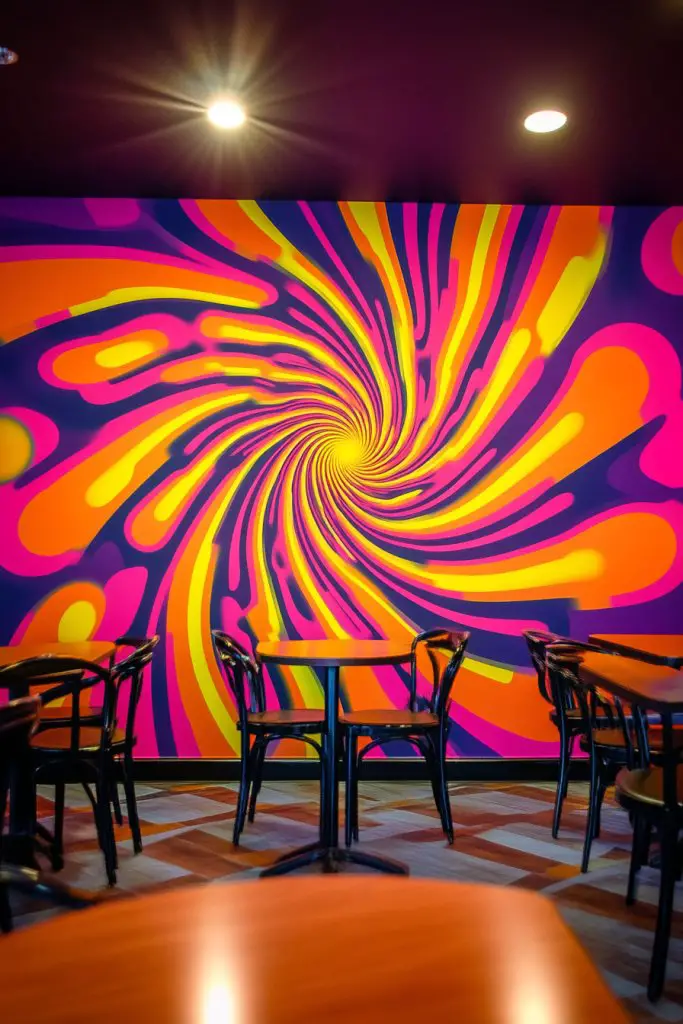
Feeling nostalgic or just craving a bold, energetic vibe? Psychedelic swirl patterns are a fun way to channel retro energy and add a vibrant, hypnotic element to your decor. They’re perfect for creating a focal point that sparks curiosity and conversation. Plus, they’re surprisingly easy to create and customize.
Recommended Products to replicate this idea
| # | Preview | Product | |
|---|---|---|---|
| 1 |

|
Roman’s E-Z Hang Peel & Stick Wallpaper Helper + Pre-Pasted Activator, Clear, Non-Staining, 32... | Check Latest Price |
| # | Preview | Product | |
|---|---|---|---|
| 1 |

|
Wiyifada LED Black Light Bulbs 2 Pack, A19 9W UV Black Light Replace Up to 100W, 120V E26 Base UVA... | Check Latest Price |
Picture a swirling vortex of bright pinks, electric blues, and fiery oranges spiraling across a large canvas or wall. The hypnotic patterns draw your eye inward, creating a sense of movement and depth. The vivid colors evoke feelings of joy, freedom, and a bit of nostalgia for the 60s and 70s. When lit with blacklights, the colors glow, intensifying the psychedelic effect.
Use contrasting or complementary colors to enhance the swirl effect. For a subtler look, opt for pastel or muted neon shades; for maximum impact, go all-in with primary neon colors. Incorporate metallic or iridescent paints for an extra layer of visual interest. Seasonal adjustments include warmer tones for fall or cooler tones for winter. The pattern works on large murals or smaller accent pieces.
Start with a blank wall or canvas, sketch a rough spiral or swirl pattern with light pencil. Use bright, saturated paints—neon or fluorescent for maximum glow—and fill in the sections, blending the edges to create a seamless flow. Use a sponge or soft brush to soften transitions. Layer multiple colors for richness, and consider adding metallic or glow-in-the-dark paints for extra flair. Finish with a protective clear coat.
Add metallic or glitter accents within the swirls. Personalize by embedding symbols or initials along the pattern’s curves. Create variations by layering different swirl sizes or combining with other geometric shapes. Incorporate LED strip lighting behind the mural for an extra glow. Your personal touches make the pattern uniquely yours.
Psychedelic swirl patterns remind us to embrace boldness and spontaneity. They’re a playful way to upgrade your space and boost your creative confidence. Plus, experimenting with colors and patterns can be a fun, therapeutic activity. Ready to swirl your way into a vibrant, retro-inspired space? Let your walls do the talking!
11. Colorful Tape Art for Geometric Designs
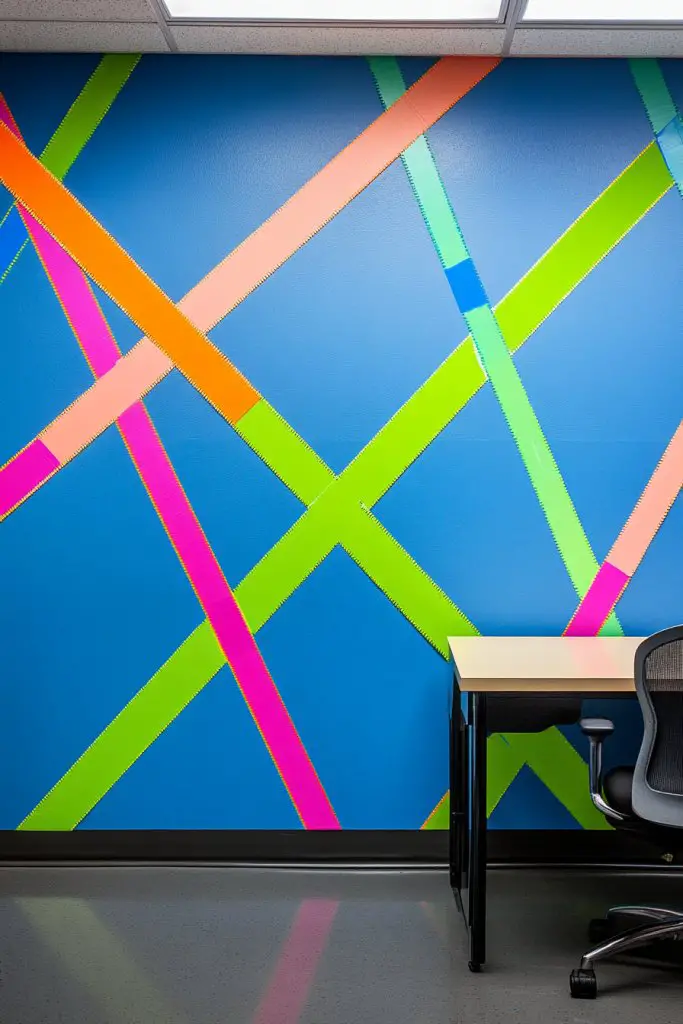
Want a quick and clean way to add eye-catching geometric designs without complicated painting? Colorful tape art is your new best friend. It’s perfect for creating sharp, vibrant patterns that instantly modernize any space. Plus, it’s a super affordable and mess-free project anyone can do.
Recommended Products to replicate this idea
| # | Preview | Product | |
|---|---|---|---|
| 1 |

|
4 Rolls Premium Painters Tape, Blue Tape, Masking Tape, Paint Tape for Multi-Purpose, Painting,... | Check Latest Price |
| # | Preview | Product | |
|---|---|---|---|
| 1 |

|
Guirnd 12PCS Colored Masking Tape, Kids Art Supplies, DIY Craft Tape, Colored Tape Rolls, Colored... | Check Latest Price |
Imagine vivid hues—hot pinks, bright blues, neon greens—outlined with crisp tape lines forming triangles, stripes, or abstract shapes. The tape acts as a stencil, creating clean edges and bold color blocks. When finished, the wall looks like a graphic design or a pop art piece, full of energy and color. The layered effect adds visual depth and interest.
Use painter’s tape in different widths and shapes for variety. Combine multiple patterns—stripes, chevrons, or polygons—for a playful, eclectic look. For a more subtle effect, limit your palette to two or three colors; for maximum impact, go for a rainbow spectrum. Seasonal adjustments include adding metallic or pastel accents. This technique adapts well to small accent walls or large feature spaces.
Sketch your design lightly with a pencil. Apply painter’s tape carefully, pressing down firmly to prevent bleeding. Paint within the taped sections with your chosen colors, using a small roller or brush. Remove the tape while the paint is still slightly wet for sharp edges. Touch up any uneven lines with a small brush. Seal the finished design with a clear matte or gloss spray for durability.
Add metallic or neon paints within some sections for extra sparkle. Personalize by incorporating initials or symbols into the pattern. Create a layered look by overlapping different shapes or adding textured paint. Frame or border your design with complementary colors or LED lighting for a polished finish. Custom touches turn simple tape art into a statement piece.
Tape art is an easy way to experiment with bold design without permanent commitment. It encourages creativity and precision, building confidence in your DIY skills. Plus, it’s a conversation starter, showing off your fun, modern style. Ready to transform your walls with crisp, colorful shapes? Tape your way to a striking new look!
12. Hand-Painted Optical Illusions
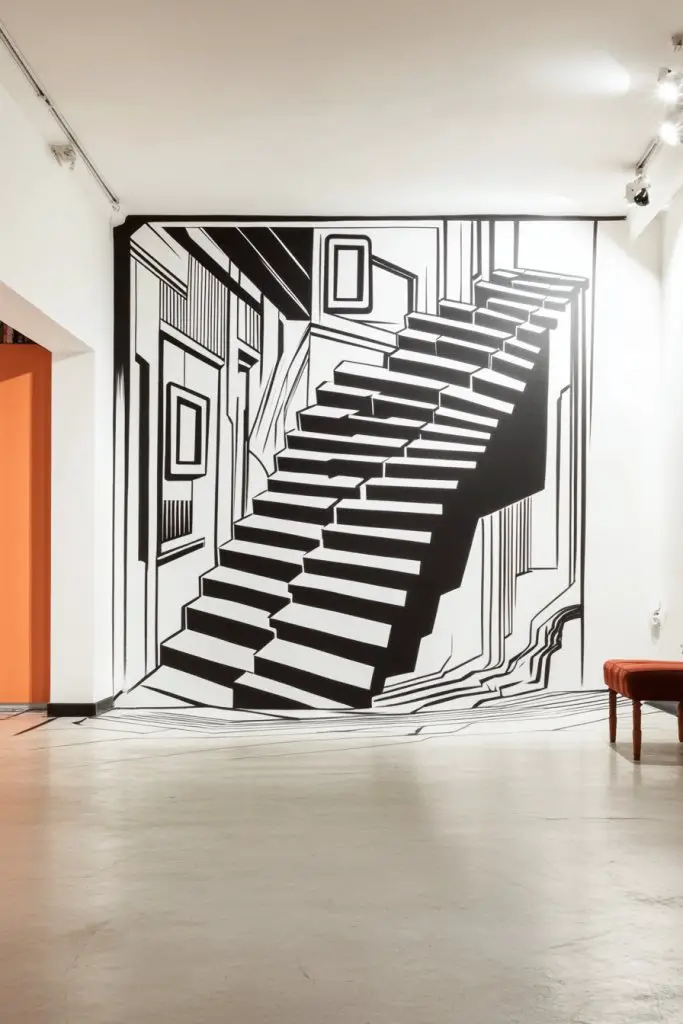
Want to dazzle visitors and add a touch of mind-bending fun to your space? Hand-painted optical illusions can do just that. They turn flat walls into fascinating, interactive art that challenges perception. Plus, creating your own illusions is surprisingly straightforward and highly impressive.
Recommended Products to replicate this idea
| # | Preview | Product | |
|---|---|---|---|
| 1 |
|
Llamazing Forest Tapestry Home Decor Landscape Living Room Bedroom Decoration Magic Tapestry Curtain... | Check Latest Price |
| # | Preview | Product | |
|---|---|---|---|
| 1 |

|
Blue Purple Galaxy Wall Decals, Removable Sticker,The Art Magic 3D Milky Way Dreamscape Home Decor... | Check Latest Price |
Visualize a wall that appears to ripple, spin, or pop out at you, thanks to clever shading and perspective tricks. Imagine a staircase that seems to ascend into the wall itself or a vortex that draws the eye inward. These illusions create a sense of depth and movement, making your space feel dynamic and alive. When executed well, they leave viewers questioning reality.
Choose illusions that suit your space—some work better in small rooms, while others are perfect for large walls. Use bold, contrasting colors for maximum impact or muted tones for subtler effects. Seasonal adjustments might involve adding glitter or metallics for a shimmering illusion. Incorporate themes like spirals, impossible shapes, or 3D cubes for variety.
Sketch your illusion design lightly with pencil, paying attention to perspective and shading. Use high-contrast paints or markers to emphasize depth and shadows. Work in layers—light base tones first, then add darker shades to create the illusion of depth. Use blending tools or sponges for smooth transitions. Once complete, seal with a clear varnish to preserve the illusion’s sharpness. Practice on small sections first.
Add metallic or iridescent accents to enhance the illusion’s depth. Incorporate personal symbols or motifs within the illusion for uniqueness. Frame sections with painted borders or lighting to emphasize the 3D effect. Combine multiple illusions into a mural for a captivating, interactive wall. Custom illusions can reflect your personality and creativity.
Optical illusions turn ordinary walls into extraordinary conversation starters. They boost your confidence by demonstrating how perspective and shading can trick the eye. Plus, they’re a fun challenge that sharpens your artistic skills. Ready to create illusions that amaze and inspire? Your walls are about to become a visual playground!
13. Funky Animal Portraits with Bold Colors
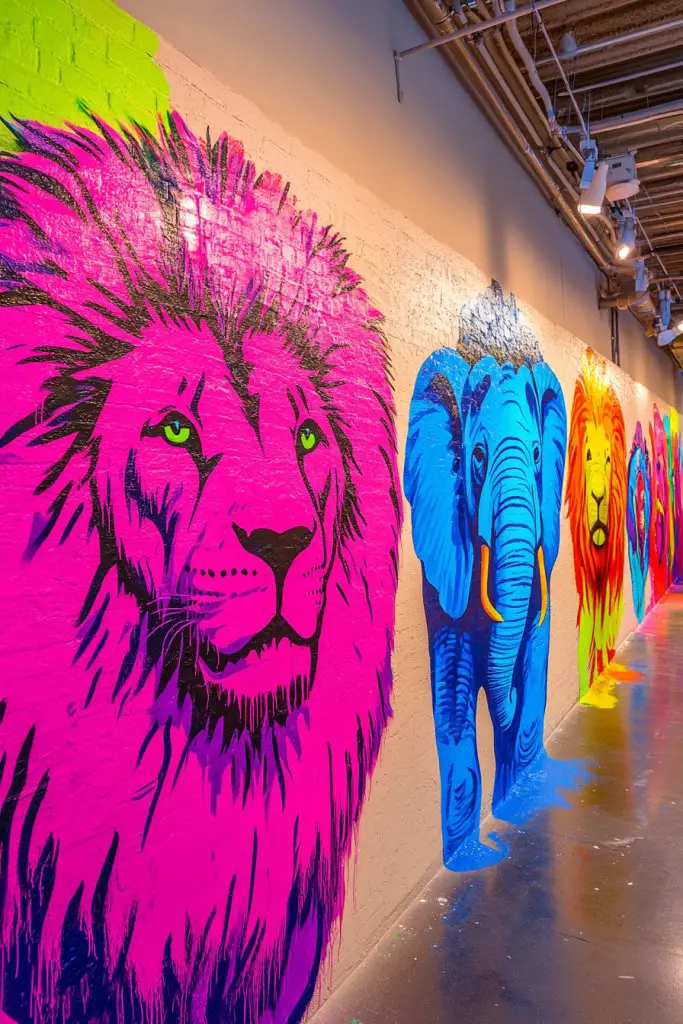
Are you bored with traditional animal art that feels stuffy and formal? Want to inject fun and personality into your decor? Funky animal portraits with bold colors are perfect for adding quirky, vibrant character to any space. They’re a playful way to showcase your love for animals while keeping things lively.
Recommended Products to replicate this idea
| # | Preview | Product | |
|---|---|---|---|
| 1 |

|
Vintage Animal Portrait Wall Art Aristocratic Fox Poster Renaissance Animal Poster Fox Vintage... | Check Latest Price |
| # | Preview | Product | |
|---|---|---|---|
| 1 |

|
SIGNLEADER Canvas Print Wall Art Set Neon Pastel Colorblocks Geometric Shapes Illustrations Modern... | Check Latest Price |
Picture a portrait of a lion, but with a neon pink mane or a zebra with turquoise stripes. The colors are unexpected, giving a whimsical twist to familiar animals. The bold hues make the animal pop off the background, creating a striking focal point. These portraits combine realism with exaggerated color, making them both fun and artistic. They evoke a sense of humor and creativity.
Experiment with different animals—cats, dogs, birds, or mythical creatures—in vibrant palettes. Use contrasting backgrounds or patterns to make the portraits stand out. Seasonal variations include adding glitter or metallic accents for festive or luxe effects. For a more subdued look, choose pastel or muted tones, blending playful with elegant.
Start with a high-quality print or create your own using acrylic paints on canvas. Sketch the animal lightly, then block in bold colors, emphasizing key features. Use contrasting colors for fur or feathers to enhance vibrancy. Add details or highlights with white or metallic paints. Seal with a glossy finish to intensify the colors and protect your artwork. Display in a prominent spot.
Incorporate your favorite patterns or motifs—such as geometric shapes or tribal designs—around the animal for added flair. Personalize by adding initials or favorite symbols. Frame with bright, contrasting borders or incorporate LED lighting for extra pop. Customizing these portraits makes them a true reflection of your personality. They’re conversation starters and mood lifters.
Bold animal portraits prove that art can be fun and unconventional. They bring joy and energy to your home while showcasing your unique style. Plus, creating or customizing them boosts your confidence in experimenting with colors and techniques. Ready to turn wild animals into vibrant works of art? Your walls will never look the same!
14. Mixed Media Collage with Paint and Textured Elements
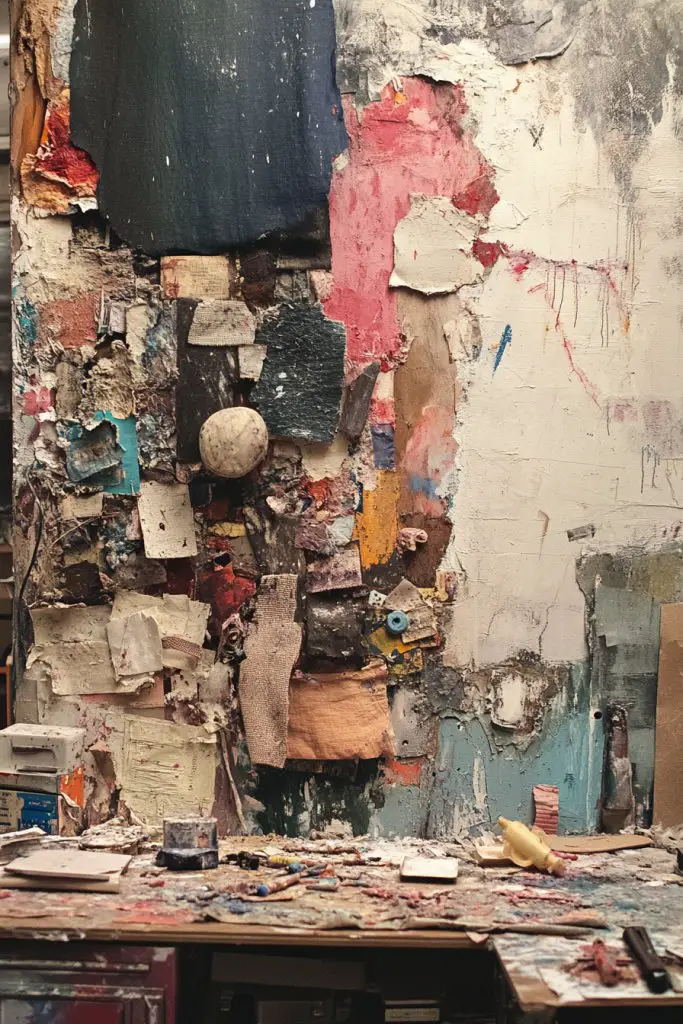
Looking to create a multi-layered, tactile piece that tells a story? Mixed media collage combines paint with textured elements, offering depth and richness that plain paintings lack. It’s perfect for those who want a dynamic, personalized artwork that’s full of surprises. Plus, it’s a creative way to repurpose old materials.
Recommended Products to replicate this idea
| # | Preview | Product | |
|---|---|---|---|
| 1 |

|
Color More Art Supplies, 175-Pack Deluxe Art Set Drawing Painting Kit with 2 Drawing Pads, Acrylic... | Check Latest Price |
| # | Preview | Product | |
|---|---|---|---|
| 1 |

|
Simetufy 18 x 24 inch 5 Pack Canvas Panels Large Flat Canvas Boards for Painting - Gesso Primed... | Check Latest Price |
Imagine a collage featuring painted backgrounds, fabric scraps, metallic foils, and textured papers layered together. The visual complexity invites viewers to explore every inch, revealing different textures and details upon closer inspection. The mix of smooth paint and rough or shiny materials creates a sensory experience, making your wall a conversation piece. The colors and textures evoke emotion and interest.
Use a theme—nature, abstract, or pop culture—and select materials accordingly. Incorporate fabrics, textured papers, or even small objects like buttons or shells. Change the color scheme seasonally—warm earth tones in fall, bright hues in summer. Layering different materials allows for endless customization, from sleek modern to boho chic.
Start with a sturdy base like canvas or thick board. Sketch your composition, then glue textured elements in place. Use acrylic or oil paints to add details or unify the piece. Incorporate metallic or glitter accents for shimmer. Seal the entire collage with a clear varnish or resin for durability and a finished look. Take your time to layer and balance textures.
Embed personal memorabilia or small keepsakes for sentimental value. Add metallic or iridescent paints to highlight specific areas. Incorporate transparent or translucent materials for a layered effect. Frame or mount your collage on a wall with complementary lighting for a gallery vibe. Personal touches turn it into a meaningful, eye-catching piece.
Mixed media collage encourages experimentation and creative thinking. It’s a fulfilling process that results in a unique, textured masterpiece. Making your own collage boosts confidence in combining different art forms and materials. Ready to craft a rich, layered story on your wall? Let your imagination run wild!
15. Neon Paint Creations for a Glowing Effect
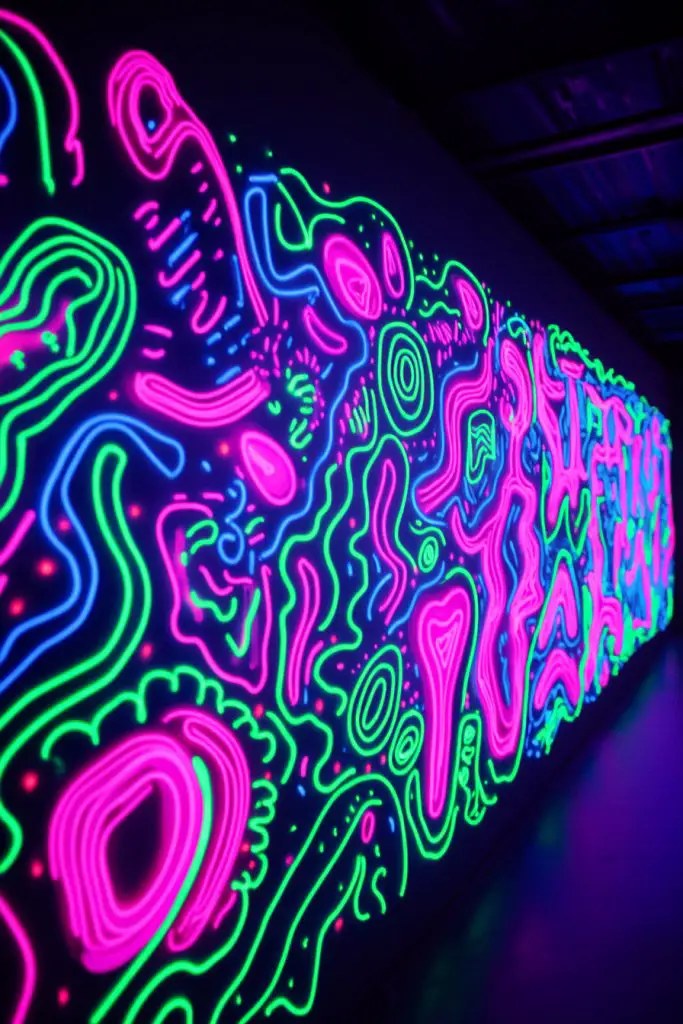
Ever wish your walls could glow in the dark and set a vibrant mood? Neon paint is the secret weapon for creating artworks that pop under blacklights or in low lighting. It’s perfect for parties, game rooms, or just injecting a dose of fun and energy into your decor. Plus, it’s surprisingly easy to use.
Imagine bold shapes, abstract forms, or words glowing in intense neon colors—hot pink, electric blue, lime green—against dark backgrounds. The luminous effect makes the artwork seem to pulsate and breathe in dim lighting. When illuminated with blacklights, the colors become surreal and mesmerizing, transforming any space into a vibrant playground. The glow adds a dynamic, modern vibe.
Use neon paints for outlines, accents, or entire murals for maximum impact. Combine with black or dark backgrounds for a striking contrast. Seasonal variations include swapping neon colors for softer pastels or metallics. Incorporate glow-in-the-dark elements or UV-reactive paints for more dramatic effects. Neon art adapts well to small details or large statement murals.
Sketch your design lightly with chalk or pencil, then fill in with neon or UV-reactive paints. Use small brushes or sponges for precision, especially around intricate details. Layer multiple coats for intensity, letting each dry thoroughly. To enhance glow, install blacklights or UV bulbs nearby. Finish with a clear matte or gloss sealant for longevity.
Add metallic or iridescent accents to amplify the glow effect. Incorporate your favorite words, symbols, or abstract shapes. Personalize with hand-lettered quotes or initials in neon for a custom touch. Frame or mount your artwork with LED backlighting for even more glow. It’s a bold, fun way to express your personality.
Neon paint projects turn dull spaces into lively hubs of energy. They’re a statement of boldness and creativity, perfect for modern interiors. Crafting your own neon art boosts confidence in experimenting with color and light. Ready to glow and stand out? Your walls are about to become a luminous masterpiece!
16. Abstract Line Art with Bright Contrasts
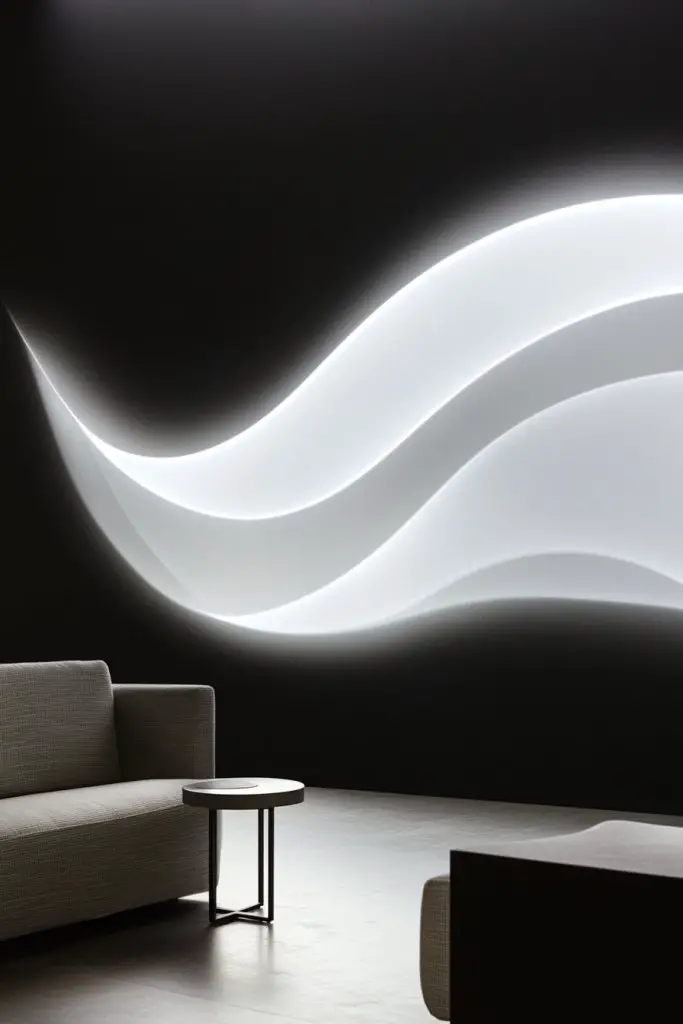
Want to add a minimalist yet striking piece that commands attention? Abstract line art with bright contrasts offers a modern solution. It’s perfect for those who love clean, simple designs but crave a bold statement. Plus, it’s a quick project that can elevate any space with a touch of sophistication.
Recommended Products to replicate this idea
| # | Preview | Product | |
|---|---|---|---|
| 1 |

|
Orange and Black Abstract Wall Art Abstract Geometric Canvas Art Modern Minimalist Abstract Line Art... | Check Latest Price |
| # | Preview | Product | |
|---|---|---|---|
| 1 |

|
Mat Board Center, Pack of 10 16x20 White Uncut Mat Boards, Acid Free, 4-Ply Thickness, White Core,... | Check Latest Price |
Imagine flowing black or white lines swirling across a vibrant background—think electric blues, fiery reds, or sunny yellows. The simplicity of the lines, combined with high-contrast colors, creates an eye-catching visual that’s both calming and energizing. The abstract shapes evoke emotion and leave interpretation open to the viewer. It’s art that communicates without clutter.
Use bold, contrasting colors for backgrounds—neon, metallic, or pastel shades—paired with fine black or white lines. Experiment with thick and thin lines to add movement and depth. Seasonal updates include switching to softer tones or metallic accents. You can also incorporate geometric shapes or patterns for added complexity. This style adapts to both small accent pieces and large murals.
Start with a blank wall or canvas and sketch your abstract lines with light pencil. Use a steady hand or masking tape to create clean, continuous lines. Fill the background with contrasting vibrant colors, either using brushes or rollers. Once dry, go over your sketches with high-quality paint pens or fine brushes. Seal with a protective varnish for longevity. Precision and patience are key.
Add metallic or iridescent highlights to certain lines for extra shimmer. Personalize by integrating symbols, initials, or favorite motifs within the design. Play with layering—overlay different line patterns for depth. Frame or mount your piece with sleek borders or incorporate backlighting for a dramatic effect. Custom touches make it uniquely yours.
Abstract line art proves that less is often more. It’s a versatile style that enhances your space with minimal effort but maximum impact. Making your own piece boosts confidence in your artistic instincts and design sensibilities. Ready to create a bold, minimalist masterpiece? Your walls are calling for clean, bright lines!
17. Colorful Splatter Art for a Spontaneous Look
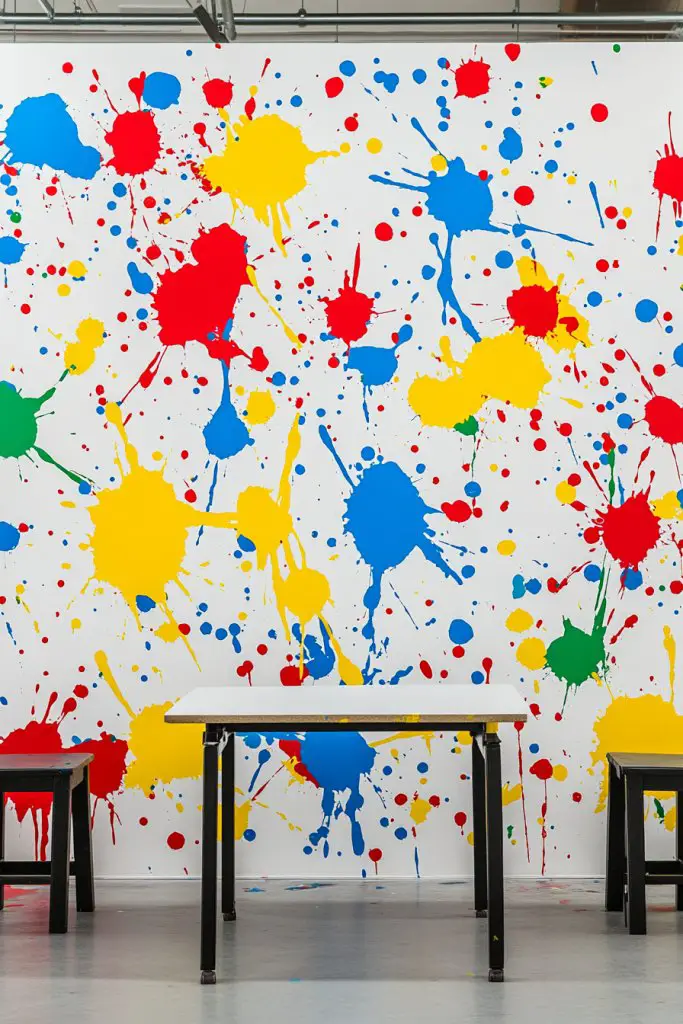
Craving a lively, energetic vibe without the fuss of detailed painting? Colorful splatter art is your answer—fun, spontaneous, and full of personality. It’s perfect for those who want to embrace chaos and create something vibrant and unique in minutes. Plus, it’s a great way to let go of perfectionism.
Recommended Products to replicate this idea
| # | Preview | Product | |
|---|---|---|---|
| 1 |
|
Apple Barrel, Vibrant Spectrum Collection Acrylic Craft Paint, PROMOABIII, 2 fl oz each, 16 assorted... | Check Latest Price |
| # | Preview | Product | |
|---|---|---|---|
| 1 |
|
Large Framed Black and White Neutral Abstract Wall Art for Living Room, 3 Piece Boho Canvas Prints... | Check Latest Price |
Picture a canvas or wall erupting with splashes of bright reds, blues, yellows, and greens, scattered randomly but beautifully across the surface. The random splatters create a sense of movement and excitement, making the space feel alive. When viewed from different angles, the layers and overlaps add depth and texture. It’s art that feels free and unrestrained.
Use a limited palette for a cohesive look or a rainbow spectrum for maximum energy. Combine with other techniques like drips or stencils for added interest. Seasonal variations include softer pastel splatters or metallic accents. You can also experiment with different tools—brushes, toothbrushes, or even spray bottles—to vary the splatter size and shape.
Choose a surface, protect surrounding areas with drop cloths, and prepare your paints—thinned or thickened for different effects. Load your brush or tool and flick or splatter paint onto the surface, aiming for randomness. Layer multiple colors, letting each dry slightly to prevent muddy mixes. For a more intentional look, plan some areas with denser splatters or specific color clusters. Seal once dry for longevity.
Add metallic or glow-in-the-dark paints to certain splatters for a surprise effect in different lighting. Incorporate personal symbols or initials within the splatter pattern. Mount the artwork in a sleek frame or leave it raw for an urban vibe. Combining splatter art with minimal furniture and lighting can elevate your entire decor. It’s a playful, liberating process.
Splatter art reminds us that beauty can come from chaos. It’s a confidence booster that encourages experimentation without fear of mistakes. Making your own splatter piece fosters a sense of artistic freedom and spontaneity. Ready to make a mess and create something stunning? Your walls are waiting for the explosion of color!
18. Stenciled Mandala or Psychedelic Patterns
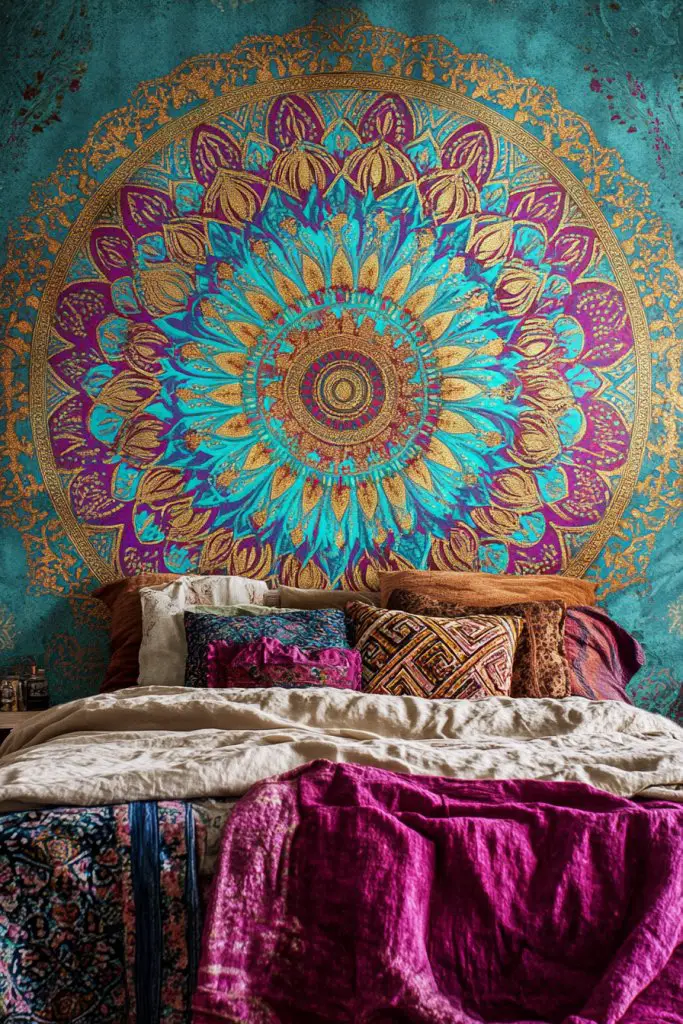
Looking for a way to add intricate, mesmerizing patterns to your space? Mandalas and psychedelic designs are perfect for creating a spiritual or bohemian vibe. They transform simple walls into focal points that draw the eye and soothe the mind. Plus, with stencils, you can achieve complex patterns without hours of freehand work.
Recommended Products to replicate this idea
| # | Preview | Product | |
|---|---|---|---|
| 1 |
|
Edeesky Black Mandala Tapestry Wall Hanging Psychedelic Wall Tapestry Aesthetic Indian Hippie Decor... | Check Latest Price |
| # | Preview | Product | |
|---|---|---|---|
| 1 |

|
Amonercvita Blacklight Tapestry Trippy Mandala Tapestries UV Reactive Galaxy Stars Tapestry... | Check Latest Price |
Imagine a detailed mandala radiating outwards with vibrant colors and symmetrical patterns. The intricate details invite viewers to get lost in the design, creating a calming or hypnotic effect. Psychedelic patterns with swirling shapes and bright hues evoke a retro, free-spirited energy. Whether centered or sprawling across a wall, these patterns add depth and personality.
Choose traditional mandalas with floral or geometric motifs, or go for freeform psychedelic designs with organic shapes. Use contrasting colors for a vibrant, dynamic look or soft pastels for a more relaxed vibe. Seasonal tweaks include adding metallic or glow-in-the-dark accents. Mix symmetrical with asymmetrical elements for a more eclectic feel.
Start by sketching your pattern lightly with a pencil or chalk. Use stencils to trace intricate shapes or freehand with a fine brush for organic designs. Fill in with bright or metallic paints, layering for richness. Use a ruler and compass for precision in mandalas. Finish with a clear sealant to protect your masterpiece. Practice on a small surface first.
Add metallic or iridescent details to highlight parts of the pattern. Personalize with symbols, initials, or motifs meaningful to you within the design. Incorporate LED backlighting to enhance the glow effect. Mix different stencil sizes or patterns for variety. These designs can serve as spiritual symbols or simply eye-catching decor.
Mandala and psychedelic art projects foster patience and attention to detail. They’re a meditative, rewarding way to beautify your space and develop your artistic skills. Your own designs can become a daily calming ritual or a bold statement. Ready to create mesmerizing patterns that captivate? Your walls await their transformation!
19. Artistic Tape Resist Techniques for Unique Textures
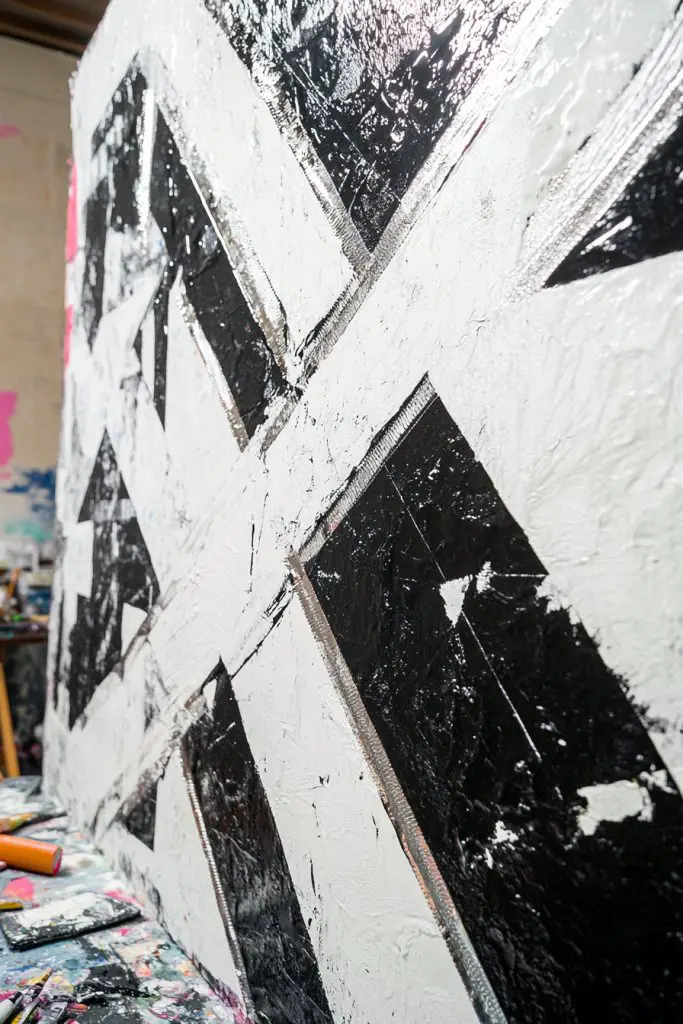
Want to add a textured, layered effect to your paintings without heavy tools or complex techniques? Tape resist is a playful, innovative method that creates crisp edges and interesting shapes. It’s perfect for those who love surprises and want to experiment with textures and patterns. Plus, it’s a fun way to elevate your DIY skills.
Recommended Products to replicate this idea
| # | Preview | Product | |
|---|---|---|---|
| 1 |
|
4 Rolls Premium Painters Tape, Blue Tape, Masking Tape, Paint Tape for Multi-Purpose, Painting,... | Check Latest Price |
| # | Preview | Product | |
|---|---|---|---|
| 1 |
|
4 Rolls Premium Painters Tape, Blue Tape, Masking Tape, Paint Tape for Multi-Purpose, Painting,... | Check Latest Price |
Visualize a wall where bold, geometric shapes are revealed through the removal of painter’s tape, exposing vibrant colors underneath. The tape acts as a barrier, preventing paint from reaching certain areas, resulting in sharp, clean lines. When the tape is peeled away, it reveals a layered, textured design that feels both modern and dynamic. It’s like a secret uncovered in your own home.
Use different tape widths and shapes—stripes, chevrons, circles—for varied effects. Combine multiple layers of tape for complex, multi-shape designs. Play with contrasting colors or metallics underneath for a striking look. Seasonal updates include switching to softer pastel or darker tones. This technique adapts well to walls, furniture, or decorative panels.
Start with a clean, dry surface and sketch your design lightly. Apply painter’s tape carefully, pressing down edges to prevent bleed-through. Paint over the entire surface or within specific sections, layering colors for depth. Once dry, peel off the tape slowly to reveal sharp, clean lines. Touch up any imperfections with small brushes. Seal your work with a protective spray.
Add metallic or iridescent paints beneath or over the tape areas for extra shine. Incorporate personal symbols or initials into the shapes. Use textured or glitter paints for added dimension. Frame or mount your finished piece for display. Customizing your design makes the result uniquely yours and adds a layer of artistic intrigue.
Tape resist techniques empower DIY painters to create complex designs with precision. They encourage patience and attention to detail, boosting confidence in your skills. The crisp, layered look makes your walls stand out and feel professional. Ready to peel back the layers and reveal a textured masterpiece? Let your creativity shine through!
20. Upcycled Canvas Art with Recycled Materials
Looking for an eco-friendly way to craft stunning wall art? Upcycling old canvases and repurposing recycled materials not only helps the environment but also results in unique, textured masterpieces. It’s a perfect project for those who love sustainability and creativity combined. Plus, it’s surprisingly simple and budget-friendly.
Recommended Products to replicate this idea
| # | Preview | Product | |
|---|---|---|---|
| 1 |

|
MCS Canvas Float Frames 16x20 Frame, Natural Woodgrain for Finished Canvases, Vertical & Horizontal... | Check Latest Price |
| # | Preview | Product | |
|---|---|---|---|
| 1 |
|
Color More Art Supplies, 175-Pack Deluxe Art Set Drawing Painting Kit with 2 Drawing Pads, Acrylic... | Check Latest Price |
Imagine transforming a worn-out canvas by layering it with scraps of fabric, paper, or metal pieces. Add paint, stains, or dyes to tie everything together—creating a piece that’s full of history and character. The mixture of textures and materials makes each artwork one-of-a-kind, telling a story of sustainability and artistic innovation. The finished piece radiates personality and eco-consciousness.
Use different materials—old book pages, fabric swatches, metal pieces, or plastic embellishments—to match your style. Change the color palette seasonally—earth tones for fall, bright hues for summer. Incorporate personal memorabilia or vintage items for sentimental value. Mix textures for visual interest, from rough to smooth, shiny to matte.
Start with a clean, sturdy canvas as your base. Attach your recycled elements with glue or staples, creating a layered composition. Use paints or stains to unify the look or add highlights. Experiment with different arrangements before fixing everything permanently. Seal the entire piece with a clear varnish or resin for durability. This process encourages creativity and resourcefulness.
Add metallic or glitter accents for extra sparkle. Personalize with handwritten messages, symbols, or initials. Incorporate small found objects or textured elements for a tactile experience. Frame or mount your artwork with reclaimed wood or metal for a truly upcycled aesthetic. These touches make your art meaningful and environmentally friendly.
Upcycled art projects demonstrate that creativity can flourish within sustainability. They boost confidence in repurposing and customizing materials, reducing waste while enhancing your decor. Each piece becomes a conversation starter about eco-conscious living. Ready to turn trash into treasure? Your walls are waiting for your eco-art masterpiece!
Conclusion
Exploring these funky painting ideas opens up a world of vibrant possibilities for your home decor. Whether you choose bold abstracts, whimsical designs, or eclectic patterns, each idea invites you to infuse your space with personality and energy. Don’t be afraid to experiment and make these ideas your own—your walls are the perfect canvas for creative expression. Dive in and let your imagination run wild—your artful transformation awaits!