
19 Kitchen Island Ideas for Stylish Gatherings
A stunning kitchen island can be the heart of your home, combining style, function, and a touch of personality. These versatile features have become a favorite for homeowners because they offer extra workspace, storage, and a welcoming spot for social gatherings.
In this article, you’ll explore a variety of creative kitchen island ideas that cater to different tastes and lifestyles. From sleek modern designs to rustic charm, there’s inspiration here for every kitchen. Get ready to discover how the right island can transform your space into a stylish, functional hub for entertaining and everyday life.
1. Extended Seating with Built-In Benches for Casual Comfort
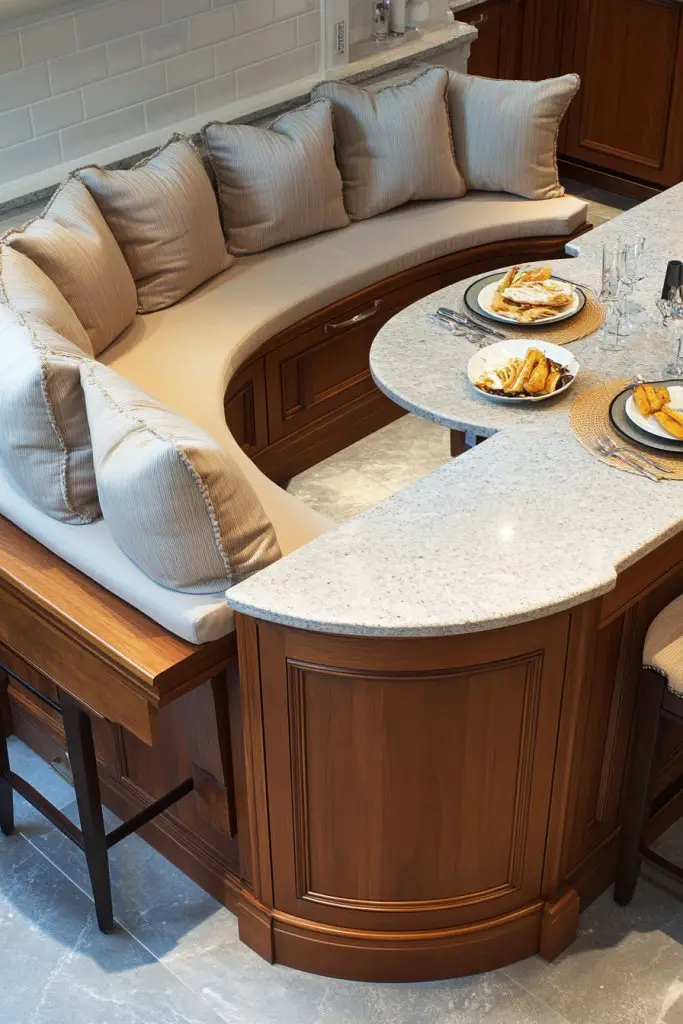
Ever wish your kitchen could be more welcoming for friends without sacrificing style? Creating a cozy spot for casual meals or chats turns your island into a social hub. It’s frustrating when seating options are limited or uncomfortable, making gatherings less relaxed. An integrated bench offers a simple way to invite more people and boost your home’s vibe.
Recommended Products to replicate this idea
| # | Preview | Product | |
|---|---|---|---|
| 1 |

|
Busaurus Storage Ottoman Bench 49.2 Inch Upholstered Fabric Storage Bench for Bedroom End of Bed... | Check Latest Price |
| # | Preview | Product | |
|---|---|---|---|
| 1 |

|
LivTee Smart LED Car Lights Interior with USB Port, LED Strip Fiber Optic Ambient Lighting Car,... | Check Latest Price |
Imagine plush, upholstered benches hugging the sides of your island, upholstered in soft fabrics that beckon guests. The warm tones of wood or vibrant cushions add personality, while the low-profile design keeps sightlines open. During evening gatherings, warm ambient lighting highlights the textures, making everyone feel at home. The combination of comfort and style creates an inviting atmosphere that encourages lingering.
Choose from rustic wooden benches for farmhouse charm or sleek upholstered ones for modern elegance. You can add storage underneath with drawers or lift-up seats for extra functionality. Seasonal textiles, like cozy throws or colorful cushions, change the mood effortlessly. Smaller spaces may opt for corner benches, while larger kitchens can feature continuous upholstered banquettes for a communal feel.
Start by measuring your island’s dimensions to determine bench length and height. Select durable, easy-to-clean fabrics or finishes suited for kitchen environments. Build or buy pre-made seating with sturdy frames, ensuring comfort with appropriate padding. Secure the benches firmly to prevent wobbling and consider adding storage compartments underneath for practicality. Finishing touches like edge trim and decorative cushions complete the look.
Personalize with custom fabric choices—think textured weaves or bold patterns that reflect your style. Add decorative throw pillows or seat cushions for extra comfort. Incorporate contrasting piping or trim to elevate the design. You could even embed small charging ports into the bench for convenience during movie nights or brunches. The goal is creating a space that feels tailored and inviting.
Extended built-in benches turn your kitchen into a welcoming social space. They encourage more frequent gatherings and make your home feel warmer and more connected. With a little effort, you can transform your island into the highlight of your home. Plus, friends will constantly ask where you found such cozy seating—score! 🙂
2. Multi-Level Surfaces for Visual Interest and Functionality

Tired of a plain, monotonous kitchen island that doesn’t inspire? Adding multi-level surfaces introduces both style and practicality. It creates distinct zones for prep, dining, or display, making your kitchen more dynamic. Who says functionality can’t be eye-catching?
Recommended Products to replicate this idea
| # | Preview | Product | |
|---|---|---|---|
| 1 |

|
Giani Quartz Easy Epoxy Countertop Paint Kit (Venetian Gold) | Check Latest Price |
| # | Preview | Product | |
|---|---|---|---|
| 1 |

|
DoubleFill 2 Pcs Unfinished Kitchen Island Legs Farmhouse Solid Wood Table Legs Rubberwood... | Check Latest Price |
Picture a sleek island with a raised bar section at one end, finished with a glossy quartz countertop that gleams under pendant lighting. The lower level provides ample space for chopping or serving, while the elevated section offers a perfect spot for quick bites or drinks. Textural contrasts between different heights add depth and character, making your kitchen feel more layered and interesting.
Opt for materials like wood, stone, or metal finishes to differentiate levels. The elevated surface can be used for casual dining with bar stools or as a display area for decorative items, avoiding wall clutter. Adjust heights to suit your needs, whether for kids’ snacks or adult conversations. You can also incorporate hidden storage beneath lower levels for extra convenience.
Begin by designing your island with varying heights, considering ergonomic comfort. Choose durable materials that complement your overall decor—marble, butcher block, or concrete all work well. Build or modify your existing structure to incorporate different levels, ensuring stability and safety. Install appropriate lighting—pendant lights or recessed fixtures—to highlight each surface. Finishing touches like edge detailing or contrasting colors enhance the visual appeal.
Personalize by selecting colors and textures that match your style—think matte black with warm wood or sleek white with metallic accents. Use decorative backsplashes or textured panels to emphasize the multi-level design. You can also add small planters or sculptural objects on the elevated surface for a touch of personality, provided restricted items are avoided. These changes make your island a true centerpiece.
Multi-level surfaces break the monotony of traditional islands, making your kitchen a conversation starter. They also improve workflow by clearly defining zones, reducing clutter, and increasing efficiency. This versatile idea adapts to various styles—industrial, modern, rustic—and elevates your space’s overall aesthetic. Don’t hesitate to experiment; your dream kitchen awaits!
3. Open Shelving for Display and Accessibility
Ever feel annoyed by cluttered counters and hidden storage? Open shelving on your island offers instant accessibility and a chance to showcase your favorite dishware or decorative pieces. It keeps essentials within reach and adds a layer of visual interest. Plus, it makes your kitchen feel more open and inviting.
Recommended Products to replicate this idea
| # | Preview | Product | |
|---|---|---|---|
| 1 |

|
QEEIG Bathroom Floating Shelves for Wall - 15.7" Wall Mounted Shelf Over Toilet Farmhouse Home Decor... | Check Latest Price |
| # | Preview | Product | |
|---|---|---|---|
| 1 |

|
Gritin 10.2inch Under Cabinet Lighting Rechargeable -84 LED Super Bright,3-Color& 5 Level... | Check Latest Price |
Imagine sleek, floating wood shelves mounted beneath your island’s overhang, displaying colorful bowls, glassware, or artisanal mugs. The natural grain of the wood contrasts beautifully with modern appliances, creating a balanced aesthetic. When illuminated with under-shelf lighting, your display becomes a focal point, adding warmth and personality to your space.
Choose from materials like reclaimed wood for rustic charm or metal for an industrial look. Adjust shelf depth and spacing to accommodate larger items or decorative objects. Mix open shelving with closed cabinets for a curated look that balances practicality with style. Seasonal swaps—like adding festive dishware—keep the display fresh and engaging.
Start by measuring your island’s length and height to determine shelf dimensions. Use sturdy brackets or floating shelf hardware that can handle the weight of your items. Securely attach the shelves, ensuring they are level and safe. Finish with protective coatings or paint to match your decor. Install LED strip lighting underneath for a subtle glow, or opt for wall-mounted sconces for more ambiance.
Personalize with decorative jars, vintage finds, or handcrafted ceramics to reflect your style. Add small hooks underneath for hanging utensils or cups—practical and decorative. Consider using different colors or finishes for each shelf to create a layered, eclectic look. Keep it functional yet playful, and switch out items seasonally for variety.
Open shelving transforms your island into a gallery of personal taste, encouraging creativity and pride. It makes your kitchen more accessible and organized, especially if you love to cook or entertain. Plus, it’s a simple DIY project that dramatically boosts your space’s charm. Your friends will love how effortlessly stylish and practical your island feels!
4. Warm Wooden Finishes for a Rustic-Chic Vibe
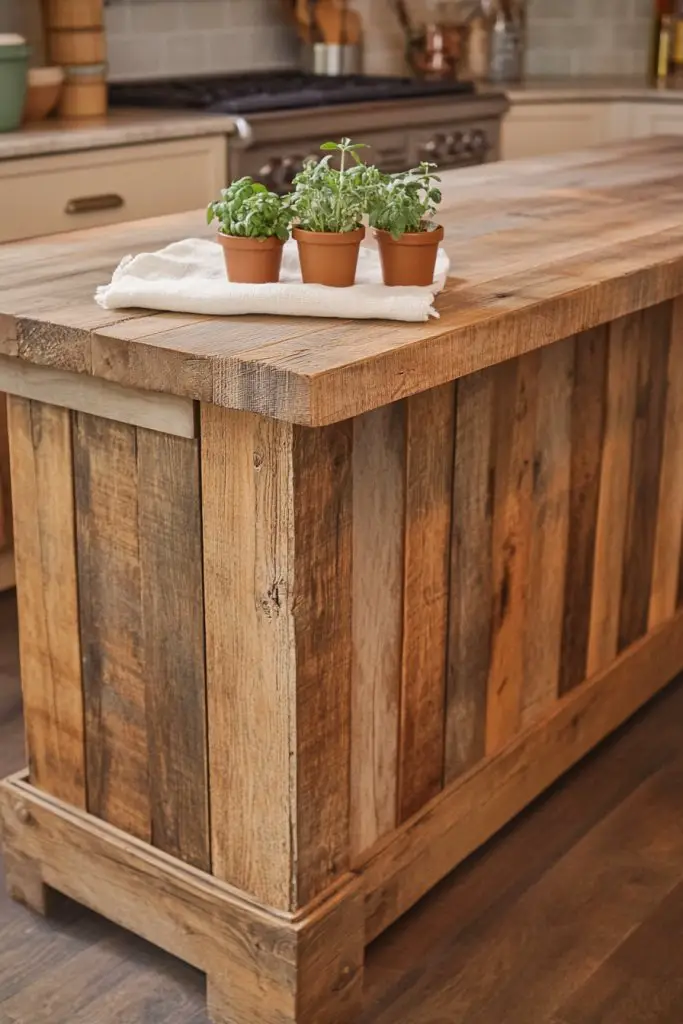
Looking to add warmth and charm to your kitchen? Wooden finishes instantly create a cozy, inviting atmosphere that makes everyone feel at home. Rustic-chic is in, and natural textures bring a timeless appeal that pairs well with various decor styles. If you crave comfort and authenticity, this idea is a must.
Recommended Products to replicate this idea
| # | Preview | Product | |
|---|---|---|---|
| 1 |

|
HEIRLOUM Reclaimed Wood Table Top - Rustic Recycled Wooden Piece Perfect for Signs, Counters,... | Check Latest Price |
| # | Preview | Product | |
|---|---|---|---|
| 1 |
|
Cinnvoice 2 Pcs 12'' W x 24'' H Unfinished Pine Kitchen Cabinet Door Replacement with 4 Pcs Cabinet... | Check Latest Price |
Picture a kitchen island topped with reclaimed barn wood, its weathered grain adding character and depth. The rich, warm hues contrast beautifully with sleek modern appliances, bridging old-world charm with contemporary style. Soft lighting highlights the natural imperfections, making every piece unique. The tactile quality of wood invites touch and creates a sensory-rich environment.
From distressed, weathered finishes to smooth, polished surfaces, wooden textures offer endless options. Dark walnut or light oak can change the entire mood of your space. Pair with matte black hardware or vintage-style fixtures for an authentic look. Seasonal accents like cozy textiles or decorative ceramics complement the rustic vibe without overdoing it.
Select high-quality, sustainably sourced wood or reclaimed materials for an eco-friendly touch. Seal the surface with food-safe finishes to withstand daily use. Use appropriate tools to cut, sand, and assemble your island, ensuring smooth edges. Attach protective pads or non-slip feet for stability on uneven floors. Regular maintenance with mineral oil or Beeswax keeps the wood looking vibrant and protective.
Add personalized touches with carved initials or custom staining to match your color palette. Incorporate decorative panels or inlays for extra detail. Use textured textiles like linen or burlap for seating or table runners that echo the natural theme. Small handcrafted accessories can elevate the rustic charm further—think artisanal pottery or woven baskets.
Wooden finishes bring a sense of history and comfort to your kitchen, making it a true haven. They blend seamlessly with other natural elements, creating a layered, textured environment. Whether modern or traditional, rustic wood adds timeless appeal and warmth. Your space will feel more authentic, cozy, and inviting—an easy way to upgrade your home’s personality.
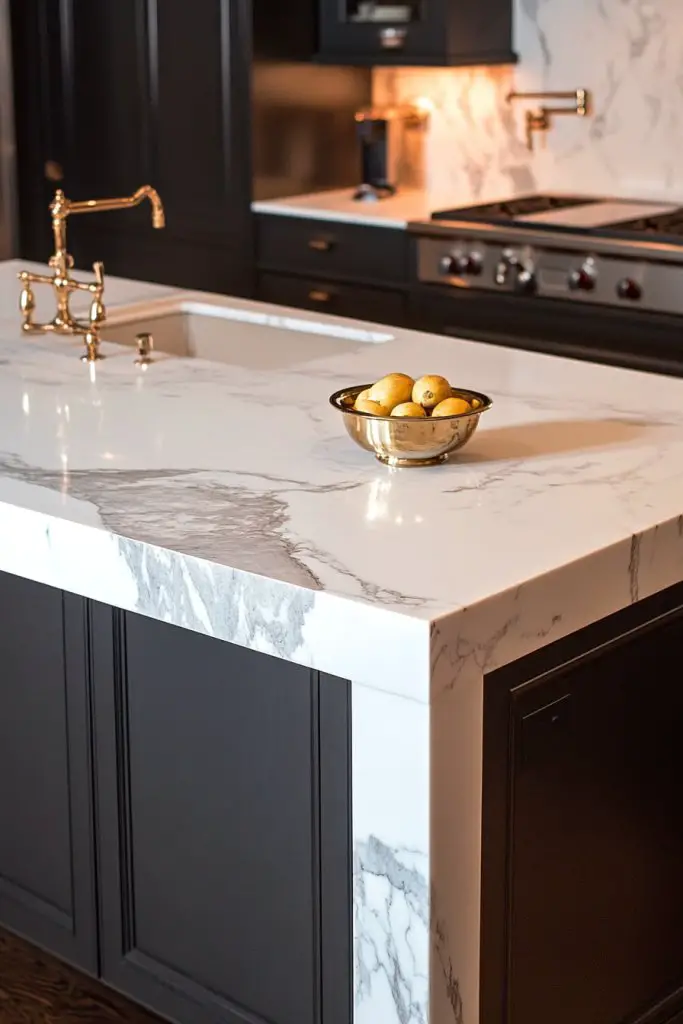
5. Sleek Quartz or Marble Countertops for a Luxurious Touch
Craving a kitchen that screams luxury without breaking the bank? Quartz and marble countertops elevate your space instantly, adding elegance and durability. They turn a basic island into a statement piece that impresses guests and boosts your home’s value. Who says you can’t have both beauty and function?
Recommended Products to replicate this idea
| # | Preview | Product | |
|---|---|---|---|
| 1 |

|
Weiman Quartz Countertop Cleaner and Polish (2 Pack w/Micro Towel) Clean and Shine Your Quartz... | Check Latest Price |
| # | Preview | Product | |
|---|---|---|---|
| 1 |

|
Giani Marble Easy Epoxy Countertop Paint Kit (Carrara White) | Check Latest Price |
Envision a pristine marble surface with subtle veining that catches the light, giving a sense of depth and sophistication. Or imagine a matte quartz countertop in a cool, neutral tone that complements your cabinetry perfectly. The sleek finish reflects ambient lighting, making your entire kitchen look brighter and more expansive. These surfaces create a refined, high-end look that’s hard to beat.
Choose from classic white marble for timeless elegance or bold, patterned quartz for a modern twist. Pair with minimalist hardware and sleek cabinetry for a cohesive look, or contrast with textured backsplashes for visual interest. The versatility of these materials allows integration into various styles—from traditional to ultra-modern. Seasonal accents like colorful bowls or decorative jars can add personality without overwhelming.
Start by selecting the right stone based on your budget and style preferences. Hire experienced installers to ensure precise cuts and secure placement, as these materials require careful handling. Seal marble surfaces regularly to prevent staining, while quartz is generally maintenance-free. Consider edge profiles—beveled, bullnose, or flat—to enhance the aesthetic. Proper sealing and care extend the lifespan and maintain their luxurious appearance.
Add custom edge detailing or inlays for a unique touch. Incorporate complementary colors in your cabinetry or fixtures to highlight the stone’s natural beauty. Use decorative trays or abstract sculptures (non-restricted items, of course) to create focal points. These high-end surfaces invite you to experiment with textures and accessories that elevate your decor.
Luxurious countertops instantly upgrade your kitchen’s style and functionality. They blend durability with beauty, making daily use a pleasure. With proper care, they remain stunning for years. Your space will exude sophistication, inspiring confidence in your design choices and inviting everyone to gather around.
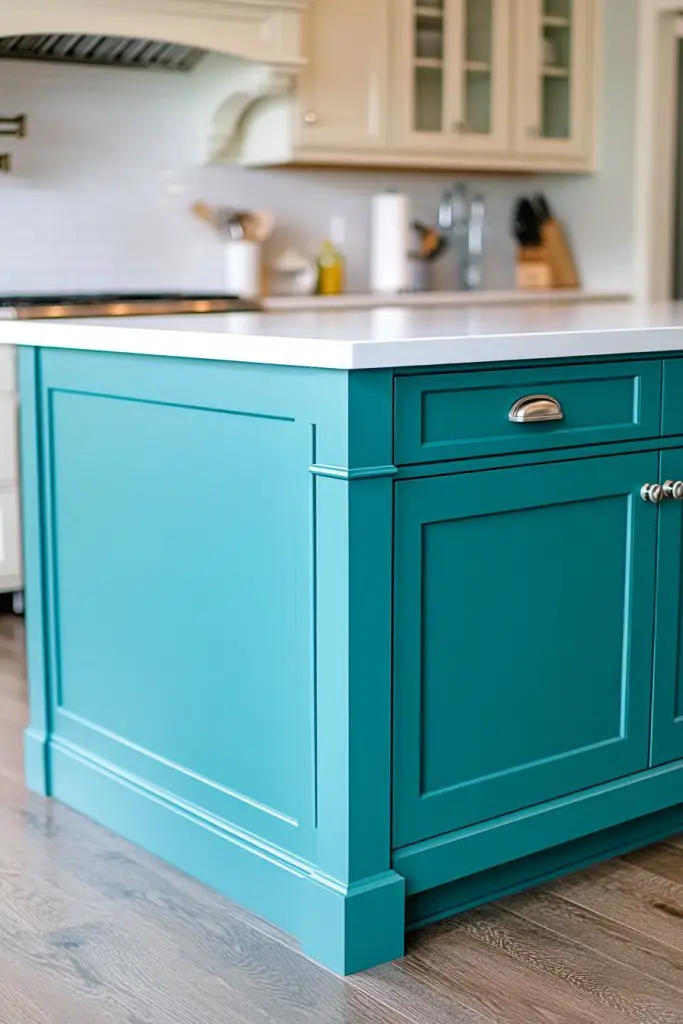
6. Bright Matte Paint Colors for a Bold Statement
Feeling bored with your current kitchen color scheme? A bold matte paint on your island can transform the entire vibe, energizing your space. It’s a cost-effective way to make a statement without overwhelming the room. Plus, matte finishes hide imperfections better than glossy paints—bonus points!
Recommended Products to replicate this idea
| # | Preview | Product | |
|---|---|---|---|
| 1 |

|
Apple Barrel, Vibrant Spectrum Collection Acrylic Craft Paint, PROMOABIII, 2 fl oz each, 16 assorted... | Check Latest Price |
| # | Preview | Product | |
|---|---|---|---|
| 1 |

|
Pro Grade Paint Roller Kit, Brush & Roller,10 Piece Set, Wall Painting Naps for Professionals &... | Check Latest Price |
Imagine a deep navy or rich emerald matte finish that absorbs ambient light, creating a cozy yet striking centerpiece. The velvety texture adds depth and softness to the bold hue, making every glance feel inviting. The matte surface reduces glare, giving your island a sophisticated, understated charm that pairs well with natural textures or sleek metals. It’s like having a tailored suit for your kitchen.
Opt for vibrant colors like mustard yellow, forest green, or even black for maximum impact. Balance the bold hue with neutral cabinetry or metallic hardware to avoid visual overload. Seasonal accessories, such as colorful textiles or decorative ceramics, can complement or contrast the paint for different moods. These colors work well in both modern and eclectic styles, adapting easily to your taste.
Prepare your surface thoroughly—sand and prime before applying matte paint to ensure even coverage. Use high-quality, VOC-free paints designed for interior walls and furniture. Apply multiple thin coats, allowing proper drying time between layers. Finish with a matte clear sealer to protect against scratches and stains, especially in high-traffic areas. Regular touch-ups keep the bold color looking fresh.
Layer textures with textiles or accessories that echo your chosen hue—think a soft cream throw blanket with chunky knit texture or a set of colorful storage bins. Incorporate complementary metallic fixtures or matte black hardware to enhance the modern vibe. Small decorative elements in contrasting shades can add visual interest and prevent the bold color from overpowering.
Bright matte colors redefine your kitchen as a bold, personalized space that reflects your personality. They make your island stand out as a focal point and inspire confidence in your decorating choices. Whether you prefer daring or subdued, a splash of color can energize your entire home environment. Go ahead—make a statement!
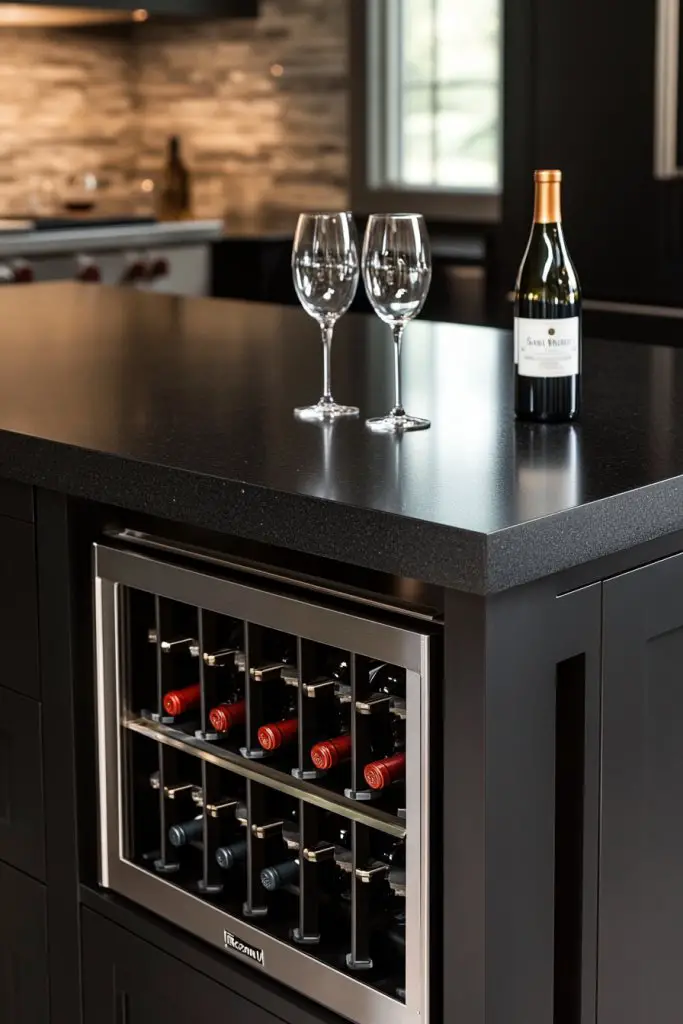
7. Incorporating a Built-In Wine or Beverage Station
Ever wanted to streamline your entertaining without running around for drinks? A built-in wine or beverage station turns your island into a dedicated bar area, making hosting effortless. It combines functionality with style, giving your space a chic, hotel-like vibe. No more cluttered countertops or awkward trips to the fridge.
Recommended Products to replicate this idea
| # | Preview | Product | |
|---|---|---|---|
| 1 |

|
Antarctic Star 26 Bottle 130 Can Wine Cooler/Cabinet Beverage Refrigerator Mini Wine Cellar Beer... | Check Latest Price |
| # | Preview | Product | |
|---|---|---|---|
| 1 |

|
Carlisle FoodService Products RG25-214 OptiClean 25 Compartment Glass Rack with 2 Extenders, Blue ,... | Check Latest Price |
Visualize a sleek, recessed niche within your island with wine racks, mini-fridges, and glass holders. The station features ambient lighting that highlights your collection, creating a cozy, inviting corner. Elegant cabinetry hides clutter, while open shelves display bottles or glassware. The overall look is sophisticated, yet practical, perfect for casual gatherings or special occasions.
Opt for integrated cooling drawers or wine coolers with glass doors for a seamless look. Use decorative trays or racks for bottles, and install pull-out drawers for accessories like corkscrews and stirrers. Style it according to your taste—industrial metal, sleek modern, or rustic wood. Seasonal touches like festive labels or themed decor can add personality.
Design a designated space within your island structure, ensuring proper ventilation and electrical connections for mini-fridges or wine chillers. Choose cabinetry with adjustable shelves to accommodate different bottle sizes. Install LED strip lighting or spotlights to showcase your collection. Use moisture-resistant materials and seal all surfaces for easy cleaning. Proper planning guarantees a functional, beautiful setup.
Add custom labels or monograms to bottles or glasses for a personal touch. Incorporate decorative elements like vintage barware or artisanal decanters (restricted items aside), and create labels or signage that reflect your style. You can also include a small chalkboard or writable surface nearby for menus or drink specials. This makes your station both functional and fun.
A built-in beverage station elevates your hosting game and turns your kitchen into a social hub. It streamlines your entertaining process, making it easy to serve and impress guests. With a little planning, it becomes a feature that adds value and style. Cheers to a more stylish, functional space!
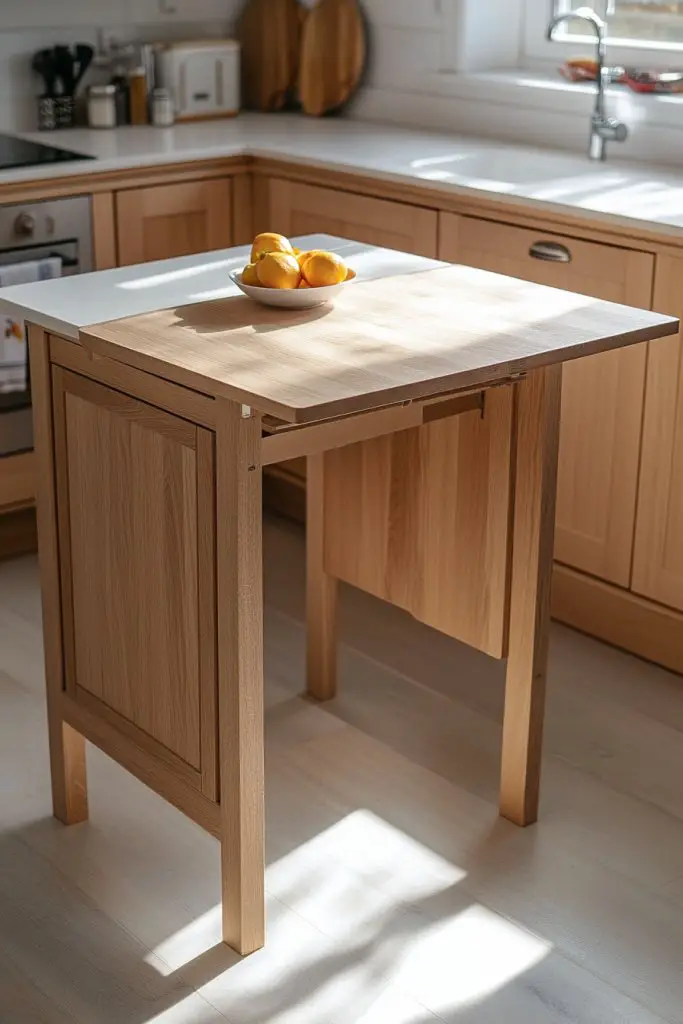
8. Compact Drop-Leaf Extensions for Flexibility
Struggling with limited space but craving a bigger surface when needed? Drop-leaf extensions allow your island to adapt to different occasions, saving space during daily use and expanding for gatherings. Flexibility is the name of the game, making your kitchen smarter and more functional. Who doesn’t love a little extra room at the right time?
Recommended Products to replicate this idea
| # | Preview | Product | |
|---|---|---|---|
| 1 |

|
POWERTEC Drop Leaf Table Supports – Set of 2, Silver Metal Table Bracket Support, Strong & Stable... | Check Latest Price |
| # | Preview | Product | |
|---|---|---|---|
| 1 |

|
AUTOHJ Folding Shelf Brackets - 16 Inch 2 Pcs Heavy Duty Stainless Steel Collapsible Triangle Shelf... | Check Latest Price |
Imagine a sleek island with fold-down leaves tucked neatly against the sides, finished in matching or contrasting materials. When extended, it creates a generous surface for serving or dining, perfect for family meals or parties. During quiet days, the leaves fold down seamlessly, maintaining a clean, uncluttered look. The soft hinges and smooth finishes add an element of craftsmanship and elegance.
Choose lightweight materials like MDF, plywood, or thin veneer to keep the leaves manageable. Use magnetic or mechanical supports to lock the leaves in place when extended. Incorporate decorative hardware or painted accents for contrast or cohesion. These extensions work well in small kitchens, breakfast nooks, or multi-purpose spaces, adapting to your lifestyle seamlessly.
Start by measuring available space and designing a foldable or drop-down mechanism that suits your needs. Attach hinges securely to support frequent use, and ensure the edges align perfectly when folded down. Finish with paint, stain, or laminate to match your island surface. Test the mechanism thoroughly, and consider adding locking supports for stability when extended. Regular maintenance keeps the hinges smooth and functional.
Personalize with painted or stained finishes that complement your overall decor. Add decorative trim or edge details for a polished look. Use magnetic strips or small hooks on the underside for hanging utensils or towels—practical and tidy. Seasonal accessories or colorful placemats can also make the extension more inviting and festive.
Drop-leaf extensions give your kitchen a versatile edge, perfect for both everyday life and entertaining. They make your space adaptable without sacrificing style, and are a smart solution for small or multi-use kitchens. With some simple adjustments, you gain a lot of extra functionality. Ready to expand your horizons?
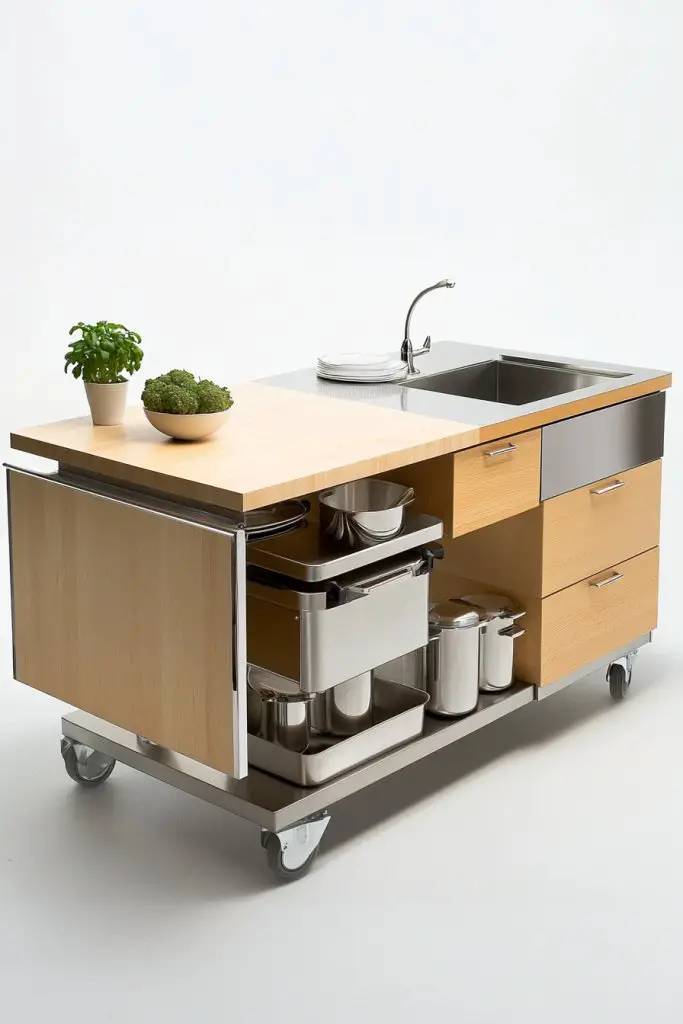
9. Incorporating a Deep Sink for Mixed-Use Convenience
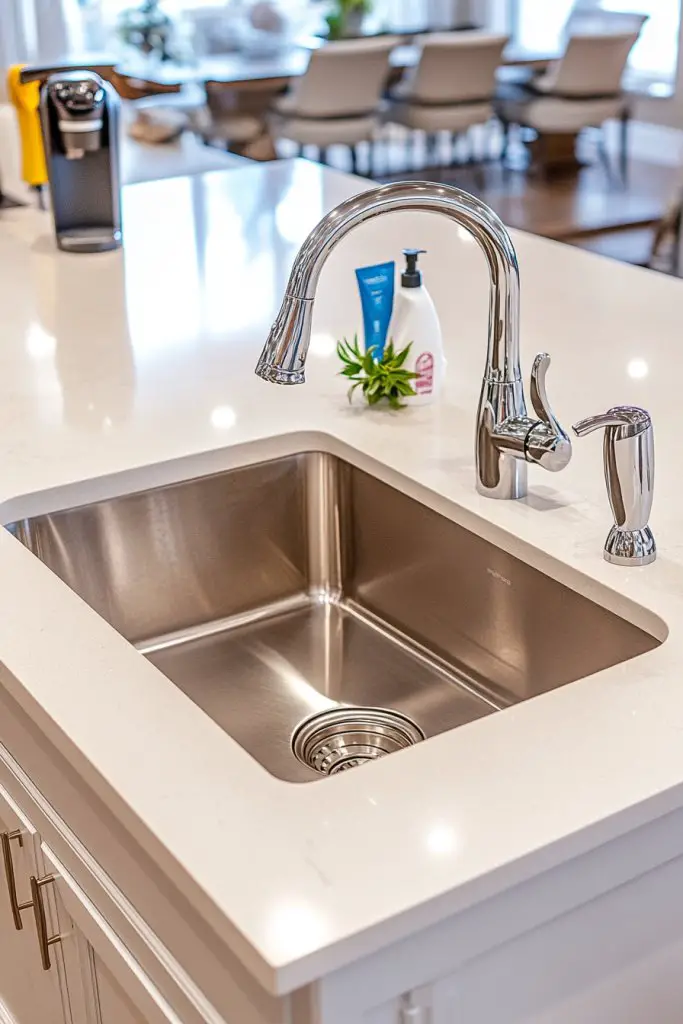
Wish your kitchen island could handle more than just prep? A deep sink transforms your space into a true multi-tasking hub, making cleaning, washing, and socializing easier. It reduces clutter by consolidating functions and boosts efficiency for busy households. Who says the island can’t be the heart of your kitchen?
Recommended Products to replicate this idea
| # | Preview | Product | |
|---|---|---|---|
| 1 |

|
KRAUS Kore 32-Inch Undermount Workstation 16 Gauge Single Bowl Stainless Steel Kitchen Sink with... | Check Latest Price |
| # | Preview | Product | |
|---|---|---|---|
| 1 |

|
FORIOUS Kitchen Faucets with Pull Down Sprayer, Brushed Nickel, High Arc Single Handle Classic... | Check Latest Price |
Visualize a large, undermount sink with a sleek, minimalist faucet, set into a durable stone or composite countertop. The deep basin easily accommodates pots, pans, and big loads of dishes, making cleanup a breeze. Nearby, a drying rack or soap dispenser blends seamlessly into the design, keeping everything tidy. The overall look is modern, functional, and inviting—perfectly suited for hosting and everyday use.
Choose from stainless steel, composite granite, or porcelain finishes to match your decor. Consider adding a built-in draining board or integrated cutting surface for extra convenience. Position the sink near storage drawers or cabinets for easy access to cleaning supplies. Larger or dual-basin sinks work well for multitasking and larger families, while smaller ones suit compact kitchens.
Plan your plumbing carefully, ensuring proper water supply and drainage connections. Select a deep, wide basin that fits your space and needs; professional installation is recommended for optimal sealing and functionality. Use corrosion-resistant materials for fixtures, and seal the edges thoroughly to prevent leaks. Incorporate accessories like pull-out sprayers or soap dispensers to enhance usability. Regular cleaning and inspection keep it looking and functioning like new.
Add custom touches with decorative or colored fixtures that match your overall scheme. Use removable silicone mats or custom racks inside for organization. Incorporate eco-friendly cleaning supplies stored neatly nearby. Consider installing a water filter or adding a small prep area with cutting boards that fit over the sink when not in use—maximizing your space.
A deep sink makes your island more versatile and user-friendly, perfect for large families or entertainers. It streamlines kitchen tasks and keeps everything in one central location. Over time, it becomes second nature, making your space more efficient and enjoyable. Your kitchen will be a true workhorse, ready for anything.
10. Modern Minimalist Design with Hidden Storage
Feeling overwhelmed by clutter and visual noise in your kitchen? A sleek minimalist island with hidden storage offers a clean, streamlined look while hiding all the mess. It’s a subtle way to keep your space looking fresh, modern, and effortlessly stylish. Who says practicality can’t be understated?
Recommended Products to replicate this idea
| # | Preview | Product | |
|---|---|---|---|
| 1 |

|
UKAOCAI 70.1" Display Cabinet with Glass Doors,4-Tier Curio Cabinet for Collectibles, Tempered Glass... | Check Latest Price |
| # | Preview | Product | |
|---|---|---|---|
| 1 |

|
Under Sink Organizer, 2 Packs 2 Tier Under Sink Organizers and Storage, Slide out Pull out Cabinet... | Check Latest Price |
Imagine flat-front cabinets in matte finish, with handleless drawers and push-to-open mechanisms that keep surfaces smooth. The island appears seamless, with no knobs or hardware to distract the eye. Inside, cleverly designed compartments and pull-out trays store utensils, pots, and pans out of sight. Soft, indirect lighting highlights the clean lines, emphasizing simplicity and sophistication.
Choose neutral tones like whites, grays, or blacks for a timeless look, or add a pop of color through accessories and accents. Incorporate soft-close drawers and soft-closing cabinet doors for quiet, smooth operation. The style adapts well to contemporary, industrial, or Scandinavian themes, depending on your finishes and details. Keep decor minimal—think sculptural objects or textured textiles for contrast.
Start with high-quality, handleless cabinetry systems designed for minimalism. Use push-to-open hardware for a sleek appearance, and ensure all hinges and slides are soft-close. Maintain a clutter-free workspace by integrating storage solutions that maximize space efficiency. Choose durable, easy-to-clean finishes that resist fingerprints and scratches. Regular organization keeps the look pristine and functional.
Add personal touches through subtle textured panels or contrasting finishes—like matte black hardware on light cabinetry. Incorporate hidden compartments for small accessories or seasonal items. Use monochrome or tonal color schemes to create a calming, cohesive vibe. Minimalist decor, such as a single sculptural piece, completes the look without clutter.
A modern minimalist island with hidden storage elevates your kitchen to a sleek, sophisticated level. It offers peace of mind knowing everything is organized and out of sight, yet easily accessible. This approach aligns with current design trends and creates a space that feels calm and uncluttered. Less truly is more—your kitchen will thank you!
11. Industrial Style with Metal Accents and Open Frame
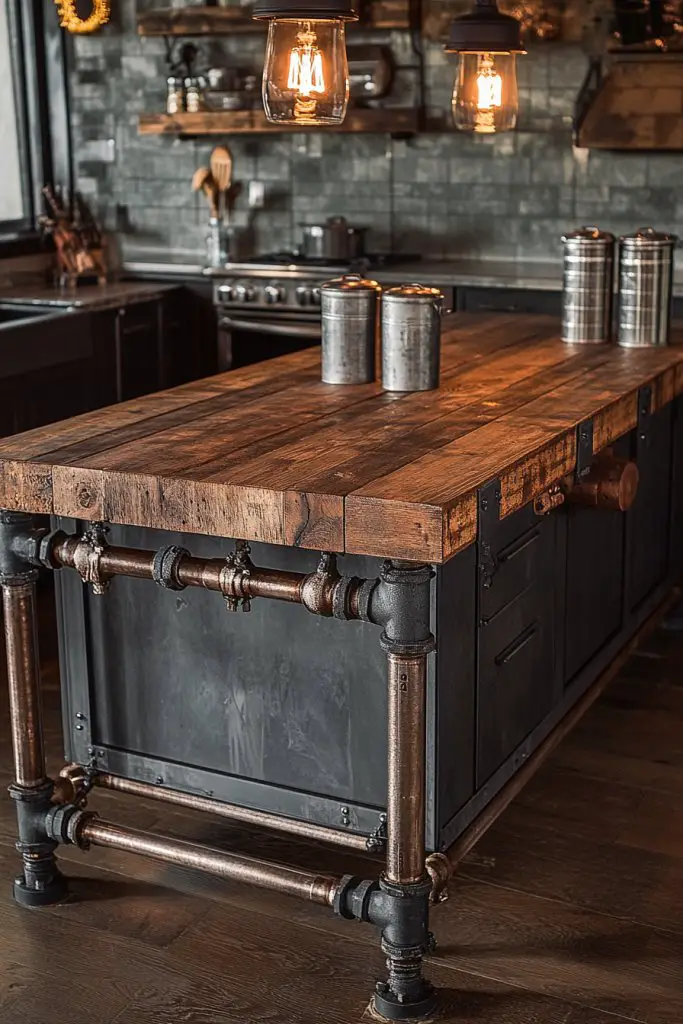
Craving a kitchen that feels edgy and contemporary? The industrial style blends raw materials like metal and wood, creating a bold statement. This look is perfect for those who love a mix of rugged and refined, turning your island into a focal point of urban chic. Ready to add some attitude?
Recommended Products to replicate this idea
| # | Preview | Product | |
|---|---|---|---|
| 1 |

|
Mdjwjj Industrial Pipe Counter Bar Height Table Leg,Metal Table Legs,Iron Base Legs Coffee Tables,... | Check Latest Price |
| # | Preview | Product | |
|---|---|---|---|
| 1 |

|
FDPBY Black Pendant Lighting Modern Pendant Light, Mini Crystal Chandeliers,Adjustable Pendant Light... | Check Latest Price |
Visualize a sturdy metal frame supporting a reclaimed wood top, with open shelving on the sides. The metal legs and hardware feature matte black or brushed nickel finishes, adding contrast and texture. Exposed bolts and rivets give an authentic industrial vibe, while pendant lights with metal shades hang overhead. The overall aesthetic is both functional and artistic, with a touch of vintage charm.
Combine distressed wood with matte black or metallic finishes for a balanced look. Incorporate wire baskets or open shelving for storage, and select bar stools with metal frames and leather seats. This style pairs well with concrete floors, brick walls, or exposed ductwork—embracing an unfinished, urban feel. Seasonal accents like cozy textiles or vintage signs can add warmth without compromising the style.
Choose a robust metal frame or repurpose industrial components for the base. Attach a reclaimed or veneered wood top, ensuring stability and levelness. Use industrial-grade hardware for assembly, and incorporate adjustable feet for uneven floors. Finish with protective coatings on metal surfaces to prevent rust, and seal wood surfaces to maintain authenticity. Install open shelving with metal brackets for a cohesive look.
Add decorative elements like vintage tools or industrial-style lighting fixtures (avoiding restricted items). Incorporate reclaimed materials or custom metalwork for a unique touch. Use leather or metal accents on bar stools or accessories. Personalize with signs or labels that reflect your personality, creating a space that’s both functional and fiercely stylish.
Industrial design offers a bold, fearless aesthetic that can transform your kitchen into a modern loft. It’s durable, practical, and endlessly customizable—perfect for a creative soul. Embrace imperfections and raw materials for a truly authentic look. Your kitchen will exude personality and confidence, inspiring your daily routine.
12. Contrasting Island and Floor Materials for Visual Drama
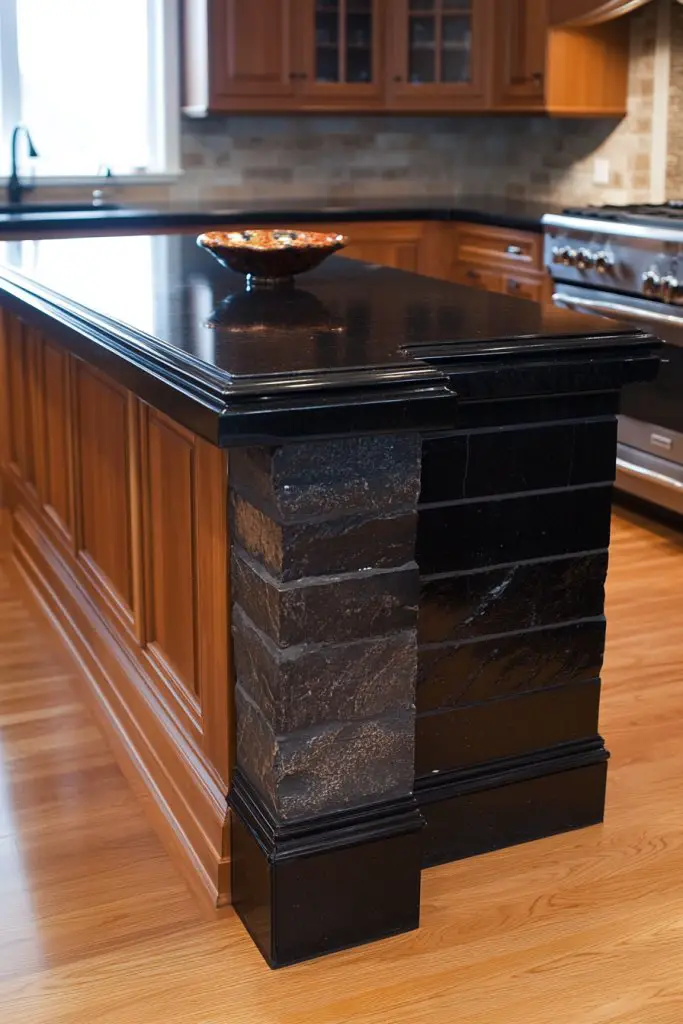
Bored of uniform surfaces? Creating contrast between your island and flooring adds instant visual punch and depth. It draws the eye, makes your space feel more dynamic, and highlights your design choices. Who says your kitchen has to be boring?
Recommended Products to replicate this idea
| # | Preview | Product | |
|---|---|---|---|
| 1 |

|
Kota Japan Premium Non-Stick Marble Pastry Cutting Board Slab 15 3/4" X 11 3/4” with No-Slip... | Check Latest Price |
| # | Preview | Product | |
|---|---|---|---|
| 1 |

|
Bruce Natural Statement 3" Wide x 3/8" Thick Click-Lock Engineered Hardwood Flooring (22sq.ft./case) | Check Latest Price |
Picture a dark, matte-finish island set against light hardwood floors, or a sleek marble top over a concrete floor. The stark contrast emphasizes the island as a focal point, while the varied textures create richness and interest. Soft lighting accentuates the difference, making the space feel layered and curated. It’s a bold move that pays off visually.
Experiment with different material pairings—like black quartz with light maple flooring or a stained wood island on patterned tile. Use paint or stain to reinforce the contrast, and consider textured or patterned floors to add extra dimension. This approach fits well with eclectic, modern, or transitional styles and allows for seasonal changes via textiles or accessories.
Select materials with complementary or contrasting colors and textures. Ensure proper sealing and finishing for durability, especially when pairing porous materials like wood or stone. Use strategic lighting to highlight the difference, and consider using area rugs or mats for warmth and comfort. Be mindful of height differences to maintain seamless flow and avoid tripping hazards.
Incorporate decorative trims or painted accents that echo your color scheme. Use contrasting hardware finishes—brushed brass on dark surfaces or matte black on light—to unify the look. Seasonal textiles or decorative mats can also reinforce the contrast while adding a cozy touch. Play with the idea of changing the flooring or island surface over time for a fresh look.
Contrasting materials create a striking visual that elevates your entire kitchen design. It shows confidence and a keen eye for detail, making your space feel curated and sophisticated. With a bit of planning, you can achieve a bold, layered aesthetic that’s uniquely yours. Let your creativity run wild!
13. Customizable Modular Components for Versatile Setups
Wish your kitchen island could adapt to different needs and occasions? Modular components let you reconfigure and expand your setup easily. It’s like having a Swiss Army knife for your kitchen—dynamic, flexible, and ready for anything. Who says one size fits all?
Recommended Products to replicate this idea
| # | Preview | Product | |
|---|---|---|---|
| 1 |

|
71" White Farmhouse Kitchen Pantry Cabinet Set of 3— Freestanding Coffee Bar with Glass Doors or... | Check Latest Price |
| # | Preview | Product | |
|---|---|---|---|
| 1 |

|
IRONCK Kitchen Island with Storage, Rolling Kitchen Island on Wheels with Drop Leaf, 3 Open Spice... | Check Latest Price |
Imagine a core island with attachable extensions, shelves, or carts that can be rearranged for hosting large gatherings or everyday use. The modules come in various finishes—wood, metal, or composite—to match your style. When assembled, they create an integrated look, but can also be separated for smaller tasks or parties. It’s a versatile, futuristic approach to kitchen design.
Choose modules that serve different functions—additional prep stations, storage units, or seating options. Use color and material options to customize each piece, creating a playful or cohesive aesthetic. This system suits open-plan spaces, small kitchens, or multi-use areas, adapting to your lifestyle changes over time. Seasonal accessories or decorative panels can further personalize the modules.
Start with a sturdy base unit designed for modularity. Select compatible components, ensuring they fit seamlessly together and are easy to lock or detach. Use high-quality materials for durability, and plan your layout to optimize workflow. Secure all connections and test for stability during movement. Maintenance involves simple cleaning and occasional reconfiguration to keep the setup fresh.
Add decorative accents or color-coded modules for quick identification and aesthetic appeal. Incorporate small features like hooks, baskets, or built-in power outlets for added convenience. Personal touches—like engraved labels or custom finishes—make each component uniquely yours. Seasonal swaps or new modules keep your space exciting.
Modular components empower you to tailor your kitchen to your needs, making it more functional and fun. They grow with you, adjusting as your lifestyle evolves. This approach shows creativity and foresight, transforming your kitchen into an adaptable, stylish hub. The future of kitchen design is modular, and it’s within your reach!
14. Incorporating Built-In Charging Stations for Tech-Savvy Hosts
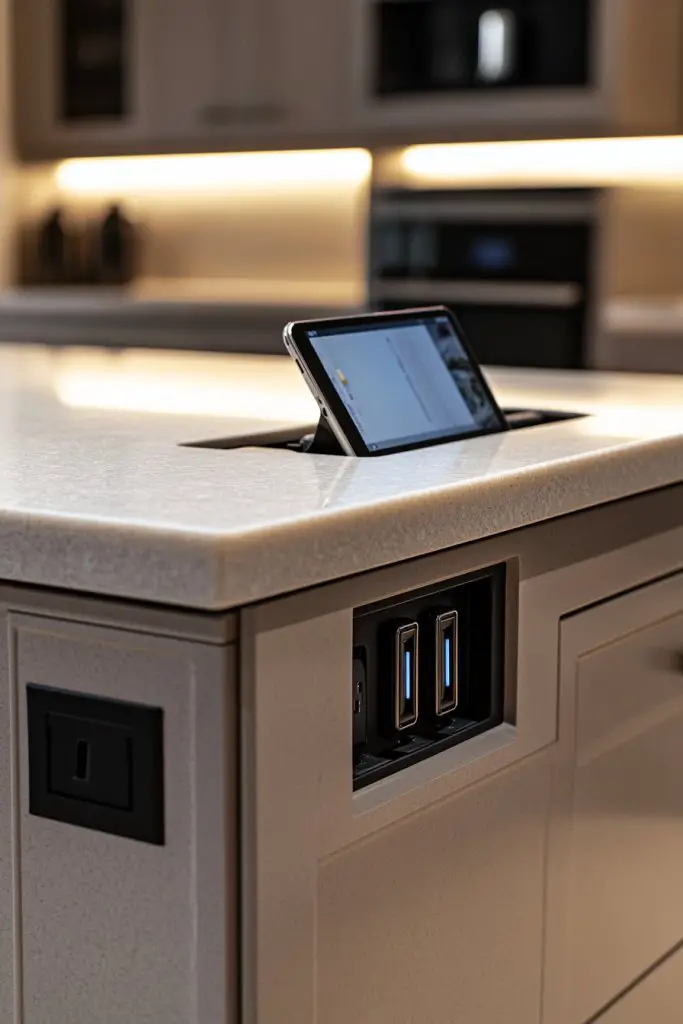
Ever been frustrated trying to find a place to charge your devices while cooking or entertaining? Built-in charging stations turn your island into a tech-friendly hub, keeping everything powered and within reach. It’s the perfect upgrade for modern living, blending convenience with sleek design. Why juggle wires when your island can do it for you?
Recommended Products to replicate this idea
| # | Preview | Product | |
|---|---|---|---|
| 1 |

|
DIN Rail Socket, DIN Rail Mount Modular Power Socket Single AC Outlet, Built in Protective Outlet... | Check Latest Price |
| # | Preview | Product | |
|---|---|---|---|
| 1 |
|
Wall Charger, Surge Protector, QINLIANF 5 Outlet Extender with 4 USB Charging Ports (4.8A Total)... | Check Latest Price |
Picture a discreet outlet panel embedded into the side of your island, with USB ports and power sockets. When not in use, it remains hidden behind a sleek cover or panel that blends seamlessly with your cabinetry. During gatherings, guests effortlessly plug in their devices while chatting or cooking, with cables neatly tucked away. The clean lines and hidden tech make your space look uncluttered and contemporary.
Choose from pop-up outlets, retractable cords, or flush-mount panels to suit your aesthetic. Incorporate wireless charging pads into the surface for a clutter-free look. Position the stations strategically for maximum accessibility—near seating areas or prep zones. This setup works well with minimalist, industrial, or modern styles, and can be customized with finishes that match your decor.
Plan your electrical wiring carefully, considering the placement of outlets and USB ports. Use certified recessed or pop-up power modules designed for kitchens. Seal all wiring connections properly to prevent moisture ingress. Install the outlets flush with the surface or within cabinetry for a sleek look. Test all connections and ensure safety standards are met before use.
Add branded or custom-engraved covers for a personalized touch. Integrate LED indicator lights or subtle glow-in-the-dark markings for visibility at night. Pair with other smart home features—like voice-activated controls—to create a high-tech experience. Seasonal or themed covers can add fun or elegance, depending on your style.
A built-in charging station keeps your kitchen tech-ready and clutter-free, making your space more functional and stylish. It simplifies daily routines and enhances entertaining—no more frantic searches for outlets. Investing in this upgrade signals a forward-thinking, organized lifestyle. Your kitchen will be smarter, more connected, and ready for the digital age!
15. Adding a Chalkboard or Writable Surface for Interactive Fun
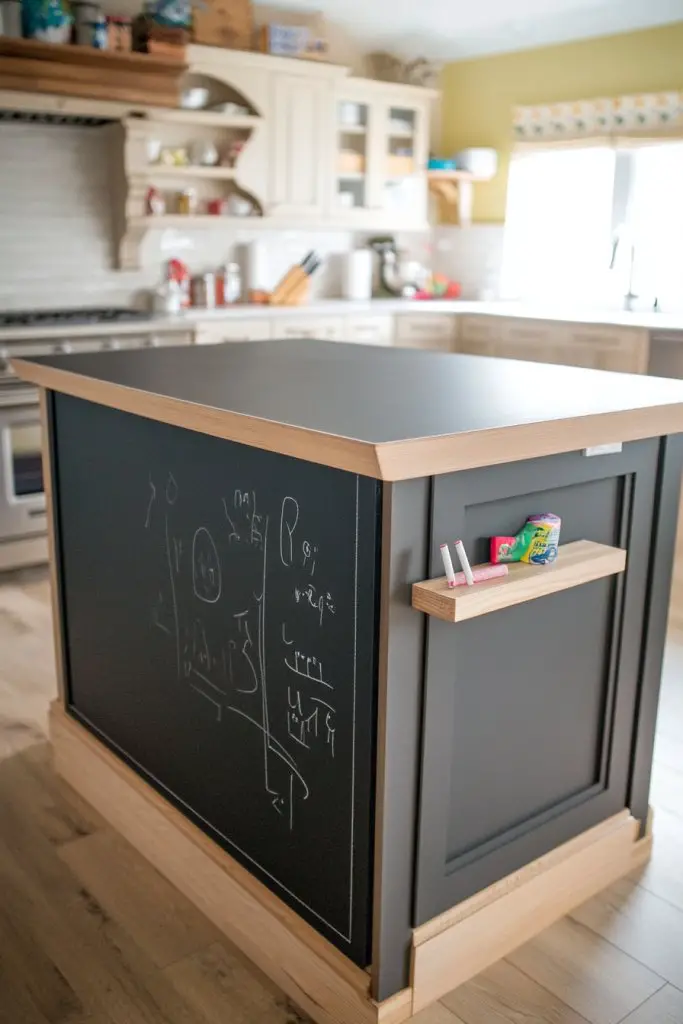
Want to make your kitchen more interactive and fun during gatherings? A chalkboard or writable surface on your island invites creativity, notes, or playful messages. It’s a simple addition that sparks conversation and adds personality. Plus, it’s perfect for family reminders or kids’ doodles—who says the kitchen can’t be a little playful?
Recommended Products to replicate this idea
| # | Preview | Product | |
|---|---|---|---|
| 1 |

|
Extra Large Chalkboard Peel and Stick Paper 9 Feet roll (108 inches) + (5) Color Chalk Included - by... | Check Latest Price |
| # | Preview | Product | |
|---|---|---|---|
| 1 |

|
pranovo 2 x Aluminum Alloy Chalk Holder Teacher's Chalk Clip Clutch (Silver) | Check Latest Price |
Visualize a sleek blackboard panel integrated into the side of your island, with colorful chalks in a nearby holder. During parties, you can write menus, jokes, or game scores, instantly engaging your guests. For everyday fun, leave notes or doodles that brighten your mornings. The surface’s matte finish contrasts beautifully with polished countertops, creating a lively, dynamic look.
Choose from chalkboard paint, whiteboard surfaces, or glass panels for different effects. Frame the writable area with decorative trim or leave it seamless for a modern aesthetic. You can also incorporate magnetic paint underneath for added versatility—think photo magnets or notes. Seasonal themes or artwork can be easily drawn or erased, keeping things fresh.
Apply chalkboard or whiteboard paint directly onto the panel or surface, following manufacturer instructions for prep and application. Seal the surface with a protective clear coat if needed. Keep chalk or markers easily accessible nearby, and consider adding a small ledge or tray for storage. Clean regularly with appropriate cleaners to maintain the surface’s appearance and usability.
Customize with colorful chalks, decorative borders, or themed messages for holidays and parties. Use playful fonts or doodles to match your decor style, making it more engaging. Incorporate removable decals or stickers to add seasonal flair. This interactive element makes your kitchen more lively and memorable.
A writable surface transforms your kitchen into a lively, interactive space that invites participation. It’s great for families, entertaining, or just adding a touch of humor to daily life. With minimal effort, you create a space that’s both functional and fun. Embrace your creative side and see your kitchen become the heart of your home!
16. Incorporating a Breakfast Bar with Overhang and Stools
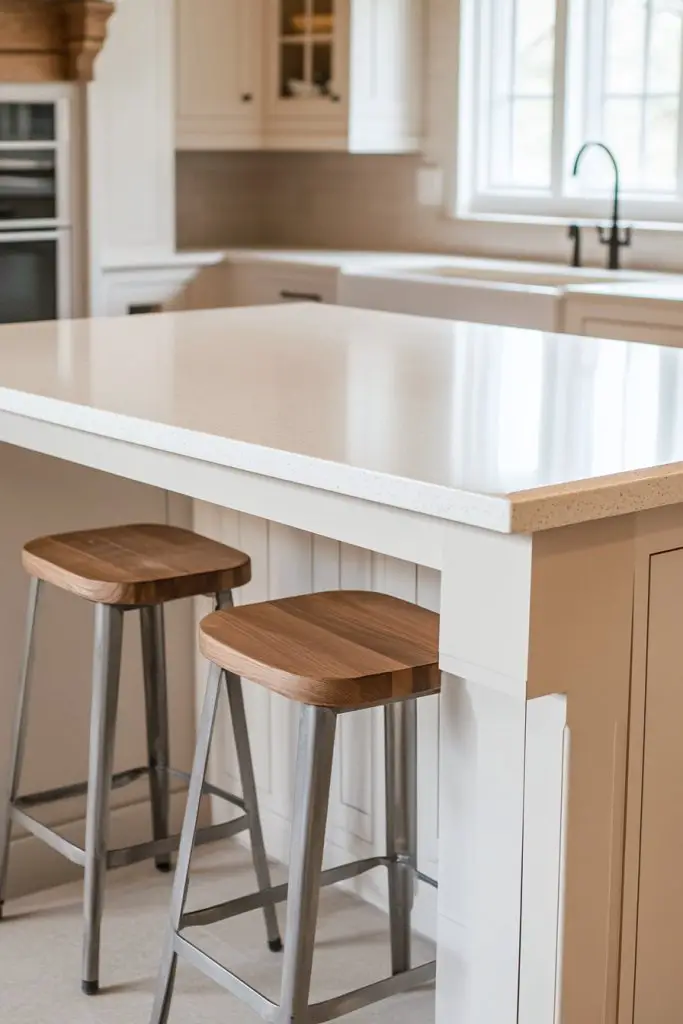
Looking to create a casual dining spot right in your kitchen? A breakfast bar with an overhang offers a perfect place for quick meals, coffee chats, or homework sessions. It’s a versatile addition that makes your island more functional and social. Who needs a separate dining room when your kitchen can do double duty?
Recommended Products to replicate this idea
| # | Preview | Product | |
|---|---|---|---|
| 1 |

|
Nalupatio Modern Bar Stools Set of 2, Adjustable Faux Leather Upholstered Swivel Bar Stools, Counter... | Check Latest Price |
| # | Preview | Product | |
|---|---|---|---|
| 1 |
|
Weiman Quartz Countertop Cleaner and Polish (2 Pack w/Micro Towel) Clean and Shine Your Quartz... | Check Latest Price |
Picture a sleek island with a sturdy overhang supported by decorative brackets or hidden supports. Stylish barstools with upholstered seats or wooden legs sit invitingly beneath, ready for family or guests. The surface, finished in quartz or butcher block, offers a warm, welcoming vibe. Pendant lights or sleek LED strips illuminate the space, making it perfect for morning coffees or evening drinks.
Choose stools that match your decor—metal, wood, or upholstered. Adjust the overhang height for comfort, typically 12-15 inches beyond the edge. Incorporate decorative elements like textured cushions or throws for added coziness. The overhang can be extended for larger gatherings or minimized for smaller, streamlined kitchens. It adapts beautifully to various styles, from rustic to modern.
Ensure your island countertop extends sufficiently to support the overhang, with sturdy brackets or cantilever supports. Select comfortable, durable stools suited for everyday use. Install lighting—pendants or recessed fixtures—above the bar area for ambiance. Seal the countertop to withstand spills and stains. Regular cleaning and tightening of supports maintain safety and appearance.
Add decorative elements like cushions, themed placemats, or seasonal accents to your stools. Use a variety of textures and colors to match your decor style. Incorporate small shelves or hooks on the sides of the island for storing utensils or glasses. Seasonal décor or custom signage can make your breakfast bar a lively focal point.
A breakfast bar makes your kitchen more inviting and functional, perfect for busy mornings or relaxed evenings. It encourages casual interactions and adds personality to your space. With a little planning, you’ll create a spot that’s both practical and stylish—a true home essential. Get ready to enjoy more mornings and lively conversations!
17. Using Colorful Accents and Decorative Hardware for Playful Charm
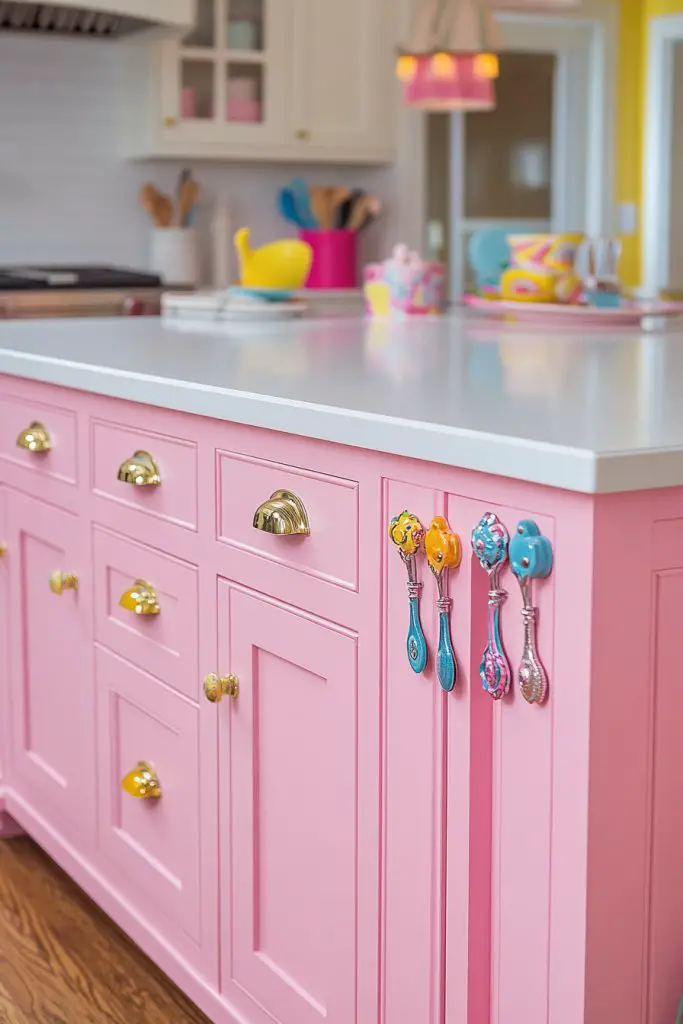
Want to add personality and fun to your kitchen island? Colorful accents and decorative hardware can instantly lift the space from plain to playful. They’re small details with a big impact, reflecting your personal style. Who says functional needs can’t be vibrant?
Recommended Products to replicate this idea
| # | Preview | Product | |
|---|---|---|---|
| 1 |

|
Ravinte 30 Pack Brushed Nickel Round Zinc Cabinet Knobs for Kitchen Bathroom Closet Dresser Cabinets | Check Latest Price |
| # | Preview | Product | |
|---|---|---|---|
| 1 |
|
Ravinte 30 Pack Solid Knobs Kitchen Cabinet Round Pulls Dresser Handles Gold Cupboard Hardware... | Check Latest Price |
Imagine bright, cheerful knobs in bold colors or geometric shapes on your cabinet doors. A soft pastel paint on the island base paired with brushed brass hardware creates a lively yet sophisticated look. The combination of textures and hues invites touch and interaction, making your kitchen feel energetic and welcoming. Accents like decorative pulls or knobs are subtle but powerful design statements.
Mix and match hardware finishes—matte black, polished chrome, or matte bronze—to complement your color scheme. Use painted or stained cabinetry in playful or muted tones, depending on your overall decor. Seasonal or thematic hardware can add a fun twist during holidays or special occasions. Incorporate decorative trims or inlays for further personalization.
Choose hardware that fits your cabinet doors and drawers, and drill the holes carefully for a seamless look. Select finishes that resist fingerprints and scratches for longevity. Painting or staining your island in bold colors can be done with high-quality interior paints—prep the surface thoroughly for best results. Seal with a clear coat if desired. Regular cleaning keeps hardware shiny and attractive.
Personalize further with custom-designed knobs or pulls—think monograms or motifs that reflect your personality. Incorporate decorative accents like colorful tiles or textured wallpaper behind open shelving. Use seasonal or themed hardware to keep the look fresh and festive. These small touches make your kitchen uniquely yours.
Colorful accents and decorative hardware inject fun and personality into your kitchen. They’re an easy, affordable way to refresh your space and express your style. The playful charm invites conversation and makes everyday tasks more enjoyable. Don’t shy away from experimenting—your kitchen is your canvas!
18. Integrating a Under-Counter Microwave or Small Appliances
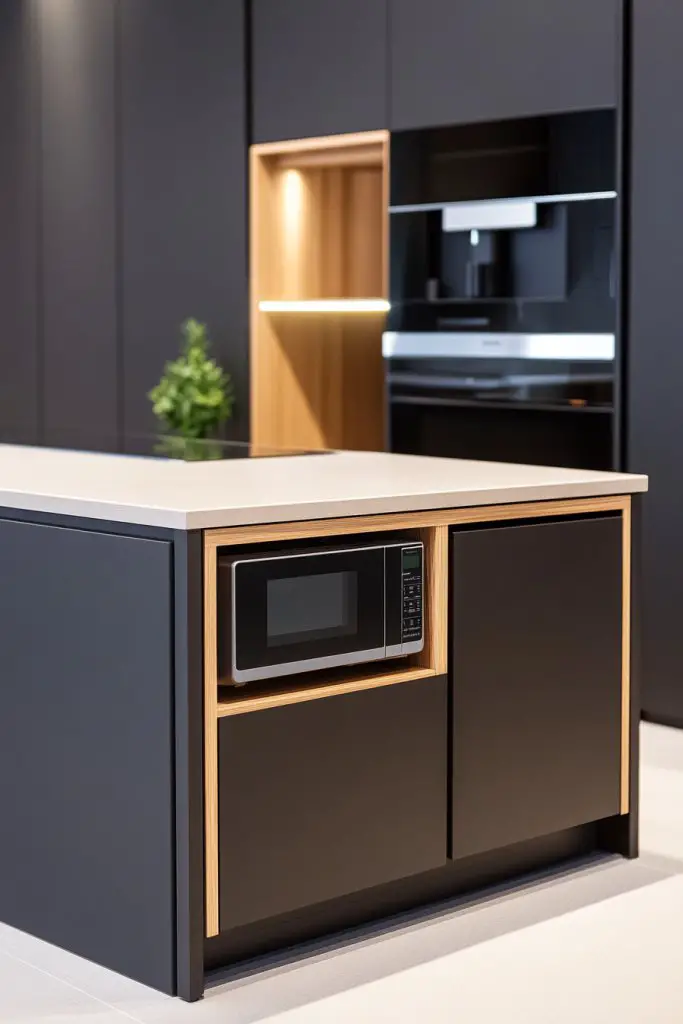
Tired of cluttered countertops with small appliances taking over? Integrating a microwave or essential gadgets into your island creates a sleek, organized look. It streamlines your workflow and keeps appliances accessible without sacrificing style. Who says convenience can’t be hidden?
Recommended Products to replicate this idea
| # | Preview | Product | |
|---|---|---|---|
| 1 |

|
Sharp R1214TY 1.5 Cu. Ft. 1100W Over-the-Counter Microwave in Stainless Steel | Check Latest Price |
| # | Preview | Product | |
|---|---|---|---|
| 1 |

|
Sonhomay Kitchen Organizer Stand with Drawer, Coffee Maker & Appliance Holder Tea Pod Storage Space... | Check Latest Price |
Visualize a custom-built cabinet with a slide-out shelf for your microwave, finished to match your island’s surface. Nearby, a pull-out drawer hides small appliances like toasters or coffee makers, keeping everything tidy. The seamless design blends appliances into the cabinetry, giving your kitchen a clean, uncluttered appearance. It’s both practical and polished.
Choose cabinetry with built-in compartments or custom inserts for each appliance. Use soft-close slides and durable finishes to handle daily use. Position these units near prep areas or main counters for convenience. You can also incorporate ventilation fans or filters if needed—especially for microwave units—ensuring safety and functionality. This setup suits modern, minimalist, or transitional styles.
Plan your appliance placement carefully, measuring available space and electrical needs. Work with a carpenter or cabinetry specialist to design custom compartments or doors. Install dedicated wiring and outlets, ensuring safety and compliance. Use durable, heat-resistant materials, and test all functions thoroughly before regular use. Proper sealing and ventilation are essential for longevity.
Add labels or decorative panels that coordinate with your decor. Use soft-close mechanisms for quiet operation and easy access. Incorporate small features like pull-out trays or adjustable shelves for versatility. Seasonal or themed paneling can add a personal touch, making the setup both functional and fun. It’s all about making appliances work for you.
Integrating appliances into your island transforms your kitchen into a seamless, efficient space. It reduces clutter, enhances your decor, and simplifies daily routines. With thoughtful planning, your kitchen will look sleek and stay highly functional. It’s a smart upgrade that makes life easier—and more stylish!
19. Installing Pendant Lighting for Ambience and Focus
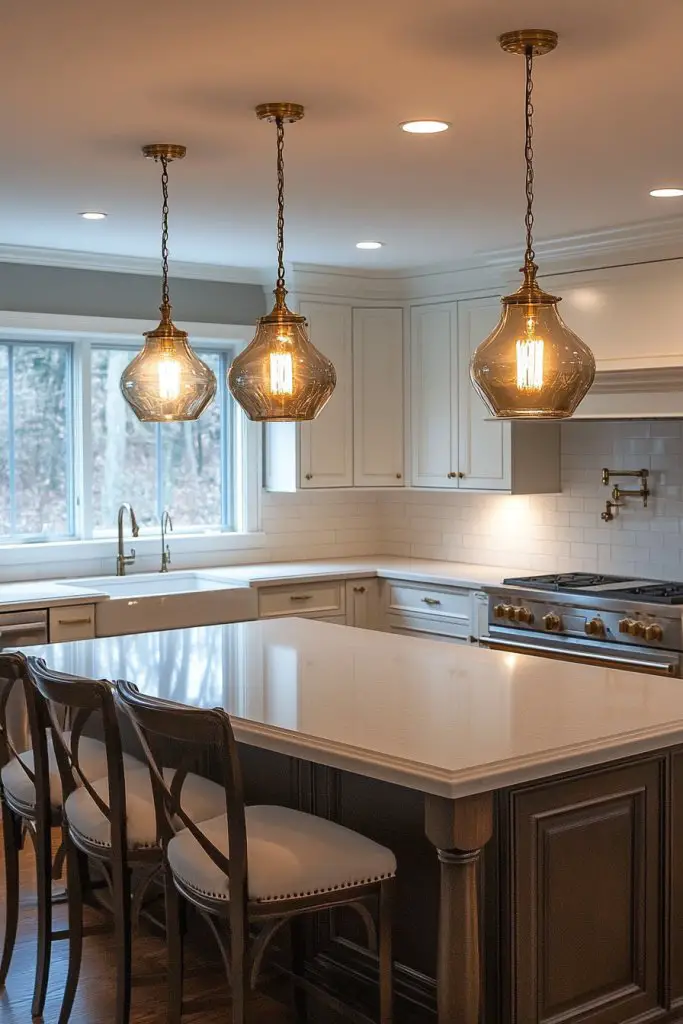
Ever feel like your kitchen lacks the right mood lighting? Pendant lights above your island add drama, focus, and warmth, transforming the space into a cozy gathering spot. They highlight your design choices and make your kitchen feel more inviting. Who says lighting can’t be both functional and fabulous?
Recommended Products to replicate this idea
| # | Preview | Product | |
|---|---|---|---|
| 1 |
|
Capaaobc 1 Light Pendant Lights Kitchen Island, Modern Farmhouse Hanging Light Fixture, 39Inches... | Check Latest Price |
| # | Preview | Product | |
|---|---|---|---|
| 1 |

|
DAYBETTER 4 Pack Vintage LED Edison Bulbs, E26 Led Bulb 60W Equivalent, Dimmable Led Light Bulbs,... | Check Latest Price |
Picture a row of sleek pendants with metallic finishes hanging at varying heights, casting a warm glow over your island. The contrast between the lights and your surface creates a focal point, drawing eyes and attention. The soft ambient light enhances textures and colors, making your entire kitchen feel more intimate and stylish. It’s a simple upgrade with a big impact.
Choose from minimalist glass or metal shades for a modern look, or go with vintage-inspired fixtures for rustic charm. Adjust the hanging height for optimal task lighting or visual balance. Incorporate dimmer switches to control brightness and mood. Coordinate fixture finishes with hardware or accessories for a cohesive aesthetic. Different styles suit various decor themes—industrial, contemporary, or eclectic.
Select fixtures that complement your ceiling height and island size, ensuring even light distribution. Install electrical wiring safely, preferably with professional help. Use adjustable cords or rods to fine-tune the hanging height. Mount fixtures securely, and test each for proper operation. Consider adding a dimmer switch for flexibility in ambiance. Regular cleaning and bulb replacements keep the lighting looking sharp.
Personalize with decorative bulbs, colored glass, or vintage filament designs. Mix and match different shapes or styles for a curated look. Incorporate smart lighting controls for remote dimming or color changes. Seasonal or themed shades can add festive flair, while consistent finishes tie the look together. Play with lighting layers to create a warm, inviting atmosphere.
Pendant lighting elevates your kitchen from everyday to extraordinary, creating mood and focus effortlessly. It’s a hallmark of good design that combines form and function. Properly chosen and installed, these fixtures make your space more inviting and stylish. Your kitchen will glow with personality and warmth, inspiring confidence in your decorating skills.
Conclusion
With a diverse array of kitchen island ideas, you now have plenty of inspiration to elevate your culinary space. Whether you opt for a bold statement piece or a subtle, functional addition, these ideas are sure to spark your creativity. Embrace the opportunity to personalize your kitchen and make it truly yours — your perfect gathering spot awaits!