
20 Kitchenette Ideas for Compact Functionality
Imagine transforming a tiny space into a cozy, efficient haven—kitchenettes are the perfect solution for urban dwellers, students, and travelers alike. Their popularity is soaring because they maximize functionality without sacrificing style, making small spaces feel spacious and inviting.
In this article, you’ll discover a variety of inventive kitchenette ideas that combine clever storage solutions, space-saving layouts, and eye-catching designs. Whether you’re looking to upgrade your current setup or create a brand-new compact kitchen, these ideas will inspire you to make the most of every inch and turn your small space into a culinary paradise.
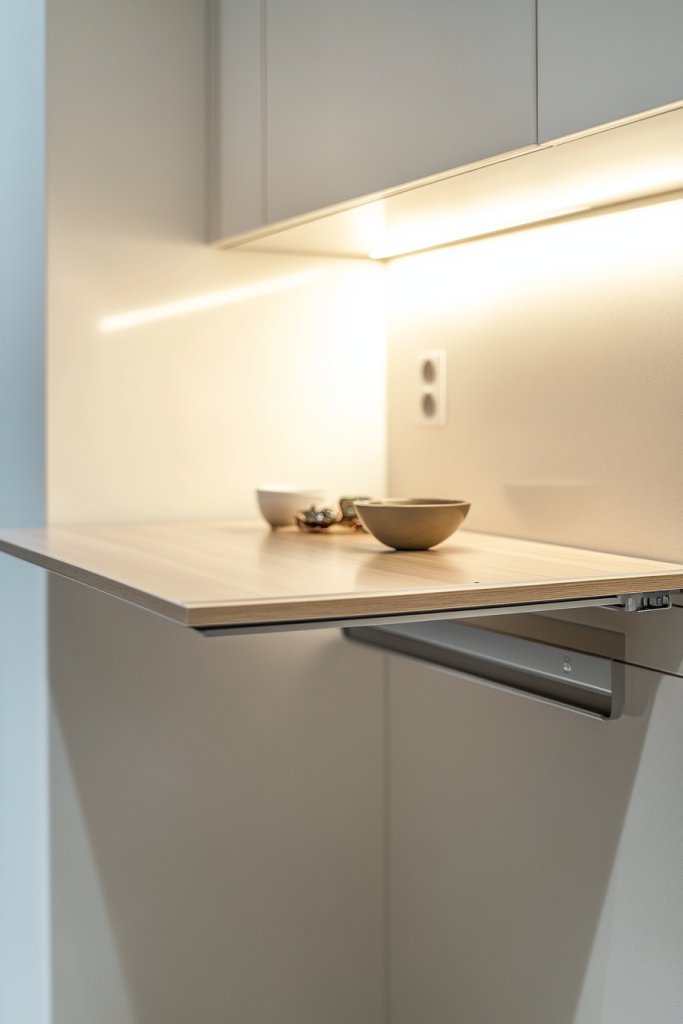
1. Clever Wall-Mounted Fold-Down Countertops for Space-Saving Prep Areas
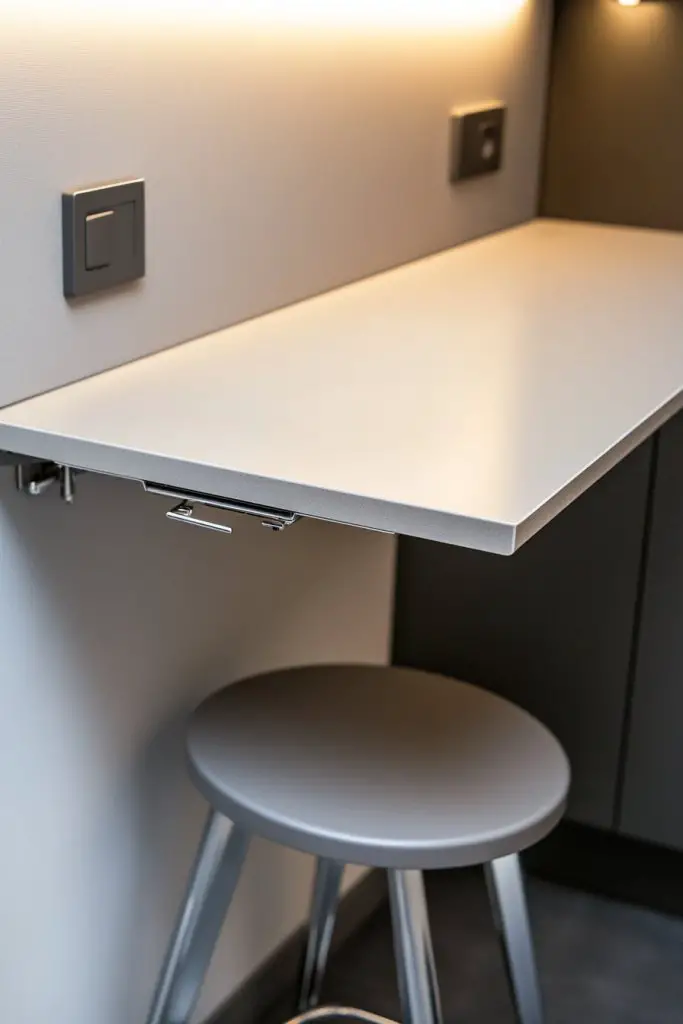
Living in a tiny apartment or a compact studio can make meal prep feel like an obstacle course. You want a functional kitchen without sacrificing precious space or style. Fold-down countertops offer a clever solution, transforming small areas into efficient work zones when needed. It’s the kind of space hack that makes you wonder why you didn’t think of it sooner.
Recommended Products to replicate this idea
| # | Preview | Product | |
|---|---|---|---|
| 1 |

|
TEAMIX Wall Mounted Folding Table, Black Floating Desk for Small Spaces, Drop Leaf Dining Table for... | Check Latest Price |
| # | Preview | Product | |
|---|---|---|---|
| 1 |

|
Howard Products Butcher Block Conditioner and Food Grade Mineral Oil for Wood Cutting Boards, 12 Fl... | Check Latest Price |
Imagine a sleek wall with a hidden countertop that folds down effortlessly when you need it. The surface is smooth, made from durable butcher block or sleek laminate, ready for chopping or plating. When not in use, it tucks neatly against the wall, leaving your space open and uncluttered. The contrast between the clean wall and the functional surface creates a modern, minimalist vibe that’s both practical and stylish.
You can customize these fold-down counters with different finishes to match your decor, from rustic wood to glossy laminate. For seasonal touches, add colorful magnets or removable decals to the wall behind them. In small kitchens, opt for a lightweight design that’s easy to open and close, while larger spaces can incorporate dual surfaces for prep and serving. They work equally well in apartments or tiny homes, adapting effortlessly to your needs.
Start by choosing a sturdy wall and measuring the available space. Select a fold-down surface with a durable hinge mechanism that can handle daily use. Mount the supporting brackets securely into studs or wall anchors for stability. Use weather-resistant or easy-to-clean materials to ensure longevity. Install a locking mechanism if you want extra safety during use, and keep a small storage hook nearby for utensils or towels.
Add a splash of color with a vibrant paint or a patterned adhesive film on the underside of the fold-down surface. Incorporate a magnetic strip underneath for metal utensils, or install a foldable tray for extra prep space. For a cozy touch, include a soft fabric cover or decorative edge trim. This way, your fold-down countertop becomes a personalized, multi-functional feature tailored to your cooking style.
This space-saving technique proves that you don’t need a large kitchen to cook comfortably. It’s a smart way to maximize your tiny space without sacrificing style or efficiency. Once you experience the convenience, you’ll wonder how you ever managed without it. Ready to fold your way to a more functional kitchen?
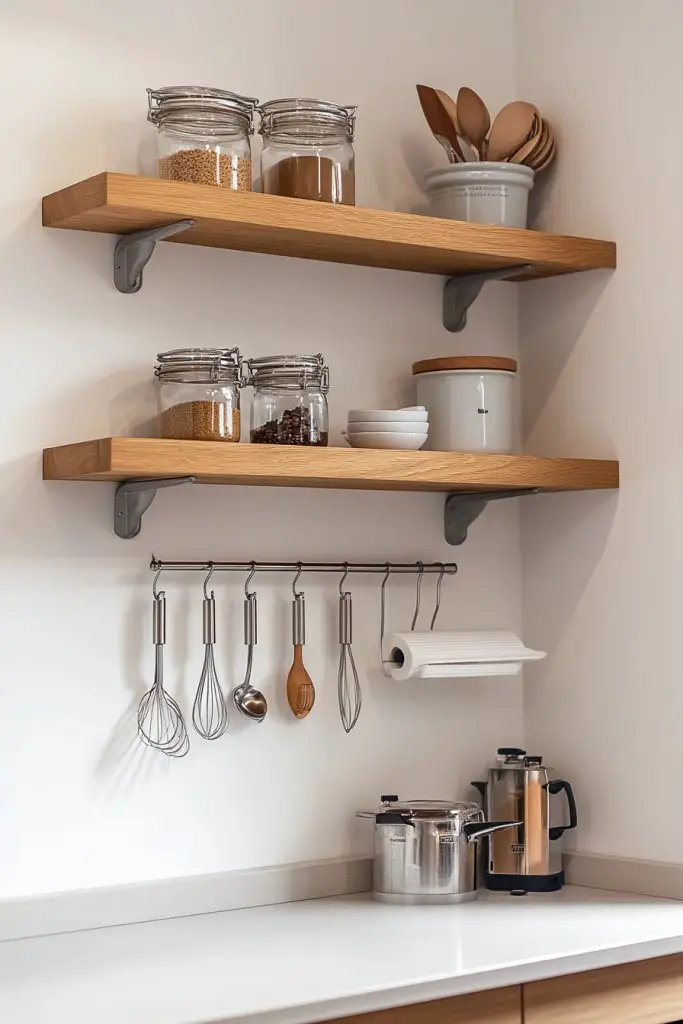
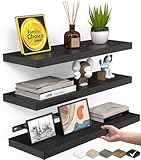
2. Vertical Storage Solutions with Open Shelving and Hooks
Cluttered countertops can turn cooking into a stressful treasure hunt. You crave an organized space where everything has its place, yet the floor and counter real estate remain limited. Vertical storage is your new best friend, turning blank wall space into a functional display and storage zone. It’s like giving your kitchen a much-needed facelift without a remodel.
Recommended Products to replicate this idea
| # | Preview | Product | |
|---|---|---|---|
| 1 |

|
Harwaya Floating Shelves for Wall 36 Inches Long 8 Inch Deep, Large Wall Book Shelves for Bedroom,... | Check Latest Price |
| # | Preview | Product | |
|---|---|---|---|
| 1 |
|
Command 5 lb Large Utility Hooks, 7 Hooks and 12 Strips, Damage-Free Hanging Wall Hook with Adhesive... | Check Latest Price |
Picture open wooden or metal shelves mounted high on the wall, holding neatly organized pots, pans, and dishes. Hooks beneath the shelves hang utensils, mugs, or measuring spoons, keeping everything within arm’s reach. The open design creates an airy feel, while the variety of textures—from sleek metal to rustic wood—adds visual interest. It’s a smart, stylish way to keep your essentials accessible and your space looking intentional.
Adjust the height and depth of shelves based on your needs, from small spice racks to full-length pantry displays. Incorporate decorative hooks or sleek rails for a minimalist look, or add baskets and bins for a more clutter-free aesthetic. For seasonal updates, swap out items or add colorful textiles on the hooks. In small kitchens, vertical storage frees up valuable counter space, making the room feel larger and brighter.
Choose sturdy wall anchors and high-quality brackets to support the weight of your stored items. Install shelves at different heights to optimize space, ensuring easy access without overcrowding. Use open shelving made from moisture-resistant materials for longevity. Hang hooks in strategic spots for frequently used tools, and consider adding a magnetic strip for knives or metal utensils. Keep the setup flexible to rearrange as your collection grows or changes.
Decorate your shelves with small decorative containers or colorful storage jars, avoiding clutter. Use sleek hooks that blend with your decor, or add personal touches like vintage utensils or handcrafted kitchen tools. Incorporate LED strip lighting underneath shelves for better visibility. You could also add decorative appliqués or decals to the wall behind for a pop of style, making the storage both functional and fun.
Vertical storage solutions turn wasted wall space into a practical masterpiece, making even the tiniest kitchens feel organized and inviting. It’s a visual reminder that smart design transforms challenges into opportunities. Once you start organizing this way, you’ll wonder why you waited so long to upgrade your space. Embrace verticality and enjoy a clutter-free cooking zone.
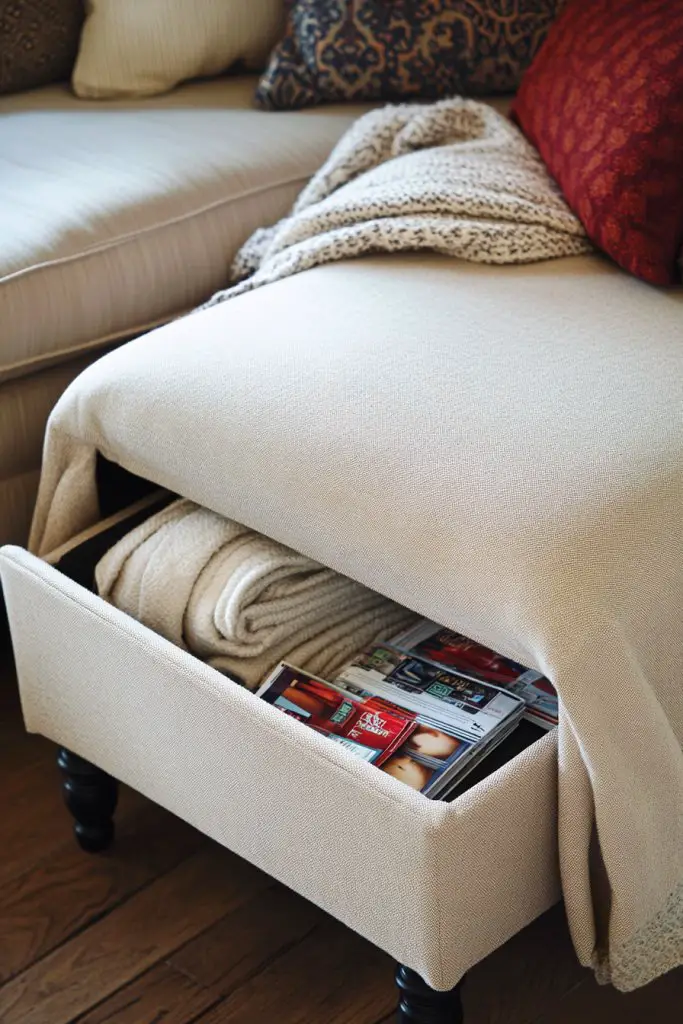
3. Multi-Functional Furniture: Ottoman with Hidden Storage
Small living spaces often force you to choose between seating and storage, leaving you with compromises. You want furniture that does double duty without looking bulky or out of place. An ottoman with hidden storage solves this dilemma, offering a cozy spot to rest and a secret compartment for your clutter. It’s the perfect blend of function and style for compact living.
Recommended Products to replicate this idea
| # | Preview | Product | |
|---|---|---|---|
| 1 |

|
DUMOS 30in Foldable Storage Ottoman Bench, Storage Chest, End of Bed Foot Rest Stool with Padded... | Check Latest Price |
| # | Preview | Product | |
|---|---|---|---|
| 1 |

|
COLAMY Fabric Round Storage Ottoman with Reversible Tray Lid – Multi-Functional Footrest, Hidden... | Check Latest Price |
Imagine a plush fabric-covered ottoman sitting at the foot of your sofa, inviting you to kick back. Beneath its soft cushion lies a spacious compartment filled with blankets, magazines, or even shoes. The exterior is sleek and customizable—choose a neutral tone or bold pattern to match your decor. Its compact size keeps your space open, while the hidden storage keeps your essentials out of sight but within reach.
Opt for a variety of fabrics, from linen to velvet, to match your aesthetic. Some models come with lift-up lids, while others have side compartments or fold-out sections. Use it as a coffee table with a tray on top for drinks, or as extra seating during gatherings. For seasonal changes, swap out cushion covers or add decorative accents to enhance its style.
Choose a sturdy frame with a durable hinge mechanism, capable of holding weight and frequent use. Measure your space to find a size that fits comfortably without overcrowding. Select a soft, easy-to-clean fabric or faux leather for durability. Assemble according to manufacturer instructions, ensuring the lid opens smoothly. Use the internal compartment for anything from linens to board games, depending on your lifestyle.
Add decorative throw pillows or a soft blanket draped over the side for added comfort. Personalize with fabric patterns or colors that complement your existing furniture. Consider adding labels or small baskets inside for better organization. You could also attach small hooks or clips inside for keys or chargers, making it a multi-purpose storage hub.
A multifunctional ottoman with hidden storage turns a simple piece into a smart solution for small homes. It helps keep clutter out of sight and creates a cozy, inviting atmosphere. Once you see how much this piece can hold, you’ll wonder how you ever managed without it. It’s a small upgrade that makes a big difference in your daily comfort.
4. Slimline Appliances with Integrated Compact Design
Ever noticed how bulky appliances eat up precious space and make your small kitchen look cramped? Slimline appliances are the answer, offering full functionality in a compact form factor. They’re designed to fit into tight spots, making every inch count without sacrificing performance. It’s a game-changer for anyone craving more room to breathe.
Recommended Products to replicate this idea
| # | Preview | Product | |
|---|---|---|---|
| 1 |

|
Frigidaire, 2 Door Apartment Size Refrigerator/Freezer Combo, 7.5 cu ft, Platinum Series, Stainless,... | Check Latest Price |
| # | Preview | Product | |
|---|---|---|---|
| 1 |

|
Elite Gourmet Countertop Electric Burner, 1000W Cast Iron Hot Plate, 7 Heat Settings, Portable... | Check Latest Price |
Picture sleek, narrow refrigerators tucked into a slim cabinet, with a smooth finish that seamlessly blends into your cabinetry. Imagine a single-burner cooktop that slides into a countertop when not in use, and a compact dishwasher that fits under the sink. These appliances look modern, clean, and almost invisible when not in action. Their minimalist profiles maintain your kitchen’s open feel, even in tight quarters.
Choose appliances with panel-ready fronts that can be customized to match cabinets or countertops. Select models with energy-efficient ratings to save on power bills. For different styles, opt for stainless steel, matte black, or even colorful finishes to add personality. They work well in tiny homes, studio apartments, or RV kitchens, adapting effortlessly to varied setups.
Measure available spaces carefully to select appliances that fit snugly without blocking pathways or drawers. Look for models with integrated controls and minimal external hardware. Install by following manufacturer instructions, ensuring proper ventilation and electrical connections. Many slim appliances require specialized plumbing or wiring, so consider professional help if needed. Regular cleaning and maintenance keep them running efficiently in small spaces.
Add custom panels or decals to match your overall decor theme. Incorporate smart features like Wi-Fi connectivity for remote control and monitoring. Use compact storage solutions nearby for utensils, cookware, or cleaning supplies to maximize efficiency. For a personalized touch, include colorful accessories or soft-close mechanisms that add a touch of luxury.
Slimline appliances prove that big performance doesn’t require big size. They help you create a sleek, modern kitchen that feels open and uncluttered. Once you experience how much space you save, it’s hard to go back to bulky models. Upgrade your kitchen with these space-smart solutions and enjoy a more functional, stylish home.
5. Under-Cabinet Lighting for Bright, Spacious Ambiance
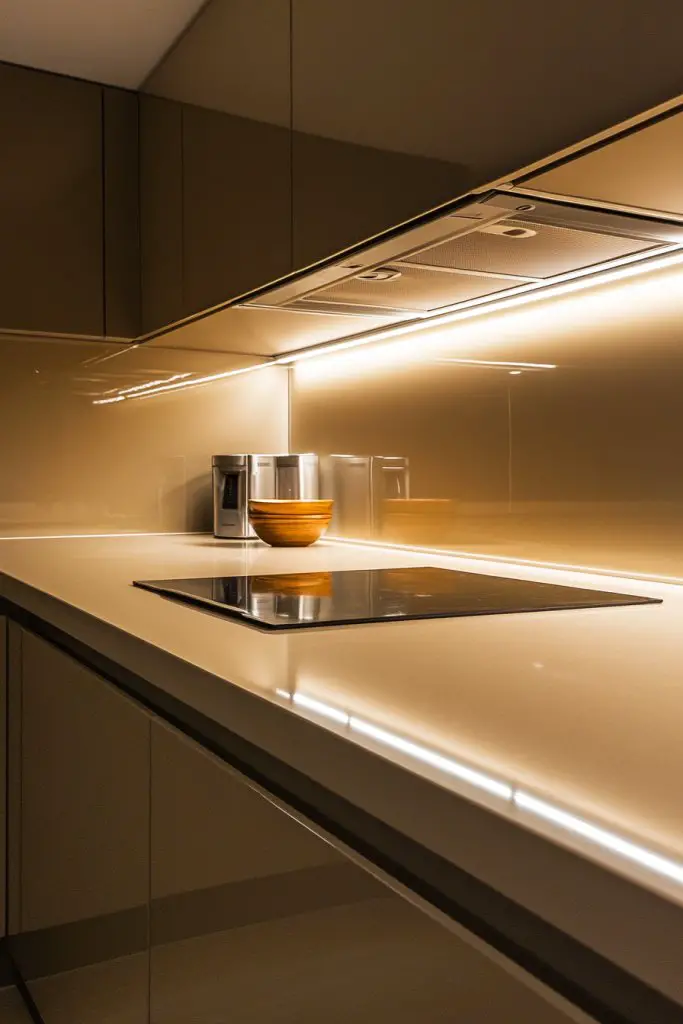
Dim lighting can turn even the most stylish kitchenette into a shadowy, uninviting space. You want a bright, welcoming atmosphere that makes cooking and cleaning easier. Under-cabinet lighting provides targeted illumination exactly where you need it, transforming your small kitchen into a luminous haven. It’s an easy upgrade with a big impact.
Recommended Products to replicate this idea
| # | Preview | Product | |
|---|---|---|---|
| 1 |
|
Govee White LED Strip Lights, Upgraded 16.4ft Dimmable LED Light Strip 6500K Bright Daylight White,... | Check Latest Price |
| # | Preview | Product | |
|---|---|---|---|
| 1 |

|
Wireless Dimmer Switch, Remote Light Switch and Receiver kit, Work with Alexa Voice Control, Smart... | Check Latest Price |
Visualize sleek LED strips tucked beneath your upper cabinets, casting a warm, even glow over your countertops. The light highlights your workspace, making chopping and prep work safer and more enjoyable. The soft glow adds a modern touch, creating a sense of depth and openness. The subtle illumination makes your kitchen look larger and more inviting, especially in evening hours or gloomy weather.
Choose from different color temperatures—from cool white to warm amber—to match your mood or decor. Install dimmable LEDs for adjustable ambiance, perfect for both cooking and relaxing. For a minimalist look, select slim, unobtrusive strips; for a more decorative approach, opt for fixtures with decorative covers. Seasonal lighting can also be added for special occasions or holidays.
Start by measuring under-cabinet space and choosing compatible LED strips or puck lights. Use adhesive backing or mounting clips for easy installation, avoiding the need for drilling. Connect to a power source, using extension cords or outlets that blend into your decor. Consider adding a dimmer switch or smart controls for remote operation. Regularly clean the fixtures to maintain brightness and efficiency.
Combine lighting with reflective surfaces like glossy backsplashes or metallic accents for extra brightness. Synchronize your lights with your smart home system for voice control or automation. Incorporate color-changing LEDs for fun or mood-specific lighting. Use diffusers or frosted covers to soften the glow and reduce glare, creating a cozy yet functional space.
Under-cabinet lighting elevates your kitchen’s style and functionality effortlessly. It’s a simple fix that makes your space feel larger and more professional. Once installed, you’ll wonder how you ever cooked without it. Brighten up your home and enjoy a more cheerful, efficient kitchen every day.
6. Corner Shelving Units for Maximized Vertical Storage
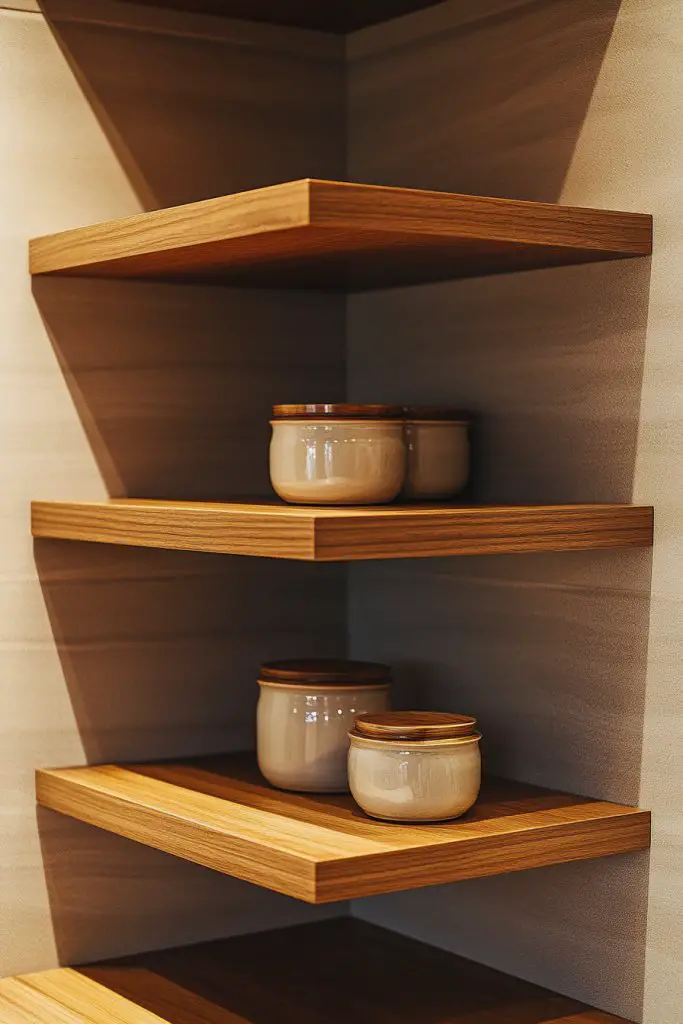
Corners in small kitchens are often wasted space, turning into awkward dead zones. You crave a way to utilize every inch without cluttering your countertops. Corner shelving units are the perfect solution, turning tricky angles into practical storage spots. They help you maximize vertical space while keeping things tidy.
Recommended Products to replicate this idea
| # | Preview | Product | |
|---|---|---|---|
| 1 |

|
Rolanstar Bookshelf 5 Tier with 4 Hooks, Reversible Corner Bookshelf, 65" Industrial Wooden Bookcase... | Check Latest Price |
| # | Preview | Product | |
|---|---|---|---|
| 1 |
|
Yalikop 10 Pack Adjustable Shelf Brackets for Double Track System Closet Organization Heavy Duty... | Check Latest Price |
Imagine a set of sleek, tiered shelves fitting snugly into a corner, holding spice jars, small appliances, or decorative containers. The open design makes everything easy to see and reach, while the vertical stacking adds visual interest. Choose materials that match your style—warm wood for a rustic look or glossy metal for a modern edge. These shelves turn an awkward corner into a focal point of organization.
Select corner shelves with adjustable heights or modular components to fit your needs. Use decorative baskets or labeled containers to keep small items organized. For seasonal updates, swap out items or add colorful liners inside baskets. Larger corner units can even include cabinets or drawers for concealed storage, ideal for less-attractive items.
Start by measuring your corner space carefully. Choose a shelving unit with a sturdy mounting system suitable for your wall material. Install brackets into studs or use heavy-duty anchors for stability. Arrange your items strategically to maximize space and accessibility. Consider adding a small lip or edge to prevent items from falling off, especially if you keep loose items or liquids.
Decorate the shelves with decorative jars, vintage tins, or small ornamental pieces that reflect your personality. Use removable adhesive hooks for hanging utensils or towels nearby. Incorporate lighting options like small puck lights underneath for better visibility. Personal touches turn functional storage into a stylish feature.
Maximizing corner space with shelving is a smart trick that boosts your kitchen’s efficiency. It proves that no space is too small or awkward when you think creatively. Once you organize your corner, you’ll appreciate every inch of your tiny kitchen. It’s a simple upgrade with a big payoff.
7. Pull-Out Pantry Shelves for Easy Access and Organization
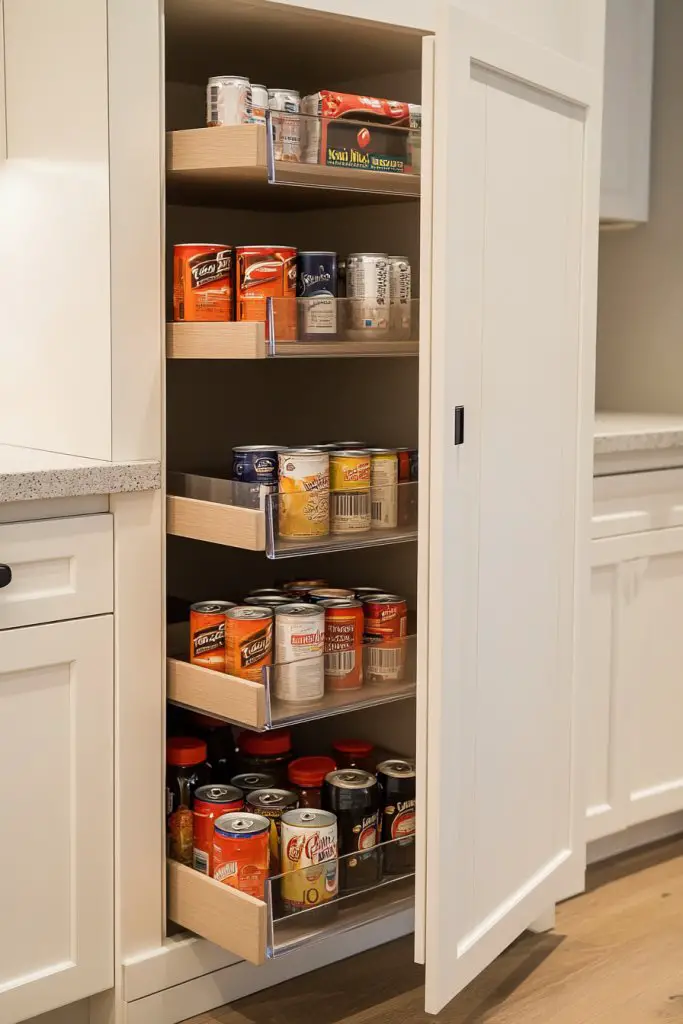
Searching for that elusive bag of rice or can of beans in a cluttered pantry is frustrating. You want quick access to all your dry goods without rummaging through layers of clutter. Pull-out pantry shelves make organization effortless, bringing everything into view at a glance. It’s a smart way to keep your small kitchen efficient and tidy.
Recommended Products to replicate this idea
| # | Preview | Product | |
|---|---|---|---|
| 1 |

|
Sintuff 4 Set Wooden Pull out Tray Cabinet Organizer Soft Close Roll out Shelves for Kitchen... | Check Latest Price |
| # | Preview | Product | |
|---|---|---|---|
| 1 |

|
Seinloes 2Pack Expandable Pull Out Cabinet Organizer 21"Deep With Raising Pad for Framed Cabinets,... | Check Latest Price |
Picture narrow, deep shelves hidden behind a cabinet door that slide out smoothly. When extended, they reveal neatly arranged cans, jars, and boxes, all visible and reachable without bending or stretching. The shiny metal or wood finish adds a sleek touch, while the organized layout makes your pantry look magazine-ready. It’s the perfect marriage of convenience and style in a tiny space.
Choose adjustable shelves to accommodate different-sized items, from tall bottles to small spice jars. Incorporate labeled containers or baskets to keep things orderly. For seasonal changes, rearrange or add dividers to sort baking supplies, snacks, or breakfast items. Use soft-close mechanisms and sturdy tracks for longevity and ease of use. Ideal for narrow spaces, these pull-outs streamline your storage without sacrificing space.
Measure your cabinet openings carefully, choosing shelves compatible with your existing cabinetry. Install high-quality slides or rails into the interior, securing into studs or solid backing. Use a level during installation to ensure smooth operation. Load shelves with your stored items, organizing by frequency of use for maximum efficiency. Regularly check for wear and tear, and clean the tracks for smooth operation.
Label each shelf or container for quick identification, or add color-coded bins for different categories. Incorporate a small step stool nearby for reaching top shelves. Use decorative liners or shelf paper to add a personal touch. Consider adding a small LED light inside the cabinet for better visibility when fully extended. Personal touches make your pantry both functional and inviting.
Pull-out shelves turn a cluttered, hard-to-access pantry into a well-organized haven. They make everyday routines smoother and less stressful. Once you see how easy it is to find what you need, you’ll wonder why you didn’t do it sooner. Small upgrades like this can dramatically improve your kitchen life.
8. Compact Dish Drying Racks that Save Counter Space

A soggy sponge and dirty dishes piling up on the counter make your tiny kitchen look cluttered and messy. You want an efficient drying solution that keeps your countertop clear and your dishes dry. Compact dish racks are designed to fit small spaces, folding or mounting away after use. They’re the unsung heroes of space-saving kitchenware.
Recommended Products to replicate this idea
| # | Preview | Product | |
|---|---|---|---|
| 1 |
|
Kitsure Dish Drying Rack for Kitchen Counter, Stainless Steel Sink Organization and Storage... | Check Latest Price |
| # | Preview | Product | |
|---|---|---|---|
| 1 |

|
Drip Pan Compatible with Drink Dispenser, 1 Pack Silicone Tray Mat for DD&HAPP Glass Drink Dispenser | Check Latest Price |
Envision a slim, foldable rack that slides out from under your sink or attaches to the wall. When in use, it holds plates, utensils, and cups, draining into a tray that can be easily emptied. After drying, it folds flat or tucks away into a drawer, freeing your surface. The clean lines and neutral materials blend seamlessly into any decor, making function look effortless. It’s a tidy solution that keeps your kitchen looking neat.
Opt for racks with adjustable arms or removable trays to fit different dish sizes and shapes. Use a color that complements your backsplash or cabinetry for a cohesive look. For added convenience, choose models with drip trays that are easy to clean or dish-washer safe. In small spaces, wall-mounted or over-the-sink racks maximize vertical space, leaving your counters free for prep.
Select a rack made from rust-proof materials such as stainless steel or silicone-coated metal. Mount it securely near your sink or on a wall with appropriate hardware, ensuring it’s level and sturdy. Consider how much capacity you need—more slots for plates, hooks for utensils, or fold-out sections for larger items. Use a level during installation to ensure even drainage and stability. Regular cleaning prevents mold and keeps everything hygienic.
Add a splash of color with silicone covers or decorative trays. Incorporate small side baskets for sponges or brushes, keeping everything organized. Use absorbent dish mats underneath for extra spill control. For a touch of personality, choose a rack with a fun shape or pattern that brings a bit of cheer to your daily routine. It’s all about making drying efficient and stylish.
A space-saving dish rack proves that practicality can be beautiful. It frees up your counter for meal prep and keeps your space looking tidy. Once you see how much room you save, you’ll appreciate the simple genius behind these compact designs. It’s a small change that makes a big difference over time.
9. Transparent Food Storage Containers for a Clean, Cohesive Look
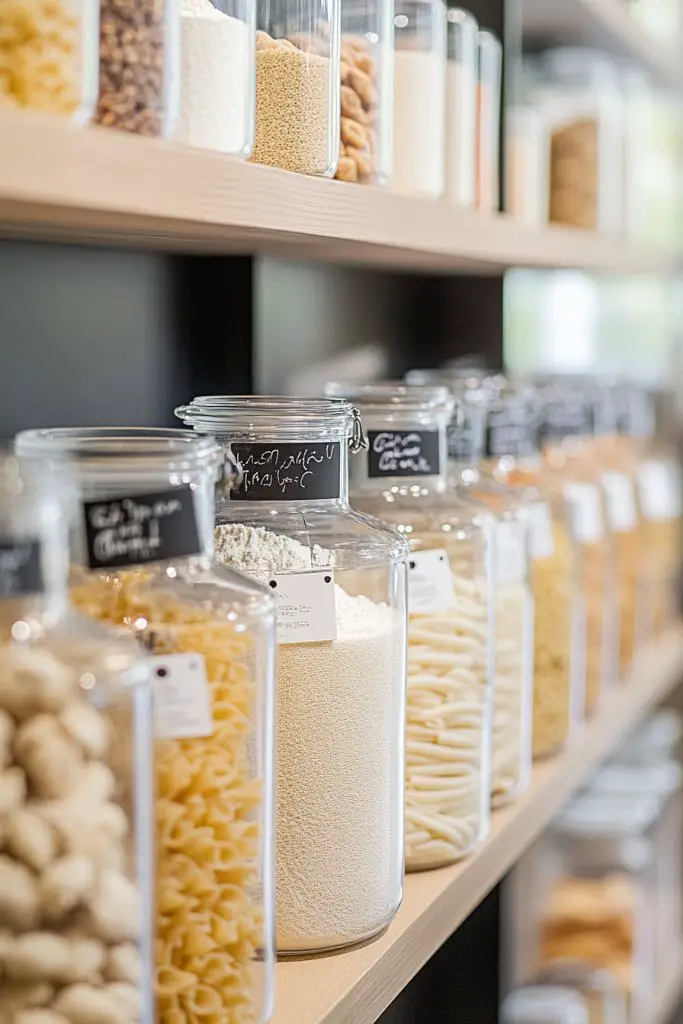
Messy, mismatched containers cluttering your pantry quickly turn cooking into a scavenger hunt. You want a uniform, organized look that makes ingredients easy to find. Clear storage containers give you instant visibility, reducing waste and frustration. They’re the secret weapon to a tidy, streamlined kitchen.
Recommended Products to replicate this idea
| # | Preview | Product | |
|---|---|---|---|
| 1 |

|
8 Pack Borosilicate Glass Food Storage Containers with Lids, Glass Meal Prep Containers, Airtight... | Check Latest Price |
| # | Preview | Product | |
|---|---|---|---|
| 1 |

|
Glad GladWare Medium Rectangle Food Storage Containers with Lids, Airtight Leak-Resistant Plastic... | Check Latest Price |
Imagine a row of uniform glass or BPA-free plastic jars filled with flour, sugar, pasta, and snacks. The transparent design allows you to see exactly what’s inside at a glance, saving you time during busy mornings. Labels or chalkboard tags add a personal touch, while matching containers create a clean aesthetic. The consistent look makes your kitchen feel organized, calm, and inviting.
Use different sizes for various ingredients—small for spices, large for grains. Incorporate stackable or modular designs for maximum space efficiency. For seasonal baking or cooking, swap out labels or add decorative touches like patterned tapes. Choose airtight lids for freshness and durability, and consider storage options that fit your cabinetry or open shelving.
Select containers made from durable, dishwasher-safe materials suitable for everyday use. Organize by frequency or type of ingredient, placing frequently used items at the front. Label each jar clearly with a chalk marker or printable labels for easy identification. Arrange containers in your pantry or on open shelves to create a cohesive look. Regularly check for expired or stale items and clean the containers for hygiene.
Decorate containers with colorful lids or personalized labels that reflect your style. Add small scoops or measuring spoons to make cooking easier. Mix and match textures—glass with bamboo lids or matte finishes—for visual interest. Use decorative shelf liners or trays underneath for added style and protection.
Clear food storage containers turn chaos into calm, making your kitchen more functional and beautiful. They help you reduce waste by keeping track of what you have. Once organized this way, cooking becomes less stressful and more enjoyable. It’s a simple upgrade that boosts your kitchen’s aesthetic and efficiency.
10. Magnetic Knife Strips and Spice Racks for Minimal Clutter
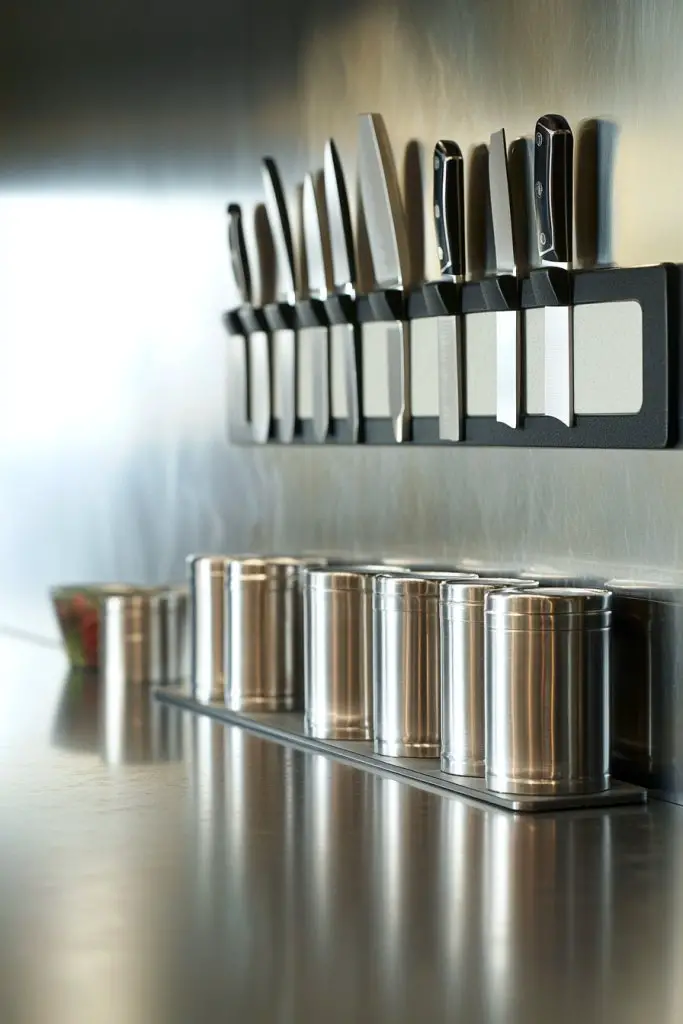
Counter space is precious, especially when every inch is needed for prep and presentation. Cluttering your counters with knives and spice jars not only looks messy but also hampers your workflow. Magnetic strips and spice racks mounted on walls free up space and keep essentials at your fingertips. It’s the sleek, clutter-free solution every tiny kitchen needs.
Recommended Products to replicate this idea
| # | Preview | Product | |
|---|---|---|---|
| 1 |

|
HOSHANHO Magnetic Knife Strips, Magnetic Knife Holder for Wall 16 Inch, Acacia Wood Knife Magnetic... | Check Latest Price |
| # | Preview | Product | |
|---|---|---|---|
| 1 |

|
AOZITA Spice Rack Organizer for Cabinet, Spice Organizer with 28 Empty Spice Jars with Black Lids,... | Check Latest Price |
Visualize a long magnetic strip mounted just above your countertop, holding knives securely in place. Nearby, a slim spice rack with metal containers displays your herbs and seasonings in a neat row. The combination creates a modern, efficient workspace, with everything you need within arm’s reach. The metallic finishes and minimalist design add a touch of industrial chic, turning functional storage into a decor statement.
Choose magnetic strips with a sleek finish—stainless steel, painted metal, or even wood-backed options—to match your style. Spice racks can be open or enclosed, with clear labels for quick identification. For a more decorative look, combine different sizes or colors of spice containers. Adjust the placement to suit your cooking habits, whether near the stove or prep area.
Securely mount the strips into wall studs or anchors, ensuring they can hold the weight of your knives and jars. Choose a location that’s easily accessible but out of reach of children. Arrange knives with blades pointing down or to the side for safety. For spice racks, install at eye level for quick grabbing. Clean surfaces regularly to prevent buildup of grease or dust that can interfere with adhesion.
Use labeled spice jars with colorful caps or decorative patterns for a personalized touch. Add small hooks or clips for utensils or measuring spoons. Incorporate a magnetic strip with LED lighting for better visibility during cooking. Personalize your setup by arranging items in order of usage frequency or color scheme—whatever makes your kitchen feel more YOURS.
Wall-mounted magnetic storage proves that less is more, creating a streamlined, safe, and stylish kitchen environment. It boosts efficiency and adds a modern touch, making cooking a pleasure rather than a chore. Once you see how organized and accessible everything becomes, you’ll wonder why you didn’t do it sooner. Embrace wall storage for a clutter-free, functional space.
11. Fold-Over Work Surfaces for Instant Additional Counter Space
Limited counter space makes meal prep feel cramped and chaotic. You need a solution that provides extra surface area on demand, without permanently sacrificing space. Fold-over work surfaces give you flexible, instant extra counter space when you need it most. It’s a simple trick that transforms tight kitchens into more functional zones.
Recommended Products to replicate this idea
| # | Preview | Product | |
|---|---|---|---|
| 1 |

|
Neoaider Upgrade Wall Mounted Folding Table 31.5”L x 15.7”W, Laundry Folding Table with Heavy... | Check Latest Price |
| # | Preview | Product | |
|---|---|---|---|
| 1 |

|
Foepoge 27.9”x20” Extra Large Silicone Sheet for Crafts, Nonstick Silicon Mat for Resin, Epoxy... | Check Latest Price |
Picture a sleek panel mounted on the wall that folds down easily, revealing a sturdy workspace. When not in use, it folds back up, flush with the wall, keeping your kitchen uncluttered. The surface material can be wood, laminate, or even a durable plastic, ready for chopping or plating. The clean, minimalist look adds a modern touch while offering practical utility when needed.
Choose a fold-over surface that complements your decor—bright colors for a playful vibe or neutral tones for a sleek, modern look. For seasonal or special occasion use, select surfaces that are easy to clean or resistant to stains. Larger kitchens can incorporate multiple fold-down surfaces for different tasks, while small spaces benefit from a single, fold-out prep station. They can be mounted at different heights for ergonomic comfort.
Start by selecting a sturdy wall with enough clearance when the surface is folded down. Use high-quality hinges and brackets designed for frequent use. Install the mechanism securely into studs or solid backing, ensuring smooth operation. Choose a durable, easy-to-clean surface material. When in use, place your utensils, cutting boards, or ingredients on the surface; fold it away after, keeping your space tidy.
Add a decorative edge or trim to the fold-over panel for a polished look. Incorporate a small lip or guardrail to prevent items from falling off. Personalize with a colorful or patterned surface for a pop of personality. Use magnetic strips or hooks nearby for utensils and tools, creating a compact, organized station. Seasonal accessories like a fabric cover or removable decals can also add a fun touch.
Fold-over work surfaces turn tiny kitchens into efficient spaces, proving that clever design can do wonders. They expand your workspace without sacrificing style or storage. Once you experience the convenience, you’ll wonder how you managed before. It’s a simple upgrade that makes everyday cooking easier and more enjoyable.
12. Use of Light Colors and Reflective Surfaces to Create an Illusion of Space
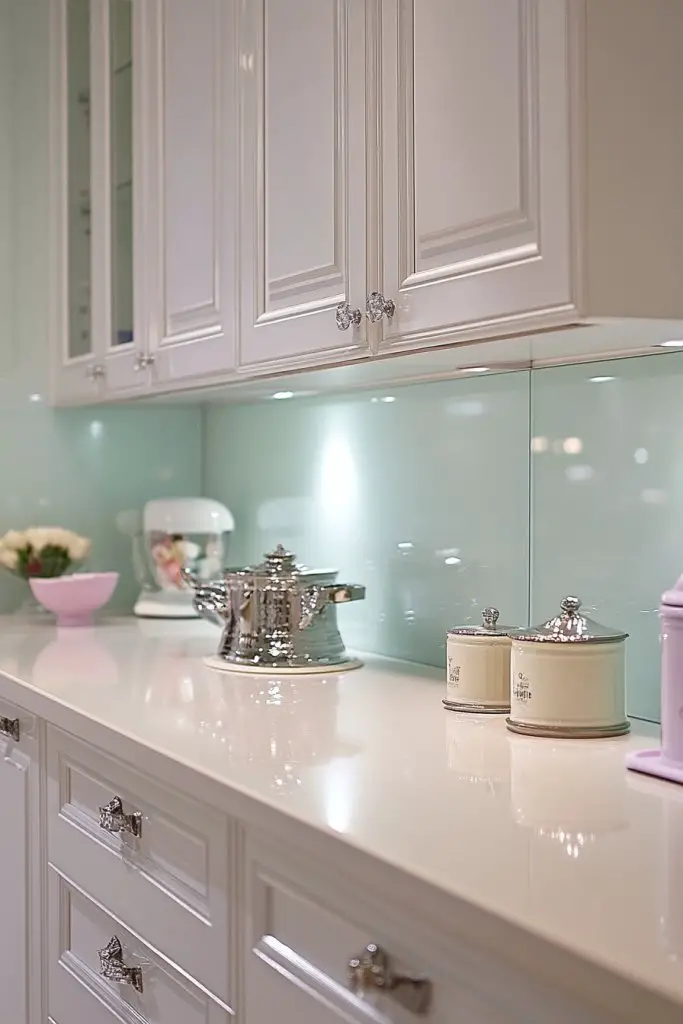
Dark, cramped kitchens can make cooking feel like a chore rather than a joy. You want your small space to feel open, airy, and welcoming. Light colors and reflective surfaces are the secret ingredients to visually expanding your kitchenette. They make the room feel larger and brighter without any major renovation.
Recommended Products to replicate this idea
| # | Preview | Product | |
|---|---|---|---|
| 1 |
|
Cinnvoice 2 Pcs Pine Kitchen Cabinet Door Replacement with 4 Pcs Cabinet Hinges Wood Shaker Door... | Check Latest Price |
| # | Preview | Product | |
|---|---|---|---|
| 1 |

|
Vamos Tile Glossy Dolomite White Backsplash Tile Peel and Stick, 12.8 x 12.8 Inch 10 Sheets Long... | Check Latest Price |
Imagine crisp white cabinets paired with a glossy backsplash that reflects light across the room. Light-colored countertops, like soft creams or gentle pastels, bounce daylight and artificial light alike. The combination creates a seamless, spacious feel, while minimalistic hardware keeps the look sleek. The reflective surfaces add depth, making your space appear larger than it really is.
Choose neutral tones such as white, beige, or pastel shades for cabinetry and walls. Incorporate high-gloss or semi-gloss finishes on cabinets and backsplashes to maximize reflectivity. Mix textures carefully—matte walls with glossy surfaces—to add dimension without clutter. These techniques work well in all seasons, brightening even the gloomiest days.
Select light-colored paints or finishes that are resistant to stains and easy to clean. Use reflective materials like glass, polished metal, or acrylic for backsplashes and countertops. Keep the decor minimal, avoiding heavy patterns or dark accents that can absorb light. Incorporate ample lighting—LEDs, under-cabinet lights, or skylights—to enhance brightness. Regular cleaning of reflective surfaces ensures they maintain their luminous effect.
Add textured textiles like a soft cream throw blanket with chunky knit texture or a plush rug to soften the space. Use decorative metallic or mirrored accessories sparingly for extra shine. Incorporate open shelving with light-colored dishware or containers that reflect light. Seasonal tweaks, like bright curtains or colorful accessories, can refresh the space without overwhelming the minimalist aesthetic.
Using light colors and reflective surfaces is a proven way to make small kitchens feel expansive and fresh. It’s an affordable, simple trick that transforms the mood and appearance of your space. Once you embrace this approach, you’ll see your tiny kitchen in a whole new light—literally. Bright, open, and inviting is the way to go!
13. Small-Scale Modular Units for Flexible Arrangement
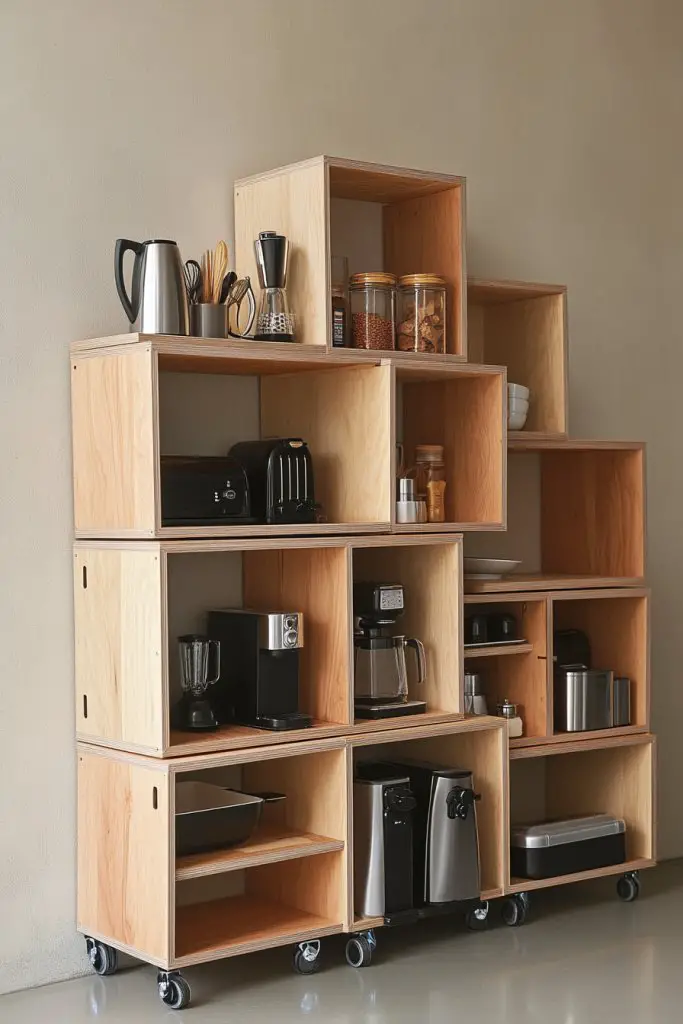
Tired of fixed furniture that doesn’t fit your evolving needs? Small-scale modular units offer endless flexibility for tiny kitchens. You can reconfigure, expand, or downsize as your lifestyle changes. They provide a customizable solution that adapts to your space and routines, making your kitchen truly yours.
Recommended Products to replicate this idea
| # | Preview | Product | |
|---|---|---|---|
| 1 |

|
AWTATOS Cube Storage Organizer, Storage Cubes Shelves Bookshelf, 6 Cube Closet Organizers and... | Check Latest Price |
| # | Preview | Product | |
|---|---|---|---|
| 1 |
|
FDW 48"L×18"W×82"H Wire Shelving Unit Storage Cart Metal Shelf Rolling Utility Cart 2100Lbs... | Check Latest Price |
Visualize stackable cubes or lightweight shelves that can be arranged in various patterns—L-shape, straight line, or clustered. Made from wood, metal, or plastic, these units can hold appliances, utensils, or pantry items. You can add wheels for mobility or combine open and closed sections for a balanced look. The modular design creates a dynamic, personalized space that evolves with you.
Choose units with different sizes, shapes, or colors to match your decor. Incorporate drawers, baskets, or open shelves depending on your storage needs. Use modular pieces to create a breakfast nook, extra prep area, or a mini pantry. Seasonal rearrangements or updates are simple—just swap or add modules. They’re perfect for renters or those who like to experiment with their layout.
Identify your storage needs and select modular units accordingly. Securely assemble or connect units using brackets, clips, or stacking systems. Position them to optimize workflow and space flow, avoiding obstructions. Use lightweight materials for easy rearrangement, and consider adding casters for mobility. Keep frequently used items within reach, and store less-used items higher or in the back.
Decorate with colorful containers, patterned fabrics, or decorative handles to match your style. Mix and match materials for visual interest—wood with metal, or transparent acrylic with opaque finishes. Add labels or small plants on top of your modules for personal flair. Seasonal accents, like festive covers or themed accessories, can refresh your setup.
Modular units turn your small kitchen into a flexible, fun space that adapts as you do. They boost your creativity in organizing and decorating. Once you get used to reconfiguring, you’ll see your space as a canvas for endless possibilities. Embrace modularity for a more dynamic, functional home.
14. Stackable Cookware and Nested Storage for Space Efficiency
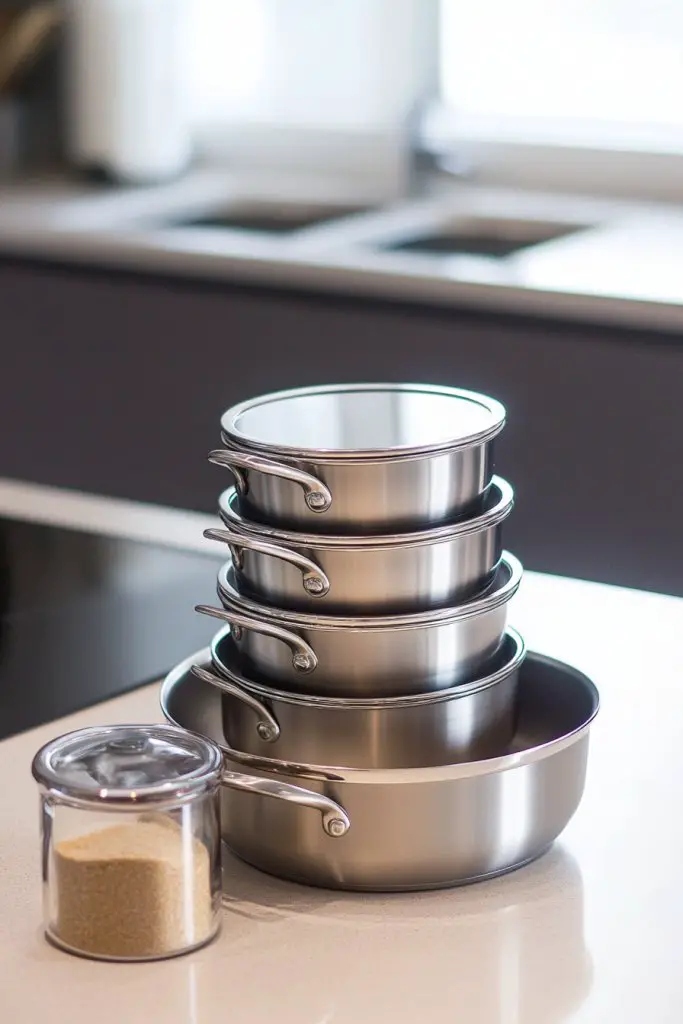
Cluttered cabinets with mismatched pots and pans make cooking frustrating and storage inefficient. You want a smarter way to keep cookware organized and accessible without wasting space. Stackable and nested storage solutions streamline your kitchen, freeing up room for other essentials. It’s the space-saving secret every small kitchen needs.
Recommended Products to replicate this idea
| # | Preview | Product | |
|---|---|---|---|
| 1 |

|
Astercook Non Stick RV Pots and Pans Ceramic Kitchen Cookware Set with Detachable/Removable Handle,... | Check Latest Price |
| # | Preview | Product | |
|---|---|---|---|
| 1 |

|
40 Piece Food Storage Containers with Lids(20 Containers & 20 Lids), BPA-Free Plastic Food... | Check Latest Price |
Imagine a set of lightweight, stackable pots and pans that nest inside each other, dramatically reducing their footprint. Color-coded or matching lids stack neatly on top, creating a tidy, uniform look. The sleek, minimalist design ensures everything is accessible without clutter. This organized arrangement turns chaos into order, making your kitchen look and feel more spacious.
Choose nesting cookware with easy-to-grip handles or stackable lids that seal tightly. Use silicone or fabric separators to prevent scratches and keep everything organized. For a decorative touch, select sets in complementary colors or finishes. These solutions work well in open shelving, drawers, or small cabinets, adapting to your storage preferences.
Arrange your pots and pans by size, nesting smaller items inside larger ones. Store lids separately or stack them with their matching cookware. Use drawer dividers or shelf organizers to keep everything stable. Regularly clean and inspect for damage or rust, replacing worn pieces. Label storage areas or add color tags for quick identification, especially if you own many pieces.
Add decorative touches like patterned silicone grips or colorful handles. Incorporate a small rack or hook for frequently used pots near your stove. Use matching storage containers or liners to create a cohesive look. Seasonally, switch out handles or add fun accessories that match your kitchen’s theme. Personal touches make your cookware storage both functional and stylish.
Nested cookware solutions make your small kitchen look more organized and professional. They reduce clutter and improve your cooking efficiency. Once you see how little space you need, you’ll wonder why you didn’t do it sooner. It’s a small change that makes a big difference in your daily routine.
15. Creative Use of Under-Window Space for Additional Storage
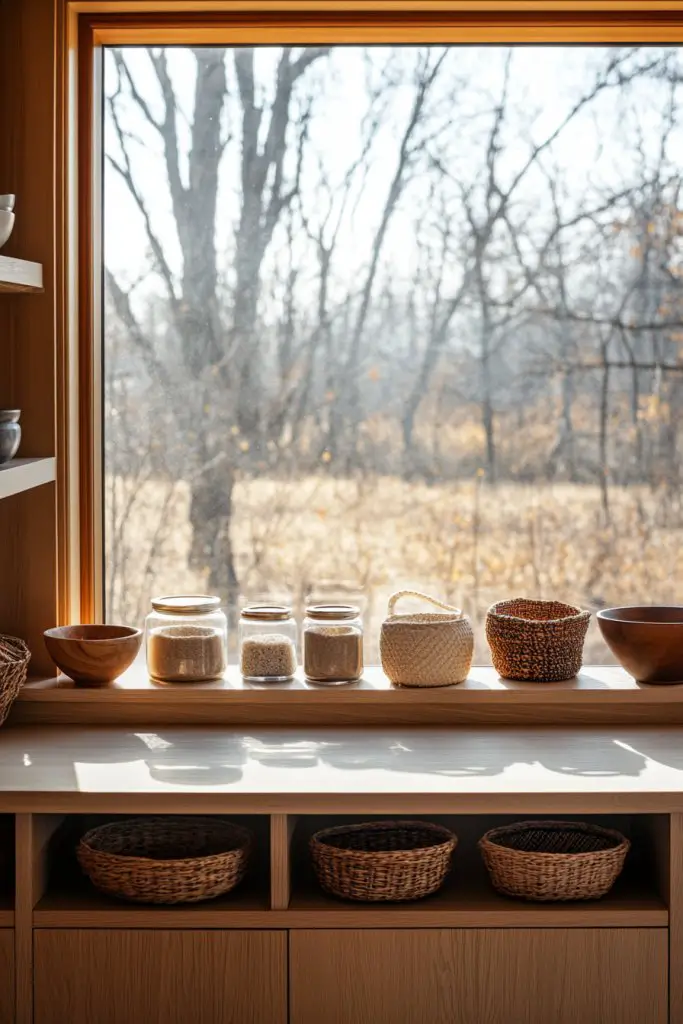
That awkward space beneath your window often goes unused, turning into a clutter magnet. You want to maximize every inch of your small kitchen, especially vertical zones that can handle storage or display. Under-window storage solutions turn this space into a functional area for shelves, cabinets, or display units. It’s a clever way to add storage without crowding your main workspace.
Recommended Products to replicate this idea
| # | Preview | Product | |
|---|---|---|---|
| 1 |
|
BAYKA Floating Shelves for Wall, Wall Mounted Rustic Wood Shelves for Bathroom, Bedroom, Living... | Check Latest Price |
| # | Preview | Product | |
|---|---|---|---|
| 1 |

|
Anchor Hocking Heritage Hill 1 Gallon Glass Jar with Lid, Set of 2 | Check Latest Price |
Imagine a low cabinet or floating shelves installed beneath your window, filled with neatly arranged jars, small baskets, or decorative items. The natural light highlights these storage pieces, creating a cozy, inviting nook. You can place a small herb garden here, or display decorative bowls and utensils. The visual balance between function and aesthetics makes your kitchen more welcoming and organized.
Use open shelving for easy access or closed cabinets for hiding clutter. Choose materials that withstand humidity and sunlight, like painted wood, laminate, or sealed MDF. Add decorative touches like colorful liners or patterned wallpaper inside cabinets for a personalized look. Seasonal or themed accessories can be swapped easily to keep the space fresh.
Measure the available space carefully, considering window sill height and width. Install cabinets or shelves securely into wall studs, ensuring stability and safety. Choose moisture-resistant materials if the window faces direct sunlight or humidity. Organize stored items by frequency of use, with everyday essentials at eye level. Regularly clean and inspect for dust or damage, especially if using open shelving.
Decorate with colorful containers or decorative trims that complement your decor. Incorporate small hooks or clips for hanging utensils or tea towels. Use removable wallpaper or peel-and-stick decals inside cabinets for a personal touch. Seasonal arrangements like fairy lights or decorative plates can also add charm.
Utilizing under-window space proves that small details can make a big difference. It transforms an overlooked area into a stylish, practical feature. Once organized, you’ll appreciate how every inch contributes to a more functional kitchen. It’s a simple, effective upgrade that boosts your space’s vibe and utility.
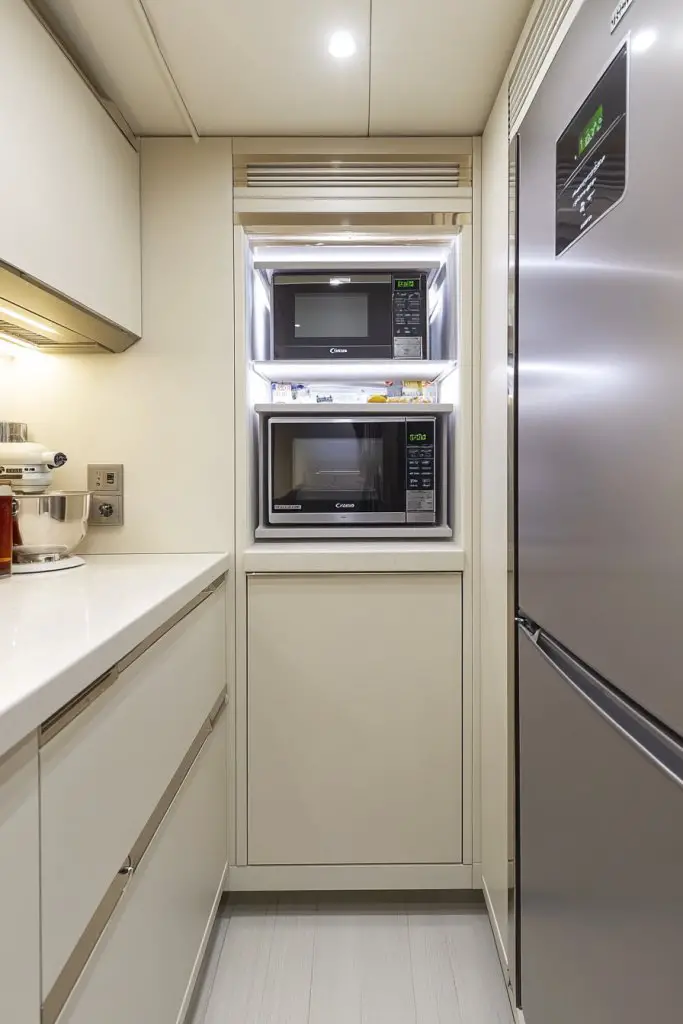
16. Minimalist Design with Hidden Appliances for a Sleek Look
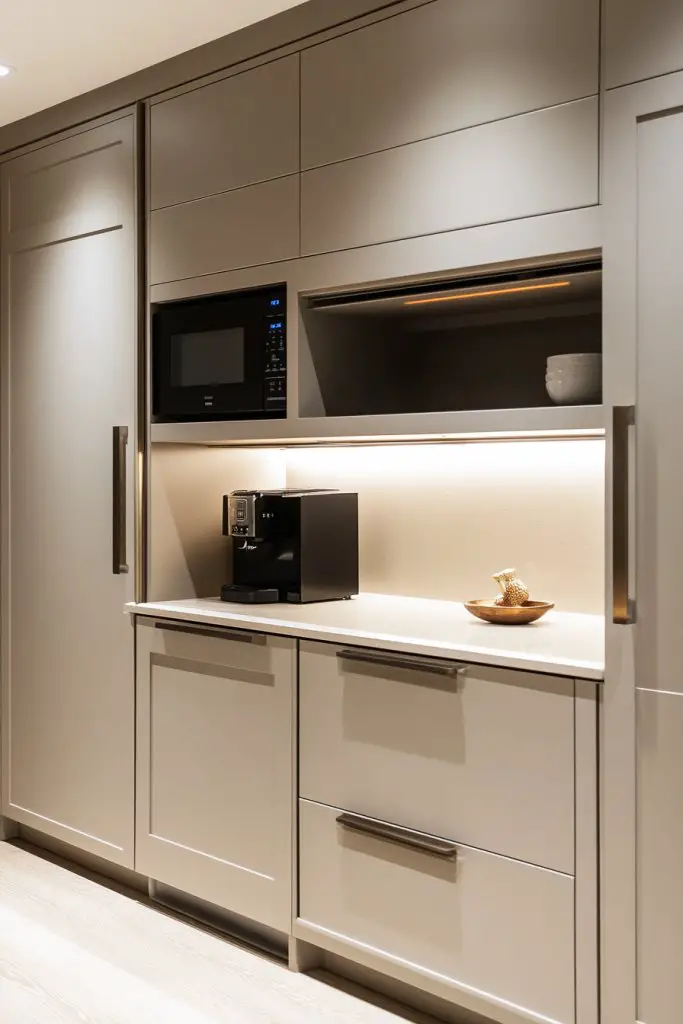
A cluttered countertop full of appliances makes even the tiniest kitchen look chaotic. You want a sleek, minimalist aesthetic that hides the mess and maximizes your workspace. Hidden appliances behind cabinetry or integrated panels create a clean, modern look. It’s all about making your small kitchen feel spacious and stylish.
Recommended Products to replicate this idea
| # | Preview | Product | |
|---|---|---|---|
| 1 |

|
SHARP SMD2470ASY Microwave Drawer Oven, 24-inch, 1.2 Cubic Feet, 950 Watt, Concealed Control Panel... | Check Latest Price |
| # | Preview | Product | |
|---|---|---|---|
| 1 |

|
Kenmore 24" Premium Hybrid Tub Dishwasher - UltraWash, MoreSpace Adjustable Rack, High Temp &... | Check Latest Price |
Picture a seamless wall of cabinetry with built-in microwave, coffee maker, and dishwasher concealed behind panel-ready fronts. When closed, the entire surface looks smooth and uncluttered, with no visible tech or cords. Only when needed do appliances reveal themselves, blending seamlessly into your decor. The overall effect is sophisticated, minimalist, and uncluttered.
Select panel-ready appliances that match your cabinetry finish—be it matte black, wood veneer, or glossy white. Use handleless doors and push-to-open mechanisms for a streamlined appearance. Incorporate hidden drawers or compartments for small gadgets, cords, or cleaning supplies. This approach works in both modern and Scandinavian-inspired kitchens, adaptable to your style.
Plan your cabinetry layout carefully, allowing space for built-in appliances. Install panel-ready units with compatible dimensions, and use high-quality hinges and hardware for a seamless finish. Conceal cords and connections behind panels or inside cabinetry. Regularly clean and maintain to keep the concealed appliances in top shape. Ensure easy access for maintenance without compromising the sleek look.
Add soft-close mechanisms and integrated lighting inside cabinets to enhance functionality. Personalize with handles or trims that reflect your style—brushed metal, wood accents, or matte finishes. Incorporate small, hidden storage drawers for utensils or spices. Seasonal updates like new hardware or subtle trims can refresh the aesthetic periodically.
Embedding appliances creates a clutter-free, modern space that impresses guests and simplifies daily routines. It shows that minimalism isn’t just a trend but a practical way to organize small spaces. Once you master hidden storage, your kitchen transforms into a sleek sanctuary of efficiency. Embrace the clean, uncluttered aesthetic for a more peaceful home environment.
17. Portable Islands or Trolley Carts for Flexible Workspace

Fixed kitchen islands often dominate small spaces, making movement difficult. You crave a flexible, versatile workspace that you can move or store away when not in use. Portable islands or trolley carts provide instant extra surface area and storage, adaptable to your needs and mood. It’s the ultimate in portable functionality.
Recommended Products to replicate this idea
| # | Preview | Product | |
|---|---|---|---|
| 1 |

|
ThreeHio Rolling Kitchen Microwave Cart, 3 Tier Microwave Table Stand with Storage, Kitchen Utility... | Check Latest Price |
| # | Preview | Product | |
|---|---|---|---|
| 1 |

|
5FT Butcher Block Countertop Birch Solid Wood - 60" x 25" Table Top Butcher Block Cutting Board for... | Check Latest Price |
Picture a sturdy trolley with wheels, topped with a butcher block or stainless steel surface, holding cutting boards, bowls, or small appliances. When not needed, it can be rolled into a closet or against a wall, freeing up space. During meal prep, it becomes a mobile station that you can position anywhere—near the stove, sink, or dining area. Its sleek design and practical mobility add a dynamic element to your kitchen.
Choose models with multiple shelves, drawers, or hooks for extra storage. Select materials that match your decor—natural wood for warmth, metal for industrial style, or plastic for lightweight ease. Use color accents or decorative handles to personalize. For seasonal events or parties, move it to serve as a buffet station or extra serving area.
Pick a trolley with sturdy wheels that lock for stability. Measure your space to ensure it fits comfortably when moved or stored. Assemble according to instructions, securing all shelves and handles. Use it to hold frequently used items or serve as a prep station during busy cooking days. Regularly check wheels and surfaces for wear and tear to keep it smooth and functional.
Decorate with a colorful tablecloth or a decorative tray on top. Attach small hooks or clips for utensils or towels. Use labels or tags to organize stored items, adding a personal touch. Seasonal or themed accessories like fairy lights or decorative bows can make it more festive. Personalization keeps this feature fun and functional.
Portable islands and carts turn your kitchen into a flexible, multi-use space that adapts to your lifestyle. They prove that mobility can save space and add convenience. Once you experience how easy it is to move your workspace, you’ll wonder how you cooked without it. Embrace this mobility for a more dynamic kitchen experience.
18. Hidden Storage in Stair-Step or Layered Cabinetry

Cluttered cabinets and cluttered countertops make tiny kitchens feel overwhelming. You want hidden storage solutions that keep your space tidy and visually clean. Stair-step or layered cabinetry creates secret compartments and maximizes vertical space. It’s a clever way to hide clutter and keep essentials out of sight.
Recommended Products to replicate this idea
| # | Preview | Product | |
|---|---|---|---|
| 1 |
|
Ravinte 30 Pack | 5 Inch Cabinet Pulls Matte Black Stainless Steel Kitchen Drawer Pulls Cabinet... | Check Latest Price |
| # | Preview | Product | |
|---|---|---|---|
| 1 |
|
Seinloes 2Pack Expandable Pull Out Cabinet Organizer 21"Deep With Raising Pad for Framed Cabinets,... | Check Latest Price |
Visualize a set of cabinets arranged in a stair-step pattern, with some doors opening to reveal hidden drawers or pull-out shelves. The layered design adds visual interest while concealing less attractive items. The sleek, integrated handles and smooth finishes maintain a minimalist aesthetic. Behind closed doors, clutter disappears, revealing a calm, organized environment.
Use a mix of open shelves and concealed cabinets to suit your storage needs. Incorporate soft-close hinges and custom dividers for better organization. For a more decorative look, choose cabinetry with subtle trims or contrasting finishes. Seasonal or special-purpose storage can be hidden in upper or lower layers, freeing up prime space for everyday essentials.
Plan your cabinetry layout to include layered compartments that suit your storage requirements. Install with high-quality hardware, ensuring smooth operation and durability. Use soft-close hinges and full-extension slides for easy access. Organize items into labeled bins or trays inside the hidden compartments to maximize efficiency. Regularly inspect and maintain the mechanisms for longevity.
Add decorative trims, hardware, or paint finishes to match your decor. Use inside storage with removable dividers or baskets for better organization. Incorporate LED lighting inside concealed cabinets for visibility. Personalize with handles or knobs in unique styles or finishes—brushed nickel, matte black, or antique brass—adding a custom touch.
Hidden storage in layered cabinetry proves that small spaces can be both beautiful and highly functional. It keeps clutter out of sight and your kitchen looking sleek. Once you master this technique, you’ll find your space more manageable and inspiring. It’s a smart upgrade that transforms your tiny kitchen into a well-organized retreat.
19. Use of Clear Glass Front Cabinets to Showcase and Organize
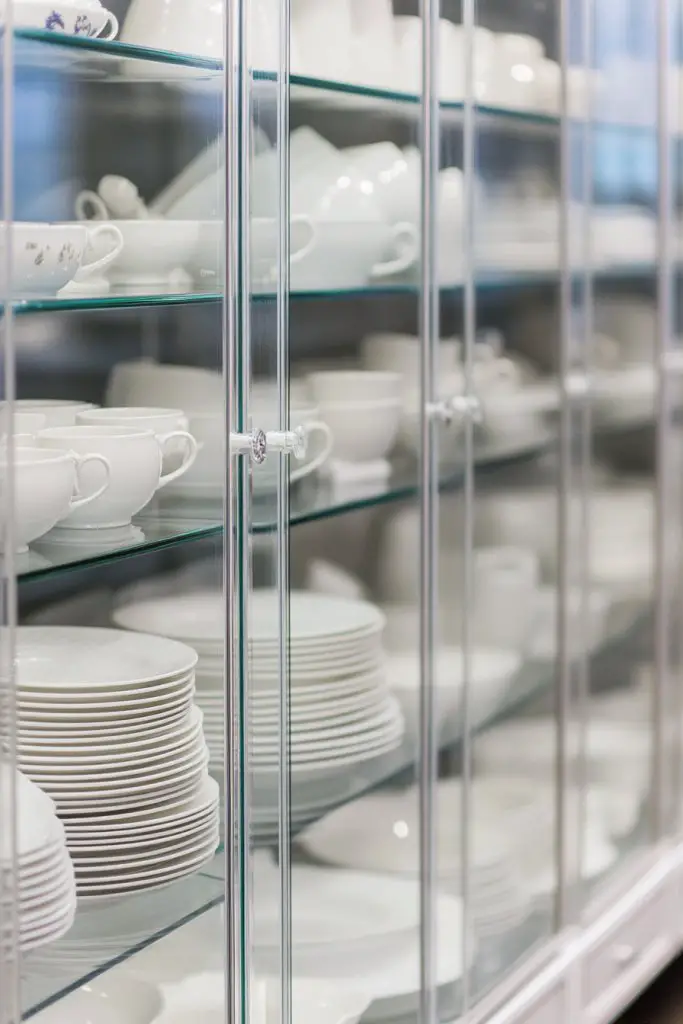
Mismatched dishware and cluttered cabinets make your small kitchen look chaotic. You want an organized display that also makes everything easy to find. Glass-front cabinets showcase your dishware while keeping clutter contained. They add a touch of elegance and openness, making your tiny space feel more expansive.
Recommended Products to replicate this idea
| # | Preview | Product | |
|---|---|---|---|
| 1 |

|
UNICOLY Display Cabinet with Glass Doors, Glass Display Cabinet 4-Tier, Metal Curio Display Cabinet... | Check Latest Price |
| # | Preview | Product | |
|---|---|---|---|
| 1 |

|
Gibson Home Oslo Porcelain Chip and Scratch Resistant Dinnerware Set, Service for 4 (16pcs), Ceramic... | Check Latest Price |
Imagine a row of glass-front cabinets filled with neatly arranged plates, bowls, and cups. The transparent doors allow you to see everything at a glance, reducing search time. The uniformity of dishware and accessories creates a cohesive, styled look while adding depth to your space. The light passing through enhances the room’s brightness and charm.
Choose clear glass with different frame finishes—white, black, or metallic—to match your decor. Incorporate decorative dishware or colorful accents inside for seasonal updates. Use interior lighting or under-cabinet LEDs to highlight the display. Mix open shelving and glass cabinets for visual interest, balancing practicality with style.
Install glass-front cabinets into your existing cabinetry framework, ensuring proper sealing and hardware. Arrange your dishware by size and color for aesthetic appeal. Keep frequently used items at eye level for convenience. Regularly clean glass surfaces to maintain clarity and shine. Use labels or decorative trays inside for better organization.
Decorate the interior with patterned or colored dishware for seasonal flair. Add small LED lights inside cabinets for a dramatic effect. Incorporate decorative trims or handles that match your overall style. Personal touches like unique cups or vintage dishware can turn your cabinets into a showcase of personality.
Glass-front cabinets elevate your kitchen’s style and organization, proving that function can be beautiful. They make your space look more open and curated, even in a small footprint. Once you start showcasing your dishware, you’ll feel more proud and inspired to cook and entertain. It’s a simple upgrade with stunning results.
20. Smart Use of Overhead Space with Hanging Pot Racks and Baskets
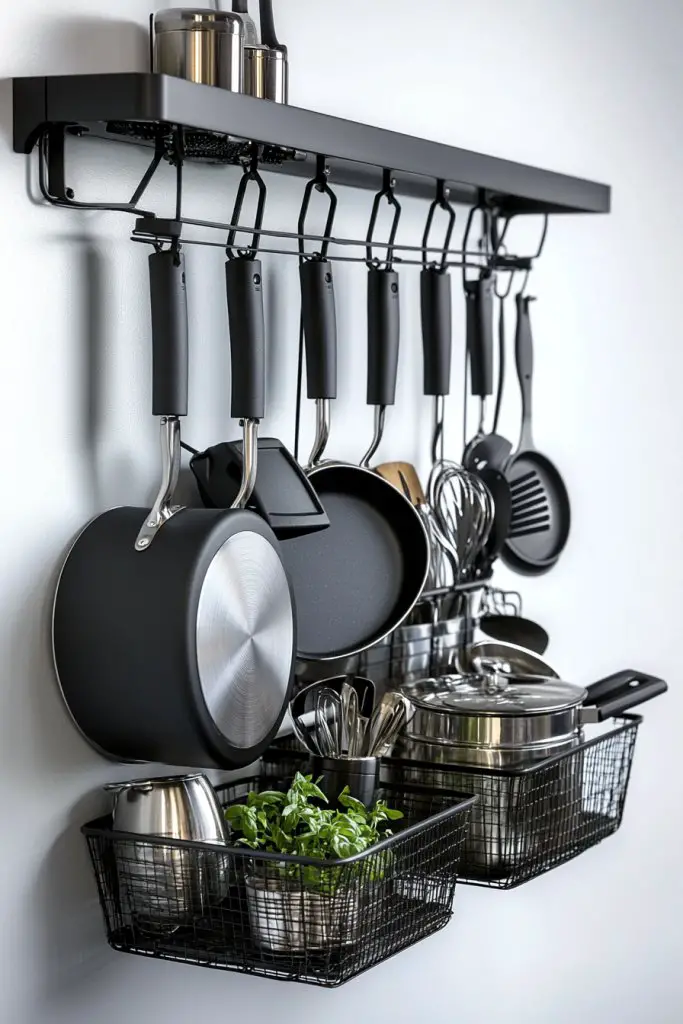
Counter space is at a premium, and cluttered stovetops or prep areas make cooking less enjoyable. You want a way to store pots, pans, and utensils overhead, freeing up your limited workspace. Hanging pot racks and baskets are the perfect solution—functional, decorative, and space-efficient. It’s a small upgrade with a big impact.
Recommended Products to replicate this idea
| # | Preview | Product | |
|---|---|---|---|
| 1 |

|
KES 48 Inch Large Hanging Pot Rack Ceiling Mount with 130lb High-Capacity, Ceiling Pot and Pan... | Check Latest Price |
| # | Preview | Product | |
|---|---|---|---|
| 1 |
![Joben Oligey 3 Set [Extra Large] Hanging Wall Baskets ,Wire Basket For Storage Pantry, Farmhouse Food Storage Kitchen Pantry Laundry Closet Garage RV ,Black](https://m.media-amazon.com/images/I/51Dr1ysZVEL._SL160_.jpg)
|
Joben Oligey 3 Set [Extra Large] Hanging Wall Baskets ,Wire Basket For Storage Pantry, Farmhouse... | Check Latest Price |
Picture a sleek metal rack suspended from the ceiling or mounted to the wall, holding a variety of pots, pans, and utensils. The open design adds an industrial-chic vibe, while keeping your cookware within easy reach. Adjacent baskets hold lids, small tools, or even herbs, turning your overhead space into a stylish storage zone. The visual clutter is replaced with neat, accessible organization.
Choose racks with adjustable hooks or multiple tiers to hold different sizes. Use decorative hooks or finishes that match your decor—brushed nickel, matte black, or vintage bronze. Incorporate baskets for lids, spices, or utensils, which can be swapped seasonally. Mount the rack at the right height for maximum accessibility and safety.
Securely install the rack into ceiling joists or wall anchors, ensuring it can support the weight of your cookware. Organize items by frequency of use, with everyday pots at the front. Use sturdy hooks and baskets that are easy to remove and clean. Regularly inspect for stability and rust, replacing worn hardware as needed. Keep the area underneath clear for safety and ease of movement.
Decorate the rack with decorative handles or colored hooks for a personal touch. Add small hanging utensils or decorative elements like vintage spatulas or patterned towels. Incorporate lighting underneath for better visibility during evening cooking. Coordinate your cookware with your overall decor theme for a cohesive, stylish look.
Overhead pot racks prove that smart, accessible storage can elevate your entire kitchen aesthetic. They free up space and add a decorative industrial or rustic charm. Once you see how organized and efficient your kitchen becomes, you’ll be inspired to keep improving your space. It’s a small change with a big payoff.
Conclusion
From smart storage hacks to stylish design touches, these kitchenette ideas demonstrate that small spaces can be both functional and beautiful. Don’t hesitate to experiment and personalize these concepts to suit your lifestyle and taste. Embrace the challenge of small-scale design and transform your kitchenette into a charming, efficient space that you’ll love to cook and entertain in.
Last update on 2026-03-03 / Affiliate links / Images from Amazon Product Advertising API