
23 Photo Wall Collage Bedroom Ideas for Memory Walls
Looking to transform your bedroom into a personalized haven? Photo wall collages are taking over as a stylish and heartfelt way to showcase your favorite memories, turning blank walls into captivating focal points. Their popularity lies in their ability to blend creativity with sentimentality, making your space uniquely yours while adding visual interest and warmth.
In this article, you’ll discover a variety of inspiring ideas to craft your perfect memory wall—whether you prefer sleek, modern arrangements or eclectic, boho displays. From monochrome themes to colorful collections, these ideas will help you create a stunning centerpiece that reflects your personality and story. Get ready to elevate your bedroom decor with a meaningful touch!
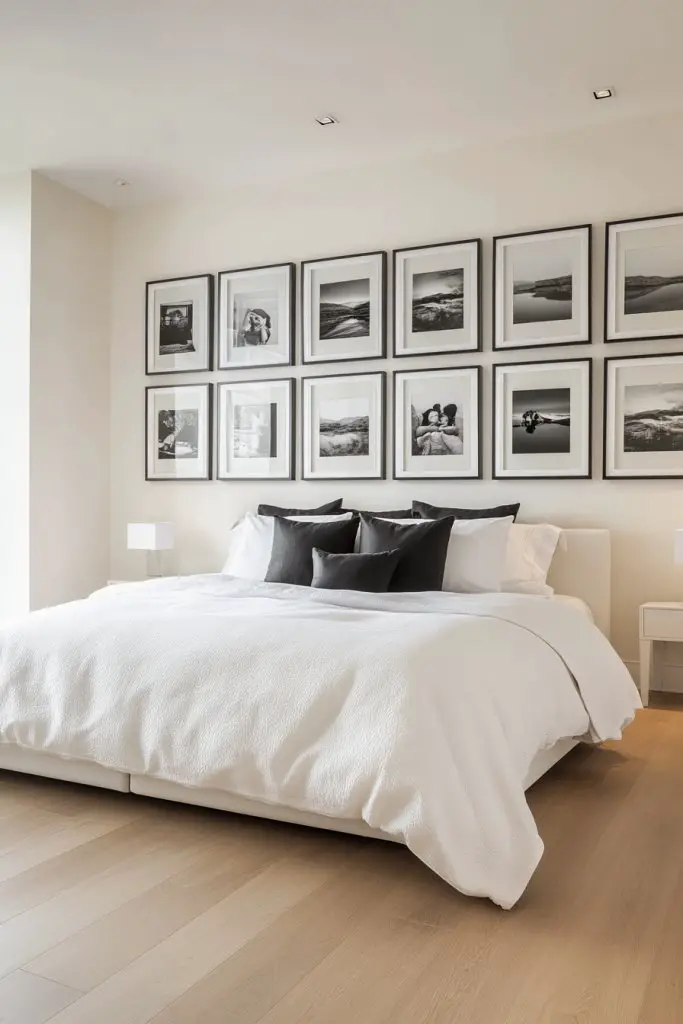
1. Gallery Wall with Symmetrical Frame Arrangement for a Modern Look

Ever feel like your bedroom walls are just screaming for a little sophistication? A symmetrical gallery wall offers a sleek, organized look that instantly elevates your space. It’s perfect if you crave a clean, modern vibe but don’t want to sacrifice personality. Plus, it’s a simple way to make your room look effortlessly put together.
Recommended Products to replicate this idea
| # | Preview | Product | |
|---|---|---|---|
| 1 |

|
upsimples 8x10 Picture Frame Set of 5, Display Pictures 5x7 with Mat or 8 x 10 Without, Wall Gallery... | Check Latest Price |
| # | Preview | Product | |
|---|---|---|---|
| 1 |

|
EZVALO Picture Lights for Wall, 2000mAh Rechargeable Battery Magnetic Poster Lights with 3 Color... | Check Latest Price |
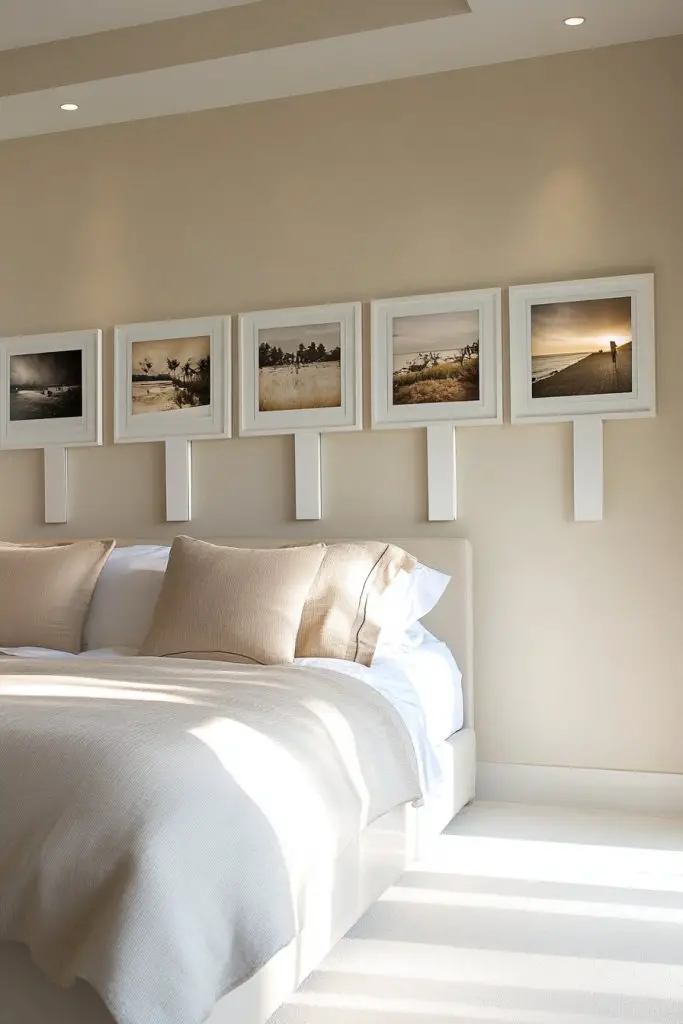
Picture matching frames arranged in perfect rows, each holding your favorite photos or artwork. The uniformity creates a calming rhythm on the wall, with subtle pops of color from your images. The symmetry adds balance, making your entire room feel more harmonious. Light reflects evenly off the frames, giving everything a polished, intentional look.
You can opt for black, white, or metallic frames depending on your decor. For a minimalistic aesthetic, stick to monochrome images or prints; for a pop of vibrancy, mix in colorful photos or prints. Adjust the spacing to suit your wall size—tight for a dense look or more spaced out for a airy feel. Seasonal changes? Swap out images or add seasonal accents in your frames.
Start by measuring your wall and choosing a layout grid—either with painter’s tape or a paper template. Select matching frames in a size that complements your wall space. Arrange your photos or prints in order before hanging to ensure balance. Use a level to keep everything straight and a good hammer or drill for secure mounting. Keep the spacing consistent for that perfect symmetrical effect. Consider using command hooks for easy adjustments.
Add personality with custom photo mats or textured frames to introduce subtle depth. Incorporate small decorative elements like initials or icons within some frames for a personalized touch. Change out images seasonally or for special occasions, keeping your wall fresh. You could also incorporate small LED strips behind the frames for a subtle glow—just avoid actual lighting fixtures for a cleaner look.
A symmetrical gallery wall transforms your space into a modern sanctuary. It’s a classic look that works with almost any decor style, from minimalist to eclectic. Once installed, you’ll feel a sense of pride knowing your wall looks so thoughtfully curated. Ready to create a stylish focal point that’s both timeless and personalized?
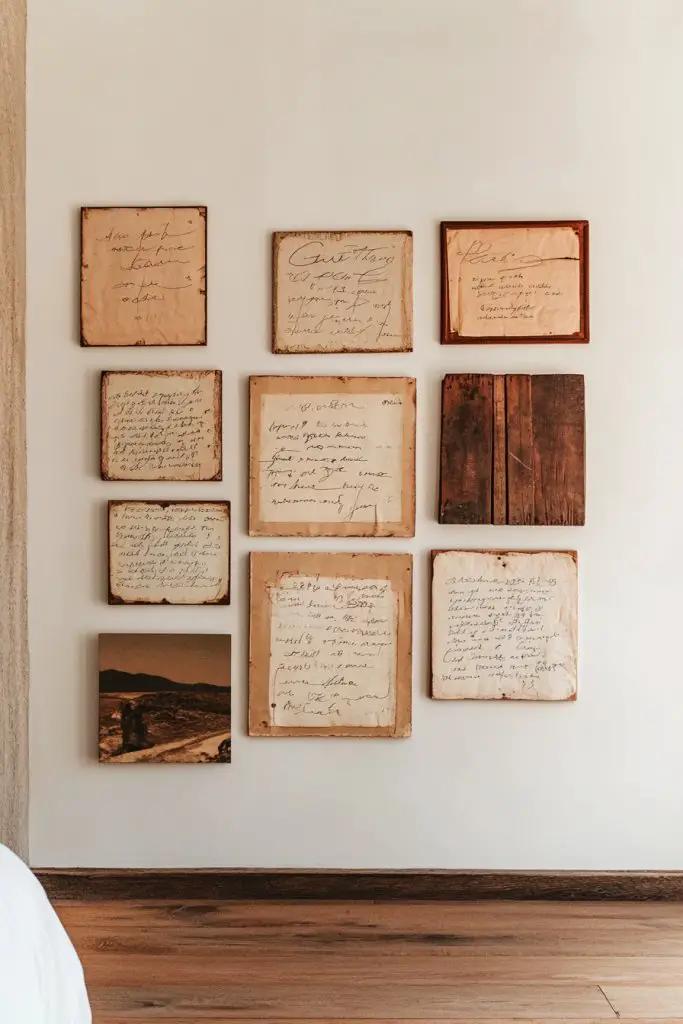
2. Eclectic Mix of Vintage and Contemporary Frames for a Personal Touch
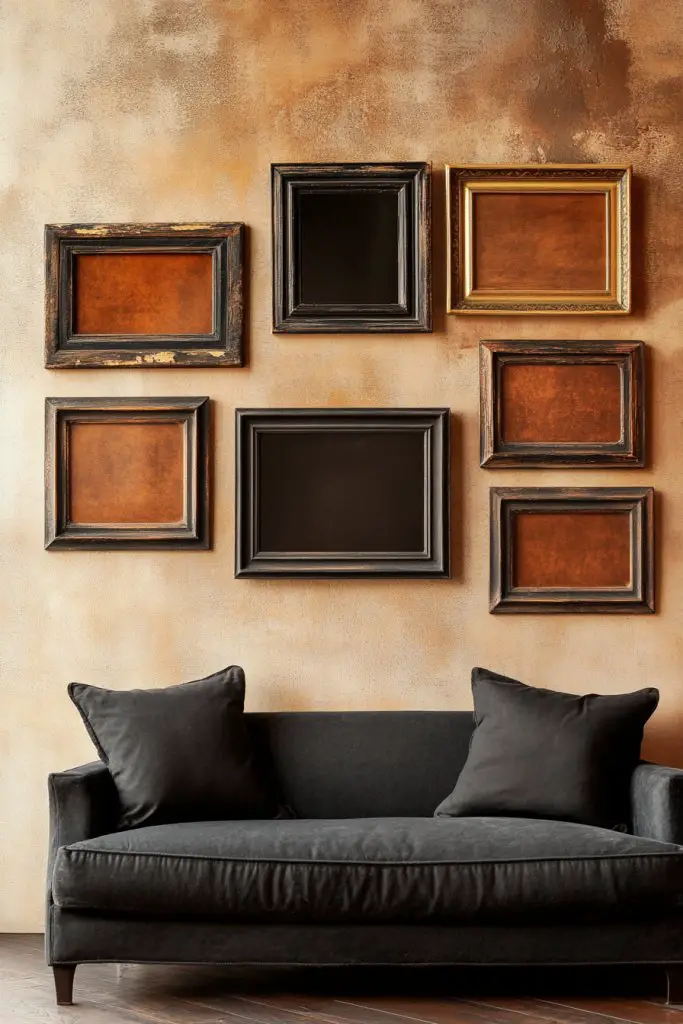
Tired of cookie-cutter walls that lack personality? An eclectic mix of vintage and modern frames can give your bedroom a warm, quirky vibe that screams ‘you’. It’s perfect if you love collecting, repurposing, or just want a wall that feels lived-in and full of stories.
Imagine a collage of mismatched frames—some ornate with intricate details, others sleek and minimal—displayed in a seemingly casual arrangement. The variety brings visual interest and a layered look that invites the eye to wander. Your favorite photos, art prints, or even small memorabilia find a cozy home among the diverse frames, creating a curated, personal gallery.
Mix vintage wooden frames with contemporary metallic or acrylic options for contrast. Play with different sizes and shapes—rectangles, ovals, circles—to add dynamic flair. For seasonal or mood changes, swap in different images or add textured textiles behind some frames. You can also cluster frames in a loose grid or scatter them organically, depending on your style.
Gather a variety of frames—thrift shops are gold mines for unique finds. Lay them out on the floor first to plan your composition, mixing sizes and styles. Use picture hooks or nails to hang, starting from the center and working outward for balance. For a more relaxed look, cluster frames in a random pattern, keeping some asymmetry. Secure heavier frames with wall anchors if needed.
Decorate some frames with fabric or textured papers to add depth. Incorporate small vintage items like keys, postcards, or fabric swatches within the frames for a tactile feel. Personalize your wall with a mix of family photos, travel souvenirs, or artwork. Change the arrangement periodically to keep the wall feeling fresh and reflective of your evolving taste.
An eclectic gallery expresses your personality and style without feeling overdone. It encourages creativity and risk-taking, making your bedroom uniquely yours. Over time, this curated display can become a meaningful visual diary. Don’t be afraid to experiment—your perfect, personal memory wall is just a few mismatched frames away.
3. Floating Shelves with Leaning Photos for a Casual, Layered Effect
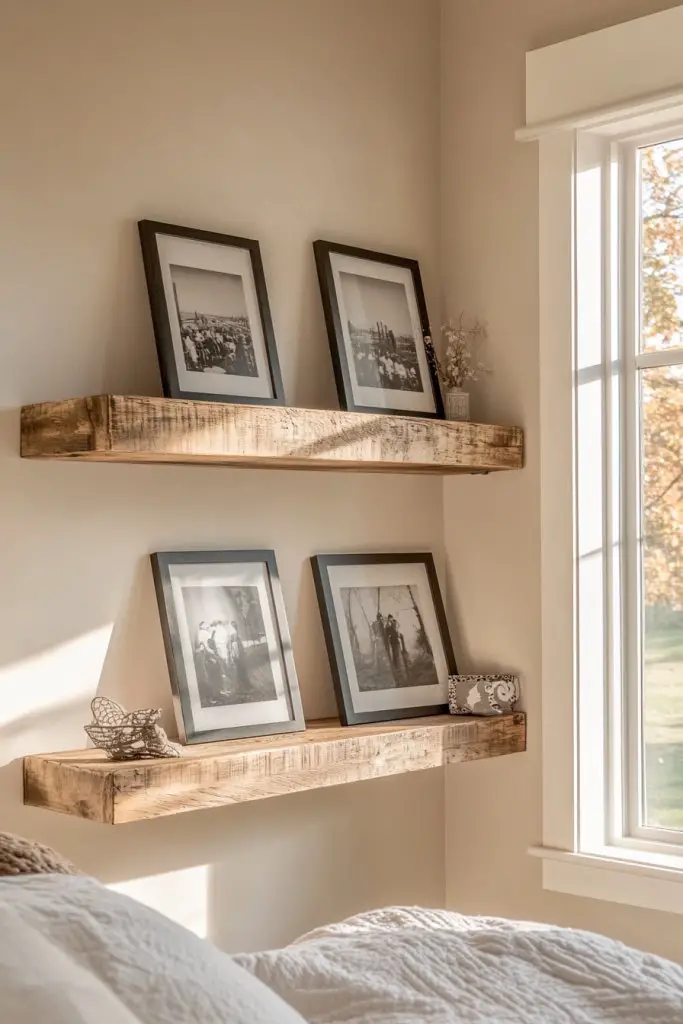
Ever wish your walls could look effortlessly stylish without the fuss of frames? Floating shelves with leaning photos combine ease and charm for a relaxed, layered display. It’s ideal for those who want a personal touch without the rigidity of hanging every picture perfectly.
Recommended Products to replicate this idea
| # | Preview | Product | |
|---|---|---|---|
| 1 |

|
BAYKA Floating Shelves for Wall, Wall Mounted Rustic Wood Shelves for Bathroom, Bedroom, Living... | Check Latest Price |
| # | Preview | Product | |
|---|---|---|---|
| 1 |

|
Framed Custom Canvas Prints with Your Photos Personalized Photo to Canvas Print Gifts for Couples... | Check Latest Price |
Picture long, sleek shelves mounted directly onto your wall, holding framed photos leaning casually against the wall. The staggered heights and overlapping images create a cozy, layered effect that feels inviting. The combination of shelves and photos adds depth and texture, making your wall look thoughtfully curated yet relaxed.
Choose shelves in materials like wood, metal, or acrylic depending on your decor. Mix and match frame styles—vintage, modern, or rustic—to add personality. Change the arrangement seasonally; add small decorative objects like candles, sculptures, or plants for variety. For smaller rooms, a single shelf might suffice; larger spaces can handle multiple staggered shelves.
Start by selecting the shelf style and length that fits your wall space. Use a level and measuring tape to install them evenly at different heights for visual interest. Lean your favorite photos in various sizes—use thick mats or mount some directly on the wall for stability. Keep the arrangement flexible so you can swap photos or rotate objects easily. Secure shelves firmly to support the weight of frames and decor.
Add fabric or textured backdrops behind some photos for contrast. Incorporate small decorative elements like vintage cameras, mini sculptures, or meaningful keepsakes. Use different frame colors or textures to reflect your personality. Change out photos for new memories or seasonal moments, keeping your display fresh and engaging.
Floating shelves with leaning photos create a laid-back yet stylish vibe that invites relaxation. It’s a flexible, low-commitment way to showcase your favorite memories. Over time, this layered look can evolve with your style and experiences, making your bedroom feel truly yours. Ready to keep it simple but meaningful?
4. String Lights and Clothespins for a Whimsical, DIY Memory Wall
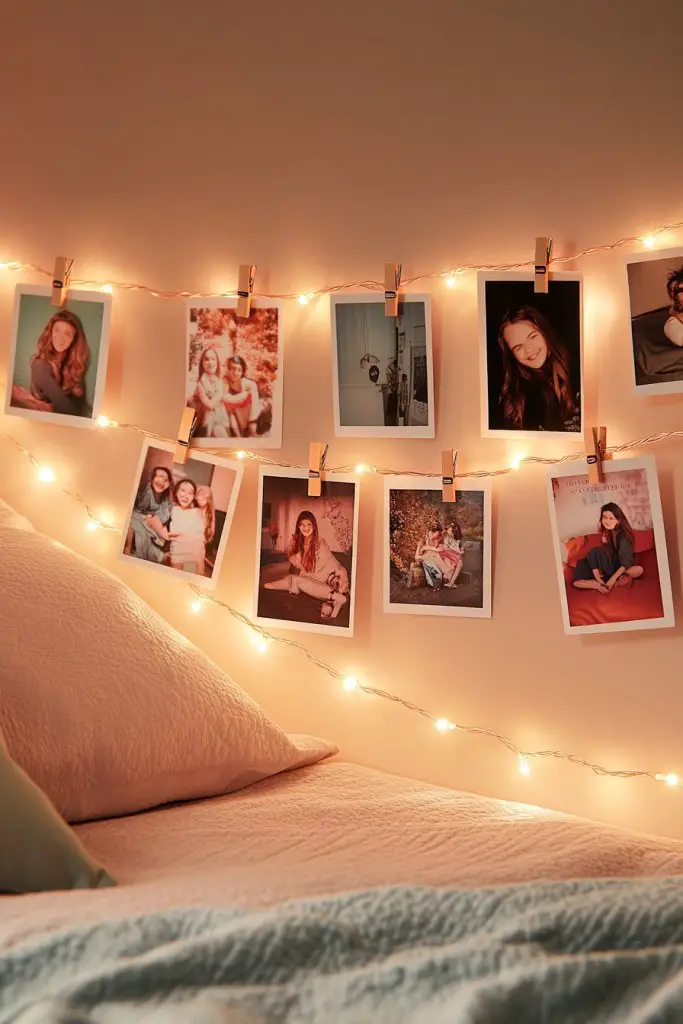
Looking to add a cozy, playful touch to your bedroom? String lights with clothespins make it easy to display your favorite snapshots while creating a warm, inviting glow. It’s a fun DIY project that instantly transforms your space into a whimsical retreat.
Imagine a soft string of fairy lights draped across your wall, with photos clipped at intervals using colorful clothespins. The gentle lighting adds ambiance, perfect for relaxing or winding down at night. The photos hang freely, overlapping or spaced out, giving a casual, spontaneous vibe. This setup turns your memories into a glowing, lively feature.
Use warm or cool-toned string lights depending on your mood—warm for cozy evenings, cool for a modern touch. Choose colorful or metallic clothespins to match your decor. For a layered look, combine multiple strings at different heights or angles. Add decorative elements like paper lanterns or mini banners for extra charm.
Start by hanging your string lights in a pattern that suits your wall space—zigzags, loops, or straight lines. Secure the ends with hooks or nails, ensuring they’re tight enough to hold the weight of photos. Attach photos to clothespins and clip along the string, balancing sizes and spacing. Use enough length to allow for flexibility and future updates. Turn on the lights and enjoy the cozy glow.
Mix in some meaningful tokens like small notes, mementos, or tiny artwork alongside your photos. Change out photos periodically to keep the display fresh. Use different colored lights or clips for seasonal themes or special occasions. You can also incorporate small plants or paper flowers for added texture and color.
This DIY setup adds a playful yet intimate vibe that’s easy to update and personalize. It’s perfect for showcasing your favorite moments without the permanence of traditional framing. It encourages creativity and a relaxed approach to wall decor. Your wall will radiate warmth and personality—just like your memories.
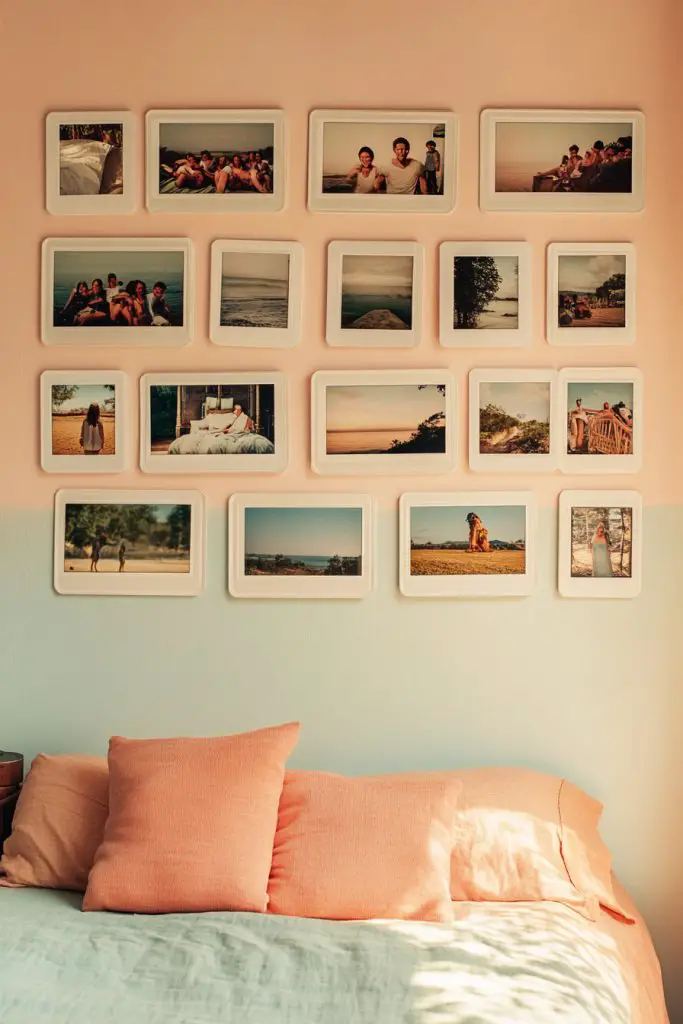
5. Oversized Central Photo with Surrounding Miniature Prints for Impact
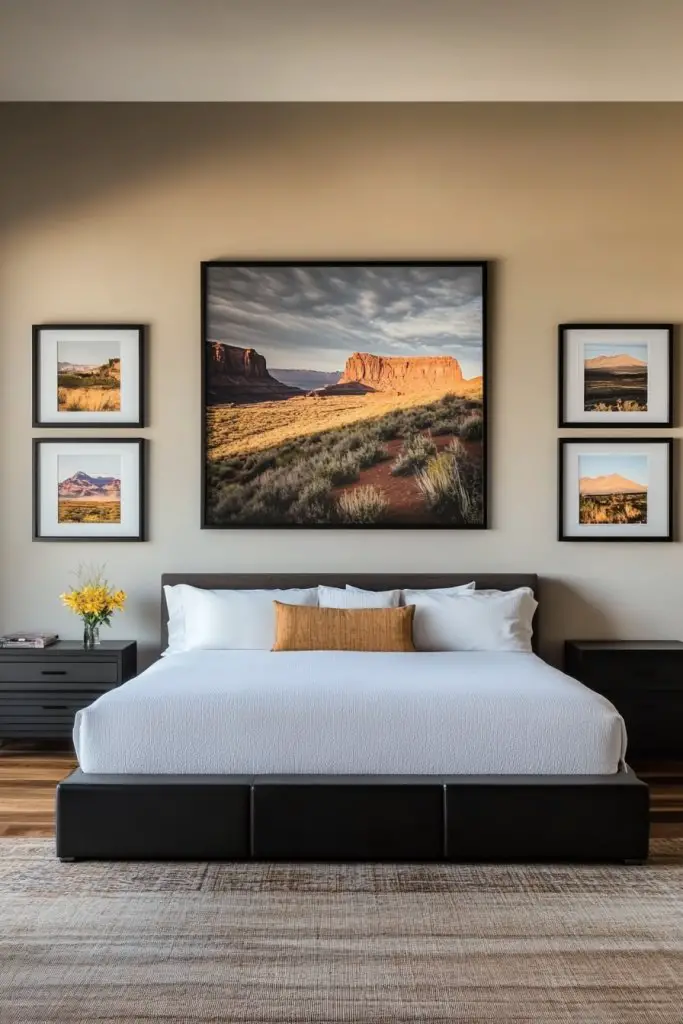
Ever wanted a statement piece that captures attention instantly? An oversized central photo surrounded by smaller prints creates a focal point that’s both dramatic and personal. It’s ideal for making a bold visual statement without overwhelming the room.
Recommended Products to replicate this idea
| # | Preview | Product | |
|---|---|---|---|
| 1 |

|
Mr. Pen- Double Headed Picture Hanging Nails, 50 Pack, Black, Push Pins for Wall | Check Latest Price |
| # | Preview | Product | |
|---|---|---|---|
| 1 |

|
STAS Cliprail Picture Hanging System Set - Covers 9.84 ft of Wall Space - Basic Picture Rail & Art... | Check Latest Price |
Visualize a large, high-quality print of a cherished moment dominating your wall, with tiny supporting images or details framing it. The contrast in sizes draws the eye naturally, making the big photo the star of the show. Surrounding smaller prints can tell a story or highlight related memories, adding depth and intimacy.
Choose a single large print in a sleek frame or opt for a canvas for a more artistic look. The surrounding mini prints can be in matching frames for cohesion or mismatched for eclectic charm. Play with asymmetrical arrangements or a grid layout depending on your style. Change the smaller prints seasonally to keep the display fresh.
Select your oversized photo carefully—preferably high resolution for clarity. Decide on the placement—centered on the wall or slightly off-center for a dynamic look. Arrange smaller prints around it, testing different layouts before hanging. Use painter’s tape to mark positions, then hang with appropriate hooks or adhesive strips. Ensure the big photo is securely mounted for safety.
Add decorative borders or mats to smaller prints to unify the look. Incorporate thematic elements like travel stamps, handwritten notes, or small keepsakes within the layout. Rotate or replace the smaller prints to celebrate new memories or milestones. Keep the display balanced but lively.
This impactful display turns your favorite photos into a gallery-worthy centerpiece. It’s a bold way to showcase your most treasured moments with style. Once in place, it sparks conversations and admiration. Go ahead, make your wall a showstopper!
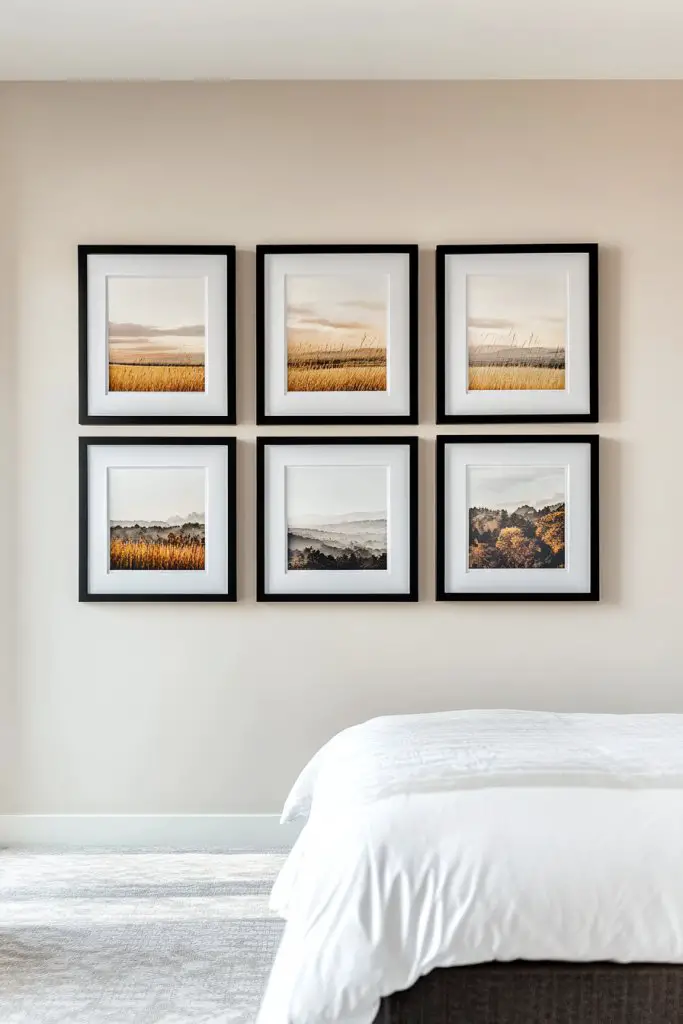
6. Geometric Grid Arrangement for a Contemporary, Structured Look
Craving a clean, modern aesthetic that feels organized and chic? A geometric grid layout offers just that—structured, symmetrical, and visually satisfying. It’s perfect for those who love order but still want to showcase their memories.
Recommended Products to replicate this idea
| # | Preview | Product | |
|---|---|---|---|
| 1 |
|
upsimples 8x10 Picture Frame Set of 5, Display Pictures 5x7 with Mat or 8 x 10 Without, Wall Gallery... | Check Latest Price |
| # | Preview | Product | |
|---|---|---|---|
| 1 |

|
Torpedo Level Magnetic, Firecore 9 Inch Shockproof Small Leveler Tool with 3 Bubble Spirit Level 45... | Check Latest Price |
Imagine a series of uniform frames arranged precisely in a grid pattern—rows and columns perfectly aligned. The repetition creates a rhythmic visual that’s calming and sophisticated. The photos or prints within each frame tell different stories but come together harmoniously, giving your wall a cohesive, modern vibe.
Use matching frames in sleek finishes like matte black, white, or metallic for a minimalist look. Spacing can be tight or with narrow gaps for a more airy feel. Incorporate different sizes within the grid for visual interest or keep it uniform for a super polished effect. Adjust the grid’s dimensions to fit your wall and style.
Measure your wall carefully and plan your layout on paper or digitally. Choose frames of consistent size or a pleasing combination of sizes. Use painter’s tape to outline your grid on the wall before hanging. Hang each frame with precision, ensuring even spacing and alignment. Use a level and measuring tape for accuracy. Double-check the arrangement before fixing everything permanently.
Add subtle variations by incorporating different textures or finishes within the grid, like matte, gloss, or metallic. Personalize with small decorative elements in some frames, or use color accents to break the monotony. Change out photos periodically for different seasons or moods, maintaining the geometric precision.
A geometric grid is a timeless, modern choice that elevates your decor instantly. It’s a simple way to add structure and sophistication, making your space look curated and intentional. Once done, you’ll enjoy a sense of order and beauty every time you glance at your wall. Ready for a fresh, clean start?
7. Rustic Wooden Frame Cluster for a Cozy, Farmhouse Vibe
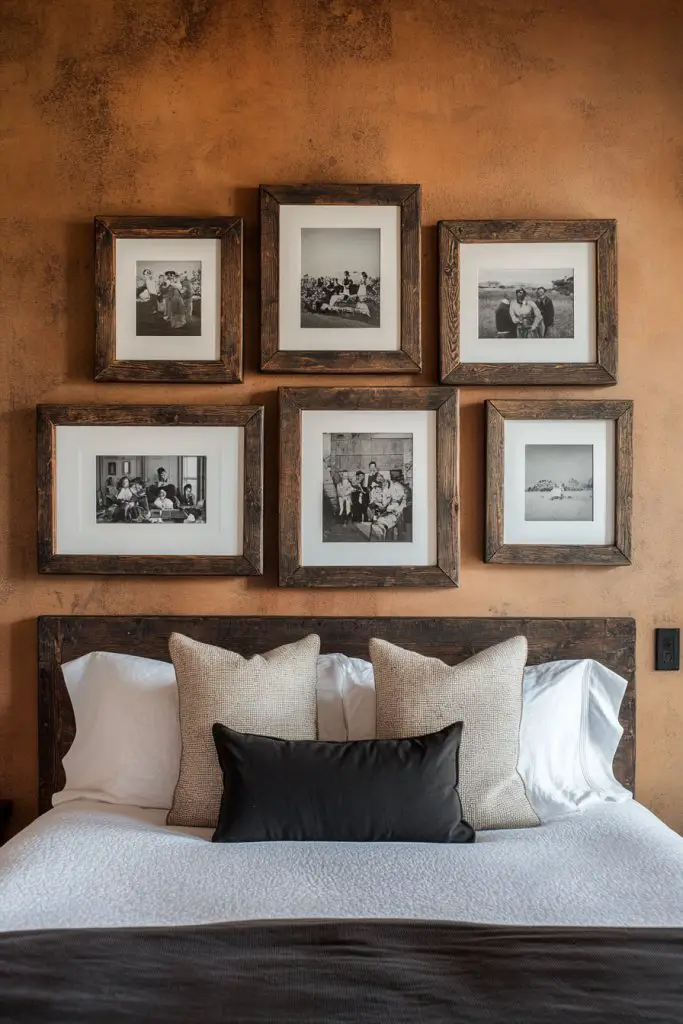
Looking to add warmth and charm to your bedroom? A cluster of rustic wooden frames can bring that cozy, farmhouse feel you crave. It’s an easy way to make your space inviting and full of character without overdoing it.
Recommended Products to replicate this idea
| # | Preview | Product | |
|---|---|---|---|
| 1 |
|
iRahmen 8x10 Picture Frame Set of 4, High Definition Real Glass Rustic Brown Frame, 8 x 10 Wood... | Check Latest Price |
| # | Preview | Product | |
|---|---|---|---|
| 1 |

|
184 Pieces Picture Hanging Kit, 20lb, 30lb, and 50lb Picture Hangers, Metal Picture Hanging Hooks... | Check Latest Price |
Visualize a group of mismatched but complementary wood frames arranged in a natural cluster on your wall. The rough textures and natural wood tones evoke a rustic charm, perfect for creating a warm, inviting atmosphere. Inside the frames, display family photos, vintage prints, or nature-inspired images. The imperfect arrangement adds personality and charm.
Mix different wood tones—light, distressed, or reclaimed—for an authentic farmhouse look. Keep the arrangement loose and freeform rather than perfectly aligned. Incorporate small decorative items like tags, twine, or fabric accents to add layers of texture. For a seasonal update, swap images or add cozy textiles behind some frames.
Collect a variety of rustic frames—thrift stores are treasure troves. Lay them out on the floor first to decide on a composition, then transfer to the wall. Use nails or hooks that support the weight, placing them unevenly for a natural feel. Hang the frames at different heights, overlapping slightly for an organic, curated look. Secure everything firmly for safety.
Decorate some frames with handwritten notes, dried flowers, or fabric swatches for extra texture. Incorporate vintage postcards or small keepsakes inside some frames for a personal touch. Keep the arrangement evolving by adding new finds or seasonal accents. Mix in some small, rustic shelves if space allows.
This cluster of rustic frames instantly transforms your bedroom into a cozy retreat. It’s a versatile look that can evolve with your style and memories. The imperfect charm reminds you that beauty often lies in the little details. Embrace the warmth and personality it brings to your space.
8. Black and White Photos in Matte Frames for a Timeless Elegance
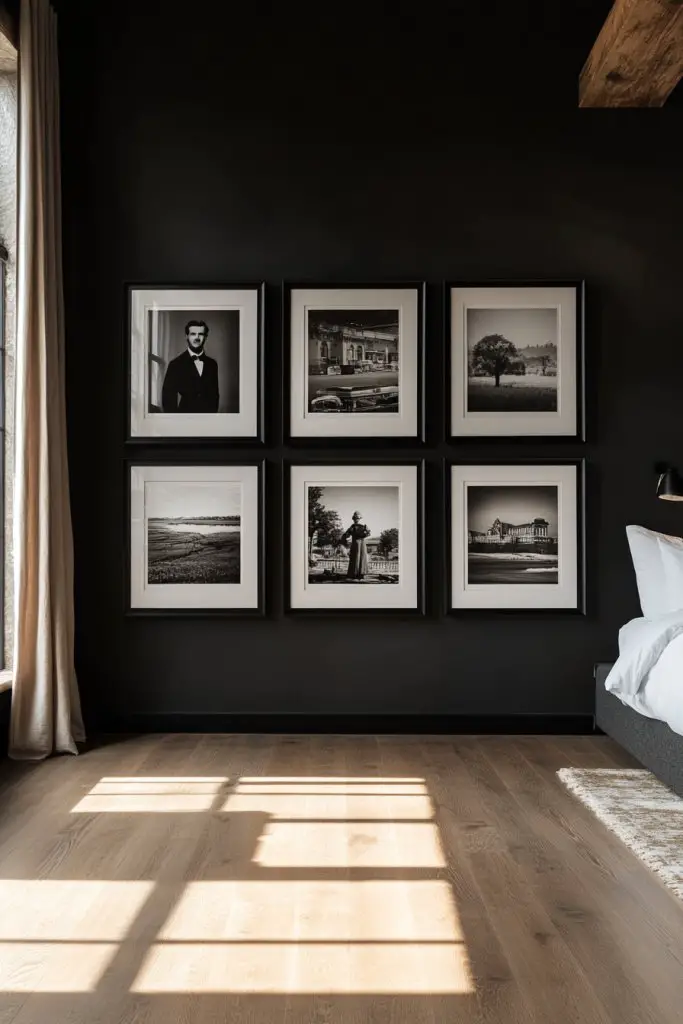
Craving a classic, sophisticated look that never goes out of style? Black and white photos framed in matte finishes offer timeless elegance that elevates any bedroom. It’s perfect if you want a chic, understated aesthetic that pairs well with modern or vintage decor.
Recommended Products to replicate this idea
| # | Preview | Product | |
|---|---|---|---|
| 1 |

|
upsimples 11x14 Picture Frame Set of 5, Display Pictures 8x10 with Mat or 11x14 Without Mat, Wall... | Check Latest Price |
| # | Preview | Product | |
|---|---|---|---|
| 1 |

|
15 Pack 5x7 White Picture Mats, Frame Mattes for 4x6 Pictures Display Photo Frame Mat Core Bevel Cut... | Check Latest Price |
Imagine a wall filled with monochrome images—portraits, landscapes, or candid moments—each framed in sleek matte black or white. The uniformity of the matte finish creates a cohesive look, while the absence of color draws attention to emotion and detail. The overall effect is refined and calming, with a gallery-like vibe.
Stick to black or white matte frames for maximum cohesiveness, or mix both for contrast. Arrange the photos in a grid or a loose cluster for a more relaxed feel. Incorporate textured mats or double mats for added depth. Complement with neutral-colored bedding and furniture to keep the focus on the wall.
Select high-quality black and white images—personal favorites or vintage prints work well. Use uniform-sized frames for a clean look or vary sizes for visual interest. Lay out your design on the floor first to plan the arrangement. Hang with picture hooks or nails, ensuring even spacing and alignment. Keep the wall free of clutter for maximum impact.
Add subtle personal touches like handwritten captions or dates in a corner of some photos. Incorporate textured or patterned textiles in your bedding and curtains to complement the classic vibe. Change out images for different seasons or milestones, maintaining the elegant monochrome theme. Consider adding a vintage mirror or clock for extra charm.
This style exudes timeless elegance and pairs beautifully with almost any decor. It’s a smart choice for creating a calm, sophisticated retreat you’ll love coming home to. Once set, it’s a look that will never feel outdated, giving you confidence in your personal style. Your room will radiate effortless grace.
9. Circular and Oval Frames for a Soft, Artistic Flair
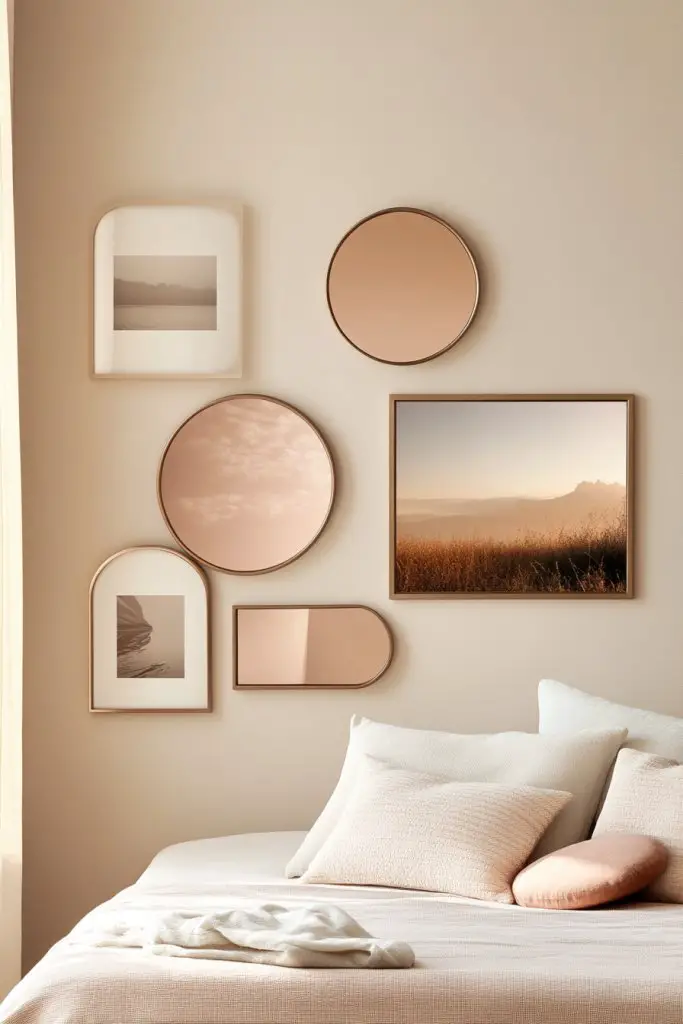
Looking to add a touch of softness and artistic flair to your wall? Circular and oval frames break away from traditional rectangular shapes, introducing a gentle, flowing aesthetic. It’s perfect if you want a more creative, less structured vibe that still feels polished.
Recommended Products to replicate this idea
| # | Preview | Product | |
|---|---|---|---|
| 1 |

|
alblinsy Round Photo Frame Wooden Wall Hanging Picture Frames for Home Office Wall Decor (Black, 6... | Check Latest Price |
| # | Preview | Product | |
|---|---|---|---|
| 1 |

|
AELS 8x10 Inch Vintage Picture Frame, Elegant Antique Photo Frames with Glass Front, Photo Display,... | Check Latest Price |
Picture a series of round and oval frames arranged in a balanced yet playful pattern. The curved shapes soften the overall look, creating a more inviting and artistic atmosphere. Inside, display a mix of personal photos, sketches, or abstract images. The contrast between shapes adds visual interest and a sense of movement.
Mix frame sizes—small and large—for a dynamic gallery. Use metallic, wood, or colored finishes to suit your decor style. Play with asymmetrical arrangements or cluster them in a loose, organic pattern. For seasonal updates, swap images or add decorative elements like fabric or textured backgrounds behind some frames.
Gather various round and oval frames, balancing sizes and materials. Arrange the frames on the floor first, experimenting with layouts that feel natural and balanced. Use picture hooks or adhesive strips for hanging, paying attention to spacing and alignment. Hang at different heights for a relaxed, artistic look. Secure everything carefully for safety.
Decorate some frames with colorful or textured mats for extra depth. Incorporate small, sculptural decorative items nearby to enhance the artistic charm. Personalize your collection with favorite quotes, doodles, or handwritten notes on some prints. Rotate or update images seasonally for ongoing freshness.
Curved frames bring a soft, artistic touch that elevates your decor effortlessly. They encourage creativity and add a playful, modern twist to your wall. Once styled, you’ll feel inspired every time you see your unique, flowing arrangement. It’s a simple way to make your space feel more personal and lively.
10. Photo String with Decorative Clips for an Easy, Changeable Display
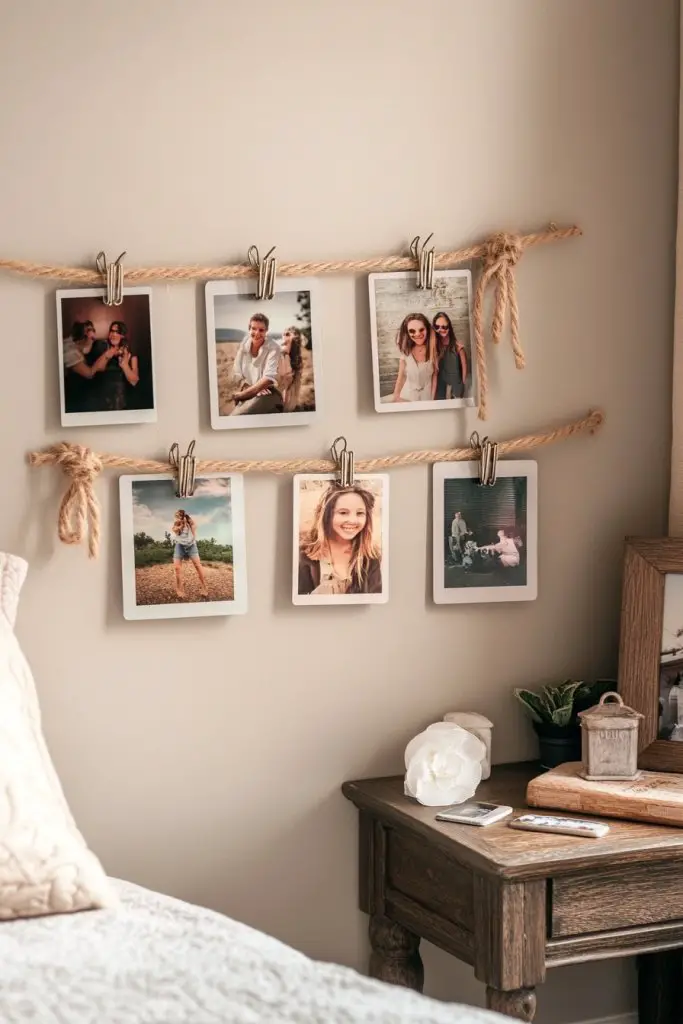
Want a quick, budget-friendly way to showcase your favorite memories? A photo string with decorative clips offers an easy, flexible solution that’s perfect for spontaneous updates. It’s ideal if you love changing your wall decor often without the hassle.
Visualize a thin string or wire stretched across your wall, adorned with colorful clips holding your photos in place. The casual arrangement creates an inviting, playful vibe, especially when combined with string lights or fabric banners. The photos hang freely, giving a sense of movement and spontaneity.
Use different types of clips—wooden, metallic, or colorful plastic—to match your decor. Hang multiple strings at different heights or angles for layered interest. Incorporate fabric or ribbon accents for a softer look. For a more polished appearance, keep the arrangement linear and symmetrical; for a boho feel, go asymmetrical.
Start by attaching hooks or nails at either end of your designated wall space. Stretch the string tightly and secure it with knots or clips. Clip your photos onto the string, spacing them evenly or randomly depending on your style. Swap out images easily whenever you want to refresh the look. For added charm, hang small decorative elements like paper flowers or mini banners.
Use themed clips or add labels, dates, or short captions to personalize each photo. Incorporate seasonal or holiday-themed clips for special occasions. Change the arrangement for different moods or seasons, keeping it fun and dynamic. You could also add small LED fairy lights intertwined with the string for a cozy glow.
This simple setup encourages creativity and spontaneity. It’s a playful way to keep your memories fresh and visible without commitment. Plus, it’s easily adjustable, making it perfect for evolving your decor. Enjoy an ever-changing, personalized wall that reflects your personality and mood.
11. Themed Collage: Travel, Family, or Special Occasions for Personal Significance
Craving a meaningful wall that tells your story? A themed collage centered around travel, family, or milestones makes your memories come alive. It’s a heartfelt way to celebrate what matters most and add depth to your decor.
Imagine a carefully curated collection of photos, postcards, tickets, or small memorabilia arranged around a specific theme. For travel, include scenic shots, souvenirs, and maps; for family, cherish candid moments and portraits; for special occasions, highlight milestone moments and quotes. Themed collages create a narrative that draws viewers into your personal history.
Use matching or complementary frames for a cohesive look or mix styles for a more eclectic feel. Arrange items in a grid, organic cluster, or a timeline. Incorporate decorative elements like string lights, fabric accents, or small shelves to add layers. Update the collage periodically to reflect new memories or seasons.
Gather your photos and memorabilia, then lay them out on the floor first. Decide on a layout—symmetrical, freeform, or chronological. Use washi tape or painter’s tape to mark the placement on your wall before hanging. Frame or mount each item securely, ensuring everything is level and evenly spaced. Keep some empty space for breathing room.
Add handwritten notes, dates, or quotes to personalize each element. Incorporate small keepsakes or mementos in some frames or alongside the display. Change out or rotate items to keep the narrative fresh. Use decorative backgrounds or textured mats to add visual interest.
A themed collage transforms your wall into a visual storybook, full of personal significance. It’s a meaningful, stylish display that evolves with your life. Show off your memories with pride and create a space that truly reflects your journey. Your wall becomes a cherished keepsake for years to come.
12. Multi-Photo Collage Canvas for a Bold Statement Piece
Looking for a striking centerpiece that commands attention? A multi-photo collage on a large canvas creates a bold, unified visual that’s impossible to ignore. It’s perfect for showcasing multiple memories in one impactful display.
Recommended Products to replicate this idea
| # | Preview | Product | |
|---|---|---|---|
| 1 |

|
Personalized Custom Canvas Prints: Photo On Canvas (Framed 11X14) Transform Your Photos into... | Check Latest Price |
| # | Preview | Product | |
|---|---|---|---|
| 1 |

|
Universal TV Mounting Hardware Screw Kit Set with Box - M4 M5 M6 M8 Screws and Washers Spacers,... | Check Latest Price |
Imagine a single large canvas printed with a collage of your favorite moments, arranged creatively across the surface. The mixture of sizes and shapes adds dynamism, making your wall look lively and engaging. The seamless integration of photos creates a modern, artistic vibe that turns your memories into wall art.
Choose a collage template or create your own layout using photo editing software. Opt for a borderless, panoramic, or multi-panel canvas for different effects. Coordinate the collage with your room’s color scheme, adding subtle accents or text overlays if desired. It can be a focal point for both modern and eclectic decor.
Select your best photos and upload them to a printing service that offers collage canvas options. Decide on the size and layout—large enough to make an impact but proportionate to your wall. Hang the finished canvas with appropriate hardware, ensuring it’s level. For multiple canvases, space them evenly to create a cohesive gallery wall.
Add captions, dates, or small decorative elements digitally before printing. Use a consistent color theme or filter for a unified look. Change out or add new collages periodically to keep your wall fresh. Pair with minimalist furniture or decor to let the canvas stand out.
A multi-photo collage canvas captures your favorite memories in a bold, artistic way. It’s a conversation starter and a personal masterpiece that elevates your entire room. Once installed, it gives your space a curated, gallery-like feel that’s both modern and meaningful. Go big and make a statement!
13. Polaroid-Style Instax Wall for a Nostalgic, Instant Vibe
Want to evoke nostalgia and add a relaxed, casual charm? An Instax-style wall with polaroid prints is perfect for capturing the instant, carefree vibe of analog photography. It transforms your space into a fun, spontaneous gallery of memories.
Picture a grid or scattered arrangement of small, square prints with white borders, mimicking classic polaroids. The imperfect, candid photos evoke a sense of spontaneity and authenticity. The wall feels lively and personal, with a vintage touch that’s both playful and warm.
Arrange the prints in a tight grid for a modern look or scatter them organically for a more relaxed feel. Use string or wire with clips if you prefer a flexible display. Incorporate decorative elements like washi tape or handwritten notes on some prints. Change the photos seasonally or for special events to keep it fresh.
Print or mount your instant photos on sturdy backing and arrange them on your wall first. Use painter’s tape or removable adhesive strips for easy adjustments. Keep the spacing consistent or vary it for visual interest. For a more polished look, frame some prints or add a decorative border. Regularly update the photos to reflect current memories.
Write captions, dates, or doodles on some prints for extra personality. Mix in small memorabilia or tickets behind some photos for layered storytelling. Use different backgrounds or paper textures to add depth. Turn your wall into a visual diary of your favorite moments.
A Polaroid wall captures fleeting moments and adds a nostalgic, heartfelt touch to your decor. It’s easy to update and personalize, making your space feel authentic and lived-in. Plus, it’s a fun way to relive your memories every day. Your wall will radiate personality and charm.
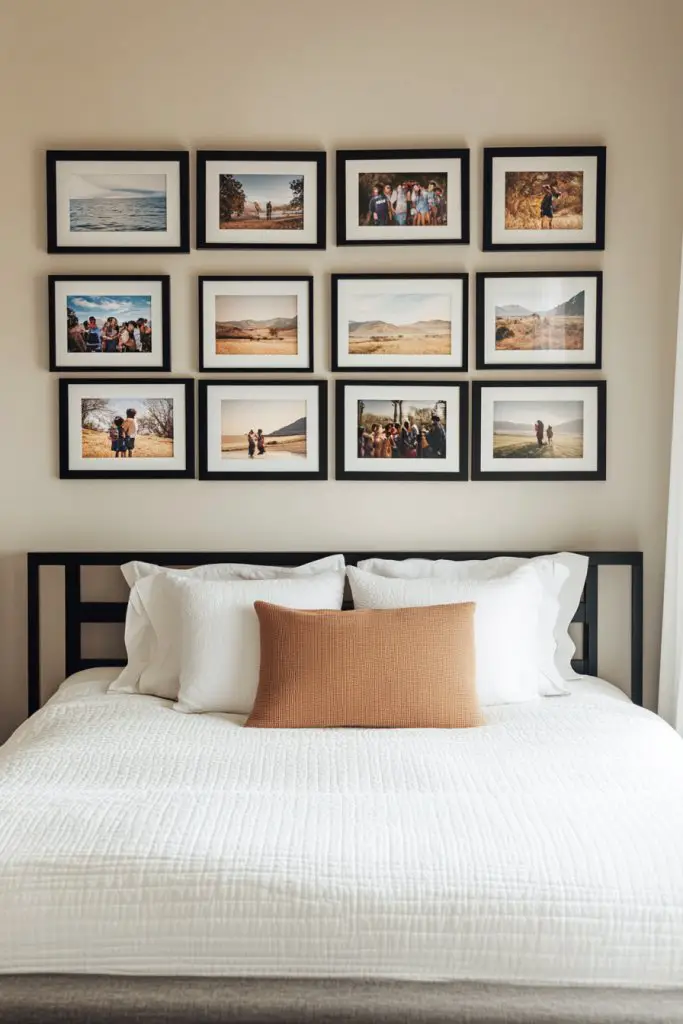
14. Black Frames and Matting for a Gallery-Inspired, Sophisticated Style
Seeking a look that’s both modern and refined? Black frames with white mats create a gallery-inspired aesthetic that exudes sophistication. It’s a timeless choice that adds structure and elegance to your bedroom’s decor.
Recommended Products to replicate this idea
| # | Preview | Product | |
|---|---|---|---|
| 1 |

|
upsimples 11x14 Picture Frame, Display Pictures 8x10 with Mat or 11x14 Without Mat, Wall Hanging... | Check Latest Price |
| # | Preview | Product | |
|---|---|---|---|
| 1 |

|
Somime 10-Pack White Uncut Picture Frame Backing Board,Acid Free 8x10 White Matte Picture Board for... | Check Latest Price |
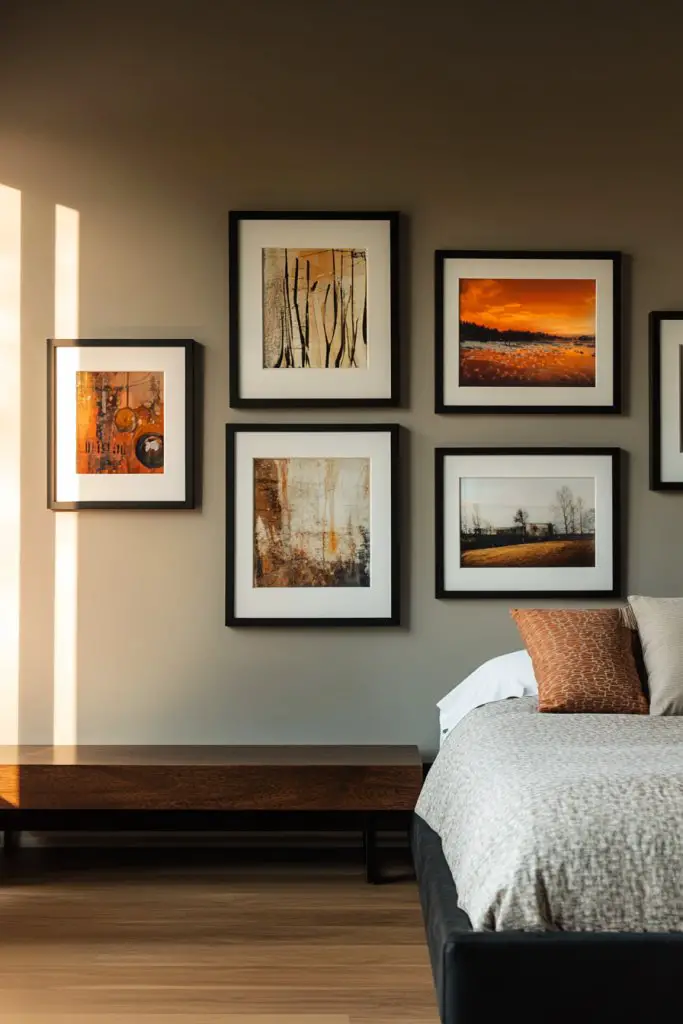
Imagine a cohesive collection of photos or artwork framed uniformly in sleek black borders with white mats. The contrast draws attention to the images and creates a clean, professional look. This setup emphasizes visual clarity and highlights your favorite moments with understated elegance.
Maintain consistency with matching frames and mats for a unified appearance or vary sizes for visual interest. Incorporate a mix of personal photos, art prints, or graphic designs. Keep the arrangement orderly—either in a grid or row—to mimic a gallery wall. For a softer touch, opt for textured mats or subtle patterns.
Choose high-quality black frames and acid-free mats to preserve your photos. Lay out your design on the floor first, then hang with level and measuring tools for precision. Use appropriate hooks or hanging strips to support the weight. Space the frames evenly for a harmonious look. Consider adding a thin ledge for easy swapping of images.
Add small decorative elements like metallic accents or minimal text to complement the frames. Incorporate personal photos, quotes, or artwork that resonate with you. Change the display periodically, rotating images or updating mats for seasonal updates. Keep the overall look sleek but adaptable.
A gallery-inspired wall in black and white elevates your decor instantly. It’s a refined, classic style that works with any color scheme or theme. Once established, it becomes a focal point that showcases your taste and memories with subtle sophistication. Your room will feel curated and stylish.
15. Cluster of Small Frames in a Random Pattern for a Playful, Artful Arrangement
Want to add energy and personality to your bedroom wall? A cluster of small frames arranged randomly creates a lively, artful look that feels spontaneous and fun. It’s ideal if you love a bit of chaos but still want a curated vibe.
Picture dozens of tiny frames scattered across your wall in no particular order—some overlapping, others spaced apart. Inside each, display different photos, quotes, or small illustrations. The randomness invites curiosity and makes your space feel dynamic and personalized. It’s like a mini art installation with a personal touch.
Mix frame styles, colors, and sizes for maximum playfulness. Overlap some frames slightly or leave gaps for a more relaxed look. Incorporate decorative elements like washi tape, fabric, or small artwork. For seasonal updates, swap images or add themed decorations to keep things fresh.
Gather a variety of small frames and lay them out on the floor first. Play with different arrangements—clustered, scattered, or a combination. Mark your wall with painter’s tape to visualize placement before hanging. Use small nails or hooks, supporting varying weights and sizes. Keep some room for growth or rearrangement.
Personalize each frame with handwritten notes, doodles, or decorative borders. Incorporate small mementos or souvenirs behind some frames for depth and meaning. Mix in decorative adhesives like metallic or colorful tapes. Rotate or update images to reflect current memories or moods.
This playful approach makes your wall a lively conversation starter. It’s a creative way to showcase your personality without strict rules. Over time, it can evolve into a signature style that’s uniquely yours. Dare to be eclectic and enjoy the vibrant energy it brings!
16. Photo Collage Using Washi Tape for a Budget-Friendly, Creative Approach
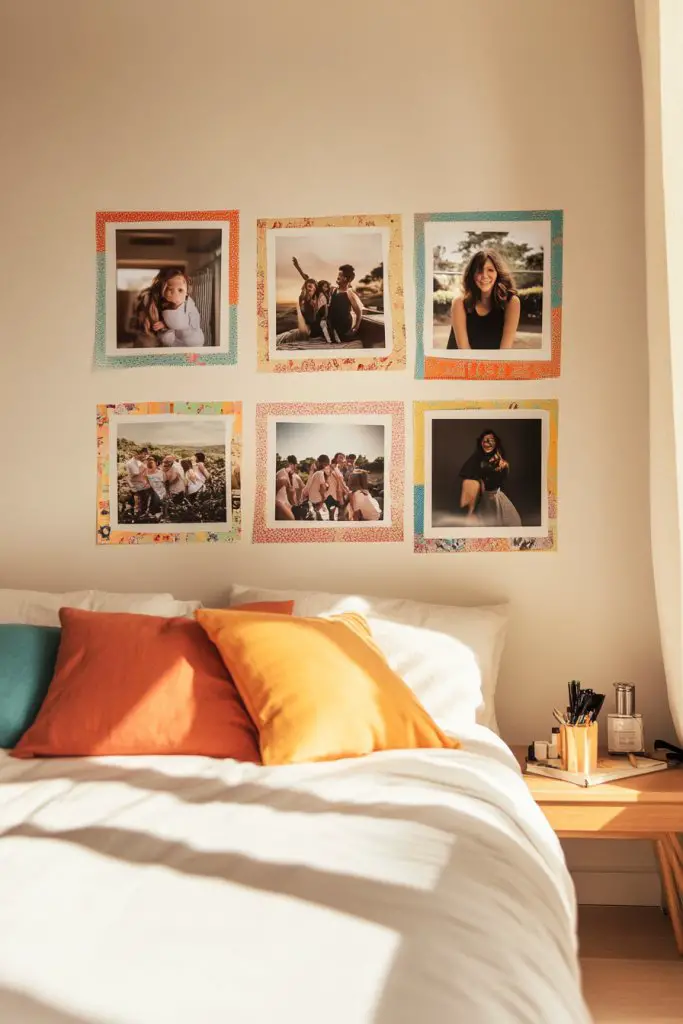
Looking for a fun, inexpensive way to display photos without damaging your walls? Washi tape offers a colorful, creative solution that’s easy to update. It’s perfect for adding a personal touch without the fuss of frames or nails.
Imagine your favorite photos taped directly onto the wall in a playful pattern—zigzags, spirals, or freeform. Washi tape comes in countless colors and patterns, allowing you to create a vibrant, customizable collage. The tape’s soft edges and removable nature add a casual, artsy feel that’s perfect for a relaxed bedroom.
Use different tape patterns and colors to match your decor mood. Combine taped photos with doodles, handwritten captions, or decorative sketches. Create a border or frame effect by taping around groups of photos. Update the collage regularly by removing or repositioning tape to keep the look fresh.
Print your photos in sizes that fit your wall space. Use painter’s tape or washi tape to attach each photo directly to the wall, experimenting with different arrangements. Keep the tape’s edges clean and avoid strong adhesives that might peel paint. For a more polished look, add decorative elements like small paper cutouts or washi accents.
Write captions, dates, or doodles with markers on the tape or directly on the photos for extra personality. Use themed tapes for holidays or special events. Rotate or add new photos as your collection grows. This approach makes your display feel fresh, fun, and uniquely yours.
This budget-friendly method proves that creativity doesn’t have to cost a fortune. It encourages experimentation and personal expression. Your walls will look lively and personal, celebrating your memories in a playful, ever-evolving way. Go ahead, tape your story!
17. Vertical Photo Strips with Minimalist Mounts for a Sleek, Streamlined Look
Want a modern, clutter-free way to display your favorite photos? Vertical photo strips with minimalist mounts offer a sleek, contemporary style that feels fresh and organized. It’s perfect if you prefer clean lines and a clutterless aesthetic.
Picture a series of vertically aligned photos mounted with thin, unobtrusive supports—think sleek clips, magnetic strips, or slim rails. The consistent verticality creates a sense of height and elegance, drawing the eye upward. The simple presentation highlights each photo’s details without distraction, making your memories pop.
Use monochrome or matching frames for a unified look, or opt for different sizes for a layered effect. Play with spacing—close together for a dense display or spaced out for a minimalist feel. Incorporate decorative elements like textured backgrounds or subtle lighting for added depth. Change photos regularly to keep the wall lively.
Choose slim mounts, clips, or rails that support your photos securely. Measure and mark the wall for even spacing and alignment. Install supports at regular intervals, ensuring they’re level. Attach your photos using clips or magnets, making adjustments easy. Keep the arrangement vertical and neat, and consider adding a thin shelf or ledge for extra support.
Personalize the display with handwritten notes, dates, or small decorative stickers on the photos. Use different shades or textures for backgrounds to add subtle variation. Rotate photos seasonally or to showcase new memories. Keep the overall look minimal but meaningful.
This streamlined display elevates your decor with simplicity and style. It’s a versatile approach that suits any modern bedroom. Once you get the hang of it, you’ll enjoy an effortlessly elegant space that highlights your personal memories. Ready for a sleek upgrade?
18. Shadow Box Frames with Memorabilia for a 3D, Sentimental Display
Want to turn your memories into a tactile, three-dimensional display? Shadow box frames combine photos with small keepsakes, creating a sentimental, layered look. It’s perfect for showcasing special moments and treasures in an artistic way.
Recommended Products to replicate this idea
| # | Preview | Product | |
|---|---|---|---|
| 1 |

|
Califortree Outside 8x10 Shadow Box Frame with Linen Back - Real Glass, Push Pins Included, Sturdy... | Check Latest Price |
| # | Preview | Product | |
|---|---|---|---|
| 1 |
|
184 Pieces Picture Hanging Kit, 20lb, 30lb, and 50lb Picture Hangers, Metal Picture Hanging Hooks... | Check Latest Price |
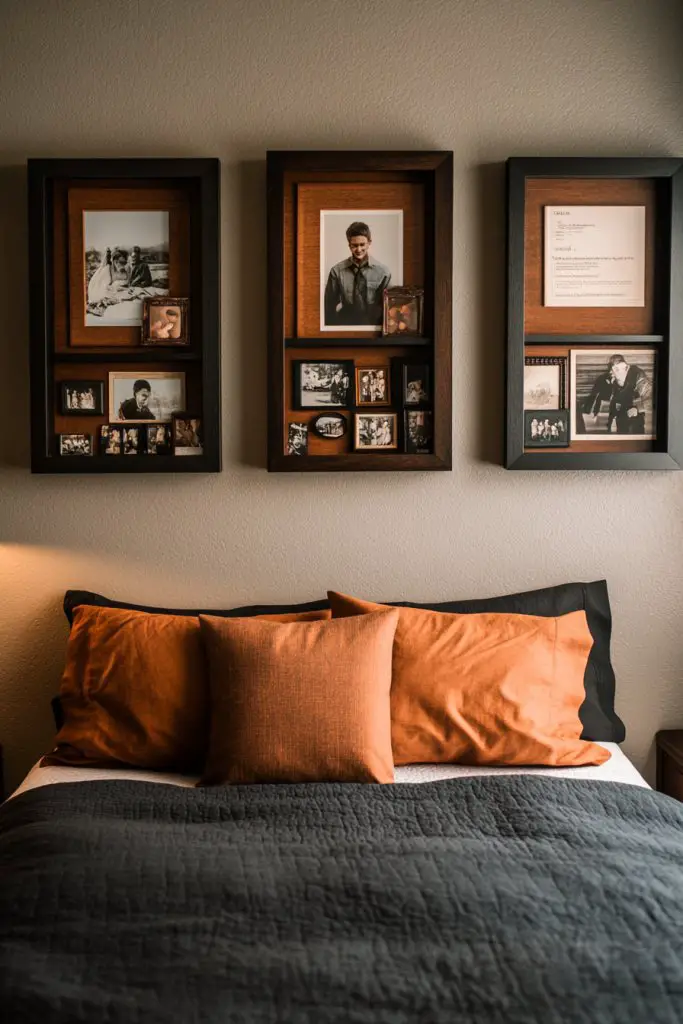
Imagine a deep frame housing a cherished photo alongside tiny objects—like a shell, a letter, or a miniature souvenir—arranged artistically. The 3D nature of shadow boxes adds depth, making the display more engaging and personal. The combination of images and objects tells a richer story than photos alone.
Mix different shadow box sizes and depths for an eclectic gallery. Use thematic groupings—travel, family, or milestones—for a cohesive story. Keep backgrounds neutral or textured for added interest. Change out objects seasonally or for special occasions to keep the display fresh.
Select shadow boxes that fit your memorabilia and photos. Arrange items beforehand to plan your composition, then secure them with glue, mounts, or small supports. Hang with sturdy hooks, ensuring they’re level and well-supported. Consider using a grid or organic cluster layout depending on your style. Regularly update or rotate items for ongoing personalization.
Add handwritten labels, dates, or small tags to provide context. Incorporate decorative background paper or fabric for contrast. Personalize each box with your stories or quotes. Keep some boxes as evolving memory capsules, adding new keepsakes over time.
Shadow boxes turn simple memories into artful, tactile displays. They evoke emotion and add a personal touch that’s hard to replicate. Your wall becomes a storytelling canvas—rich with history and sentiment. It’s a heartfelt way to honor your journey and treasures.
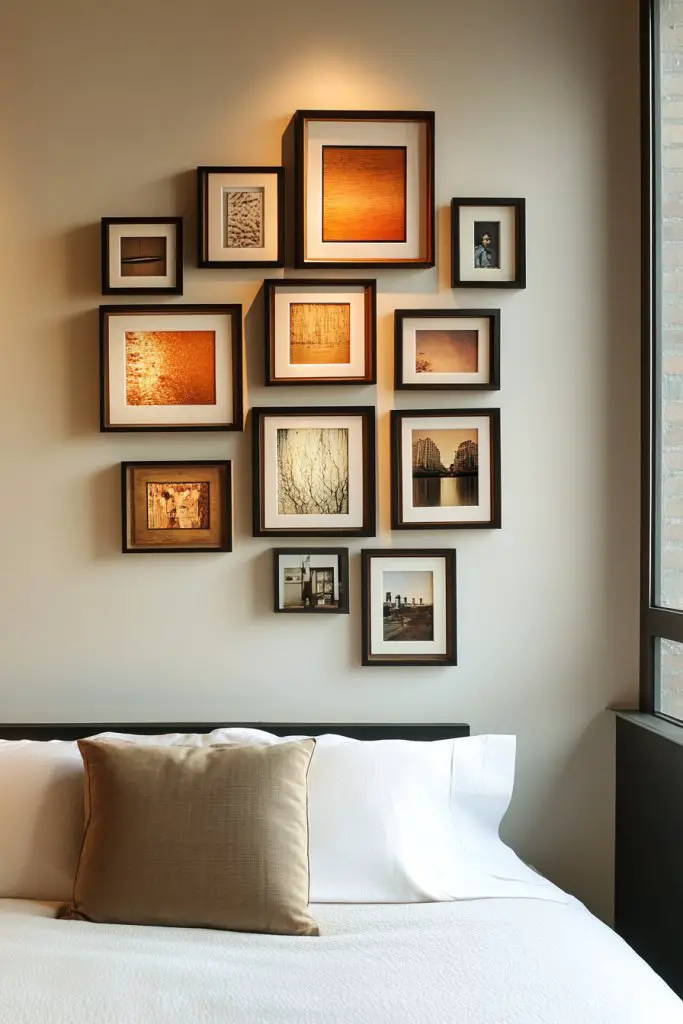
19. Asymmetrical Aspects with Uneven Frame Heights for a Dynamic, Artistic Feel
Craving a wall that feels energetic and artistic rather than perfectly orderly? Asymmetrical arrangements with uneven frame heights inject personality and movement into your decor. It’s a bold choice that breaks the rules and makes a statement.
Recommended Products to replicate this idea
| # | Preview | Product | |
|---|---|---|---|
| 1 |
|
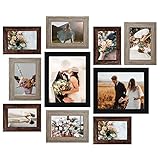
LUCKYLIFE Picture Frames Collage Wall Decor 10-Pack, Gallery Wall Frame Set with 8x10 5x7 4x6 Frames... | Check Latest Price |
| # | Preview | Product | |
|---|---|---|---|
| 1 |
|
Adhesive Hooks Kitchen Wall Hooks - 24 Packs Heavy Duty 24lb(Max) Nail Free... | Check Latest Price |
Visualize a collection of frames placed at varying heights and angles, creating an organic, dynamic pattern. The irregularity draws the eye across the wall, inviting viewers to explore each frame individually. This approach adds a sense of spontaneity and creative freedom.
Mix frame sizes, shapes, and finishes—metal, wood, or colored—to enhance the eclectic vibe. Play with asymmetry by clustering some frames closer together and spacing others farther apart. Incorporate decorative elements like textured backgrounds or layered materials behind some frames. Adjust the layout seasonally or as your collection grows.
Lay out your frames on the floor first, experimenting with heights and angles. Use painter’s tape or chalk lines as guides on the wall to visualize the composition. Hang frames at different heights, supporting with appropriate hooks or nails. Keep balance in mind—distribute visual weight evenly across the wall. Secure everything tightly for safety.
Decorate some frames with textured mats or colorful borders for added interest. Incorporate small decorative objects or layered backgrounds behind certain frames. Personalize with handwritten quotes or doodles. Rotate images or add new pieces to keep the arrangement lively and reflective of your evolving style.
Asymmetrical layouts create a vibrant, artistic atmosphere that feels spontaneous yet curated. They encourage your personality to shine through your decor choices. Once styled, your wall becomes a captivating focal point that embodies creativity and individuality. Go ahead, embrace the beautiful chaos!
20. Collage with Personal Artwork and Handwritten Notes for an Intimate Touch
Want your bedroom wall to feel truly personal and heartfelt? Combining personal artwork and handwritten notes makes your space warm, welcoming, and uniquely yours. It’s a DIY approach that adds authenticity and emotional depth.
Recommended Products to replicate this idea
| # | Preview | Product | |
|---|---|---|---|
| 1 |

|
VIYYIEA Vintage Gold Framed Wall Art for Living Room, Birds Canvas Prints Home Decor, Sketch... | Check Latest Price |
| # | Preview | Product | |
|---|---|---|---|
| 1 |

|
EZlifego Double Sided Tape Heavy Duty, Nano Double Sided Adhesive Tape, Clear Mounting Tape Picture... | Check Latest Price |
Visualize a collage of sketches, doodles, quotes, and photos arranged organically across the wall. Handwritten notes add a personal narrative—memories, affirmations, or favorite lyrics. The mixture of art and words creates a layered, intimate display that’s rich with meaning and personality.
Use various mediums—pencil sketches, watercolor paintings, or calligraphy—to diversify the visual texture. Incorporate handwritten quotes or stories directly on the wall with chalk markers or paint pens. Mix with photos or small keepsakes for a balanced, heartfelt collection. Change and add new artwork or notes periodically.
Create or gather your artwork and notes, then experiment with layout on the floor. Use washi tape or painter’s tape to plan your collage on the wall. Mount or tape your artwork and notes at different heights and angles for a lively, handcrafted effect. Keep some space for new additions or updates. Consider framing small artwork for a finished look.
Add decorative borders, colored backgrounds, or embellishments to your artwork and notes. Incorporate meaningful symbols, stickers, or small memorabilia. Personalize each piece with dates or signatures. Refresh the display periodically to reflect your evolving story.
This heartfelt collage turns your wall into a visual diary full of personal expression. It’s a constant reminder of your creativity and life journey. Once you see your artwork and words daily, you’ll feel more connected and inspired. Your space becomes a true reflection of you—authentic and beautiful.
21. Monochrome Theme with Colored Borders for a Cohesive Yet Playful Style
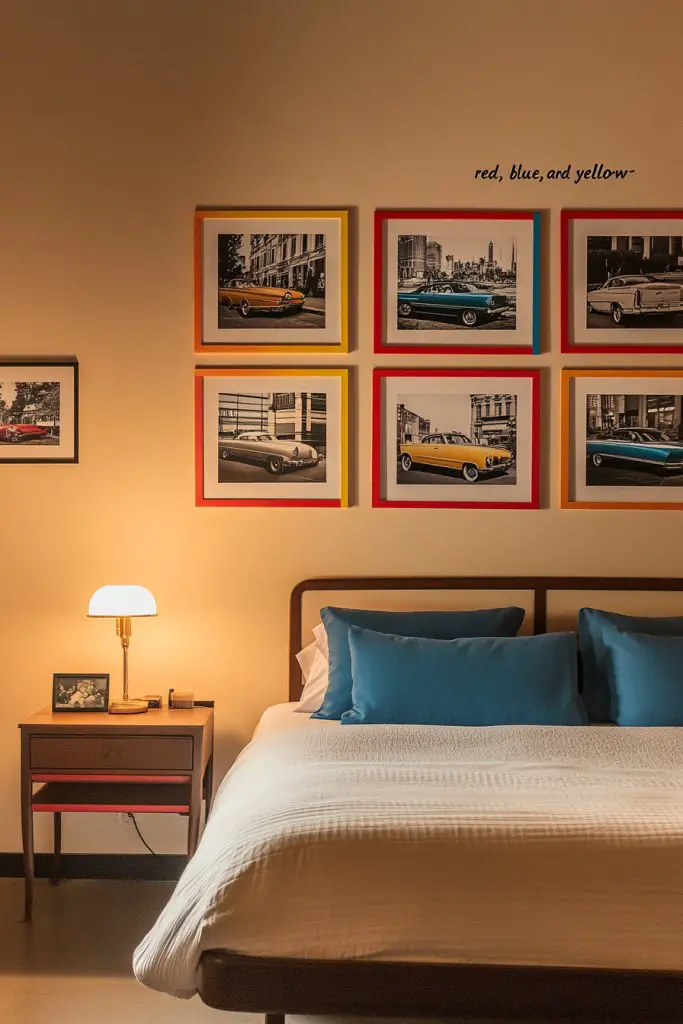
Looking for a decor scheme that’s both cohesive and fun? A monochrome theme with colored borders adds a playful pop of color within a unified palette. It’s a perfect way to keep your wall looking stylish but not dull.
Recommended Products to replicate this idea
| # | Preview | Product | |
|---|---|---|---|
| 1 |
|
upsimples 8x10 Picture Frame Set of 5, Display Pictures 5x7 with Mat or 8 x 10 Without, Wall Gallery... | Check Latest Price |
| # | Preview | Product | |
|---|---|---|---|
| 1 |
|
15 Pack 5x7 White Picture Mats, Frame Mattes for 4x6 Pictures Display Photo Frame Mat Core Bevel Cut... | Check Latest Price |
Imagine a collection of black-and-white or sepia-toned photos, each framed with brightly colored borders—red, blue, yellow, or pastel shades. The colored borders draw attention and add vibrancy, while the monochrome images keep the overall look elegant and unified. The result is a lively yet sophisticated display.
Use consistent frame styles with different colored borders or vary frame shapes in a monochrome palette. Play with border thickness—thinner for subtlety, thicker for impact. Arrange the photos in a grid or a loose cluster, balancing the color accents. Change border colors seasonally or to match your mood.
Print or frame your photos with colored mats or borders—many printing services offer this option. Lay out your arrangement on the floor first, then hang, maintaining even spacing. Use painter’s tape or a level to keep everything aligned. Incorporate complementary decor in your room to enhance the color theme.
Add handwritten captions or doodles on some borders for extra personality. Mix in some colored paper or decorative tape behind certain photos for added depth. Rotate images or update borders seasonally to keep the display fresh. Use the color accents to tie your wall into your room’s overall color scheme.
This colorful, cohesive display balances fun and elegance effortlessly. It’s a creative way to showcase your memories while keeping your decor lively. Once styled, it’s a visual feast that makes your room feel vibrant and personalized. Get ready to impress with a wall that’s both harmonious and playful!
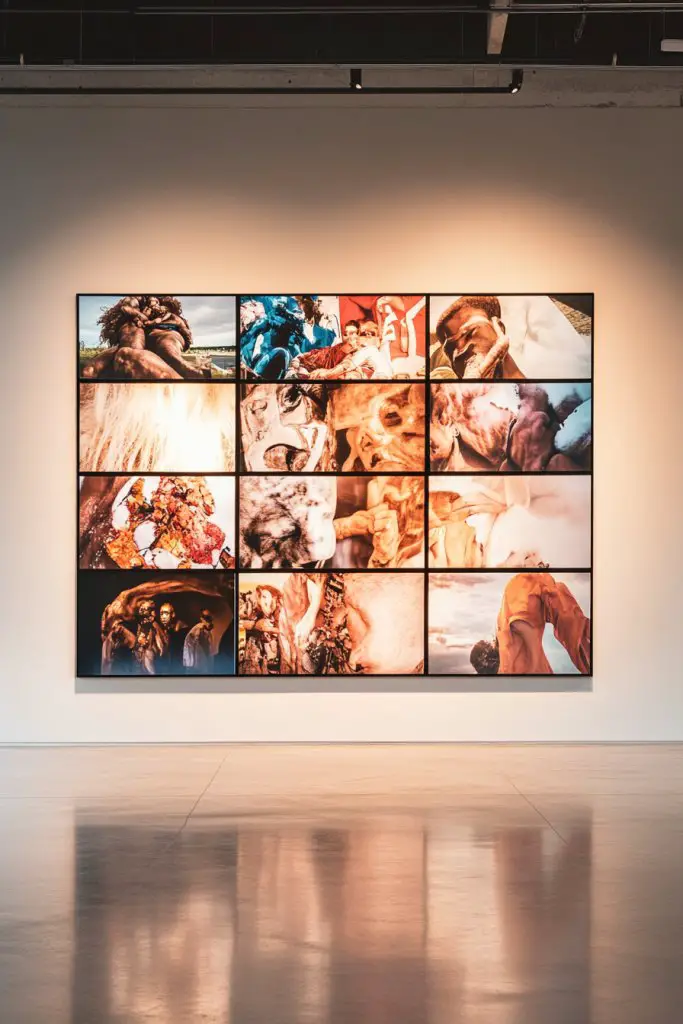
22. Multi-Panel Photo Arrangement for a Large-Scale, Modern Statement
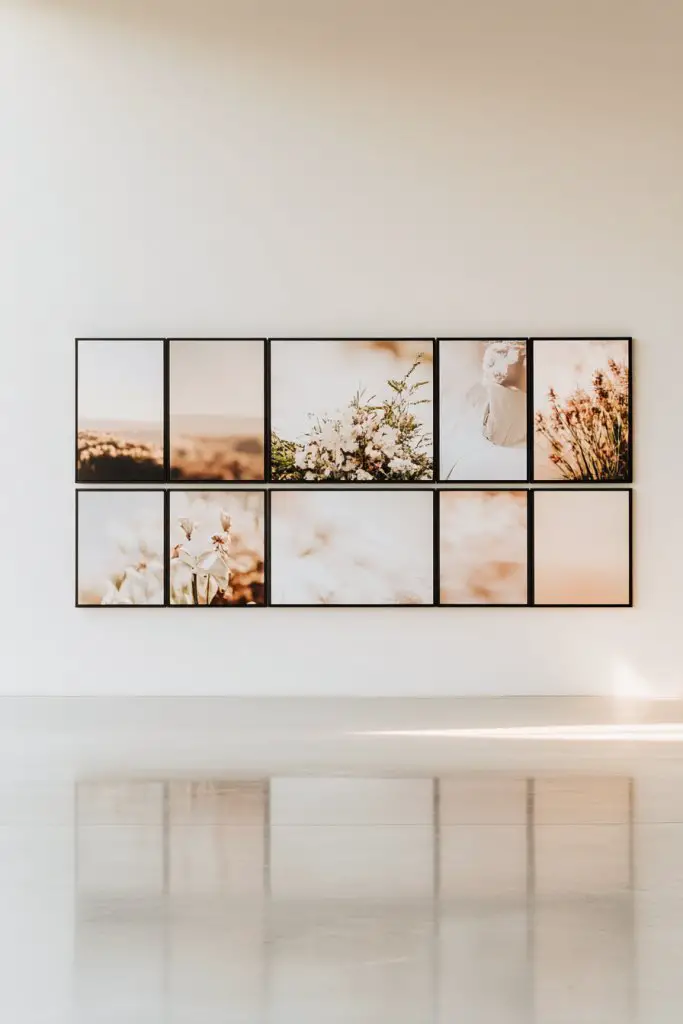
Want to make a bold statement in your bedroom? A multi-panel photo arrangement spreads across multiple canvases or frames, creating a large, eye-catching focal point. It’s perfect for showcasing epic memories or artwork in a modern, gallery-inspired style.
Recommended Products to replicate this idea
| # | Preview | Product | |
|---|---|---|---|
| 1 |

|
KURUI Drywall Anchors and Screws Assortment Kit 270PCS, 135 Plastic Dry Wall Expansion Anchors and... | Check Latest Price |
| # | Preview | Product | |
|---|---|---|---|
| 1 |
|
Personalized Custom Canvas Prints: Photo On Canvas (Framed 11X14) Transform Your Photos into... | Check Latest Price |
Imagine several large canvases or framed panels aligned in a grid or organic pattern, each displaying part of a larger image or related photos. When hung together, they form a cohesive, striking visual that commands attention. The segmented approach adds a contemporary edge and visual interest.
Choose a series of matching or complementary canvases in different sizes for a dynamic look. You can create a panoramic scene or a thematic series—like a travel journey or family milestones. Vary the spacing for a more relaxed vibe or keep panels tightly aligned for a formal look. Incorporate subtle color accents for cohesion.
Select high-quality prints or canvases that fit your space and theme. Measure and lay out your design on the wall first—using painter’s tape or a template. Hang each panel with appropriate hardware, ensuring they’re evenly spaced and level. For a seamless effect, align the edges or leave small gaps for a modern touch. Consider lighting to highlight the panels.
Add captions, quotes, or small decorative elements to some panels for context. Change out images or update panels as your memories evolve. Pair with minimalist furniture to let the artwork stand out. Incorporate subtle textures or metallic accents to elevate the display further.
Multi-panel arrangements turn your favorite memories into a stunning, large-scale piece of art. It elevates your decor and creates a sense of grandeur. Once installed, you’ll enjoy a modern, gallery-like atmosphere that’s both inspiring and aesthetically impressive. Ready to go big?
23. Minimalist Single-Photo Focal Point with Accent Wall for a Subtle, Elegant Look
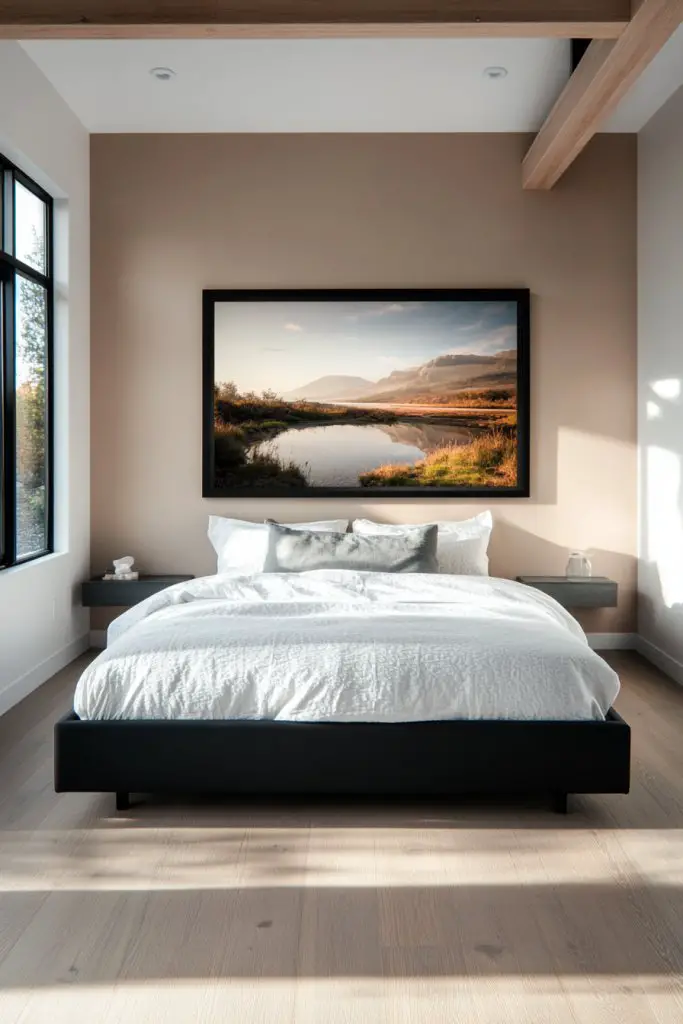
Craving a subtle yet impactful way to highlight your favorite memory? A single, large photo as a focal point on an accent wall creates understated elegance. It’s perfect if you prefer minimalism but still want a meaningful centerpiece.
Recommended Products to replicate this idea
| # | Preview | Product | |
|---|---|---|---|
| 1 |

|
MCS Trendsetter 24x36 Poster Frame Black High-Gloss, Vertical & Horizontal Wall Hanging Large... | Check Latest Price |
| # | Preview | Product | |
|---|---|---|---|
| 1 |
|
KURUI Drywall Anchors and Screws Assortment Kit 270PCS, 135 Plastic Dry Wall Expansion Anchors and... | Check Latest Price |
Picture one high-quality, oversized photo displayed prominently on a textured or neutral-colored wall. Surround it with minimal decor—perhaps a simple shelf or small decorative element—to emphasize its importance. The contrast between the large image and the simple background creates a calm, refined ambiance.
Choose a statement photo in a sleek frame or mount it directly on the wall for a seamless look. Keep the surrounding space uncluttered—no busy patterns or contrasting colors nearby. Use textured or neutral paint for the wall to enhance the elegance. Add subtle lighting to draw focus without overpowering the image.
Select your favorite high-resolution photo and print it in a large format. Mount it using a clean, minimal frame or adhesive if you prefer a frameless look. Prepare your accent wall with a neutral or textured paint or wallpaper. Hang the photo at eye level and keep other decor minimal to ensure the focus remains on the image. Consider adding a small ledge or shelf nearby for subtle decorative items.
Personalize the display with a small, meaningful quote or date subtly inscribed on the wall. Keep accessories simple—perhaps a single vase or sculpture—so as not to distract. Change the photo periodically to reflect new memories or milestones. Focus on quality, simplicity, and balance for a timeless effect.
This design approach emphasizes quality over quantity, making your favorite memory stand out beautifully. It’s an elegant, modern statement that enhances your space without clutter. Once in place, it offers a peaceful, sophisticated atmosphere that feels both personal and refined. It’s a quiet yet powerful way to celebrate what matters most.
Conclusion
By exploring these diverse photo wall collage ideas, you’ll find the perfect style to celebrate your memories and elevate your bedroom decor. Don’t hesitate to try out different layouts, frames, and themes to make your space truly your own. With a little creativity, your wall can become a beautiful storytelling canvas that fills your room with joy and inspiration. Start creating your personalized memory wall today and turn your bedroom into a gallery of your life’s most cherished moments!