
16 Pretty Painting Ideas for Artistic Expression
There’s something undeniably captivating about pretty paintings that instantly brighten up any space and spark creativity. These artful ideas are incredibly popular because they allow both beginners and seasoned artists to explore their imagination while adding a touch of beauty to their surroundings.
In this article, you’ll find a delightful range of painting ideas that cater to various styles and skill levels. Whether you love soft pastels, vibrant colors, botanical themes, or abstract patterns, there’s something here to inspire your next masterpiece and help you express your unique artistic voice.
1. Abstract Acrylic Wall Art with Bold Color Blocks
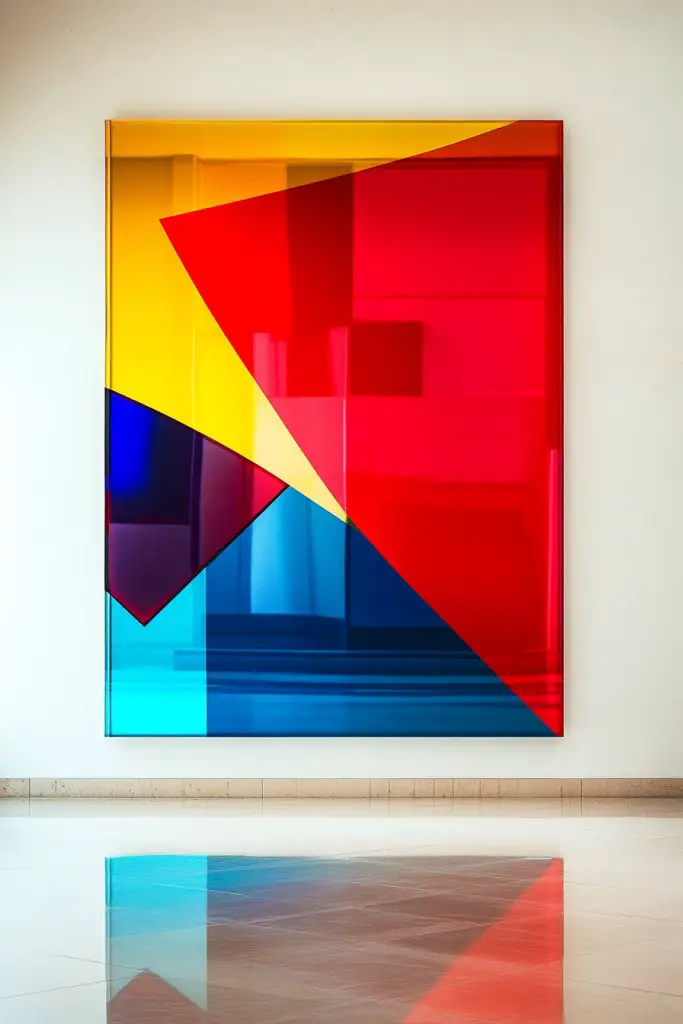
Ever feel like your blank walls are just sucking the life out of your space? Maybe you want to add a punch of color and personality without going overboard. Abstract acrylic wall art with bold color blocks offers a quick fix for dull walls, giving your room a modern, energetic vibe. It’s perfect for anyone craving a statement piece that’s both stylish and easy to create.
Recommended Products to replicate this idea
| # | Preview | Product | |
|---|---|---|---|
| 1 |

|
clicked craft Acrylic Photo Wall Art - Picture Printed on Glass, Acrylic Gift, Portrait Photo, Home... | Check Latest Price |
| # | Preview | Product | |
|---|---|---|---|
| 1 |

|
30 PCS Push Pins Picture Hangers Wall Hooks, Double Headed Thumb Tacks for Wall Hangings, Renter... | Check Latest Price |
Imagine a large canvas dominated by vibrant rectangles in fiery reds, cool blues, and sunny yellows. The textured acrylic paint catches the light, creating a dynamic interplay of shadows and shine. Sharp geometric shapes contrast with soft, blended edges, making the artwork pop off the wall. It’s like a piece of modern art you’d find in a gallery but customized to fit your color palette.
Switch up the colors to match seasonal themes—pastel shades for spring, deep jewel tones for winter. You can also experiment with different shapes, from squares to irregular polygons, to suit your aesthetic. For small spaces, opt for a single bold block, while large walls can handle a sprawling multi-piece arrangement. Metallic accents or textured mediums can add extra flair for different styles.
Start with painter’s tape and large canvas or sturdy board. Choose acrylic paints in your favorite shades, then block out your design. Use painter’s tape to create crisp edges or freehand for a more organic look. Layer the paint, allowing each color to dry before adding the next for depth. Finish with a gloss varnish if you want extra vibrancy and protection. Hang with secure hooks or rails, ensuring the artwork is taut and level.
Add metallic or neon acrylics to make certain blocks stand out even more. Incorporate textured mediums like modeling paste for raised areas that catch the light differently. You could also add custom inscriptions or motifs within the color blocks for a personalized touch. Framing the piece with a sleek border can give it a polished, gallery-ready appearance.
Bold color blocks are a fantastic way to elevate your decor and showcase your artistic side. They’re forgiving, so even beginners can achieve impressive results. Plus, you can swap or update sections over time to keep your walls fresh and exciting. Ready to transform your space into a vibrant, modern haven?
2. Watercolor Botanical Prints for a Soft, Elegant Touch
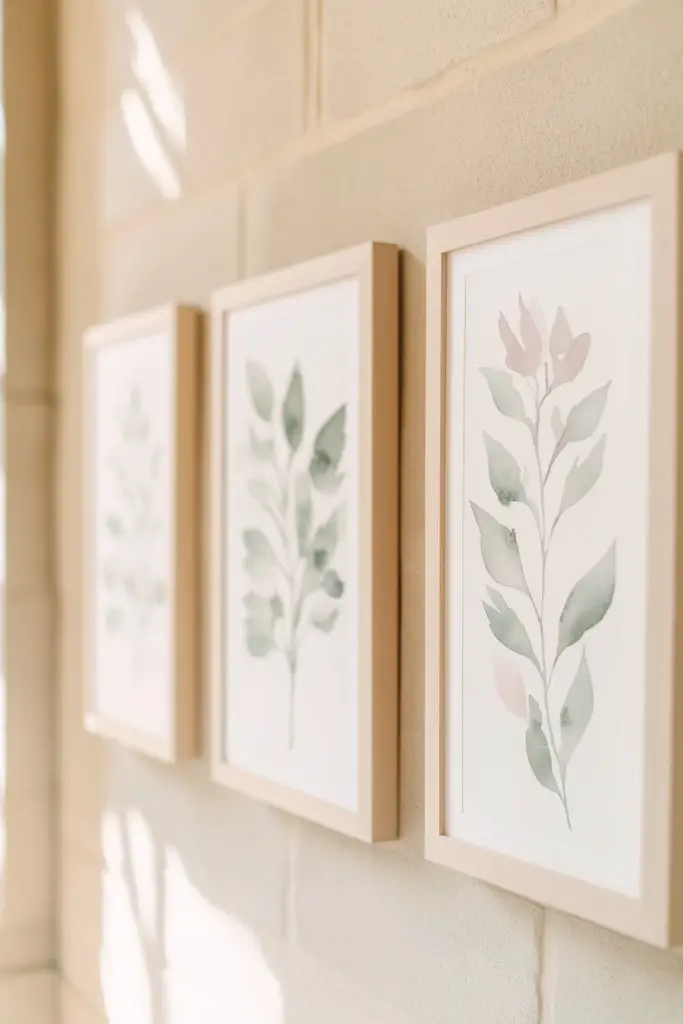
Does your home feel a little too sterile or lacking in nature-inspired charm? Watercolor botanical prints can soften any space, adding a gentle, elegant vibe. They’re perfect for creating a calming atmosphere that’s both stylish and soothing. Whether you prefer delicate florals or lush greenery, these prints bring a touch of the outdoors inside.
Recommended Products to replicate this idea
| # | Preview | Product | |
|---|---|---|---|
| 1 |

|
97 Decor Vintage Botanical Wall Art - Vintage Botanical Prints Plant Posters For Room Aesthetic,... | Check Latest Price |
Picture light, airy watercolor blooms spilling across textured paper, with subtle gradients blending seamlessly. Soft pinks, leafy greens, and gentle blues evoke a peaceful garden scene. The translucent washes create a sense of depth and movement, almost like the plants are swaying in a breeze. Framed in simple, light wood or white mats, these prints look effortlessly chic.
Mix and match different floral styles—romantic roses, wildflowers, or tropical leaves—for varied looks. For a modern twist, combine watercolor prints with minimalist frames or hang as a series along a hallway. Seasonal variations work well: vibrant spring blooms or muted winter branches. You can also print on different materials like textured paper or canvas for added dimension.
Start by selecting high-quality watercolor prints or create your own with watercolor paints and good paper. Use light pencil sketches as guides before applying washes of color with water brushes. Focus on soft, flowing strokes and layered transparency. Frame your finished pieces with simple borders, or mount on foam backing for a floating effect. Hang at eye level for maximum impact.
Add hand-lettered quotes or botanical labels in fine ink for a personalized touch. Incorporate metallic accents like gold foil details on the leaves or flowers. Customize the size and arrangement to fit your wall space, creating a mini botanical gallery. Combining different types of flowers or leaves can also add visual interest.
Watercolor botanical prints create a serene, sophisticated ambiance that elevates your decor effortlessly. They’re versatile enough to suit both classic and contemporary styles. Plus, making your own prints can be a rewarding creative project. Ready to bring nature’s beauty into your home?
3. Minimalist Line Art for Sophisticated Simplicity
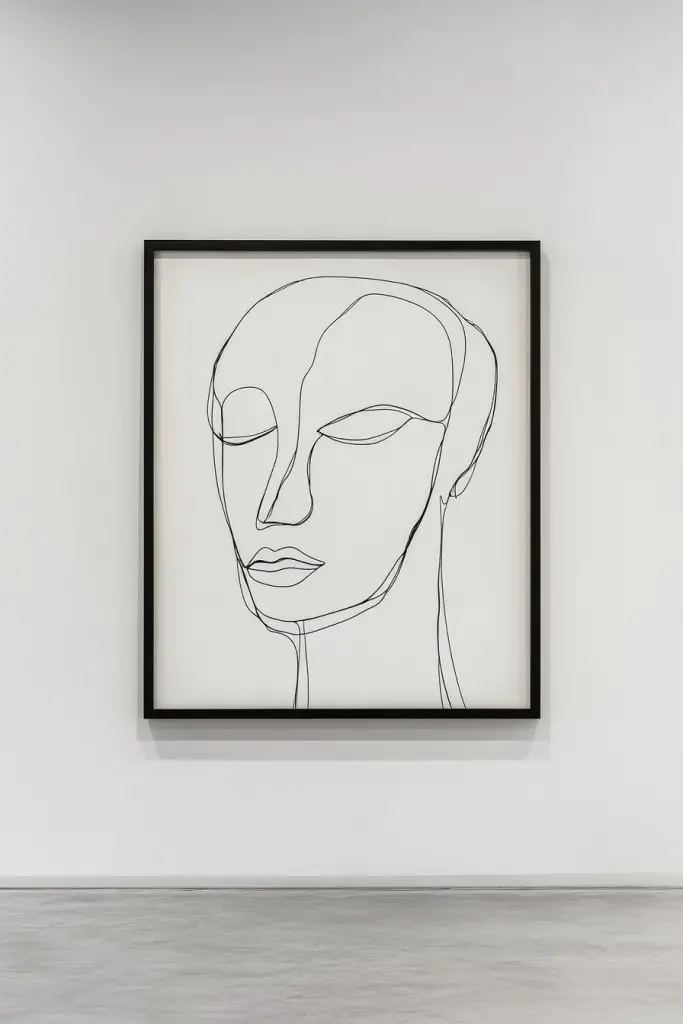
Feeling overwhelmed by busy, cluttered art on your walls? Sometimes less really is more. Minimalist line art offers a chic, understated way to add personality without cluttering your space. It’s perfect for those who love clean, modern aesthetics but still want a touch of artistic flair.
Recommended Products to replicate this idea
| # | Preview | Product | |
|---|---|---|---|
| 1 |

|
Clabby Minimalist Wall Art 16 Pieces 8 x 10 Inch Minimalist Line Wall Art Decor Black and White... | Check Latest Price |
| # | Preview | Product | |
|---|---|---|---|
| 1 |

|
Supcline Ultra Slim TV Wall Mount for 42 to 100 inch Flat & Frame TVs, Only 0.31” Low Profile Flat... | Check Latest Price |
Imagine a single continuous black line forming a delicate face, an abstract animal, or an elegant plant. The simplicity of the design draws focus to the fluid motion and expressive strokes. The artwork’s negative space becomes just as important as the line itself, creating a balanced, calming visual. Mounted in slim frames or on unframed mats, these pieces look effortlessly sophisticated.
Choose lines that reflect your personality, from abstract figures to geometric shapes. For a more playful look, incorporate color accents or metallic inks. You can also combine multiple small line drawings into a gallery wall for visual interest. Seasonal themes—like minimalist holiday motifs—can refresh the vibe throughout the year.
Start with a simple sketch or use graphic design software to create your line art. Transfer the design onto high-quality paper or print it digitally. Use fine-tipped ink pens or metallic markers for crisp, clean lines. Keep the framing minimal—think slim black or metallic borders—so the artwork remains the focus. Mount with acid-free adhesives or clips for a sleek presentation.
Add small color dots or subtle shading to bring certain elements to life. Customize the subject matter to reflect your favorite themes or personal symbols. You can also experiment with textured papers or layered materials to add a tactile dimension. Personal sketches or initials can be integrated for a truly unique piece.
Minimalist line art combines modern elegance with effortless style, making every wall feel curated. It’s an easy DIY project for all skill levels and adapts well to any room. Once you master the simple technique, your art collection will grow naturally. Ready to embrace the beauty of simplicity?
4. DIY Canvas Gallery Wall with Mixed Media Elements
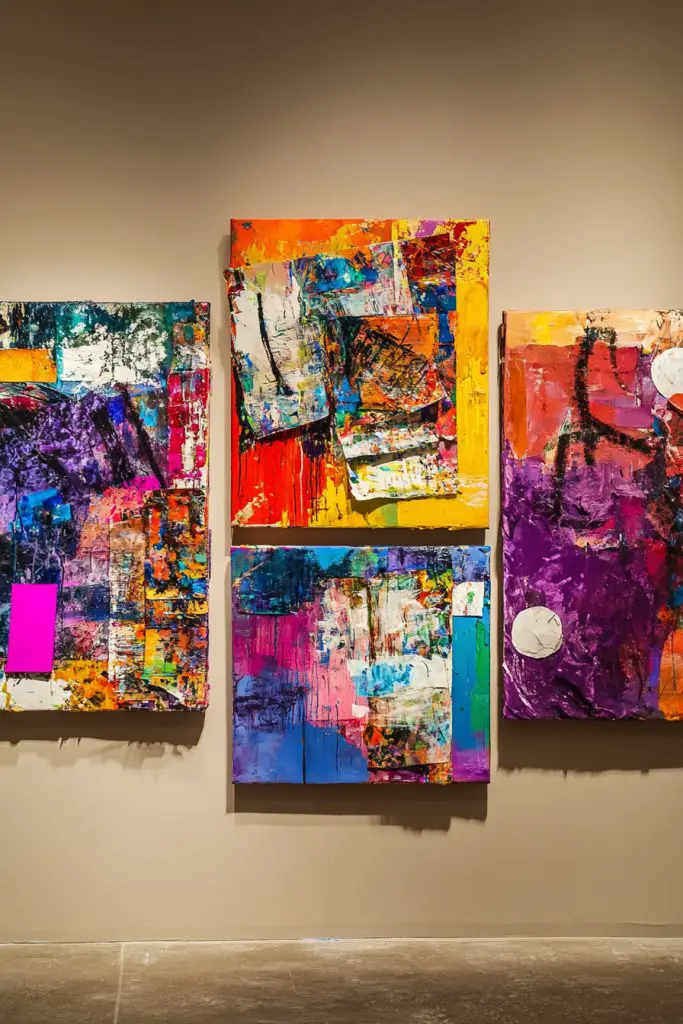
Want to create a bold focal point without hiring a pricey artist? A DIY gallery wall with mixed media elements lets you showcase your personality and creativity. It turns blank walls into vibrant storytelling canvases that reflect your style. Plus, it’s a fun project that feels more like play than work.
Recommended Products to replicate this idea
| # | Preview | Product | |
|---|---|---|---|
| 1 |

|
Personalized Custom Canvas Prints: Photo On Canvas (Framed 11X14) Transform Your Photos into... | Check Latest Price |
| # | Preview | Product | |
|---|---|---|---|
| 1 |

|
Ranger Texture Paste, 3.9 fl oz | Check Latest Price |
Visualize a series of canvases featuring textured paint layers, stenciled patterns, and collage snippets. Each piece tells a part of your story—abstract backgrounds, bold strokes, and layered materials create depth. The textures catch the light differently throughout the day, adding visual intrigue. Arranged in a balanced grid or eclectic cluster, these works become a captivating display.
Mix media by combining acrylics, modeling paste, fabric scraps, and even small objects like metal or wood pieces. Choose a unifying color scheme or theme for cohesion, or go wild with contrasting styles for an eclectic look. For smaller rooms, opt for a single row; larger walls can handle a sprawling, multi-tiered arrangement. Seasonal updates can be made by swapping or adding new pieces.
Begin by selecting blank canvases of varying sizes. Prepare your base layers using acrylic paints and textured mediums. Use stencils or masking tape for geometric patterns, then layer collage elements with gel medium or Mod Podge. Incorporate elements like textured paste or metallic leaf for extra richness. Mount each piece with sturdy hooks or rails, spacing evenly for balance. Consider adding LED strip lighting for a dramatic effect.
Personalize by adding your own photographs, handwritten notes, or favorite quotes directly onto the canvases. Use metallic or iridescent paints to highlight certain areas. Incorporate three-dimensional objects or fabrics to create tactile interest. Arrange the canvases asymmetrically for a modern, dynamic look that truly reflects your personality.
A mixed media gallery wall showcases your creative spirit and transforms any plain wall into a masterpiece. It’s adaptable to any style, from boho to industrial. Plus, you can continuously evolve your collection—adding or replacing pieces over time. Your space will feel uniquely yours, filled with art that speaks to you.
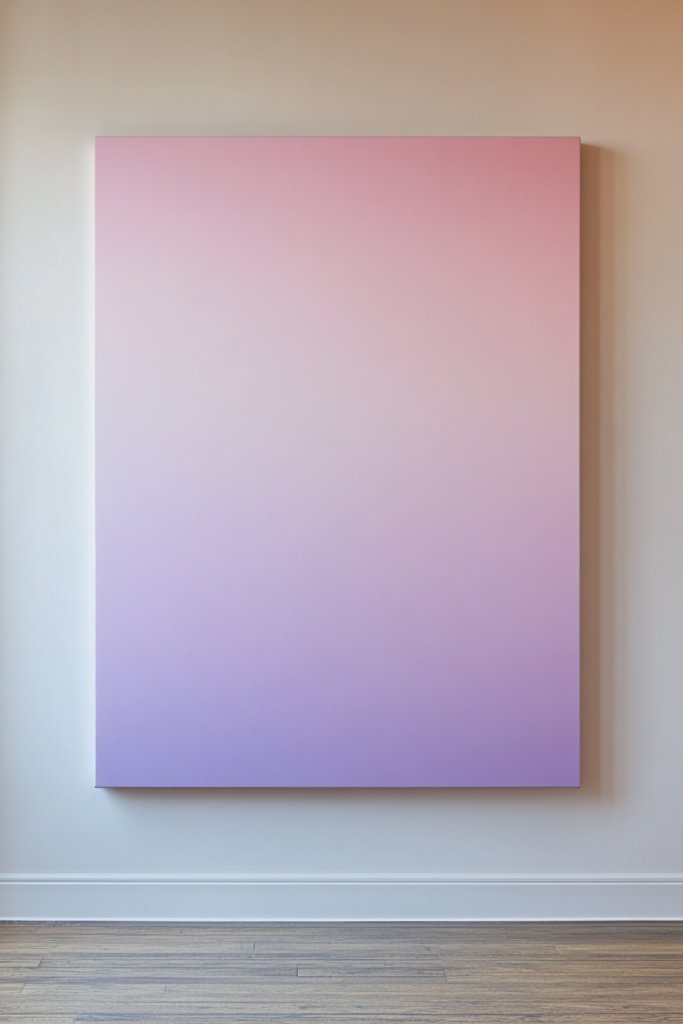
5. Ombre Painted Canvas for a Subtle Gradient Effect
Looking for a calming, versatile backdrop for your space? An ombre painted canvas offers a gentle gradient that adds depth without overwhelming your decor. It’s perfect for creating a soothing atmosphere or tying different elements together. Plus, it’s surprisingly simple to DIY, even for beginners.
Recommended Products to replicate this idea
| # | Preview | Product | |
|---|---|---|---|
| 1 |
|
30 PCS Push Pins Picture Hangers Wall Hooks, Double Headed Thumb Tacks for Wall Hangings, Renter... | Check Latest Price |
Imagine a large canvas fading smoothly from deep indigo at the top to soft blush at the bottom. The seamless transition of colors creates a sense of flow and tranquility. Light reflects softly off the subtle gradient, making the wall feel alive and dynamic. Framed in a sleek black or white border, it becomes a sophisticated focal point.
Choose color schemes that match your mood or season—cool blues and greens for summer, warm oranges and reds for fall. The gradient can be horizontal, vertical, or diagonal, depending on the effect you want. For a more textured look, incorporate metallic or pearl pigments or add subtle patterns within the gradient.
Start with a primed, smooth canvas or a sturdy panel. Mix your paints with a medium to extend drying time and ensure a seamless blend. Use large, flat brushes or sponges to apply the colors, blending as you go for a smooth transition. Work in sections, moving from dark to light, and use a clean brush or sponge to soften edges. Finish with a clear matte or gloss sealant for longevity.
Add metallic or iridescent accents to certain areas of the gradient for extra shimmer. Incorporate subtle textures with sponges or palette knives before the paint dries. Personalize with a favorite quote or symbol subtly embedded into the gradient. You can also layer multiple ombres for a more complex, multi-dimensional effect.
Ombre canvases bring a tranquil, modern touch that fits well in any room. They’re forgiving and adaptable, allowing you to experiment with colors and techniques. Once mastered, you can create a series of gradients for a cohesive look across your home. Ready to add a soft, calming glow?
6. Folk Art-Inspired Painted Plates for Decorative Accents

Want to add a splash of color and charm to your home without the fuss of traditional art? Folk art-inspired painted plates can serve as whimsical accent pieces that brighten up any space. They’re easy to make and perfect for showcasing your creative side in a playful way.
Recommended Products to replicate this idea
| # | Preview | Product | |
|---|---|---|---|
| 1 |

|
FolkArt PROMO830 Multi Satin Finish Acrylic Craft Paint Set Designed for Beginners and Artists,... | Check Latest Price |
| # | Preview | Product | |
|---|---|---|---|
| 1 |

|
Wall Plates, Duplex Outlet Covers, Toggle Light Switch Plates, Decorator Light Switch Cover, Bamboo... | Check Latest Price |
Picture a set of ceramic plates decorated with bold, colorful motifs—flowers, animals, or abstract patterns—reminiscent of traditional folk art. The designs are lively and imperfect, giving them a handcrafted, authentic feel. When displayed on a wall or atop a shelf, they add a cheerful, artistic vibe to your decor.
Mix different motifs and color schemes for a vibrant, eclectic look. For a more refined aesthetic, stick to a monochromatic palette with intricate detailing. You can also customize plates for seasonal themes—pumpkins for fall, snowflakes for winter. Mount them with decorative brackets or hangers that complement your style.
Start with plain ceramic plates and high-quality ceramic paints or markers. Sketch your design lightly with pencil, then fill in with bold, vibrant colors. Use fine brushes for detailed work and seal with a clear, food-safe varnish if you intend to use the plates functionally. For wall display, attach sturdy plate hangers or wall brackets designed for ceramics.
Personalize by adding initials, dates, or custom motifs that hold meaning for you. Incorporate metallic or glitter accents to make the designs pop. Arrange the plates in a creative pattern—circular, linear, or clustered—for visual interest. You could also incorporate smaller painted ceramics like cups or bowls into your display.
Folk art-inspired painted plates bring a lively, handcrafted feel that can brighten any corner. They’re a fun project that doesn’t demand professional skills—just patience and creativity. Displaying your own art adds personality and warmth to your home. Ready to get crafty?
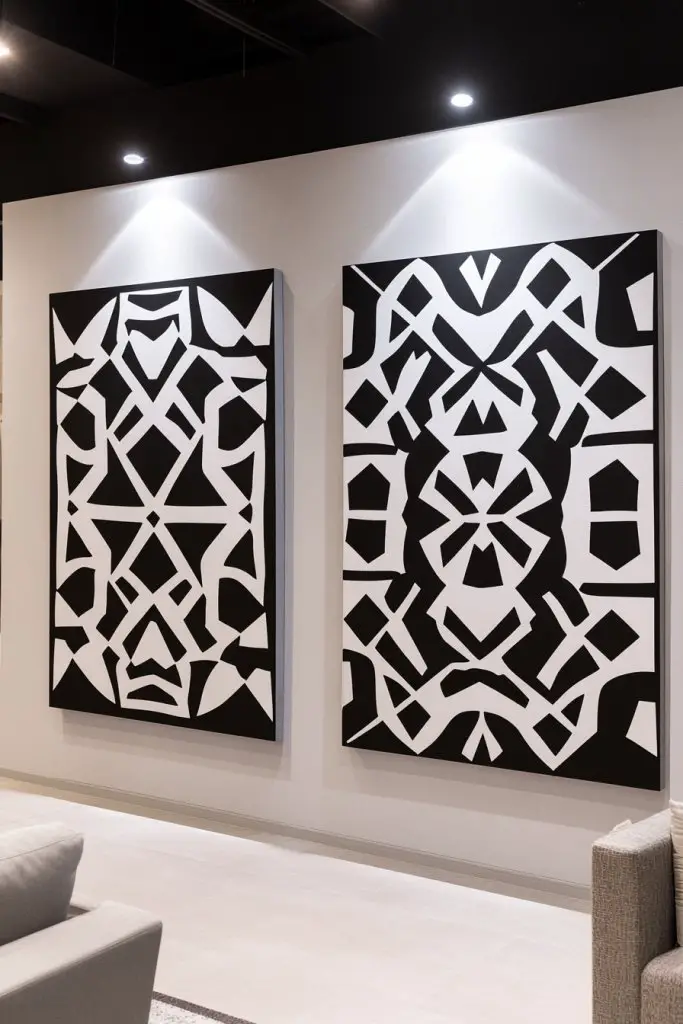
7. Stenciled Geometric Patterns on Large Wall Panels
Tired of boring, plain walls that lack visual interest? Stenciled geometric patterns can instantly elevate your space with minimal effort. They add a contemporary, sophisticated touch that’s both trendy and timeless. Plus, they’re a budget-friendly way to achieve a designer look.
Recommended Products to replicate this idea
| # | Preview | Product | |
|---|---|---|---|
| 1 |

|
Cutting Edge Stencils - Stencil Essential Kit - Dense Foam Roller, White Bristle Brush, and Clip-On... | Check Latest Price |
| # | Preview | Product | |
|---|---|---|---|
| 1 |

|
Liquid Nails Heavy Duty Construction Adhesive (LN903), 10 oz | Check Latest Price |
Visualize a large wall adorned with crisp black triangles and squares on a muted background. The repetitive, symmetrical patterns create rhythm and order, making the room feel more structured. The sharp lines and contrasting colors catch the eye, adding depth and dimension. When done right, it looks like a custom mural but is much easier to DIY.
Play with different color combos—muted tones for subtle sophistication or bold hues for drama. Use metallic or textured paints for added luxury. Vary the scale of the patterns for a more dynamic visual. Perfect for feature walls in living rooms, bedrooms, or even offices.
Begin by choosing your stencil pattern and wall surface. Use painter’s tape to mark the edges and ensure clean lines. Secure the stencil with painter’s tape or spray adhesive. Use a dense foam roller or brush to apply paint, dabbing gently and removing excess to avoid bleed. Repeat the process, aligning the pattern carefully for a seamless look. Finish with a protective sealant if desired.
Add metallic or glow-in-the-dark paints for extra effect. Incorporate different shapes or mix patterns for a custom mosaic feel. Use a contrasting border or frame to contain the design. You can also stencil over textured walls for a layered, tactile effect.
Geometric stenciling is a fun way to add modern flair without a big budget. It’s highly customizable and adaptable to any space. Once you get the hang of it, you can create entire feature walls. Ready to make your walls pop?
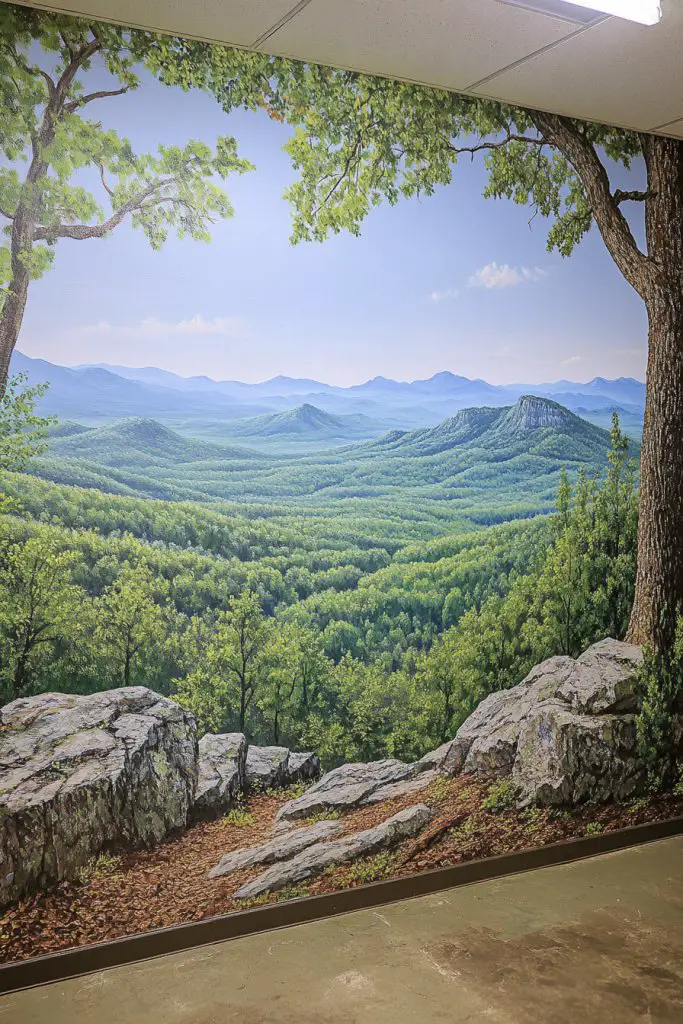
8. Nature-Inspired Mural with Mountain and Forest Scenes
Craving a breathtaking focal point that brings the outdoors inside? A nature-inspired mural featuring mountains and forests can transform a dull wall into a captivating landscape. It’s perfect for creating a sense of escape and adventure right in your own home.
Recommended Products to replicate this idea
| # | Preview | Product | |
|---|---|---|---|
| 1 |

|
Roman’s E-Z Hang Peel & Stick Wallpaper Helper + Pre-Pasted Activator, Clear, Non-Staining, 32... | Check Latest Price |
| # | Preview | Product | |
|---|---|---|---|
| 1 |
|
3 Pieces Mountain Canvas Wall Art for Living Room Nature Landscape Picture Sunflower Wall Decor for... | Check Latest Price |
Imagine a sweeping mountain range beneath a sky ablaze with sunset hues, rolling into lush, green forests. The scene extends across the wall, immersing you in a serene wilderness. The layers of color and detail evoke depth and realism, making the space feel larger and more open. It’s like having your own private retreat, painted directly into your room.
Choose different styles—from realistic to abstract—for varied moods. Seasonal variations, like snowy peaks or blooming forests, keep your decor fresh. Incorporate elements like a river or wildlife for added interest. You can adapt the size of the mural to fit small nooks or entire walls for maximum impact.
Start by selecting a high-quality mural wallpaper or mural-sized canvas. If painting directly, sketch the scene lightly with pencil. Use layered paints—starting with background gradients, then adding details and highlights. For wallpaper, carefully adhere with proper tools, smoothing out air bubbles. Seal or varnish for durability if painted on canvas. Incorporate natural textures nearby, like wood or stone, to complement the scene.
Add personal touches by including favorite landscape elements or custom color schemes. Incorporate subtle metallic or pearl paints to create shimmer in the sky or water. Framing the mural with natural wood trim can enhance the outdoor vibe. You can also add small, sculptural elements like faux rocks or tree branches for extra dimension.
A landscape mural can redefine your room, making it feel expansive and peaceful. It’s a bold choice that showcases your love for nature and adventure. With patience and planning, you can achieve a professional look. Ready to escape into your own mountain retreat?
9. Textured Impasto Painting with Thick Brushstrokes
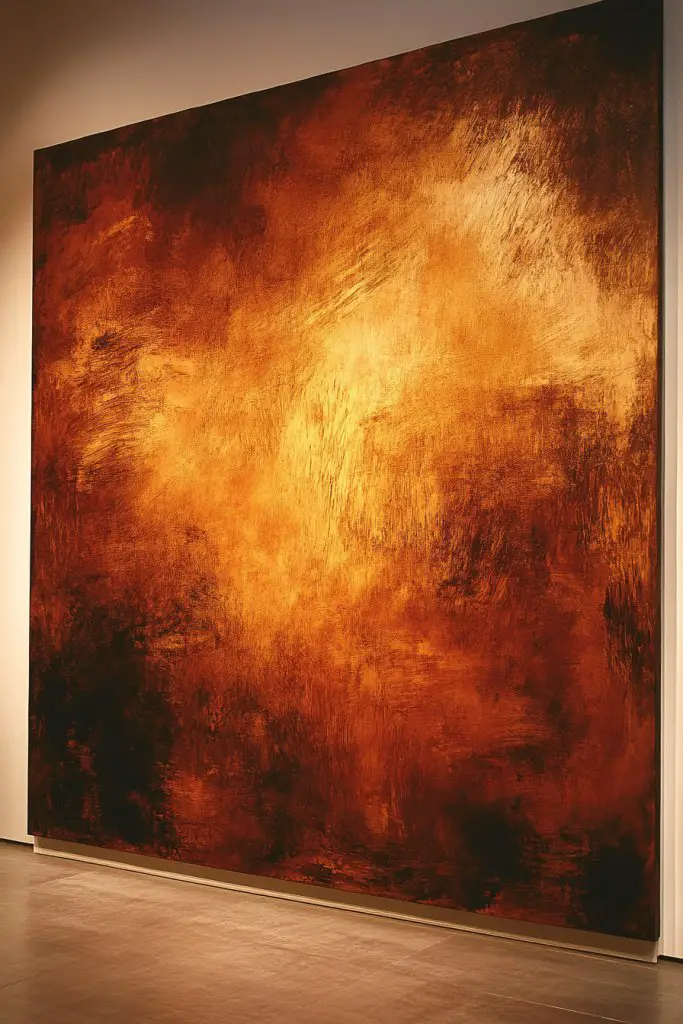
Bored with flat, lifeless wall art that lacks dimension? Impasto paintings with thick, expressive brushstrokes add a tactile, energetic feel that instantly livens up any space. They turn simple paintings into textural sculptures, making your decor stand out. It’s a bold choice for art lovers craving more than just visual appeal.
Recommended Products to replicate this idea
| # | Preview | Product | |
|---|---|---|---|
| 1 |

|
10PCS Palette Knife, Stainless Steel Painting Knife Set, Flexible Spatula Pallet Knife, Metal Artist... | Check Latest Price |
| # | Preview | Product | |
|---|---|---|---|
| 1 |
|
TouYinger 8x8 Shadow Box Frame Display Case with Letter Stickers, 3D Picture Frame, Display Case Box... | Check Latest Price |
Picture vibrant swirls of paint piled high on the canvas, creating a landscape of bold, textured strokes. The thick layers catch the light, casting shadows and highlighting movement. The artwork’s physicality invites viewers to see it not just with their eyes but with their touch. Mounted on a deep frame or directly on the wall, it becomes a dynamic focal point.
Use a limited color palette for a cohesive look or go wild with contrasting hues for energy. Experiment with different tools—palette knives, sponges, or even your fingers—to create varied textures. Incorporate metallic or iridescent paints for extra sparkle. Make abstract compositions or semi-representational scenes, depending on your taste.
Begin with a primed, sturdy canvas or thick board. Mix your paints with thickening mediums to achieve a heavy consistency. Apply with palette knives or brushes, building layers and textures as you go. Focus on expressive, spontaneous strokes that convey emotion. Once dry, consider sealing with a matte or gloss varnish to protect the surface. Hang with sturdy hooks or brackets to support the weight.
Incorporate metallic or pearl accents into the impasto for shimmer. Use contrasting colors within the thick textures to create visual interest. Customize by adding small sculptural elements or embedded objects. Creating a series with related themes or color schemes can build a cohesive art wall.
Impasto art radiates energy and personality, making your space uniquely yours. It’s a forgiving technique that encourages experimentation. With practice, you’ll develop a signature style that’s both bold and beautiful. Ready to make your walls a tactile masterpiece?
10. Sunburst or Radiant Paintings for a Dynamic Focal Point
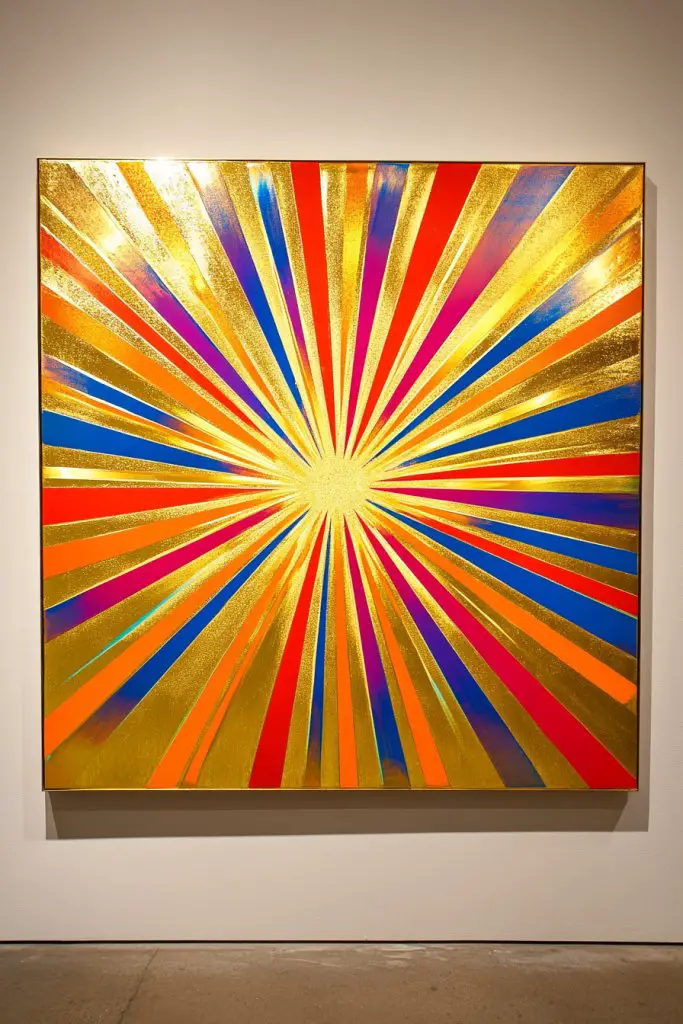
Looking to energize a dull wall with an eye-catching centerpiece? Sunburst or radiant paintings are perfect for creating a sense of movement and positivity. Their bold, symmetrical designs draw the eye and brighten the entire room. Plus, they add a vintage-modern vibe that’s hard to beat.
Recommended Products to replicate this idea
| # | Preview | Product | |
|---|---|---|---|
| 1 |

|
HUARCEY Gold Framed Vintage Wall Art for Living Room, Flowers Painting Canvas Prints Shelf Decor for... | Check Latest Price |
| # | Preview | Product | |
|---|---|---|---|
| 1 |
|
Personalized Custom Canvas Prints: Photo On Canvas (Framed 11X14) Transform Your Photos into... | Check Latest Price |
Imagine a burst of golden rays emanating from a central point, spreading outward in sharp, defined lines. The contrasting colors—like deep navy and shimmering gold—create a striking visual impact. The symmetry and radiating lines evoke feelings of energy, hope, and vitality. Mounted centrally, it transforms the space into an instant focal point.
Use metallic or iridescent paints for the rays to add shimmer. Play with different color combinations—warm tones for cozy vibes or cool hues for a sleek, modern look. Vary the size and number of rays for different room scales. Incorporate textured paints or layered techniques for extra depth.
Start with a sturdy canvas or plywood and mark the center point. Use a ruler and pencil to draw radiating lines, then paint the rays with a brush or sponge. For crisp edges, use painter’s tape or stencils. Layer metallic or pearl paints over base colors for shimmer. Seal with a clear coat for durability, then hang with appropriate hardware centered on your wall.
Add personal symbols or initials at the center for a customized touch. Incorporate subtle textures or metallic accents within the rays. Use contrasting matte and shiny finishes for added dimension. You can also create a series of smaller sunbursts for a playful, cohesive gallery.
Sunburst paintings bring a lively, optimistic energy that upgrades any decor. They’re simple to make but have a big visual impact. With a little practice, you’ll be creating your own radiant designs in no time. Ready to shine?
11. Whimsical Doodles and Zentangle-Inspired Art for Playful Decor
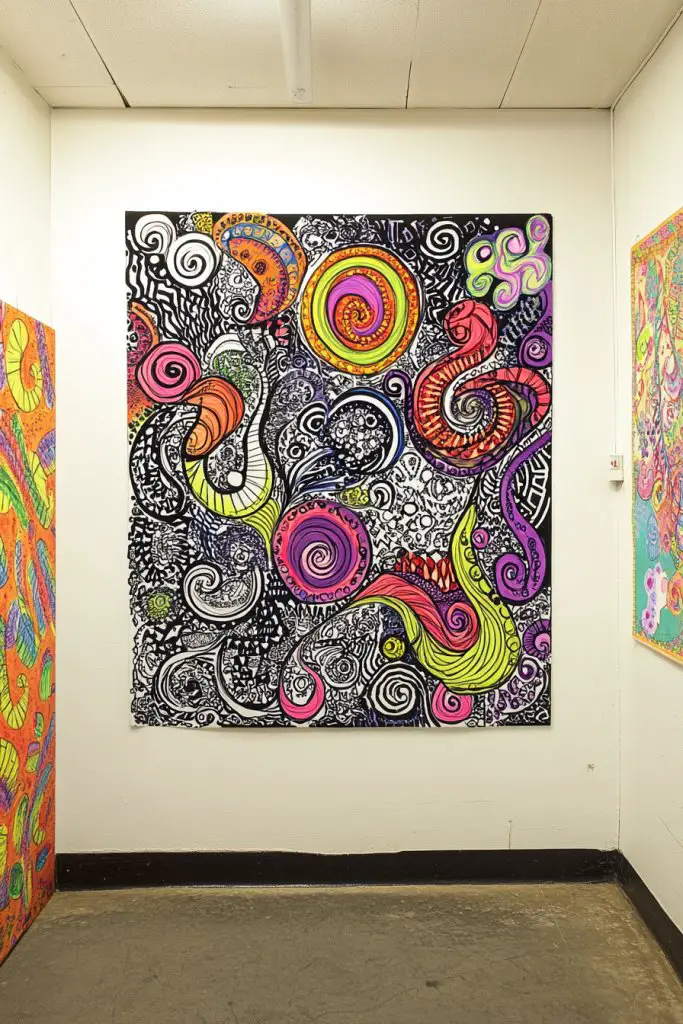
Feeling stuck with boring wall art that lacks personality? Whimsical doodles and Zentangle-inspired designs inject fun, creativity, and a touch of quirkiness into your decor. They’re perfect for sparking joy and showcasing your artistic side without needing professional skills.
Recommended Products to replicate this idea
| # | Preview | Product | |
|---|---|---|---|
| 1 |

|
16 PCS Framed Eclectic Wall Art Decor, Modern Maximalist Home Gallery Wall Frame Set Prints for... | Check Latest Price |
| # | Preview | Product | |
|---|---|---|---|
| 1 |

|
RoomMates Bluey Family and Friends Peel and Stick Wall Decals, RMK5457SCS | Check Latest Price |
Picture an intricate web of swirling lines, tiny patterns, and whimsical characters filling a canvas or large sheet. The repetitive, flowing motifs create a mesmerizing effect that invites closer inspection. The playful nature of the designs makes any space feel lively, relaxed, and full of personality. Framed simply or left unframed, they add a spontaneous, artistic vibe.
Mix different patterns—dots, stripes, floral motifs—for variety. Use vibrant colors or stick to monochrome for a more subdued look. Create themed series—like fantasy, animals, or abstract patterns—that reflect your interests. Display as a single statement piece or cluster multiple smaller doodles for a dynamic gallery.
Start with a blank canvas or high-quality paper. Use fine liners, markers, or pens to draw freehand, focusing on repetitive patterns and playful characters. Keep a sketchbook handy for practice. Once finished, you can add splashes of color or metallic accents for emphasis. Seal with a fixative spray if necessary and frame or mount for display.
Incorporate your favorite themes, like nature or fantasy, into the doodles. Use bold colors or metallics to highlight certain areas. Add hand-lettered words or phrases for extra personality. Personalize by including your initials or signature within the design.
Whimsical doodles bring a playful, relaxed vibe that makes your space instantly more inviting. They’re a great way to loosen up your artistic muscles and experiment freely. Once you get started, you’ll find yourself creating more spontaneous art that makes your home uniquely yours.
12. Monochrome Brushwork with Textural Variations
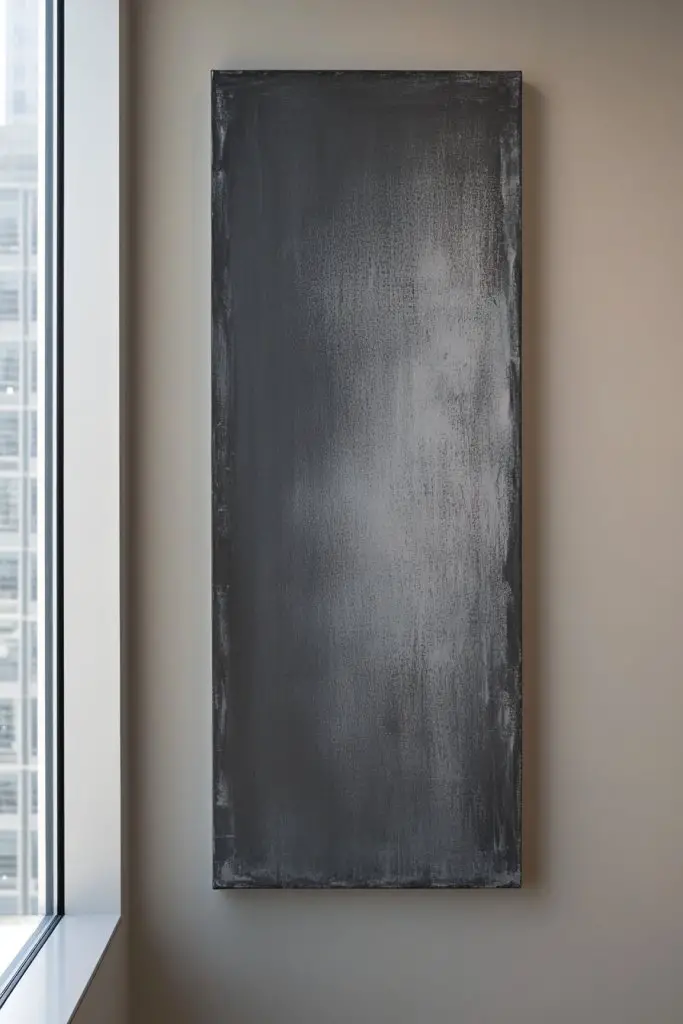
Want art that feels both sophisticated and effortless? Monochrome brushwork with textural variations offers a sleek, modern look that’s easy to achieve and endlessly adaptable. It’s perfect for creating a calm, cohesive atmosphere while still making a visual statement. Plus, it simplifies color choices, letting you focus on technique.
Recommended Products to replicate this idea
| # | Preview | Product | |
|---|---|---|---|
| 1 |

|
MCS Canvas Float Frames 16x20 Frame, Walnut Woodgrain for Finished Canvases, Vertical & Horizontal... | Check Latest Price |
| # | Preview | Product | |
|---|---|---|---|
| 1 |

|
KEFF 24-Pack Canvas for Painting, 6 of 5x7, 8x10, 9x12,11x14 Painting Canvas Boards, Art Supplies... | Check Latest Price |
Visualize a canvas painted entirely in shades of gray or deep black, with thick, expressive strokes creating a layered, textured surface. Variations in brush pressure and direction add depth and dimension, making the artwork feel alive. The tactile quality invites viewers to look closer, appreciating the nuances within the monochrome palette. Framed simply, it complements any decor style.
Experiment with different brush sizes and techniques—stippling, dry brushing, or sweeping strokes—to create varied textures. Incorporate metallic or matte finishes to add contrast within the monochrome theme. Use textured substrates like rough canvas or sanded panels to enhance the tactile effect. It’s adaptable for abstract, landscape, or minimalist styles.
Choose a high-quality surface and prepare it well. Mix your paint with medium for better flow and control. Use a variety of brushes to apply different strokes—thick, thin, stippled. Build layers gradually, allowing each to dry for a richer effect. Focus on the emotional impact of your brushwork rather than detailed realism. Seal with a matte or gloss varnish, then hang in a spot that invites close inspection.
Add subtle metallic accents or textured elements like sand or fabric to enhance the surface. Incorporate hand-lettered words or symbols that resonate with you. Personalize by choosing shades that evoke specific moods—cool grays for serenity, warm blacks for intensity. Create a series to explore different moods or themes in monochrome.
Monochrome brushwork proves that simplicity can be stunning. It’s an accessible way to develop your technique and express emotion through texture. As your skills grow, so will your confidence in creating compelling, cohesive art collections. Ready to explore the power of shades?
13. Abstract Expressionist Splatter and Drip Paintings
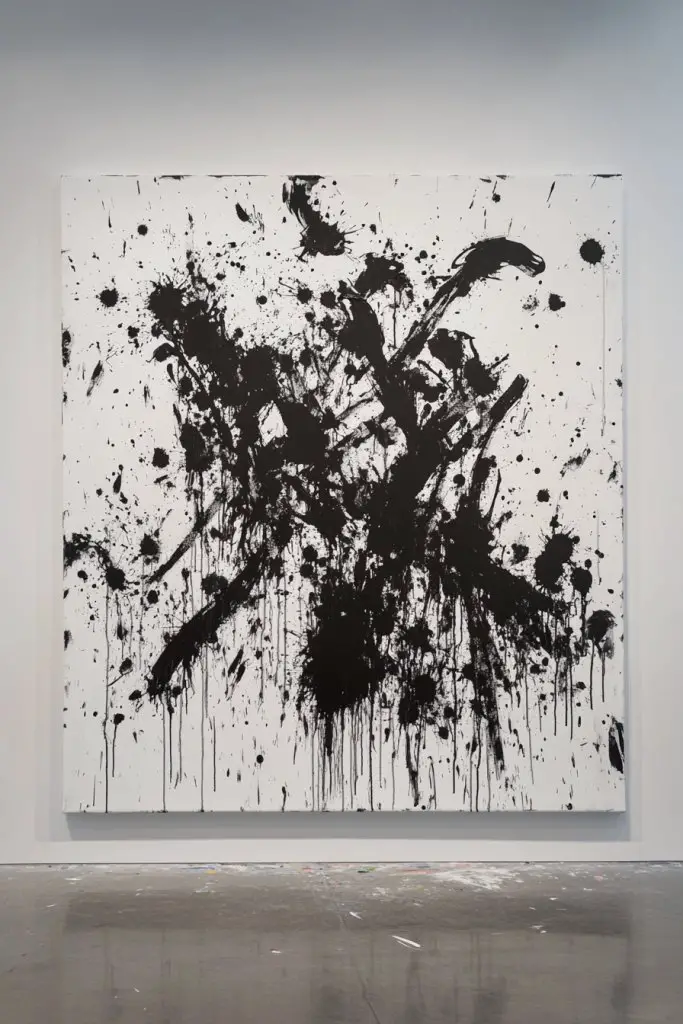
Craving an art piece that’s full of energy and spontaneity? Abstract expressionist splatter and drip paintings deliver just that, turning chaos into beauty. They’re perfect for adding a dynamic focal point that feels alive and raw. Plus, they’re a fun way to unleash your inner artist without needing technical precision.
Recommended Products to replicate this idea
| # | Preview | Product | |
|---|---|---|---|
| 1 |

|
ESRICH Canvas Boards for Painting, 5 Pack Canvases for Painting 8x10 Cotton Primed Acid Free Blank... | Check Latest Price |
| # | Preview | Product | |
|---|---|---|---|
| 1 |
|
Self Adhesive Picture Frame Backing Tape Rolls Kraft Brown 2'' Wide x 55 Yd | Check Latest Price |
Imagine a canvas covered in bold, random splashes of color—reds, yellows, blacks—frozen in motion. The drips and splatters create a sense of movement, like a visual explosion. The randomness invites viewers to interpret the chaos, making each piece uniquely expressive. When hung boldly, these paintings inject vitality into any room.
Use bright, contrasting colors for maximum impact or stick to monochrome for a more subdued look. Experiment with different tools—brushes, sticks, or even your hands—to create varied splatter effects. Combine with other abstract works or keep as a standalone statement piece. Adjust the size based on wall space for a dramatic or subtle effect.
Prepare a sturdy canvas or board, then load brushes, sticks, or sponges with paint. Flick, drip, or throw paint onto the surface, controlling the amount and direction for desired effects. Layer multiple colors for complexity, allowing each layer to dry before adding more. Protect surrounding areas with newspaper or drop cloths. Seal with a protective varnish and hang prominently.
Add metallic or fluorescent paints for extra vibrancy. Incorporate your favorite colors or create a theme—like a fiery explosion or a calming storm. Personalize by including small symbols or initials within the splatters. Create a series to explore different color combinations and emotional effects.
Splatter and drip art reminds us that beauty often emerges from chaos. It’s a liberating process that encourages experimentation and expression. With practice, you’ll develop your own distinctive style that energizes your decor. Ready to unleash your inner abstract artist?
14. Pastel-toned Geometric Collage on Canvas
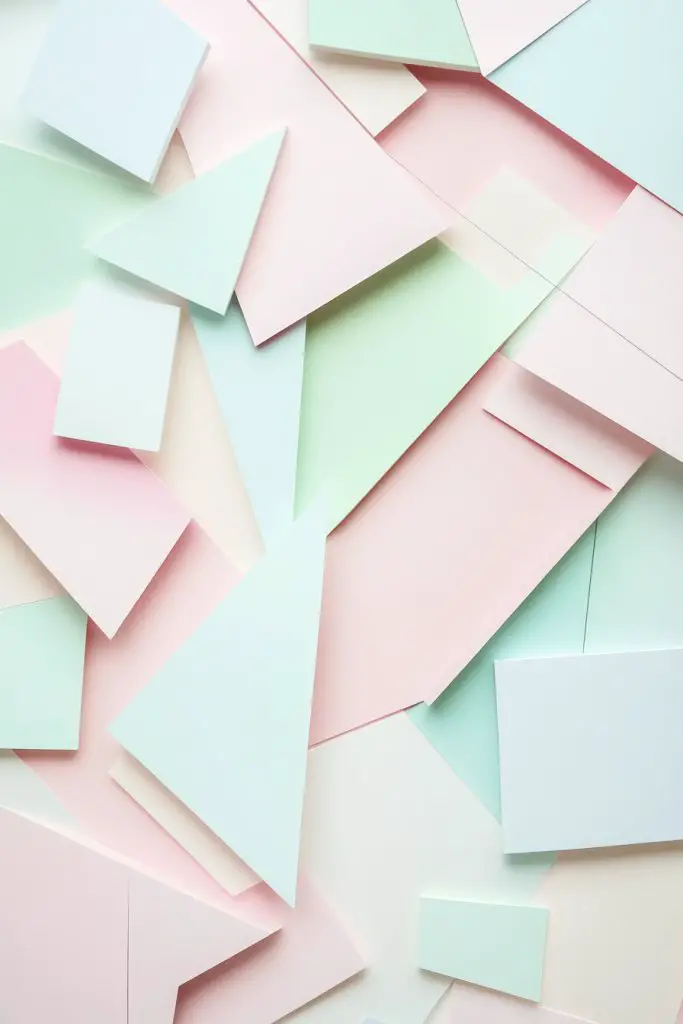
Looking for a fresh, modern way to add color and structure to your walls? Pastel-toned geometric collages combine soft hues with clean lines, creating a calming yet striking visual. They’re perfect for brightening a space while maintaining an elegant, contemporary vibe. Plus, they’re easy to customize and update.
Recommended Products to replicate this idea
| # | Preview | Product | |
|---|---|---|---|
| 1 |
|
30 PCS Push Pins Picture Hangers Wall Hooks, Double Headed Thumb Tacks for Wall Hangings, Renter... | Check Latest Price |
| # | Preview | Product | |
|---|---|---|---|
| 1 |

|
Large Framed Black and White Neutral Abstract Wall Art for Living Room, 3 Piece Boho Canvas Prints... | Check Latest Price |
Picture a canvas filled with overlapping triangles, circles, and rectangles in blush, mint, lavender, and peach. The layered shapes create depth and movement, while the pastel palette keeps the overall look delicate and soothing. The composition balances chaos and order, making your wall feel lively yet harmonious. Framed or mounted directly, it becomes a centerpiece.
Vary the shapes—mix circles with sharp-edged polygons—to create visual interest. Use different pastel shades in each shape for a vibrant, layered look or stick to a monochromatic scheme for subtle elegance. Incorporate textured papers or fabrics behind the shapes for added dimension. Adjust the size for small nooks or large feature walls.
Begin by sketching your design on graph paper or using a digital tool. Cut out shapes from pastel-colored paper or paint directly onto a prepared canvas. Use glue or acrylic mediums to layer the shapes, overlapping for depth. Seal with a clear varnish if painted, or attach with mounting squares for paper shapes. Finish with a sleek frame or leave raw edges for a modern touch.
Add metallic or glossy accents to select shapes for extra shine. Incorporate personal symbols or initials into the collage for a custom touch. Mix in different textures—glossy, matte, or metallic—to enrich the visual experience. Create a series with varying color schemes for a cohesive collection.
Pastel geometric collages bring a fresh, trendy vibe to any space, balancing softness with modernity. They’re a fantastic DIY project that results in a personalized art piece. As you experiment, your confidence in combining shapes and colors will grow. Ready to craft your own pastel masterpiece?
15. Faux Canvas Painted Mural for a Faux-Textured Wall Look
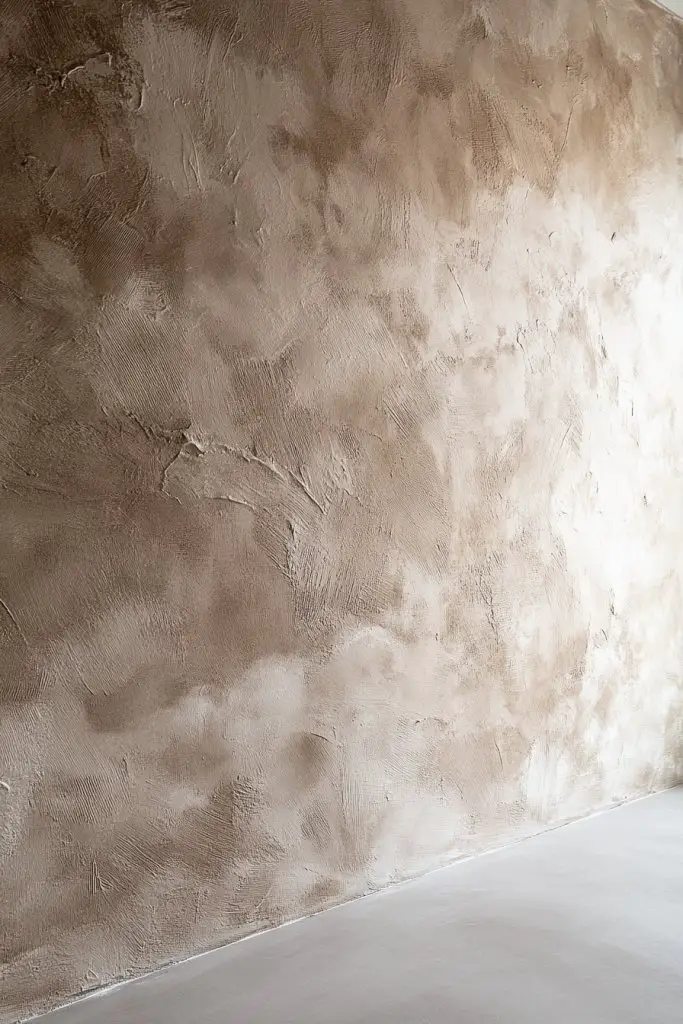
Want the richness of textured walls without the hassle or cost of actual fabric or plaster? A faux textured mural painted to resemble canvas or fabric can add depth and sophistication. It’s a clever way to elevate your decor with a minimal investment and maximum impact.
Recommended Products to replicate this idea
| # | Preview | Product | |
|---|---|---|---|
| 1 |

|
FLFK Fake Window Wall Sticker - Landscape Faux Window Wall Mural for Wall Decor, Stick and Peel Wall... | Check Latest Price |
| # | Preview | Product | |
|---|---|---|---|
| 1 |

|
Art3d Pre-Cut Wall Molding Set of 6 pcs, Ready-to-Assemble Wainscoting Panels for Interior Wall... | Check Latest Price |
Picture a large wall painted with subtle, layered brushstrokes mimicking woven fabric or textured canvas. The surface appears tactile, with variations in color and pattern creating the illusion of depth. Light plays differently across the textured surface, adding richness and warmth. Framed with simple molding, it becomes a luxurious feature in your space.
Choose patterns that suit your style—subtle linen weaves, distressed leather, or rustic canvas textures. Use a combination of sponges, brushes, and palette knives to create layered effects. Incorporate shading and highlights to enhance the illusion of depth. This technique works well in living rooms, bedrooms, or even entryways.
Start with a smooth, primed wall surface. Mix your paints with mediums to create textured effects. Use sponges or stippling brushes to apply layers, varying the pressure and direction. Build up the texture gradually, adding darker shades for shadows and lighter tones for highlights. Finish with a matte or satin sealant to preserve the textured look. Mount or frame as desired.
Add metallic or iridescent paints to certain areas for shimmer. Incorporate subtle patterns or motifs that align with your decor theme. Personalize by including your initials or favorite symbols subtly within the texture. This faux mural can serve as a backdrop for other decorative elements.
Faux textured murals mimic high-end wall coverings at a fraction of the cost. They’re a creative way to add visual interest and depth, making your space feel richer. With patience and practice, you can master this technique and impress everyone with your DIY skills. Ready to create a textured masterpiece?
16. Upcycled Art Using Recycled Materials and Paints
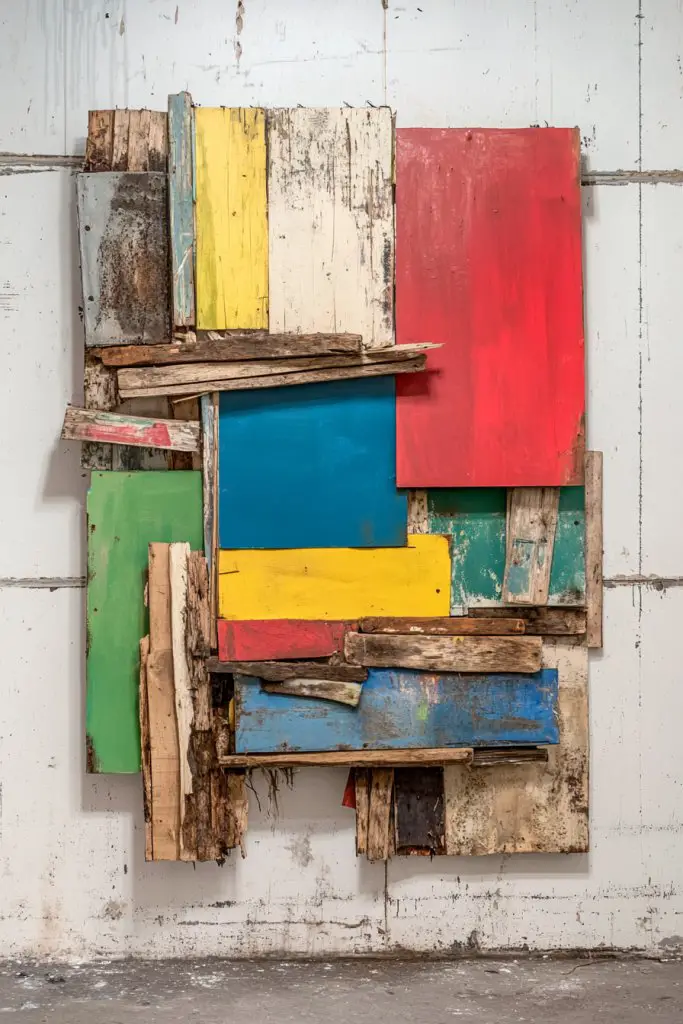
Looking to make your decor more eco-friendly and budget-conscious? Upcycled art combines sustainability with creativity, transforming reclaimed materials into stunning wall pieces. It’s a perfect way to give new life to old objects while showcasing your artistic flair. Plus, it’s a conversation starter!
Recommended Products to replicate this idea
| # | Preview | Product | |
|---|---|---|---|
| 1 |
|
Rustic Weathered Reclaimed Wood Planks for DIY Crafts, Projects and Decor (6 Planks - 24" Long) | Check Latest Price |
| # | Preview | Product | |
|---|---|---|---|
| 1 |

|
ESTART Metal Birds Wall Art, Metal Vivid Birds on Branch Silhouette Wall Decor Black Leaves with... | Check Latest Price |
Imagine a large wooden pallet painted with vibrant colors and layered with different textures of reclaimed wood, metal, or fabric scraps. The piece tells a story of sustainability and creativity, blending raw, rustic elements with bold, modern strokes. It becomes a focal point that reflects your eco-conscious lifestyle. The textures and colors create a rich, tactile visual that invites closer inspection.
Use various reclaimed materials—wood, metal, plastic—to suit your style. Paint with acrylics, spray paints, or even natural dyes for a unique finish. Incorporate found objects like old tools, jewelry, or fabric for added dimension. The piece can be a single large statement or a series of smaller, themed works.
Collect and clean your materials thoroughly. Plan your design layout before painting or assembling. Use durable adhesives or nails to attach different elements securely. Paint and decorate with eco-friendly or inexpensive paints, experimenting with layering and textures. Seal with a protective coating if necessary. Mount your upcycled art with sturdy hardware, ensuring it’s safe and stable.
Add personal touches such as meaningful symbols or favorite colors. Incorporate recycled labels or tags with inspirational quotes. Use a mix of textures and finishes—matte, gloss, metallic—to enhance visual interest. Display alongside other eco-friendly decor pieces to create a cohesive theme.
Upcycled art proves that sustainability and style go hand in hand. It’s a rewarding process that turns trash into treasure, making your home uniquely yours. As you experiment, you’ll develop a keen eye for repurposing and a deeper appreciation for creative reuse. Ready to craft your eco-chic masterpiece?
Conclusion
With this diverse collection of pretty painting ideas, you’re equipped to transform your home and creative space into a gallery of your own making. Don’t hesitate to try these techniques and themes—each one offers a wonderful opportunity to develop your skills and showcase your personality. Dive in, get painting, and let your artistic journey flourish!