
18 Toddler Room Storage Ideas for Organized Play
A well-organized toddler room isn’t just about aesthetics; it’s about creating a functional space that sparks joy and encourages independence. Storage solutions for these vibrant spaces are more popular than ever, helping parents keep clutter at bay while allowing little ones to easily access their favorite toys and books.
In this article, you’ll find a variety of creative storage ideas that combine practicality with fun, from clever bins to space-saving shelves. Whether your toddler’s room is small or spacious, these ideas will inspire you to craft an organized haven that grows with your child and makes daily routines a breeze.
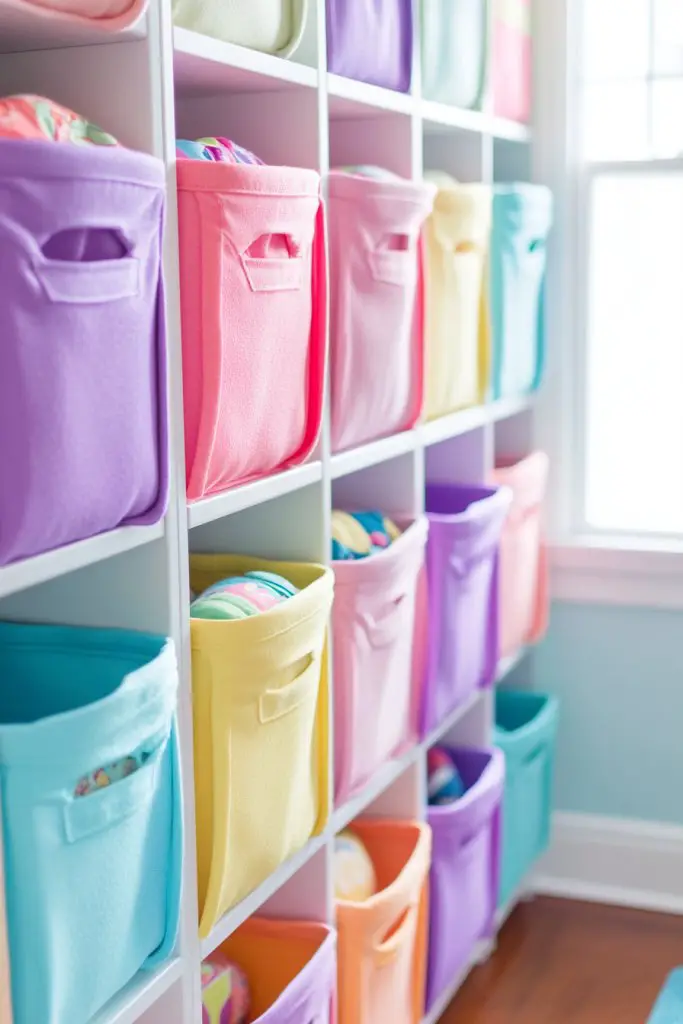
1. Colorful Cube Storage Units for Easy Access and Visual Appeal
Ever tried to keep a toddler’s room tidy when their toys seem to multiply overnight? It’s like herding tiny chaos-makers! Finding a way to organize toys without turning the space into a cluttered mess feels impossible sometimes. The goal is to create a system that makes cleanup less of a battle and more of a fun activity. Plus, who doesn’t love a splash of color to brighten the room?
Imagine a set of vibrant cube shelves stacked neatly on the wall, each cube bursting with toys, books, or art supplies. Bright hues like sunny yellow, playful turquoise, and cheerful pink make the space lively and inviting. The cubes are easy for tiny hands to access, encouraging independence. The textures of the plastic or painted wood add a tactile element that makes the storage as fun as the toys themselves. It’s a cheerful, organized playground that looks like a Pinterest dream.
You can mix and match colors to match your kid’s favorite themes or room decor. For smaller spaces, opt for vertical stacks to save floor space. If your child is into a particular theme—like animals or space—find cubes with themed stickers or decals. For a seasonal twist, swap out colors or add themed fabric bins inside the cubes. These units are flexible and grow with your kid’s changing tastes.
Start by measuring your wall space to choose the right size. Pick sturdy cubes made from durable plastic or painted wood that can handle daily roughhousing. Mount the cubes securely with appropriate anchors, especially for taller stacks. Use labels or colored stickers to categorize the contents—like ‘Legos’, ‘Books’, or ‘Arts & Crafts’. Arrange them in a pattern that’s visually pleasing and accessible. Regularly purge or rotate toys to keep the system manageable. This setup is simple enough for DIY installation, but a quick trip to the hardware store helps ensure stability.
Add personal touches by customizing the cubes with your child’s name or favorite characters. Incorporate fabric bins with fun patterns for smaller items or loose pieces. Use clear labels or pictures for pre-literate kids to identify their toys effortlessly. Incorporate a small chalkboard or whiteboard nearby for quick notes or reminders about cleanup. These small updates make the storage system uniquely theirs, encouraging pride and responsibility.
Bright, colorful cube storage units transform chaos into cheerful order, making cleanup part of playtime. They foster independence by allowing toddlers to find and put away their toys easily. Plus, the room looks lively and inviting, sparking creativity. With a simple, adaptable design, you’re set for a tidier, happier toddler space that grows alongside your kid’s imagination.
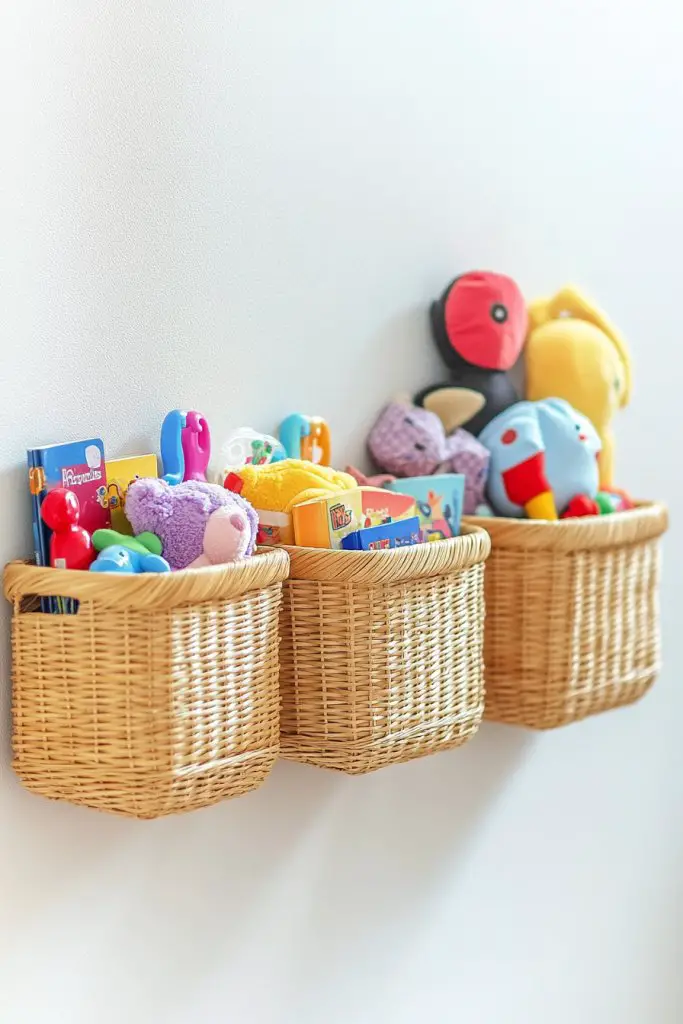
2. Wall-Mounted Baskets for Quick Reach Toy Storage
Ever struggle with toys strewn across the floor, making cleanup feel like an endless chore? Kids often leave their favorite items in inconvenient spots, turning the room into a small chaos zone. The key is to bring storage closer to their reach so they can grab and tidy up with minimal fuss. Plus, wall-mounted solutions save precious floor space and add a playful touch. Who said organization can’t be fun?
Picture a series of colorful, woven baskets hanging at toddler height on a wall. Each basket is filled with different toys—soft blocks, art supplies, or plush animals—creating a lively mosaic of storage. The baskets sway gently when touched, adding a tactile element that invites kids to explore. Bright colors and varied textures give the wall a dynamic, inviting look. It’s like a mini toy store right in your child’s room, organized and accessible.
Mix and match basket styles—rattan, fabric, or plastic—to match your decor or your child’s personality. Consider installing a low-mounted rail or hooks to hang the baskets securely. For added fun, label each basket with pictures or words to help pre-readers identify contents. Seasonal or themed baskets, like holiday patterns or favorite characters, can make the storage more engaging. These baskets are versatile and can be relocated or swapped out easily.
Start by choosing durable, lightweight baskets suitable for frequent use. Install a sturdy wall-mounted rail or a series of hooks at the right height for your toddler. Secure the baskets with strong hooks or clips, ensuring they can handle the weight of toys. Arrange them in a way that forms a visual balance and allows easy access. Use labels or pictures on the baskets to help your child identify their favorites. Reassess periodically to swap out toys or update the decor. This simple setup is quick to install and highly adaptable.
Decorate baskets with your child’s favorite colors, stickers, or fabric covers for added personality. Label each basket with simple pictures or words to boost their reading skills. Encourage your kid to help with arranging or decorating the baskets, fostering ownership. Incorporate a small step stool nearby for reaching higher baskets comfortably. These personalized touches turn an ordinary storage solution into a fun, interactive feature.
Wall-mounted baskets keep toys organized and within easy reach, turning cleanup into a quick, satisfying routine. They promote independence and responsibility, as your toddler can put away their toys without your constant help. The visual appeal adds a cheerful vibe to the room, inspiring your kid to stay organized. It’s a simple yet effective way to make tidying up part of their daily play. Plus, it frees up floor space for more important things—like extra playtime!
3. Multi-Functional Toy Chest with Seating Top

Ever felt like your kid’s toys are taking over every corner of the house? A solution that combines storage and seating could be your new best friend. The challenge is to find furniture that’s practical, safe, and appealing for a toddler’s room. An item that hides clutter but also invites your child to sit and relax sounds too good to be true, right? Well, it’s possible, and it’s stylish too.
Imagine a sturdy, sleek ottoman with a soft, cushioned top that doubles as a seat. Beneath the lid, spacious compartments hold plush toys, blankets, or books. The exterior is covered in a cozy fabric, perhaps with playful patterns or bright colors that match the room’s decor. When your child sits on it, they get a soft, supportive surface for reading or playing. The storage inside remains hidden until needed, keeping the room tidy and inviting.
Choose an ottoman in a color or fabric that complements the room’s theme—think a pastel pink for a girly room or a bold geometric print for a modern vibe. For more durability, opt for leather or faux leather covers, especially if your kid tends to be rough on furniture. Some models come with additional storage compartments or divided sections for better organization. If space is limited, a smaller bench with a lid might work, or add decorative pillows for extra comfort.
Start by selecting a sturdy, child-safe ottoman with a cushioned lid. Make sure it’s lightweight enough for your child to open and close independently. Inside, organize toys with fabric bins or baskets to keep small items sorted. Secure the lid properly so it doesn’t slam shut unexpectedly. Place the ottoman in a corner or at the foot of the bed for easy access. Encourage your child to use it regularly for both seating and storage, turning tidying up into a game. Regularly check for wear and tear to ensure safety and longevity.
Add decorative touches like embroidered initials or favorite characters on the fabric. Include a plush cushion or throw blanket on top for extra coziness. Label compartments inside the ottoman for quick cleanup, especially for younger kids learning to organize. You can also sew or attach a small pocket on the side for quick access to books or small toys. These tweaks personalize the piece, making it a cherished part of your child’s space.
A multi-functional toy chest with seating turns clutter management into a fun, interactive activity. It helps your kid develop habits of tidying up while providing a cozy spot for relaxation. It’s a clever way to maximize space without sacrificing style or comfort. Watching your child take pride in their organized, inviting room boosts confidence and independence. Plus, it makes playtime and cleanup seamless and enjoyable.
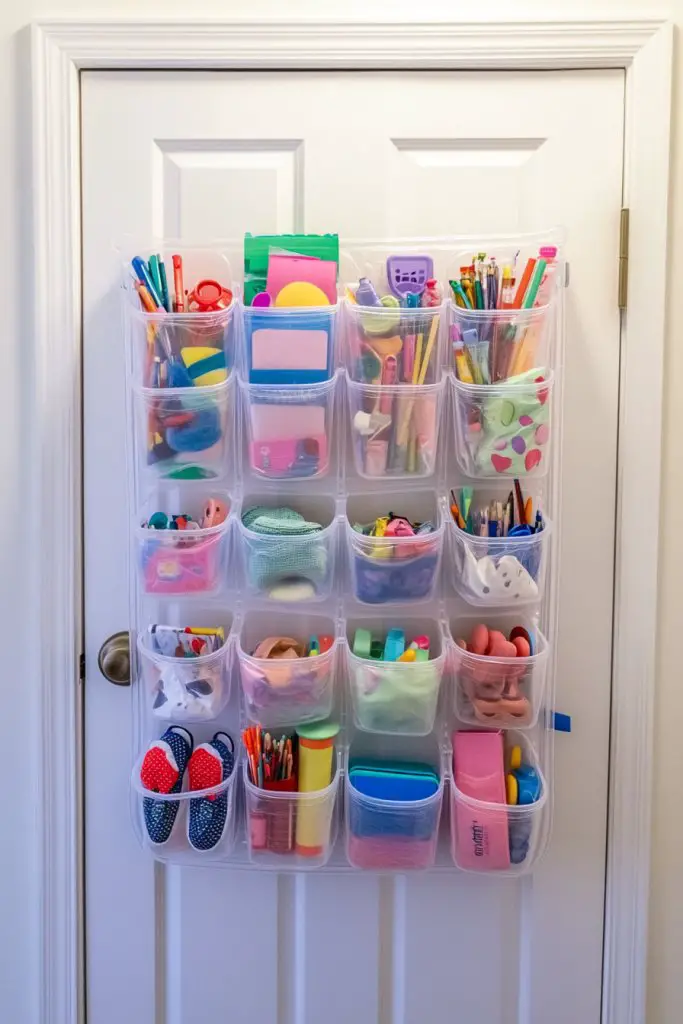
4. Over-the-Door Organizers for Small Item Storage
Is your kid’s room overflowing with tiny items like shoes, art supplies, and accessories? Finding a place for everything without cluttering the floor or shelves can feel like an impossible puzzle. The trick is to leverage vertical space and keep essentials within arm’s reach. Over-the-door organizers offer a simple, effective solution that turns a blank door into a storage powerhouse. Who knew a door could hold so much?
Visualize a clear, hanging pocket organizer secured over the closet or bedroom door. Each pocket is filled with neatly arranged shoes, small toys, or craft supplies, making everything visible at a glance. The transparent material allows kids to find what they need instantly, reducing chaos. Brightly colored pockets add a playful touch to the room’s decor. It’s like a mini storage mall right at your child’s fingertips, easy to access and impossible to ignore.
Choose from mesh, clear plastic, or fabric pockets depending on your preferred aesthetic. Install the organizer on the inside of closet doors for a sleek look or on the bedroom door for quick access. Label pockets with words or pictures to help pre-readers identify items. For a seasonal update, switch out the pockets or add themed decals. Some organizers come with extra hooks or compartments for larger items like hats or small backpacks. Flexibility is the name of the game.
Start by selecting a durable, easy-to-clean organizer with enough pockets for your needs. Hang it securely with hooks or adhesive strips that won’t damage the door finish. Arrange items so frequently used ones are at the top or in larger pockets. Use labels or pictures on each pocket for easy identification, especially for preschoolers. Regularly review and declutter, swapping out seasonal items or discarding broken or outgrown pieces. This setup is quick to install and offers instant organization.
Personalize pockets with your kid’s favorite colors, stickers, or drawings. Encourage your child to help organize their items, fostering responsibility. Attach small tags or labels with their name for ownership. Use themed stickers for special occasions or holidays. These small touches make the organizer more fun and engaging, transforming a simple storage trick into a favorite feature.
Over-the-door organizers turn clutter chaos into accessible, organized storage at a glance. They empower your kid to take charge of their space and develop tidy habits early on. The visual appeal encourages regular use and makes cleanup part of their routine. Watching your child confidently manage their belongings boosts independence. It’s a smart, simple solution that keeps their room neat and lively.
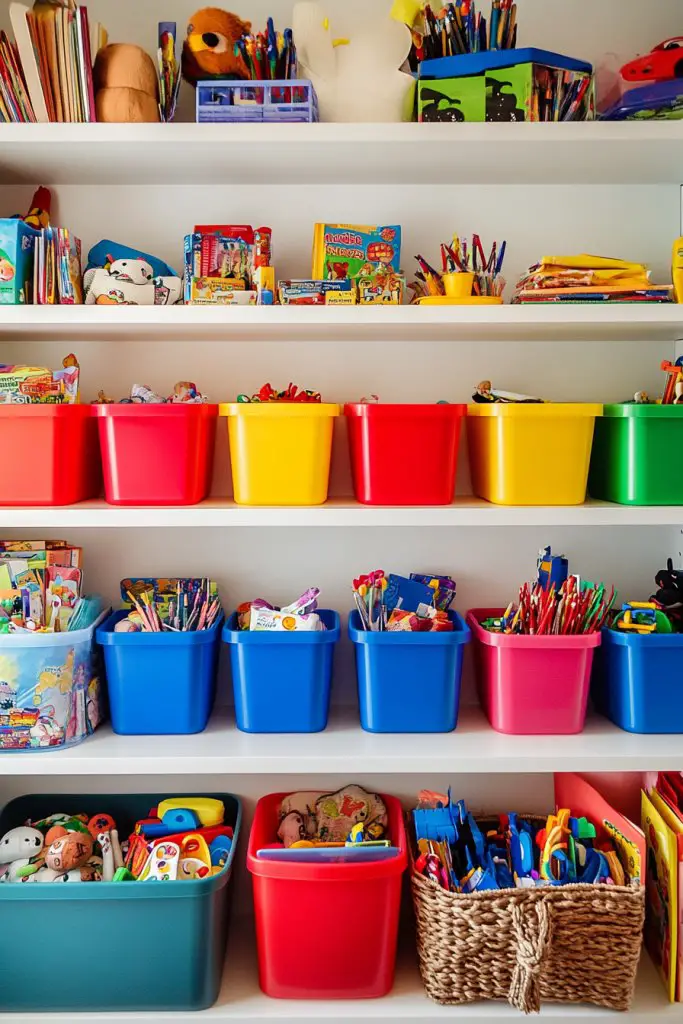
5. Open Shelving with Bitted Bins for Color-Coded Organization
Ever feel overwhelmed by the endless clutter of toys, books, and art supplies in your toddler’s room? Keeping things neat while allowing easy access can seem like an impossible mission. The secret lies in organizing by type and color, making cleanup intuitive and fun. Open shelving with labeled, color-coded bins offers a practical yet stylish solution. Who says organization can’t look cool?
Visualize a set of sturdy open shelves mounted at a toddler’s eye level. Each shelf holds a series of brightly colored, labeled bins—red for cars, blue for blocks, yellow for art supplies. The bins are made of plastic or fabric, with clear fronts or decorative labels to identify contents easily. The overall look is cheerful and orderly, encouraging a sense of control over their belongings. It’s like a mini organize-your-life station built just for them.
Choose bins in various sizes and colors to match your room’s theme or your child’s favorites. For a more minimalist look, opt for monochrome bins with different labels. You can add themed decals or stickers for visual cues, especially helpful for pre-readers. For a seasonal update, swap out colors or add decorative trims. These bins can be stacked or arranged in different patterns to fit your space and style preferences.
Start by installing sturdy open shelves at a height your child can reach. Select bins that fit well in the shelves and are easy for small hands to open and close. Label each bin with words or pictures for quick identification. Organize toys and supplies by category, and keep frequently used items at the front. Regularly review the contents to remove outgrown or broken items. This system is simple to set up and promotes independence in tidying up.
Personalize the bins with your child’s name, favorite characters, or themed decals. Use colorful labels or stickers to help with identification. Incorporate a few decorative elements like plush toys or small artwork displays on the shelves to make the space inviting. Encourage your child to help with sorting and organizing to foster responsibility. These small touches turn functional storage into a fun project.
Open shelving with color-coded bins provides a clear, manageable way for your toddler to keep their space tidy. It builds confidence as they learn to organize their belongings independently. The cheerful colors and labels make tidying up feel less like a chore and more like a game. A tidy room boosts their sense of pride and encourages ongoing good habits. It’s a practical, playful way to keep clutter under control and inspire responsibility.
6. Corner Shelves with Floating Bolders for Space Efficiency

Struggling to make the most of every nook in your toddler’s room? Corners are often wasted space that could hold more than just awkwardly placed furniture. The goal is to utilize those sharp angles for storage without cluttering the room or making it feel cramped. Corner shelves with floating baskets or bins turn neglected spaces into functional zones. Who knew a corner could be so productive?
Visualize sleek, floating shelves installed in the corner of the room, with colorful baskets or bins nestled inside. Stuff the baskets with small toys, books, or art supplies—easy for tiny hands to reach. The shelves seem to float effortlessly, giving a minimalist yet playful vibe. The colorful baskets add a pop of personality, while the open design keeps everything visible and organized. It’s a smart, stylish solution for space-starved rooms.
Choose baskets or bins in bright, cheerful colors or subtle neutrals to match your decor. You could opt for woven baskets for a rustic feel or sleek plastic bins for a modern look. For added fun, label each basket with pictures or words. Adjust the number of shelves based on the size of your corner and your storage needs. Seasonal or themed baskets can also add a personalized touch. These shelves can be customized to fit both small and large spaces.
Start by measuring your corner space to determine the size of shelves and baskets needed. Install floating shelves securely with appropriate brackets or anchors—ensure they can handle the weight of the baskets. Place the baskets inside, making sure they are easy for your child to access. Label each basket with pictures or words to promote independence. Organize toys or supplies by category, and periodically declutter for maintenance. This setup is straightforward and maximizes unused space efficiently.
Decorate baskets with your child’s favorite colors, patterns, or stickers. Attach labels with fun fonts or images for easy recognition. Consider adding a small step stool nearby for reaching higher shelves comfortably. Incorporate decorative elements like plush toys or themed ornaments on the shelves to make the space more inviting. These small touches turn a simple corner into an engaging, functional part of the room.
Corner shelves with floating baskets make the most of every inch, turning dead space into a tidy, accessible storage hub. They teach your child to organize and take responsibility for their belongings. The bright, playful design inspires them to keep their space neat and inviting. It’s an easy, attractive way to optimize room layout while encouraging independence. Plus, it adds a modern, stylish touch to the overall decor.
7. Multi-Level Ladder Shelves for Display and Storage
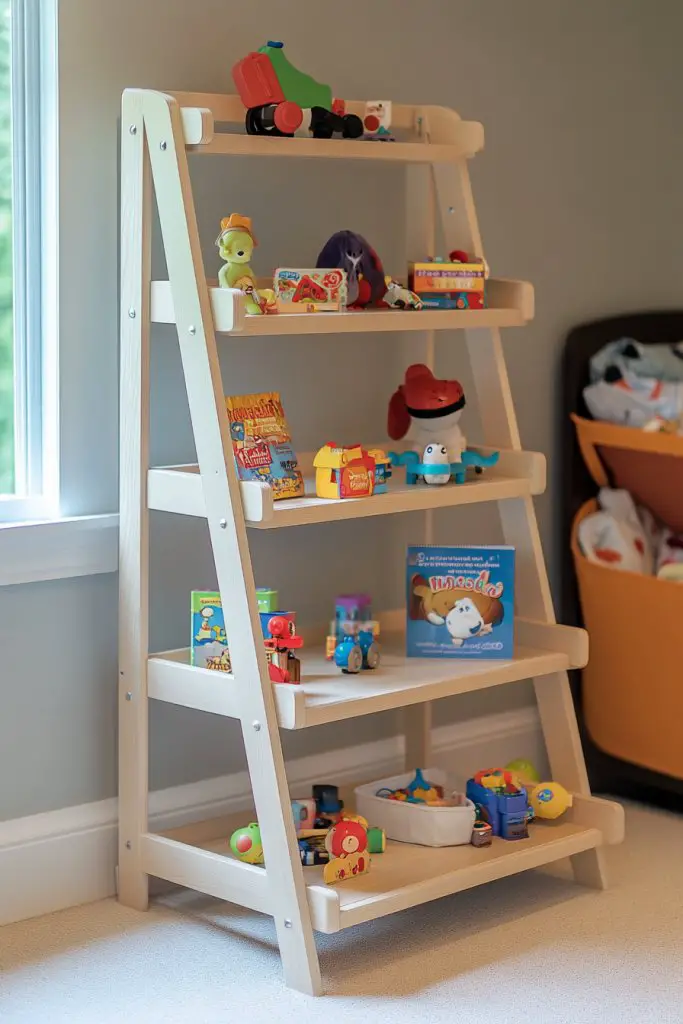
Feeling like your kid’s room is a jumble of toys, books, and decorative items? Keeping everything accessible yet organized can be a real challenge. The solution? Multi-level ladder shelves that add a playful, dynamic touch while offering ample storage. They allow you to display favorite items and keep clutter off the floor. Who says storage can’t be fun and functional?
Picture a tall, leaning ladder shelf made of natural wood or painted in bright colors. The rungs hold a variety of items—books, small baskets, decorative boxes, or toys—stacked or arranged in an eye-catching way. The staggered levels create visual interest, making it easy for your child to reach up or down. Decorative storage boxes or baskets sit on some rungs, adding pops of color and texture. It’s a playful display that doubles as practical storage.
Choose a ladder style that complements your decor—sleek and modern, rustic, or colorful and fun. Adjust the height based on your space and your kid’s reach. Use decorative boxes, fabric baskets, or open bins for different storage needs. For a seasonal look, swap out colors or add themed accessories like plush toys or fairy lights. These shelves can be freestanding or mounted for extra stability. They are versatile and adaptable for any room size.
Begin by selecting a sturdy, leaning ladder shelf that fits your space. Assemble it following the manufacturer’s instructions, anchoring it to the wall if necessary for safety. Organize toys and books by type or frequency of use, placing the most used items at accessible levels. Use decorative storage containers to keep smaller items tidy while adding visual appeal. Regularly review and rotate contents to keep the display fresh. This setup is simple to assemble and a delightful showcase for your child’s favorite things.
Add personal touches by choosing storage boxes with your child’s favorite colors, characters, or patterns. Decorate the ladder with stickers or decals to match the room’s theme. Incorporate fairy lights or decorative garlands for a whimsical feel. Encourage your child to help arrange their items and decorate the shelves, fostering ownership. These small details turn a functional piece into a cherished part of their space.
Multi-level ladder shelves make storage an eye-catching feature rather than an eyesore. They teach your kid to organize their belongings creatively and independently. The playful design inspires pride and responsibility. Plus, they free up floor space, making the room feel larger and more inviting. It’s a practical, stylish solution that turns clutter into a showcase of personality and order.
8. Clear Plastic Storage Bins with Labels for Easy Sorting
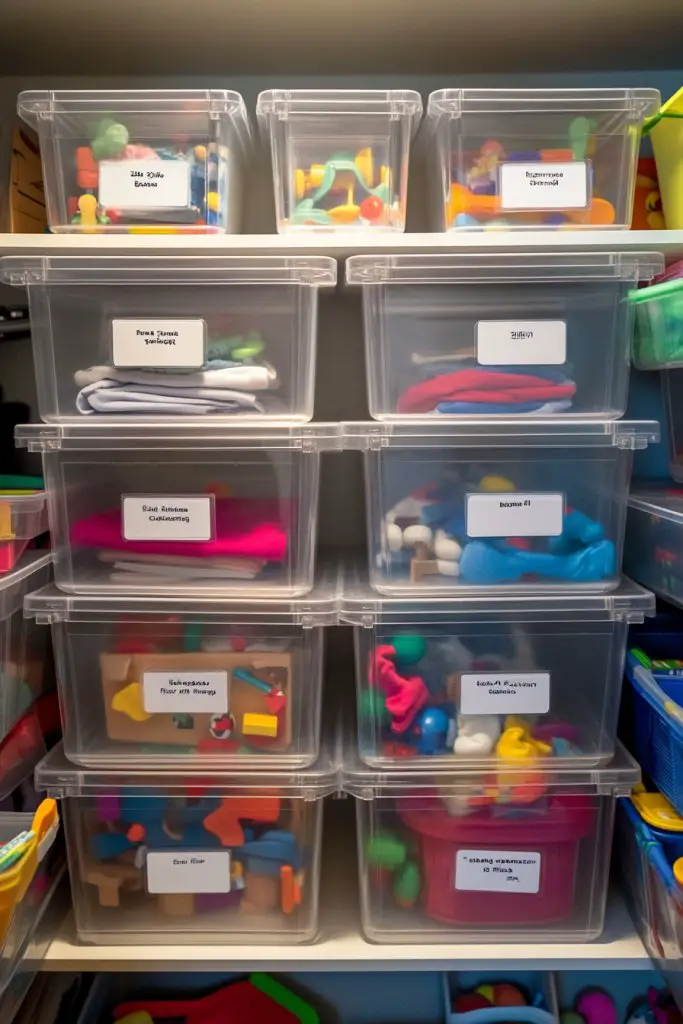
Ever find yourself digging through piles of toys, trying to locate that one specific item? Maintaining an organized toy stash can be a nightmare without clear visibility. The trick is to use transparent bins that let you see everything at a glance. Add labels for quick identification, and suddenly cleanup becomes less of a chore and more of a game. Who knew clarity could be so helpful?
Imagine a set of stackable, see-through plastic bins lined up on a shelf or inside a cubby system. Each bin is filled with different toys—puzzle pieces, action figures, or art supplies. The labels, with pictures or words, help your child identify their favorites easily. The clear plastic shows off their collections while keeping everything neat and contained. It’s like a mini warehouse designed for tiny hands and big imaginations.
Choose bins with colored lids or accents to add a pop of color or match your theme. Use picture labels or write simple words to help pre-readers. For a more decorative look, add fun stickers or decals on the outside of the bins. Stack them vertically or nest them in cubbies for space efficiency. For seasonal or special collections, swap out labels or containers for variety. These bins are versatile and grow with your child’s changing interests.
Begin by selecting sturdy, stackable clear bins with secure lids. Label each bin with pictures or words that clearly identify the contents. Arrange the bins on open shelves, inside cubbies, or in toy chests for easy access. Encourage your child to help sort items into the correct bins, fostering their organizational skills. Periodically review and rotate contents to keep the system fresh and manageable. This simple setup is cost-effective and highly functional.
Personalize labels with your child’s drawings or favorite characters for added fun. Use color-coded lids or labels to create a visual sorting system—like red for toys, blue for art, green for building blocks. Add a small chalkboard label or sticker for updates or reminders. Incorporate decorative touches like patterned duct tape or themed decals to make the bins more engaging. These small details encourage your kid to take ownership of their space.
Clear plastic bins make sorting simple, quick, and satisfying. They teach your child to categorize and take responsibility for their belongings. The visual clarity boosts confidence and independence, turning cleanup into a rewarding activity. Plus, it keeps their room neat and the toys accessible, sparking more imaginative play. It’s a straightforward, effective way to foster order and responsibility in a fun, colorful way.
9. Modular Storage Cubes with Removable Drawers for Flexibility

Does your kid’s room feel like a storage maze, with no system to grow or change? Fixed furniture can quickly become outdated or inadequate as your child’s collection of toys and books expands. The solution? Modular storage cubes with removable drawers that adapt over time. They’re like building blocks for organization, giving you flexibility and control. Who wouldn’t want a system that evolves with their kid?
Imagine a set of cube units in different colors and sizes, each with removable drawers or bins. Some cubes host toys, others hold clothes or craft supplies. The drawers glide smoothly in and out, making sorting a breeze. The modular design allows stacking or arranging in a variety of layouts—like a mini wall or a corner unit. The vibrant colors and clean lines create a playful, adaptable storage display that’s as fun to look at as it is functional.
Choose from a range of colors and sizes to match your decor or your kid’s favorite themes. Incorporate labels or pictures on drawers for easy sorting. Mix open cubes with drawers for a layered look. For seasonal updates, swap out drawer fronts or reconfigure the layout. Add decorative knobs or stickers to personalize each cube. These versatile units can be reassembled as needs change, making them ideal for growing families or changing tastes.
Begin by selecting a modular cube system that fits your space and storage needs. Assemble the cubes following the manufacturer’s instructions, ensuring they’re sturdy and stable. Use the removable drawers or bins to organize different categories—clothes, toys, art supplies. Stack or arrange the cubes to suit your room’s layout, securing them to the wall if necessary. Label each drawer or bin for quick identification. Reconfigure periodically to keep the system fresh and aligned with your kid’s evolving interests.
Personalize drawers with your child’s name, favorite characters, or themed stickers. Mix and match colors to create a vibrant, cheerful display. Add decorative knobs or handles for extra flair. Incorporate small labels or pictures to help pre-readers sort their belongings independently. Encourage your kid to help reconfigure the layout or decorate the units, fostering ownership. These small touches turn functional storage into a fun, creative project.
Modular storage cubes grow with your child, offering flexible, customizable organization. They make tidying up easier and more engaging, promoting independence. The ability to reconfigure the layout keeps the space fresh and exciting. Watching your kid take charge of their room builds confidence and responsibility. It’s a smart, adaptable solution that combines style, function, and fun.
10. Hanging Storage Nets for Soft Toy Collection
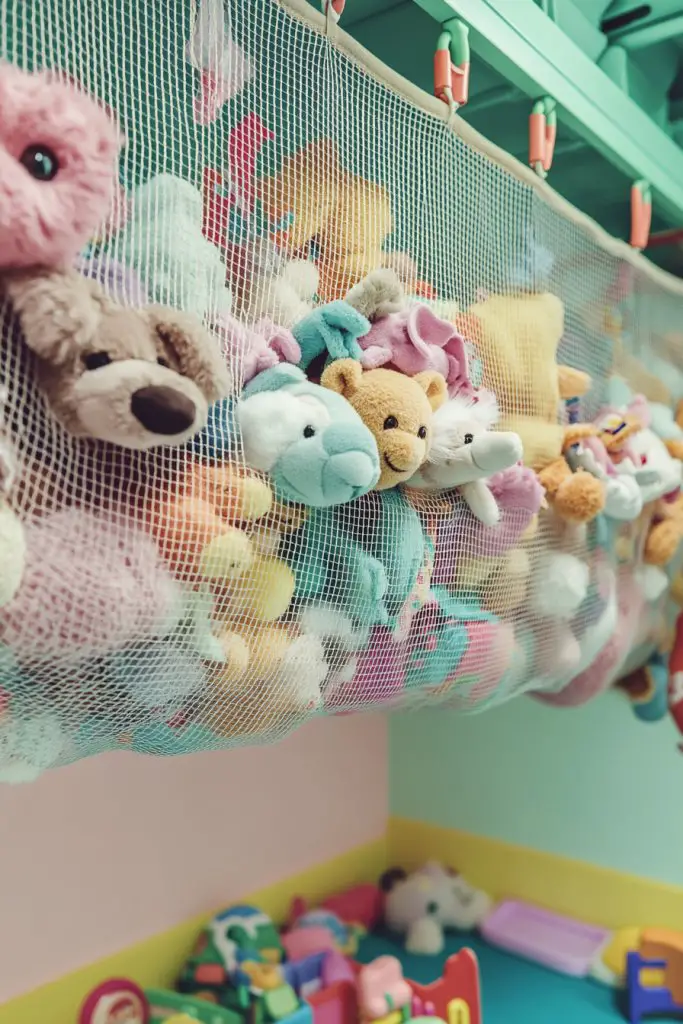
Are soft toys taking over every surface in your toddler’s room? When plush animals multiply faster than you can count, it’s hard to keep things tidy without sacrificing space. The solution is to hang the collection up high or along walls, freeing up floor and shelf space. An organized net keeps toys accessible yet out of the way. Plus, it adds a playful, cozy vibe to the room.
Picture a breathable mesh or fabric net suspended from ceiling hooks or wall anchors. Stuffed animals spill out in a colorful, soft mound, yet are easy to grab when needed. The net’s airy design allows the toys to breathe and keeps dust away. It creates a fun visual focal point—like a soft cloud or hammock of cuddly friends—adding texture and personality to the room. It’s a playful, space-saving display your kid will love.
Choose nets in bright colors, fun patterns, or neutral tones to match your decor. Install at different heights or along walls for maximum effect. Use clips or ties to secure the toys inside, and consider adding labels or pictures for easy sorting. For a seasonal touch, switch to themed nets or add decorative elements like ribbons or fairy lights. The nets can be repositioned or expanded as your child’s collection grows.
Start by selecting a durable, washable net with enough capacity for your child’s plush collection. Install ceiling hooks or wall anchors securely, ensuring safety and stability. Place the net in a corner or along a wall where it doesn’t block access or light. Fill it with plush toys, arranging them to be easy to grab. Maintain regularly by removing worn or outgrown toys and washing the net when needed. This setup is simple, quick, and highly adaptable.
Decorate the net with colorful ribbons, stickers, or character patches for extra fun. Encourage your child to help with filling and arranging the toys, fostering a sense of ownership. Label sections with pictures of the toys inside to promote sorting skills. Incorporate a small step stool or ladder for reaching higher nets comfortably. These small personalizations make the storage space inviting and unique.
Hanging nets keep plush toys organized, accessible, and out of the way. They teach your child responsibility for their belongings and create a fun, cozy environment. The visual appeal makes cleanup a delightful part of play. Seeing their plush collection neatly stored boosts pride and independence. It’s a clever way to manage soft toy overload while adding a playful touch to the room.
11. Rolling Carts with Multiple Tiers for Portable Play Zones
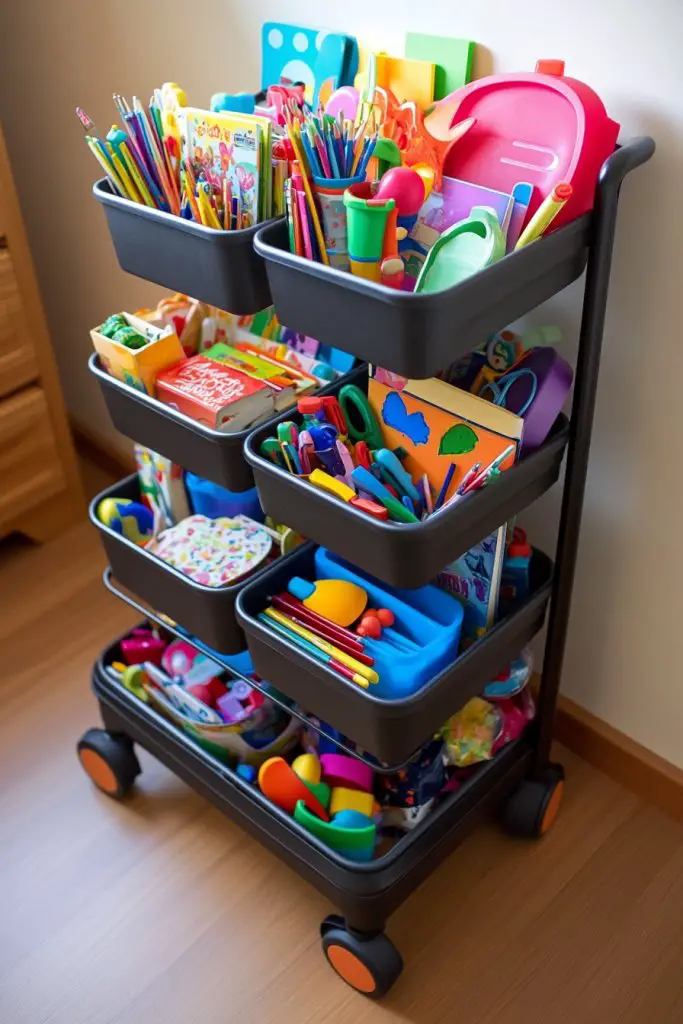
Ever wish you could move your toddler’s toys and supplies from room to room without dragging a heavy box? A portable play zone that can be rolled anywhere sounds like a dream, right? The challenge is to find a solution that’s lightweight yet sturdy, with enough compartments for all their favorite stuff. Enter rolling carts with multiple tiers—your new best friend for flexible, organized play.
Visualize a sleek, multi-tiered cart on wheels, filled with colorful bins and baskets. Each level holds different categories—building blocks, art supplies, stuffed animals—making everything easy to find. The cart’s smooth wheels glide effortlessly over carpets and hardwood, allowing you to shift the play area instantly. Bright colors and neatly labeled compartments make it inviting and fun. It’s like having a mobile mini-closet of organized chaos.
Choose a cart with a stylish frame and colorful bins that match your decor or your kid’s personality. For older kids, incorporate themed bins—superheroes, princesses, animals—for added excitement. Use labels or pictures on each tier to help pre-readers sort their belongings. For smaller spaces, opt for a compact cart; for larger rooms, a bigger multi-tier model works better. Add a handle or decorative elements like ribbons for a personalized touch. These carts are versatile and grow with your child’s needs.
Start by selecting a sturdy, lightweight cart with multiple tiers or baskets. Assemble it following instructions, ensuring wheels lock securely when stationary. Fill each tier with categories of toys, art supplies, or books, labeling as needed. Use baskets or bins to contain loose items and make cleanup easier. Position the cart in a central location or near the play area for convenience. Encourage your child to help with organizing and moving the cart, turning it into a fun responsibility. Regularly review and refresh contents for ongoing tidiness. This setup is simple, flexible, and highly functional.
Customize the cart with your child’s favorite colors, stickers, or themed decals. Use fun labels or pictures for each bin to promote sorting skills and independence. Add a small tray or cup holder on top for quick access to snacks or small tools. Incorporate decorative elements like bows or tags for extra personality. These small personal touches make the cart feel like a special part of their space, encouraging regular use.
Rolling carts turn cleanup into a quick, easy task that your child can do themselves. They promote independence and organization skills while keeping the room neat and flexible. The mobility allows for spontaneous play sessions anywhere in the house, making tidying up less of a chore. Watching your child take charge of their toys with confidence boosts their sense of responsibility. It’s a practical, stylish addition that makes a big difference in daily routines.
12. Repurposed Crates as Rustic Toy Bins
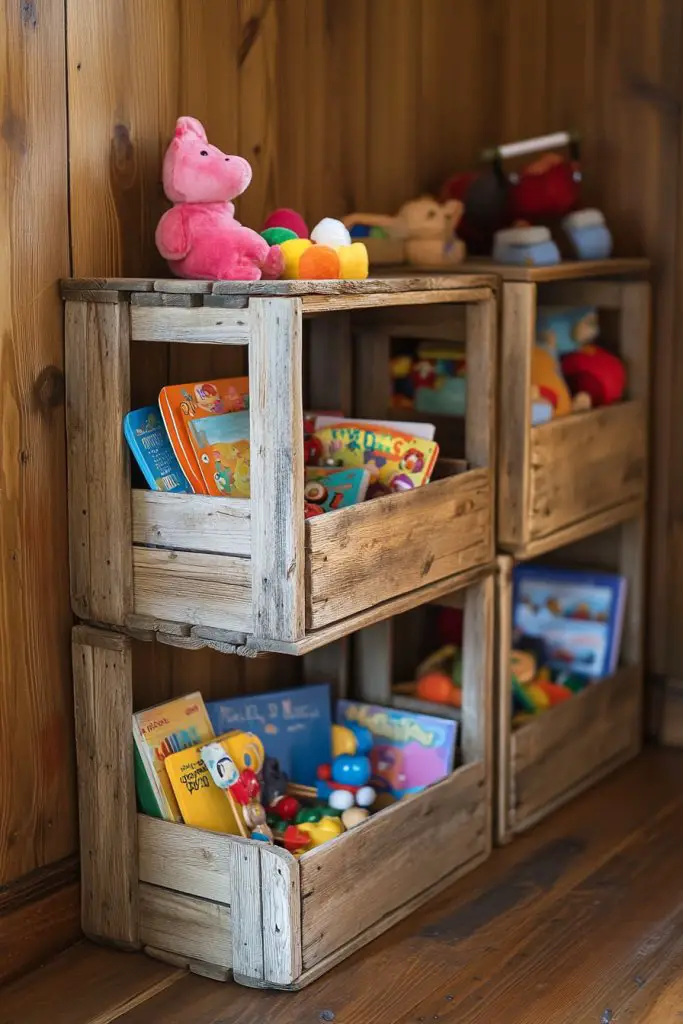
Feeling overwhelmed by plastic storage that feels boring and impersonal? Want a rustic, charming alternative that adds character to your toddler’s room? Repurposed crates can be transformed into stylish, functional toy bins that blend seamlessly with a cozy decor. They’re budget-friendly and eco-conscious, giving new life to old materials. Who knew that a simple crate could become a centerpiece?
Picture a row of wooden or plastic crates painted in cheerful colors or left natural for a rustic look. They’re lined up along the wall or stacked in a corner, filled with toys, books, or stuffed animals. The open design makes it easy for your child to choose their favorites and put things away. The rough textures and natural finishes add warmth and charm, making the room feel inviting and lived-in. It’s like a mini farmstead of organized fun.
Paint crates in bright colors or stain them for a natural look. Add decorative stickers, decals, or stencils for a personalized touch. Stack crates to save space or line them up along a wall for easy access. Use fabric or paper liners inside the crates to protect the wood and add color. For a seasonal update, swap liners or add themed accessories. These crates are super flexible and can be customized to match any decor style.
Start by sourcing sturdy crates—wooden, plastic, or metal—depending on your style and budget. Sand and paint or stain them for a finished look. Line the insides with fabric or paper for added durability and aesthetic appeal. Arrange them along the wall or in a corner, stacking if needed, and secure them for stability. Fill them with toys, art supplies, or clothing. Label or decorate the outside for easy identification. Regularly declutter and refresh the contents to keep it tidy. This DIY project is simple, affordable, and full of charm.
Decorate crates with your child’s name, favorite characters, or seasonal themes. Use stencils or stickers for a personalized touch. Incorporate fabric or decorative paper liners for a polished look. Encourage your child to help with decorating or organizing, fostering ownership. Add small decorative elements like bows or charms. These personalized crates become a treasured part of their room and help teach responsibility.
Rustic crates bring warmth and character to any toddler’s space while providing ample storage. They teach your child to care for their belongings and take pride in their organized room. The DIY aspect fosters creativity and responsibility. Seeing their toys neatly stored in charming crates makes tidying up more rewarding. It’s a stylish, functional, and eco-friendly solution that grows with your family’s needs.
13. Built-In Closet Shelves with Baskets for Seamless Integration
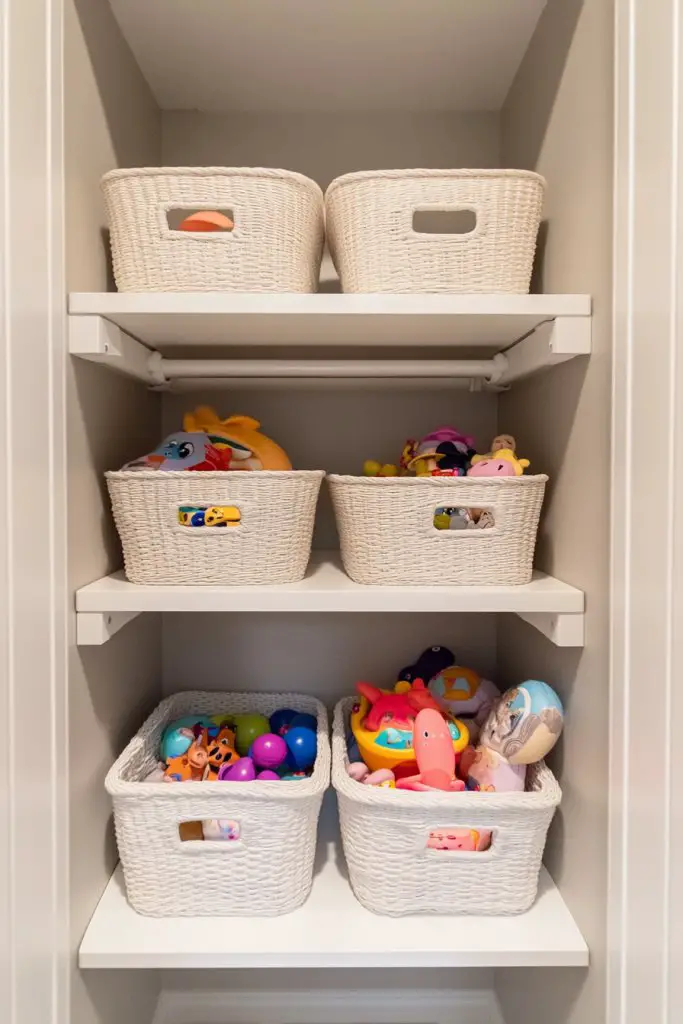
Is your toddler’s clutter spilling out everywhere, making the room look chaotic? Small rooms demand smart storage solutions that blend into the space seamlessly. Built-in closet shelves with baskets offer a sleek, integrated way to keep everything organized without cluttering the room’s flow. The best part? They’re hidden when not in use and stylish when needed. Who doesn’t want a tidy, cohesive look?
Imagine custom shelves installed inside the closet, with woven baskets or fabric bins neatly arranged. The baskets hide smaller items like socks, pajamas, or toys, while larger shelves store bulkier items. The uniform look of the baskets and shelves creates a clean, minimalist aesthetic. When the closet doors are closed, the room appears more spacious and orderly. When open, it’s a functional, organized treasure trove of everything your child needs.
Opt for baskets in neutral tones for a modern look or bright colors for playful vibes. Incorporate labels or pictures to help your child put things away independently. Choose woven, fabric, or plastic baskets depending on your decor style. For a seasonal twist, swap out baskets or add decorative trims. The shelves can be built into a wall or customized into a closet system for a seamless, integrated appearance. Adapt the layout to fit your space and storage needs.
Start by measuring your closet space carefully and designing custom shelves with a carpenter or DIY plans. Install sturdy shelving brackets that can support the weight of baskets and contents. Select baskets that fit the shelves and are easy for small hands to open. Label each basket with words or pictures for easy sorting. Organize frequently used items at eye level and less-used items higher or lower. Regularly review and update contents for efficiency and tidiness. This solution creates a sleek, clutter-free environment.
Personalize the baskets with your child’s favorite colors, characters, or themes. Use decorative trims or stickers to make them more appealing. Label each basket with pictures or words to teach sorting skills. Incorporate a small step stool or a decorative sign for a fun, functional touch. Encourage your child to help with organizing and maintaining the system. These small details turn a simple closet into a charming, organized retreat.
Built-in closet shelves with baskets keep the room looking tidy and spacious. They promote independence by teaching your child to organize their belongings efficiently. The seamless design adds a polished, modern look that grows with your family. When your child takes pride in a neat closet, they develop good habits that last. It’s a smart, stylish way to keep clutter out of sight and encourage responsibility.
14. Hanging Rods with Baskets for Clothing and Small Toys

Is your little one’s wardrobe a jumble of clothes, accessories, and toys? Finding a quick way to organize and access small items can be a headache. The answer is low-hanging rods with baskets—easy for tiny hands to reach and perfect for keeping essentials in sight. This simple system turns chaos into order and makes dressing and playtime more efficient. Who says organization can’t be fun?
Visualize a sturdy, low-hanging rod installed along a wall or inside a closet, with baskets hanging underneath. Each basket is filled with different clothing items—hats, socks, or small toys—organized and easy to grab. The baskets are colorful or patterned, adding a playful touch. The rods and baskets create a vertical mini closet, freeing up space and making everything more accessible. It’s like a mini retail display right in your kid’s room.
Choose baskets in various sizes, shapes, and colors to match your decor or your child’s preferences. Use labels or pictures on each basket to teach sorting skills. Install the rod at a height your child can reach comfortably and add decorative accents like ribbons or stickers. For seasonal updates, swap out the baskets or add themed accessories. You can also add hooks or clips for hanging small accessories or jewelry. This flexible setup adapts easily to changing needs.
Start by selecting a durable, low-hanging rod that can support the weight of multiple baskets. Mount it securely to the wall or inside a closet, ensuring it’s at a height accessible for your child. Hang baskets from the rod, filling them with clothing, toys, or accessories. Label each basket for easy sorting and encourage your child to help with organizing. Regularly review and rotate contents to keep everything fresh and practical. This setup is straightforward, customizable, and promotes independence.
Decorate baskets with your child’s favorite colors, stickers, or characters. Use labels or pictures for easy sorting, and let your kid help decorate them. Add decorative ribbons or charms for extra flair. Incorporate small hooks or clips inside the baskets for hanging necklaces or hair accessories. These personal touches make the system more engaging and fun, fostering responsibility and pride.
Hanging rods with baskets make organization quick, simple, and accessible for your toddler. They foster independence and teach sorting skills early, making dressing and tidying up easier. The vibrant, playful look adds a cheerful vibe to the space, encouraging ongoing tidiness. Watching your child confidently manage their belongings boosts self-esteem. It’s a practical, charming solution that turns clutter into order and responsibility.
15. Multi-Purpose Toy Wall with Pegboards and Bins
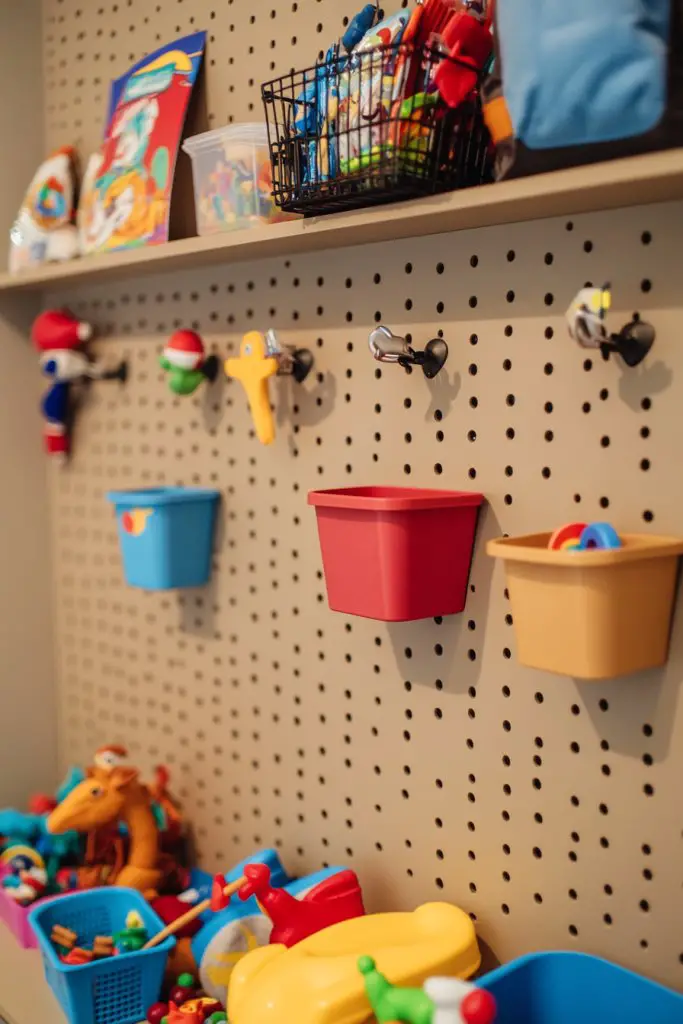
Feeling like your toddler’s toys are taking over every inch of the room? A cluttered space makes it hard to find what’s needed and discourages cleanup. The solution? A multi-purpose toy wall combining pegboards, hooks, and bins to organize everything vertically. It’s a space-efficient, customizable system that turns walls into functional art. Who wouldn’t want a tidy, interactive play zone?
Visualize a colorful pegboard mounted on a wall, with hooks holding small baskets and toys. Pegs allow you to hang everything—from plush toys to craft tools—while bins hold smaller items like crayons or building blocks. The combination of open hooks and closed bins creates a dynamic display. Bright colors and varied textures make the wall inviting and engaging. It’s like a mini play station built just for your kid’s needs.
Choose pegboards in bold colors or natural wood for a modern look. Use a variety of hooks and baskets to match your decor. Labels or pictures on bins help pre-readers identify their favorite toys and supplies. Arrange the pegboard with some toys hanging freely and others stored in bins for a balanced look. For seasonal updates, swap out hooks or add themed accessories. This system is flexible and easily adaptable to changing interests.
Start by selecting a sturdy pegboard that fits your wall space. Mount it securely using appropriate anchors. Organize toys and supplies by category—like art, small figures, or plush toys—and assign specific hooks or bins for each. Attach baskets or smaller containers to hold loose items. Encourage your child to help with hanging or rearranging items to foster ownership. Regularly review contents, swapping out toys or reorganizing for freshness. This setup is easy to install and highly customizable.
Decorate the pegboard with your child’s favorite colors, stickers, or themed decals. Customize hooks and bins with labels or pictures that teach sorting skills. Add small decorative elements like plush toys or novelty hooks for extra fun. Encourage your kid to help decorate and organize for a sense of pride. These personal touches make the wall a vibrant, engaging feature of their room.
A multi-purpose toy wall transforms clutter into a fun, organized display that your child can manage. It promotes independence by teaching sorting and organizing skills. The colorful, interactive setup inspires creativity and pride. When your kid can easily find and put away their toys, cleaning becomes part of their routine. It’s a playful, functional solution that enhances their space and confidence.
16. Stackable Storage Drawers with Themed Labels for Fun Organization
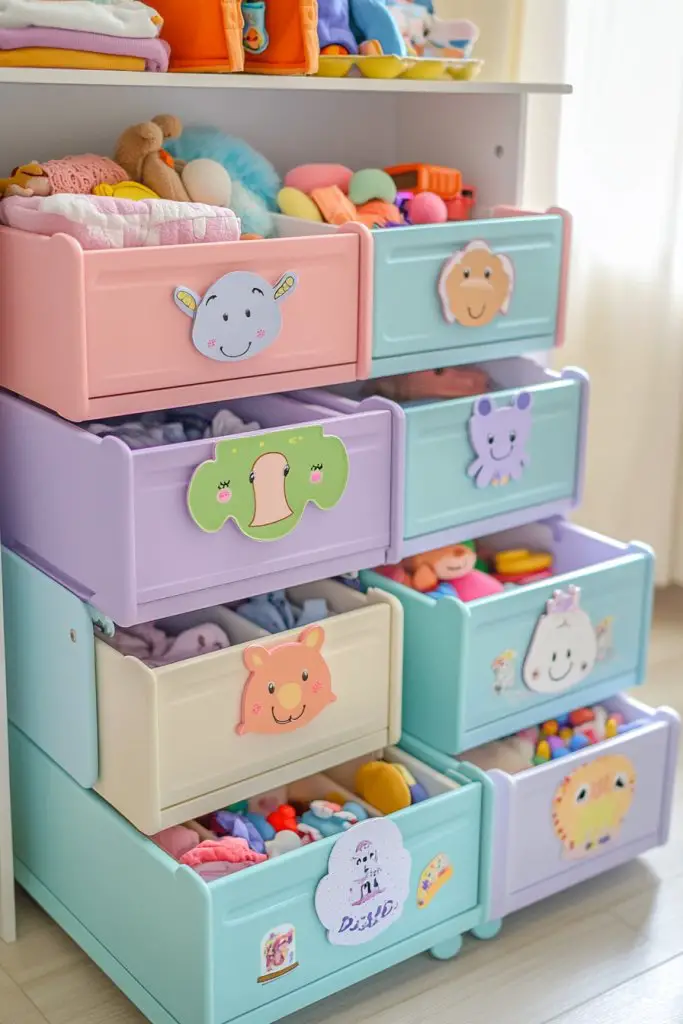
Does your kid’s room look like a whirlwind of toys, clothes, and random stuff? Keeping things tidy when everything’s jumbled together can be a nightmare. The answer? Stackable drawers with fun, themed labels that motivate your child to organize. They’re practical, colorful, and make cleanup a game. Who wouldn’t want a system that’s both functional and playful?
Visualize a set of vibrant drawers stacked neatly, each with a themed label—animals, cars, princesses, or superheroes. The labels feature pictures and words to guide your child in sorting their belongings. The drawers are made of sturdy plastic or wood, with handles that are easy to open. When organized, they create a cheerful, accessible storage unit that encourages independence. It’s like a mini store of their favorites, right in their room.
Choose drawers in bright colors or with patterned fronts that match your decor or your child’s preferences. Use themed labels with pictures and words for easy sorting. Mix and match sizes based on what your child needs to store—small for jewelry or art supplies, larger for clothes or plush toys. For seasonal updates, swap out labels or add new themes to keep it fresh. These drawers are versatile and grow with your kid’s changing interests.
Start by selecting sturdy, stackable drawers with handles that are easy for small hands. Arrange them in a way that fits your space—stacked or side-by-side. Label each drawer with pictures or words corresponding to its contents. Fill the drawers with categorized items—clothes, toys, art supplies—and encourage your child to put things back after play. Regularly review and rotate contents to keep everything fresh and tidy. This system is simple to implement and highly customizable.
Decorate labels with your child’s favorite characters, colors, or themes. Use stickers or printable labels for a personalized touch. Encourage your kid to help with labeling and organizing, fostering responsibility. Add decorative knobs or handles to make drawers easier and more fun to open. These small details turn a basic storage unit into a playful and engaging feature.
Colorful, themed stackable drawers make tidying up fun and rewarding. They teach your child to categorize and take responsibility for their belongings. The visual cues boost confidence and independence, turning cleanup into a game. A well-organized room promotes good habits and a sense of pride. It’s a simple, cheerful way to keep clutter in check while inspiring responsibility.
17. Curtain-Backed Storage with Fabric Pockets for Easy Access
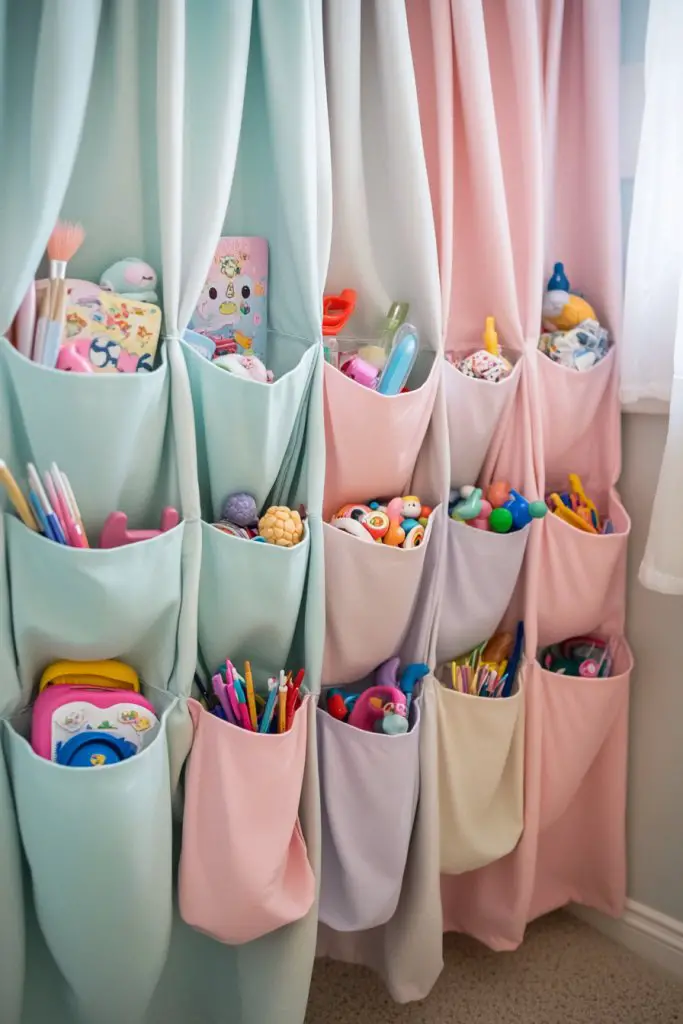
Is your toddler’s room cluttered with small toys, accessories, or art supplies? Finding a discreet yet accessible storage solution can be tricky. Curtain-backed storage with fabric pockets offers a clever way to hide clutter behind a curtain while keeping essentials within reach. It’s stylish, functional, and perfect for any space. Who said storage can’t be cute?
Imagine a soft fabric curtain hanging in a corner or behind a wardrobe door, with multiple fabric pockets sewn into the back. Each pocket holds different items—small toys, hair accessories, or craft supplies—organized and visible through the fabric. When the curtain is pulled aside, everything is accessible yet neatly tucked away. The colorful or patterned fabric adds texture and personality, turning a simple curtain into a hidden storage treasure chest.
Choose fabric in cheerful patterns or neutral tones to match your decor. Sew or buy curtain panels with pockets already attached, or DIY with fabric and sewing skills. Add labels or pictures on each pocket to help your child identify their belongings. For seasonal updates, swap out fabrics or add themed trims. This flexible solution can be customized to fit any room size or style, blending seamlessly into your decor.
Start by selecting a curtain fabric that complements your room’s theme. Sew or attach pockets in various sizes, labeling each for easy identification. Hang the curtain on a rod, tension wire, or hooks behind a wardrobe or in a corner. Fill the pockets with toys, accessories, or art supplies, and encourage your child to take part in organizing. Regularly review and update the contents for ongoing tidiness. This setup is simple, stylish, and highly adaptable.
Decorate the fabric with your child’s favorite colors, stickers, or themed appliqués. Label each pocket with pictures or words for easy sorting and independence. Add decorative trims or ribbons to make it more fun and personalized. Encourage your kid to help change fabrics seasonally or for special occasions. This makes storage an engaging activity and a design feature.
Curtain-backed fabric pockets keep small items organized and out of sight, reducing clutter. They foster responsibility as children learn to put things away in designated pockets. The decorative fabric adds charm and personality, making tidy-up time less of a chore. It’s a practical, attractive solution that turns storage into a creative project, encouraging pride and independence in your child.
18. Stylish Storage Bench with Hidden Compartments for Cozy Play and Storage
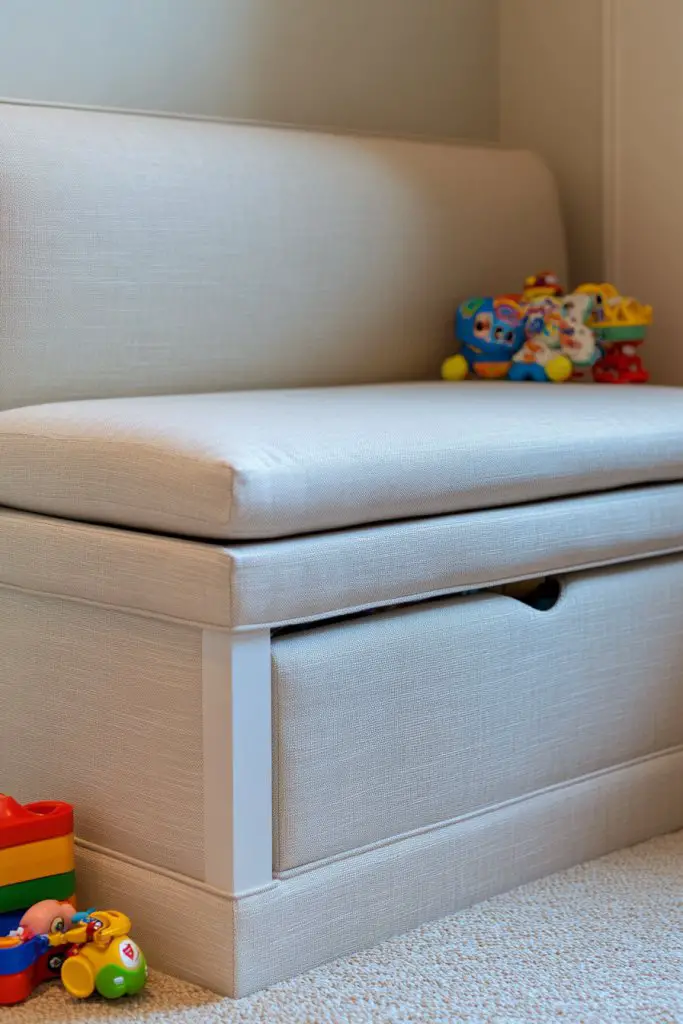
Ever wish your kid’s room had more seating and storage without sacrificing style? A storage bench with hidden compartments offers a cozy spot for your child to sit while hiding clutter out of sight. It’s the perfect blend of practicality and decor, turning everyday furniture into a multi-tasking hero. Who doesn’t want a room that’s both functional and stylish?
Picture a sleek upholstered storage bench at the foot of the bed or along a wall, with a soft cushion on top for sitting. Inside, spacious hidden compartments store toys, blankets, or seasonal clothing. The exterior can be upholstered in a fabric that matches the room’s theme—think plush velvet, soft linen, or patterned textiles. When closed, it looks like a chic piece of furniture; when opened, it reveals a treasure trove of organization. It’s the perfect secret weapon for tidy, cozy spaces.
Choose a bench in your preferred style—modern, rustic, or playful—and upholster it with fabrics that match your decor. Add decorative trims, buttons, or tufting for extra flair. Use labels or small tags inside the compartments for easy organization. For seasonal updates, change the cushion cover or add decorative pillows for a fresh look. You can also personalize the exterior with stickers or paint for a one-of-a-kind piece.
Start by selecting a sturdy, comfortable bench with a hinged or removable lid for easy access. Ensure the compartments are deep enough to hold larger items. Decorate or upholster the exterior to match the room’s decor. Fill the hidden compartments with toys, blankets, or clothes, and label sections if needed. Position the bench where your child can sit comfortably and access the storage easily. Encourage your child to help with organizing and decorating, making it a fun project. Regularly review contents to keep it tidy. This furniture is a versatile, stylish solution for maximizing space.
Add decorative elements such as tufting, embroidered initials, or themed fabric to make the bench unique. Incorporate cushions or throws that match your decor to enhance comfort. Label compartments with pictures or words to foster independence. Let your child help choose the fabric or decorations, making it a special piece they’re proud of. These small touches turn a simple storage bench into a cherished feature.
A stylish storage bench combines comfort, function, and design, elevating your child’s room. It teaches responsibility for their belongings while providing a cozy space for reading or relaxing. The hidden compartments keep clutter out of sight, making the room feel more spacious. When your child helps organize and decorate their furniture, they develop pride and independence. It’s a practical, attractive way to keep their space tidy and inviting.
Conclusion
Exploring these diverse storage solutions demonstrates how both simple and innovative ideas can transform a toddler’s room into an organized wonderland. Feel free to adapt and try out these ideas in your own home to create a space that’s both functional and delightful. Take the first step toward an effortlessly tidy toddler room and enjoy the peace of mind that comes with smart storage!