
19 String Lights Bedroom Ideas for Magical Ambiance
Imagine walking into a room that instantly transports you to a fairy tale—soft, shimmering lights making every corner feel cozy and magical. String lights are one of the most popular decor trends for bedrooms because they effortlessly add warmth, charm, and a touch of whimsy to any space. Their versatility allows for endless creative possibilities, from boho vibes to modern elegance, making them a favorite among interior enthusiasts and dreamers alike.
In this article, you’ll discover a variety of inspiring ideas to transform your bedroom with string lights, whether you prefer a subtle glow or a bold statement piece. From hanging lights in unique patterns to incorporating them into headboards or wall art, there’s something for every style and space. Get ready to spark your creativity and turn your bedroom into a magical retreat you’ll love to unwind in each day!
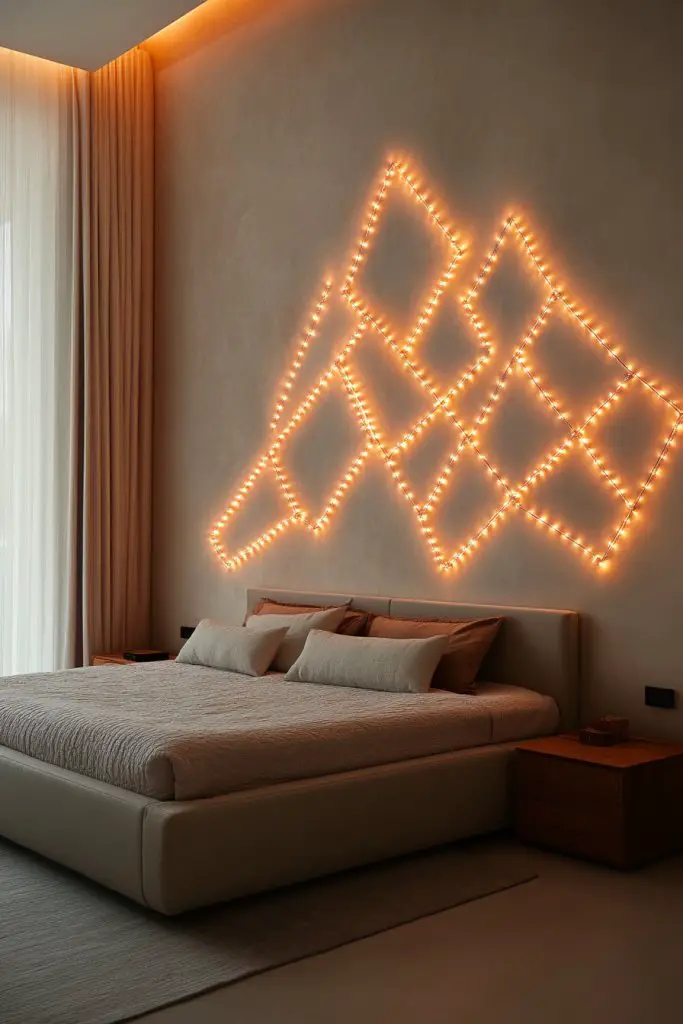
1. Twinkle Wall Backdrop: Create an enchanted accent wall with string lights arranged in a constellation pattern for a dreamy effect
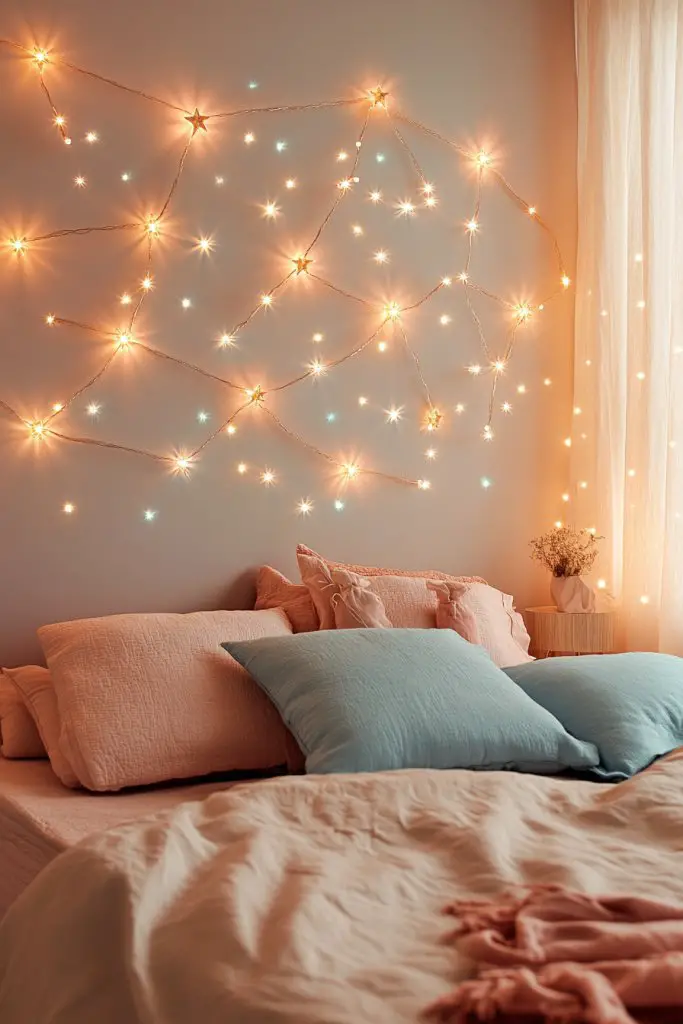
Ever wish your bedroom had that magical, dreamy vibe that makes you want to stay forever? Sometimes, plain walls just don’t cut it when you want a space that feels enchanting and unique. The idea of transforming a boring wall into a starry sky sounds amazing but seems complicated or expensive, right? Well, not anymore. String lights can turn an ordinary wall into a mesmerizing constellation without breaking the bank.
Recommended Products to replicate this idea
| # | Preview | Product | |
|---|---|---|---|
| 1 |

|
Minetom Fairy Lights Plug in, 33Ft 100 LEDs Waterproof Silver Wire Firefly Lights, Adaptor Included,... | Check Latest Price |
| # | Preview | Product | |
|---|---|---|---|
| 1 |

|
Command Clear Indoor Mini Light Clips Value Pack, 45 Clips, 54 Strips, Damage-Free String Light... | Check Latest Price |
Imagine a wall painted in a soft, neutral tone serving as a canvas for tiny twinkling lights arranged in random clusters mimicking stars. The lights shimmer in gentle hues, casting a subtle glow that makes the room feel like a celestial haven. Every time you glance at it, you feel like you’re gazing up at a night sky full of stars, creating a peaceful, dreamy ambiance. It’s a calming focal point that instantly elevates your space.
You can customize this look by choosing warm white lights for a cozy feel or multicolor ones for a more playful vibe. For a minimalist style, keep the constellation pattern sparse and simple. If your room has a high ceiling, extend the lights across the entire wall for a more immersive effect. Seasonal variations, like adding fairy lights with soft, twinkling effects during holidays, make this feature adaptable all year round. Play around with different light densities to match your mood.
Start by choosing a wall that’s the natural focal point of your room. Measure and plan your constellation pattern—no need for perfection, just a natural scatter. Use small nails or adhesive hooks to secure the string lights or simply tape them with painter’s tape for easy adjustments. Arrange the lights in clusters, connecting them to a simple plug-in power source with a dimmer switch if possible. For a more professional look, consider using pre-made star-shaped or custom-cut templates as guides. Finish by testing the lights and adjusting the pattern until it feels just right.
Add little touches like tiny glow-in-the-dark stars or decals around the lights for an extra layer of magic. Incorporate different sizes or shapes of bulbs to create depth and visual interest. You could also hang delicate fabrics or sheer curtains in front for a soft, dreamy effect. Personalize with a string of fairy lights that match your favorite colors or themes, making it uniquely yours. Keep the arrangement dynamic by swapping out lights or patterns seasonally.
Creating a constellation wall is simple, affordable, and endlessly customizable. It’s a perfect way to add an enchanting feature that feels personal and magical. Once done, you’ll love how it transforms your space into a dreamy retreat. Ready to turn your wall into a night sky? You’ll be surprised how a few strings of lights can make your bedroom feel like a celestial escape.
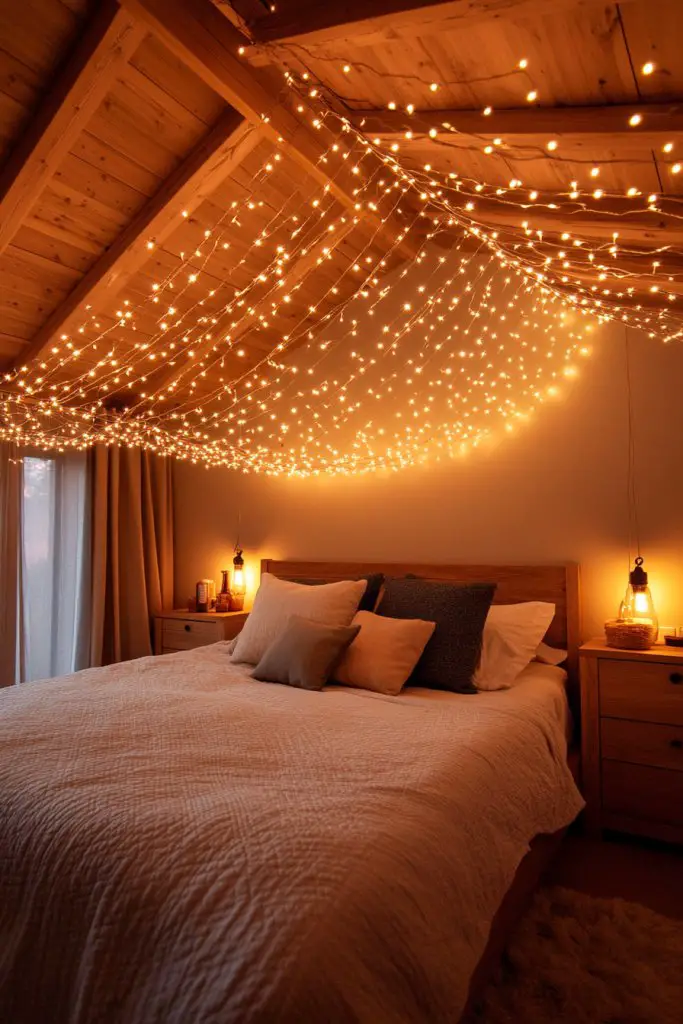
2. Canopy of Lights: Drape string lights across the ceiling to form a cozy, starry canopy above your bed
Ever wanted to feel like you’re sleeping under the stars without leaving your bedroom? Creating a cozy, intimate atmosphere can be tricky with standard ceiling lighting that’s too harsh or uninspiring. The idea of a starry canopy is appealing but sounds complicated or expensive, right? Well, string lights make it super easy and affordable to craft that dreamy, magical ceiling feature.
Recommended Products to replicate this idea
| # | Preview | Product | |
|---|---|---|---|
| 1 |

|
WASTROYAL 210 LEDs Warm White LED String Lights – 70FT Transparent Wire, Waterproof & Connectable... | Check Latest Price |
| # | Preview | Product | |
|---|---|---|---|
| 1 |

|
NACETURE Ceiling Hook Clips- 100 Pack Drop Ceiling Hanger Hooks Hanging on Suspended Ceiling Tile,... | Check Latest Price |
Picture a ceiling decorated with gentle, warm lights cascading from the corners and crisscrossing above your bed. The soft glow creates a cocoon-like effect, making your space feel warm and inviting. Tiny, twinkling lights shimmer against a dark ceiling or a neutral-painted one, mimicking a night sky full of stars. It transforms your bedroom into a tranquil, fairy-tale retreat, perfect for relaxing or drifting off peacefully.
You can opt for warm white lights for a cozy glow or cool tones for a modern, minimalist look. For a boho vibe, intertwine the lights with lightweight fabrics or sheer drapes hanging loosely from the ceiling. Adjust the density of the lights for more or less brightness—less for a subtle effect, more for a starry effect. During festive seasons or special occasions, add optional decorative elements like paper lanterns or small ornaments to enhance the theme.
Start by selecting a ceiling anchor point—either use hooks or adhesive clips for easy installation. Drape the string lights across the ceiling in a crisscross or curved pattern, securing them periodically to avoid sagging. Use extension cords and power strips to manage multiple light strings if needed, ensuring all are plugged into a single socket for safety. For a more seamless look, hide excess wiring behind ceiling molding or paint over the cords with matching ceiling paint. Turn on the lights and tweak the arrangement until it feels just right—perfect for unwinding.
Add hanging fabric strips, tassels, or lightweight paper decorations for extra texture and interest. Incorporate small, battery-operated twinkle lights around your headboard or nearby wall to extend the starry effect. Use dimmer switches or remote-controlled outlets to adjust brightness and create different moods. Personal touches like your favorite color schemes or themed decorations make the canopy uniquely yours and perfect for special nights.
A ceiling canopy of lights instantly elevates your bedroom’s ambiance with minimal effort and cost. It’s a versatile feature that suits any style, from boho to modern minimalism. Once installed, it creates a cozy, dreamy environment ideal for relaxing or sleeping peacefully. Why not try it? Your room will feel like a magical hideaway every night.
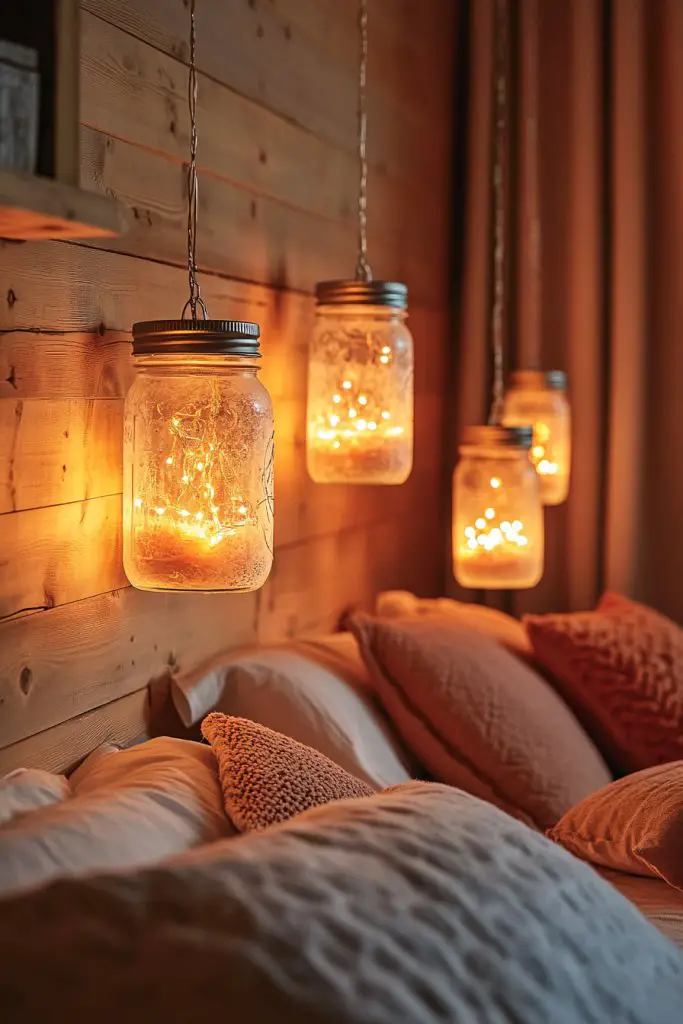
3. DIY Mason Jar Lanterns: Embed fairy lights inside glass jars and hang them around your room for a rustic glow
Looking for a charming, handmade touch to your bedroom decor? Standard lighting can feel sterile and uninspired, but DIY projects add personality and warmth. Mason jar lanterns are a popular craft that instantly adds rustic charm and cozy illumination. Plus, they’re easy to make and budget-friendly, making your space feel more personal and inviting.
Recommended Products to replicate this idea
| # | Preview | Product | |
|---|---|---|---|
| 1 |

|
GIGALUMI Hanging Mason Jar Solar Lights, 6 Pack 30 Led Hanging Solar Lanterns Outdoor Waterproof,... | Check Latest Price |
| # | Preview | Product | |
|---|---|---|---|
| 1 |

|
Brightown 12 Pack LED Fairy Lights Battery Operated String Lights - 7ft 20LED Waterproof Silver Wire... | Check Latest Price |
Imagine clear glass jars filled with tiny, flickering fairy lights, suspended from the ceiling or placed on shelves. The warm glow filters through the glass, casting soft circles of light across your walls and ceiling. Each jar can be decorated with twine, ribbons, or painted lids for a customized look. The overall effect is a gentle, ambient light that makes your room feel like a woodland cottage or a vintage retreat.
Mix and match different sizes of jars for visual interest, or paint the jars in matte or metallic finishes to match your decor theme. Hang the jars at varying heights for a dynamic look, using sturdy twine or wire. For a seasonal update, add faux greenery or small decorative stones inside the jars, but avoid real plants to keep it low maintenance. During holidays, incorporate themed ornaments or colored lights inside the jars for festive flair.
Start by cleaning and drying your mason jars thoroughly. Insert battery-operated fairy lights inside each jar, ensuring the battery pack is accessible for turning on and off. Secure the lights in place using hot glue or wire if needed. Attach a hanging hook or loop to the lid, then thread sturdy twine or wire to hang the jars from ceiling hooks or curtain rods. Arrange the jars evenly or in clusters, depending on your space, and plug in the lights. Adjust the placement until the glow feels just right—like a fairy tale.
Personalize each jar with decorative elements like stickers, paint, or fabric wraps. Use different colored fairy lights inside each jar for a playful or romantic vibe. Create themed sets matching your favorite colors or seasons. Add small battery packs with remote controls for easy switching and brightness adjustment. These jars can be moved around easily, allowing you to change your room’s ambiance effortlessly.
DIY mason jar lanterns are a simple, charming way to add warmth and personality to your space. They’re versatile, functional, and perfect for creating cozy corners or ambient lighting for relaxing nights. The best part? You made them yourself, so the glow feels even more special. Ready to craft your own little lanterns and brighten your bedroom the rustic way?
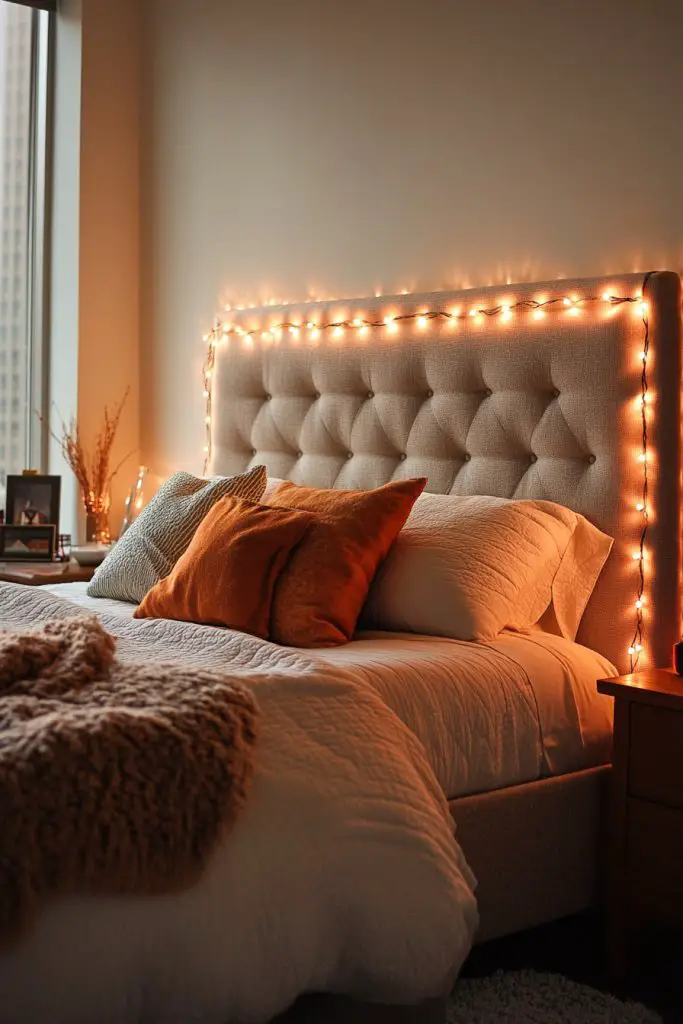
4. Headboard Highlight: Frame your headboard with string lights to add a warm, inviting focal point
Does your bedroom lack that cozy, inviting vibe that makes you want to curl up and relax? A plain headboard can feel dull and uninspiring, especially if it’s just a simple piece of wood or upholstered panel. Adding a string light frame around your headboard instantly transforms it into a warm focal point. It’s a quick, affordable way to elevate your bedroom’s style and comfort.
Recommended Products to replicate this idea
| # | Preview | Product | |
|---|---|---|---|
| 1 |

|
suddus Curtain Lights for Bedroom, 200 Led Hanging String Light Outdoor, Fairy Curtain Lights Indoor... | Check Latest Price |
| # | Preview | Product | |
|---|---|---|---|
| 1 |

|
LEPOWER Clip on Light/Reading Lights/Book Light/Desk Lamp Color Changeable/Night Lights Clip on for... | Check Latest Price |
Picture your headboard outlined with soft, glowing lights that cast a gentle halo around your sleeping area. The warm illumination creates an intimate atmosphere, perfect for winding down after a long day. The lights highlight the shape and texture of your headboard, whether it’s wood, fabric, or a decorative panel. It’s like having a cozy firelight that surrounds you, making your space feel more personal and inviting.
Choose warm white or amber lights for a classic, soothing effect, or go for colored or fairy lights for a playful or romantic mood. For a contemporary look, keep the lights sleek and minimal, or add decorative elements like fabric drapes or tassels for a boho vibe. Adjust the length of the lights depending on your headboard size, ensuring an even glow. This feature works well in small bedrooms as well as larger spaces.
Measure your headboard and determine how much lighting is needed to frame it evenly. Attach the string lights with adhesive hooks, clips, or small nails, ensuring they’re secure but easy to remove later. Run the power cord discreetly behind the headboard or along the wall to keep it tidy. Use a timer or dimmer switch for adjustable brightness and convenience. Test the setup, then sit back to enjoy your newly illuminated focal point.
Add decorative elements like fabric backdrops or small fabric banners hanging from the frame. Use different colors or light effects to match your mood or seasons. Incorporate small, battery-operated star or moon-shaped lights for extra whimsy. Keep the lighting minimalistic or layer with textured textiles to enhance comfort. Personal touches like a throw blanket or pillows in coordinating colors complete the cozy look.
Framing your headboard with string lights is a clever, inexpensive way to add warmth and charm. It instantly makes your bedroom more inviting and stylish. Once installed, you’ll wonder how you ever slept without it. It’s a versatile feature that suits many decors and personal styles. Ready to highlight your space and create a serene retreat?
5. Floating Light Shelves: Install slim shelves with integrated string lights underneath to illuminate decorative objects

Ever feel like your room is missing that wow factor or a way to showcase your favorite items? Cluttering surfaces can look messy and unorganized, but open shelving offers a sleek solution. Adding integrated string lights underneath floating shelves creates a stunning display while illuminating your decor. It’s a practical yet beautiful upgrade that transforms your space.
Recommended Products to replicate this idea
| # | Preview | Product | |
|---|---|---|---|
| 1 |

|
BAYKA Floating Shelves for Wall, Wall Mounted Rustic Wood Shelves for Bathroom, Bedroom, Living... | Check Latest Price |
| # | Preview | Product | |
|---|---|---|---|
| 1 |
|
BestLuz Battery Powered LED Strip Lights, Wireless LED Strip Lights 40 inch x 3 Pack for Kitchen... | Check Latest Price |
Imagine slim, minimalist shelves mounted on your wall, with warm lights hidden underneath to cast a soft glow on your favorite collectibles, books, or photos. The lighting emphasizes each item, making your decor pop against the wall. The shelves appear to float effortlessly, adding depth and dimension to your room while the gentle illumination creates a cozy, gallery-like atmosphere.
Choose material and color for your shelves that match your decor—wood for rustic, glass for modern, or painted MDF for playful themes. Use LED strip lights or mini fairy lights for the under-shelf illumination, adjusting brightness as needed. This setup works well in bedrooms, living rooms, or even dressing areas. Seasonal swaps, like adding fairy lights with colored bulbs, keep the look fresh and fun.
Start by measuring your wall space and selecting the right length and style of shelves. Secure the shelves with appropriate anchors and brackets, ensuring they’re level. Attach the LED strip or fairy lights underneath using double-sided tape or adhesive clips, hiding wires behind the shelf or wall. Plug the lights into a nearby socket with a switch or remote control for ease of use. Style your objects on the shelves, then turn on the lights and enjoy the glow.
Add decorative elements like small sculptures, framed photos, or plants (avoiding actual greenery to stay within restrictions). Use different light colors or effects to match seasons or moods. Incorporate dimmable lighting for adjustable ambiance. Personalize further with themed objects or color schemes that reflect your personality, making every shelf a curated mini gallery.
Floating shelves with integrated lights are a simple way to add both function and style. They make your decor shine and make your room feel thoughtfully designed. Plus, they’re easy to update or rearrange whenever you want a fresh look. Once installed, you’ll love how these subtle details elevate your space into a stylish sanctuary.
6. Curtain of Lights: Hang curtain-style string lights behind your bed for a soft, curtain-like glow that enhances privacy and ambiance
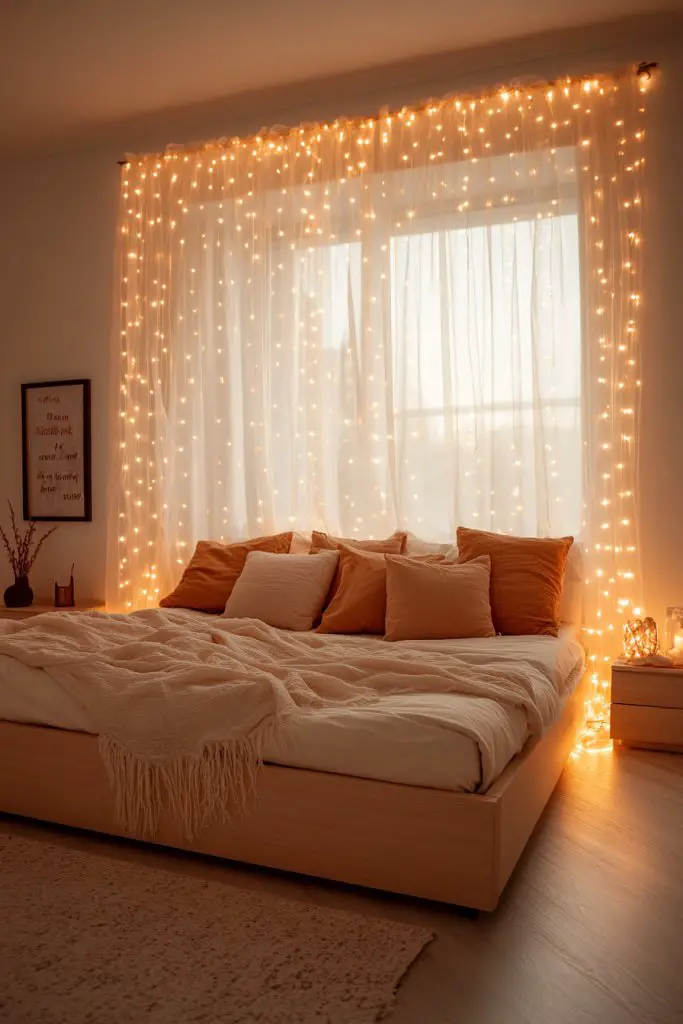
Want to add a touch of magic and intimacy to your bedroom without sacrificing privacy? Standard curtains can sometimes feel dull or only serve a functional purpose. But what if your curtain could also provide a dreamy, ambient glow that transforms the entire room? String lights arranged like a curtain behind your bed create a beautiful, cozy atmosphere that’s both functional and aesthetic.
Recommended Products to replicate this idea
| # | Preview | Product | |
|---|---|---|---|
| 1 |

|
Brightown 300 LED Fairy Curtain Lights, 9.8ft x 9.8ft Warm White Curtain String Lights, USB Plug in... | Check Latest Price |
| # | Preview | Product | |
|---|---|---|---|
| 1 |

|
GXOACKJ Curtain Rods for windows 32-48 inch, 5/8 inch Decorative Curtain Rod Set, Matte Black... | Check Latest Price |
Visualize a sheer fabric or lightweight curtain hanging behind your headboard, with delicate string lights woven through it. When turned on, the lights cast a warm, diffused glow through the fabric, softening the entire space. The effect is a romantic, fairy-tale-like backdrop that feels luxurious yet effortless. It’s perfect for relaxing evenings or adding a gentle glow for bedtime.
Use sheer or semi-transparent fabrics for a light, airy feel, or heavier drapes for a more dramatic look. Choose warm white or amber lights for a cozy vibe or colored fairy lights for a playful touch. You can drape the lights in a straight line, or create gentle waves for a more organic appearance. This setup works in small bedrooms and large master suites alike.
Secure the curtain rod or wire frame behind your headboard or along the wall where the curtain will hang. Weave the string lights through the fabric or attach them to the back with clips or zip ties, ensuring even distribution. Plug the lights into a nearby outlet and add a switch or dimmer for control. Adjust the fabric to create gentle folds or waves, then test the lighting to ensure it’s soft and evenly spread.
Incorporate decorative elements like tiny paper stars, charms, or tassels into the curtain for added charm. Use different lighting effects—twinkle, fade, or steady—to suit your mood. You can also add a second layer of fabric for texture or privacy. Personalize with your favorite colors or patterns to match your decor theme and personality.
A curtain of lights behind your bed is a simple, impactful way to turn your bedroom into a romantic retreat. It’s easy to install, adjustable, and endlessly customizable. Once set up, you’ll love the soft, magical glow that makes every night feel special. Ready to create your dreamy sanctuary with just a few strings of fairy lights?
7. Bed Frame Accents: Wrap fairy lights around your bed frame or headboard for a subtle, magical outline
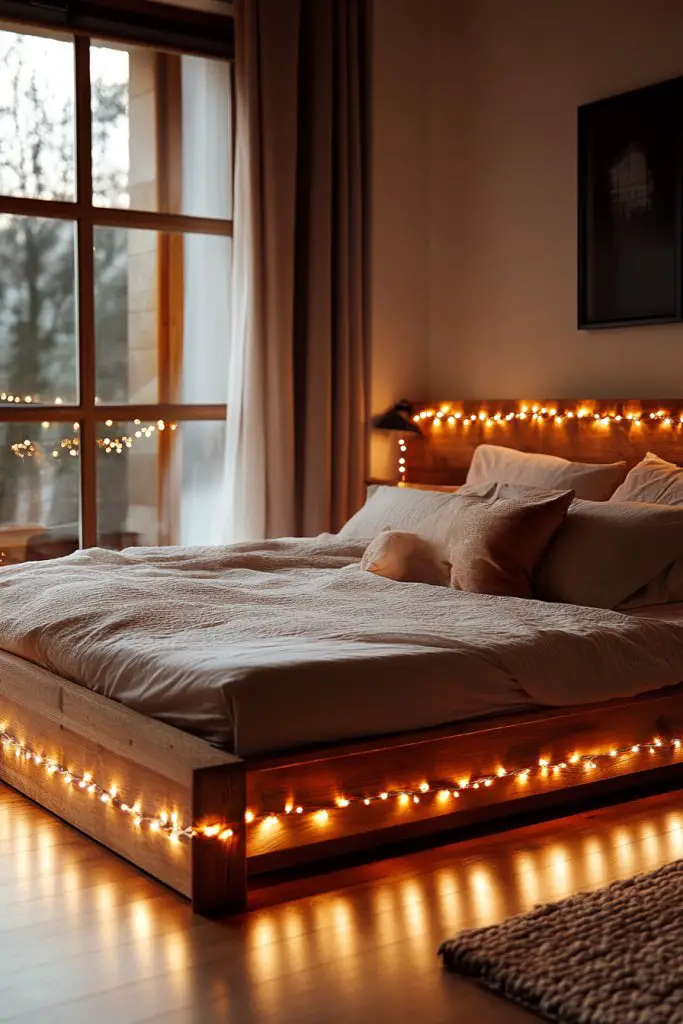
Does your bed look a little plain and uninspiring? Sometimes, a simple bed frame can lack the visual impact it deserves. Adding subtle lighting around the frame creates a magical outline that transforms your entire sleeping area. It’s an easy upgrade that adds warmth and character without overwhelming your decor.
Recommended Products to replicate this idea
| # | Preview | Product | |
|---|---|---|---|
| 1 |
|
Brightown 12 Pack LED Fairy Lights Battery Operated String Lights - 7ft 20LED Waterproof Silver Wire... | Check Latest Price |
| # | Preview | Product | |
|---|---|---|---|
| 1 |
|
Command Clear Indoor Mini Light Clips Value Pack, 45 Clips, 54 Strips, Damage-Free String Light... | Check Latest Price |
Visualize fairy lights gently wrapped around the edges of your bed frame, outlining its shape with a warm, inviting glow. The soft light creates a floating effect, making your bed the star of the room. Whether you have a modern metal frame or a rustic wooden one, the lights add a cozy, fairy-tale touch that makes your space feel enchanted. It’s a simple fix with big visual impact.
Opt for warm white or amber lights for a classic, cozy look. For a more whimsical vibe, choose multicolor or twinkle-effect lights. Wrap the lights loosely or tightly—depending on your style—ensuring they follow the contours of your bed frame. This technique works well with various bed styles and sizes, from twin to king. Seasonal variations, like adding fairy lights with red and green bulbs during holidays, are easy to swap in.
Secure the fairy lights with small clips, zip ties, or adhesive strips along the edges of your bed frame. Avoid damaging the finish; use gentle attachments. Plug the lights into a nearby outlet, and consider adding a timer or remote to control them effortlessly. Test the setup to make sure the lights stay put and cast an even glow. Adjust the wrapping for a balanced look that highlights your bed’s shape.
Decorate the lights with small fabric bows or seasonal ornaments for a personalized touch. Use different light colors or effects to match your decor or mood. For a more dramatic effect, combine with a textured bedspread or layered textiles that complement the glow. Keep the setup simple for everyday use, or add extra elements for special occasions.
Wrapping fairy lights around your bed frame is a subtle yet stunning way to add charm and warmth. It’s a quick project that can be customized endlessly to suit your style. Once done, your bed will look like a cozy, enchanted nook ready for relaxing nights. Why not give it a try and make your sleeping space truly special?
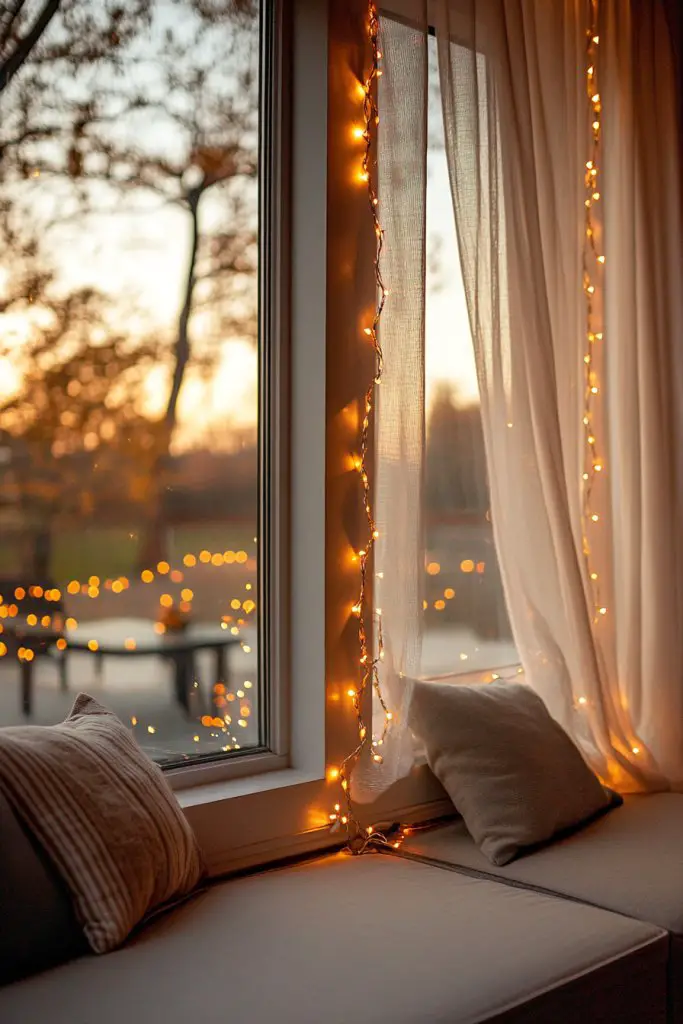
8. Window Frame Illumination: Outline your window with string lights to create a cozy, inviting view from inside and outside
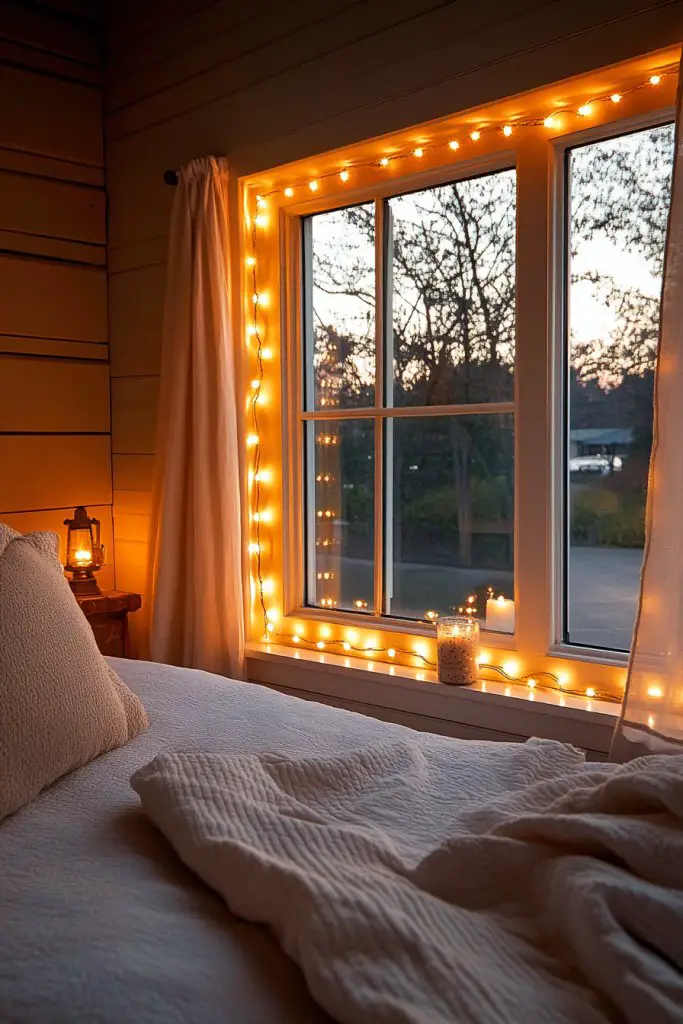
Does your window feel like a plain opening in the wall rather than a charming feature? Without proper framing, windows can look dull and uninspiring, especially at night. Outlining your window with string lights can turn it into a warm, inviting focal point. It’s a simple way to add charm and ambiance, making your room feel cozier and more welcoming.
Recommended Products to replicate this idea
| # | Preview | Product | |
|---|---|---|---|
| 1 |

|
Brightown Outdoor String Lights, 50FT 25 G40 Bulbs Shatterproof Patio Lights, IP65 Waterproof... | Check Latest Price |
| # | Preview | Product | |
|---|---|---|---|
| 1 |
|
Command Clear Indoor Mini Light Clips Value Pack, 45 Clips, 54 Strips, Damage-Free String Light... | Check Latest Price |
Picture a window softly glowing with delicate string lights running along its edges, casting a gentle light into the room. From inside, it creates a cozy glow that invites you to relax and unwind. From outside, it looks like your home is lit with warm, festive cheer, perfect for holidays or just a cozy night in. The light’s reflection on the glass enhances the effect, making the view more enchanting.
Choose warm white or amber lights for a classic look, or multi-color for a festive, playful vibe. Attach the lights with clips or adhesive strips that won’t damage the window frame. Adjust the length to fit different window sizes, and add seasonal decorations like ribbons or ornaments for special occasions. This setup can be as subtle or as bold as you like, depending on your decor style.
Measure your window frame and plan the light placement to ensure even coverage. Secure the string lights with clips or adhesive strips, making sure they’re firmly attached but easy to remove later. Plug the lights into a nearby outlet, and consider using a timer for automatic lighting during evenings. Test the setup by closing the curtains or blinds to see the glow, then make adjustments as needed for a perfect outline.
Decorate the string lights with small holiday ornaments, seasonal ribbons, or themed clips to match your style. Use different light effects—fading, twinkle, steady—to create the perfect mood. Add reflective or textured window treatments to amplify the glow. Personal touches like a string of fairy lights outside during holidays can make your space feel extra special.
Outlining your windows with string lights is a simple, stylish way to add warmth and charm. It makes your space feel more inviting both day and night. Once installed, you’ll love how it elevates your home’s curb appeal and interior ambiance. Why not brighten up your view and give your room a cozy glow today?
9. Floating Cloud of Lights: Suspend a fluffy, cloud-shaped structure with integrated string lights above your bed for a whimsical look
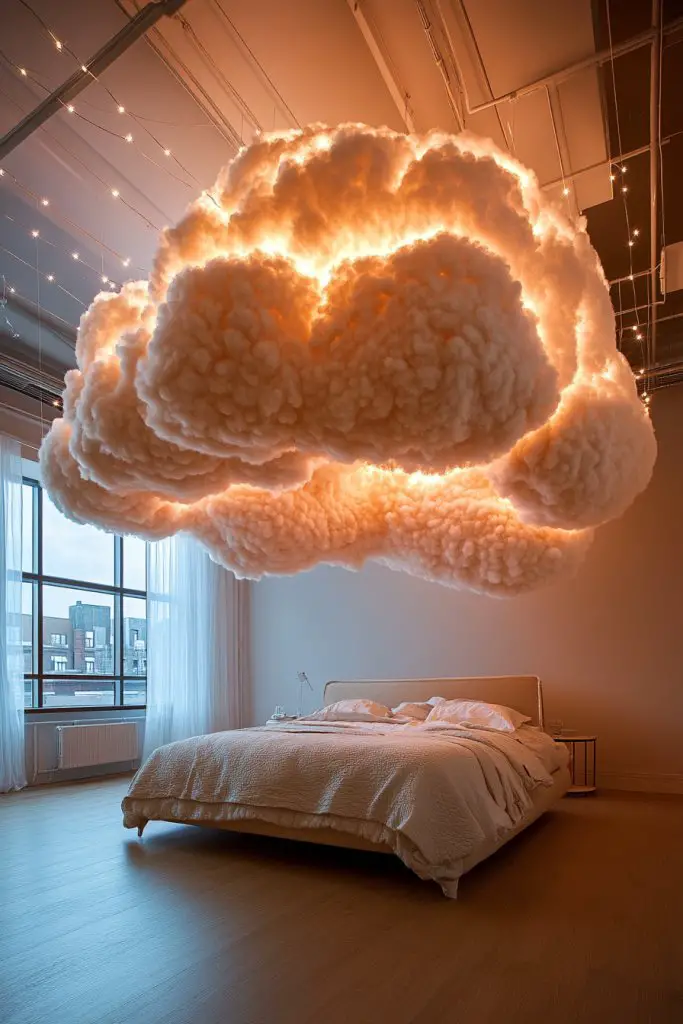
Ever dreamed of having a whimsical, dreamy feature in your bedroom that sparks imagination? A plain ceiling can feel boring, but a floating cloud of lights can add a magical, surreal touch. It’s perfect for creating a cozy, fairy-tale atmosphere that turns your space into a personal sanctuary. Plus, it’s surprisingly easy to make and customize.
Recommended Products to replicate this idea
| # | Preview | Product | |
|---|---|---|---|
| 1 |

|
Xisakaca Cloud Pendant Hanging Light Fixture, Modern Fluffy Ceiling Lighting Chandelier, White Lamp... | Check Latest Price |
| # | Preview | Product | |
|---|---|---|---|
| 1 |
|
Brightown 300 LED Fairy Curtain Lights, 9.8ft x 9.8ft Warm White Curtain String Lights, USB Plug in... | Check Latest Price |
Imagine a soft, fluffy cloud suspended just above your bed, with tiny fairy lights woven into its fibers. The lights softly glow, mimicking a real cloud illuminated by moonlight, casting gentle shadows across your ceiling. The effect is enchanting and calming, making your bedroom feel like a hidden fairy world or a dreamy retreat. It’s a visual delight that invites relaxation and wonder.
Use faux cotton or plush fabric to craft the cloud’s shape, or buy pre-made cloud structures. Integrate warm white or twinkle fairy lights for a magical glow. Hang the cloud with transparent fishing wire or sturdy cords to give the illusion of it floating. Decorate with small stars or moons for a more celestial theme. You can also change the size or density of the cloud based on your ceiling height.
Create or buy a cloud-shaped structure using lightweight foam, fabric, or paper mâché. Embed string lights inside, ensuring the battery pack or plug is accessible. Hang the cloud from the ceiling using transparent fishing wire or sturdy hooks, making sure it’s balanced and secure. Connect the lights and test the glow, adjusting the height and position for optimal effect. Add additional decorative elements if desired.
Decorate with small glow-in-the-dark stars or metallic accents to add texture. Use a mix of twinkle and steady lights for a dynamic effect. Change the lighting colors seasonally or to match your mood. Incorporate textured fabrics or lightweight decorative elements to enhance the cloud’s realism and charm.
A floating cloud of lights adds an element of magic and wonder to your bedroom. It’s a captivating focal point that’s both fun and relaxing. Once installed, you’ll love how it transforms your space into a dreamy haven. Ready to make your bedroom feel like a fairy tale?
10. Bedside Ambiance: Hang small string lights near your nightstand for gentle, accessible lighting perfect for reading
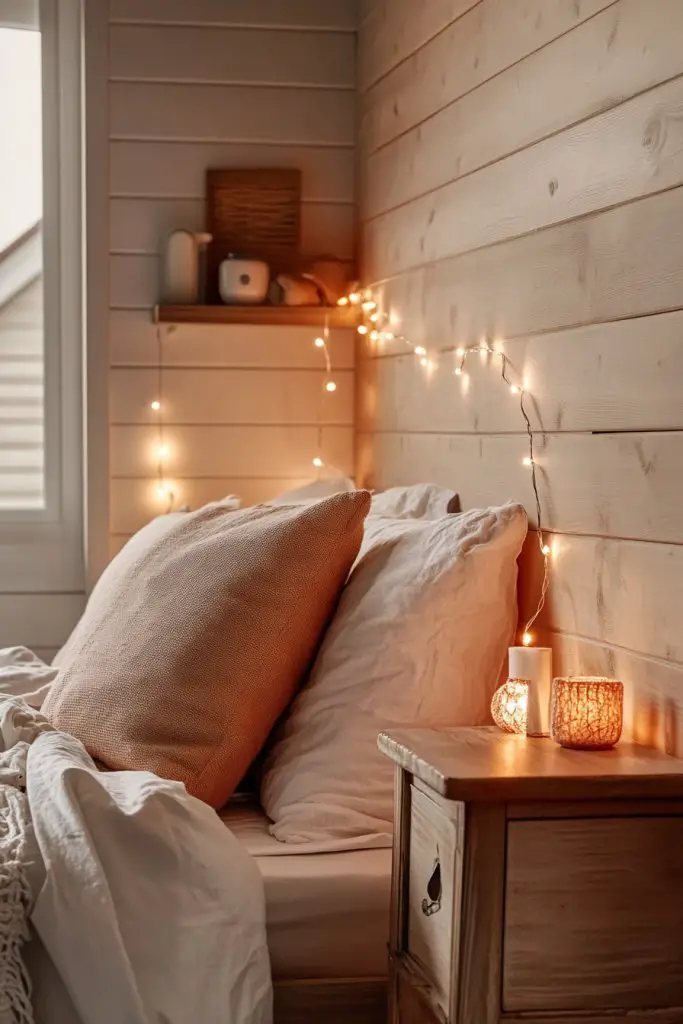
Ever struggle to find the perfect lighting for nighttime reading or relaxing in bed? Harsh overhead lights can be disruptive and uninviting. Small, soft lights near your bed can create a calming ambiance that’s both functional and cozy. String lights are a simple way to achieve this without cluttering your space.
Recommended Products to replicate this idea
| # | Preview | Product | |
|---|---|---|---|
| 1 |
|
Minetom Fairy Lights Plug in, 33Ft 100 LEDs Waterproof Silver Wire Firefly Lights, Adaptor Included,... | Check Latest Price |
| # | Preview | Product | |
|---|---|---|---|
| 1 |
|
LEPOWER Clip on Light/Reading Lights/Book Light/Desk Lamp Color Changeable/Night Lights Clip on for... | Check Latest Price |
Visualize tiny, warm lights hanging just above your nightstand or along the wall near your bed, casting a gentle, diffused glow. The soft light makes your space feel warm and inviting, perfect for reading or winding down. The glow is subtle enough not to disturb your sleep but bright enough for practical use. It’s like having your own personal twilight zone.
Choose small fairy lights, LED string lights, or even battery-operated options for easy placement. Wrap the lights around a decorative rail, along a picture ledge, or behind a fabric panel for a clean look. Adjust the brightness and color temperature to suit your mood—warm white for relaxation or soft colored lights for a playful vibe. Seasonal or themed lights can be swapped in easily.
Secure the lights with adhesive clips or hooks near your nightstand or along the wall, avoiding damage. Plug into a nearby outlet or use battery-powered lights for more flexibility. Position the lights so they’re easily accessible for switching on and off—consider remote controls or timers. Test the lighting, then adjust the placement until it’s just right for reading and relaxing.
Add small decorative elements like fabric wraps, tassels, or themed charms to the lights for a personalized touch. Use dimmable options to customize brightness, or add a small dimmer switch. Incorporate color-changing lights for different moods or seasons. Keep it simple but fun, making your nighttime routine more enjoyable.
Small, cozy string lights by your bedside turn ordinary nights into relaxing escapes. They add a layer of warmth and style that invites calm and comfort. Once you see how easy they are to install and adjust, you’ll want to keep them as a permanent feature. Your bedroom will become a personal retreat designed just for you.
11. Spiral Light Decor: Wrap string lights in a spiral around a decorative object or plant to add visual interest without clutter
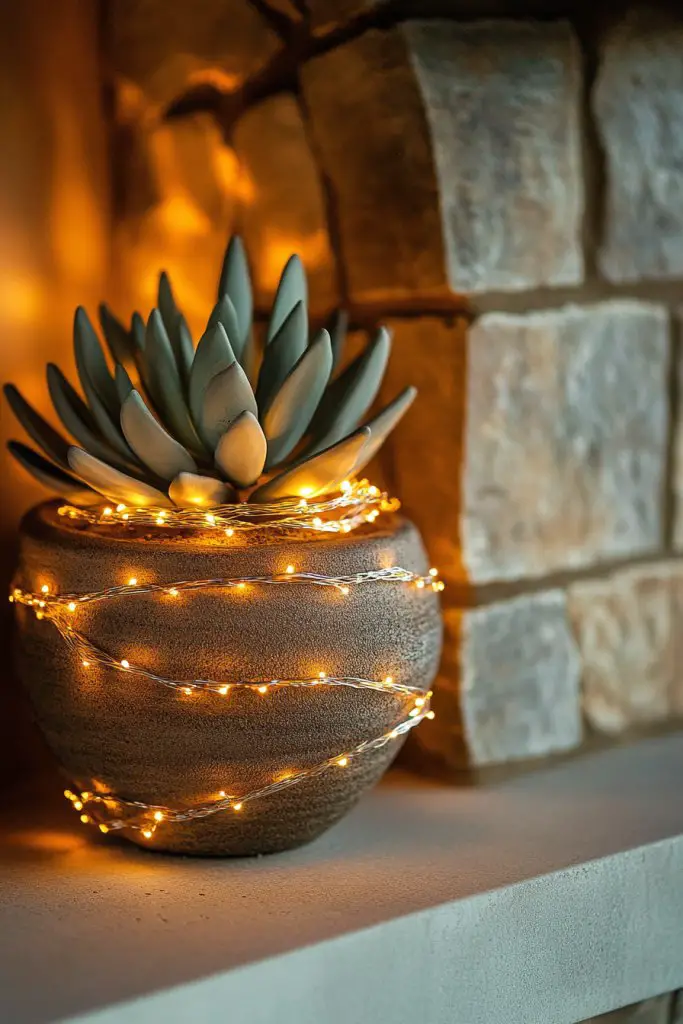
Looking for a simple way to add a bit of sparkle without cluttering your space? Overstuffed shelves and busy decor can make a room feel chaotic. Wrapping string lights in a spiral around a decorative object instantly adds a touch of magic and sophistication. It’s an easy, stylish upgrade that doesn’t require much effort.
Recommended Products to replicate this idea
| # | Preview | Product | |
|---|---|---|---|
| 1 |
|
Brightown 300 LED Fairy Curtain Lights, 9.8ft x 9.8ft Warm White Curtain String Lights, USB Plug in... | Check Latest Price |
| # | Preview | Product | |
|---|---|---|---|
| 1 |

|
Lvases Snuggle Hollow Ceramic Vase Set of 2, Nordic Modern Boho ins Style Decorative Ceramic... | Check Latest Price |
Picture a beautiful vase, sculpture, or even a tall candle holder with delicate fairy lights wrapped in a tight spiral around it. The lights shimmer gently, creating a captivating focal point that draws the eye. The spiral pattern adds texture and movement, making the object stand out while adding warmth to your decor. It’s a subtle yet enchanting detail that elevates any room.
Use different colors or effects—twinkle, steady, or color-changing—to match your mood or decor style. Wrap the lights tightly or loosely, depending on the look you want—neat or more organic. This technique works well with plants (avoiding actual greenery if necessary), vases, or sculptures, adding visual interest without clutter. Seasonal variations, like adding small ornaments or ribbons, keep it fresh.
Wrap the string lights carefully around your chosen object, securing the ends with small clips or tape if needed. Make sure the wiring is hidden or blends seamlessly with the object, and plug the lights into a nearby outlet. Use a remote or dimmer to control the effect, especially if you want to change moods frequently. Position the object in a prominent spot to maximize visual impact. Adjust the spiral for a balanced, eye-catching look.
Decorate the object with seasonal or themed accessories for added charm. Combine with other decorative elements like textured fabrics or metallic accents nearby. Use different light effects or colors for variety, or add small faux gems or beads along the wire for extra sparkle. Keep the look simple but elegant, fitting your personal style.
Spiral-wrapped lights around objects are a clever, understated way to add visual interest and warmth. They’re easy to implement and customize, giving your decor a personal, magical touch. Once you see how much more lively and engaging your space becomes, you’ll want to experiment with other objects. Brighten your home effortlessly and stylishly.
12. DIY Light Chandelier: Craft a unique chandelier using string lights and a simple frame for a statement piece
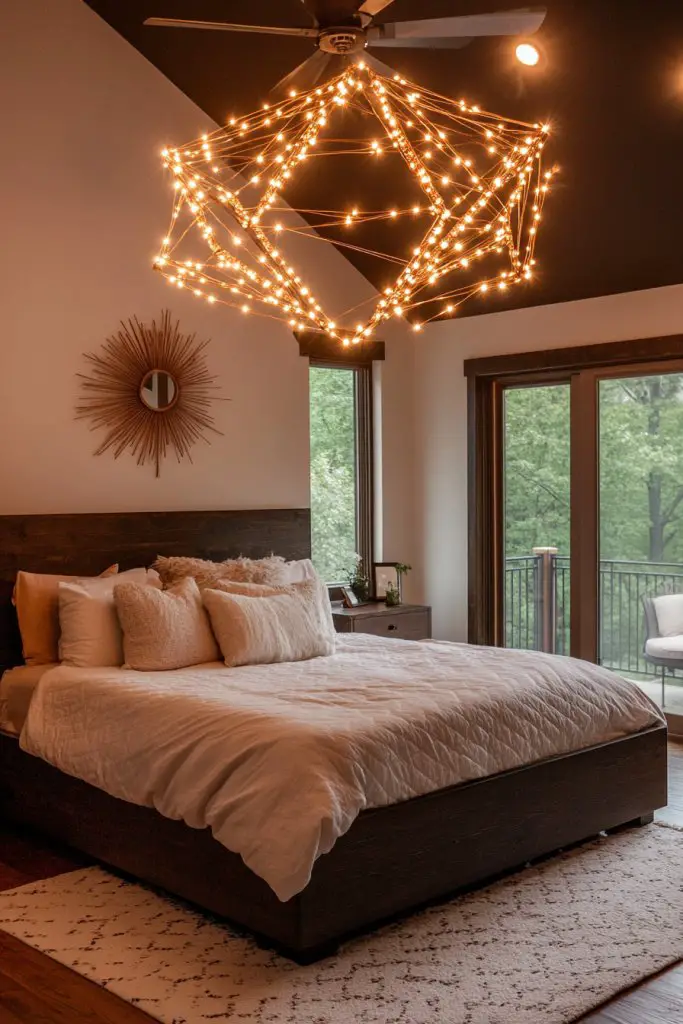
Ever wanted a stunning, one-of-a-kind light fixture that reflects your personal style? Commercial chandeliers can be pricey and often don’t match your decor perfectly. Making your own DIY chandelier with string lights is an affordable way to create a show-stopping centerpiece. Plus, it’s a fun project that adds a personal touch to your bedroom.
Recommended Products to replicate this idea
| # | Preview | Product | |
|---|---|---|---|
| 1 |
|
Minetom Fairy Lights Plug in, 33Ft 100 LEDs Waterproof Silver Wire Firefly Lights, Adaptor Included,... | Check Latest Price |
| # | Preview | Product | |
|---|---|---|---|
| 1 |

|
RISEON Lamp shade Frame with hanging holes, DIY Lamp shade Wire Ring Support Hanging E27 Chandelier... | Check Latest Price |
Imagine a custom-made chandelier hanging from your ceiling, composed of twinkling fairy lights woven into a geometric or organic frame. The lights cast a warm, inviting glow, creating a focal point that’s both artistic and cozy. The design can be minimalist with simple shapes or elaborate with intricate patterns—whatever matches your style. It’s a piece that draws admiration and adds a magical ambiance.
Use metal, wood, or plastic frames in various shapes—geometric, organic, or abstract—depending on your decor. Incorporate different types of string lights, like flickering or color-changing options, for added effect. Hang the chandelier at a height suitable for your space; in small rooms, keep it lower, in larger rooms, hang higher for drama. Seasonal or theme-based decorations can be added for special occasions.
Create or purchase a frame in your preferred shape and size. Wrap the string lights around the frame, ensuring even coverage and secure attachment with zip ties or hot glue. Attach a sturdy chain or cord for hanging, and connect the lights to a power source with a switch or remote control. Balance the weight carefully, and test the lighting before finalizing the installation. Adjust the pattern to ensure a balanced, eye-catching design.
Decorate the frame with additional elements like small ornaments, fabric accents, or themed charms. Use different light effects—fading, twinkle, steady—to customize the mood. Incorporate colors that match your room palette or seasonal themes. Keep the design simple for everyday use or elaborate for special occasions, making it uniquely yours.
A DIY light chandelier is a striking, personalized statement piece that elevates your decor. It’s a rewarding project that combines craftsmanship with style, making your space truly yours. Once installed, it transforms your bedroom into a stylish, cozy sanctuary. Ready to craft your own luminous masterpiece?
13. Wall Art Alternative: Arrange string lights in geometric shapes or patterns as a modern, illuminated wall art piece
Tired of blank walls that do nothing for your decor? Plain wall art can be expensive or hard to change frequently. What if your wall could become the art itself—glowing, geometric, and endlessly customizable? String lights offer a creative way to craft modern, illuminated wall decor that’s both stylish and easy to update.
Recommended Products to replicate this idea
| # | Preview | Product | |
|---|---|---|---|
| 1 |

|
Hoolight Diamond String Lights 10 LED 6.8 ft Battery Operated, Geometric String Lights Warm White,... | Check Latest Price |
| # | Preview | Product | |
|---|---|---|---|
| 1 |

|
YOFAN 10 Pairs Clear Double-Sided Adhesive Wall Hooks - Mounted Door Hanger Kit - No Drill Sticker... | Check Latest Price |
Visualize a wall decorated with string lights arranged in bold geometric shapes—triangles, squares, or abstract patterns—filling the space with a warm, inviting glow. The lights highlight the shapes, creating a contemporary art piece that’s dynamic and eye-catching. The glow adds depth and texture, making your wall a statement of style and personality. It’s a sleek, modern alternative to traditional wall art.
Use different colors, light effects, or shapes to match your decor theme—minimalist, boho, industrial, or eclectic. Combine multiple shapes or patterns for a layered, complex look. Keep the arrangement symmetrical or freeform, depending on your style. This approach works well in various room sizes and can be adapted for seasonal or themed displays.
Sketch your design or use stencils as guides to arrange the lights in the desired pattern. Secure the lights with small clips, adhesive hooks, or transparent tape, ensuring they follow your pattern precisely. Connect the lights to a power source with a switch or remote, and test the effect. Adjust the spacing or shape to perfect the visual impact. For a cleaner look, hide wires behind the wall or within decorative molding.
Add small decorative touches like miniature DIY sculptures, fabric accents, or themed shapes. Change the colors or effects to suit your mood or season—fading, twinkle, or steady glow. Incorporate complementary decor like textured wall paint or fabric panels to enhance the illuminated shapes. Personalize with your favorite colors or themes for a truly original piece.
Arranged in geometric shapes or patterns, string lights become a versatile piece of wall art that’s both modern and personal. It’s a fun project that instantly upgrades your decor while offering endless customization options. Once installed, you’ll love how it transforms your room into a stylish, luminous gallery. Ready to turn your wall into a piece of art that glows?
14. Lofted Light Nook: Create a dedicated reading or relaxation nook with a hanging string light canopy overhead
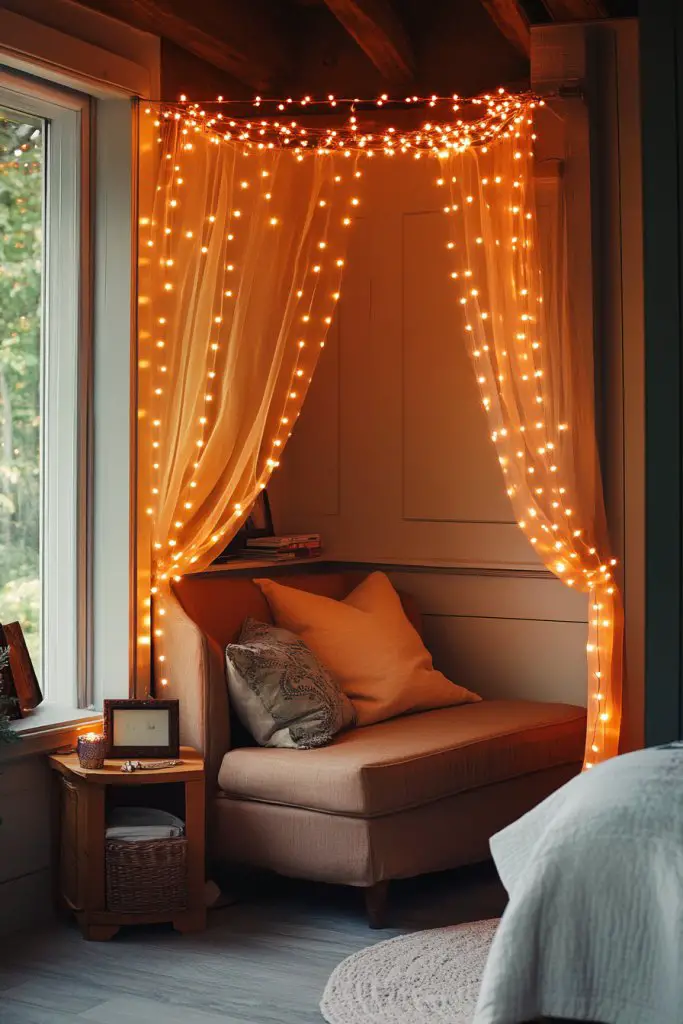
Ever wanted a special corner in your room that feels like a cozy escape? A dedicated reading or relaxation nook can be hard to create without a lot of space or clutter. Using a hanging string light canopy overhead instantly transforms a corner into a magical, inviting retreat. It’s a simple way to carve out your personal sanctuary within your bedroom.
Recommended Products to replicate this idea
| # | Preview | Product | |
|---|---|---|---|
| 1 |

|
HOLITS Fairy Curtain Lights Upgraded Tangle-Free Warm White USB Plug in 8 Modes String Hanging... | Check Latest Price |
| # | Preview | Product | |
|---|---|---|---|
| 1 |
|
VISATOR Mosquito Net Bed Canopy for Girls,King Canopy Bed Curtains Queen Size from Ceiling,Dome... | Check Latest Price |
Picture a small, comfy nook with a plush chair or cushions, enclosed by a canopy of fairy lights hanging from the ceiling. The soft glow creates a warm, intimate ambiance perfect for reading, meditating, or simply relaxing. The lights gently diffuse the surrounding space, making it feel like a secret hideaway. It’s a charming, tranquil spot that invites you to unwind.
Use lightweight fabrics or sheer curtains in neutral or calming colors to hang beneath the lights for extra coziness. Choose warm white or soft-colored fairy lights for a restful atmosphere. The canopy can be shaped in different ways—circular, star-shaped, or freeform—depending on your space and style. Seasonal or themed decorations can be added for variety.
Secure ceiling hooks or anchors in the corner or ceiling above your nook. Drape the fairy lights in a canopy shape, attaching them at multiple points for an even, balanced look. Use transparent fishing wire or thin cords to give the appearance of floating lights. Connect the lights to a power source with a switch or remote. Adjust the height and shape to create your perfect retreat.
Add plush cushions, textured textiles, or small accent tables to complete your nook. Incorporate themed decorations or seasonal accents to keep it fresh and inspiring. Use adjustable or dimmable lights to set the perfect mood. Personal touches like a favorite blanket or a small bookshelf can make this space truly yours.
A lofted light nook is a dreamy, customizable space that makes your bedroom feel bigger and more personal. It’s an easy project that adds a lot of charm and comfort without taking up much room. Once created, you’ll find yourself eager to relax and unwind in your new sanctuary. It’s your special corner—enjoy it.
15. String Light Garland: Drape a garland of fairy lights along your curtain rod or window frame for added sparkle
Looking to add some extra sparkle and charm to your windows or curtains? Basic curtain rods and window frames can feel uninspired. Draping a string of fairy lights creates a whimsical, festive vibe that enhances your room’s ambiance. It’s a quick and inexpensive way to make your space more lively and inviting.
Recommended Products to replicate this idea
| # | Preview | Product | |
|---|---|---|---|
| 1 |
|
Brightown 12 Pack LED Fairy Lights Battery Operated String Lights - 7ft 20LED Waterproof Silver Wire... | Check Latest Price |
| # | Preview | Product | |
|---|---|---|---|
| 1 |
|
Coideal Large Curtain Clips Hooks - 60 Pack Metal Gutter Christmas Light Hanging Clips for Outdoor... | Check Latest Price |
Imagine a delicate garland of tiny lights cascading along your curtain rod or framing your window. When lit, the lights cast a soft, warm glow that reflects off the glass, creating a cozy, enchanting view both inside and outside. During evenings, it turns your window into a sparkling display, adding charm and personality to your home. It’s like a mini festival right in your room.
Choose lights with small bulbs or tiny fairy lights for a delicate look, or larger bulbs for a bolder statement. You can layer multiple garlands or combine with fabric drapes for a layered effect. Use different colors or effects—twinkle, fade—to match your decor or mood. Seasonal or holiday themes can be easily incorporated for added fun.
Secure the garland with clips or hooks along the curtain rod or window frame, ensuring they stay in place. Plug the lights into a nearby outlet and consider using a timer for automatic evening lighting. Adjust the draping pattern for a natural, flowing look or a more structured cascade. Test the setup at night to ensure the glow is even and charming.
Decorate the garland with tiny ornaments, fabric bows, or themed charms. Mix different light effects or colors to create a dynamic display. Coordinate with your room’s color scheme for a harmonious look. Use battery-operated fairy lights if outlets are far, for more flexibility. Personal touches like seasonal decorations make it truly yours.
A string light garland along your window or curtain rod adds instant sparkle and personality. It’s simple, affordable, and endlessly customizable. Once installed, it creates a charming, festive atmosphere that warms your entire room. Ready to add some twinkle and charm to your windows?
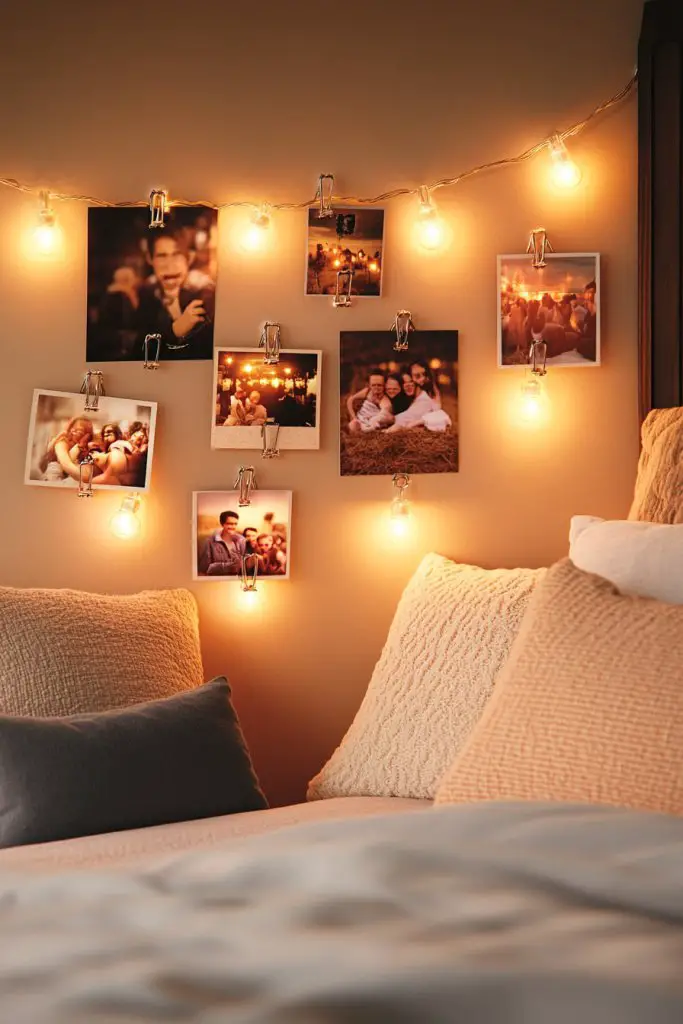
16. DIY Photo and Light Combo: Incorporate string lights with string photo clips to display memories while illuminating them
Want to keep your favorite memories close while adding a cozy glow to your room? Standard photo frames are nice, but they don’t add much ambiance. Combining string lights with photo clips turns your walls into a personal gallery that’s both functional and decorative. It’s a fun DIY project that makes your space truly yours.
Recommended Products to replicate this idea
| # | Preview | Product | |
|---|---|---|---|
| 1 |

|
HXWEIYE 120LED Warm White 40Ft Fairy String Light with 52 Clear Clips & 12 Hooks, USB Powered,... | Check Latest Price |
| # | Preview | Product | |
|---|---|---|---|
| 1 |

|
Magnoloran 20 Photo Clip String Lights LED Fairy Twinkle Lights for Hanging Pictures,Home Wall... | Check Latest Price |
Picture a string of fairy lights stretched across a wall with small clips holding your favorite photos, postcards, or keepsakes. When turned on, the lights softly illuminate your memories, creating a warm, nostalgic vibe. The photos hang like a constellation of treasured moments, adding personality and emotion to your decor. It’s a visual story that’s constantly changing and evolving.
Use different sizes and shapes of clips for visual interest, or mix in small decorative elements like charms or miniature ornaments. Choose warm or cool lights depending on your mood—warm for cozy, cool for modern. Swap out photos seasonally or for special events to keep the display fresh. Create a symmetrical or freeform layout to match your style.
Secure the string lights with hooks or adhesive clips along your wall, ensuring they’re taut and even. Attach the photo clips at regular intervals, making sure they’re stable and accessible. Hang your favorite photos or keepsakes in the clips, adjusting spacing for balance. Plug in the lights and test the glow, then tweak the arrangement as needed. Keep the wires hidden behind furniture or along corners for a clean look.
Add decorative tags, small banners, or themed accents to personalize the display. Use lighting effects—fading, twinkle—to match your mood or season. Incorporate small fairy lights or LED strips around the display for extra brightness. Change photos regularly to keep your wall lively and meaningful.
A photo and light combo makes your memories a part of your decor, creating a cozy, personal vibe. It’s simple to set up and easy to update, making your space feel alive and personal. Once you see your favorite moments beautifully lit and displayed, you’ll wonder why you didn’t do it sooner. Turn your wall into a glowing memory lane.
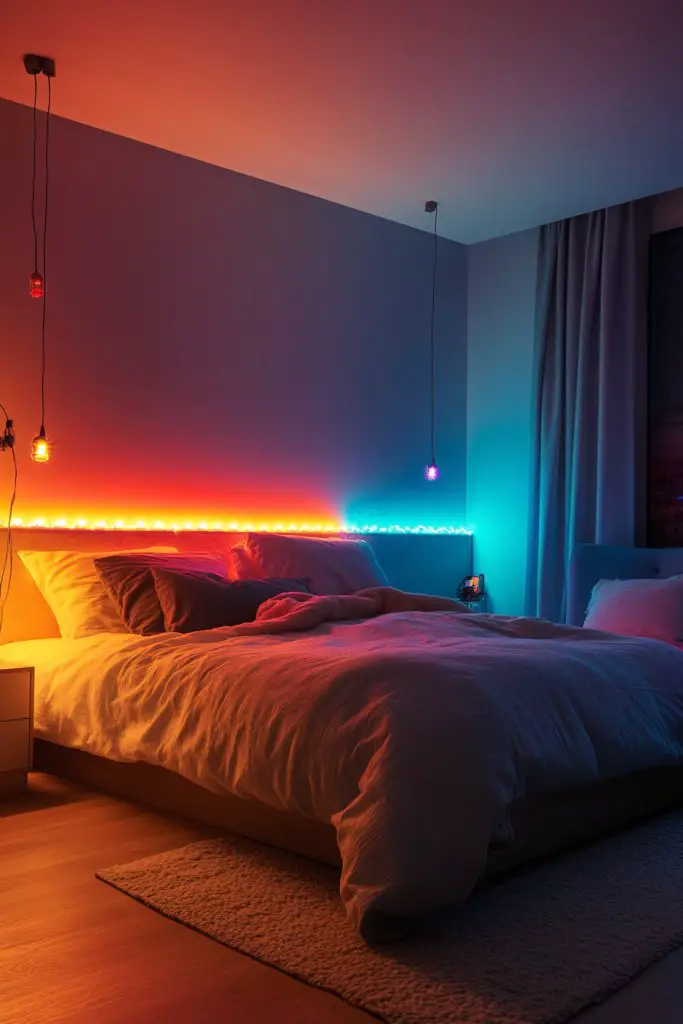
17. Color-Changing Lights: Use RGB string lights to customize your ambiance with different colors and moods
Ever wish you could instantly change the mood of your room with just a flick of a switch? Standard lighting is usually static and limited in mood-setting. RGB string lights give you the power to customize your ambiance—whether you want calm, vibrant, or festive in seconds. It’s a fun, versatile upgrade for any bedroom.
Recommended Products to replicate this idea
| # | Preview | Product | |
|---|---|---|---|
| 1 |

|
Govee 100ft RGBIC LED Strip Lights, Smart LED Lights Work with Alexa and Google Assistant, LED... | Check Latest Price |
| # | Preview | Product | |
|---|---|---|---|
| 1 |

|
Govee LED Smart Light Bulbs, 1000LM Color Changing Light Bulb, Wi-Fi & Bluetooth Light Bulbs, Work... | Check Latest Price |
Imagine a room where the lighting shifts from warm, relaxing tones during the evening to bright, energetic colors for parties or mornings. The RGB lights can be controlled via remote or app, allowing you to switch colors, dim, or create dynamic effects like fading or flashing. The changing colors set the perfect vibe for any occasion, making your room feel alive and adaptable. It’s like having a mood ring for your bedroom.
Choose flexible LED strips or bulbs with RGB capabilities, ensuring they’re compatible with your existing setup. Use different zones or sections for specific colors or effects—perhaps a calming blue near your bed and energizing red or yellow in the rest of the room. Synchronize with music or set timers for automatic changes. Seasonal or holiday themes become effortless with color-changing options.
Secure the RGB lights along your ceiling, bed frame, or wall edges with clips or adhesive backing. Connect to a power source and set up the remote or app for easy control. Experiment with different colors and effects before finalizing the placement. Use dimming features to adjust brightness and avoid overpowering your space. Schedule automatic changes for a dynamic environment.
Create custom color schemes for different moods or seasons—cool blues, warm oranges, festive reds. Sync the lights with your music for a lively atmosphere during parties or relaxing nights. Incorporate themed effects like rainbow or fading transitions for visual interest. Personalize with your favorite color combinations to make the space uniquely yours.
RGB color-changing lights give you total control over your room’s mood, turning ordinary lighting into an experience. They’re fun, flexible, and perfect for creating a space that adapts to your vibe. Once you get the hang of it, you’ll love how easy it is to set the perfect scene at any time. Elevate your bedroom ambiance with a touch of tech!
18. Rope Light Integration: Combine traditional string lights with flexible rope lights for varied textures and lighting effects

Want a versatile lighting setup that combines the soft glow of string lights with the bold impact of rope lights? Mixing different types of lighting creates varied textures and effects that can dramatically enhance your decor. It’s an easy way to add depth and interest without complicated installations or high costs. Who says you can’t have it all?
Recommended Products to replicate this idea
| # | Preview | Product | |
|---|---|---|---|
| 1 |

|
AILBTON 20Ft Neon Rope Lights,Flexible Led Rope Lights Control with App/Remote,Multiple Modes Music... | Check Latest Price |
| # | Preview | Product | |
|---|---|---|---|
| 1 |
|
suddus Curtain Lights for Bedroom, 200 Led Hanging String Light Outdoor, Fairy Curtain Lights Indoor... | Check Latest Price |
Imagine pairing delicate fairy lights with thicker, textured rope lights along your ceiling, bed frame, or accent walls. The string lights provide a subtle, twinkling glow, while the rope lights add a bold, linear presence that’s perfect for highlighting architectural features. The combination creates a layered, dynamic lighting environment that feels both cozy and modern. It’s a look that invites curiosity and admiration.
Use warm white or multicolor string lights for delicate effects, and choose high-visibility rope lights for statement pieces. Wrap the string lights around delicate features and incorporate rope lights along edges or curves for contrast. This technique adapts well to various room styles—from boho to industrial—and can be tailored for seasonal themes or special occasions.
Secure the string lights with clips or adhesive hooks in the desired pattern, then do the same with the rope lights, ensuring they follow the contours and curves you want to emphasize. Connect each to a power source, ideally with a shared switch or remote control for easy operation. Experiment with different layering arrangements, then test the combined effect. Adjust spacing and tension for a balanced, cohesive look.
Decorate the junctions with decorative tapes or accents to unify the look. Use contrasting colors or effects—fading, twinkle, steady—to create mood shifts. Incorporate textured fabrics or metallic finishes nearby to amplify the layered aesthetic. Personalize with seasonal ornaments or themed accessories for a unique touch.
Combining string and rope lights offers a flexible, creative way to enhance your decor. It adds depth and visual interest, making your space feel thoughtfully designed. Once you see the vibrant, layered glow, you’ll be inspired to experiment further. It’s a simple update that makes a big difference.
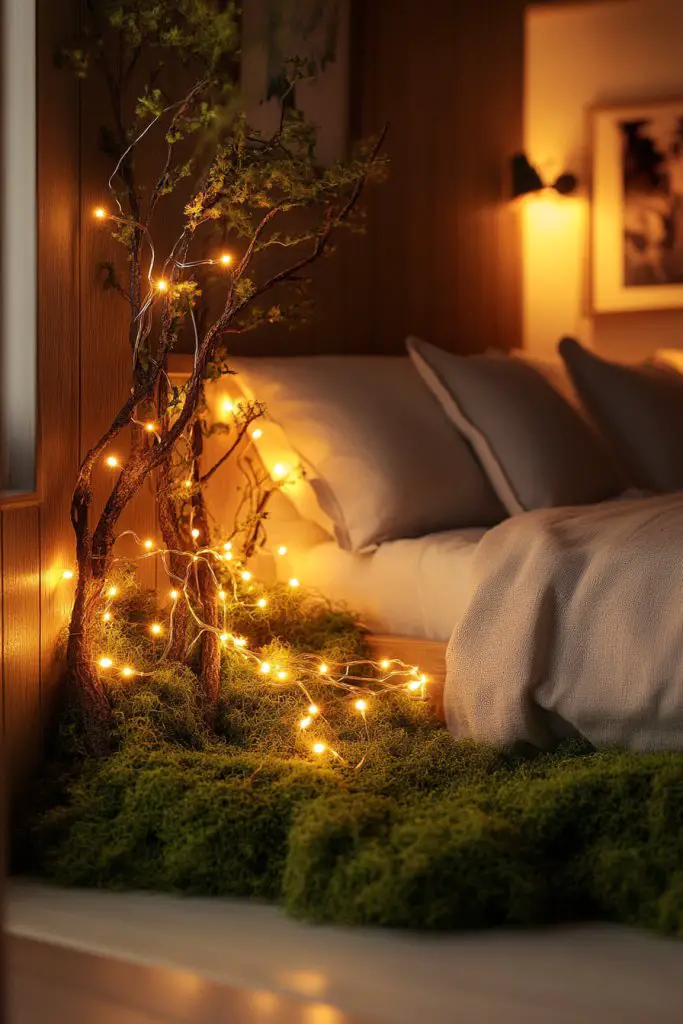
19. Miniature Fairy Forest: Design a tiny fairy forest scene using small string lights intertwined with faux branches or moss for a magical woodland vibe
Craving a whimsical, fairy-tale escape right in your bedroom? A miniature fairy forest can bring magic and serenity to your space in a playful, enchanting way. It’s perfect for dreamers and nature lovers alike, and doesn’t require a massive budget or space. Ready to create your own woodland fantasy?
Recommended Products to replicate this idea
| # | Preview | Product | |
|---|---|---|---|
| 1 |
|
Brightown 12 Pack LED Fairy Lights Battery Operated String Lights - 7ft 20LED Waterproof Silver Wire... | Check Latest Price |
| # | Preview | Product | |
|---|---|---|---|
| 1 |
|
USMOLA Moss Roll, Dried Moss for Crafts, Moss Table Runner for Fairy Gardens, Wedding Woodland... | Check Latest Price |
Imagine a small corner decorated with tiny faux trees, moss, and miniature mushrooms, all intertwined with delicate string lights. The lights twinkle like fireflies and illuminate your miniature forest, casting a soft glow that invites curiosity and calm. It’s like stepping into a hidden fairy glade, full of wonder and tranquility. The scene is both charming and magical.
Use faux branches, moss, and tiny figurines to craft your woodland scene, choosing natural tones or whimsical colors. Wrap the string lights around the branches, embedding the tiny bulbs among the faux foliage. Incorporate elements like miniature lanterns or fairy figurines for added detail. Seasonal accents like tiny pumpkins or snowflakes can be swapped in for variety.
Arrange the faux branches and moss on a small shelf or platform, securing the string lights by wrapping or pinning them into place. Ensure the battery pack is hidden but accessible for turning the lights on and off. Use small hooks or glue dots for stability, creating layers of foliage and lights to mimic a lush forest. Test the lighting and adjust for a natural, magical glow.
Add tiny fairy figurines, miniature lanterns, or seasonal decorations to make your forest scene more captivating. Use different light effects—fading or twinkle—for a more realistic, mystical atmosphere. Incorporate textured fabrics or decorative stones for extra dimension. Personal touches make the scene uniquely yours, inspiring imagination.
A miniature fairy forest scene is a delightful, enchanting addition that sparks joy and creativity. It’s a charming project that turns your bedroom into a magical woodland hideaway. Once completed, it becomes a calming retreat and a conversation starter. Ready to bring fairy magic into your space?
Conclusion
With a wide array of string light bedroom ideas—from delicate drapes to eye-catching installations—you have all the inspiration you need to create a cozy, enchanting sanctuary. Each idea offers a simple yet impactful way to elevate your space and infuse it with personality and warmth. Don’t hesitate to experiment and make these luminous touches uniquely yours; your dream bedroom is just a string of lights away. Light up your space and let your creativity shine!
Last update on 2026-03-06 / Affiliate links / Images from Amazon Product Advertising API