
17 Support Beam Decorating Ideas for Functional Displays
Support beams are often overlooked as mere structural elements, but they hold incredible potential to become eye-catching focal points in your home decor. Their rustic charm and architectural presence make them a popular choice for adding character and warmth to any space.
In this article, you’ll find a variety of creative ideas to transform support beams into stunning displays of style and functionality. Whether you’re into bold statement pieces, subtle enhancements, or practical storage solutions, there’s something here to inspire your next home makeover. Get ready to reimagine your support beams as the perfect blend of form and function!
1. Install Floating Shelves for Stylish Storage and Display
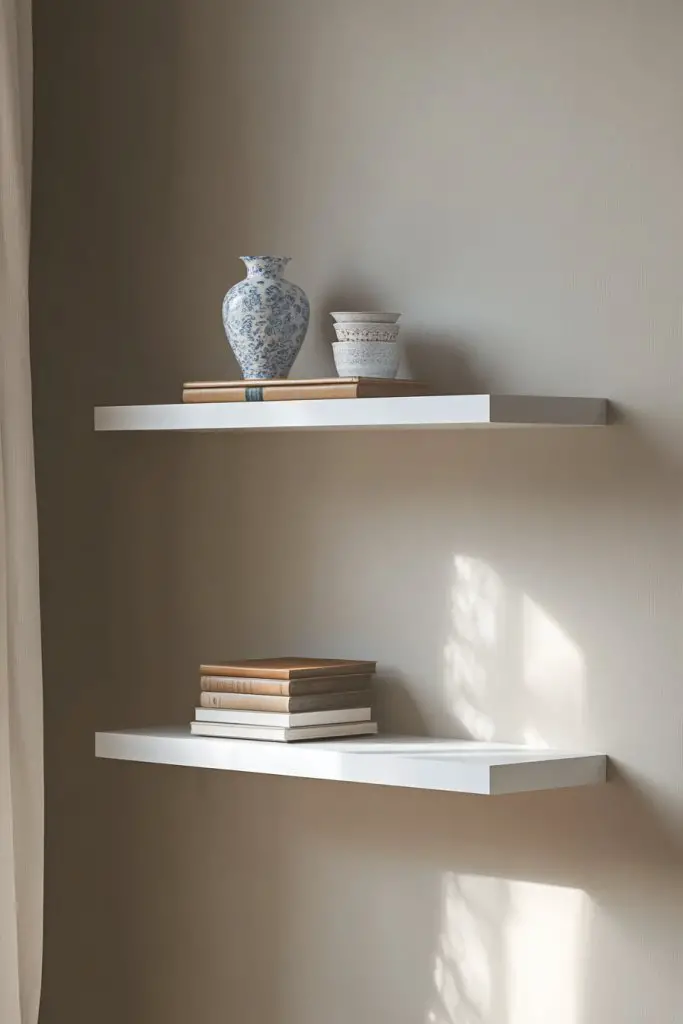
Ever wish you could add extra storage without cluttering your space? Floating shelves are the perfect way to do just that. They let you display your favorite items while keeping essentials within arm’s reach. Plus, they add a modern, clean look that upgrades any room.
Recommended Products to replicate this idea
| # | Preview | Product | |
|---|---|---|---|
| 1 |

|
WOPITUES Wood Floating Shelves Set of 6, Shelves for Wall Decor, Farmhouse Shelf for Bedroom,... | Check Latest Price |
| # | Preview | Product | |
|---|---|---|---|
| 1 |

|
Starunder 6 Pack Floating Shelf Brackets, 6 Inch Heavy Duty Industrial Shelf Bracket, Black Metal L... | Check Latest Price |
Imagine sleek, minimalist shelves floating seamlessly against your wall, holding a stack of colorful books, a few decorative boxes, or a couple of chic candles. The floating design creates a sense of openness and makes your space feel larger. The textures of wood or metal add warmth and contrast, making your decor pop.
You can customize floating shelves to match your style—go rustic with reclaimed wood, industrial with metal pipes, or sleek glass for a contemporary vibe. In small rooms, narrow shelves save space, while in larger areas, multiple tiers create a layered look. Seasonal colors or decorative objects can also change up the vibe easily.
Start by measuring your support beam’s width and weight capacity. Choose sturdy brackets or wall anchors suited for your wall type. Install the brackets level and evenly spaced, then slide the shelves into place. Use a level tool to ensure everything is perfectly aligned. Finish with decorative items that reflect your personality.
Add personal touches like painted labels on storage boxes or small framed photos alongside your display items. You can even paint the shelves a bold color to make them stand out or match your existing decor palette. Consider adding LED strip lighting underneath for a subtle glow.
Floating shelves turn plain walls into stylish focal points and help organize your space effortlessly. They’re versatile, affordable, and easy to install—what’s not to love? Give them a try, and watch your room transform with minimal effort and maximum impact.
2. Hang Industrial Pipe Racks for Kitchen or Entryway Organization

Is your kitchen or entryway overflowing with hooks, containers, and clutter? An industrial pipe rack offers a stylish solution that combines function and flair. It’s a clever way to keep everyday essentials organized and accessible.
Recommended Products to replicate this idea
| # | Preview | Product | |
|---|---|---|---|
| 1 |

|
1/2inch Rigid Pipe Strap Clamp, Two Hole Strap,U Bracket Tube Clip, Stainless Steel Heavy Duty Pipe... | Check Latest Price |
| # | Preview | Product | |
|---|---|---|---|
| 1 |
|
Large Hooks for Hanging Heavy-Duty 44Ib(Max) 10 Packs, Wall Hangers without Nails Self-Adhesive... | Check Latest Price |
Picture sturdy black iron pipes mounted along your support beam, with hooks hanging from them holding utensils, keys, or accessories. The raw metal finish adds an edgy, industrial touch that pairs well with rustic or modern decor. It creates a visual statement while maximizing vertical space.
You can customize pipe racks with different pipe diameters or finishes—black, brushed nickel, or antique brass. Use them in a farmhouse kitchen, a modern apartment, or a cozy mudroom. Add baskets or small shelves to hold additional items, and change the hooks’ positions for different needs.
Select pipes and fittings designed for wall mounting, ensuring they can support the weight of your items. Mark the placement of brackets on your support beam, then drill into the wall or support beam directly. Secure the pipes with appropriate fittings, then hang hooks or baskets as needed. For added stability, consider anchoring into studs.
Personalize your pipe rack with custom hooks shaped like animals or initials. Use chalkboard paint on the pipes for labeling purposes or add decorative elements like vintage signage. You could even incorporate LED strip lighting for a dramatic effect.
Industrial pipe racks are not only functional but also add a rugged charm that elevates your space’s style. They’re a DIY-friendly project that transforms your support beam into a focal point of design and organization. Get creative, and enjoy a clutter-free area with serious attitude.
3. Attach Wire Grid Panels for Customizable Wall Art and Notes
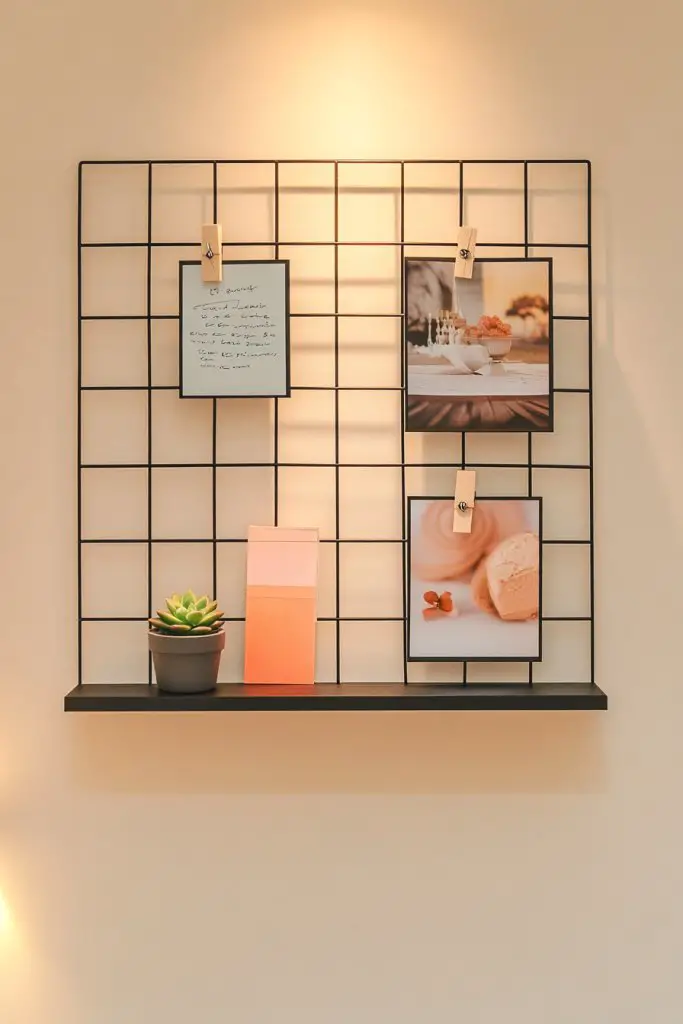
Tired of boring walls and disorganized notes? Wire grid panels offer a versatile way to display photos, reminders, or small decor items in a way that’s both functional and stylish. They’re perfect for creating a dynamic, changeable display.
Recommended Products to replicate this idea
| # | Preview | Product | |
|---|---|---|---|
| 1 |

|
Wall Photo Grid Shelf, Wall Hanging Ins Art Display Grid Panel for Decor & Storage, Metal Wire... | Check Latest Price |
| # | Preview | Product | |
|---|---|---|---|
| 1 |

|
10 Pcs Metal Mini Clamps Mini Spring Clamp Crocodile Alligator Clips 1/2 Inch Wide for Work, Smooth... | Check Latest Price |
Imagine a metal grid mounted on your support beam, with clips holding up colorful photos, postcards, or inspirational quotes. You can also hang small baskets or decorative items, giving your wall a layered, textured look. The open design allows light and air to flow through, avoiding a cluttered feel.
Choose different grid sizes, shapes, or finishes like matte black, brass, or silver. Use them in a home office, kitchen, or craft area—anywhere you need a flexible display. Change the items regularly to keep things fresh or personalize with themed decor for holidays or seasons.
Securely mount the wire grid to your support beam using heavy-duty screws or hooks designed for metal. Use clips, clothespins, or hooks to hang your photos and notes, ensuring they are evenly spaced. Add small shelves or containers for extra storage or display options. Keep in mind the weight limit of your mounting hardware.
Personalize your grid with themed accessories—like vintage clips for a retro vibe or colorful clips for a cheerful look. You can paint the frame to match your decor palette or add decorative string lights for a warm glow at night. Mix and match items to reflect your personality.
Wire grid panels turn simple walls into creative showcases that evolve with your tastes. They’re easy to install, highly customizable, and perfect for keeping your space organized. With a little imagination, your support beam transforms into a personal gallery.
4. Use Rope Lighting for Ambient Illumination and Visual Interest
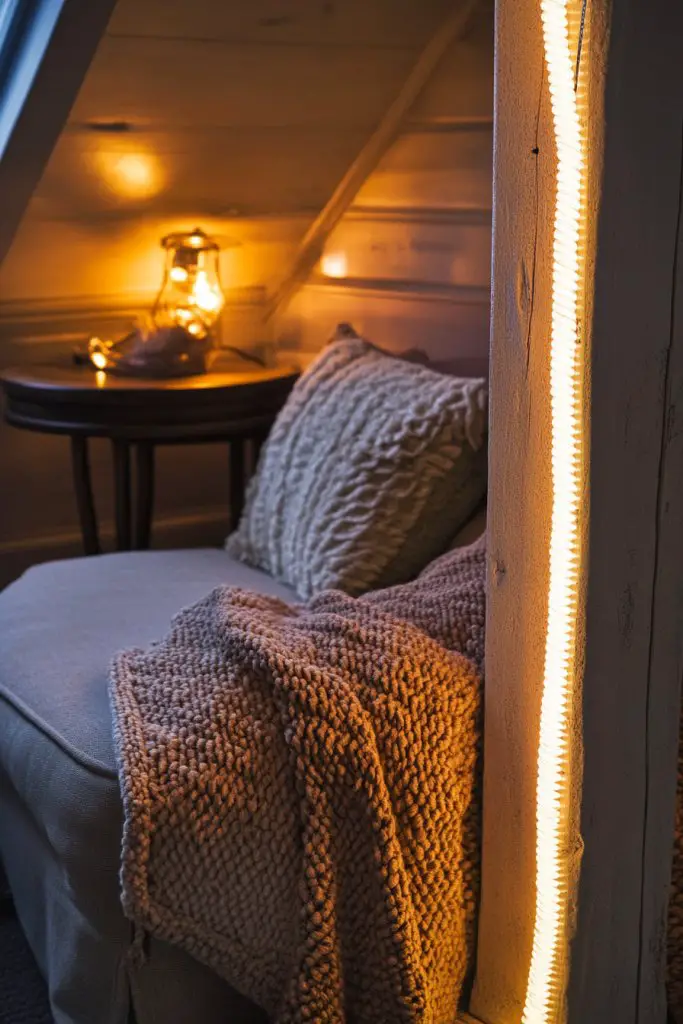
Want to create a cozy, inviting atmosphere without big fixtures? Rope lighting provides soft, indirect illumination that instantly elevates your space. It’s a simple upgrade that adds warmth and style to any support beam.
Recommended Products to replicate this idea
| # | Preview | Product | |
|---|---|---|---|
| 1 |

|
httpsmp 20Ft Neon Rope Lights,Flexible Led Rope Lights Control with App/Remote,Multiple Modes Rope... | Check Latest Price |
| # | Preview | Product | |
|---|---|---|---|
| 1 |

|
KSIPZE 100ft Led Strip Lights RGB Music Sync Color Changing Led Lights with Smart App Control Remote... | Check Latest Price |
Picture a warm glow emanating from a twisted rope of LED lights wrapped around your support beam. The gentle light casts playful shadows and highlights architectural details. It’s like giving your room a subtle hug, perfect for relaxing evenings or romantic dinners.
Choose from different color temperatures, from cool white to warm amber. Wrap the rope light tightly for a sleek look or loosely for a more relaxed feel. Use it in living rooms, bedrooms, or outdoor patios—anywhere you want to add ambiance.
Securely attach the rope light to your support beam using clips or adhesive channels designed for outdoor or indoor use. Run the wiring discreetly along the beam, hiding excess cords behind decorative elements or inside wall cavities. Connect to a dimmer switch for adjustable brightness. Ensure all connections are weatherproof if used outdoors.
Add colored filters or RGB options for dynamic lighting effects. Combine with other lighting sources like sconces or candles for layered illumination. For a festive touch, synchronize the rope lights with music or set timed schedules. Play around with different lengths and placements for the best effect.
Rope lighting is a quick, affordable way to instantly warm up your space. It’s versatile enough to fit any decor style, from modern minimalism to boho chic. Light up your support beam and enjoy a cozy, inviting environment every day.
5. Install Pegboards for Tool, Jewelry, or Accessory Storage
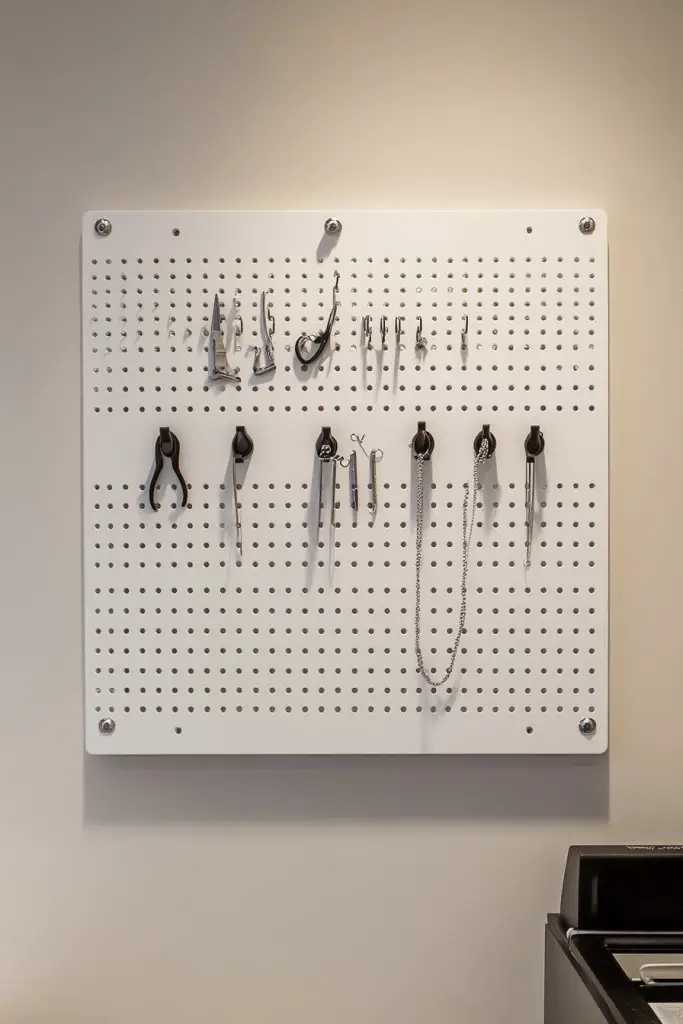
Cluttered drawers and messy counters are the bane of organized living. Pegboards offer an easy, customizable solution to keep tools, jewelry, or accessories neatly displayed and within reach. They turn chaos into order with a simple grid.
Recommended Products to replicate this idea
| # | Preview | Product | |
|---|---|---|---|
| 1 |

|
INCLY 278PCS Pegboard Accessories Organizer Kit, Peg Board Hooks Assortment with Bins for Organizing... | Check Latest Price |
| # | Preview | Product | |
|---|---|---|---|
| 1 |
|
HORUSDY 12-Piece Precision Hook and Pick Set, Car Auto Oil Seal/O-Ring Seal Gasket Pick, Precision... | Check Latest Price |
Imagine a sturdy pegboard mounted on your support beam, with hooks holding necklaces, earrings, or small tools. The open grid makes everything visible at once, reducing search time. Add colorful hooks or baskets for a playful, functional look that’s easy to update.
Use different pegboard materials like wood or metal, and choose colors that match your decor. For small spaces, opt for a compact size; in larger areas, create a feature wall. Change the layout by swapping hooks or adding small shelves for extra storage. It’s a flexible system that adapts to your needs.
Mount the pegboard securely onto your support beam using appropriate screws or wall anchors. Arrange hooks in a pattern that suits your items—larger hooks for heavier tools, smaller for jewelry. Keep frequently used items at eye level for quick access. Consider adding labels or decorative frames for a polished look.
Decorate the pegboard with paint or stencil designs to match your style. Use themed hooks—like vintage or industrial—to add character. Incorporate small baskets or containers for organizing tiny items, and swap out hooks seasonally for a fresh look. Personal touches make it uniquely yours.
Pegboards turn your clutter into a clean, accessible display. They’re a DIY-friendly project that adds both function and style. Once installed, you’ll wonder how you ever managed without this versatile organizer.
6. Hang Potted Plants in Macramé or Hanging Baskets
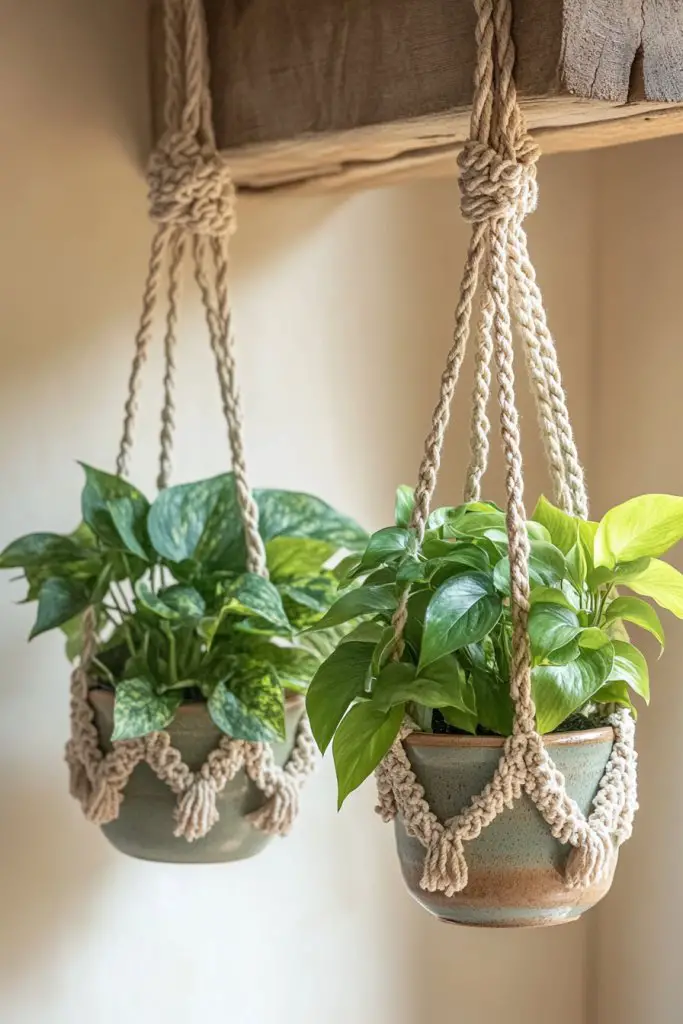
Looking to add life and color to your space without sacrificing floor or counter space? Hanging plants are a fantastic way to introduce greenery and a natural vibe. Macramé hangers or baskets make it easy and stylish.
Recommended Products to replicate this idea
| # | Preview | Product | |
|---|---|---|---|
| 1 |

|
SFENNGPET Macrame Plant Hangers, 6Pack Hanging Planters for Indoor Plants w/ 6 Set Hangers Kit... | Check Latest Price |
| # | Preview | Product | |
|---|---|---|---|
| 1 |

|
Karlliu 4 Pack 14 Inch Hanging Flower Baskets for Outdoor Plants Large Metal Wire Planters with Coco... | Check Latest Price |
Visualize lush green plants suspended from your support beam, with textured macramé hangers adding a boho touch. The plants cascade down, softening the architectural lines and bringing a fresh, organic feel. The contrast of natural fibers and vibrant foliage creates an eye-catching display.
Choose plants that thrive indoors—like pothos, philodendron, or small ferns—and match the hanger style to your decor. For a minimalist look, opt for sleek white or black baskets; for a boho vibe, go with chunky knits or woven textures. Change plant varieties seasonally for variety.
Securely attach hooks or anchors into your support beam, ensuring they can support the weight of the plant and container. Hang your macramé or basket, then place the plant inside, making sure it has enough space and access to light. Water regularly, but avoid overwatering to prevent damage.
Decorate the baskets with beads or tassels for added flair. Use colorful or patterned textiles for the hangers to match your room’s theme. Incorporate decorative stones or small figurines in the baskets for a personalized touch.
Hanging plants bring a vibrant, lively atmosphere that’s easy to maintain and refresh. They’re a simple way to incorporate nature into your home, boosting mood and air quality. With a few hooks and some greenery, your space transforms effortlessly.
7. Mount Narrow Cabinets or Wall Niches for Extra Storage
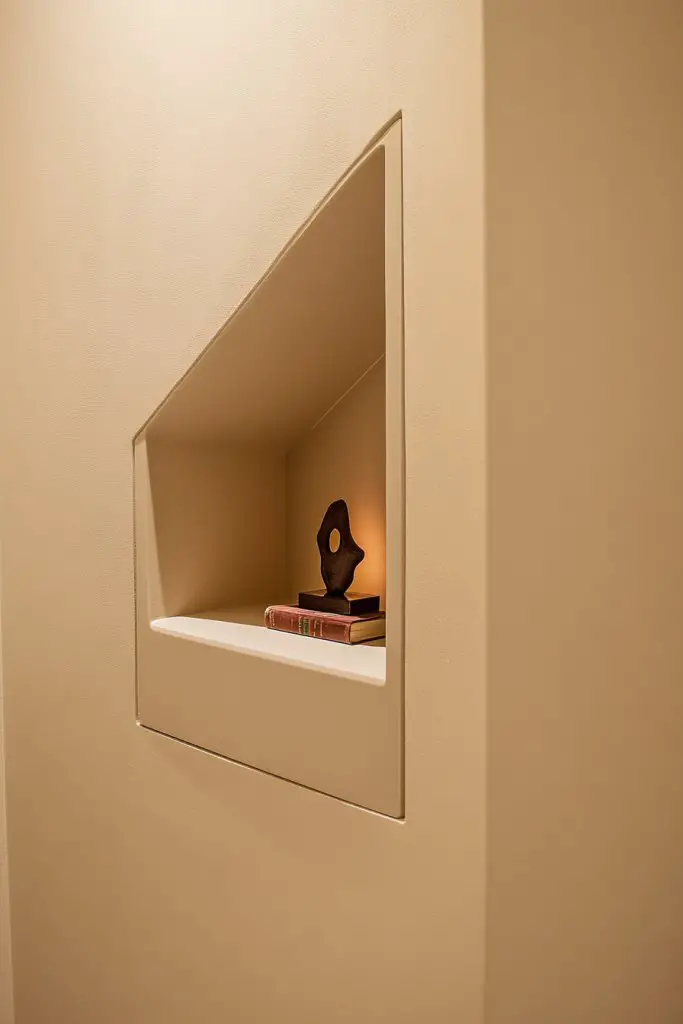
Running out of storage in your home can feel like a constant battle. Narrow cabinets or recessed wall niches offer a clever way to add hidden storage without sacrificing style. They keep clutter out of sight but close at hand.
Recommended Products to replicate this idea
| # | Preview | Product | |
|---|---|---|---|
| 1 |

|
White Laundry Room Cabinets and Storage with 4 Doors and Utility Adjustable Shelf,Gabinetes Para... | Check Latest Price |
| # | Preview | Product | |
|---|---|---|---|
| 1 |

|
Design Toscano Classical European Style Wall Niche Display Shelf, Medium, 21 Inches Tall, Cast Stone... | Check Latest Price |
Picture slim cabinets seamlessly integrated into your support beam, with doors that blend into the wall or feature decorative hardware. Inside, you store household essentials out of view, maintaining a clean aesthetic. Alternatively, wall niches are perfect for displaying decorative objects or organizing daily items.
Choose from various materials—wood, lacquer, or metal—to match your decor. Small, shallow niches work well in tight spaces, while deeper cabinets are suitable for larger storage needs. You can also opt for open shelving in niches for easy access or concealed doors for a sleek look.
Plan your storage needs and measure available space. Use appropriate tools to cut or install the cabinets or niches, ensuring they are level and securely anchored to the support beam or wall studs. Finish with paint, stain, or hardware that complements your decor. Install hinges or handles carefully, and organize your items inside.
Add decorative hardware or paint the cabinets in bold colors for a statement look. Use labeled containers inside for better organization. For niches, incorporate LED strip lighting or decorative backing panels to elevate the visual appeal.
Extra hidden storage helps declutter your space and creates a more serene environment. They’re a smart, stylish upgrade that enhances both function and design. With a little effort, your support beam becomes a hidden treasure of organization.
8. Create a Wine or Beverage Rack Using Custom Brackets
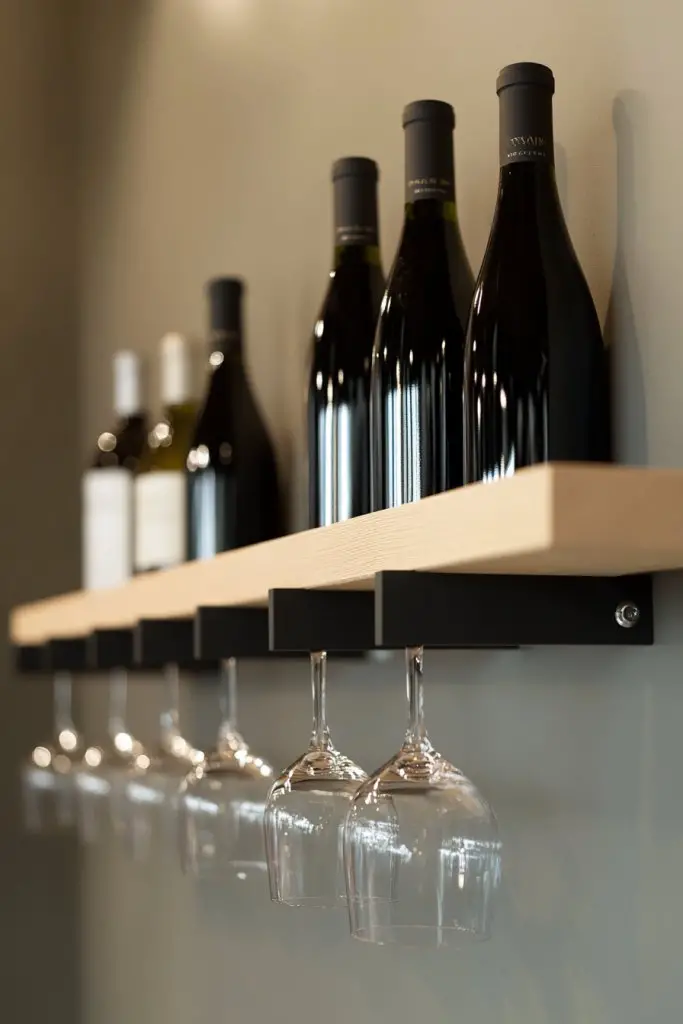
Love entertaining but hate the clutter of bottles? A custom wine or beverage rack built into your support beam keeps everything organized and ready to serve. It’s both practical and adds a touch of sophistication.
Recommended Products to replicate this idea
| # | Preview | Product | |
|---|---|---|---|
| 1 |

|
VEVOR 72 Bottle Upgrade Modular Wine Rack, Continuously Store Pinot Bottles, 8-Tier Bamboo Wood... | Check Latest Price |
| # | Preview | Product | |
|---|---|---|---|
| 1 |

|
Carlisle FoodService Products RG25-214 OptiClean 25 Compartment Glass Rack with 2 Extenders, Blue ,... | Check Latest Price |
Envision sleek brackets holding wine bottles horizontally, with a few glass racks for drinkware. The layout is neat, accessible, and shows off your collection. The metallic or wooden finish can match your decor, making it a statement piece in your space.
Choose from rustic wood slats, modern metal brackets, or a combination of both. Adjust the size and spacing to accommodate bottles, cans, or glasses. You can also incorporate a small countertop area for serving or prep.
Measure the length of your support beam and select brackets or slats designed for weight support. Mount brackets securely using anchors or screws into the beam, ensuring even spacing. Attach slats or racks, then organize your bottles and glasses. Consider adding a small shelf for openers or napkins.
Paint brackets in your favorite color or finish them with a stain for a natural look. Add decorative tags or labels for different types of drinks. For a fun touch, include LED lighting underneath to highlight your collection.
A custom rack turns your support beam into a functional art piece perfect for entertaining. It’s easy to create, upgrade your decor, and keep your drinks perfectly organized—impress guests with style and practicality.
9. Add Vertical Slat Panels for Textured Privacy or Accent Walls
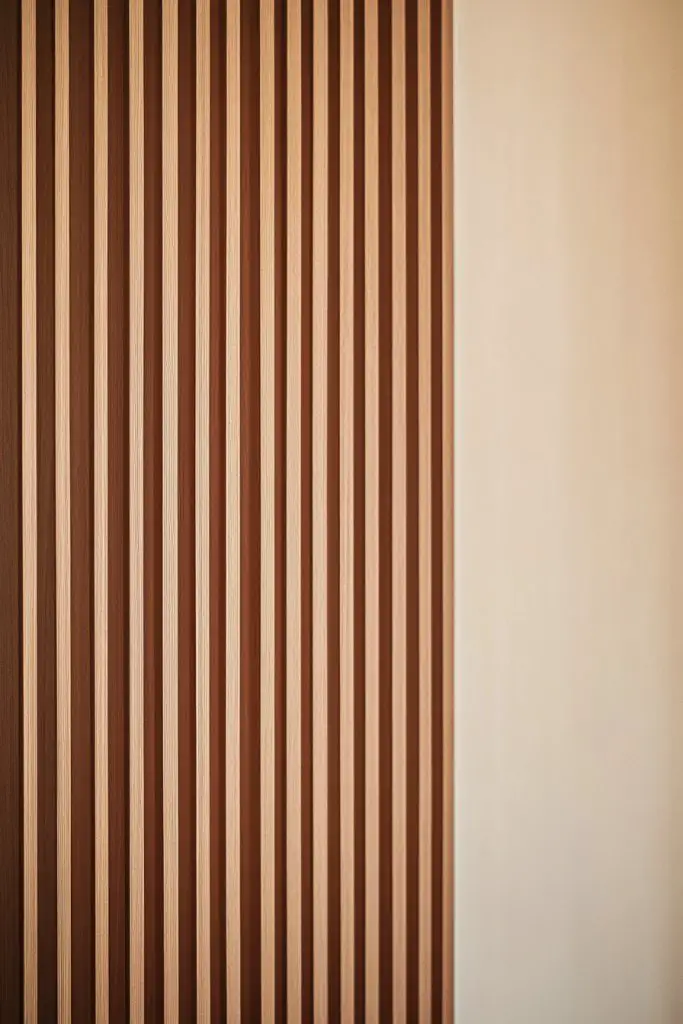
Looking to add depth and privacy to your space without sacrificing style? Vertical slat panels are an excellent way to create textured walls that serve as both decoration and functional partitions.
Recommended Products to replicate this idea
| # | Preview | Product | |
|---|---|---|---|
| 1 |

|
Olanglab Wood Slat Wall Panels 4 Pack, Wooden Acoustic Wall Panels, 94.5"x12.6" Each 3D Wall Panels... | Check Latest Price |
| # | Preview | Product | |
|---|---|---|---|
| 1 |

|
Alise Floating Shelf Brackets,L Brackets for Shelves Heavy Duty Shelving Brackets Stainless Steel... | Check Latest Price |
Imagine tall, narrow wooden slats arranged vertically along your support beam, creating a rhythmic pattern that draws the eye. The natural or painted finish adds texture, warmth, and visual interest. This design can serve as a backdrop for a seating area or a subtle divider.
Choose different materials—wood, MDF, or metal—for various textures. Play with spacing for a more open or dense look. Use the slats as a backdrop for other decor elements or leave them bare for a sleek, modern vibe. They work well in open-plan living spaces or bedrooms.
Measure the length and height of your support beam, then cut your slats accordingly. Attach them using screws or adhesive, ensuring even spacing for a uniform appearance. For added stability, secure the slats into wall studs or support beams. Finish with stain, paint, or sealant to match your decor.
Decorate the slats with painted patterns or carve subtle designs for a personalized touch. Incorporate LED backlighting for a dramatic effect. You can also add small planters or hooks for hanging accessories—just skip the plants and artwork, remember!
Vertical slat panels add a sophisticated, textured layer to your interior design. They’re simple to install and customize, giving your space a modern edge. Elevate your decor with this stylish architectural feature.
10. Hang Artistic Weaving or Tapestries for Texture and Color

Want to add warmth, color, and texture to your walls without cluttering your space? Hanging woven textiles or tapestries provides a cozy, artistic touch that’s easy to swap out whenever you like. It’s a quick way to refresh your decor.
Recommended Products to replicate this idea
| # | Preview | Product | |
|---|---|---|---|
| 1 |

|
Command Spring Clips, Quartz, 8-Clips (17089Q-8ES), Great for dorm decor | Check Latest Price |
| # | Preview | Product | |
|---|---|---|---|
| 1 |

|
1” Diameter Curtain Rods Itself is 30 to144 inch 1 Pack Fit 30-142 inch, 66 to 120 inch Window... | Check Latest Price |
Visualize a beautifully woven tapestry draped from your support beam, with intricate patterns and vibrant colors that catch the light. The fabric adds a soft texture that balances the harder architectural elements. It creates a welcoming, bohemian vibe that invites relaxation.
Choose from bold geometric designs, floral patterns, or neutral textures for versatile looks. Size and placement can vary—go large for a dramatic focal point or smaller for a subtle accent. Mix textures by layering different textiles or combining with other decor styles.
Secure a sturdy rod or hooks into your support beam. Hang the textile with clips or loops that won’t damage the fabric. Ensure it’s evenly spaced and centered for a clean look. Use additional hooks or pins to keep the fabric flat and smooth.
Personalize your textile with embroidery, patches, or dyeing to match your style. Layer with other textiles like throw blankets or cushions for a cozy, layered appearance. For a seasonal update, swap tapestries to match holiday or seasonal themes.
Artistic weaving and tapestries bring a rich, textured element to your decor that’s easy to change and update. They add personality and warmth, making your space feel inviting and uniquely yours. Dive into textiles and express your creative side!
11. Affix Magnetic or Cork Boards for Notes and Inspiration
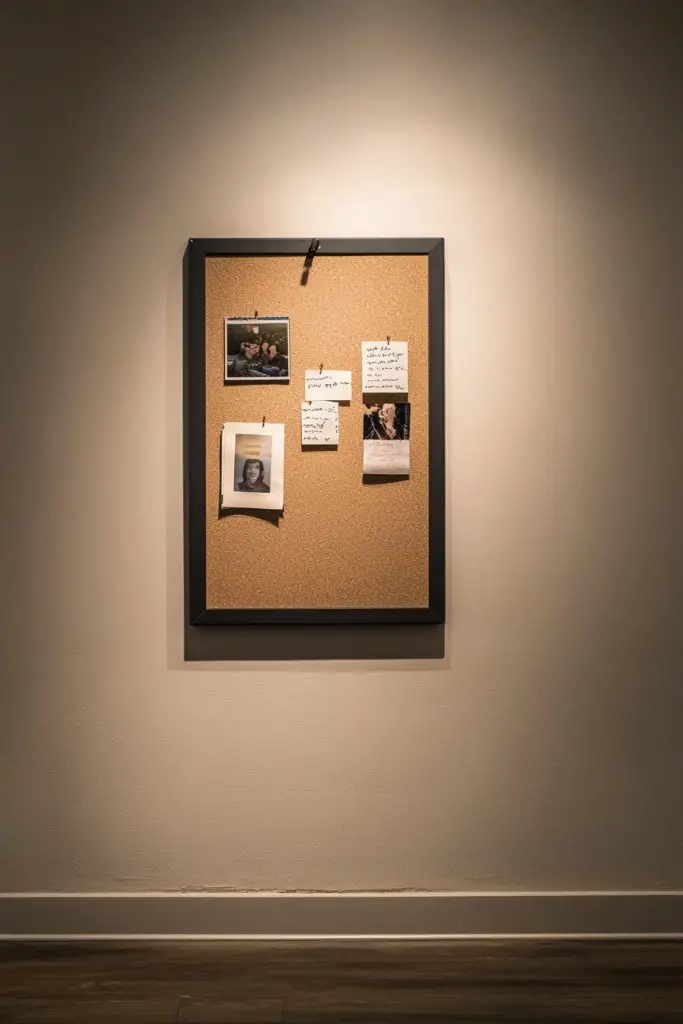
Forget scattered sticky notes and lost reminders. Magnetic or cork boards offer a central spot to organize thoughts, to-do lists, or inspirational quotes visibly and attractively. They turn your support beam into a functional workspace or motivational hub.
Recommended Products to replicate this idea
| # | Preview | Product | |
|---|---|---|---|
| 1 |

|
U Brands Cork Bulletin Board, 18" x 24" Inches, Light Birch Wood Frame (265U00-01) | Check Latest Price |
| # | Preview | Product | |
|---|---|---|---|
| 1 |

|
VIZ-PRO Magnetic Dry Erase Board, 36 X 24 Inches, Silver Aluminium Frame | Check Latest Price |
Imagine a large cork board secured to your support beam, filled with colorful notes, photos, and memos. Magnetic strips hold important papers, while pushpins display motivational quotes or calendars. The setup keeps your essentials front and center, reducing clutter.
Choose framed cork boards or sleek magnetic panels to match your decor style. Add decorative border trims or paint the frame for a custom look. Use different sizes in combination for a layered, organized effect. Perfect for home offices or kitchens.
Securely attach the board to your support beam with screws or strong adhesives suitable for your wall type. Organize your notes with magnets or pushpins, and keep frequently referenced items within easy reach. Consider adding small shelves or clips to hold pens or markers.
Decorate the frame with washi tape, paint, or decals to match your style. Use colorful magnets or pins to add vibrancy. For a personal touch, frame your favorite photos or inspirational quotes in decorative printouts.
Magnetic and cork boards turn your support beam into a hub of productivity and motivation. They’re simple, customizable, and practical—perfect for staying organized while adding a personal touch to your space.
12. Use Adjustable Curtain Rods for Flexible Room Dividers
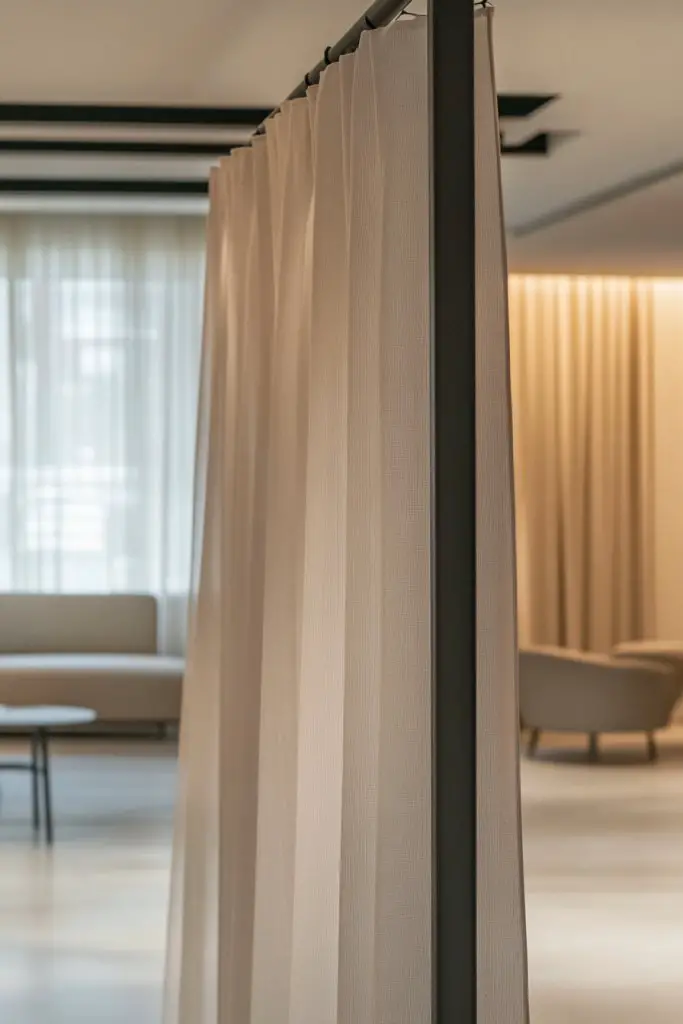
Ever wanted an easy way to create privacy or define different zones in an open-plan space? Adjustable curtain rods let you hang fabric panels or curtains quickly and effortlessly. They’re the go-to solution for adaptable room separation.
Recommended Products to replicate this idea
| # | Preview | Product | |
|---|---|---|---|
| 1 |

|
MEXAU 1Pack Spring Tension Curtain Rod 26-39 inch Black Adjustable Spring Rod Extendable Tension Rod... | Check Latest Price |
| # | Preview | Product | |
|---|---|---|---|
| 1 |

|
OWENIE Sheer Curtains 84 inches Long 2 Panels Set for Living Room/Bedroom, Rod Pocket Voile Sheer... | Check Latest Price |
Picture a lightweight curtain hanging from a sleek, adjustable rod mounted on your support beam. When drawn, it creates a cozy nook or separates your workspace from the rest of the room. The fabric adds texture and color, softening the architectural lines.
Select from various fabrics—light linen, velvet, or patterned textiles—to suit your style. Use neutral tones for a minimalist look or bold prints for a statement. Adjust the length and position of the rod to accommodate different room layouts or needs.
Install the adjustable curtain rod brackets securely into your support beam, following the manufacturer’s instructions. Hang your chosen fabric, adjusting the length as needed. Use tiebacks or decorative holdbacks for flexibility and style. Make sure the fabric glides smoothly when opening or closing.
Add decorative curtain tiebacks or rings for a polished look. Layer multiple curtains for insulation or light control. Choose fabrics with interesting textures or patterns to match seasonal decor or your personal taste.
Using adjustable curtain rods is a versatile way to reconfigure your space on a whim. They’re affordable, easy to install, and highly customizable—making your support beam a multi-purpose feature that adapts to your lifestyle.
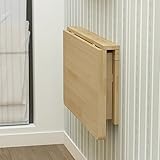
13. Mount Small Fold-Out Desks or Work Surfaces for Compact Workstations
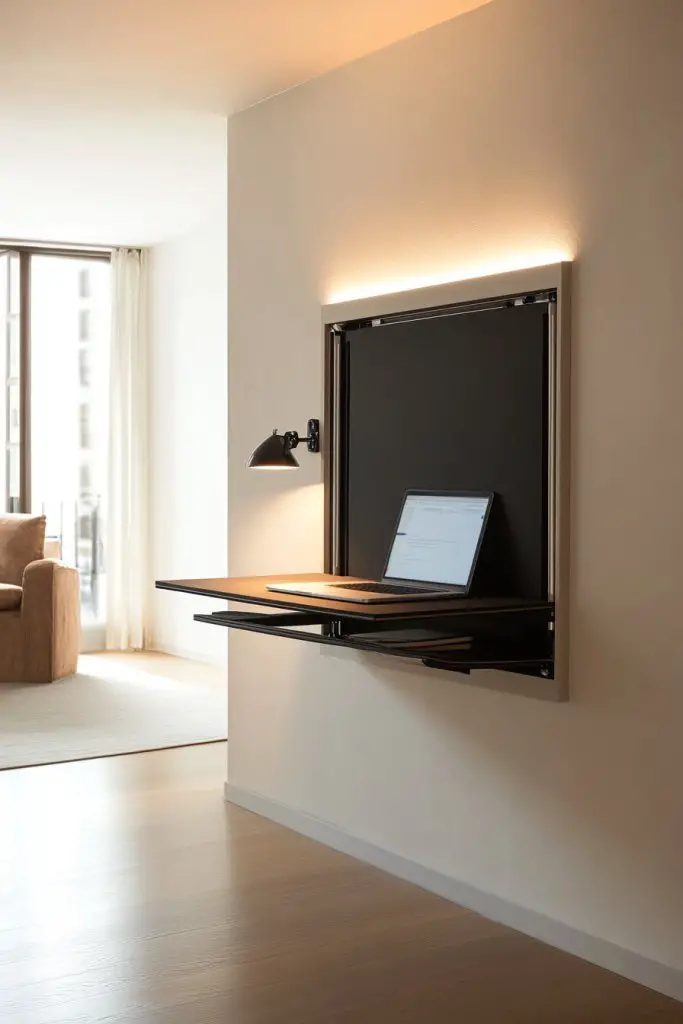
Struggling to find a dedicated workspace in your small home? Fold-out desks or work surfaces mounted on your support beam provide a compact, efficient solution. They fold away when not in use, freeing up space for other activities.
Recommended Products to replicate this idea
| # | Preview | Product | |
|---|---|---|---|
| 1 |
|
MM MELISEN Wall Mounted Folding Table for Laundry Room, Wall Mounted Fold Down Desk for Small Saving... | Check Latest Price |
| # | Preview | Product | |
|---|---|---|---|
| 1 |

|
AOKLIT 4 Pcs T Post Timber Brackets,Post to Beam Connector for 6x6 Brackets,Durable Steel Material... | Check Latest Price |
Imagine a sleek, wall-mounted desk fold down when you need to work or craft, then tuck away neatly. The support beam acts as a sturdy support, and the fold-out surface adds a functional workspace that doesn’t take up permanent room. It’s perfect for small apartments or multi-use rooms.
Choose from different materials—wood, laminate, or metal—for durability and style. Finish the surface with a protective coat or paint to match your decor. Add small storage hooks or containers underneath for supplies. Customize the size to fit your needs.
Securely mount the fold-out hinge brackets into your support beam, ensuring they can support the weight of your work items. Attach the fold-down surface, then test for stability. Keep the area clear when folded up, and add a latch or magnet to hold it in place when not in use. Organize your tools or papers on the surface.
Decorate the surface with a patterned or colored finish for visual interest. Attach small wall organizers or clipboards for quick access to notes or supplies. Add a fold-down shelf or small pegboard for extra storage.
Fold-out desks turn your support beam into a flexible workspace that adapts to your needs. They’re perfect for maximizing small spaces and keep your environment clutter-free. Easy to install and highly functional—get ready to work smarter, not harder.
14. Hang String Lights or Fairy Lights for Cozy Ambiance
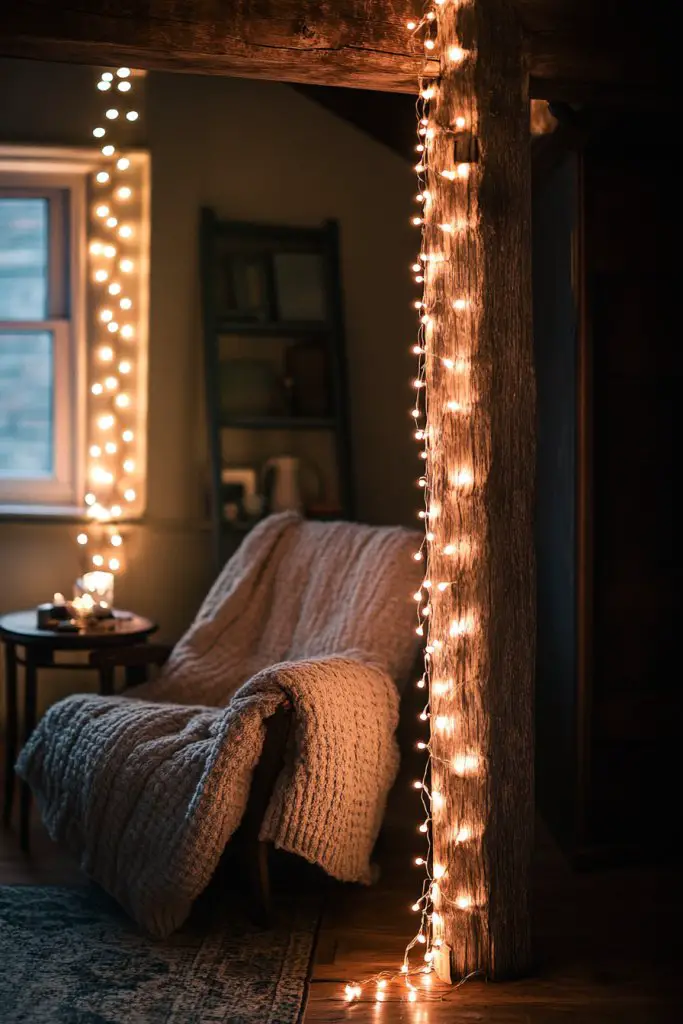
Want to instantly make your space warmer and more inviting? String or fairy lights are an inexpensive way to create a magical, cozy atmosphere. They add soft illumination that’s perfect for relaxing or entertaining.
Picture delicate fairy lights draped along your support beam, casting a gentle glow across the room. The tiny bulbs twinkle softly, creating a dreamy environment. The warm light complements any decor style and makes your space feel more intimate.
Choose from different bulb shapes, colors, or string lengths to suit your style. Wrap the lights tightly for a sleek look or loosely for a whimsical feel. Use clips, hooks, or adhesive tape to secure them discreetly. Combine with other lighting sources for layered ambiance.
Securely attach the string lights along your support beam using clips or adhesive hooks designed for delicate surfaces. Run the wiring neatly along the support beam, hiding excess cords behind decorative elements or inside wall cavities. Plug into a nearby outlet or use a battery pack for flexibility. Ensure all connections are secure and safe.
Create themed lighting with colored bulbs or smart LED options that change color and intensity. Sync lights with music or set timers for automated effects. Layer with lanterns or candles for additional ambiance—just skip the fire hazards, OK?
String lights are a simple, versatile way to add charm and warmth to your space. They’re quick to install, inexpensive, and instantly lift the mood. Light up your support beam and enjoy a cozy, stylish retreat whenever you need it.
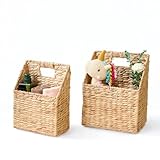
15. Attach Wall-Mounted Baskets for Storage and Decor
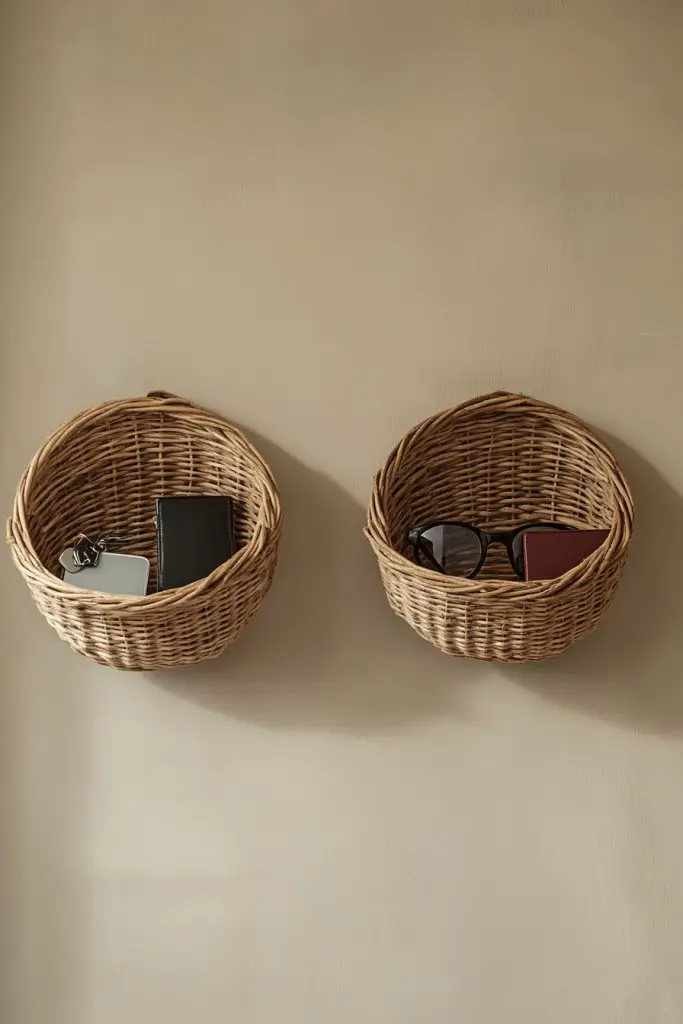
Clutter piling up on counters and shelves? Wall-mounted baskets are a practical and stylish way to organize miscellaneous items while adding rustic charm. They keep essentials accessible and your space tidy.
Recommended Products to replicate this idea
| # | Preview | Product | |
|---|---|---|---|
| 1 |
![Joben Oligey 3 Set [Extra Large] Hanging Wall Baskets ,Wire Basket For Storage Pantry, Farmhouse Food Storage Kitchen Pantry Laundry Closet Garage RV ,Black](https://m.media-amazon.com/images/I/51Dr1ysZVEL._SL160_.jpg)
|
Joben Oligey 3 Set [Extra Large] Hanging Wall Baskets ,Wire Basket For Storage Pantry, Farmhouse... | Check Latest Price |
| # | Preview | Product | |
|---|---|---|---|
| 1 |
|
CHI AN HOME Set of 2 Hanging Storage Basket, Wicker Water Hyacinth Wall Hanging Basket with Handle... | Check Latest Price |
Imagine a series of woven or metal baskets hung along your support beam, each holding different items—keys, mail, or small accessories. The natural textures or sleek finishes add visual interest and contrast with your wall or beam. It’s a simple, effective decor upgrade.
Select baskets in various shapes, sizes, and materials—rattan, wire, or wood—to suit your decor theme. Use them in entryways, kitchens, or bathrooms. Mix and match for a layered, eclectic look or keep it uniform for a clean, modern feel. Change their contents seasonally for freshness.
Mount the baskets securely into your support beam with appropriate hooks or brackets. Distribute weight evenly to prevent sagging or falling. Organize items inside for quick access and a clutter-free appearance. Consider adding labels or decorative ties for an extra touch.
Decorate the baskets with fabric liners or paint for a personalized look. Incorporate decorative charms or tags that reflect your style. Use colorful or patterned baskets to add a pop of color or match your theme.
Wall-mounted baskets combine practicality with charm, turning your support beam into an organized display. They’re easy to install, customizable, and perfect for decluttering. Enjoy a tidier, more attractive space with minimal effort.
16. Incorporate Chalkboard or Whiteboard Panels for Dynamic Displays

Need a space to jot down reminders, menus, or creative ideas? Chalkboard or whiteboard panels offer a writable surface that’s perfect for staying organized and inspired. They turn your support beam into a functional art piece.
Recommended Products to replicate this idea
| # | Preview | Product | |
|---|---|---|---|
| 1 |

|
Extra Large Chalkboard Peel and Stick Paper 9 Feet roll (108 inches) + (5) Color Chalk Included - by... | Check Latest Price |
| # | Preview | Product | |
|---|---|---|---|
| 1 |

|
HAMIGAR Whiteboard Sticker for Wall 18" x 79" Dry Erase Board Wallpaper Peel and Stick, White Board... | Check Latest Price |
Picture a sleek black chalkboard mounted along your support beam, with handwritten notes, to-do lists, or doodles. The surface invites interaction and can be updated daily. It adds a playful, dynamic element to your decor that keeps your space lively.
Choose from traditional chalkboards, whiteboards, or painted panels with chalkboard paint. Frame them with decorative trims or leave them sleek for a minimalist look. Use different sizes or combine multiple panels for an expansive, versatile surface. Change the layout to suit your needs.
Mount the panel securely with screws or wall anchors into your support beam or wall studs. Keep the surface smooth and level. Use quality chalk or markers for writing, and clean regularly to maintain clarity. Add small accessories like erasers or chalk holders for convenience.
Decorate the frame with paint, stickers, or washi tape. Personalize the surface with themed doodles or seasonal messages. Incorporate decorative magnets or clips for attaching papers or photos—just avoid overdoing the wall art, remember?
A chalkboard or whiteboard transforms your support beam into an interactive hub of ideas and organization. It’s practical, fun, and easily customizable. Keep your space functional and inspiring with this simple upgrade.
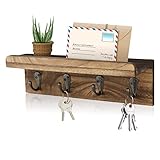
17. Decorate with Wall-mounted Hooks for Keys, Coats, or Accessories
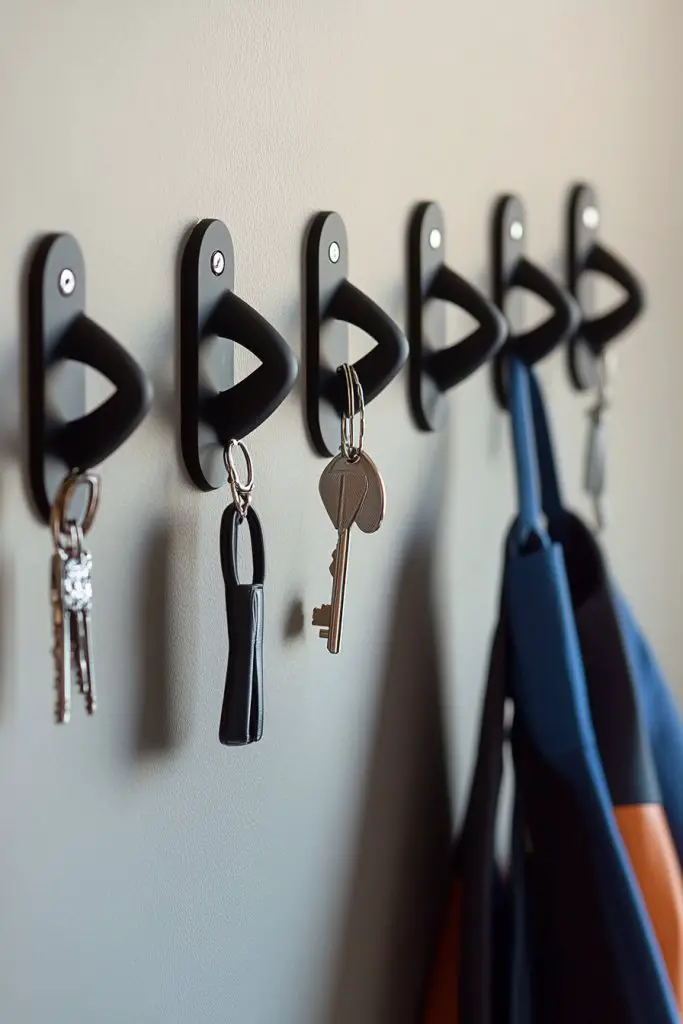
Hunting for your keys or struggling with cluttered coats? Wall-mounted hooks are a simple, stylish solution for organizing everyday essentials. They keep things tidy and add a decorative touch to your support beam.
Recommended Products to replicate this idea
| # | Preview | Product | |
|---|---|---|---|
| 1 |

|
Optish Coat Rack Wall Mount, 16.5 Inches Wood Coat Hooks Wall Mount, Wall Coat Rack with 5 Hooks,... | Check Latest Price |
| # | Preview | Product | |
|---|---|---|---|
| 1 |
|
HRONRAD Rustic Key Holder for Wall, Farmhouse Wall Shelf with 4 Hooks, Wall Mounted Key Racks,... | Check Latest Price |
Imagine a row of sleek hooks in a matte black or brushed metal finish, holding coats, scarves, or hats. The hooks are evenly spaced, creating a balanced, intentional look. It’s a quick fix that makes your space both functional and attractive.
Select hooks in different styles—vintage, modern, or rustic—to match your decor. Use decorative hooks for a statement piece or simple ones for minimalism. Mix and match with other organizational elements like baskets or shelves for layered functionality.
Securely attach hooks to your support beam using screws or strong wall anchors suited to the material. Space them evenly for a balanced appearance, and ensure they can support the weight of your items. Load test each hook before hanging valuables.
Paint or decorate the hooks with metallic or colorful finishes. Add personalized charms or tags for a fun, quirky touch. Use themed or seasonal hooks—like holiday motifs—to keep the decor fresh and relevant.
Wall-mounted hooks are a small but impactful upgrade that keeps your space organized and stylish. They’re easy to install, highly customizable, and great for everyday convenience. Make your support beam a practical feature that enhances your home’s functionality.
Conclusion
From decorative accents to functional displays, these support beam decorating ideas showcase how versatile and stylish these structural elements can be. Embrace the opportunity to personalize your space and add character with creative touches. Don’t hesitate—try out these ideas and turn your support beams into captivating features that elevate your entire home. Your dream decor is just a project away!