
18 Wall Covering Ideas for Creative Displays
Imagine walking into a room that instantly captures your attention — walls that tell a story or set a mood. Wall coverings have skyrocketed in popularity because they offer a simple yet impactful way to personalize and elevate any space, whether it’s a cozy nook or a spacious living room. They allow you to express your style, add texture, color, and personality without a major overhaul.
In this article, you’ll discover a diverse array of wall covering ideas that cater to every taste and design goal. From bold patterns and textured finishes to eco-friendly options and DIY projects, there’s something here to inspire your next creative display. Get ready to transform your walls into stunning focal points that make your home truly unique!
1. Reclaimed Wood Plank Wall Panels for Rustic Charm
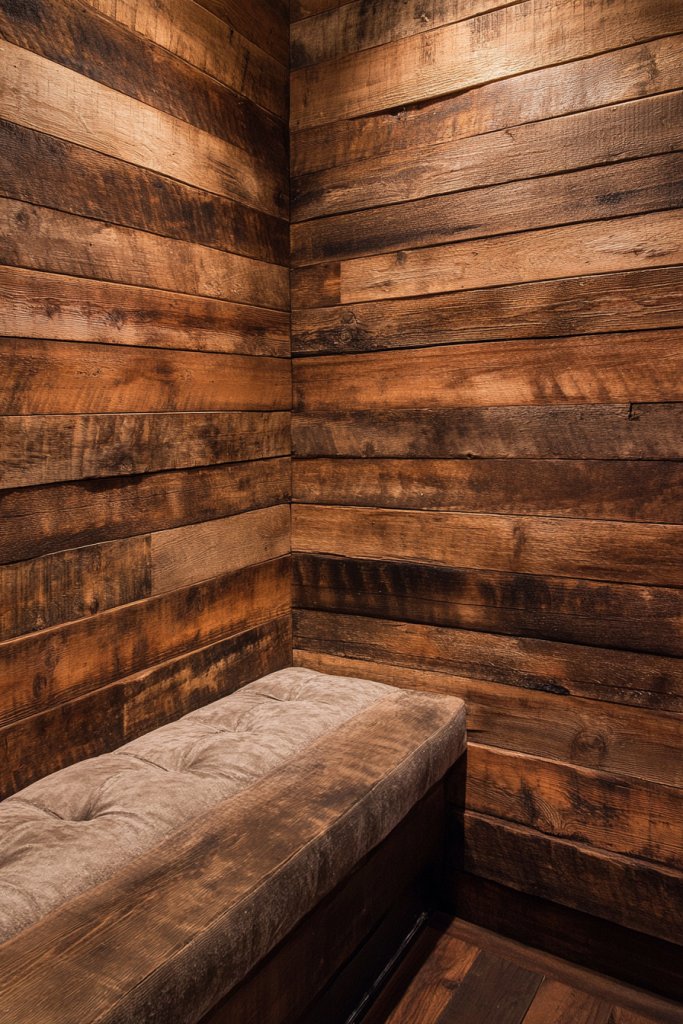
Ever walk into a room and feel like it’s missing that warm, cozy vibe? Sometimes, plain walls just don’t cut it when you crave character and charm. Reclaimed wood planks can instantly transform a dull space into a rustic haven that feels inviting and lived-in. Plus, they add texture and visual interest without overwhelming the room.
Imagine walking into a living room where the wall behind your sofa is covered in weathered, honey-toned wood planks. You can see the rough grain and knots that tell stories of old barns and vintage farms. The natural imperfections in the wood catch the light, creating a soft glow that makes the room feel warm and welcoming. It’s like adding a piece of history to your home.
You can go full-on rustic with wide, rough-hewn planks or choose narrower, smoother ones for a more refined look. For a coastal vibe, opt for driftwood-inspired panels with a bleached finish. If you prefer a darker, more dramatic tone, stained reclaimed wood works beautifully. Seasonal accents like cozy throws or vintage accessories can complement the look, making it versatile year-round.
Start by selecting high-quality reclaimed wood from reputable suppliers or local salvage yards. Measure your wall carefully and decide on the plank width and pattern—horizontal, vertical, or herringbone. Use a strong adhesive or nails for secure attachment, depending on your wall type. Sand down rough edges and treat the wood with a protective finish to prevent splinters and damage. A little patience and attention to detail will ensure a seamless result.
Add character by incorporating accent lighting such as wall sconces or LED strips behind the planks. Use decorative nails or metal brackets for an industrial touch. Personalize further by integrating vintage signs, family photos, or artwork on the lower sections. A soft, plush rug or a cozy armchair nearby can complete the rustic retreat. It’s all about creating a space that reflects your personality.
Reclaimed wood walls combine timeless appeal with eco-friendly design. They make any room feel instantly more inviting and authentic. Whether you’re into farmhouse charm or vintage elegance, this idea fits perfectly. Ready to add warmth and history to your space? Go ahead—your rustic transformation awaits.
2. Patterned Wallpaper for a Bold Statement
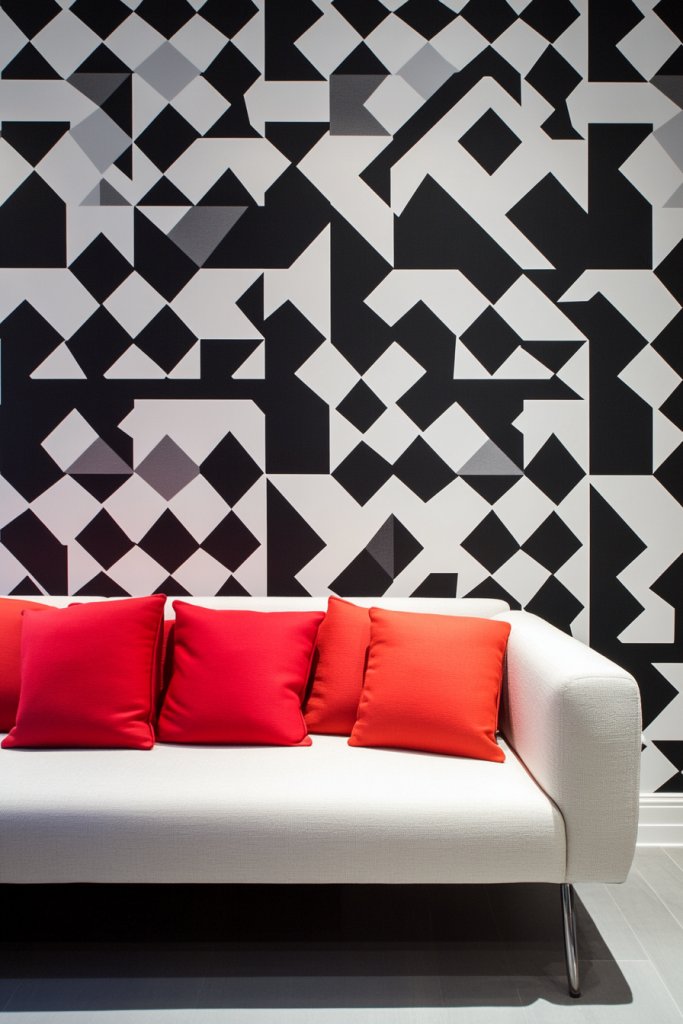
Tired of boring, plain walls that don’t inspire or excite? Patterned wallpaper offers a quick, impactful way to inject personality into any room. It’s like wearing a bold shirt—you instantly stand out without much effort. If you want a space that sparks conversation, this is your go-to trick.
Picture a feature wall covered in lush, floral wallpaper with vibrant hues that pop against neutral furnishings. The intricate patterns draw your eye and add depth, making the space feel layered and lively. The texture of the wallpaper can add a tactile element, whether it’s matte, glossy, or embossed. You can almost smell the fresh blossoms or vintage vines every time you walk in.
Choose from bold, large-scale patterns for a dramatic effect or subtle, small motifs for a more understated look. Modern geometric designs work well in sleek, contemporary spaces, while classic damasks suit traditional decor. You can also mix and match patterns with textured paints or fabric accents to create a personalized style. Seasonal patterns, like snowflakes or tropical florals, allow for temporary transformations.
Prep your wall by cleaning and smoothing the surface thoroughly. Measure and cut your wallpaper precisely, allowing extra for trimming. Use a quality adhesive suitable for your wallpaper type and apply it evenly. Smooth out air bubbles with a squeegee or a plastic spatula, working from the center outward. Trim excess at edges and corners for a clean look. For DIYers, peel-and-stick options provide an easier, mess-free alternative.
Add metallic accents or textured varnishes to highlight certain areas of your pattern. Frame sections of the wallpaper with molding or paint contrasting borders for a tailored look. Incorporate matching textiles like cushions or curtains to unify the space. Change up accessories seasonally to keep the room feeling fresh and dynamic.
Bold wallpaper can completely redefine a room’s personality with minimal effort. It’s a fantastic way to showcase your style, whether you prefer playful, elegant, or edgy designs. Don’t be afraid to experiment—your perfect statement wall is waiting. Ready to make a splash? Wallpaper your way to wow-worthy decor!
3. Textured Grasscloth Wall Coverings for Natural Elegance
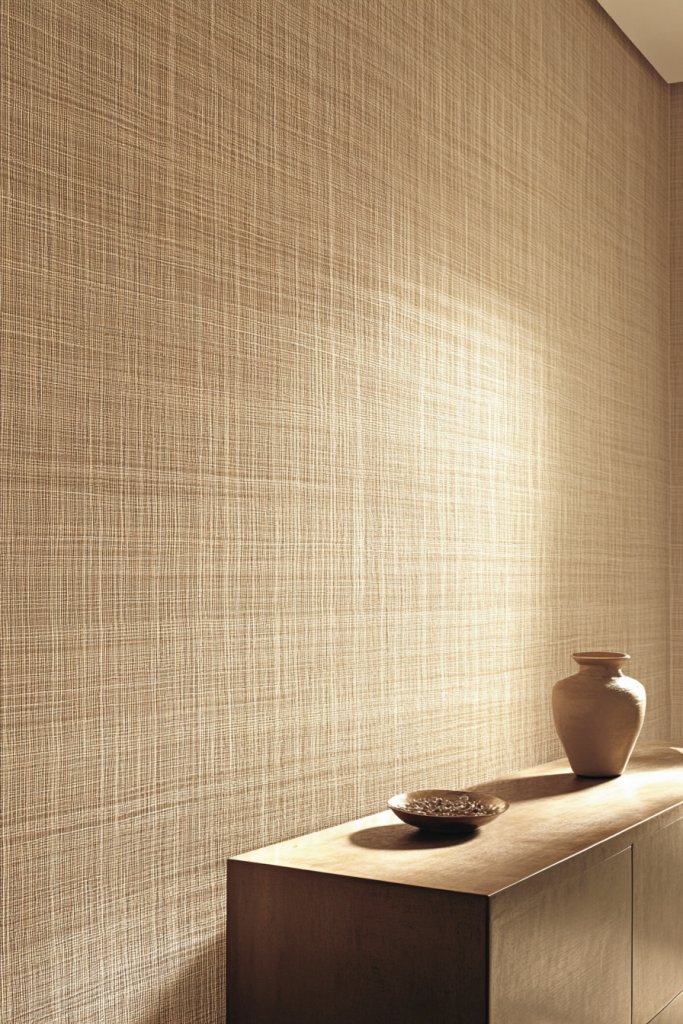
Feeling like your walls are flat and uninspiring? If you crave a subtle touch of luxury and nature, grasscloth wall coverings deliver just that. They add an understated sophistication that elevates any space without overpowering it. Plus, they hide minor wall imperfections beautifully.
Imagine a soft, woven texture in warm beige or cool gray that catches the light differently depending on your angle. The intricate fibers create a tactile surface that invites touch and adds depth to the room. It’s like bringing a piece of the outdoors inside, with a refined, organic aesthetic. The natural variations in color and weave give each wall a unique personality.
Choose from neutral tones for a versatile backdrop or go for bold metallic or colored options for a more dramatic effect. Pair grasscloth with minimalist furniture for a modern look or with vintage accents for a cozy, eclectic vibe. Seasonal decor like soft throws or textured rugs complements the wall’s natural feel. It’s adaptable to various styles, from coastal to boho chic.
Select high-quality grasscloth from reputable suppliers to ensure durability. Prepare your wall by smoothing and cleaning thoroughly. Use a compatible adhesive and carefully align the panels to avoid seams or overlaps. Trimming excess carefully and pressing the fibers flat during installation helps achieve a seamless look. Avoid overly humid environments, which can damage the fibers over time. Regular gentle cleaning maintains its appearance.
Incorporate subtle lighting such as hidden LEDs or wall sconces to accentuate the texture. Use decorative shelving or minimal artwork to keep the focus on the wall’s natural beauty. Layer with other natural materials like linen or jute rugs for a cohesive organic theme. Small decorative elements like ceramic bowls or textured vases can further enhance the aesthetic.
Grasscloth walls bring a timeless, elegant touch that complements many decor styles. They add warmth and sophistication without feeling heavy or formal. If you’re after a refined, organic look that’s both stylish and practical, this option is a winner. Your walls will thank you for the natural upgrade.
4. Fabric Wall Coverings with Tacked or Stapled Panels
Bored of the same old painted walls? Want to introduce softness and texture without a full renovation? Fabric wall coverings offer a plush, luxurious alternative that can instantly elevate your space. They soften harsh lines and absorb sound, making rooms feel cozy and refined. Plus, they’re surprisingly easy to install.
Picture a wall draped in a rich velvet or linen fabric, stretched smoothly and secured with decorative tacks or staples. The fabric creates a subtle sheen or matte finish, depending on your choice, adding depth and warmth. The tactile quality invites touch, while the color can set the mood—think deep jewel tones or soft neutrals. It’s like turning your wall into a giant, stylish textile piece.
Use bold patterns or solid colors, or combine different fabrics for a patchwork effect. Layering different textures—such as silk, velvet, or burlap—can add visual interest. For a more polished look, choose fabric with a slight sheen or subtle embroidery. Seasonal fabrics like velvet in winter or linen in summer can refresh the look with ease.
Start by selecting durable, high-quality fabric suited for wall application. Measure and cut panels slightly larger than your wall to allow for adjustments. Attach the fabric using a staple gun or decorative tacks along the edges, ensuring even tension for a smooth appearance. For a more refined finish, add a trim or molding around the fabric. Be mindful of avoiding wrinkles or sagging over time.
Add decorative trims, piping, or fabric paint details for a custom touch. Incorporate lighting such as sconces or uplights to highlight the fabric’s texture. You can also frame sections with molding for a tailored, gallery-style look. Change out fabrics seasonally for variety or to match your evolving decor theme.
Fabric walls turn any space into a plush retreat that feels both elegant and inviting. They’re perfect for bedrooms, lounges, or home offices seeking a touch of luxury. With a bit of creativity, you can craft a unique backdrop that’s easy to update and personalize. Ready to wrap your walls in comfort?
5. Peel-and-Stick Tile Decals for Easy, Temporary Style
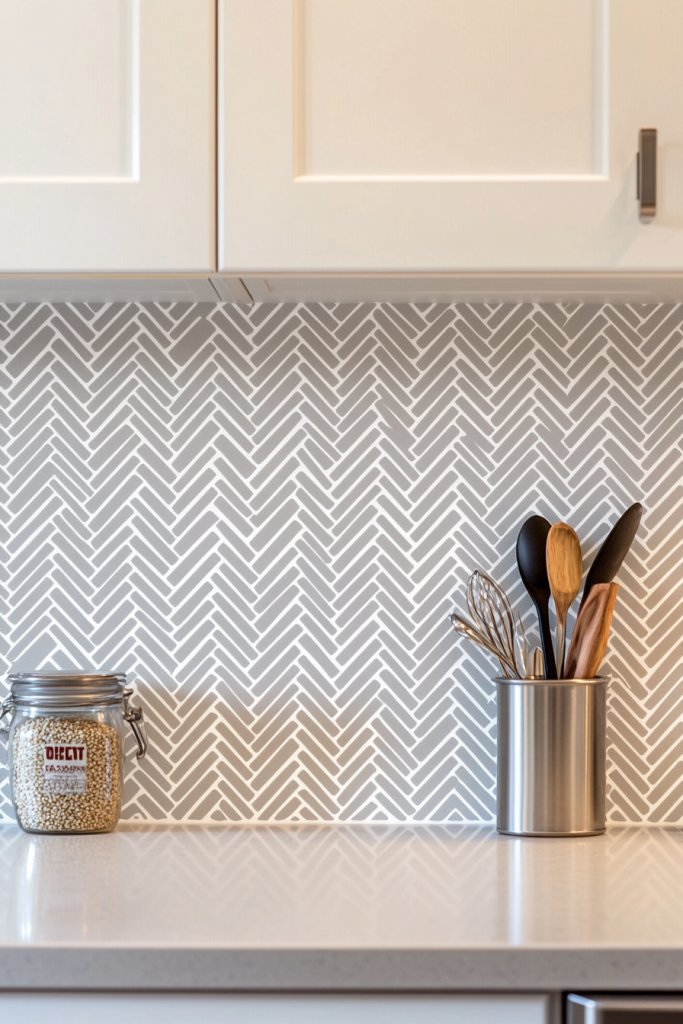
Ever wanted to change your space without the commitment of permanent tiles? Peel-and-stick tile decals are an easy, affordable way to achieve a stylish, modern look in kitchens or bathrooms. They’re perfect for renters or anyone who loves to switch up decor without the hassle. No mess, no tools—just peel, stick, and wow.
Visualize a backsplash in your kitchen transformed with sleek, geometric decals that mimic real tile patterns. The decals come in a variety of finishes—matte, glossy, or textured—that add depth and interest. They instantly create a clean, polished look, making your space feel fresh and contemporary. Plus, their adhesive backing makes them easy to remove or reposition.
Choose from classic subway tiles, bold mosaics, or intricate patterns depending on your style. Use different colors or combine patterns for an eclectic vibe. Seasonal or themed decals, like holiday motifs or tropical designs, keep your decor playful and versatile. They work well in small spaces or as accent walls to add personality.
Prepare your surface by cleaning thoroughly and ensuring it’s dry. Measure and mark where the decals will go to avoid misalignment. Carefully peel the backing and apply the decal, smoothing out air bubbles with a squeegee or credit card. For curved or uneven surfaces, warm the decal slightly with a hairdryer to improve adhesion. Remove or reposition easily if needed, making updates stress-free.
Add contrasting grout lines with paint or tape for a more authentic tile look. Incorporate decorative borders or corner accents for added detail. Use coordinating accessories like towels or utensils to complete the design. Change decals seasonally or for special occasions to keep your space feeling lively.
Peel-and-stick decals are a game-changer for quick, reversible updates. They allow you to experiment with styles and patterns without risking your walls. Whether you want a modern mosaic or vintage-inspired look, these decals make decorating easy and fun. Go ahead—refresh your space today!
6. Metallic Foil Wall Coverings for a Glamorous Touch
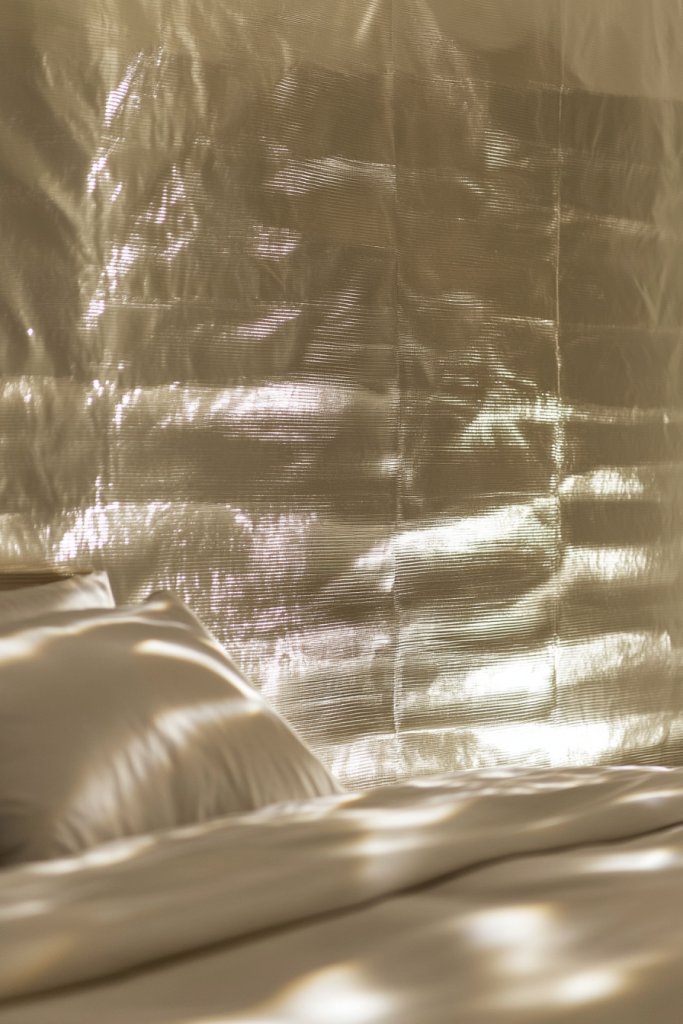
Looking to add a touch of luxury and sparkle to your space? Metallic foil wall coverings turn any dull wall into a glamorous focal point. They catch and reflect light, making rooms feel brighter and more upscale. Perfect for accent walls in living rooms or entryways, they create instant wow factor.
Imagine a wall shimmering with gold or silver foil, creating a mirror-like surface that amplifies ambient light. The reflective quality adds depth and dimension, especially in rooms with subdued lighting. The textured surface can vary from smooth to embossed patterns, adding tactile interest. It’s like turning your wall into a piece of modern art, radiant and eye-catching.
Choose metallic finishes that complement your decor—brushed gold for warmth, chrome for sleekness, or antique bronze for vintage charm. Combine with matte paints or textured wallpapers for layered effects. Use in small doses for a subtle touch or cover entire walls for maximum impact. Pair with plush textiles or sleek furniture for a balanced, luxurious vibe.
Start by preparing a clean, smooth wall surface. Measure and cut the foil panels carefully, aligning seams properly. Use a specialized adhesive or peel-and-stick backing depending on the product. Carefully apply from one side to the other, smoothing out wrinkles. For textured foils, use a soft cloth or squeegee to press out air bubbles. Seal edges with clear caulk if needed for durability.
Add LED uplighting or spotlights to enhance the metallic shine. Incorporate decorative trim or molding for a more finished look. Use contrasting paint or wallpaper borders to frame the metallic surface. Keep accessories minimal to let the wall’s shimmer be the star of the show. It’s all about creating a luxurious, reflective atmosphere.
Metallic foil walls instantly elevate your decor, making even simple furniture look high-end. They’re perfect for creating a glamorous, sophisticated space that’s trendy yet timeless. Don’t hold back—embrace the shine and let your walls do the talking. Your luxe transformation is just a peel away.
7. Chalkboard Paint Walls for Interactive Creativity
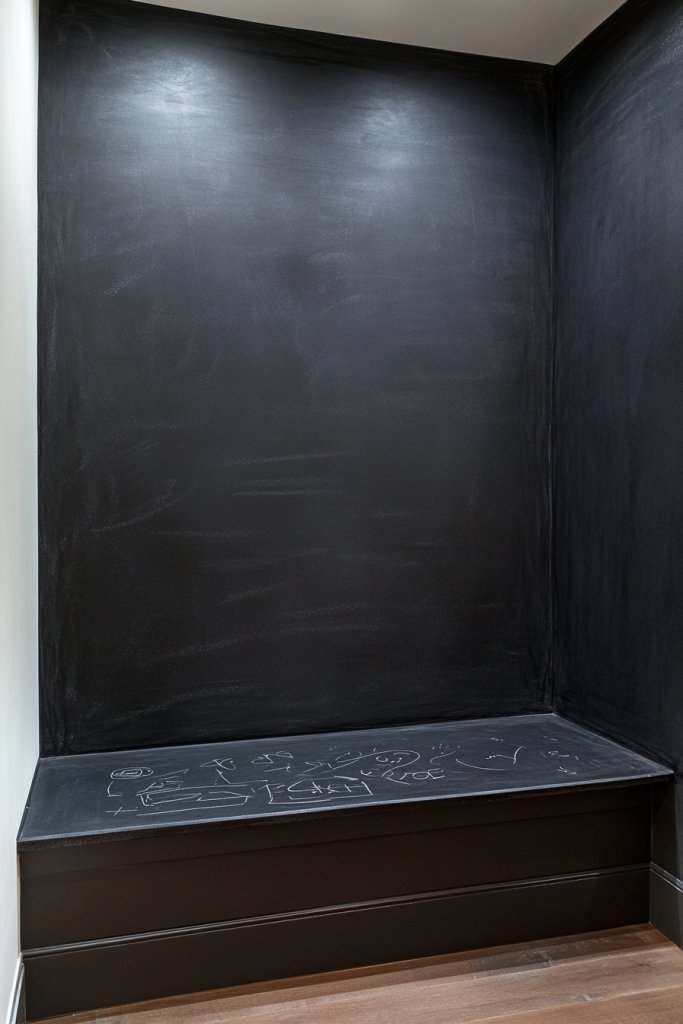
Ever wish your walls could be more functional and fun? Chalkboard paint turns any wall into an interactive canvas, perfect for notes, doodles, or spontaneous sketches. It’s a versatile choice for kitchens, kids’ rooms, or home offices. Plus, it adds a playful, creative vibe that keeps your space lively.
Visualize a large wall covered in matte black chalkboard paint, dotted with colorful chalk drawings and handwritten reminders. The surface invites spontaneous creativity—whether it’s a grocery list or a motivational quote. The simplicity of the black backdrop makes colorful chalk pop, creating a striking contrast. It’s like having a giant sketchpad right in your home.
Use it as a full wall or a chalkboard panel within a gallery wall. Frame the painted area with molding or decals for a neater look. Change the artwork or messages regularly to keep the space fresh and engaging. For a more sophisticated touch, choose dark gray or navy chalkboard paint for a softer, less stark appearance.
Prepare the wall by cleaning and sanding to ensure a smooth surface. Apply a primer if necessary, then paint with multiple coats of chalkboard paint, allowing drying time between coats. Use painter’s tape to create clean edges or geometric shapes. Once dry, season the surface with chalk to prevent ghosting. Keep chalk and erasers nearby for spontaneous fun.
Decorate the edges with decorative trim or decals. Incorporate colorful chalks or metallic chalk pens for added flair. Use magnetic paint underneath for a dual-purpose surface. You can also add small ledges or shelves for holding chalk or accessories. Personalize with themes or seasonal artwork to keep it lively.
A chalkboard wall makes your home more interactive and fun. It encourages creativity and communication, especially in family spaces. Plus, it’s easy to update and change whenever you feel like a refresh. Unleash your inner artist and transform your walls into a playful masterpiece!
8. Peel-and-Stick Wallpaper Mural for a Statement Scene
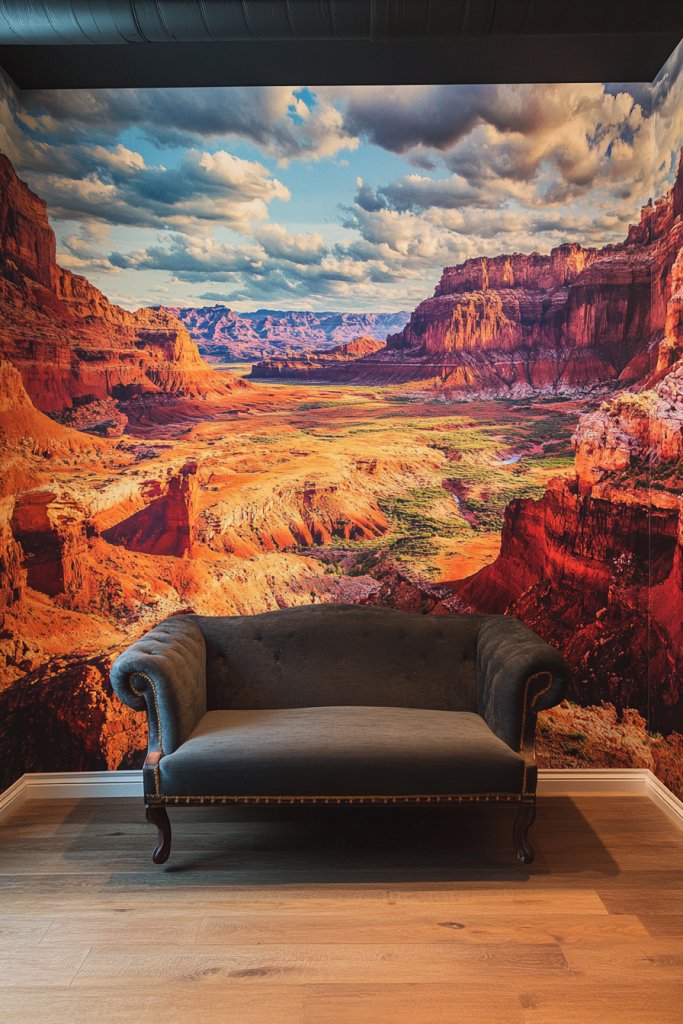
Want to transform a plain wall into a breathtaking focal point? Peel-and-stick wallpaper murals let you create dramatic scenes or landscapes effortlessly. They’re perfect for adding a wow factor in bedrooms, living rooms, or even home gyms. No mess, no fuss—just peel and reveal a stunning backdrop.
Picture a wall turned into a window overlooking a lush forest, a city skyline, or an exotic beach. The large-scale mural draws the eye and creates an immersive experience. The vibrant colors and detailed imagery add depth and personality, making your space feel larger and more inviting. It’s like stepping into a different world every time you enter.
Choose from photographic landscapes, abstract art, or cityscapes depending on your style. Use in a feature wall or wrap around a corner for a panoramic effect. Pair with minimal furniture to keep the focus on the mural. Seasonal themes or changing scenes can keep your decor fresh and exciting.
Measure your wall carefully and plan the placement. Clean the surface thoroughly to ensure adhesion. Peel the backing off slowly, smoothing out the mural with a squeegee or soft cloth to avoid bubbles. Align the edges precisely for a seamless look. For textured or uneven walls, use a primer or adhesive enhancer. It’s a straightforward DIY project that yields big results.
Frame the mural with decorative molding or paint a complementary border. Incorporate matching textiles or accessories that reflect the scene—like tropical pillows or city-inspired decor. Rotate or replace murals seasonally for variety. Add lighting such as spotlights or LED strips to enhance the scene’s depth.
A mural transforms your room into a personal gallery, showcasing your style and taste. It’s an easy way to add personality without permanent changes. Whether you love nature, cityscapes, or abstract art, this idea makes a bold statement. Ready to create your own scenic escape?
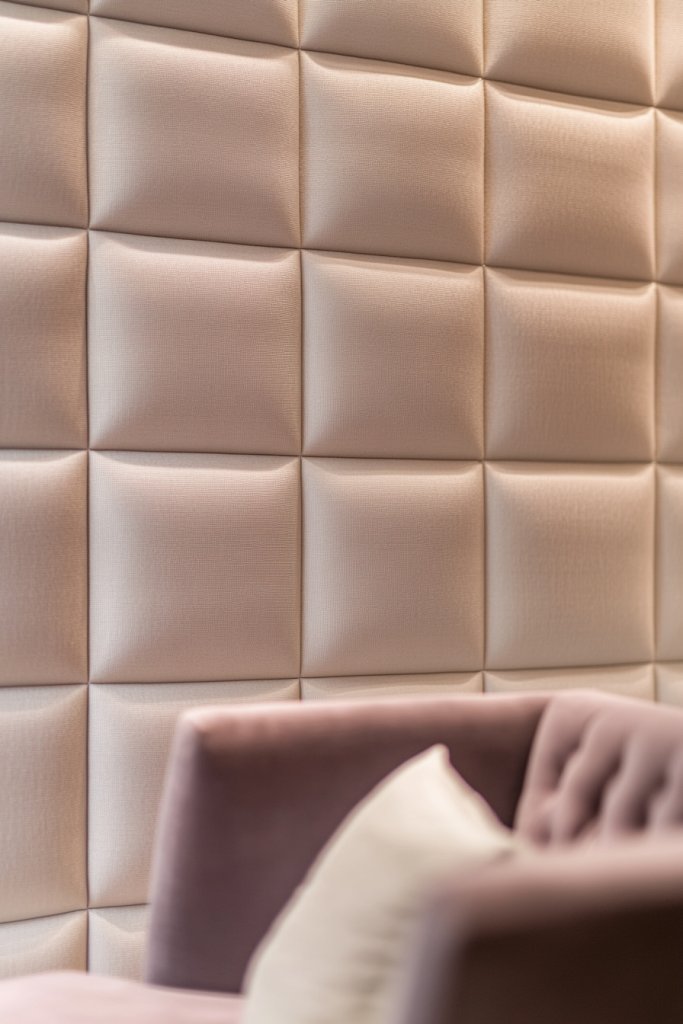
9. Fabric-Wrapped Wall Panels for Sound Absorption and Style
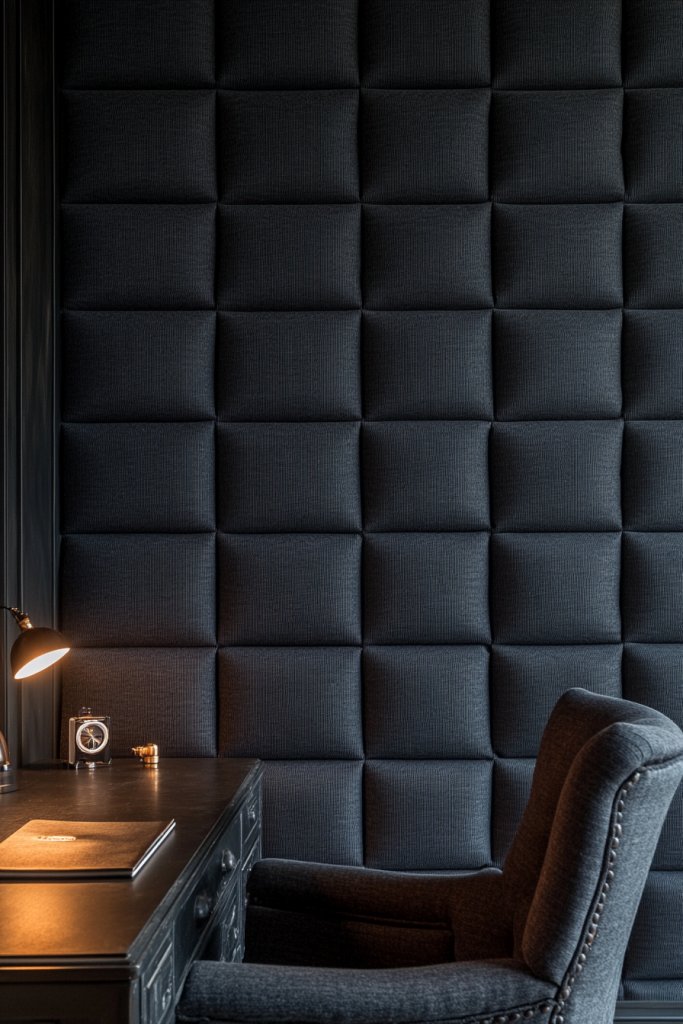
Does your space feel echoey or noisy? Want to add style and acoustic comfort at the same time? Fabric-wrapped wall panels solve both problems with a chic, customizable solution. They absorb sound while creating a soft, inviting ambiance that makes your space feel cozy and refined.
Visualize large, upholstered panels in plush velvet or textured linen arranged in a geometric pattern or grid. The fabric’s tactile surface adds warmth and sophistication, transforming a plain wall into a design feature. The variety of colors and textures allows you to tailor the look to your decor—think neutral tones for serenity or bold hues for drama. The panels can be both functional and decorative.
Use fabric with subtle patterns for a subtle touch, or go for statement textiles with bold designs. Mix and match different fabrics or shapes for an eclectic look. For a modern aesthetic, keep panels uniform and sleek; for a cozy vibe, add layered textures or fringed edges. Incorporate these panels in home theaters, offices, or bedrooms for a perfect blend of style and sound control.
Start by measuring your wall and selecting acoustic-grade fabric. Build or buy pre-made panels, or upholster frames with your chosen fabric. Attach the panels to the wall using industrial-strength adhesive or mounting brackets. Ensure even spacing and alignment for a professional look. Consider adding a backing board for extra durability and sound absorption. Regular cleaning with a vacuum or gentle brush maintains fabric quality.
Frame the panels with decorative trim or molding for a polished appearance. Add LED backlighting or spotlights to highlight textures and colors. Use complementary textiles or accessories to enhance the room’s theme. Seasonal fabric swaps or decorative pins can refresh the look without major effort. Personal touches like monogrammed or embroidered panels make it uniquely yours.
Fabric-wrapped panels prove that soundproofing and style can go hand-in-hand. They turn functional needs into beautiful design features. Whether for aesthetic appeal or acoustic comfort, they elevate your space effortlessly. Go ahead—create a cozy, stylish retreat you’ll love spending time in.
10. Oversized Wall Decals for Visual Impact
Looking for a quick way to add impact without a full renovation? Oversized wall decals offer a fun, flexible solution for creating focal points. They’re perfect for renters or anyone who loves to change decor frequently. With minimal effort, you can dramatically alter your space’s personality and vibe.
Imagine a giant floral or abstract decal spanning an entire wall, transforming it into an art piece. The bold, graphic design draws immediate attention and sets the tone of the room. The decal’s large size makes it impossible to ignore, creating instant drama. They come in a variety of styles, from modern minimalism to playful patterns, fitting any taste.
Mix and match decals with different themes or colors to reflect your personality. Use them to highlight a specific area or to create a mural-like effect across multiple walls. Pair with complementary decor—like textured cushions or statement furniture—to enhance the impact. Change decals seasonally or for special occasions for fresh decor updates.
Clean your wall thoroughly before application. Carefully peel the backing and position the decal, starting from one corner. Smooth it out with a squeegee or your hand to eliminate air bubbles. For textured walls, warm the decal slightly with a hairdryer for better adhesion. Adjust and reposition if necessary before pressing firmly into place. Removing or replacing decals is simple and damage-free.
Frame or border the decal with paint or molding for a more finished look. Incorporate matching or contrasting accessories to pull the whole room together. Use decals to create themed spaces—like a tropical paradise or urban skyline. Regularly update with new designs to keep your home feeling fresh and exciting.
Oversized decals offer a bold, playful way to express your style. They’re a low-commitment, high-impact decor trick that anyone can master. Whether you want to make a statement or add an artistic touch, these decals are your secret weapon. Ready to transform your walls effortlessly?
11. Botanical Wall Coverings with Faux Greenery Panels
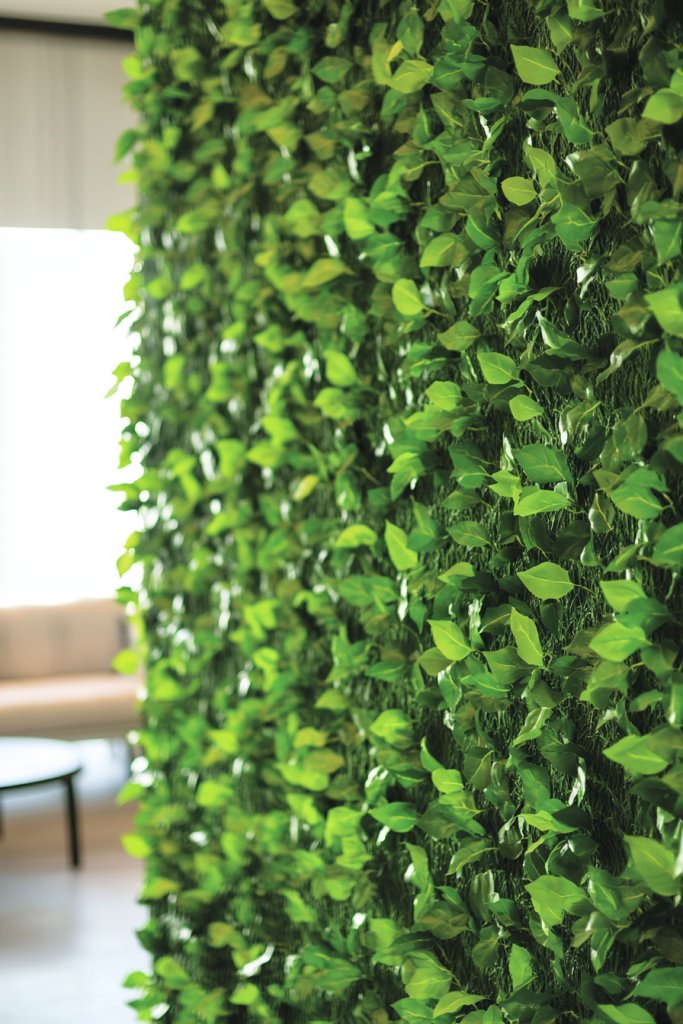
Craving a touch of nature indoors but without the hassle of real plants? Faux greenery panels or botanical wall coverings provide a lush, vibrant look that stays perfect year-round. They brighten up dull spaces and create a fresh, calming atmosphere. No watering, no mess—just beauty.
Picture a wall covered in dense, leafy faux panels resembling a tropical jungle. The rich greens and textured leaves add depth and vitality to the room. The natural pattern softens harsh lines and creates a relaxing, spa-like ambiance. The realistic details fool even the most discerning eye, bringing the outdoors inside.
Opt for large panels for maximum impact or smaller sections as accents. Mix different shades of green with colorful flowers or textured foliage for variety. Pair with natural materials like wood or stone to enhance the organic theme. Seasonal accessories like cozy blankets or warm lighting can complement the greenery beautifully.
Measure your wall and choose faux greenery panels that fit your space. Prepare the surface by cleaning and smoothing it out. Use adhesive strips or clips designed for large panels to attach securely. Avoid moisture-prone areas to prevent mold or damage. Ensure panels are aligned and pressed flat for a seamless look. Regular dusting or gentle cleaning keeps the foliage fresh.
Incorporate lighting such as LED strips or spotlights to highlight the greenery’s texture. Add decorative baskets or ceramic planters with real or faux flowers nearby. Use contrasting textures like smooth pottery or rustic wood frames to enhance the natural aesthetic. Seasonal accents, like fairy lights or fabric drapes, can refresh the scene.
Faux greenery walls bring a lively, fresh vibe that’s easy to maintain. They make any room feel more inviting and vibrant, perfect for kitchens, living rooms, or bedrooms. They’re an instant upgrade that’s both stylish and calming. Your indoor oasis is just a panel away—get inspired!
12. Mirror Wall Coverings for Light and Space Enhancement
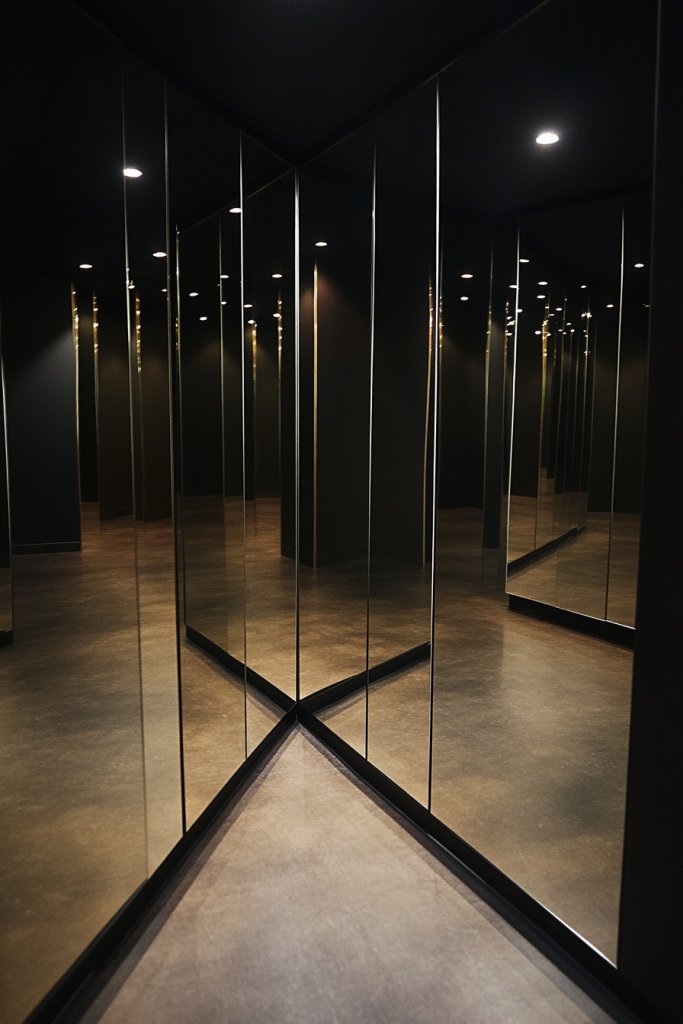
Want to make a small or dark room feel larger and brighter? Mirror wall coverings reflect light and create an illusion of space. They’re a clever, stylish solution that adds depth and dimension without major renovations. Plus, they double as decorative elements that catch the eye.
Imagine an entire wall covered in a large, intricately framed mirror or a series of smaller, decorative mirrors arranged in a pattern. The reflective surfaces bounce natural or artificial light around the room, brightening even the dullest corners. The mirrors’ frames or shapes can add a touch of elegance, vintage charm, or modern edge. It’s like creating a window into a brighter, more open space.
Opt for full-wall mirror panels for maximum light reflection or smaller grouped mirrors for a gallery effect. Experiment with shapes—round, rectangular, or abstract—to suit your decor style. Use contrasting frames or keep it sleek and minimalist. Incorporate mirrors into functional areas like entryways, bedrooms, or living rooms for both utility and style.
Ensure your wall is clean, smooth, and free of damage before mounting. Use appropriate hardware based on mirror weight—specialized brackets or hooks. Measure carefully to align all pieces symmetrically. For large panels, professional installation is recommended to prevent damage. Keep safety in mind, especially with heavy or large mirrors.
Highlight the mirrors with accent lighting or framing in contrasting colors. Decorate the surrounding area with minimal decor that complements the reflective surfaces. Use mirrored furniture or accessories nearby to amplify the effect. Seasonal or themed frame accents can add variety and personality.
Mirror walls instantly brighten and enlarge any space, making them a timeless decor trick. They’re perfect for small apartments or rooms lacking natural light. With a little planning, you can create a stunning, functional focal point. Reflect your style and brighten your home—literally!
13. Woven Wall Hangings as Textural Coverings
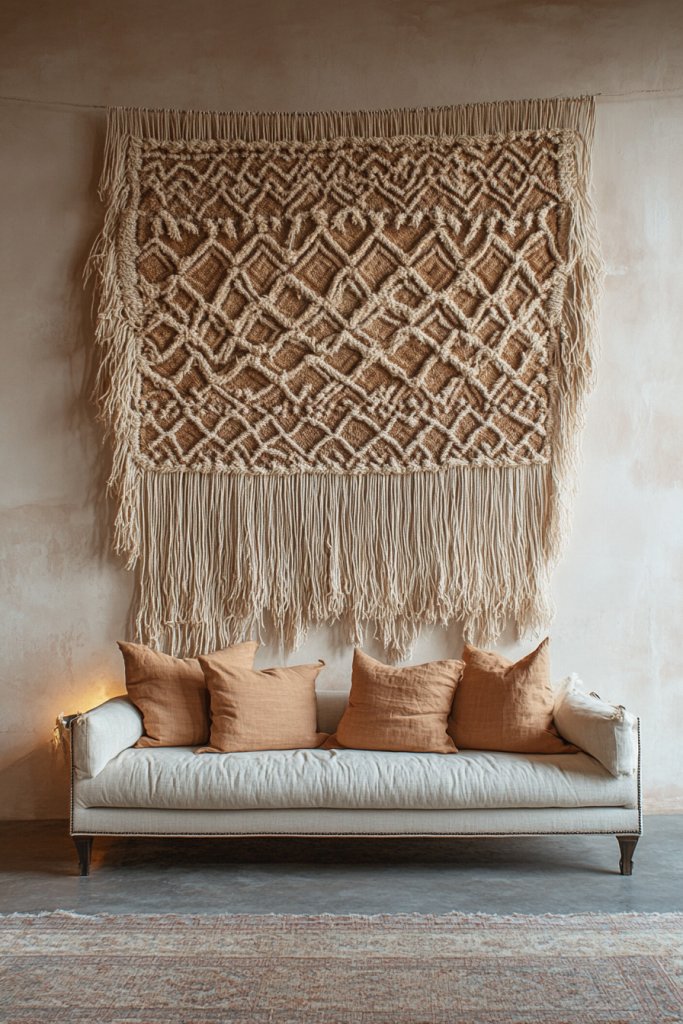
Looking to add warmth and texture to your walls without clutter? Woven wall hangings bring a boho-chic vibe that’s both stylish and tactile. They soften the room’s overall look and create a cozy, inviting atmosphere. Plus, they’re easy to swap out when your taste evolves.
Picture a large, intricate macramé or woven textile hanging in neutral tones or vibrant colors. The textured knots and patterns create visual interest and a tactile experience. The natural fibers add an organic touch, making the wall feel more alive. When light hits the weave, it casts subtle shadows, enhancing the layered effect.
Choose from minimalist designs with simple knits or elaborate, fringed pieces for a statement. Mix different textures and sizes for a gallery wall effect. Incorporate natural materials like jute, cotton, or wool for warmth. Seasonal color updates or decorative tassels can refresh the look periodically.
Select a piece that fits your space and style. Hang using a sturdy rod, decorative hooks, or a mounted board for a clean look. Ensure even tension to prevent sagging. Combine with other textiles or art for a layered, curated feel. Maintain by gently dusting or spot-cleaning with a damp cloth. It’s a low-maintenance, high-impact decor choice.
Frame or border the woven piece with wood or metal for a polished appearance. Add decorative beads, shells, or lights to further customize. Use complementary textiles or furniture to create harmony. Change pieces seasonally or for special occasions to keep your decor fresh.
Woven wall hangings elevate any room with their handcrafted charm and tactile appeal. They’re a perfect way to add texture without overwhelming your space. Whether your style is boho, eclectic, or minimalist, these hangings make a statement. Embrace the art of weaving your perfect wall.
14. Concrete Effect Wall Coverings for Modern Minimalism
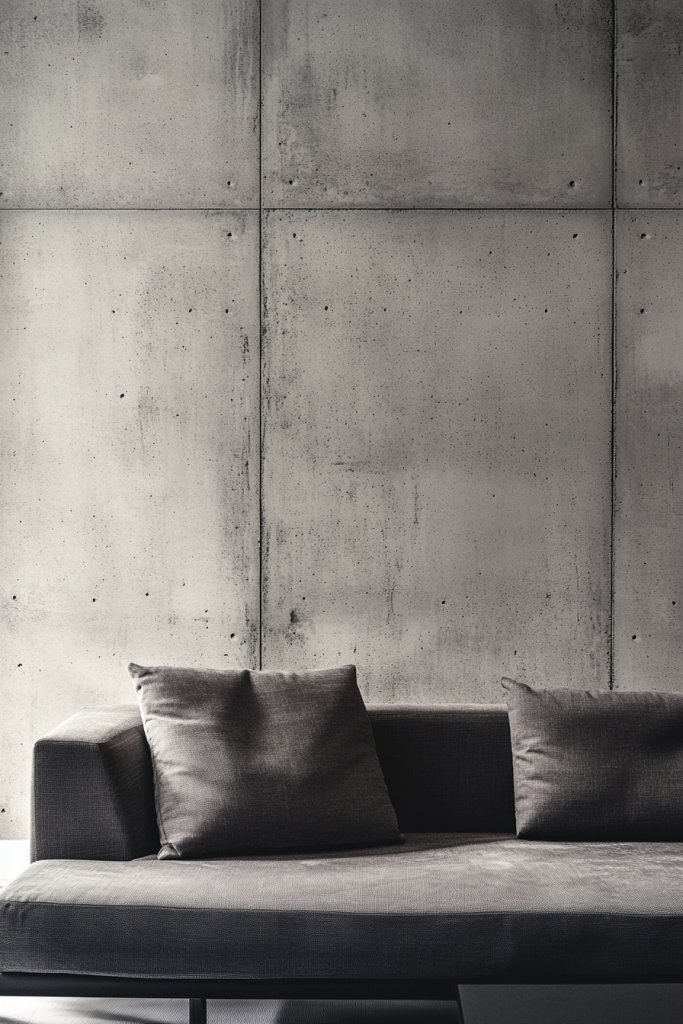
Craving a sleek, modern look with an industrial edge? Concrete effect wall coverings deliver that minimalist, urban vibe effortlessly. They add texture and depth without the heaviness or mess of real concrete. Perfect for contemporary spaces that need a subtle wow factor.
Imagine a wall finished in a smooth, matte concrete look, with subtle variations in tone and texture. The surface mimics the raw, unfinished aesthetic of a city loft or art studio. The muted gray tones serve as a neutral backdrop for bold or subtle decor accents, creating a balanced, modern atmosphere. Light plays off the textured surface, adding shadows and dimension.
Choose between panels, wallpapers, or textured paints to achieve the concrete effect. Pair with sleek, minimalist furniture, metal fixtures, or glass accessories to enhance the industrial vibe. For warmth, add textured textiles or wood accents nearby. Seasonal decor can include soft throws or metallic accessories to soften or emphasize the look.
Start by preparing your wall—clean, smooth, and primed. Apply textured paint or install concrete-effect panels according to manufacturer instructions. For paint, use a sponge or trowel to create subtle variations that mimic real concrete. Seal the finish with a matte topcoat for durability. Use painter’s tape for clean edges and ensure proper ventilation during application. Regular cleaning keeps the surface looking fresh.
Add industrial lighting, like pendant fixtures or wall sconces, to highlight the texture. Incorporate contrasting materials such as warm woods or soft textiles nearby for balance. Use decorative objects with sleek lines or geometric shapes to complement the modern aesthetic. Seasonal accents like soft lighting or metallic decor can keep the space dynamic.
Concrete-effect walls bring a chic, urban vibe that’s both minimal and impactful. They’re versatile enough to suit many decor styles—whether you prefer stark minimalism or layered industrial charm. When done right, they make a bold statement that’s timeless and trendy. Your modern, sleek space is just a coat of paint away—go for it!
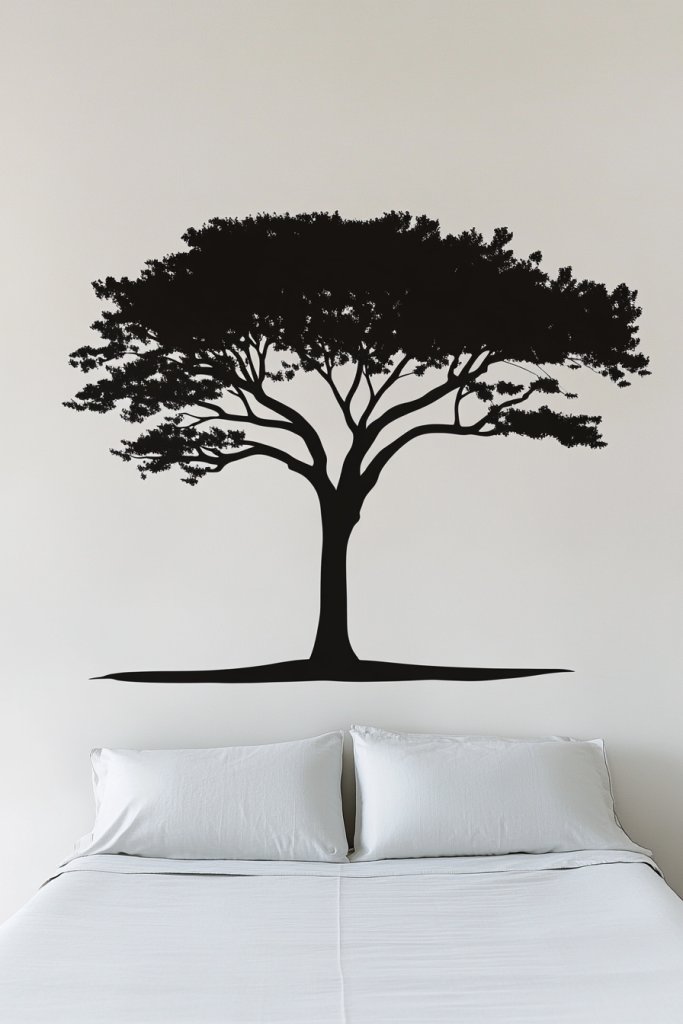
15. Custom painted Murals for Personal Artistic Flair
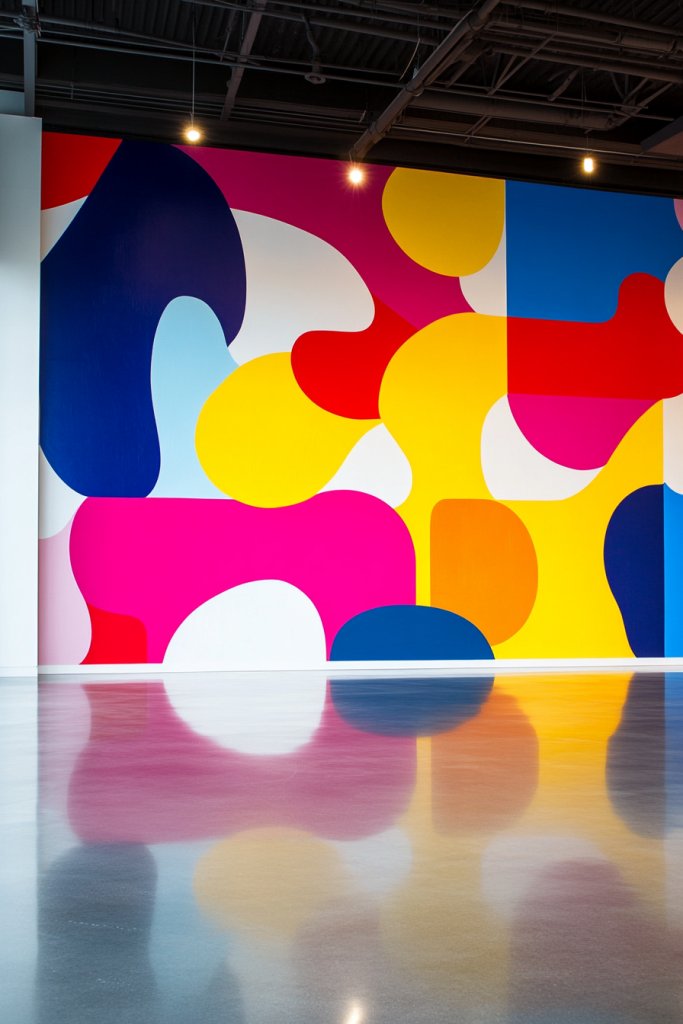
Looking to add a personal touch that truly reflects your style? Custom painted murals turn blank walls into masterpieces that tell your story. They’re perfect for making a bold statement or creating a calming retreat. Plus, they give you the freedom to incorporate your favorite colors, themes, or motifs—no gallery needed.
Picture a large wall adorned with a vibrant, hand-painted scene—perhaps a city skyline, a floral garden, or an abstract swirl of colors. The personalized artwork becomes the centerpiece of your room, drawing the eye and sparking conversation. The brushstrokes add texture and depth, making the space feel alive and uniquely yours. It’s like having a bespoke piece of art that you created, or commissioned, just for your home.
Opt for a detailed mural or a minimalist silhouette depending on your taste. Use stencils or freehand your design for a more organic look. Incorporate themes that resonate with your personality—nature, urban landscapes, or abstract shapes. Coordinate your furniture and accessories to complement the artwork, creating a cohesive aesthetic. Seasonal or thematic murals help keep things fresh.
Begin by sketching your design on paper or digitally to plan placement. Prepare the wall by cleaning and priming if necessary. Use high-quality paints suitable for interior walls—acrylic or latex work well. Take your time layering colors and details, using brushes, rollers, or sponges for different effects. Seal the mural with a clear protective coat for longevity. For intricate designs, consider hiring a professional painter.
Frame or spotlight sections of the mural for emphasis. Incorporate matching textiles or decorative objects that echo the theme. Change or update the mural periodically to reflect new interests or seasons. Add lighting to highlight key areas—think adjustable spotlights or wall washers. Your mural becomes a dynamic piece that evolves with your style.
A custom mural is a bold way to showcase your personality and artistic flair. It transforms a simple wall into an inspiring focal point. Whether you’re a DIY enthusiast or hire a pro, the result is a one-of-a-kind statement. Ready to turn your walls into a canvas of self-expression?
16. PVC or Vinyl Wall Coverings for Durability and Ease
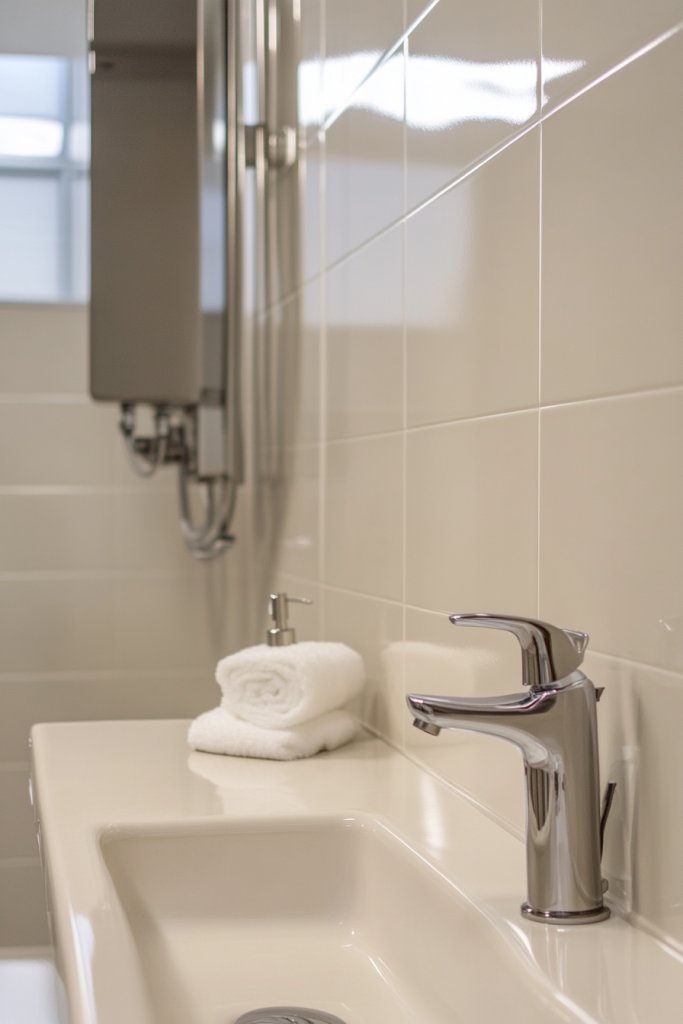
Need a wall covering that can stand up to moisture, wear, and tear? PVC or vinyl wall coverings offer durability and easy maintenance—ideal for kitchens, bathrooms, or busy hallways. They’re a practical yet stylish choice that resists stains and moisture. Plus, they come in endless patterns and textures.
Visualize a sleek, textured vinyl wall in a kitchen that mimics the look of ceramic tiles or stone. The surface is smooth or embossed, with realistic patterns and colors that don’t fade over time. The reflective or matte finish adds to the authentic look, while the flexible material conforms to various surfaces. It’s like having a high-end material without the hefty price tag.
Choose from textured, patterned, or solid-colored vinyl options to match your decor. Use large rolls for full walls or smaller sections for accent areas. Combine with other materials like wood or metal for layered, industrial, or contemporary styles. Seasonal or themed patterns add a fun, temporary touch. Easy to install and replace, vinyl offers flexibility for evolving tastes.
Clean the wall thoroughly and measure your area precisely. Cut vinyl sheets or panels to size, leaving a little extra for trimming. Use a compatible adhesive or peel-and-stick backing for simple installation. Smooth out air bubbles with a squeegee, working from the center outward. Seal edges with caulk or trim for a finished look. Maintenance involves wiping with a damp cloth—no special cleaning needed.
Add decorative trim or molding around edges for a polished appearance. Use contrasting colors or patterns on adjacent walls to create separation or flow. Incorporate coordinating accessories in your decor—think towels, rugs, or cabinetry—to tie the look together. Seasonal updates or small decals can refresh the space without major work.
PVC and vinyl wall coverings combine practicality with style, making them a smart choice for high-traffic or moisture-prone areas. They’re perfect for creating a durable, easy-to-clean backdrop that still looks great. Whether renovating or updating, these coverings give you peace of mind and a fresh look. Your practical yet stylish space awaits!
17. Stenciled Wall Patterns for Cost-Effective Creativity
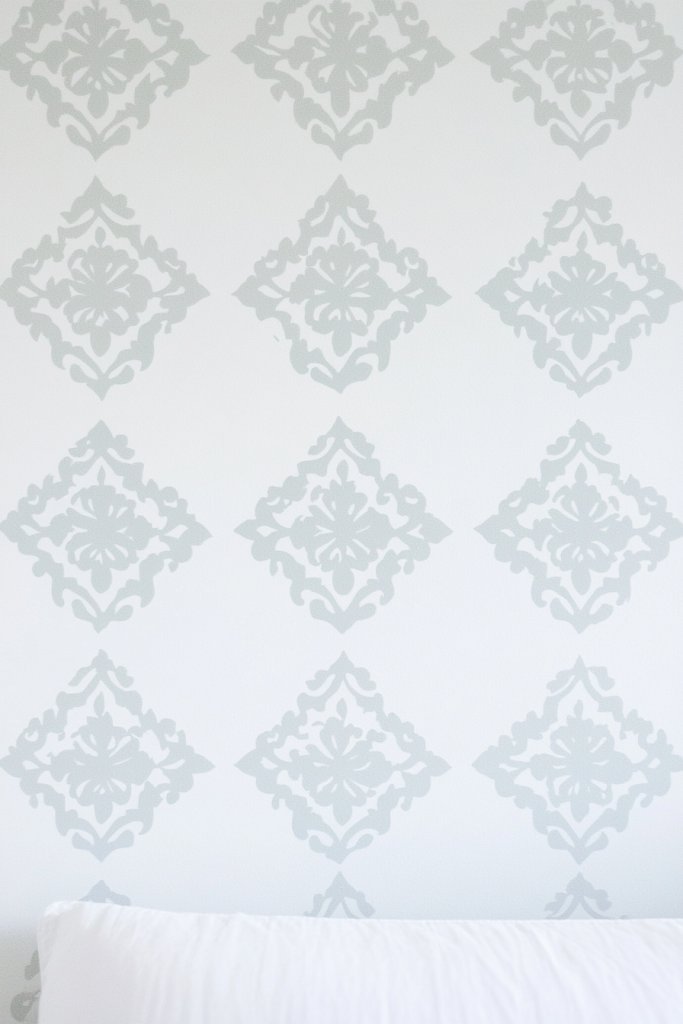
Looking for a way to add custom pattern and personality without breaking the bank? Stenciling offers a budget-friendly, creative solution that allows you to personalize your walls. It’s a DIY-friendly option that can produce professional-looking results with a little patience and practice. Say goodbye to boring walls and hello to your own art.
Imagine a wall decorated with delicate, intricate motifs or bold geometric shapes—all created with stencils. The patterns can range from floral designs to modern abstracts, giving your space a distinctive look. The contrast of colors and repeated motifs creates visual rhythm and interest. It’s like turning your wall into a giant piece of custom wallpaper, but with your personal touch.
Select stencils that match your decor style—classic, contemporary, bohemian, or playful. Use multiple colors or layered patterns for a more complex effect. Combine stenciled patterns with textured paints or wallpapers to add depth. Experiment with different sizes and placements to create a unique, tailored look. Seasonal or thematic stencils keep your design fresh.
Prepare the wall by cleaning and priming it for paint adherence. Secure the stencil to avoid shifts during painting. Use a sponge, brush, or roller with your chosen paint, dabbing or brushing gently to prevent bleeding. Carefully lift the stencil and reposition for repeating patterns. Clean your stencils after each use for longevity. Finish with a clear protective sealant if desired.
Add metallic or glitter accents to certain motifs for extra sparkle. Incorporate complementary painted borders or frames for a more finished look. Use matching textiles, accessories, or furniture to unify the design theme. Change colors or patterns seasonally to keep the decor lively and engaging.
Stenciling empowers you to create a custom, artistic statement without professional help. It’s an affordable way to experiment with patterns and colors, making your walls truly one-of-a-kind. With a steady hand and some patience, you’ll be amazed at the results. Your DIY masterpiece is within reach!
18. Geometric Wall Paneling with 3D Effects for Modern Sophistication
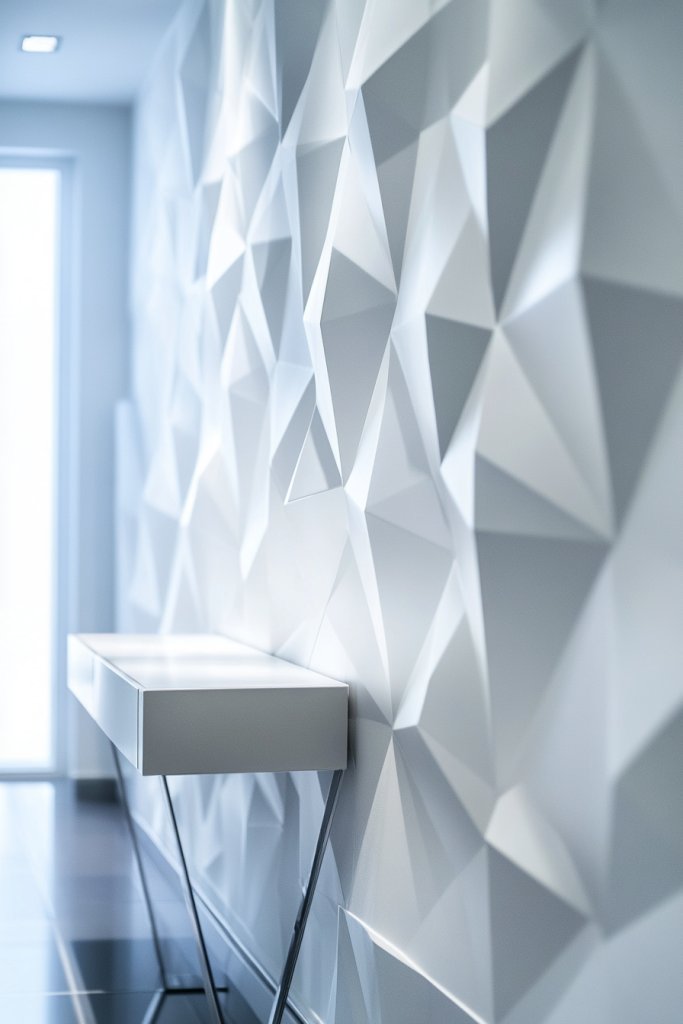
Want to add depth and modern flair to your walls? Geometric 3D wall paneling creates a sculptural effect that’s both eye-catching and sophisticated. It’s perfect for contemporary homes looking for a statement feature. Plus, it adds texture without clutter, elevating your decor instantly.
Visualize a wall with angular, layered panels in matte black or metallic finishes, creating a dynamic, three-dimensional surface. The interplay of light and shadow across the geometric shapes enhances the sense of depth. The pattern can be subtle or bold, depending on your style. It transforms flat walls into engaging art pieces that command attention.
Opt for sleek, minimalist designs for a modern aesthetic or choose intricate patterns for visual complexity. Mix materials like wood, MDF, or metal to add variety. Use lighting to accentuate the 3D features—think directional spotlights or LED strips. Coordinate with simple furniture and accessories to keep the focus on the wall.
Measure and plan your pattern layout carefully before installation. Use adhesive or mounting hardware suitable for your panel material. Attach panels securely, ensuring they’re aligned precisely for a seamless appearance. For large or heavy panels, professional installation may be wise. Finish edges with paint or trim for a clean, integrated look. Regular dusting and gentle cleaning preserve the effect.
Illuminate the panels with strategic lighting to enhance the 3D effects. Incorporate contrasting colors or finishes for a layered, textured look. Use complementary decor—like sleek furniture or metallic accents—to reinforce the modern aesthetic. Seasonal lighting or decorative accessories can add variety and flair.
Geometric 3D panels bring a contemporary edge that’s both stylish and functional. They turn ordinary walls into focal points that showcase your design savvy. With a little planning, you can easily create a space that’s cutting-edge and inviting. Your modern masterpiece awaits—get started today!
Conclusion
With such a wide variety of wall covering ideas—from vibrant murals and stylish wallpapers to creative DIY solutions—there’s no limit to how you can personalize your space. These ideas empower you to experiment and find the perfect look that reflects your personality and style. Don’t be afraid to try something new and make your walls a true expression of your creativity. Start transforming your home today and turn your walls into captivating works of art!