Where Do You Place the Check Valve on Sump Pump
A sump pump is a necessary appliance in many homes, especially those that are prone to flooding. The check valve is an important part of the sump pump, as it prevents water from flowing back into the sump pit. But where do you place the check valve on the sump pump?
There are a few things to consider when placing the check valve on your sump pump. The first is the size of the check valve. There are two common sizes of check valves, 1-1/2″ and 2″.
The second thing to consider is the type of pipe that you are using. Check valves are available in both PVC and ABS. And finally, you need to decide if you want a threaded or slip connection.
There are a few things to consider when placing a check valve on a sump pump. The first is the height of the discharge pipe. The check valve should be placed as close to the top of the discharge pipe as possible so that water has to travel through the valve before it can enter the pipe.
This will ensure that water doesn’t flow back into the sump pit when the pump isn’t running.
The second thing to consider is the size of the check valve. Check valves come in different sizes, so you’ll need to make sure you get one that’s big enough for your particular sump pump.
A larger check valve will result in less water flowing back into the pit, but it will also cost more money.
Finally, you need to think about where you want to place the check valve itself. There are two basic options: inside or outside of the sump pit.
If you place it inside, then you run the risk of damaging it if there’s ever any flooding in your basement (although this is unlikely). Placing it outside means that it’s more exposed to potential damage, but it’s also easier to access if you ever need to replace it.
How To Add Check Valve To Your Sump Pump
What Height to Install Check Valve on Sump Pump
A check valve is a backflow prevention device that allows water to flow in only one direction. Check valves are often installed in sump pump systems to prevent water from flowing back into the sump pit when the pump is not in use.
The ideal height for installing a check valve on a sump pump system depends on a few factors, including the size of the check valve and the diameter of the discharge pipe.
A general rule of thumb is to install the check valve at least 2 feet above the highest point of discharge. This will ensure that there is enough pressure to keep water flowing in the correct direction when the pump is not in use.
Sump Pump Check Valve Location
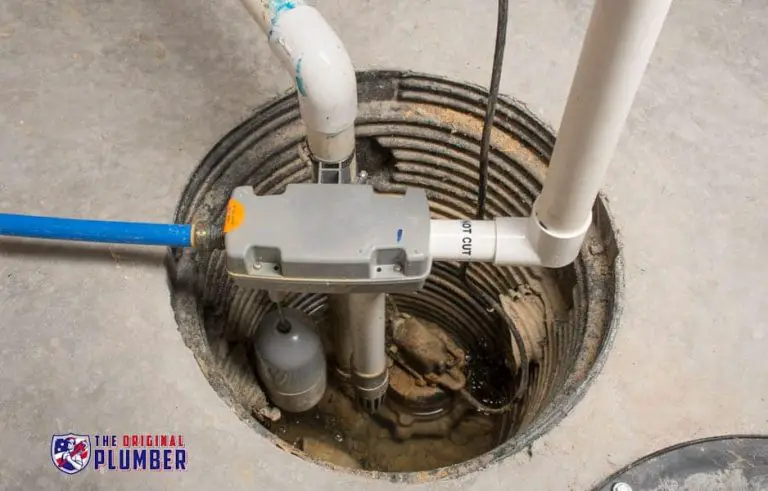
The sump pump check valve is located at the base of your sump pump. This valve is responsible for keeping water from flowing back into your sump pit after your pump has turned off. If this valve fails, it can cause your pump to cycle on and off more frequently, which can shorten its lifespan.
Sump Pump Check Valve Vertical Or Horizontal
If you have a sump pump, it’s important to know whether your check valve is vertical or horizontal. A check valve is a one-way valve that allows water to flow in only one direction. It prevents water from flowing back into the sump pit after the pump has turned off.
A vertical check valve has a threaded connection at the bottom and requires some assembly. The good thing about a vertical check valve is that it can be easily removed for cleaning or replacement if necessary.
A horizontal check valve has connections on both sides and is easier to install than a vertical check valve.
However, it can be more difficult to remove if you need to clean or replace it.
Sump Pump Check Valve Horizontal Installation
A sump pump check valve is a backflow prevention device that is installed in the sump pit. The check valve allows water to flow in one direction only, from the sump pit to the discharge pipe. This prevents water from flowing back into the sump pit when the pump is not running.
A properly installed and maintained check valve will prolong the life of your sump pump.
There are two types of check valves, vertical and horizontal. Vertical check valves are more common, but horizontal check valves can be used in some situations where space is limited.
Horizontalcheck valves must be installed so that the arrow on the body of the valve points in the direction of water flow. If installed incorrectly,the check valve will not work properly and could cause damage to your sump pump.
When installing a horizontal check valve, first locate a suitable location forthe valve near the discharge pipe.
Mark the center ofthe hole onthe discharge pipe and drill a 1/2″ hole using a carbide or steel-tipped drill bit. Next, thread a 1/2″ NPT (National Pipe Thread) fitting into the hole and hand-tighten it with a wrench until snug. Be careful not to overtighten as this could damage threads or crackthe pipe.
Now you’re ready to installthe check valve body ontoethe threaded fitting you just installedontherdischarge pipe.
.Alignthe arrow onthevalve bodywiththerdirectionofwaterflowandhand-tightenuntilsnugusingawrenchorusingscrewsprovidedwithyourcheckvalvekitifapplicable..Onceagain,don’tovertightentocompletetheinstallationasthiscoulddamageorthecheckvalvetobodyorpipe..
Finally,testyourcheckvalvebyrunningthesumppumptoseeifit’sworkingproperly..Ifyouhaveanyleaksattachedfittingsoraaroundthenbodyofthecheckvalve,useteflonpipetapeorequalto makeasealbeforeretesting..
How to Tell If Sump Pump Check Valve is Bad
If your sump pump has a check valve, it’s important to know how to tell if it’s bad. A bad check valve can cause your sump pump to fail or even make it work harder than necessary, which can shorten its lifespan.
There are a few things you can look for to determine if your check valve is bad:
1. Listen for a hissing noise when the pump is turned off – this indicates that there is air leaking through the valve and into the pump.
2. Check for water leaks around the valve – this could be an indication that the valve is not sealing properly.
3. Inspect the valve itself for any cracks or damage – this could also be causing water to leak through.
If you notice any of these signs, it’s best to replace the check valve as soon as possible. A new one should only cost a few dollars and will save you from potential costly repairs down the road.
Sewage Check Valve Installation
If you have a home with a sewage system, it’s important to have a check valve installed. A check valve helps to prevent sewage from flowing back into your home. It’s a one-way valve that only allows water to flow in one direction.
Check valves are typically installed at the point where the sewer line leaves the house.
Installing a check valve is not a difficult task, but it’s important to do it correctly. The first step is to locate the cleanout plug on your sewer line.
This is usually located near the main sewer line or at the point where the sewer line enters your home. Once you’ve located the cleanout plug, remove it using a wrench or pliers.
Next, use a hacksaw to cut off about 2 inches of pipe from the cleanout plug.
Once you’ve done this, cleaning any burrs off of the end of the pipe with sandpaper. Next, take the check valve and attach it to the end of the pipe that you just cut. Make sure that the arrow on the check valve is pointing in the right direction – this indicates which way water will flow through the valve.
Finally, screw on two hose clamps (or use PVC glue) to secure everything in place.
That’s all there is to installing a check valve! By taking this simple step, you can help protect your home from sewage backup and flooding.
Silent Check Valve for Sump Pump
If you have a sump pump in your basement, you know that they can be noisy. A silent check valve can help to reduce the noise of your sump pump and make it more bearable. Check valves are devices that allow water to flow in only one direction.
This prevents water from flowing back into the sump pit after the pump has turned off. Silent check valves are designed to open and close quietly, so you won’t even know they’re there!
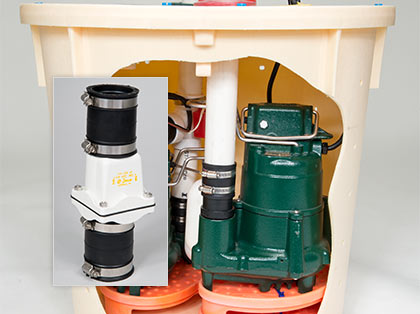
Credit: www.basementsystems.com
How Close Should the Check Valve Be to the Sump Pump?
A check valve is a backflow preventer that keeps sewage and other liquids from flowing back into your home through the sump pump. The check valve should be installed as close to the sump pump as possible to prevent backflow.
Where Should a Check Valve Be Installed?
A check valve should be installed at the outlet of the pump.
Should a Check Valve Be Installed on a Sump Pump Discharge Pipe?
A check valve should be installed on a sump pump discharge pipe to prevent water from flowing back into the sump pit. Check valves are available at most hardware stores and home improvement centers.
Should a Sump Pump Have a Check Valve?
Most sump pumps come with a check valve installed. If your pump doesn’t have a check valve, or if the one it has isn’t working properly, water can flow back into the pit after the pump turns off. This not only wastes energy, but can also shorten the life of your pump.
A properly functioning check valve will keep water flowing in the right direction and help your sump pump run more efficiently.
Conclusion
Many people don’t know where to place the check valve on their sump pump. The check valve is a one-way valve that prevents water from flowing back into the sump pit. It’s important to place the check valve in the right spot so that it can do its job properly.
There are two main types of check valves: inline and submerged. Inline check valves are placed outside of the sump pit, while submerged check valves are placed inside the pit. If you’re not sure which type of check valve to use, consult a professional plumber or pump installer.