How Can You Tell If a Check Valve is Bad in a Sump Pump
If your sump pump has a check valve, it’s important to know how to tell if it’s bad. A bad check valve can cause your sump pump to fail or not work properly.
Here are some signs that your check valve may be bad: -There is water leaking from the check valve. -The sump pump is making noise. -The sump pump is not working as well as it used to. If your sump pump has a check valve, it’s important to know how to tell if it’s bad.
A bad check valve can cause your sump pump to fail and allow water to backflow into your home. There are a few signs that you can look for to tell if your check valve is bad: 1. Water is leaking around the valve: If you see water leaking from the sides of the valve, or pooled around the base of the unit, this is a sign that the check valve is not sealing properly. 2.
The pump runs constantly: If your sump pump turns on and off frequently, or runs for long periods of time without stopping, this could be a sign that water is leaking past the check valve and causing the pump to work harder than it should. 3. The Pump doesn’t turn on: If your sump pump doesn’t turn on at all, this could be due to a number of factors, including a bad check valve.
Check valves can become stuck in the “open” position, preventing the pump from turning on. If you suspect that yourcheck valve may be failing, it’s important to have it checked out by a professional as soon as possible. A failed check valve can cause extensive damage to your home if left unchecked.
If you have a sump pump in your home, it’s important to know what height to install the check valve. The check valve is a vital part of the sump pump system, and it helps to ensure that water flows in the correct direction and doesn’t backflow into the sump pit. There are two main types of check valves: flap-type and spring-loaded.
Flap-type check valves have a hinged flap that opens when water flows in the right direction, and closes when water tries to flow back. Spring-loaded check valves have a small spring-loaded ball that sits on top of an opening.
When water flows in the right direction, the ball is pushed up and allows water to pass through. When water tries to flow back, the ball seals off the opening and prevents any leakage. Most sump pumps come with a pre-installed check valve, but if yours doesn’t, or if you’re not sure which type of valve is best for your system, you can talk to a plumber or hardware store employee for advice.
Generally speaking, most homes can use either type of valve without any problems. When installing your check valve, it’s important to place it as close to the discharge pipe as possible. This will help prevent any backflow from happening in case of power outages or other disruptions in service.
You’ll also want to make sure that the valve is installed at least 12 inches above the highest expected flood level – just in case! If your sump pump has a check valve, it’s important to know how to tell if it’s bad. A bad check valve can cause your pump to run continuously, which can lead to damage and wear.
Here are some signs that your check valve may be going bad: Your sump pump runs continuously, even when there is no water in the pit. You hear water flowing back into the pit after the pump has turned off. The check valve leaks water when the pump is not running. If you notice any of these signs, it’s time to replace your check valve. You can buy a new one at most hardware stores or online.
Be sure to get one that is the correct size for your sump pump. If your sump pump doesn’t have a check valve installed, or if the check valve is not working properly, your pump could be losing a considerable amount of water each time it cycles on.
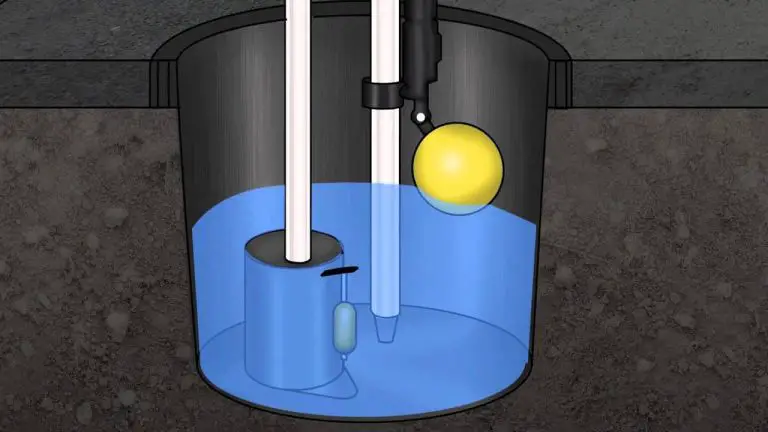
A sump pump check valve is a one-way flap that opens when water flows into the pit and closes when the pump turns off. This prevents water from flowing back into the pit and keeps your basement dry. Most sump pumps come with a pre-installed check valve, but it’s always a good idea to double-check that it is functioning properly.
To do this, simply remove the cover of your sump pit and look for the check valve. It should be located between the inlet (where water enters the pit) and the outlet (where water is pumped out).
If you can’t see it or if you’re not sure whether or not it’s working, you can always pour some water into the pit and watch to see if it flows back out when the pump turns off. If you don’t have a check valve installed, or if yours isn’t working properly, head to your local hardware store to pick one up. They’re relatively inexpensive and easy to install – just make sure to get one that’s compatible with your specific sump pump model.
With proper installation, a check valve will help keep your basement dry and free of any unwanted flooding. If you have a sump pump in your home, it’s important to have a silent check valve installed as well.
A silent check valve is a one-way valve that allows water to flow through it in only one direction. This prevents water from backflowing into the sump pit when the pump is not in operation. While most sump pumps are designed to be quiet, there can still be a humming or buzzing noise when they’re running.
This can be annoying for some people, especially if the pump is located near where they sleep at night. A silent check valve eliminates this problem by completely stopping the flow of water when the pump is turned off. There are many different brands and models of silent check valves available on the market, so it’s important to do your research before purchasing one.
Make sure to get one that is compatible with your specific sump pump model and that has good reviews from other homeowners. Installing a silent check valve is usually a fairly simple process, but you may want to hire a professional if you’re not comfortable doing it yourself.
If your sump pump check valve is stuck closed, it’s a problem. This valves allows water to flow in only one direction, and when it’s stuck closed, water can’t flow back into the sump pit.
This can cause your pump to run continuously or not at all. Here’s how to fix a stuck sump pump check valve. First, identify the problem.
If your check valve is stuck closed, you’ll likely see that the float switch isn’t working properly. The float switch is what turns the pump on and off, and if it’s not working correctly, the pump will either run continuously or not at all. Next, try to loosen the check valve with a screwdriver or pliers.
If you can’t loosen it, you may need to replace the entire valve. Once you’ve loosened or replaced the check valve, be sure to test it before putting everything back together. Simply pour some water into the sump pit and watch to see if the float switch activates the pump and if water flows freely through the check valve.
Sump pumps are one of the most important pieces of equipment in a home, and their check valves are an essential part of their proper function. Check valves allow water to flow in only one direction, preventing backflow that can damage the pump.
Sump pump check valves must be installed correctly in order for them to work properly, and this means that they must be installed horizontally. If a sump pump check valve is installed vertically, there is a risk that backflow could occur and damage the pump. When water flows backward through the valve, it can cause wear and tear on the internal parts of the pump, which can lead to premature failure.
Additionally, backflow can also cause airlocks that prevent the pump from working properly. For these reasons, it is essential that sump pump check valves be installed horizontally to prevent any problems.
A sump pump check valve is a backflow preventer that is installed in the sump pit. The check valve keeps the water from flowing back into the pit when the pump is not operating.
The check valve also prevents the water from siphoning out of the pit when the power is off. There are two types of sump pump check valves, vertical and horizontal. The type of check valve you need depends on how your sump pit is set up.
If your sump pit has an ejector pump, you will need a vertical check valve. If your sump pit does not have an ejector pump, you will need a horizontal check valve. Installing a sump pump check valve is a relatively easy task that can be completed in about an hour.
You will need to purchase the correct size check valve for yourpit, as well as some PVC glue and primer if you are using PVC pipe. Once you have all of your materials, follow these steps to install your newcheck valve: 1) Cut a length of PVC pipe that will reach from the bottom of yoursump pit to just above where the discharge pipe exits the pit. 2) Clean all ends of the pipe with primer and glue one end ofthe pipe to the outlet side of the pump discharge elbow. 3) Dry fit (do not glue)the other end ofthe pipe tothe fitting onthecheckvalve soyou canmarkwhereyouneedtocut itto makea snug fitaroundthevalvefitting.(Youmayneedtouse ahack sawto cutPVC.) If your sump pump check valve is spraying water, there are a few things you can do to fix the problem. First, check to see if the valve is installed properly.
If it is, then you may need to replace the valve itself. Sometimes, however, all you need to do is clean the valve and make sure that there is no debris blocking it.
If you have a sump pump in your home, it’s important to know what to do if the check valve fails. This valve is responsible for keeping the water in the sump pit from flowing back into the pump, so if it fails, the pump will have to work harder to remove the water.
This can cause premature wear and tear on the pump, and may even lead to its failure. If you notice that your sump pump isn’t working as well as it used to, or if it seems to be running more often than usual, check the check valve for signs of failure. If there is any debris or sediment build-up in the valve, this can prevent it from sealing properly.
Cleaning out the valve may resolve the issue. If not, you’ll need to replace the valve with a new one. Be sure to turn off power to the sump pump before attempting any repairs.
Once you’ve replaced the check valve, test it by pour some water into the pit and make sure that it doesn’t flow back into the pump. With a properly functioning check valve in place, your sump pump should be able to keep your basement dry even during heavy rains or periods of high water table levels.
If you suspect that your check valve may be failing, there are a few ways to test it. One way is to remove the valve from the piping and hold it up to a light.
If you can see light shining through the valve, then it is likely that the valve is not functioning properly. Another way to test the valve is to place your finger over the inlet port and try to blow air through the outlet port.
If air leaks past your finger, then the check valve is not working correctly. If a check valve goes bad, it can cause a variety of problems.
For example, if the check valve is not sealing properly, it can allow water to backflow into the system. This can lead to leaks and flooding.
Additionally, if the check valve is not opening properly, it can block water from flowing through the system. This can lead to decreased water pressure and difficulty using fixtures in the home.
A sump pump check valve should be replaced every two to three years, or as needed. If you have a sump pump, it’s important to know how to tell if the check valve is bad.
The check valve is what prevents water from flowing back into the sump pit after the pump has turned off. If the check valve is bad, water can flow back into the pit and cause the pump to turn on more frequently, which can shorten its lifespan. There are a few signs that you can look for to see if your check valve is going bad: * Water leaking from around the base of the pump * Check valve making noise when the pump turns off * Pump running more frequently than usual If you notice any of these signs, it’s time to replace your check valve.