How To Install A Submersible Sump Pump
Do you have drainage issues around the house? Does groundwater seep into your basement and disrupt your living arrangements? If your answer is “yes,” installing a submersible sump pump may be one solution that can help keep flooding at bay. Flooding can cause untold damage to the lower parts of your house and surroundings. Submersible sump pumps are affordable, and while it requires some hard work, the process is simple.
Let us show you how:
Tools
- Submersible pump
- Pit liner
- Power drill
- Cement
- Caulk
- Tape
- Glue
- PVC pipe and fittings
- Gravel
- Sledgehammer or jackhammer
- Bucket or container
The process:
- Create the sump pit
- Lay the gravel
- Set the concrete
- Install the sump pit
- Install the sump pump and check valve
- Install the drainpipes
- Test the pump
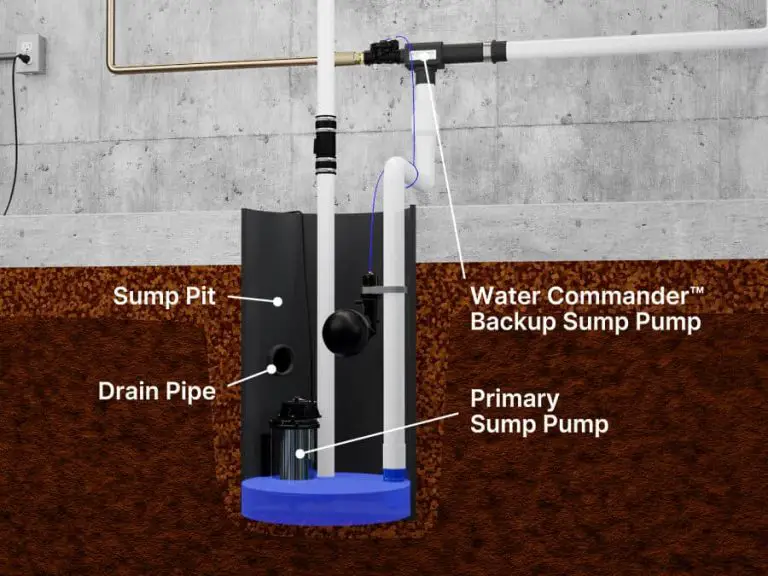
Make a sump pit
The sump pit is the holding base for your submersible sump pump. You form the pump basin by digging a hole in the basement floor to house the pump liner and the sump pump. After you set up the sump liner, the sump pump fits inside the casing. Some experts suggest placing the sump pit at a minimum of 8 feet from the basement walls and the edges of the foundation. When choosing a space for your pump, ensure it lies close to an electric outlet to connect the pump cable to the power supply.
Measure the sump pump
The pit hole should be at least 6 inches deep and about 10 inches wider than the sump pump you plan to install.
Step 1: Dig the pit
When digging the hole, look out for any water, electric, or sewer lines that may lie under the basement floor. It’s a good idea to check with the local authorities to ensure you are digging in a safe space and within any local codes. Start by cutting out a circle between 8 and 12 inches wide in the area you plan to place the sump pump. Use a jackhammer around the area to help break up the flooring. Keep a bucket or container handy to collect the dirt as you dig.
Step 2: Form the sump pit base.
After digging the hole, pour at least 3 inches of gravel at the base of the pit before inserting the sump liner. Next, place a wooden base on top of the gravel to help level out the bottom of the sump basin.
Step 3: Insert the sump pit
Place the sump liner in the hole and pack it all around with some gravel. The sump liner has a series of openings on the halfway point from the rim. The holes allow water to get in and start up the submersible pump. After installing the sump liner, level the space around it with cement. Then, trowel it smoothly to bring it in line with the basement flooring.
How to install the submersible sump pump
- Start by locating the discharge port on the sump pump.
- Pass a one and ½-inch PVC male adapter inside the port.
- Fasten it with a pair of pliers until it feels tight.
- Set the adapter in place with some plumber’s glue and cement.
- The riser needs to rest slightly over the top of the liner of the sump pump.
- Attach the sump cables to the riser using a twist tie or some tape.
1. Insert the submersible pump inside the sump liner.
Hold the handle and riser of the sump pump and gently let the pump down into the sump liner. After the pump sits on the base, check to ensure the float switch is not resting near the sump liner and can move freely inside the casing. Next, put the liner cover above the riser.
2.Set up the check valve
After the pump is in place, it’s time to install the check valve. The check valve is vital in protecting the pump motor from overheating and burning out. It also helps keep the water from falling back into the pit after pumping. Set the valve in place with the pointers following the line of the water flow. Use a screwdriver and grip the hose clamps and rubber connectors. Attach them above the pump riser. Attach another riser over the valve that runs into the areas between the ceiling joists and the basement. Allow an extra inch or two on the riser. Use the hose clamp and fasten the riser to the connectors over the valve.
3.Install the discharge line
- To install the discharge pipe, drill a hole from outside the house from the joist to the outer wall.
- Make the opening at least ¼-inch in diameter.
- After you finish the hole, run the PVC pipe into the joist and let it rest close to the riser that comes from the sump pump.
- Next, match a PVC elbow joint to the drain pipe.
- Check to see that the riser is in line before attaching it to the discharge pipe.
- Step outside and make an opening at least ½-inch from the pipeline running through the siding.
- Use some glue and attach the elbow to the pipe end that points downward.
- Line both sides of the joist opening with some caulk to make it water-resistant.
- After everything is in place, pour some water into the pump to test it out.
Conclusion
A submersible sump pump sits underwater inside the pump liner. Floodwater passes through the liner and alerts the float to start the pump system. Installing a submersible sump pump takes some time and energy, but once it’s in place, it will help you control flooding and fighting against the flooded basement. After the pump is in place, you’ll have the peace of mind knowing there’s help when flooding occurs.